乐高搭建合集 — 卷二:乐高微型城市
来源:《LEGO Micro Cities: Build Your Own Mini Metropolis!》| 原始行范围:146-236, 1944-2427
第二卷:乐高微型城市
LEGO MICRO CITIES BUILD YOUR OWN MINI METROPOLIS!
致谢
感谢全球乐高社区在提供持续搭建灵感的同时,也是互联网上最友善的群体。特别感谢BrothersBrick (https://www.brothers-brick.com/),这是世界上最好的乐高博客,感谢他们将我的乐高微型城市模型评为2017年度乐高创作。很荣幸与No Starch Press的Annie Choi、Serena Yang和Tyler Ortman以及其他工作人员合作,他们致力于制作如此高品质和富有想象力的乐高书籍。
第1章 基础建设
你城市的地基是建筑物赖以生存的基石。在乐高搭建中,就像生活中一样,坚实的基础是建造任何有持久价值东西的关键。地基看起来只是不起眼的结构,但值得用心打造。
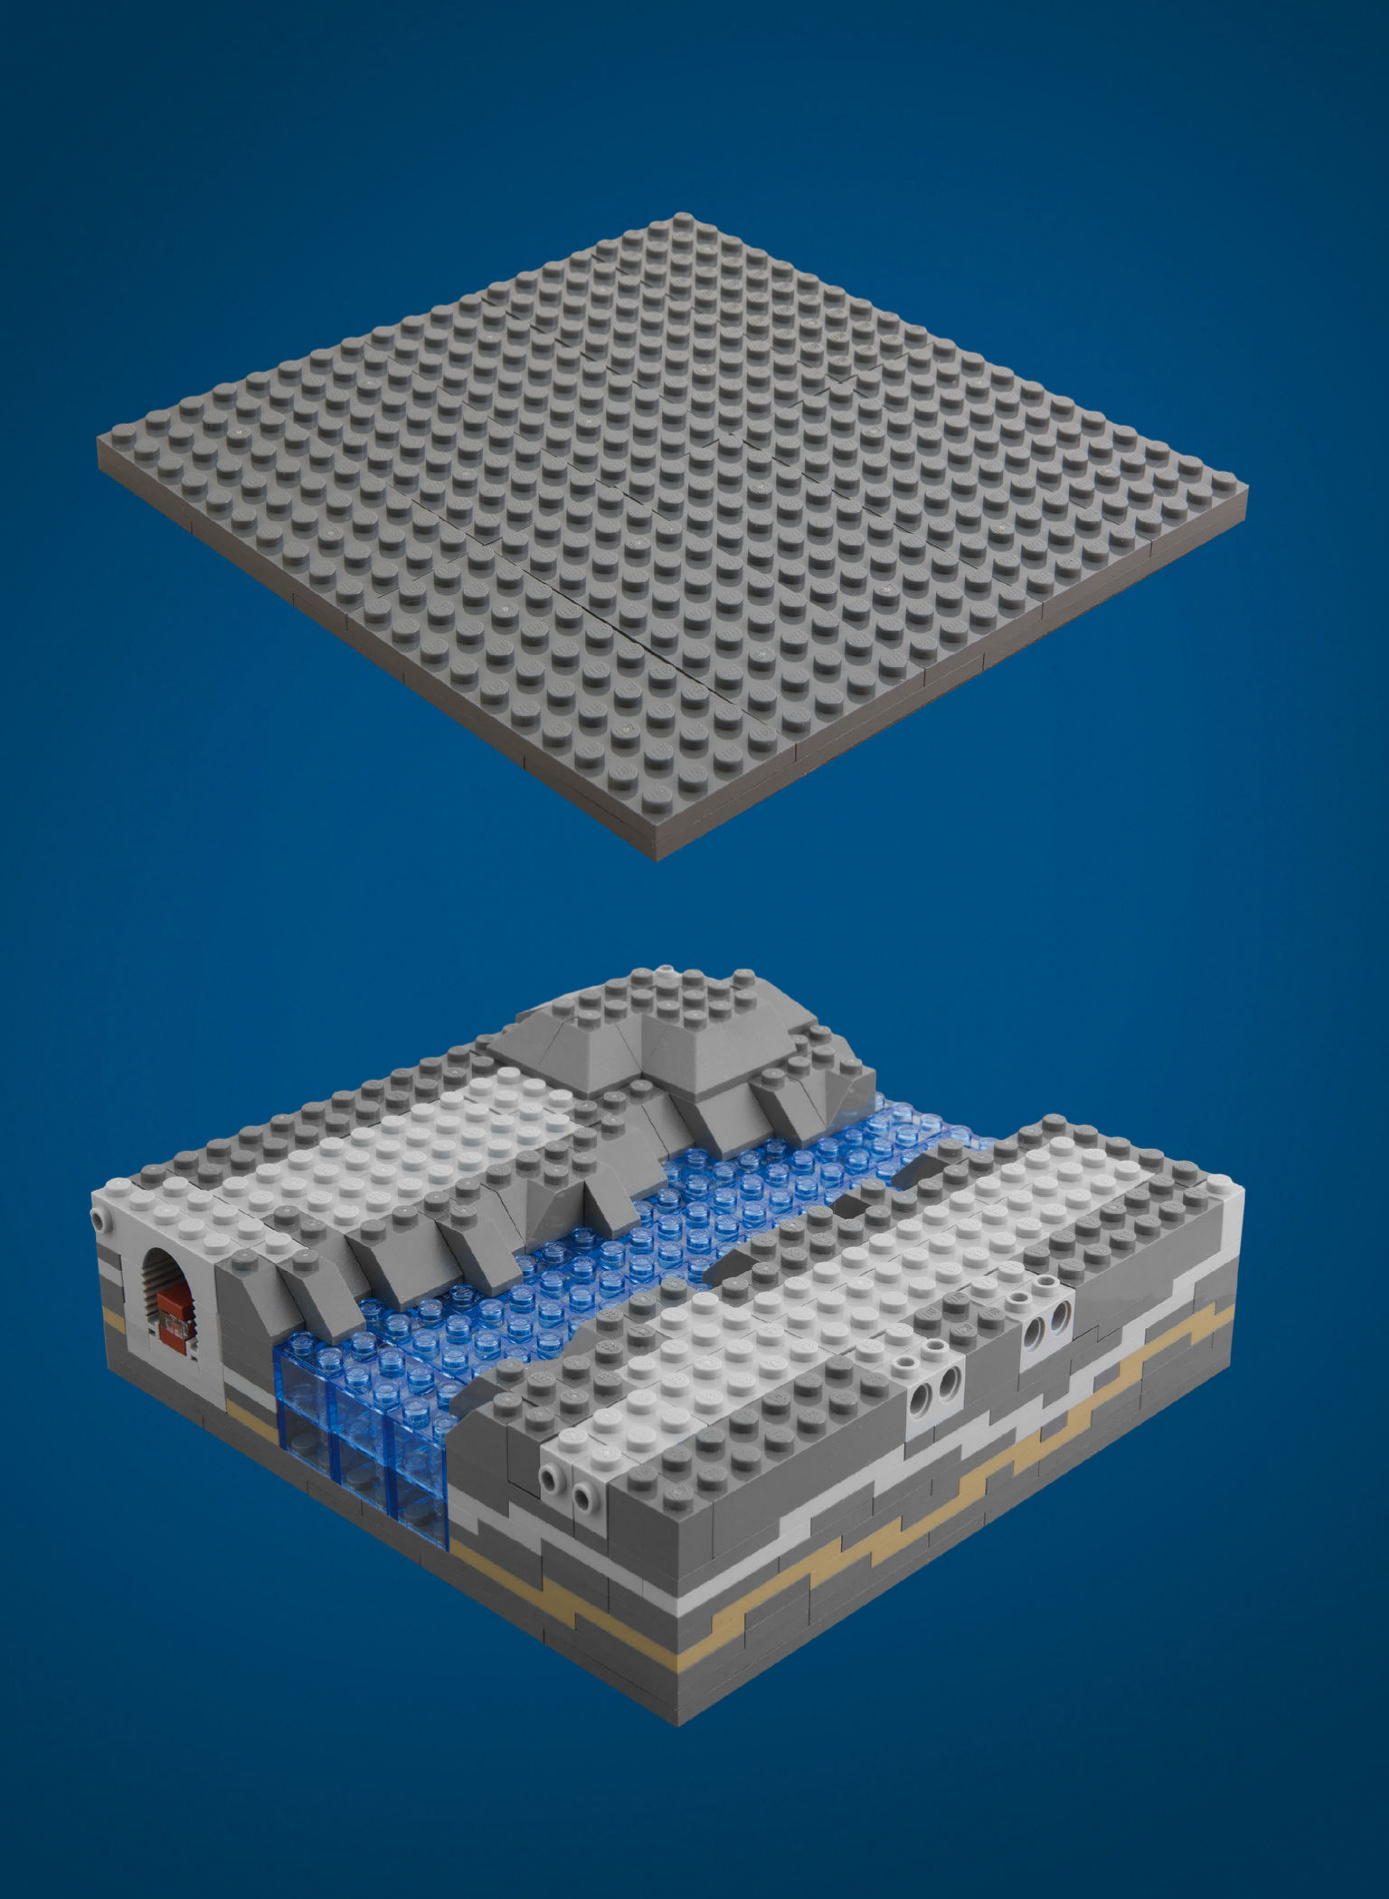
在本章中,你将建造一个既实用又美观的微型城市地基。你将在本书中看到的乐高微型城市看起来就像是用方形饼干切割器从地下雕刻出来。这创造了一个充满活力的立体模型,展现了城市地下秘密的一些秘密。
建造一个出色微型城市的秘诀是把它当成一件艺术品来思考。你城市的每个部分都很重要,每一块砖都应该仔细考虑。随着城市的发展,它的故事也在增长。迷人的地基只是一个开始。
平板堆叠
本书中的微型城市都建造在20x20颗粒的地基上,这个尺寸足够支撑一系列微缩结构,但又小到足以保证微缩比例。
20×20视野
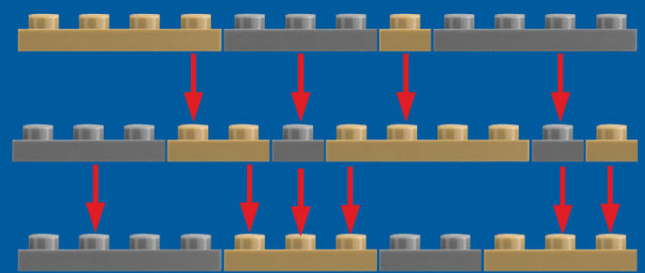
据我所知,乐高集团不生产20x20颗粒的地基,但你可以很容易自己制作。只需收集你的平板,组成两个平坦的20x20颗粒正方形。只要最终结果给你留下两个20×20正方形,平板的大小无关紧要。组装正方形后,将一个堆叠在另一个上面,确保顶层平板覆盖底层平板的接缝。这将两层板粘合在一起。
右侧的例子展示了完全用4x10平板制作的两个20x20颗粒正方形。注意顶部正方形如何旋转四分之一圈,这样顶板将底部板块连接成一个坚实的地基。
因为这个20x20颗粒平板堆叠将是你城市的地基,灰色或大地色调是现实的选择——也就是说,如果你的城市在地球上的话。
第2章 河流:蓝色的层次
河流是一个易于建造的特色,你可以将它添加到你的微型城市中。世界上许多伟大的城市都有河流贯穿,为什么你的城市不能有呢?
使用透明蓝色或实蓝色砖块来重现流动的水。

蓝色 透深蓝

中蓝色
透中蓝色:

中青色透浅蓝:

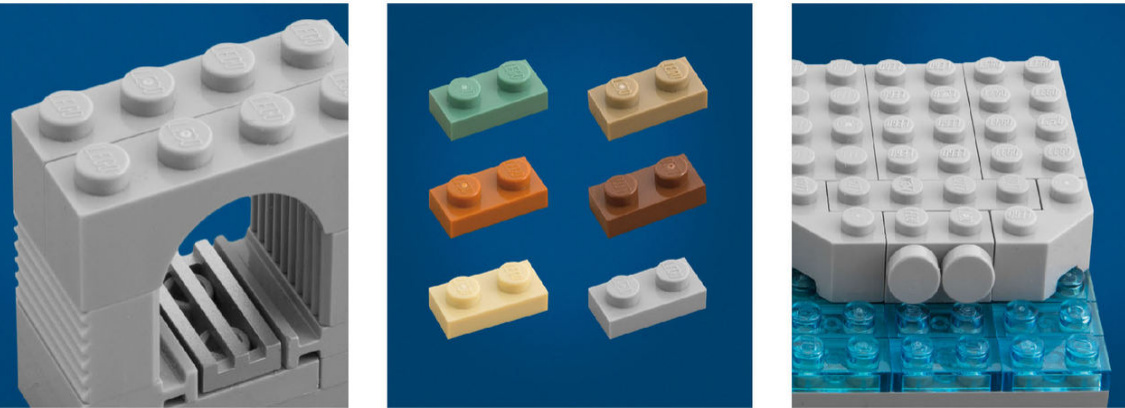
深青色砖块可获得性是选择蓝色调的关键因素。传统蓝色可以在所有标准砖块和平板尺寸中找到,而透中蓝色很稀有,尺寸有限。为了模拟平静的水面,使用光面砖而不是砖块和平板。
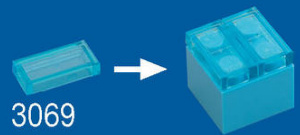
注意,只有河流可见区域需要是相同颜色。如果你没有足够的某种颜色砖块,你可以在下方使用不同颜色的砖块支撑河流,但记住透砖块颜色会透出来。灰色或大地色调砖块是放置在河流下方最安全的选择。
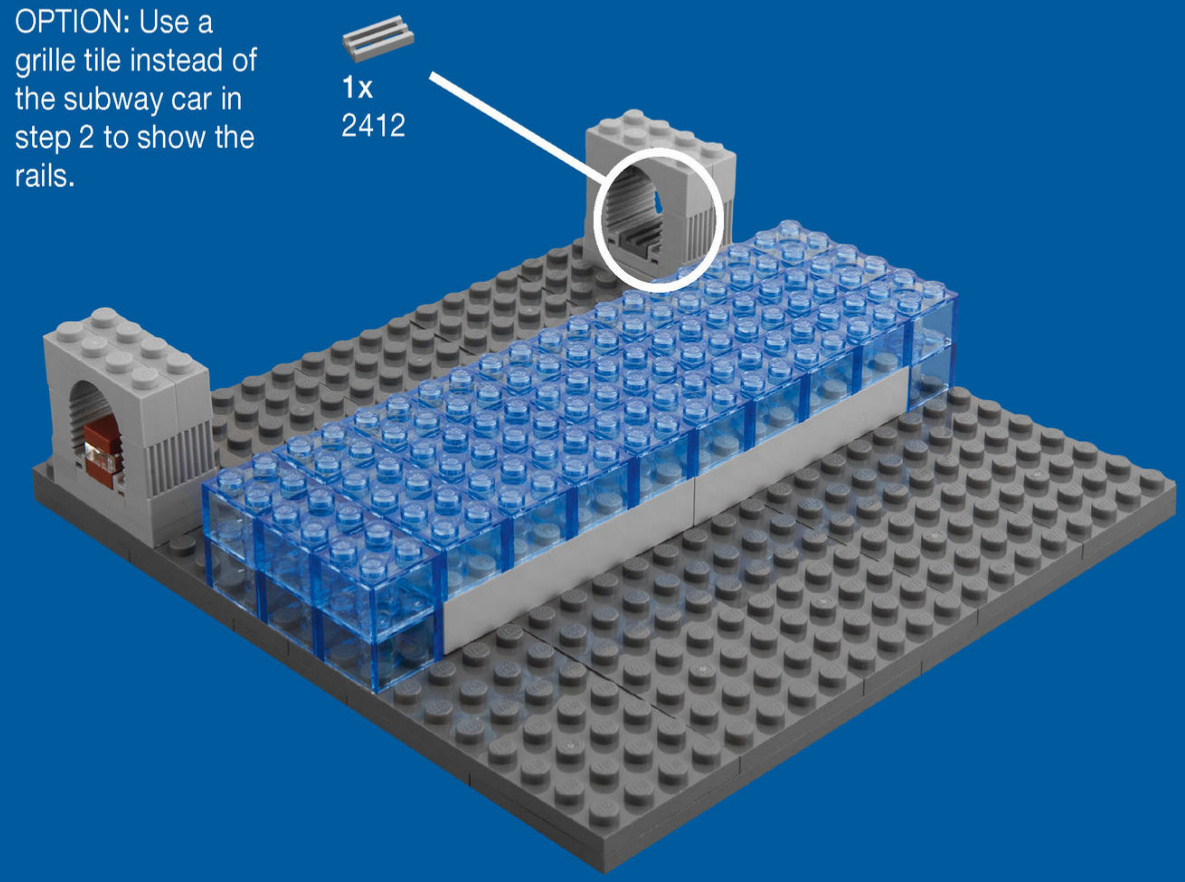
第3章 地铁
地铁为你的城市提供了地下趣味,暗示着街道下方广阔的隧道网络。
地质学
你可以使用一种纯色来代表城市下方的地面,但考虑添加地质分层来增加真实感,并展示引人注目的砖块艺术。
大地色调
顾名思义,大地色调砖块是代表你城市所建地层的完美选择。
Geologic stratification looks more elegant in thin layers, so use plates rather than bricks for this effect.
Building stratification layers is a freeform technique, so feel free to make it your own! Here is a sample cross-section to get you started.
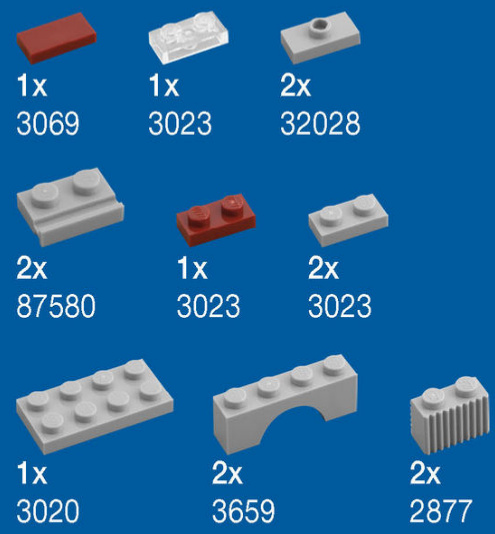
We use 2x2, 2x3, and 24 plates on the base’s sides, but you could use 1x2, 1x3, and 1x4 plates instead.
MAKING YOUR BASE LEVEL
You can fill hollow pockets in the base to provide a level surface for your city.
ANY BRICK THAT FITS THE ONE EXCEPTION
None of the fill bricks will be visible in your finished city, so you can use bricks of any color and size that fit the hollow spaces in your base. The only exception is the row of bricks next to any transparent bricks.
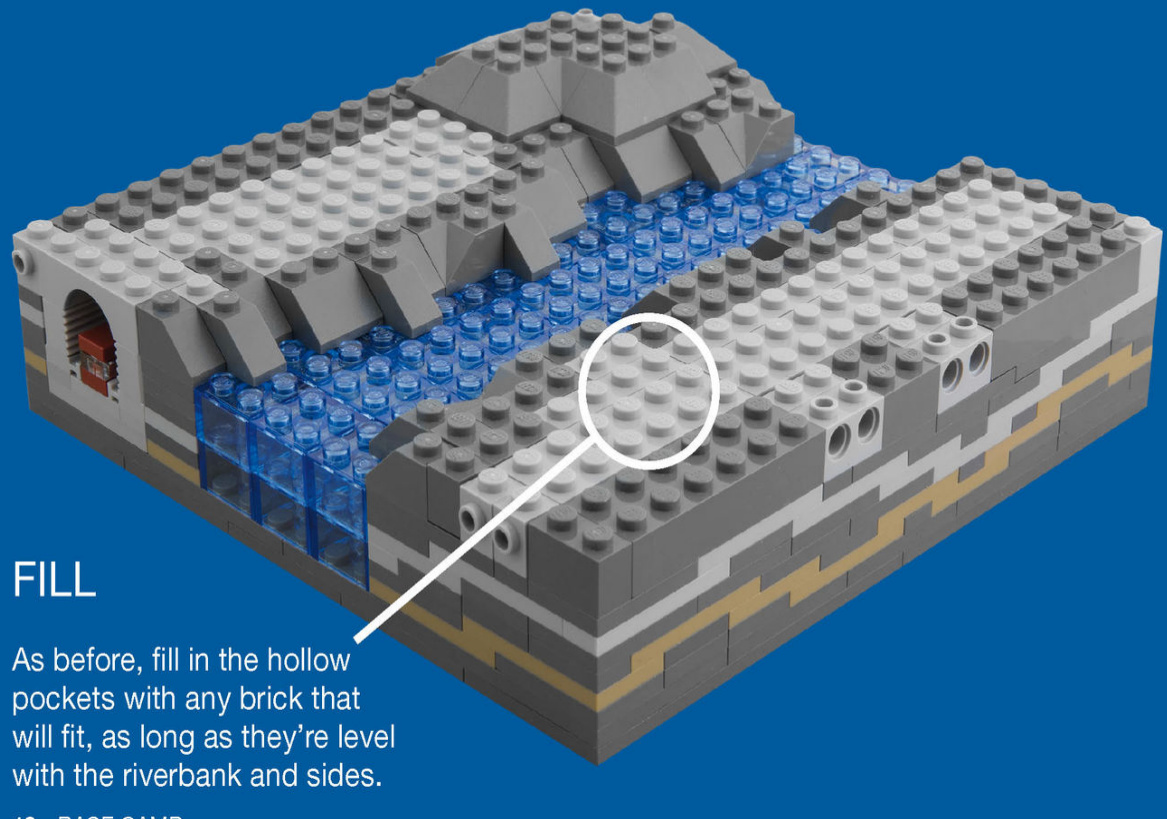
If your river is made of transparent blue bricks, be sure to use grey or earth-tone fill bricks next to the transparent bricks. If you use a bright color like red, it will show through the transparent blue and make your water look purple!
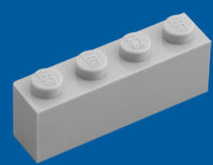
Here, we use two levels of 2x4 bricks to fill the base, but you can use any brick that fits.
Use grey to keep your rivers blue!
FINISHED BASE 1 RIVER BANK VISIBLE SIDES PIPES
This is an example of a good base with a bounty of open studs that are ready for your infrastructure, landscaping, buildings, and other architectural designs.
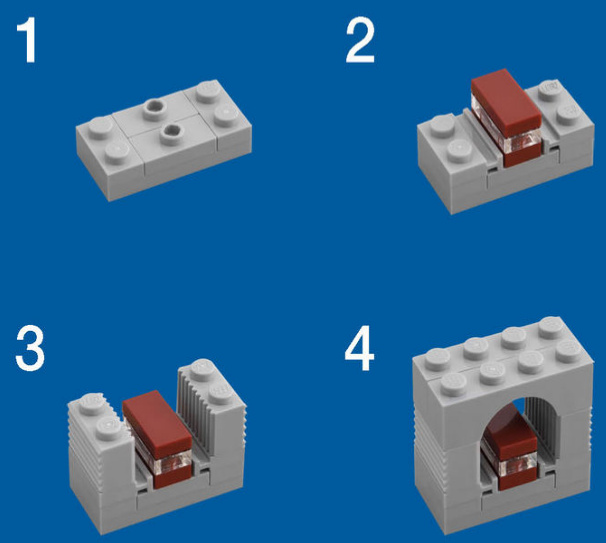
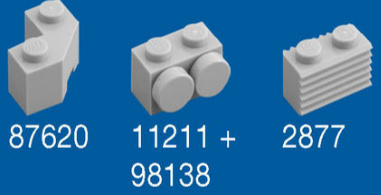
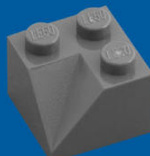
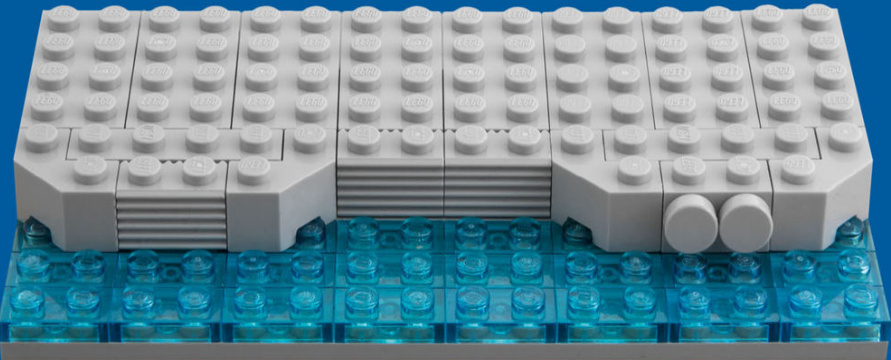
This base features a riverbank contained by a reinforced concrete shore. The angled 2x2 brick, known as a modified facet 2x2 (part #87620) lets you shape the river’s meandering form.
Build up the bedrock on the base’s sides to match the riverbank’s height. The color should match your dominant bedrock color, but brick size is unimportant as long as it fits.
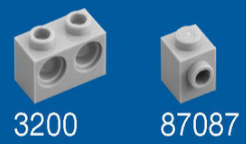
Re-create underground infrastructure, such as sewers, water pipes, and conduits, using Technic bricks or bricks with a side-facing stud, which you’ll learn more about when we explore studs not on top (SNOT) techniques in “Gearhead Trading Co.” on page 25.
Use any brick that fits.
FILL
Fill in the hollow pockets with any brick that fits, keeping the surface level with the riverbank and sides.
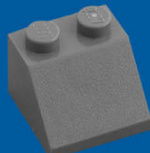
FINISHED BASE 2 USING SLOPE BRICKS
This version features a natural rocky riverbank instead of a concrete one. There is also a hill to add interest to the terrain. The base’s sides remain the same as in Base 1.
Slope bricks are ideal for simulating rocky shores. Stagger the slope bricks along the river to create a rugged shoreline. To make a hill, first fill in the hollow pockets between the finished riverbank and the base’s sides with any brick that fits. The land area of your base should be level at this point. Then, place a group of slopes on top of the land, with every slope touching at least one other to create a mound.
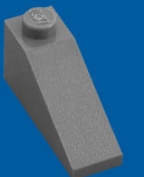
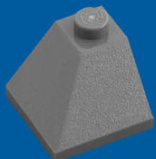
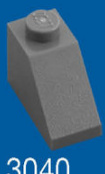
Slope bricks can be one brick to five bricks high. This base uses only slopes that are one brick high for ease of leveling.
10 BASE CAMP
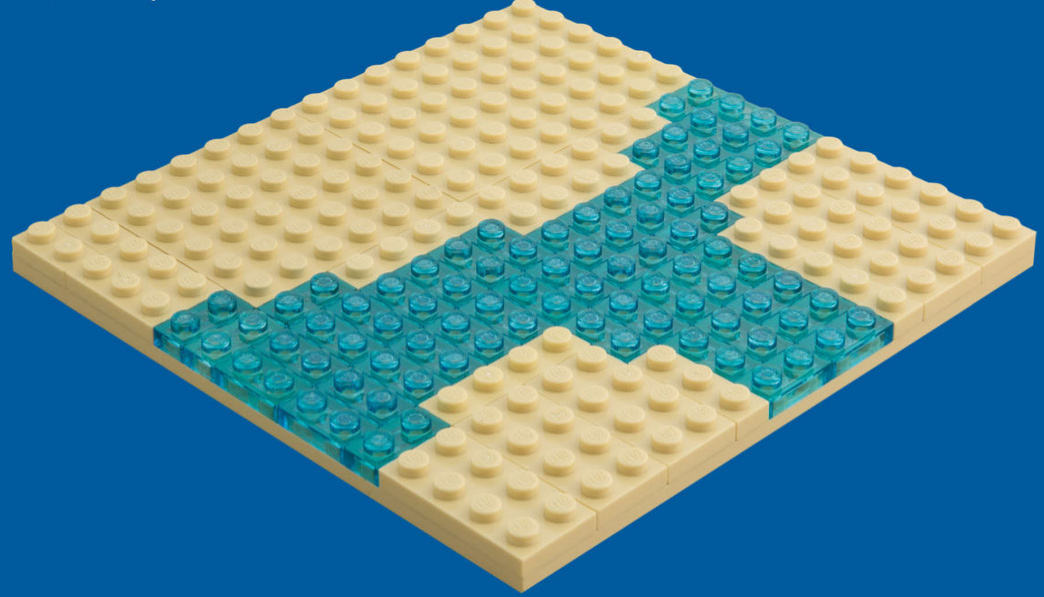
SMALLER BASE OPTIONS TWO PLATES TALL
While a thick 20x20-stud base complete with subways and detailed geology is impressive, you can still build a stunning micro city on a smaller and simpler base.
This base rests on a tan 16x16 plate (part #91405), which we top with tan and transparent light blue plates to represent water and sand, respectively.
NARROW FOCUS
This base uses a grey 8x16 plate (part #92438), which we top with grey and transparent light blue plates. We built the riverbank on top of the plates using techniques from Base 1. Despite its size, this small base has room for at least three microscale buildings.
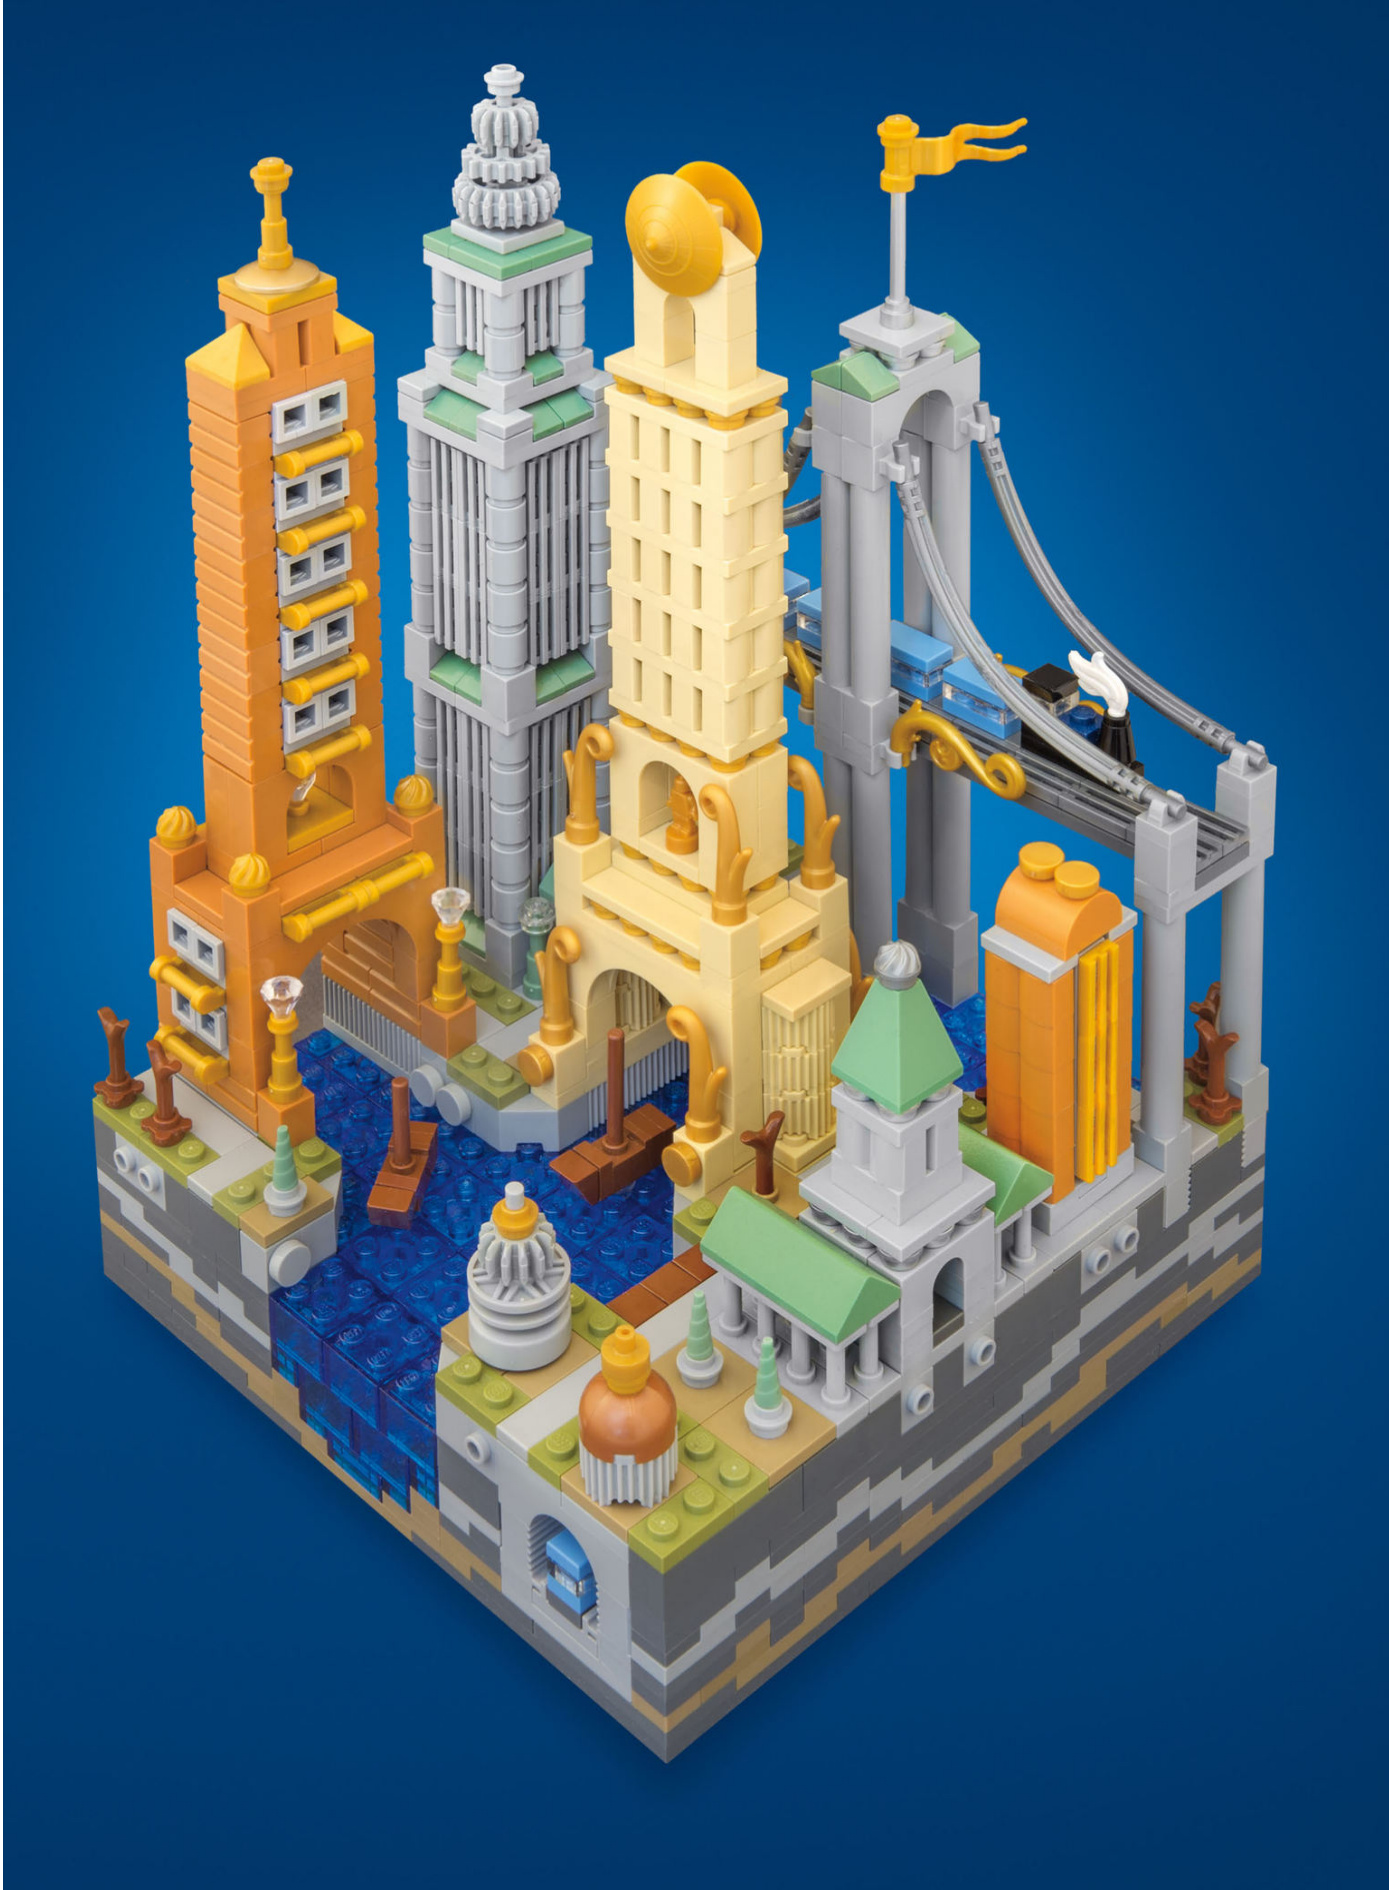
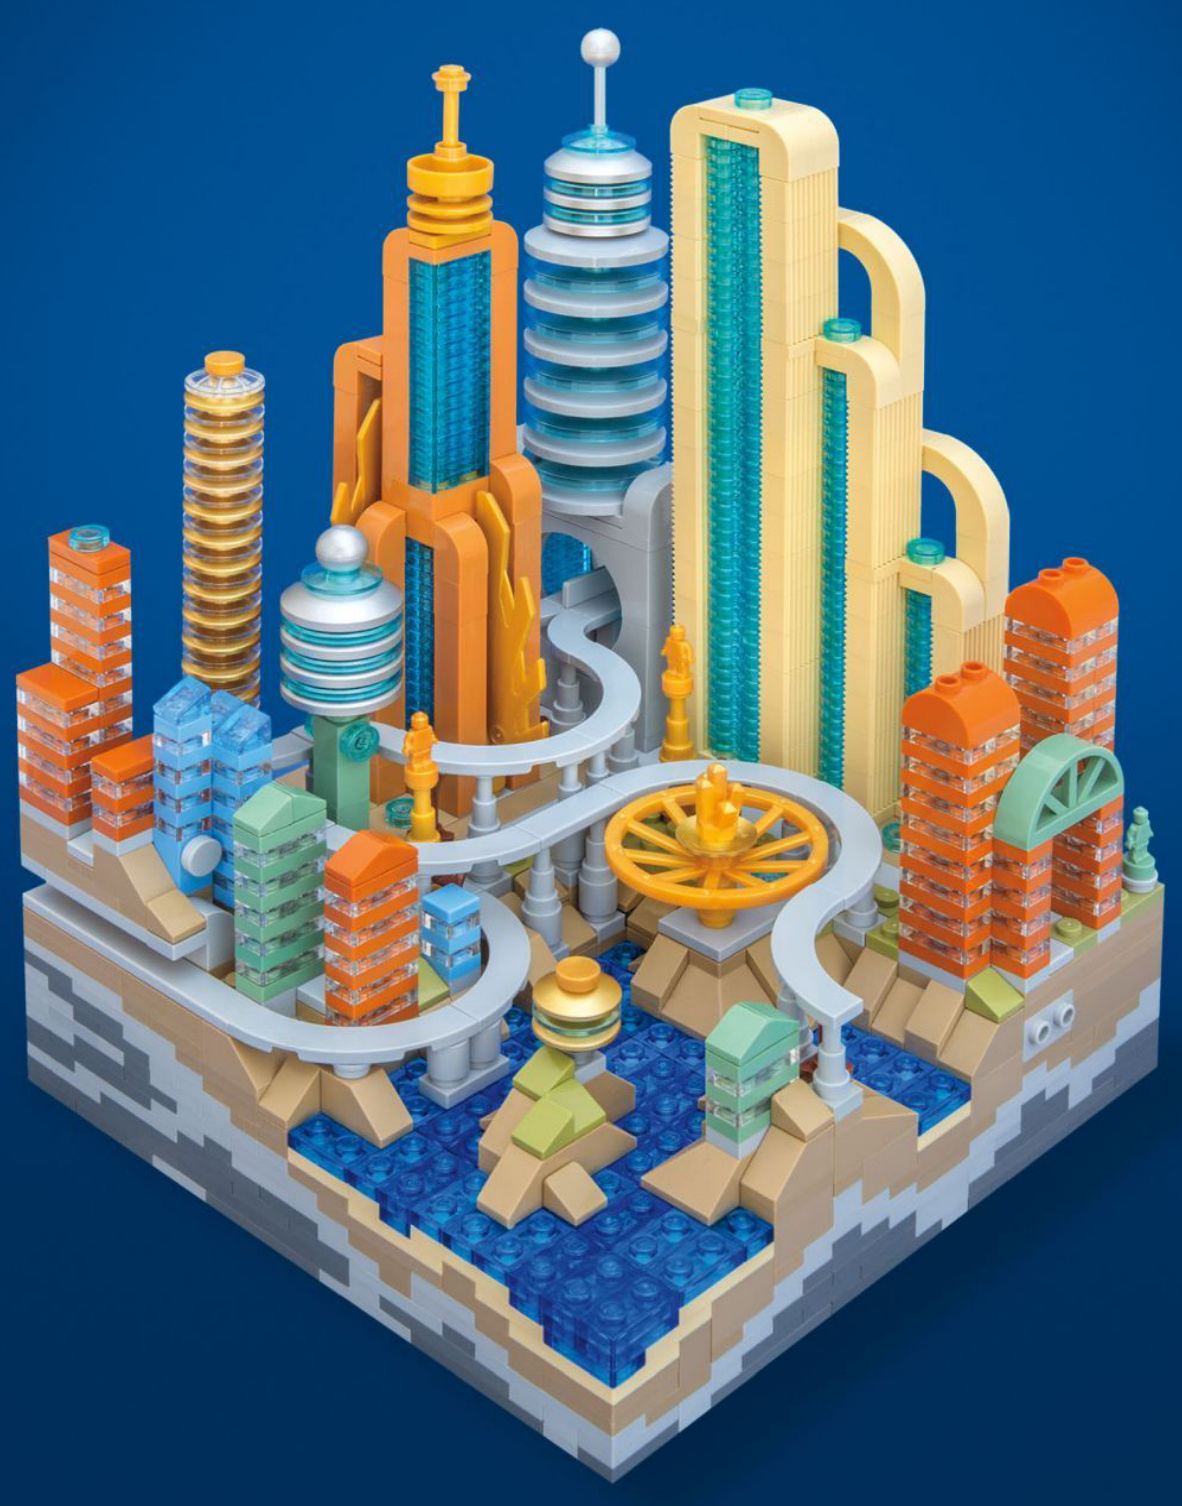
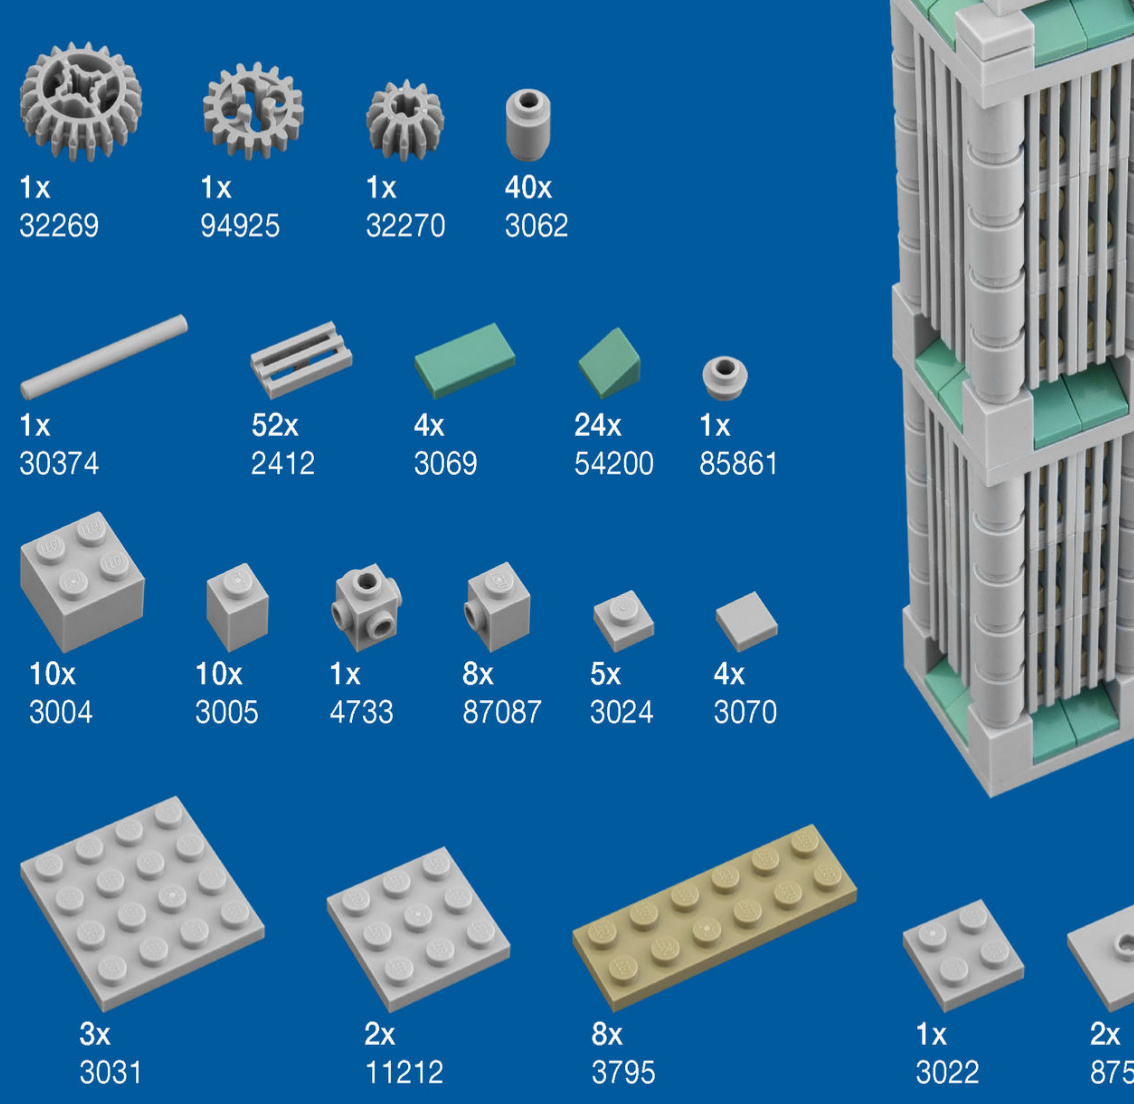
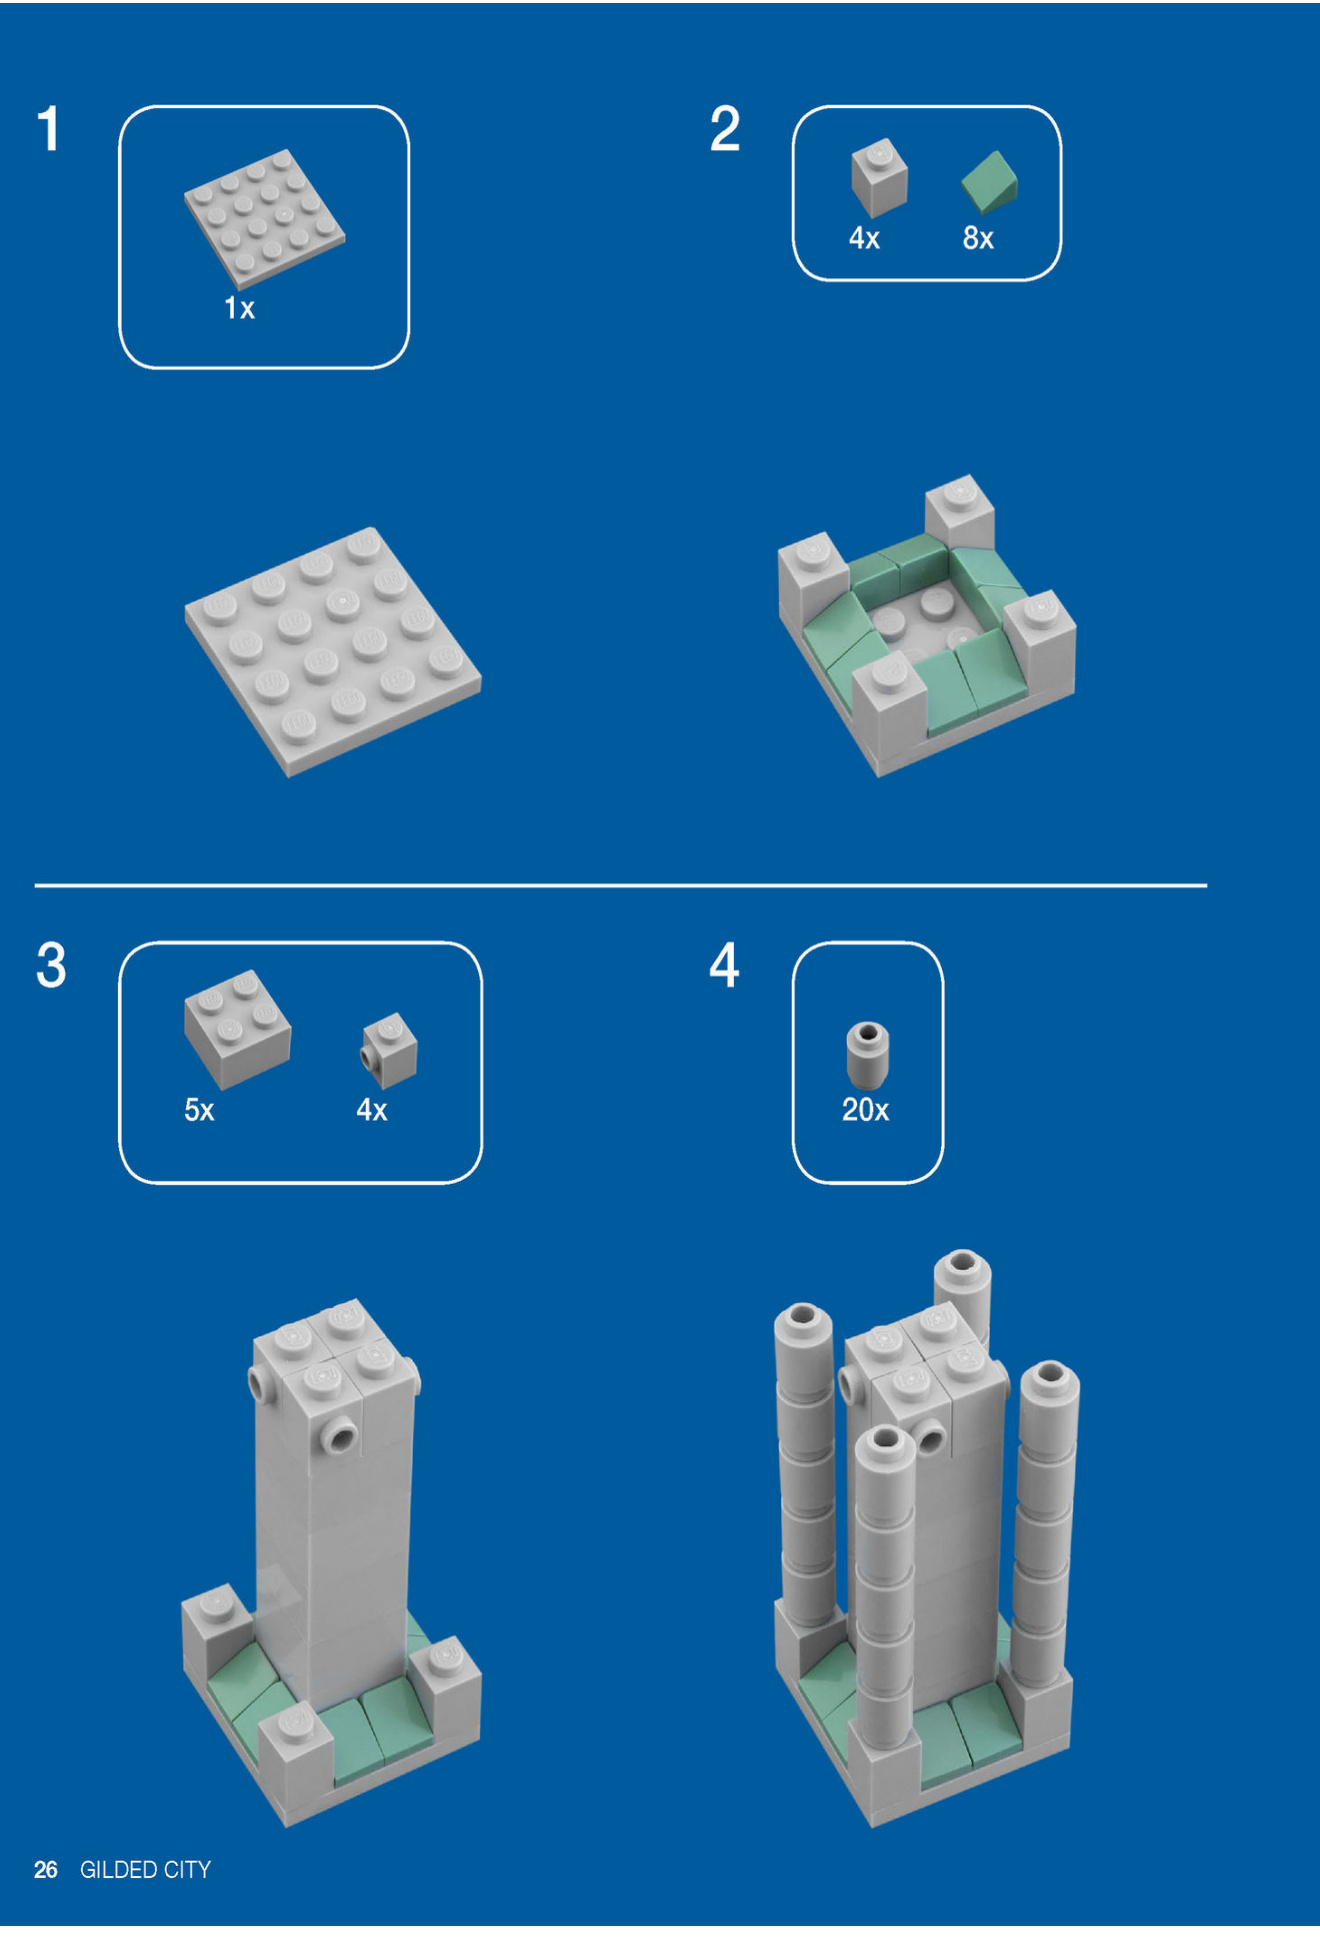
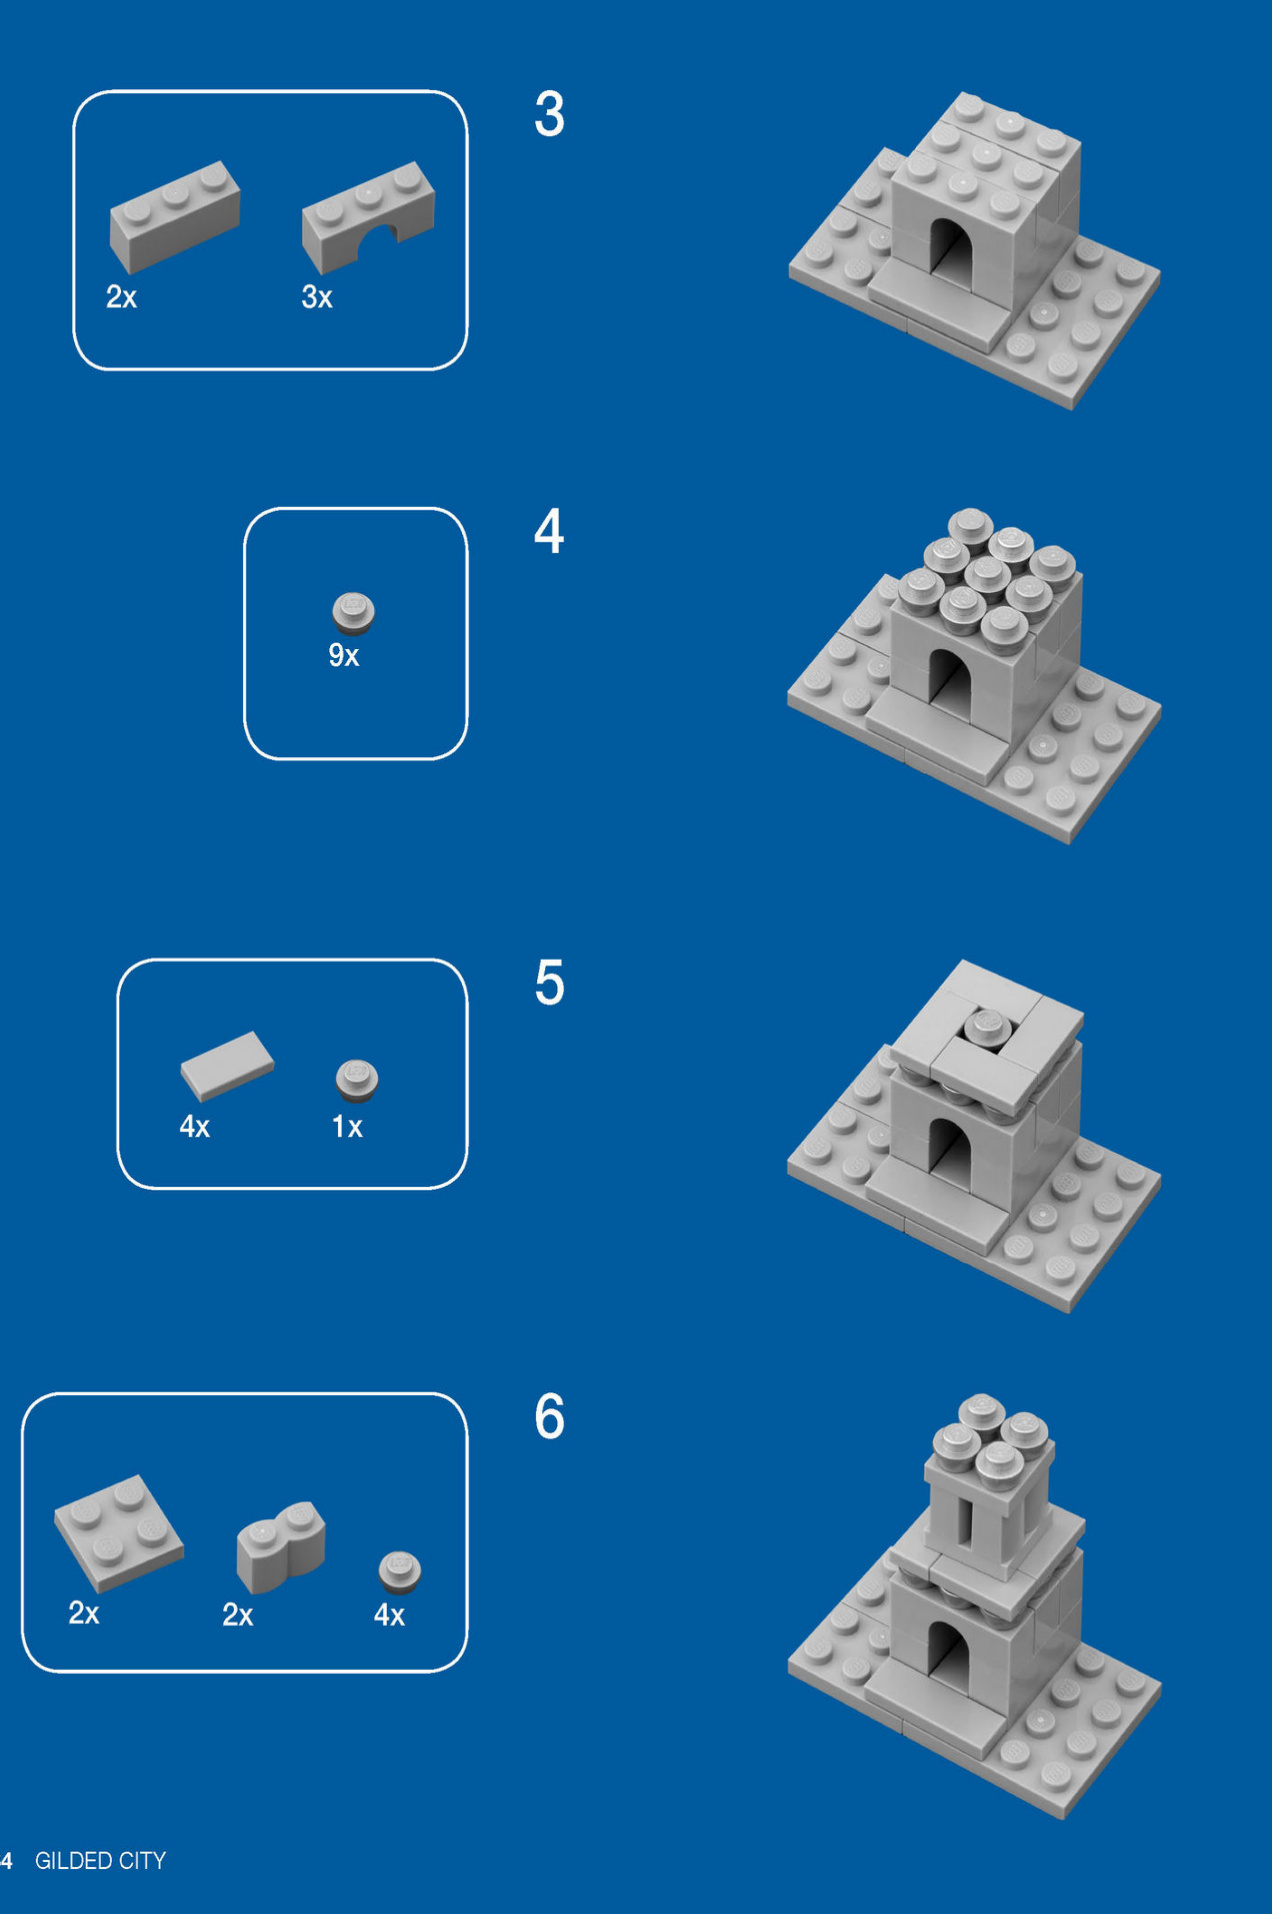
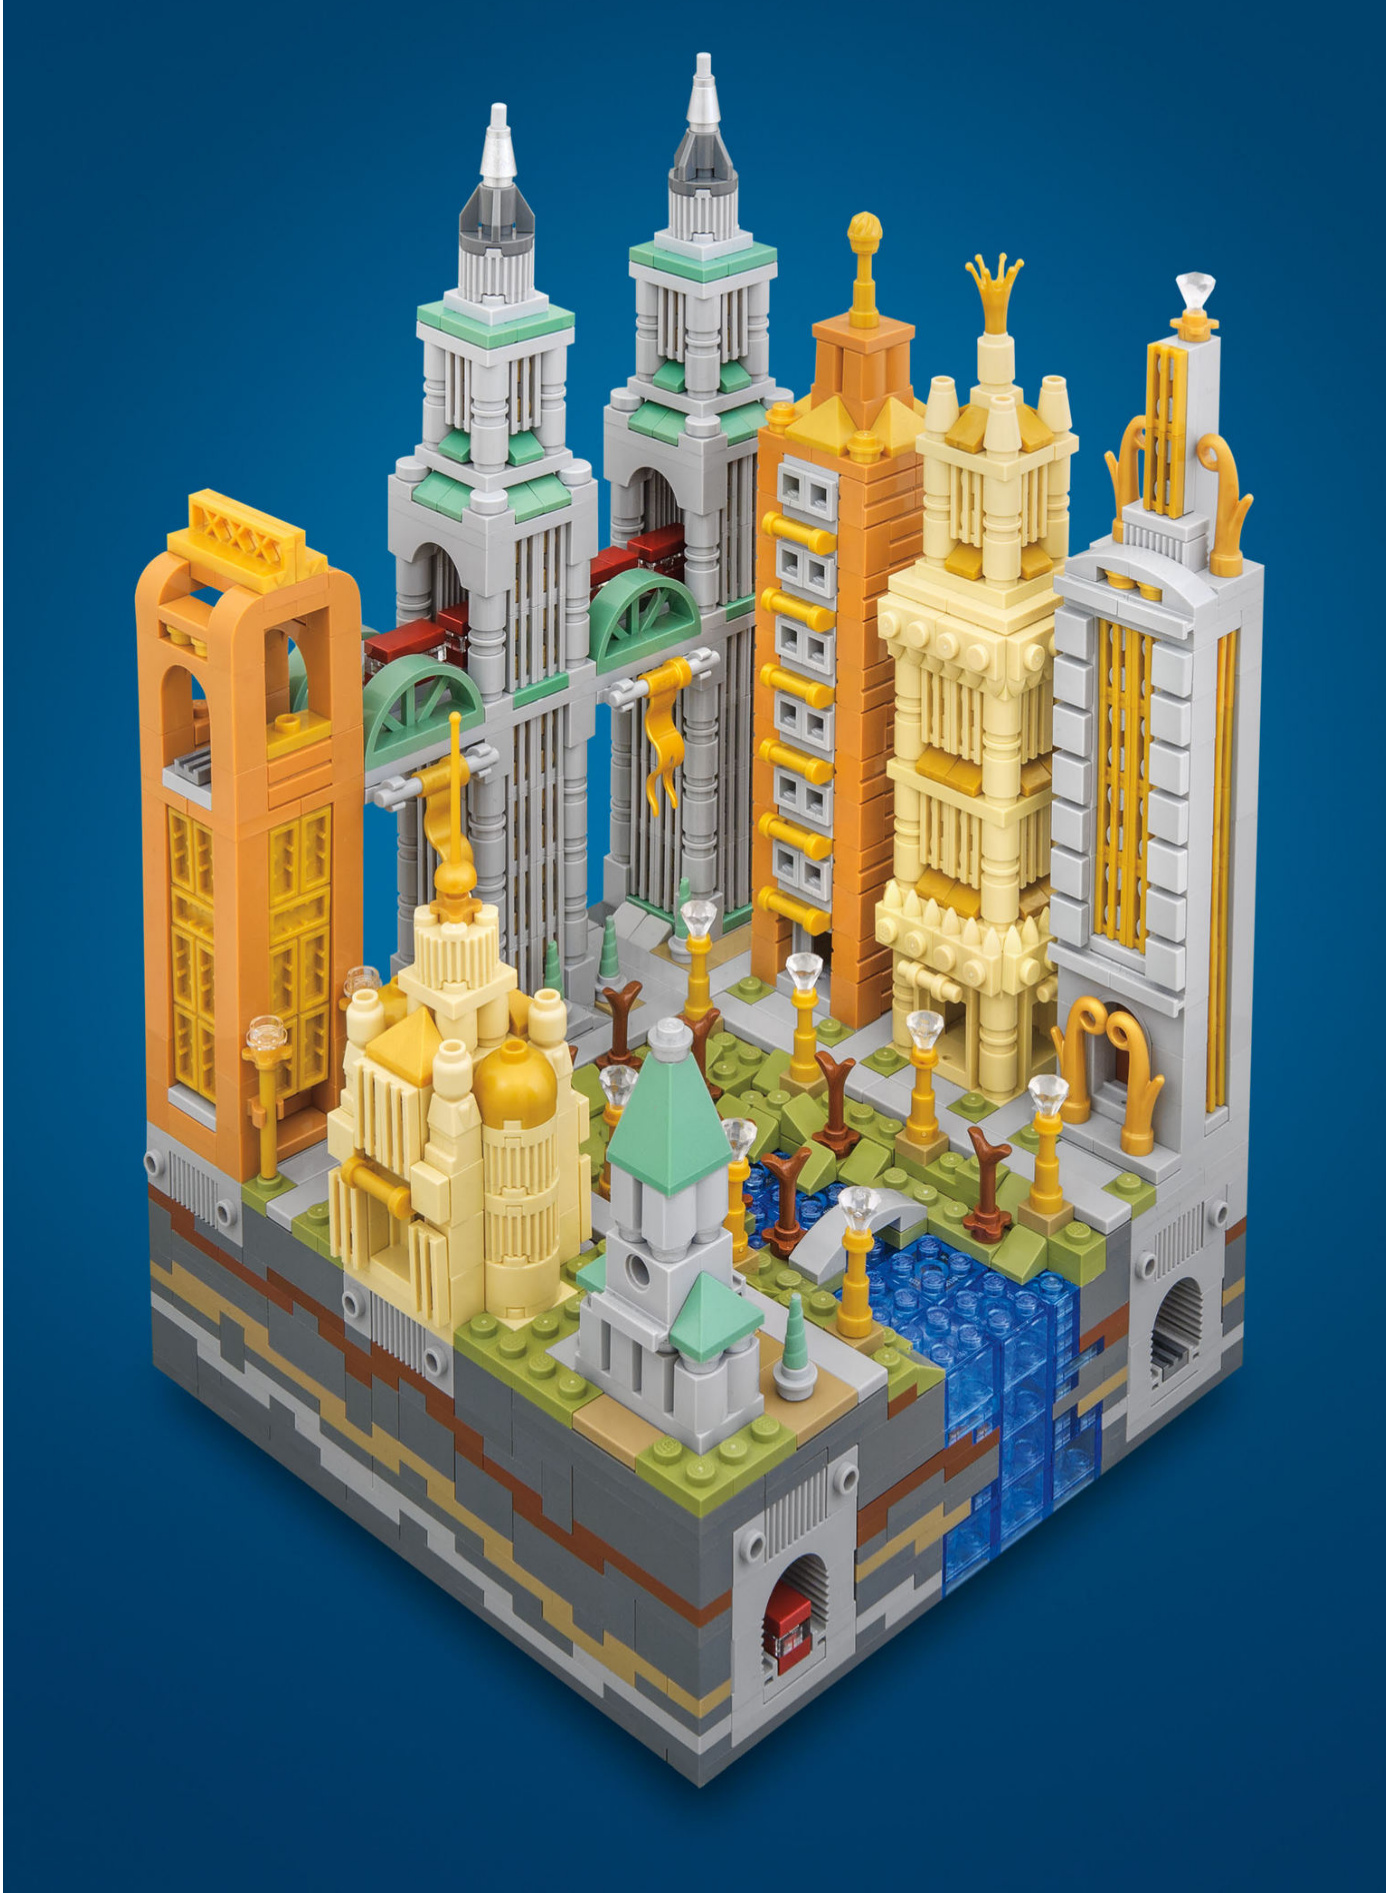
GILDED CITY
The world’s first cities rose up in four different parts of the world: Mesopotamia, ancient Egypt, the Indus Valley, and China’s Yellow River valley. These places all have one geographic feature in common: a life-giving river runs through each one. These rivers provided the dual gift of fresh water and fertile soil, the ingredients needed for agriculture, which in turn allowed people to settle in one place rather than spend their lives chasing migratory animals. Once settled, they began to build permanent shelters, which multiplied into cities.
Today, you’ll find thousands of riverside cities, many of which are major world capitals. Central Europe’s Danube flows through four national capitals itself. It’s almost as if rivers have the power to sprout cities on their banks.
A city’s river is also indispensable to that city’s soul. London without the Thames would be like tea without crumpets. New Orleans without the Mississippi would be like jambalaya without Cajun seasoning. Paris without the Seine would be like a baguette without butter.
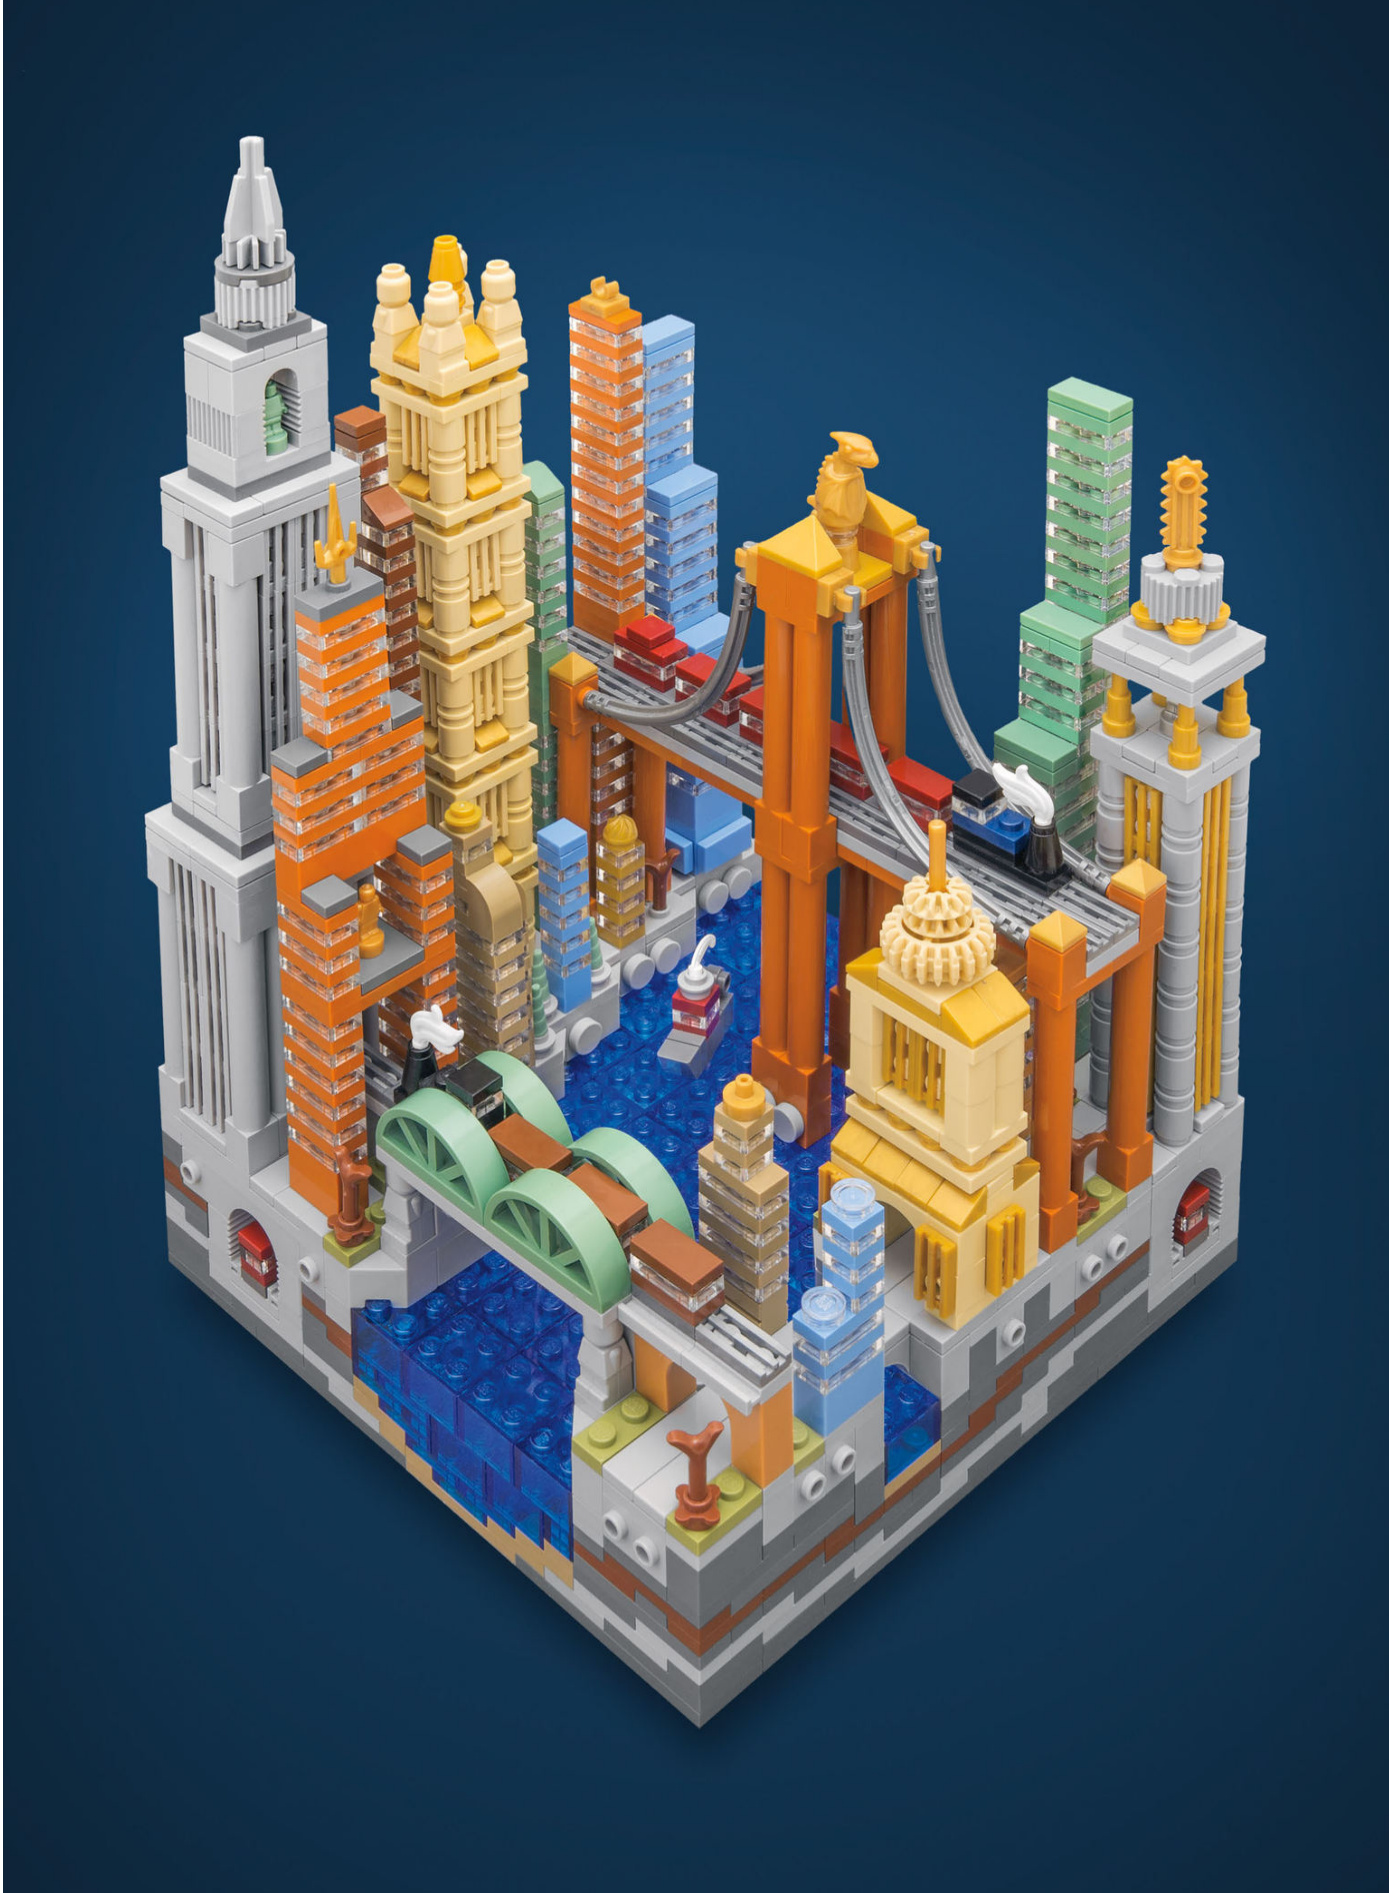
This LEGO micro city sits at the confluence of two rivers, providing two different trade routes that have generated ostentatious wealth. The city’s abundant cash flow gave rise to a flood of gilded buildings as wealthy merchants sought to outshine one another with ornamental one-upmanship.
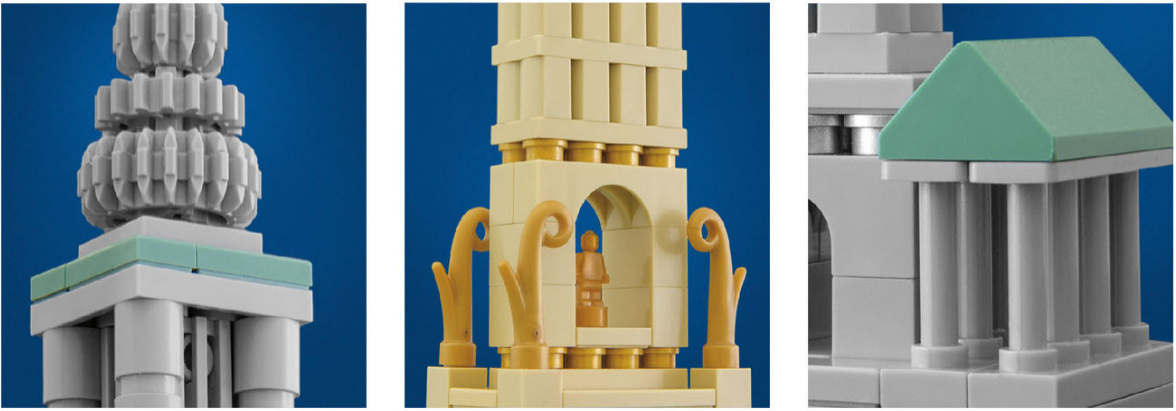
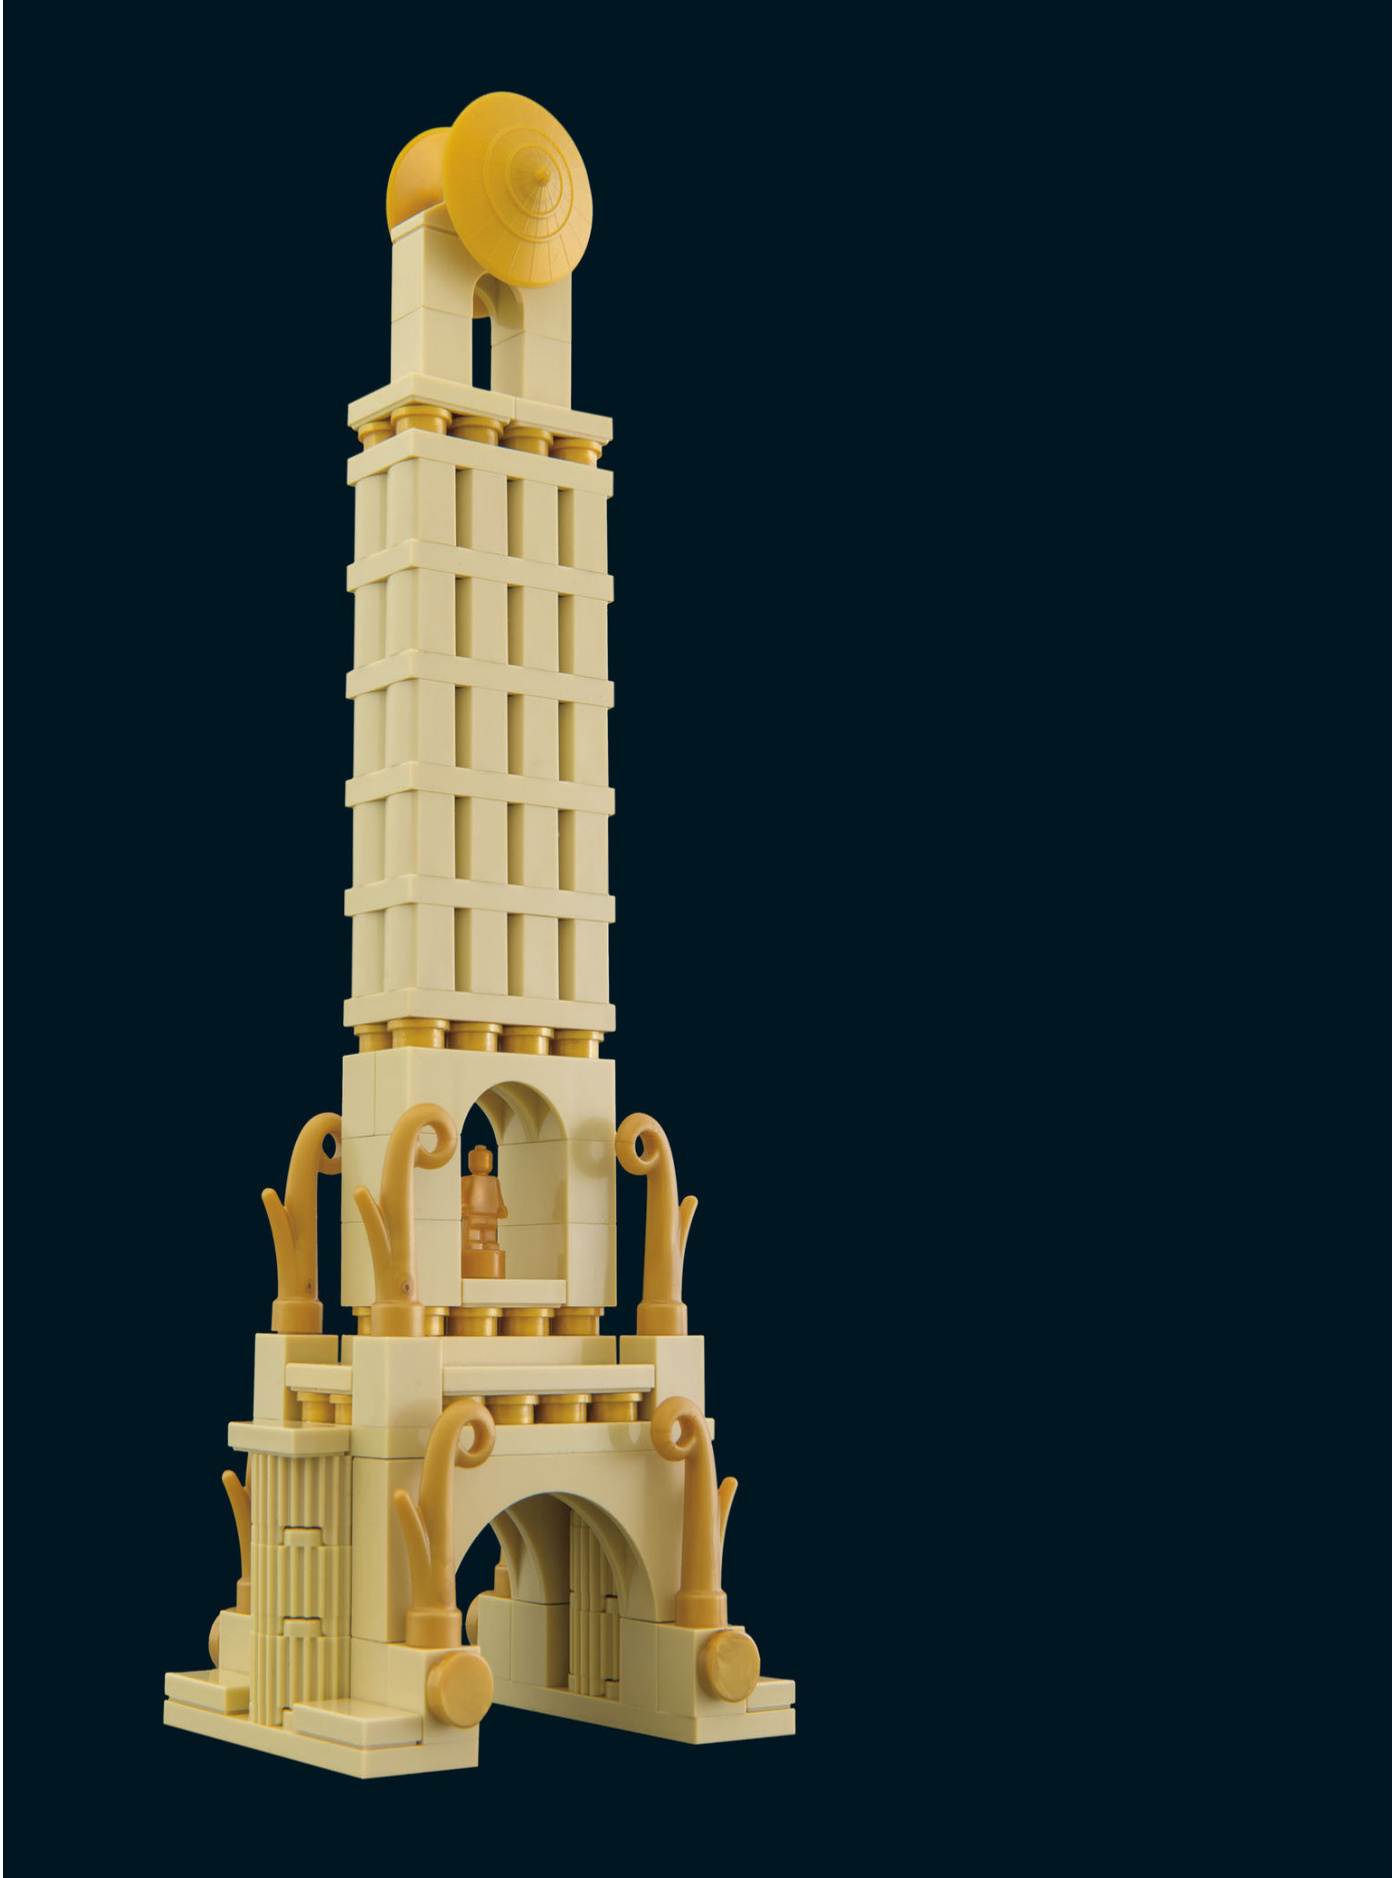
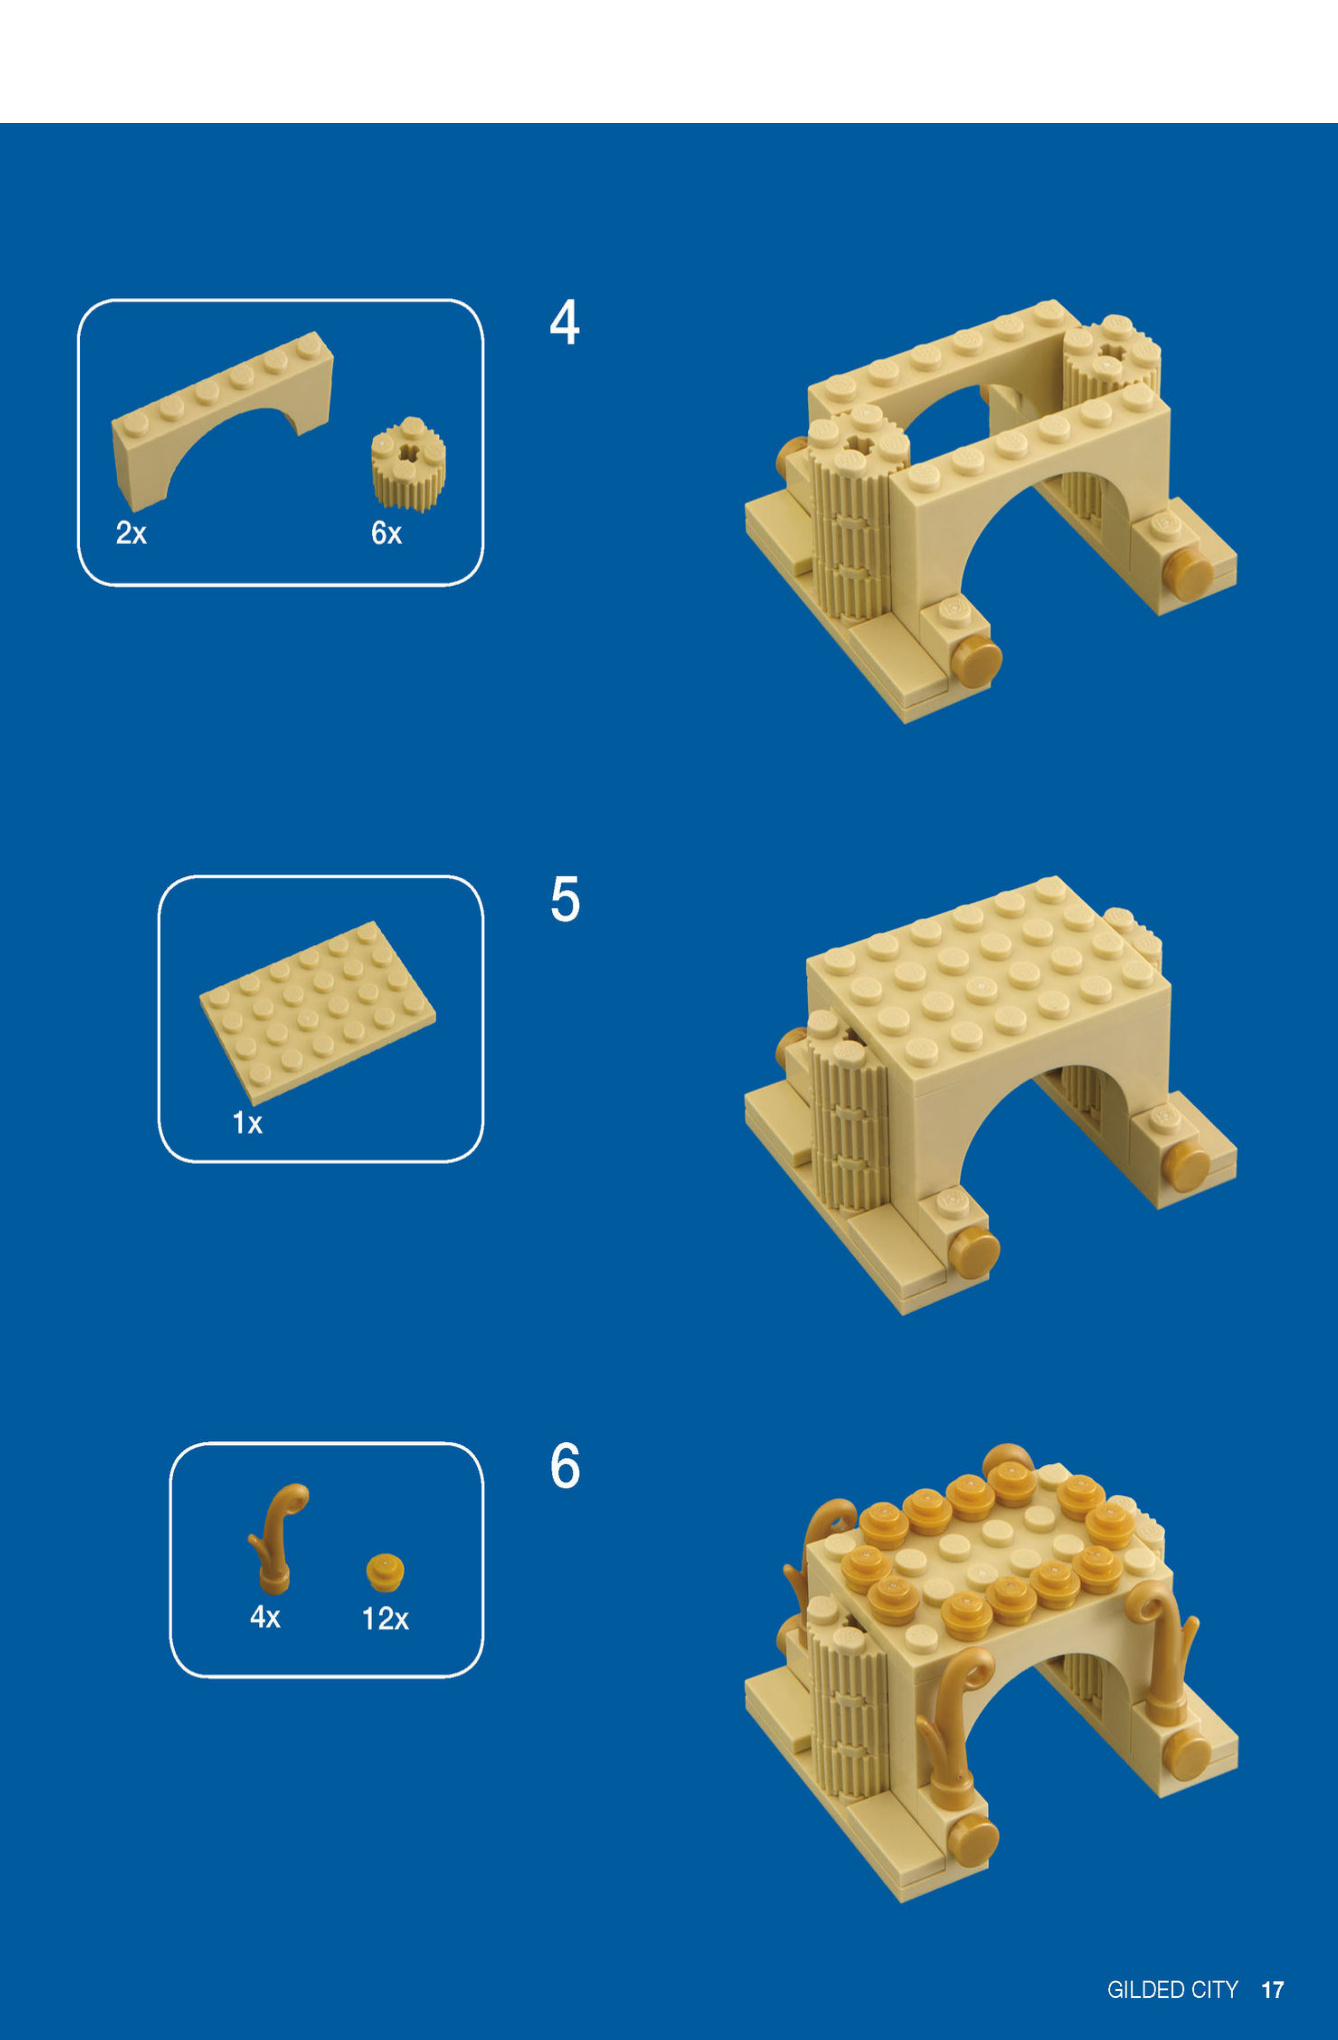
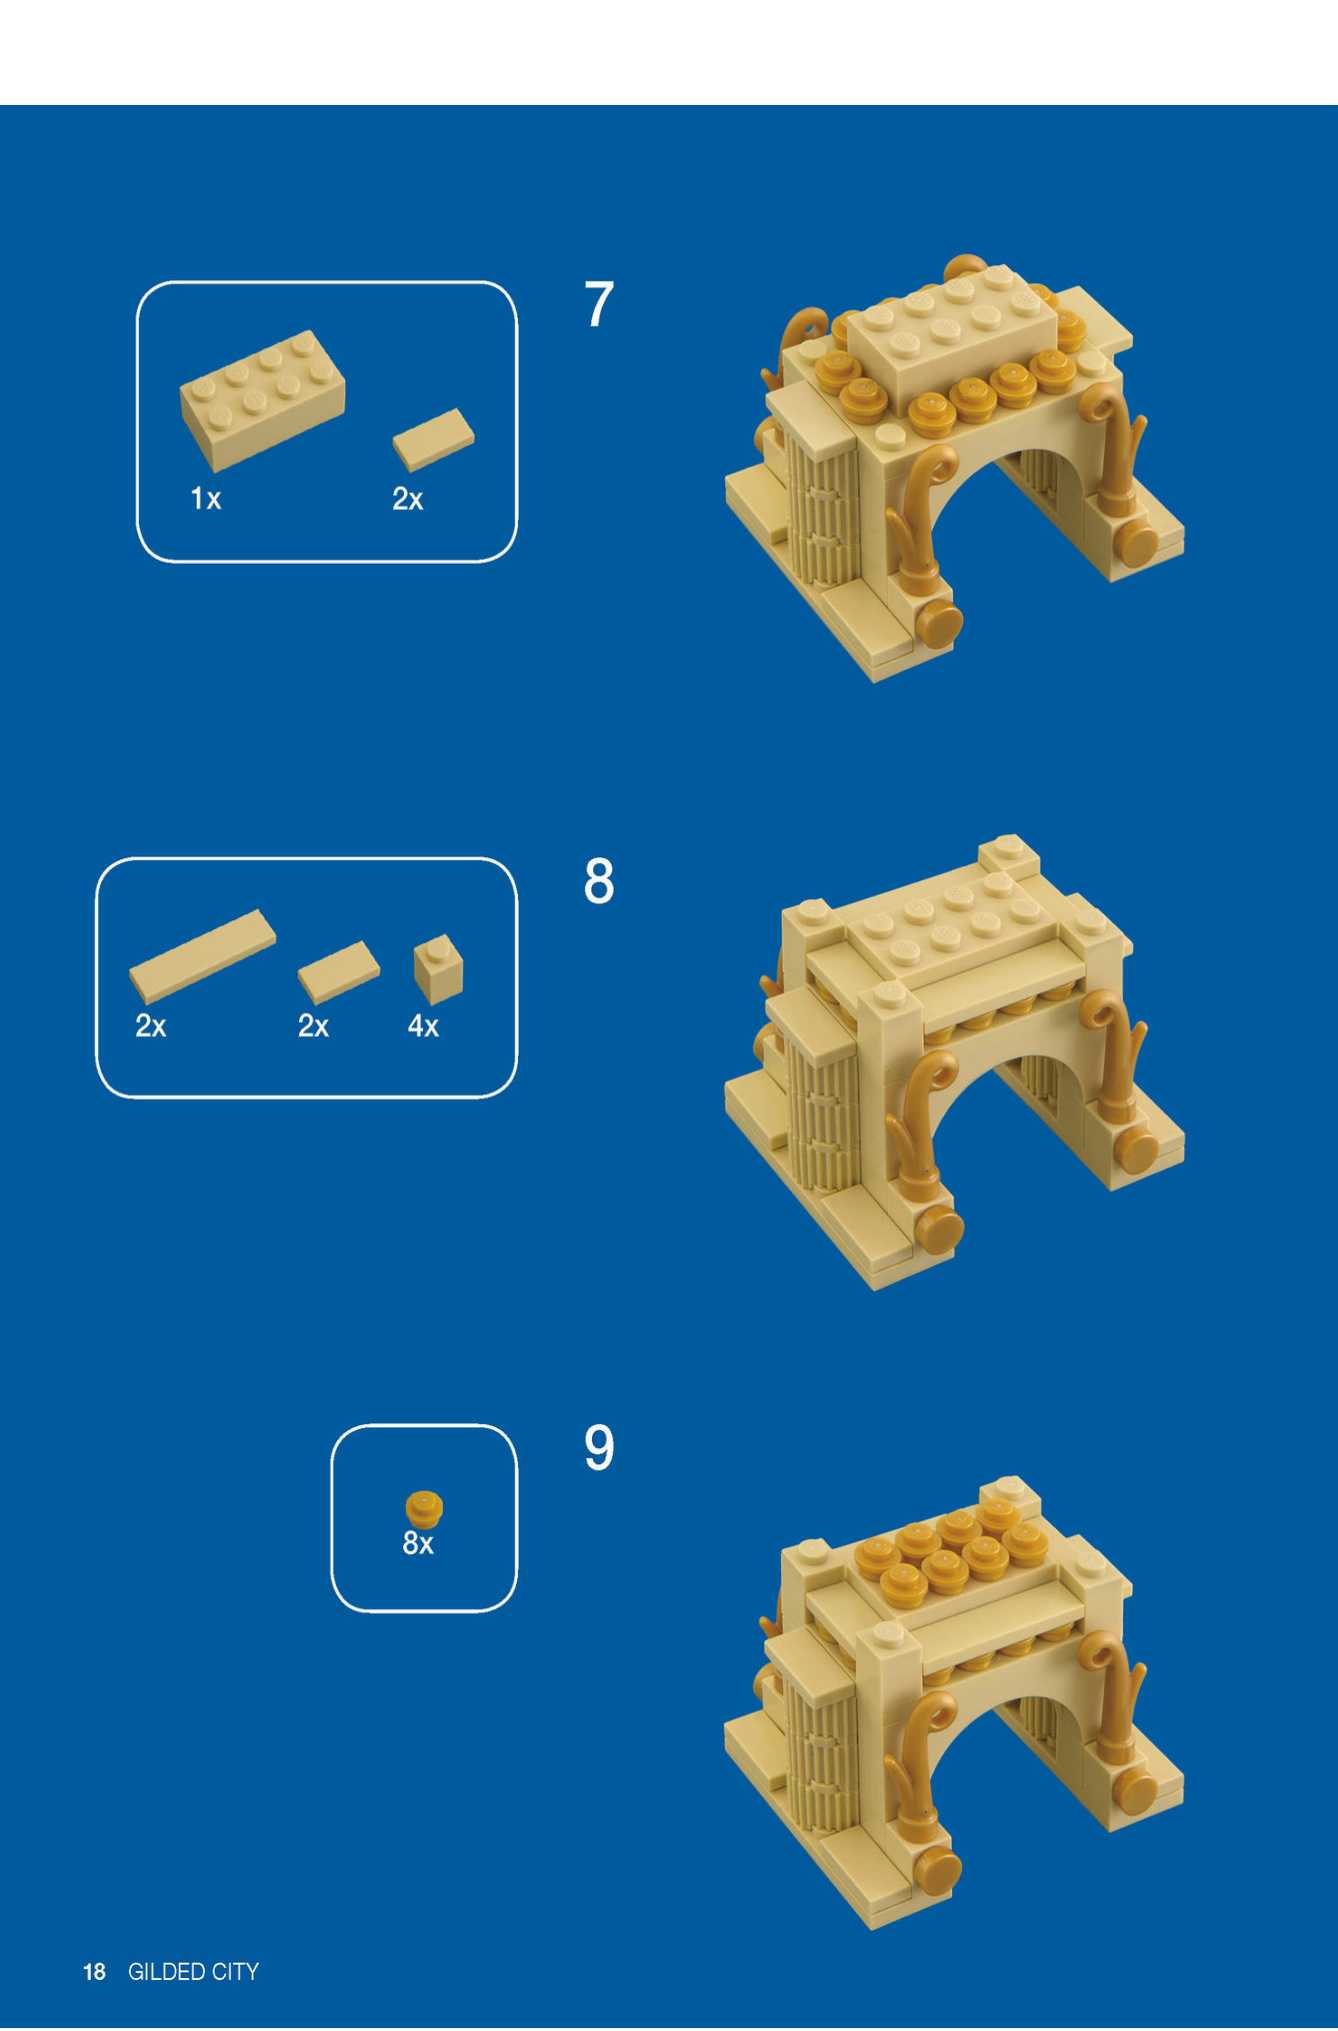
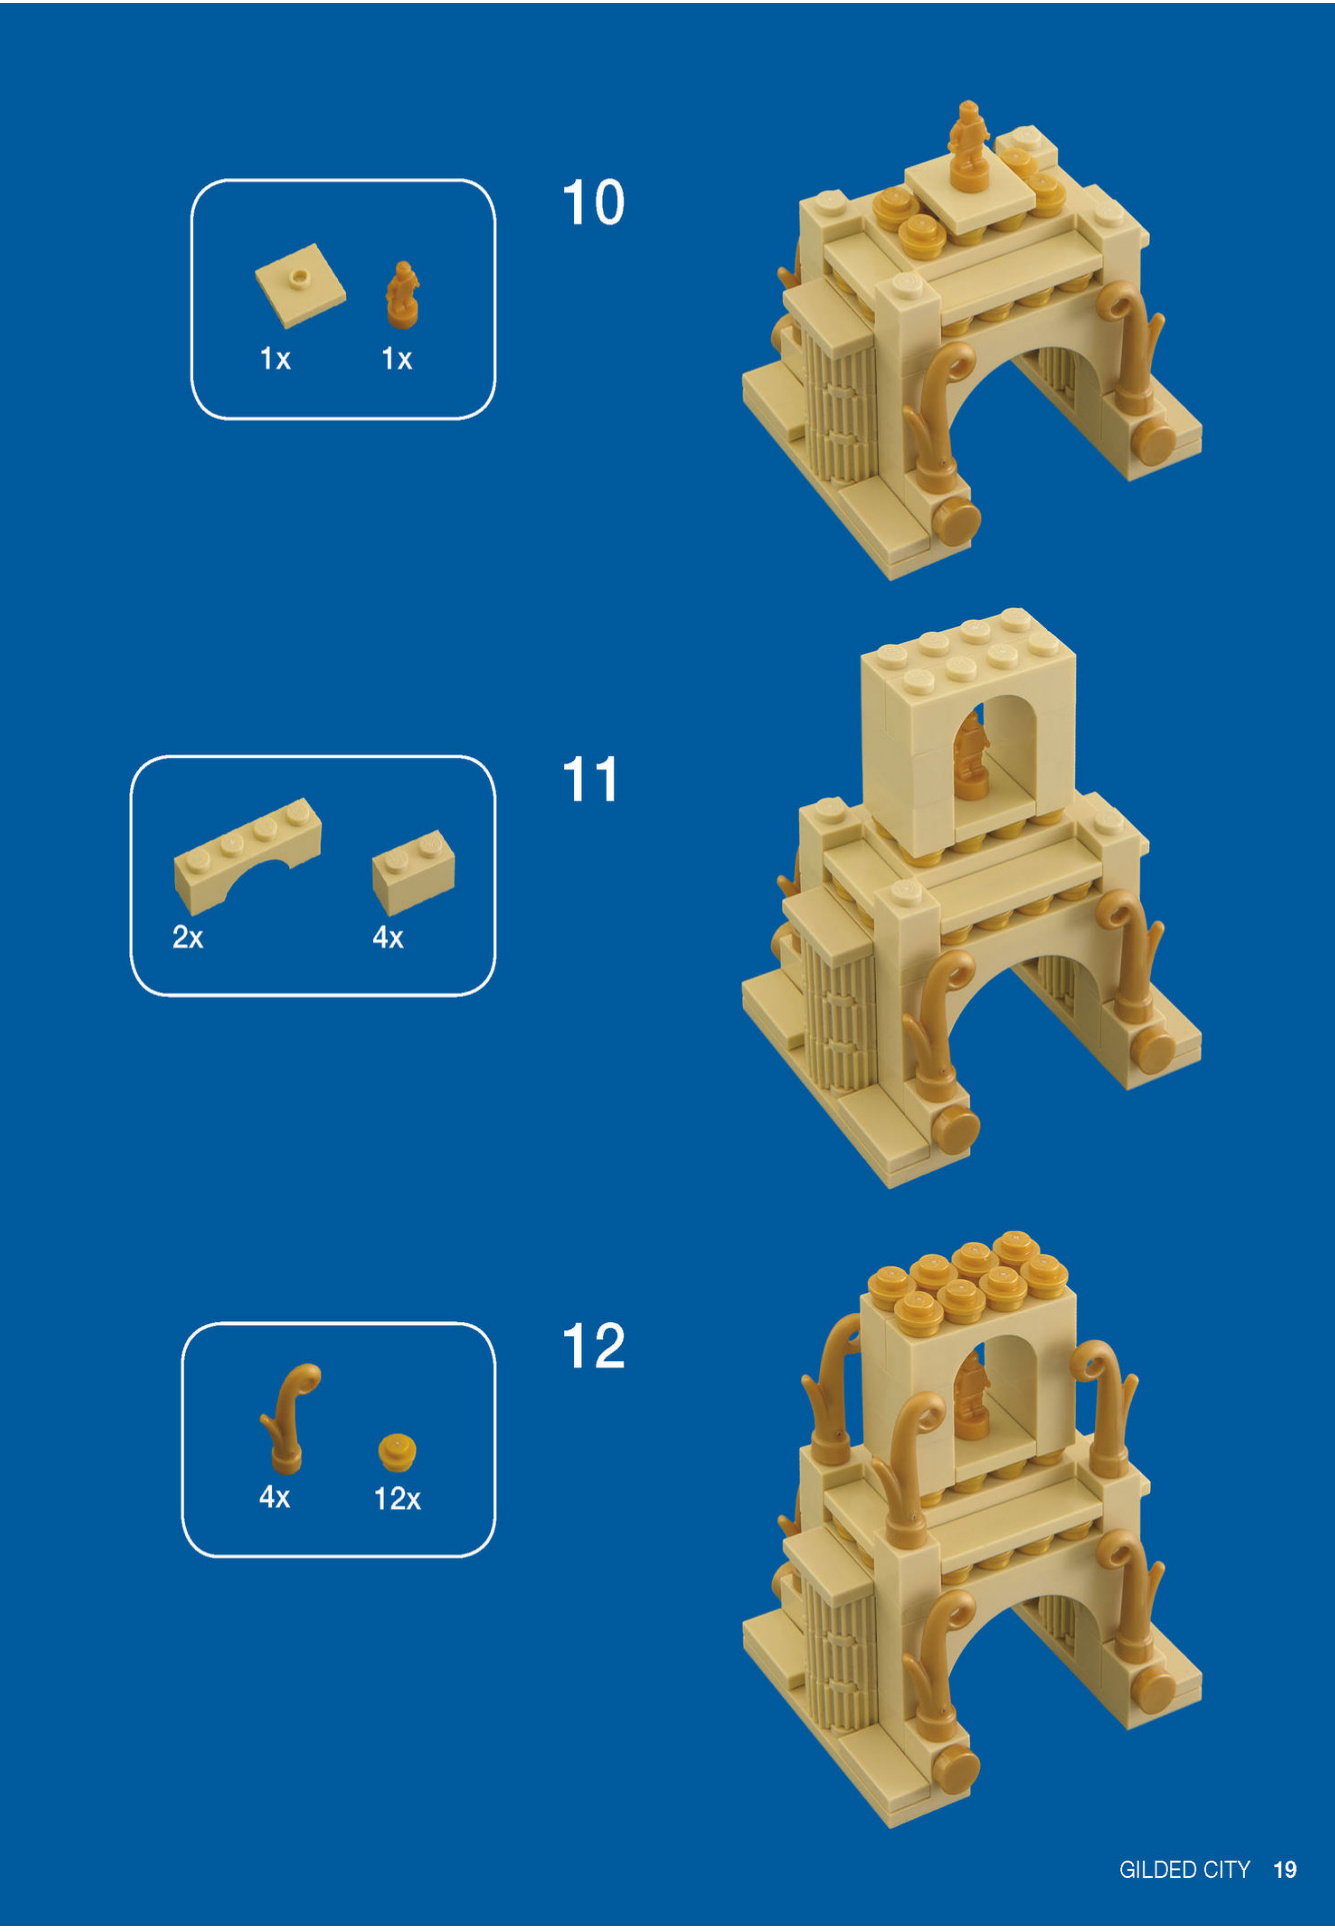
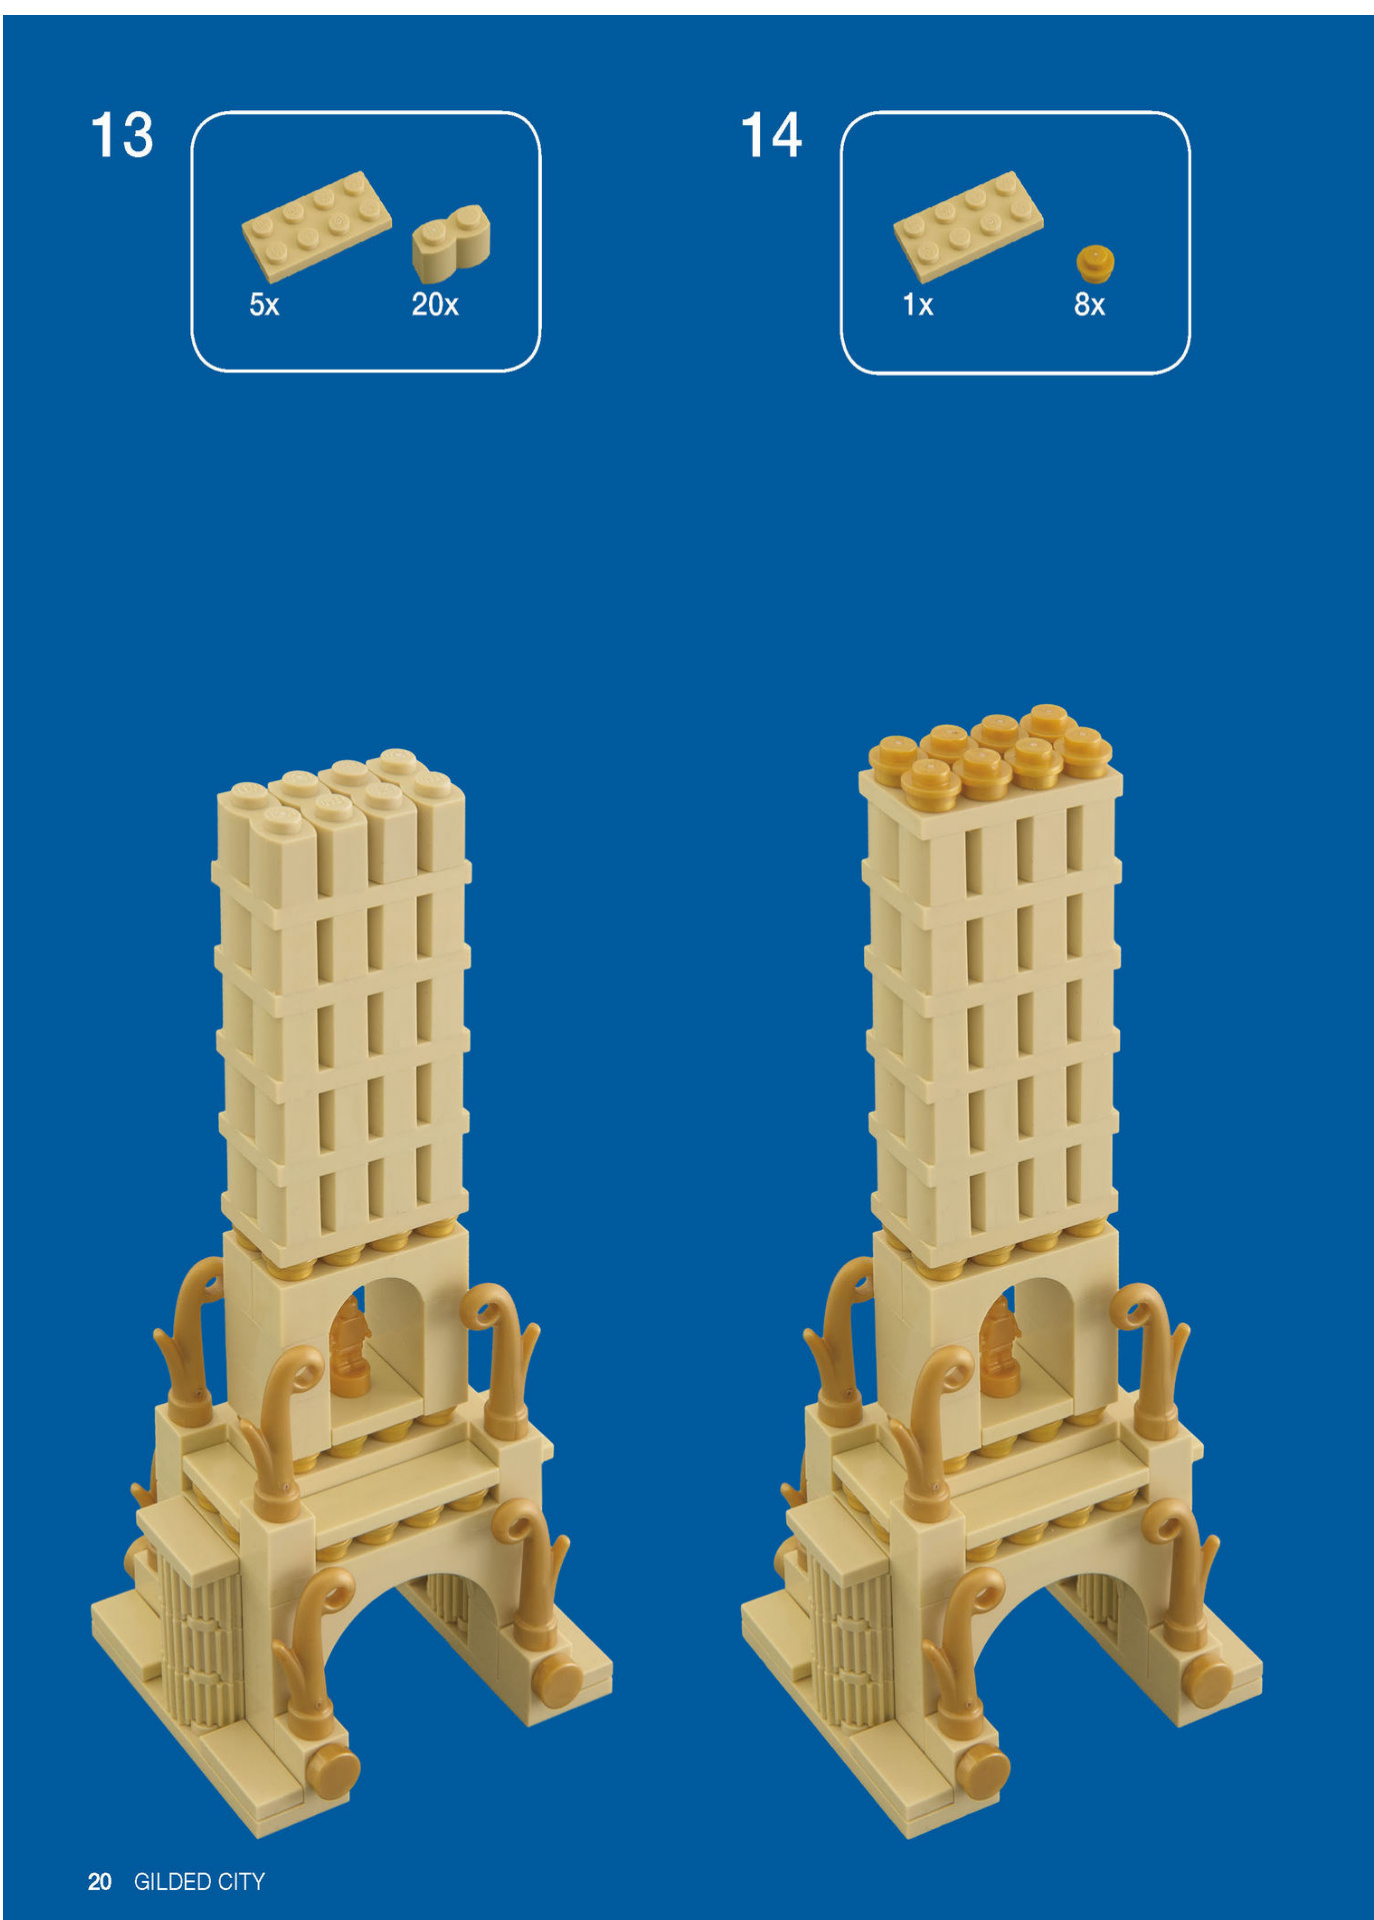
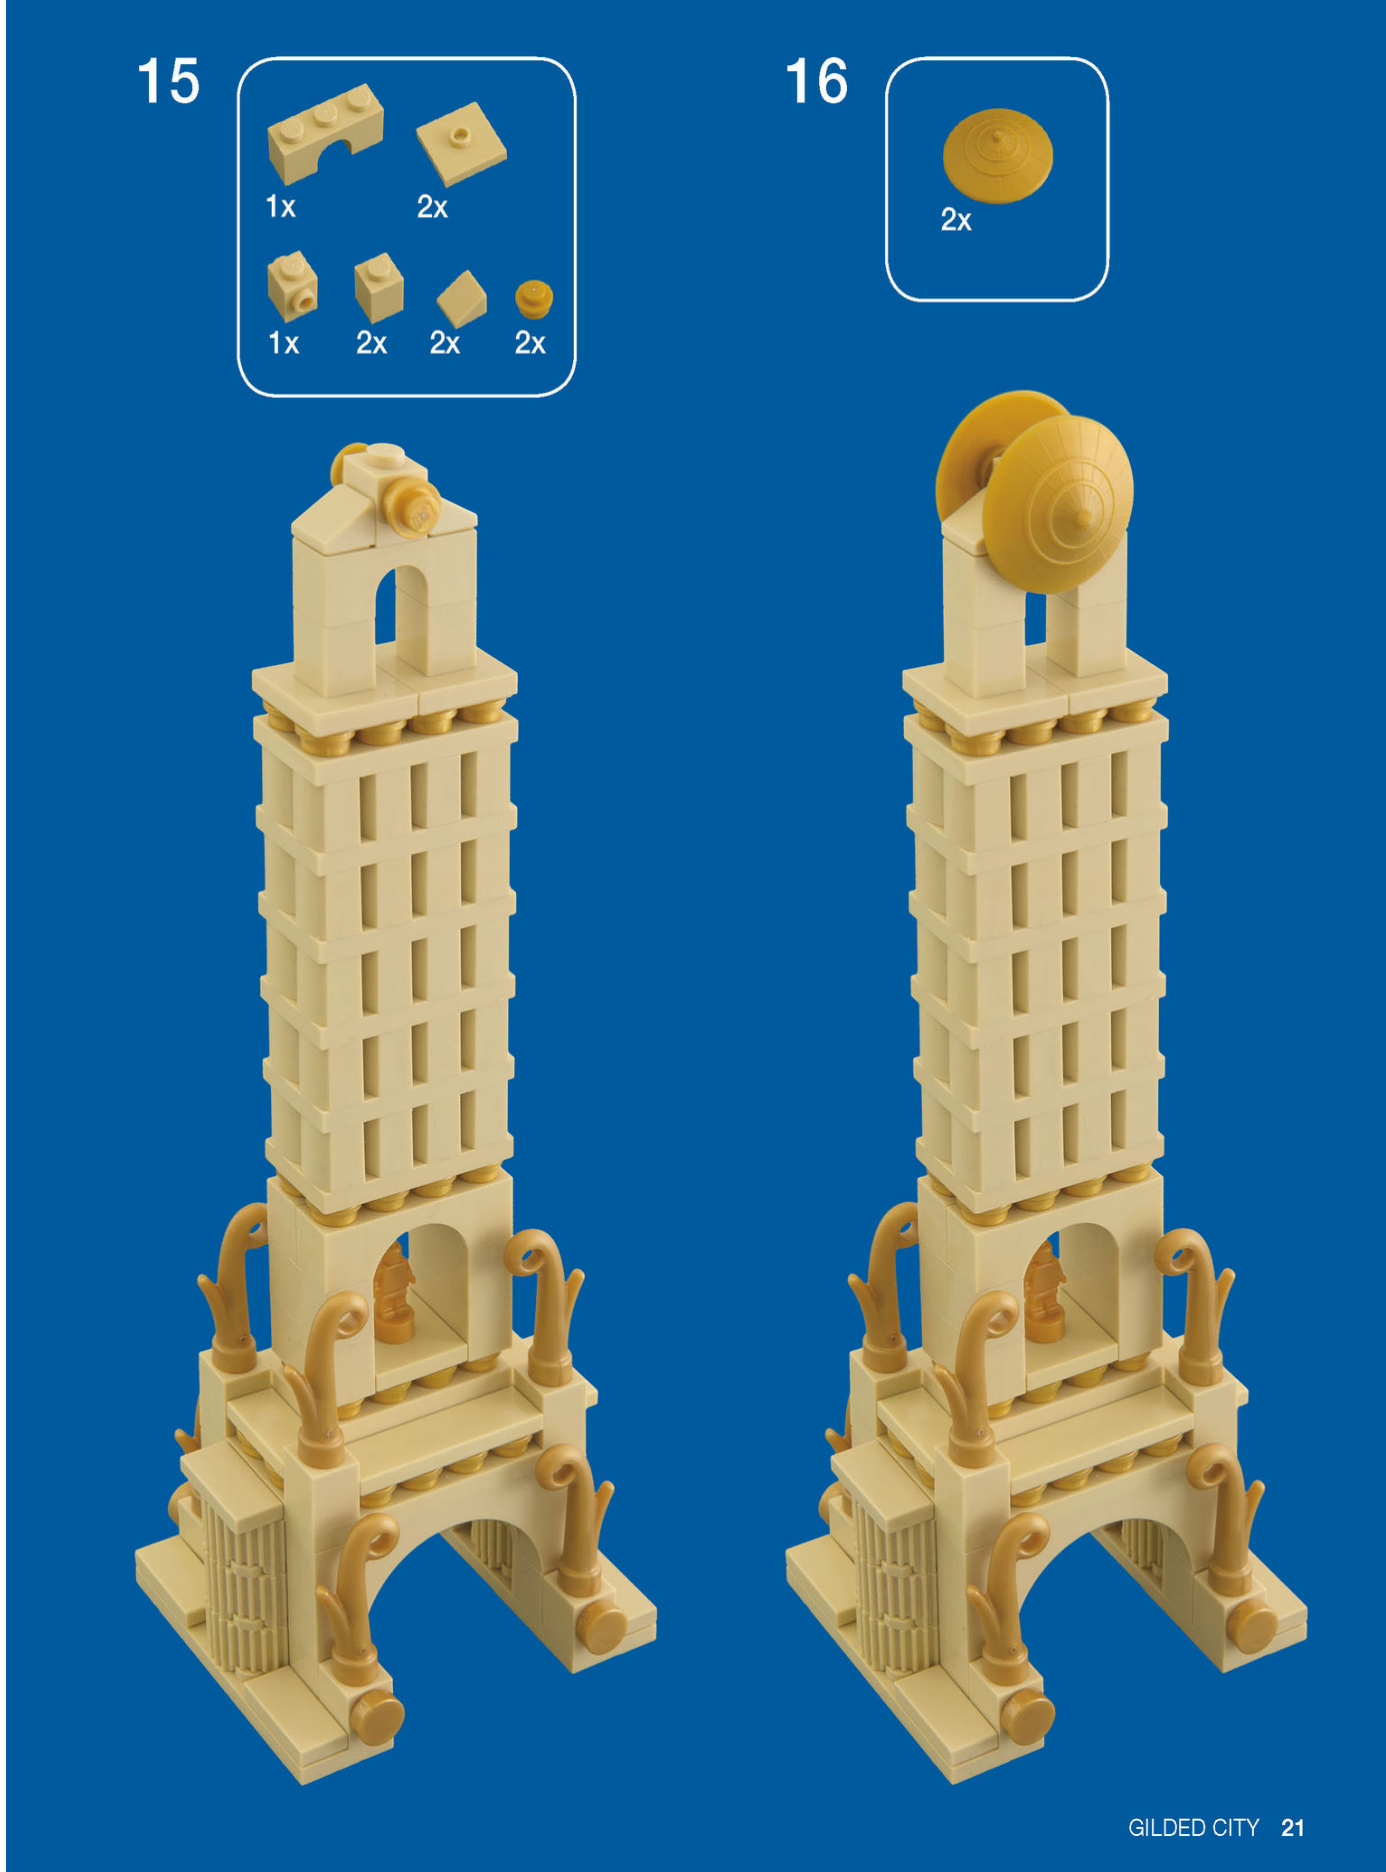
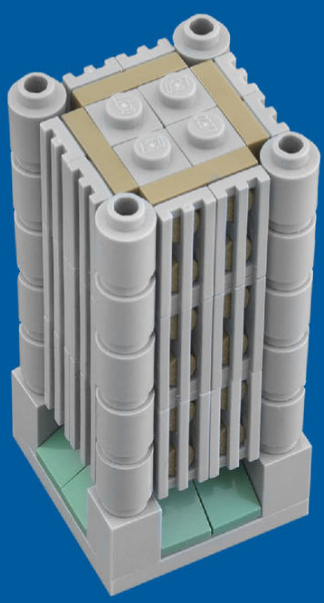
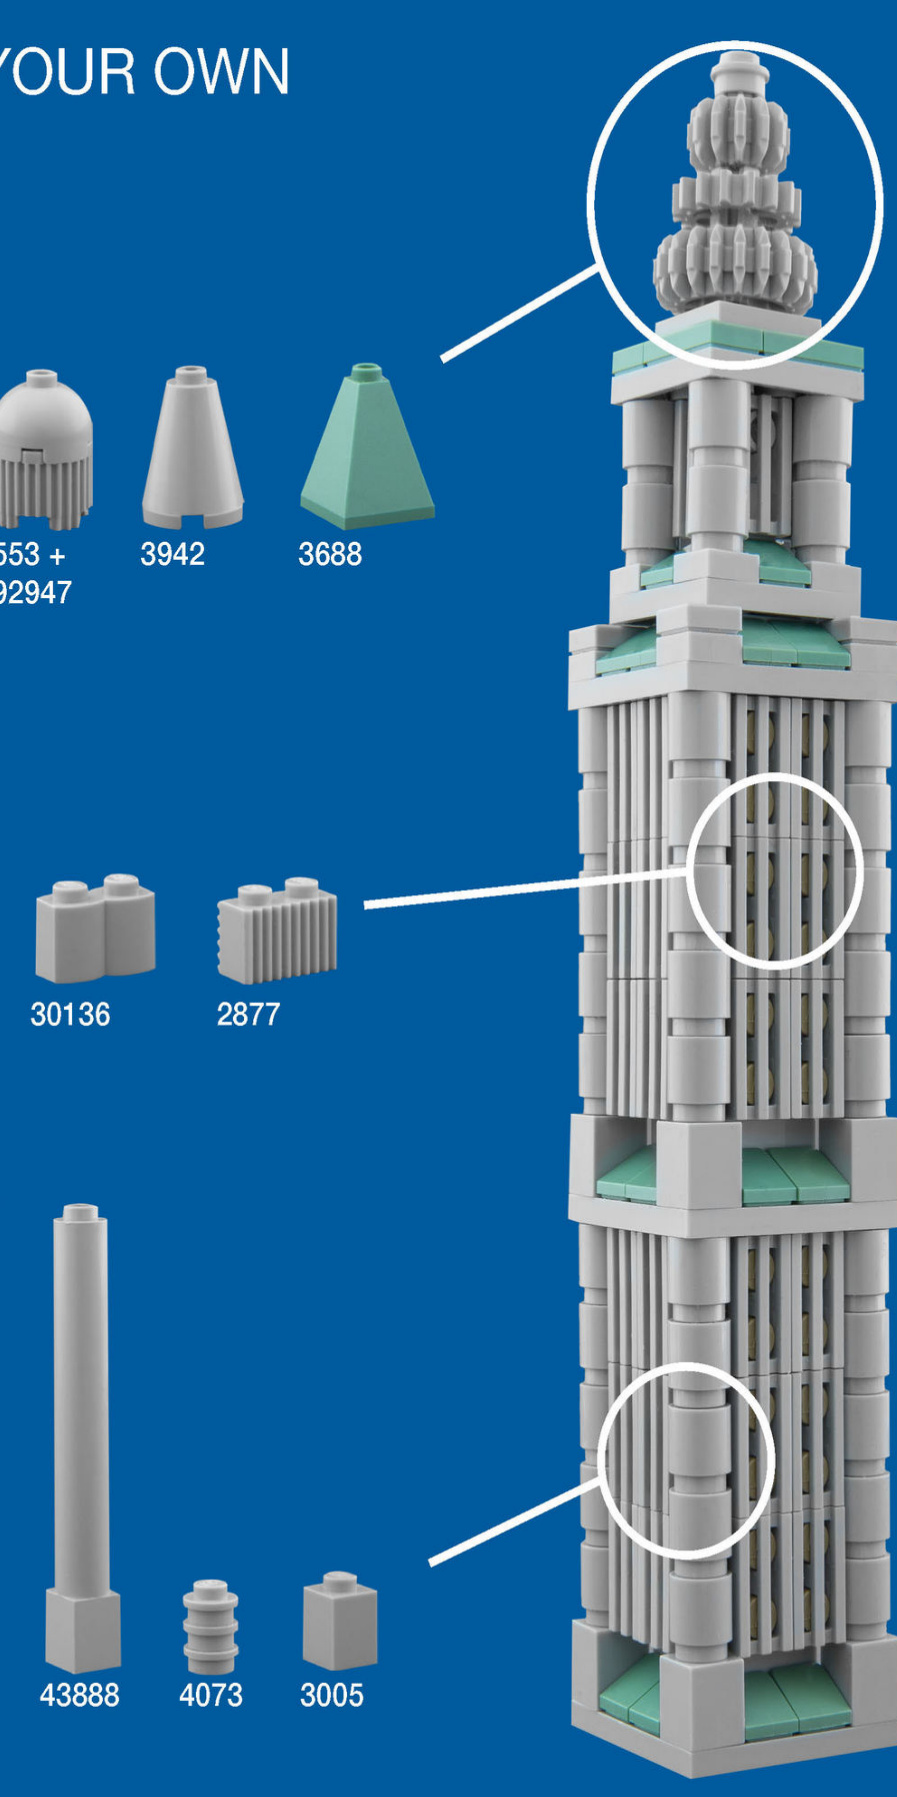
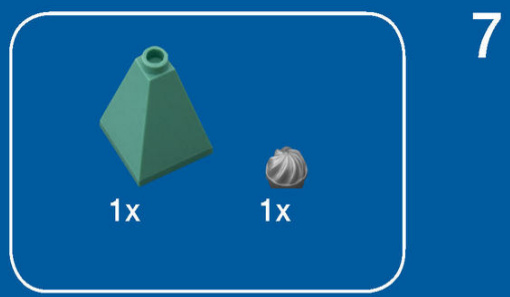
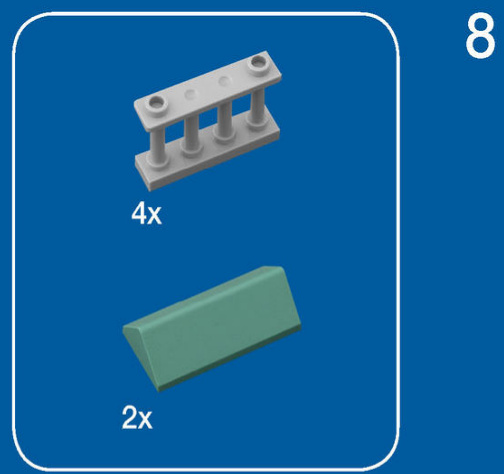
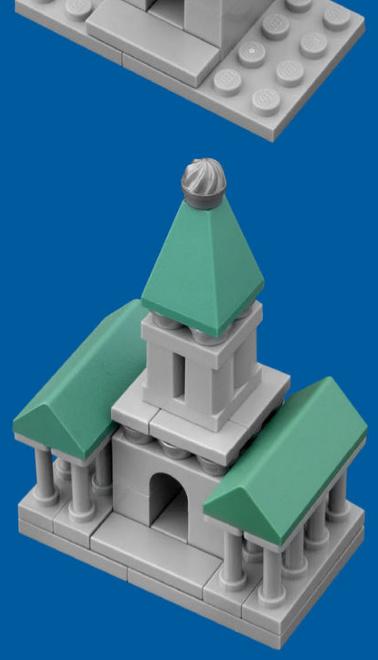
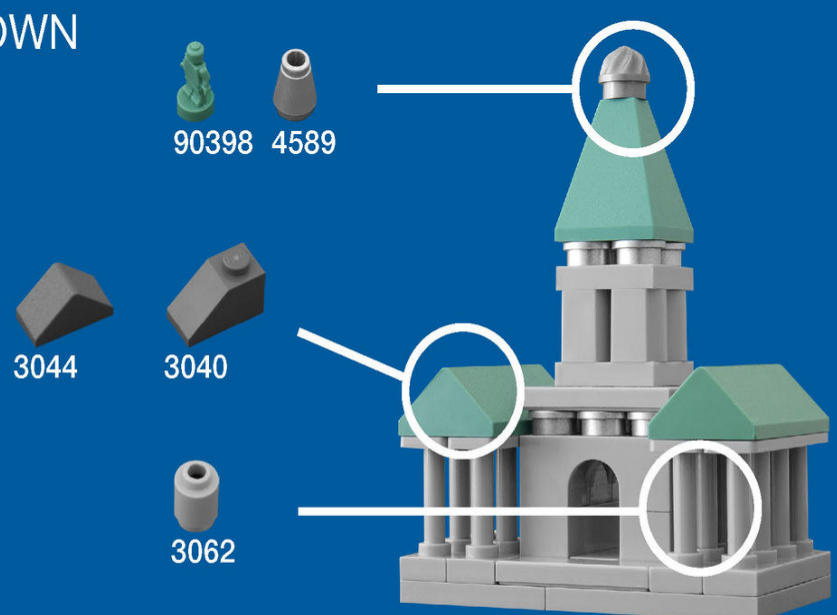
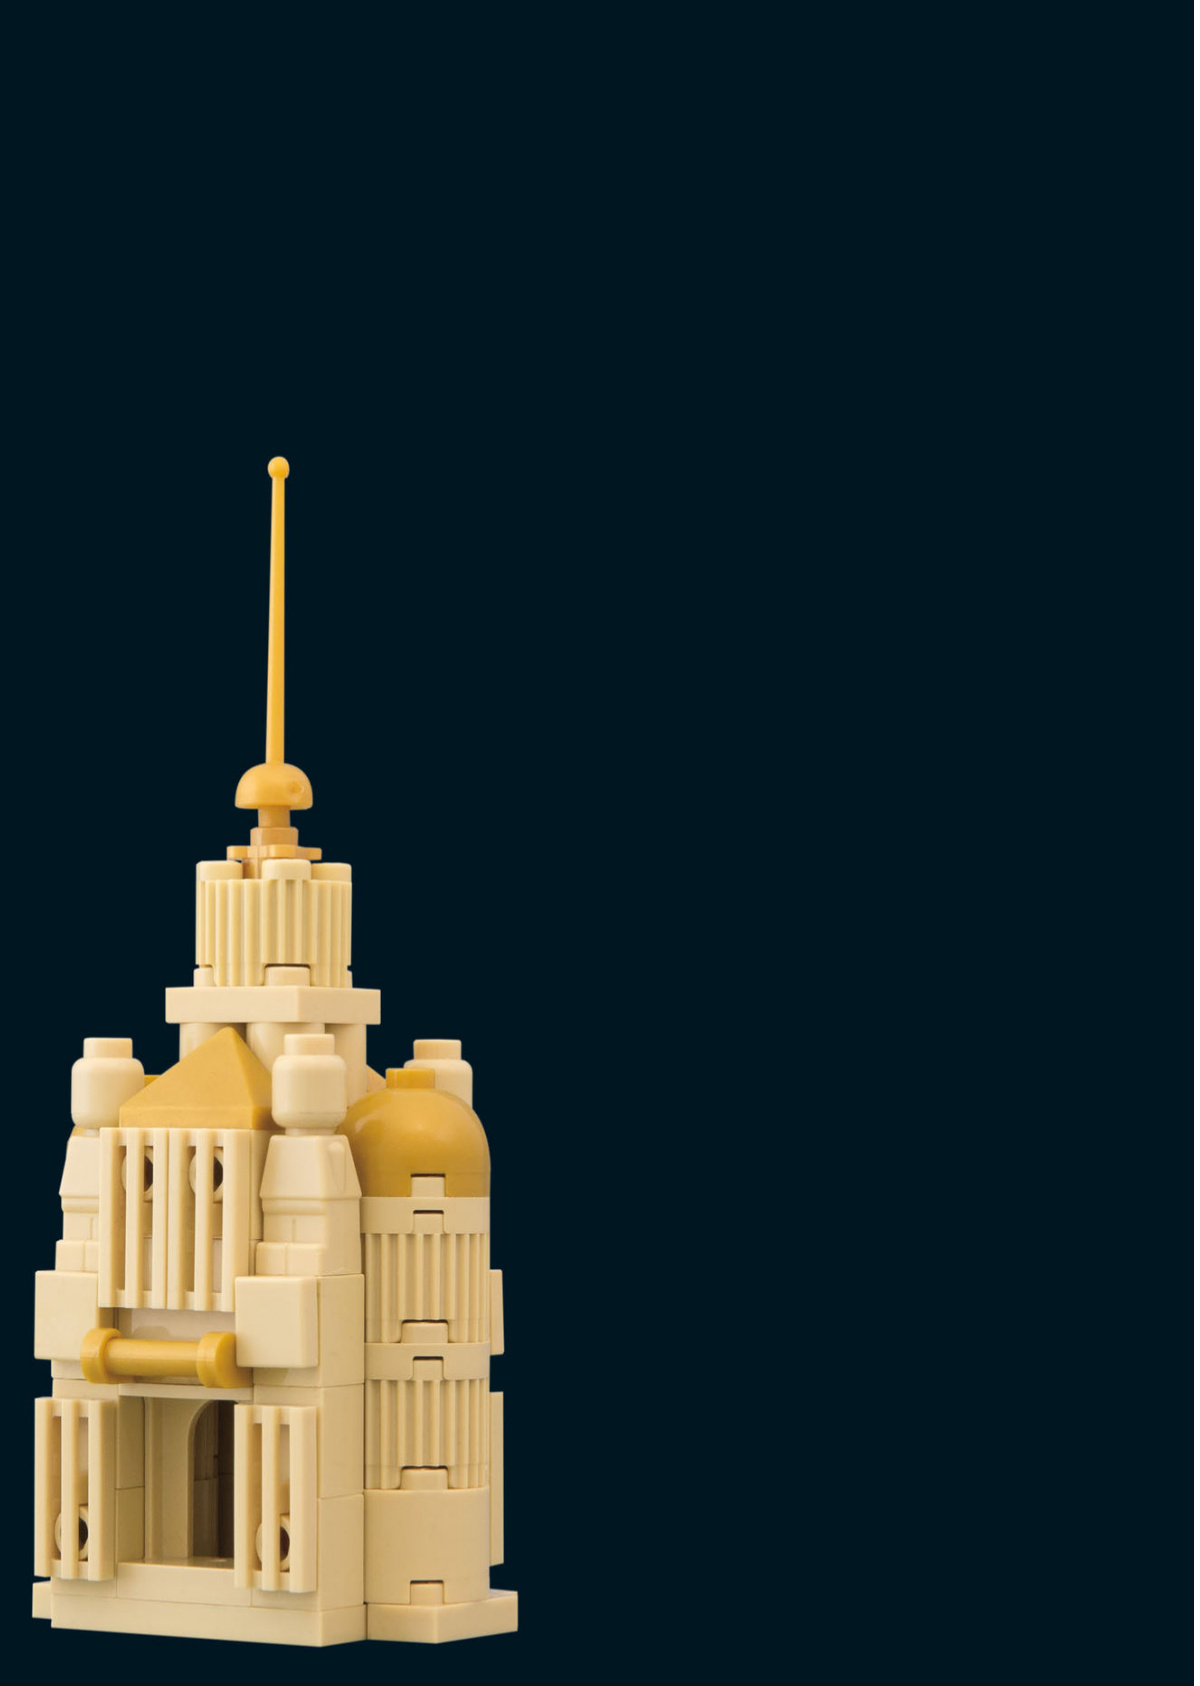
SUNGATE ESTATES
Sun Gate Estates was built by global shipping magnate Gimlet D. Goldenpaddle, who made a fortune with his Do Pay the Ferryman river transportation service. His opulent tastes and high self-regard are evident in the building’s polished gold ornamentation and the statue of him that welcomes visitors to the city.
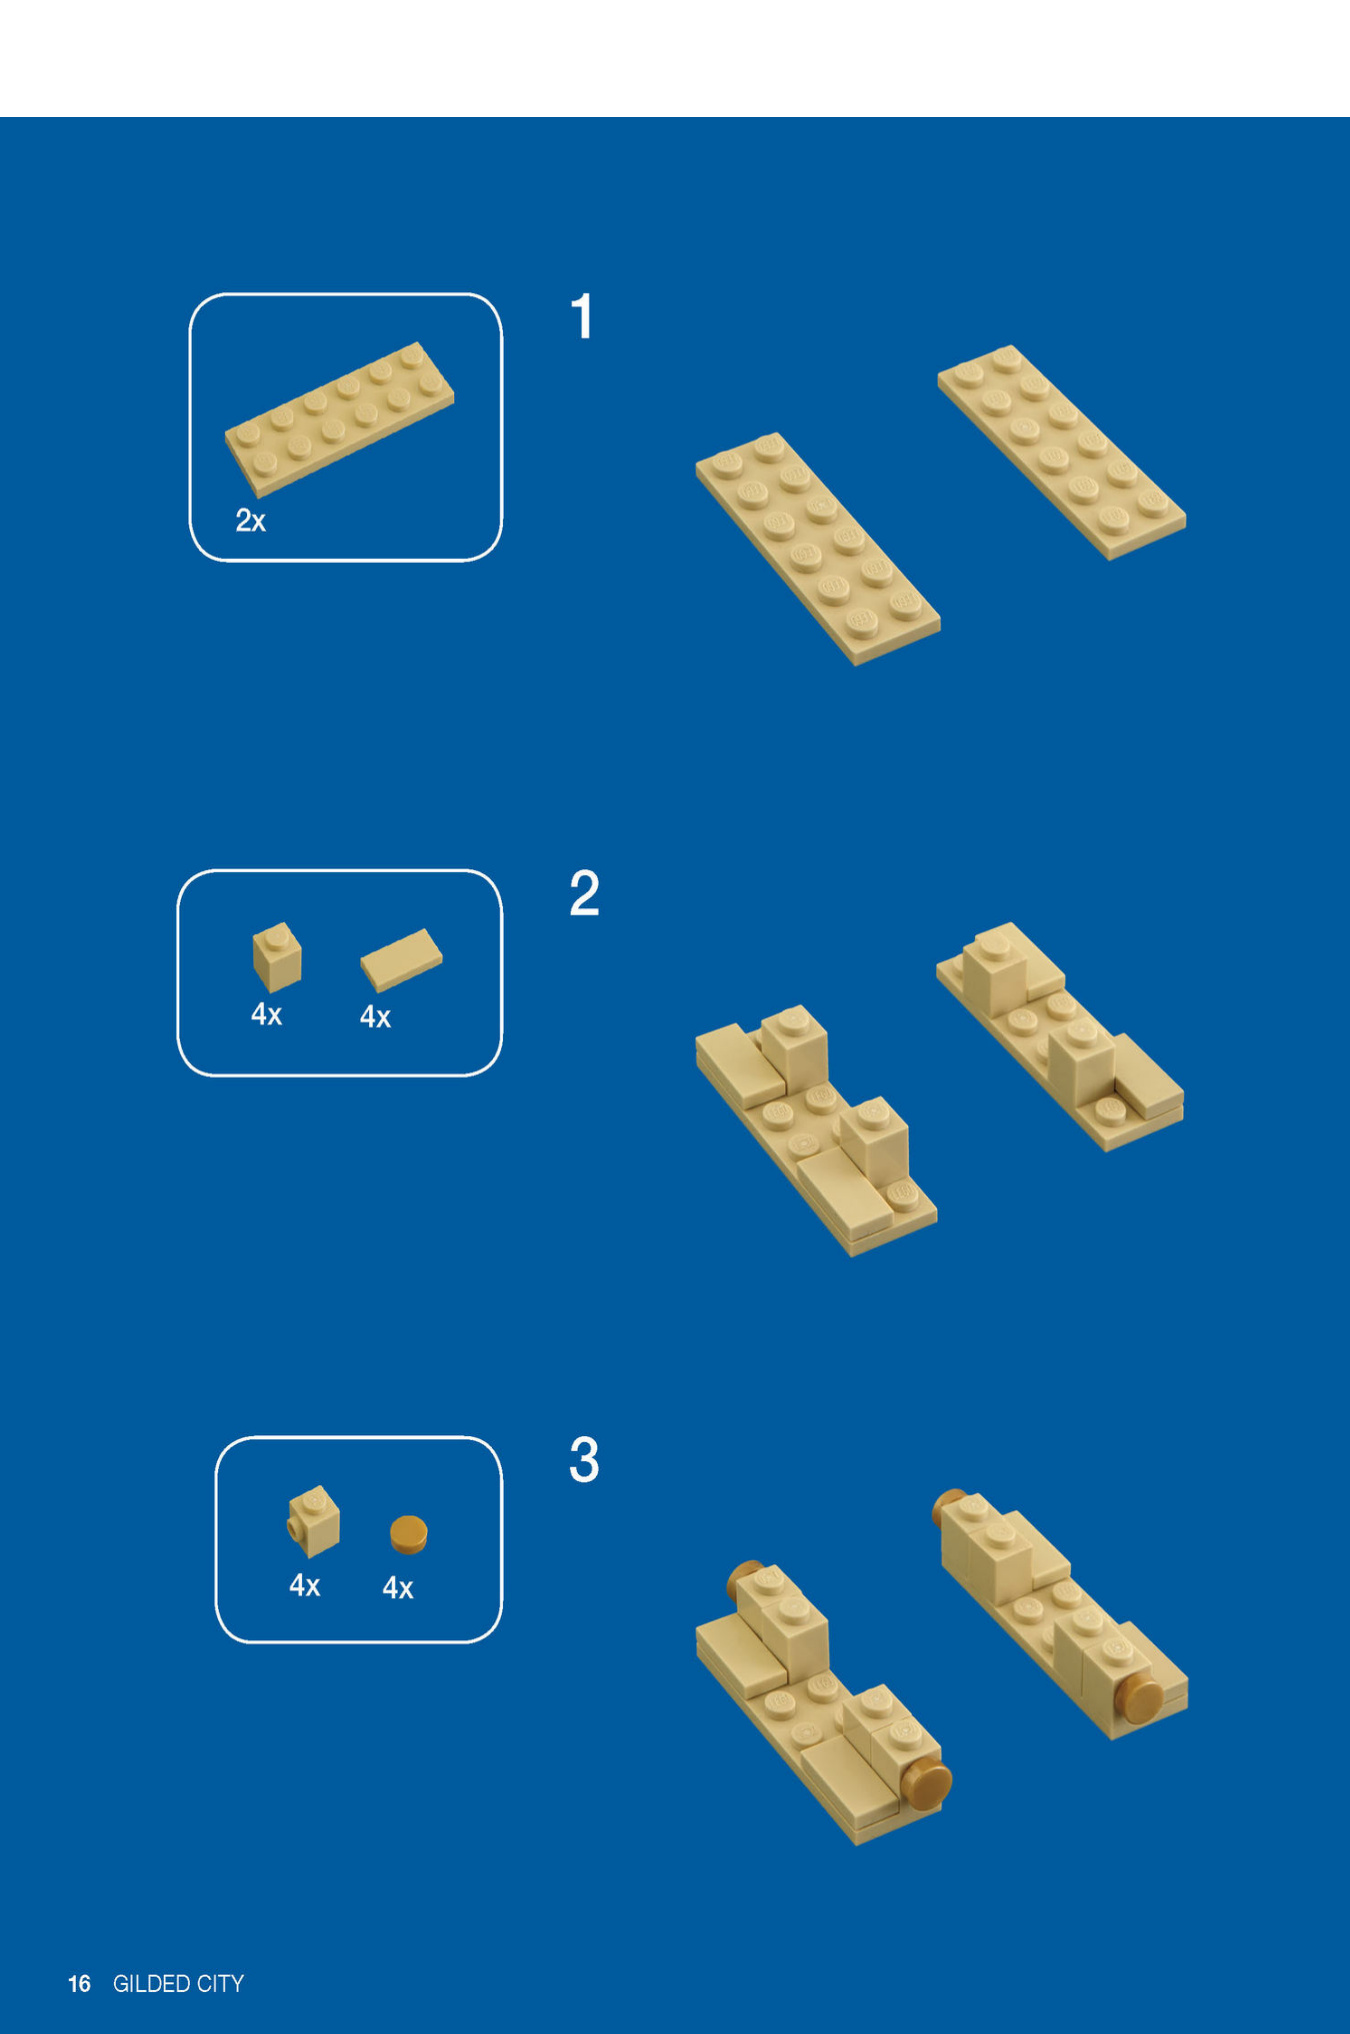
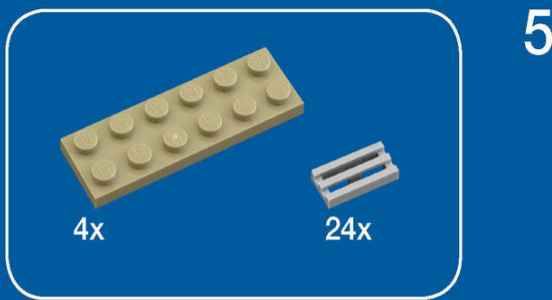
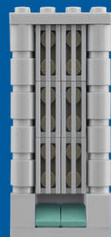
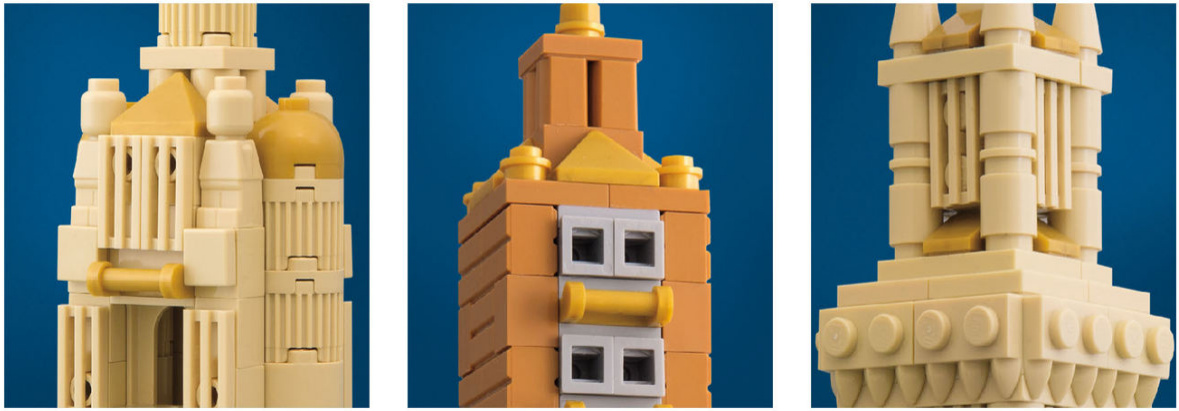
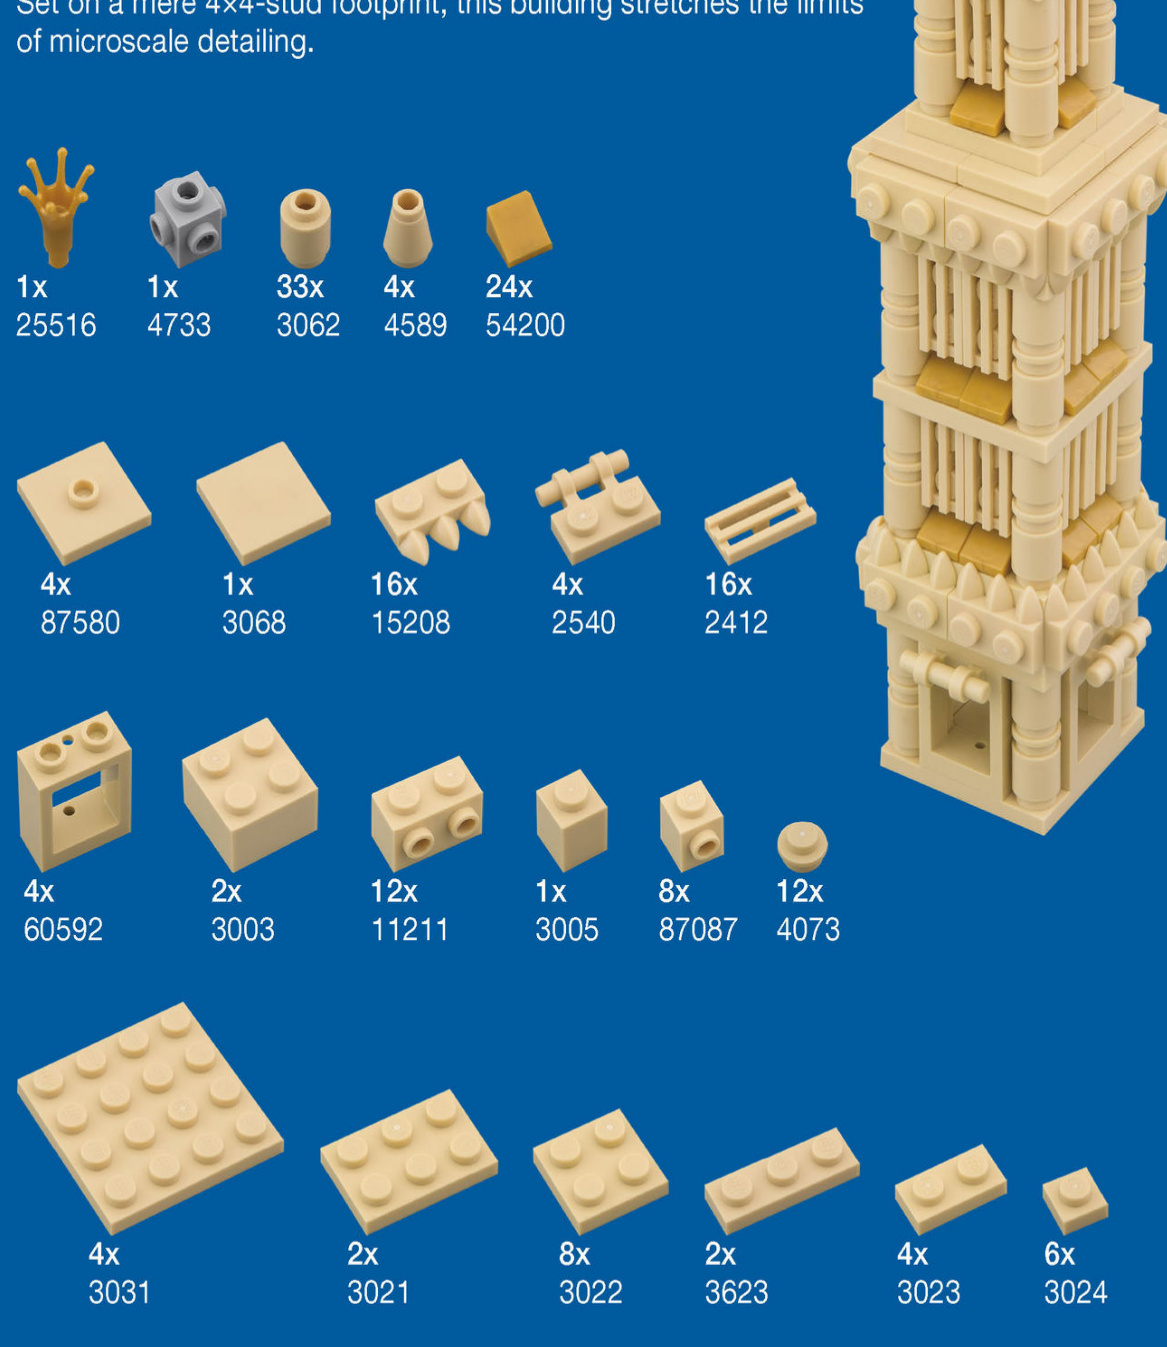
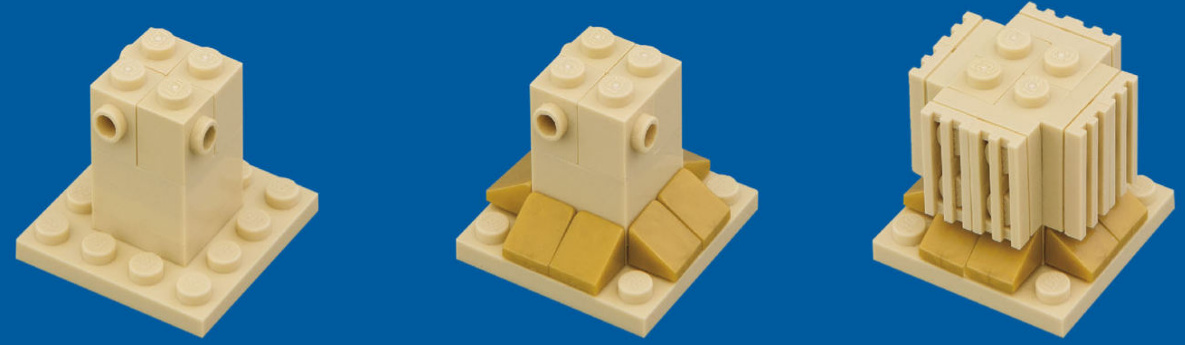
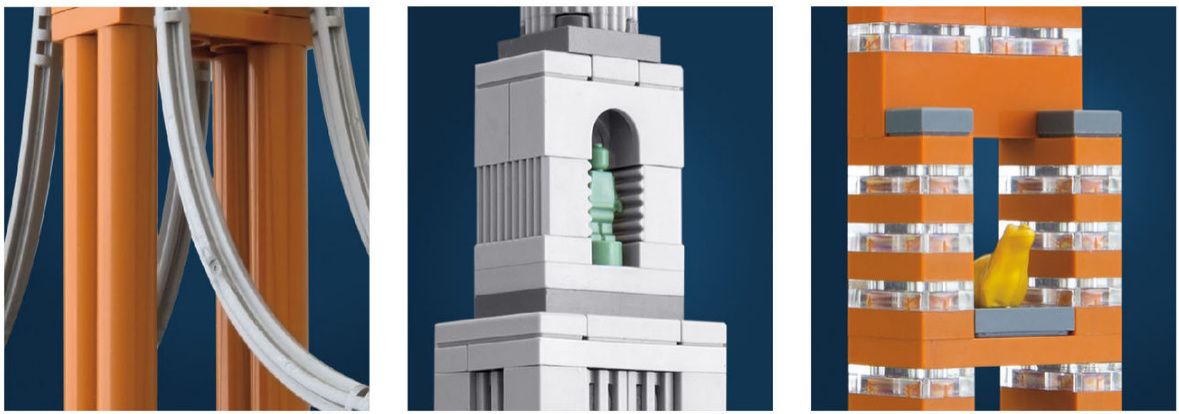
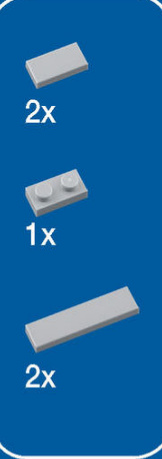
Place 1x2 “log” or palisade bricks side by side to make elegant vertical windows.
MAKE IT YOUR OWN
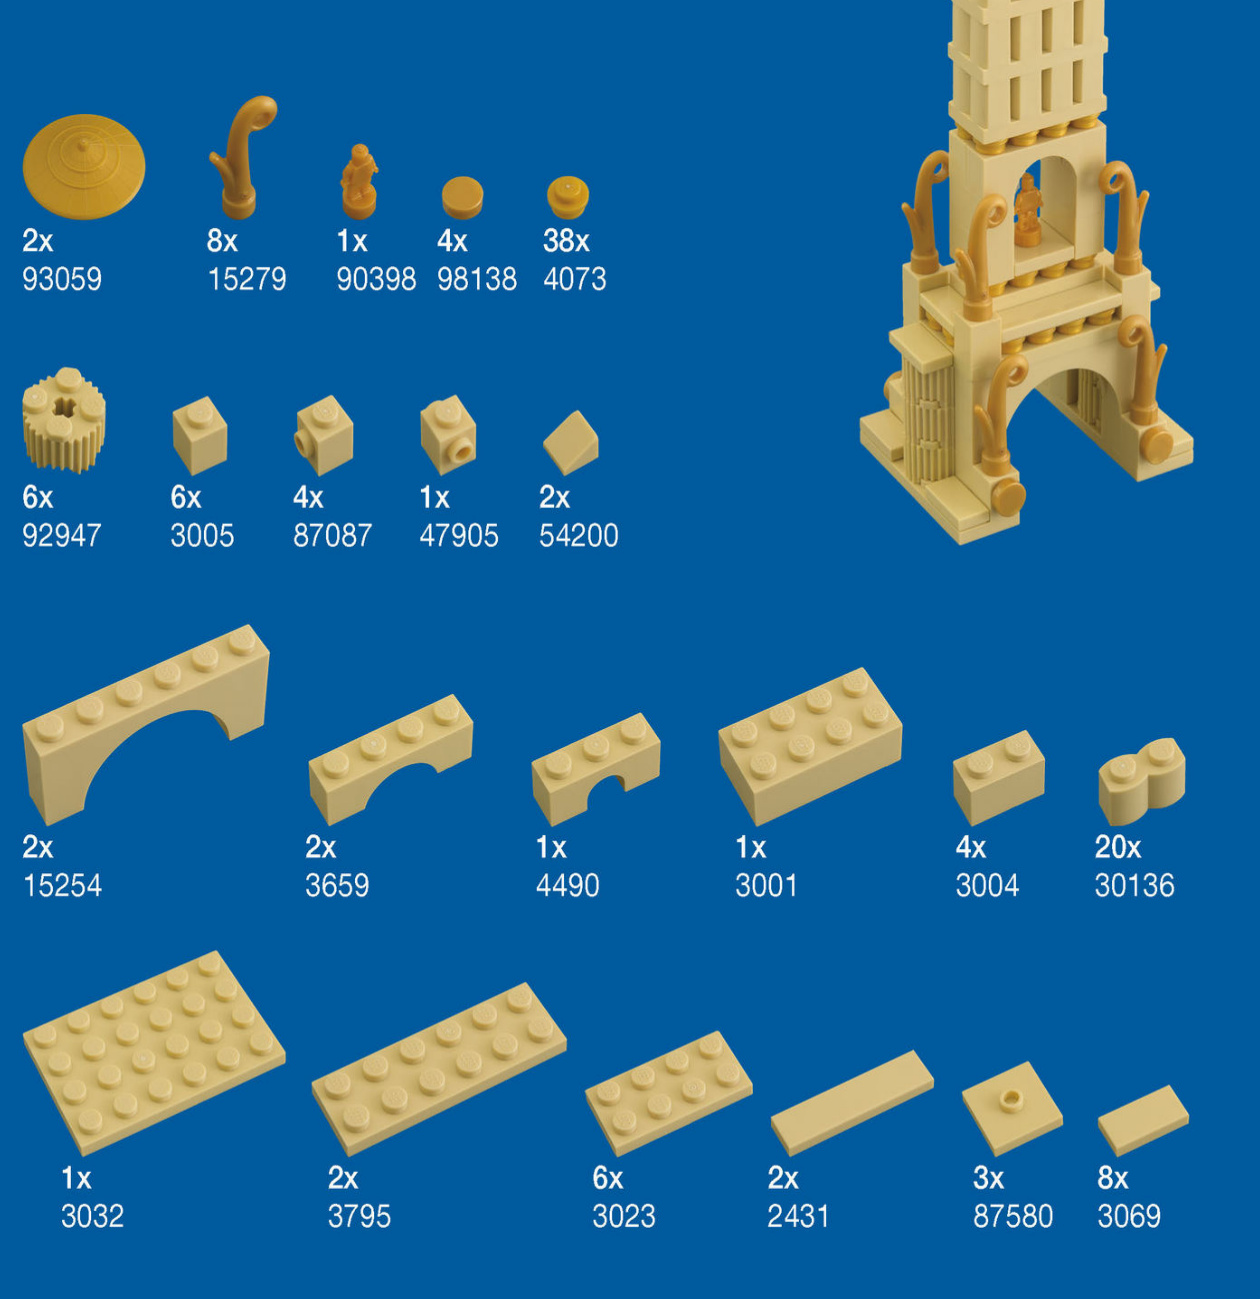
Sun Gate Estates was inspired by a 1957 Chevrolet Bel Air with all of the options. To customize this build to your taste, try swapping out the decorative pieces with the following parts. Note that you can also build the tower itself with alternate bricks.
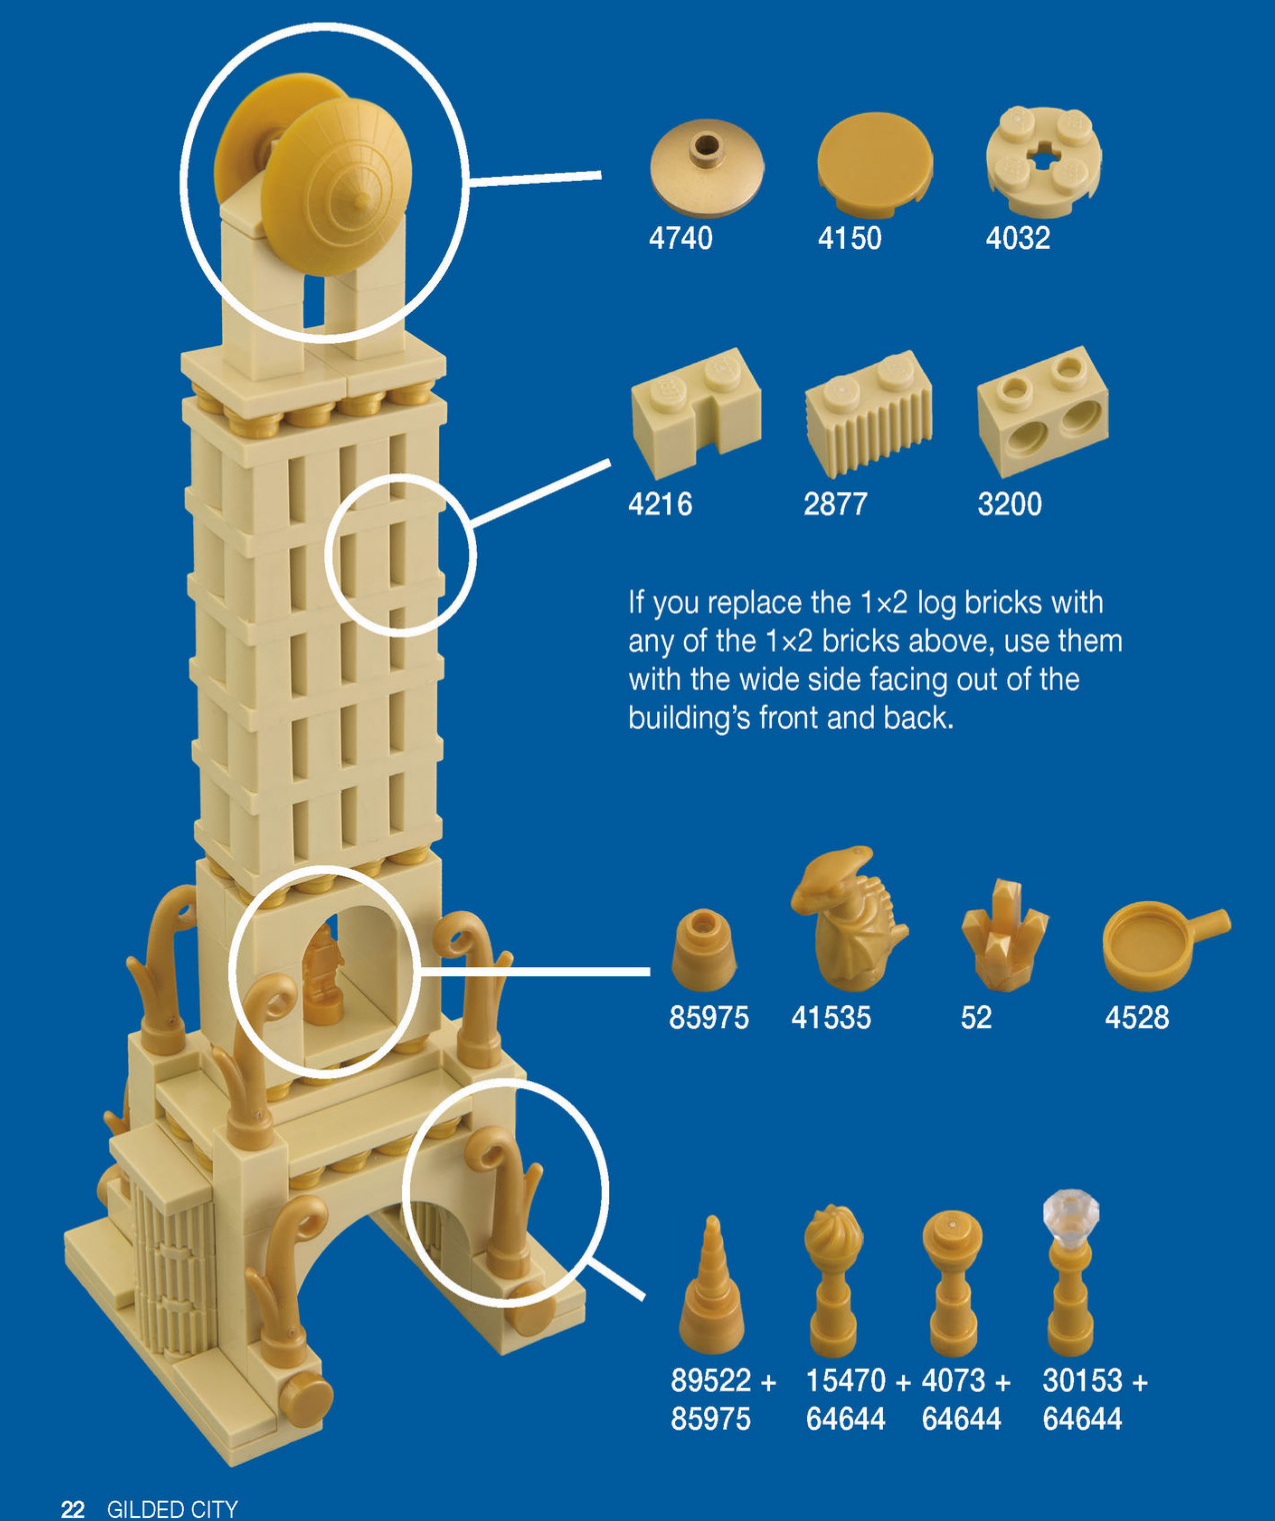
ALL THAT GLITTERS IS NOT GOLD
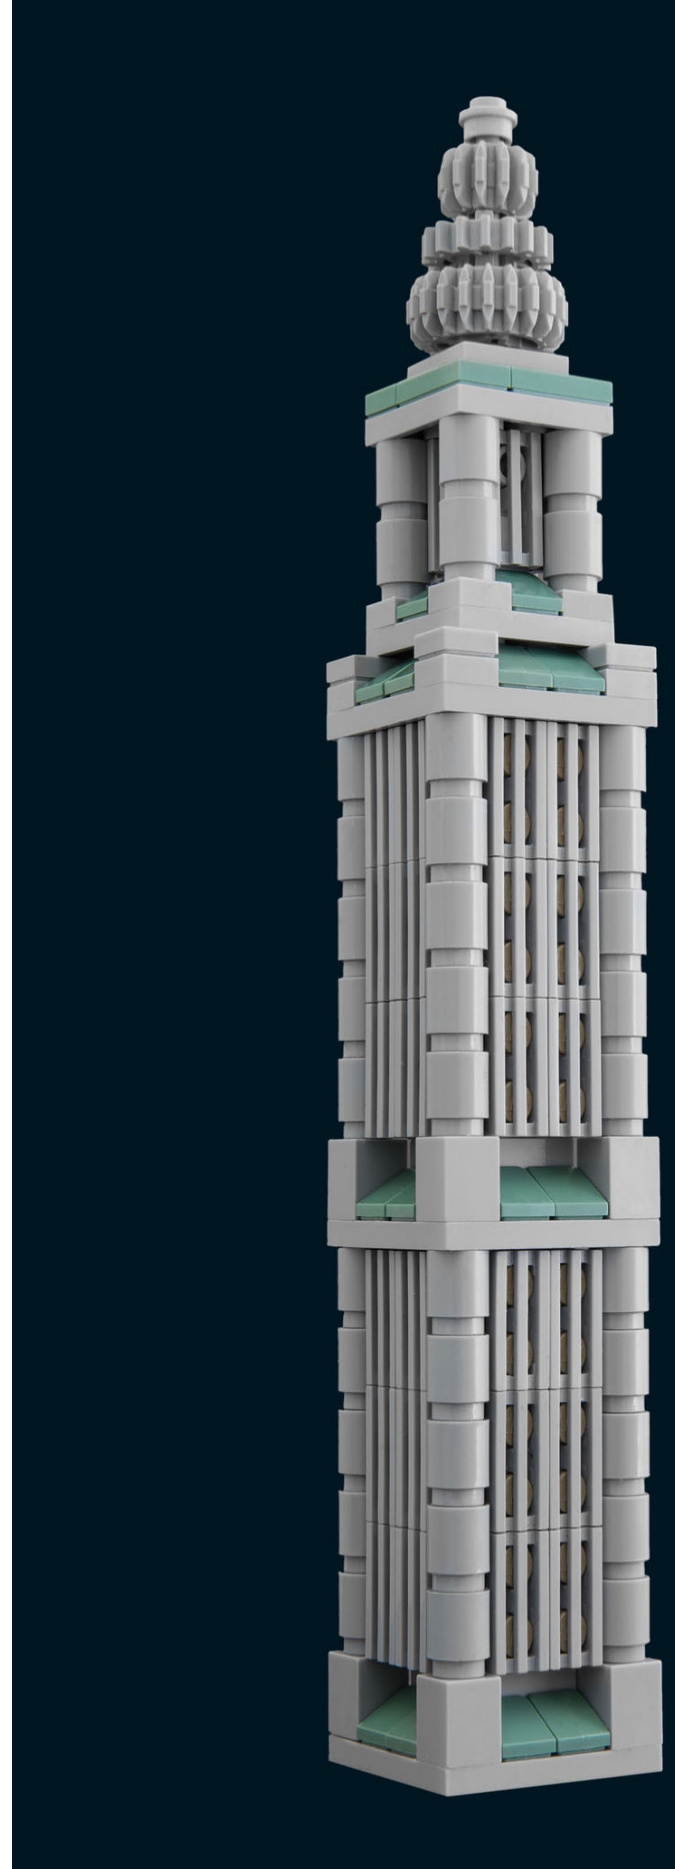
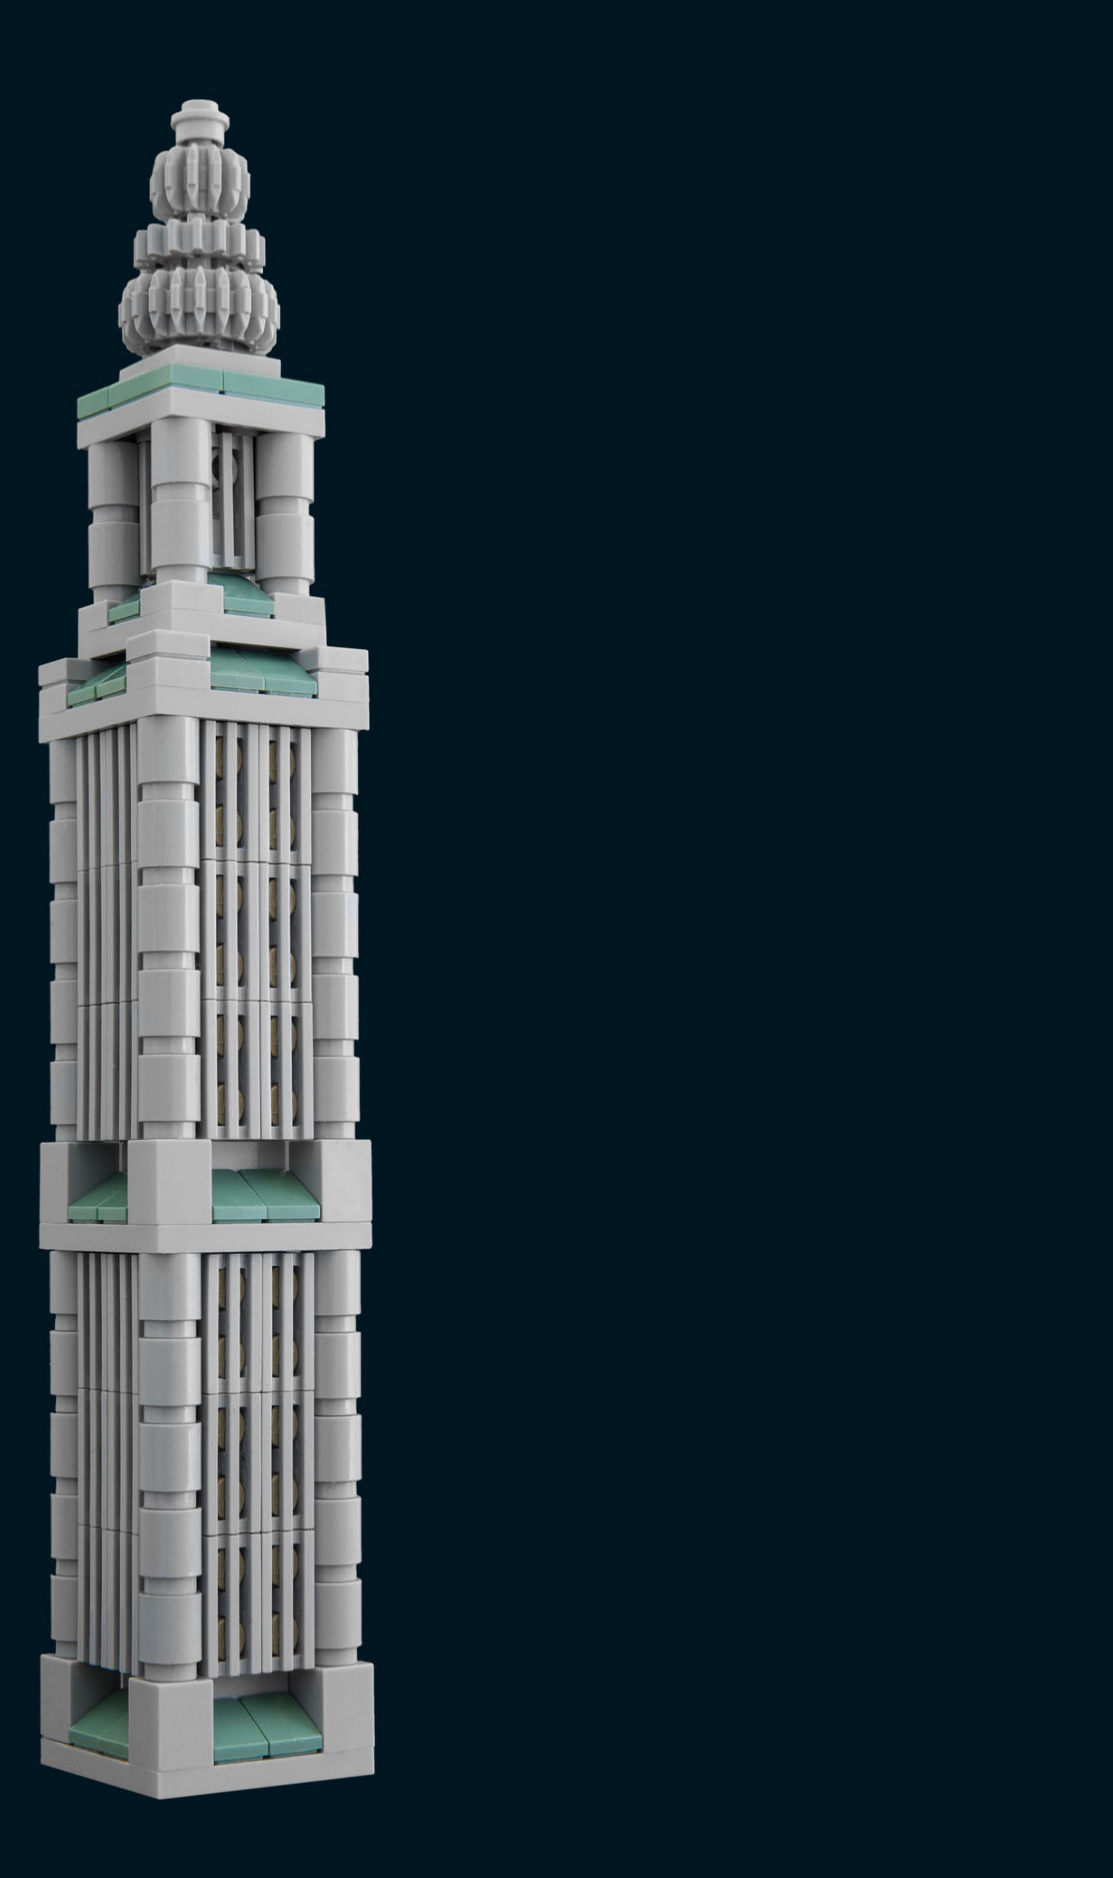
If you don’t have any special pearl gold bricks in your collection, replace the gold ornamentation with a few tan-colored round plates for a more pared-down look.
BUILD LIKE IT’S 1982
Don’t worry if you don’t own any fancy-colored bricks and haven’t bought any new parts since Yoda first lit up the big screen. You can build a retro-cool version like this using only white bricks made before 1982.
GEARHEAD TRADING CO.
The Gearhead Trading Company headquarters has a sprocket-based crown, which spins using leftover steam from the company’s many espresso machines.
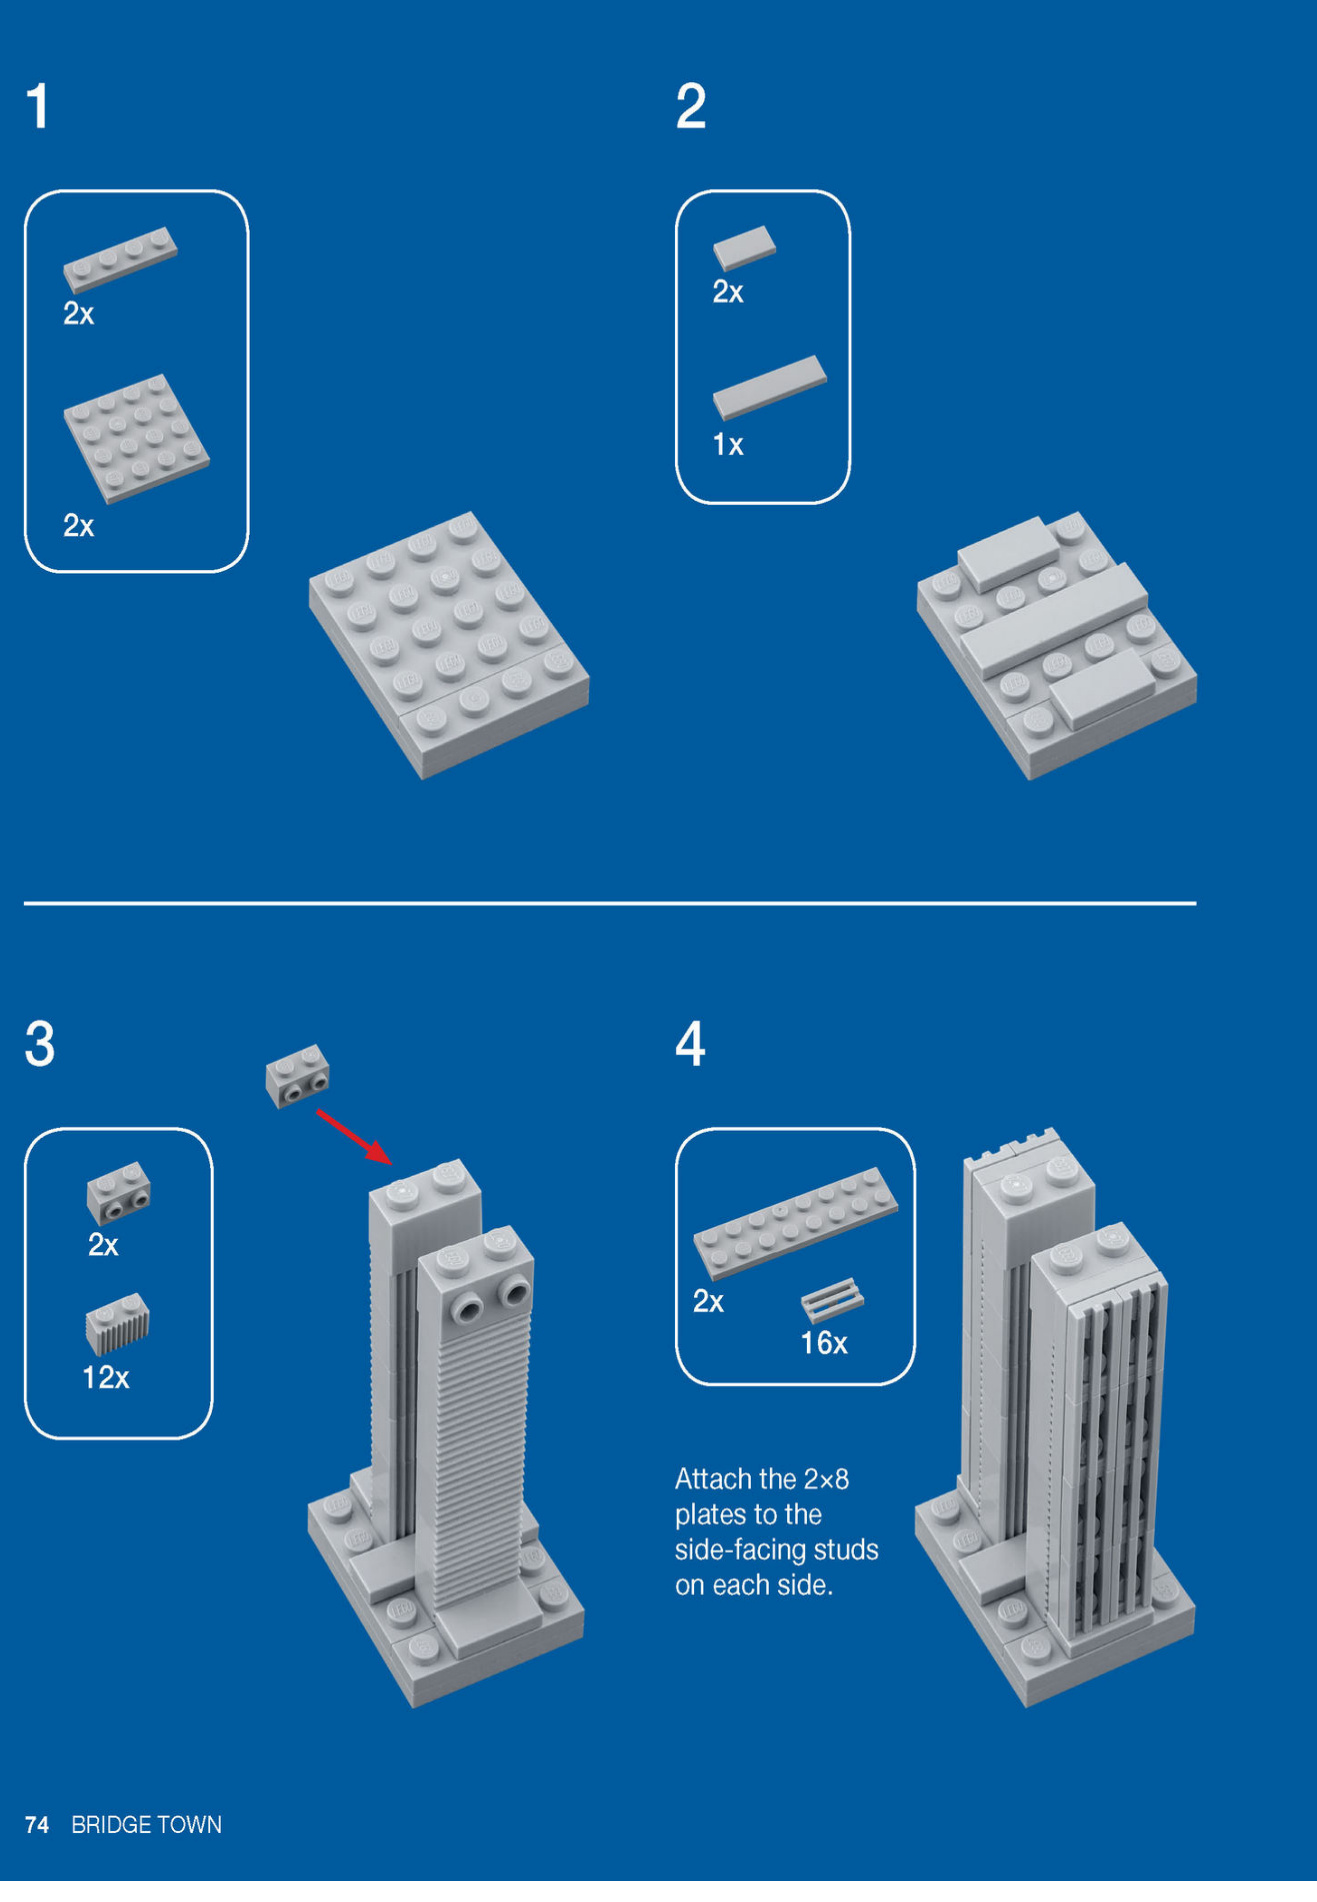
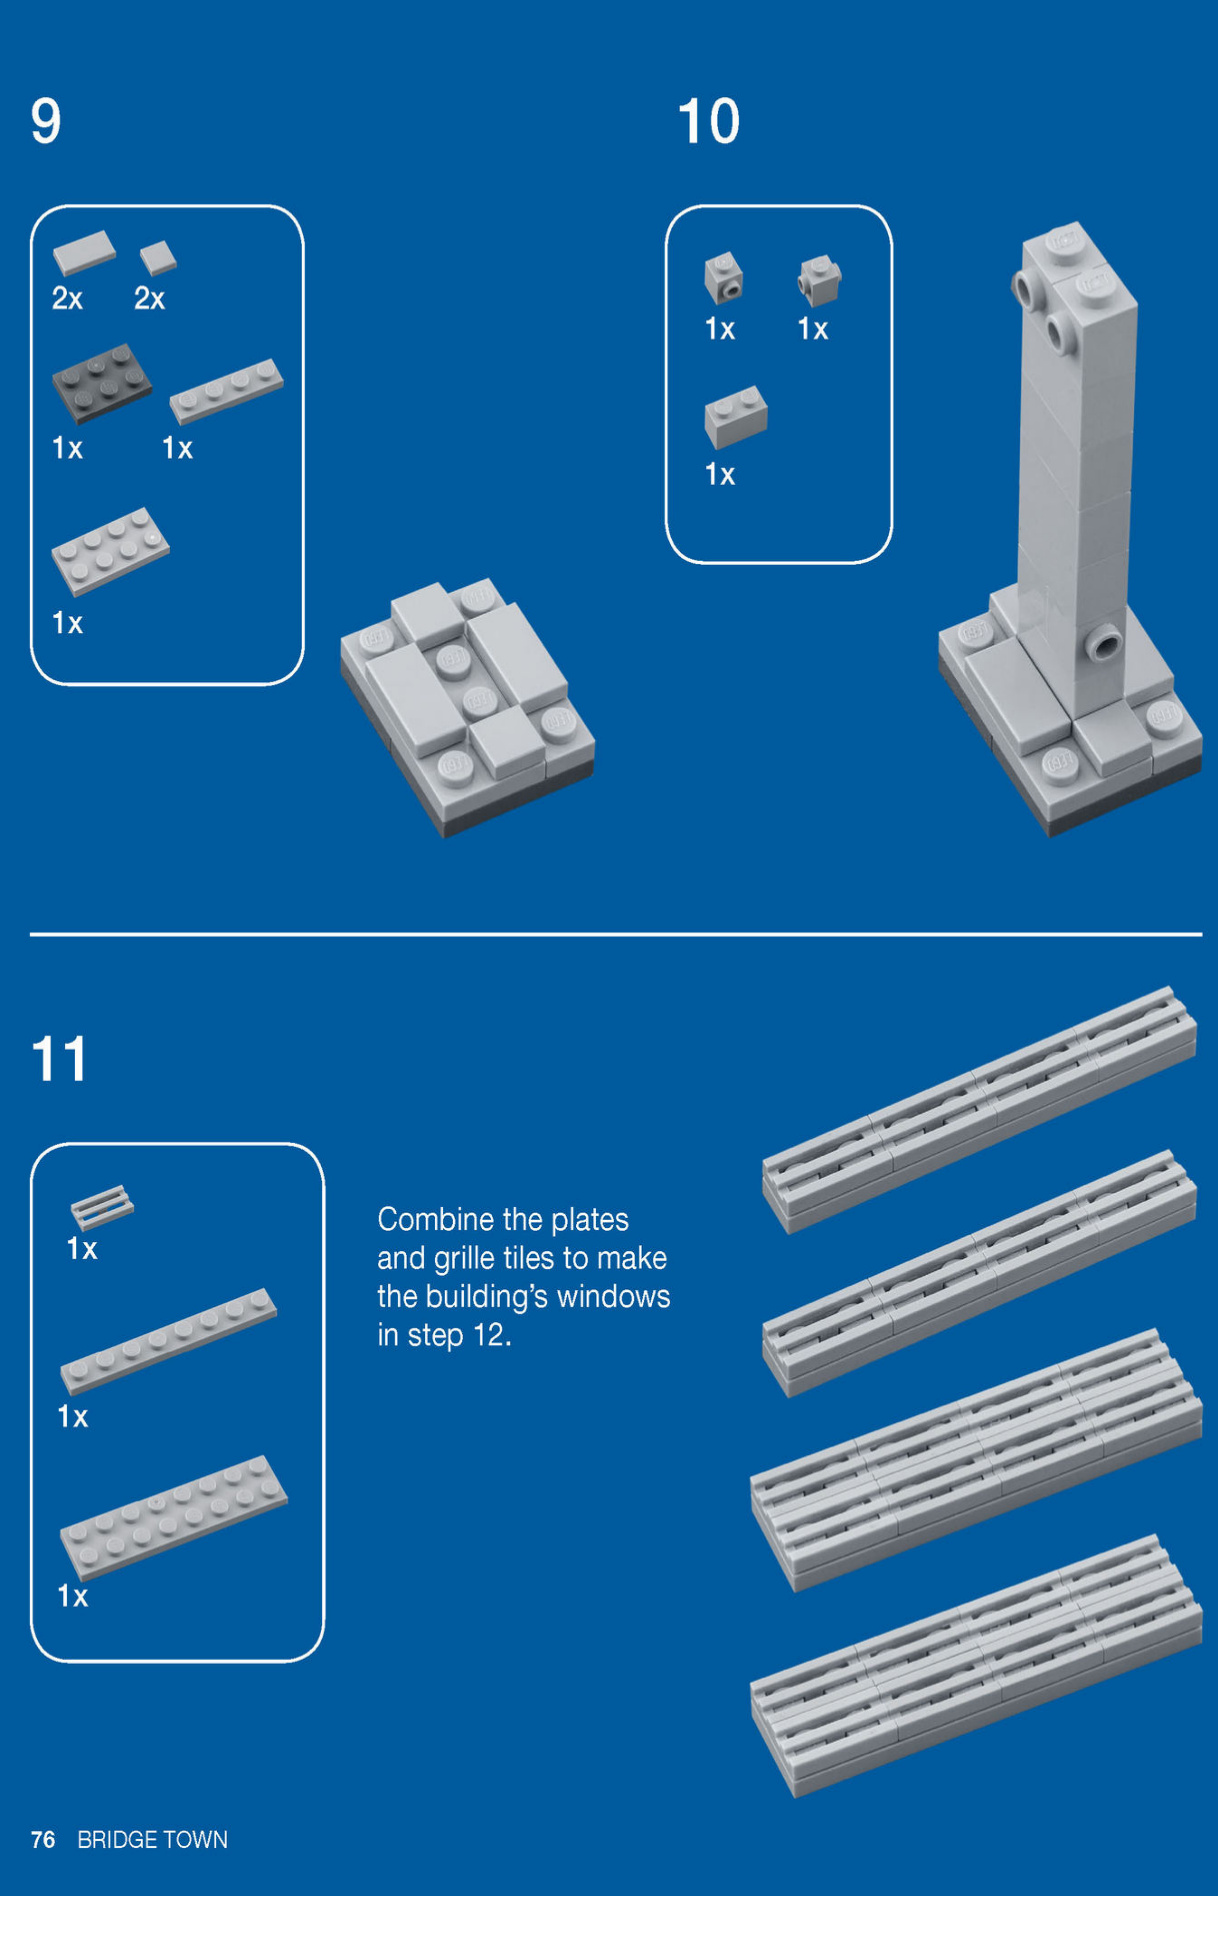
You’ll use the SNOT technique to build these microscale windows. Despite the unfortunate acronym, SNOT bricks are useful because they have one or more studs on their sides, which allow you to build outward horizontally. In this building, we use a SNOT brick to place 1x2 grille tiles on top of 2x6 plates, which we then attach to the sides of the building.
Attach the 1x2 grille tiles to the 2x6 plates, and then attach the 2x6 plates to the horizontal stud on each side of the building’s core. This results in a surprisingly strong connection that won’t loosen easily.
Here, we use dark tan plates to add a subtle color variation, but grey or black plates would be perfect substitutes.
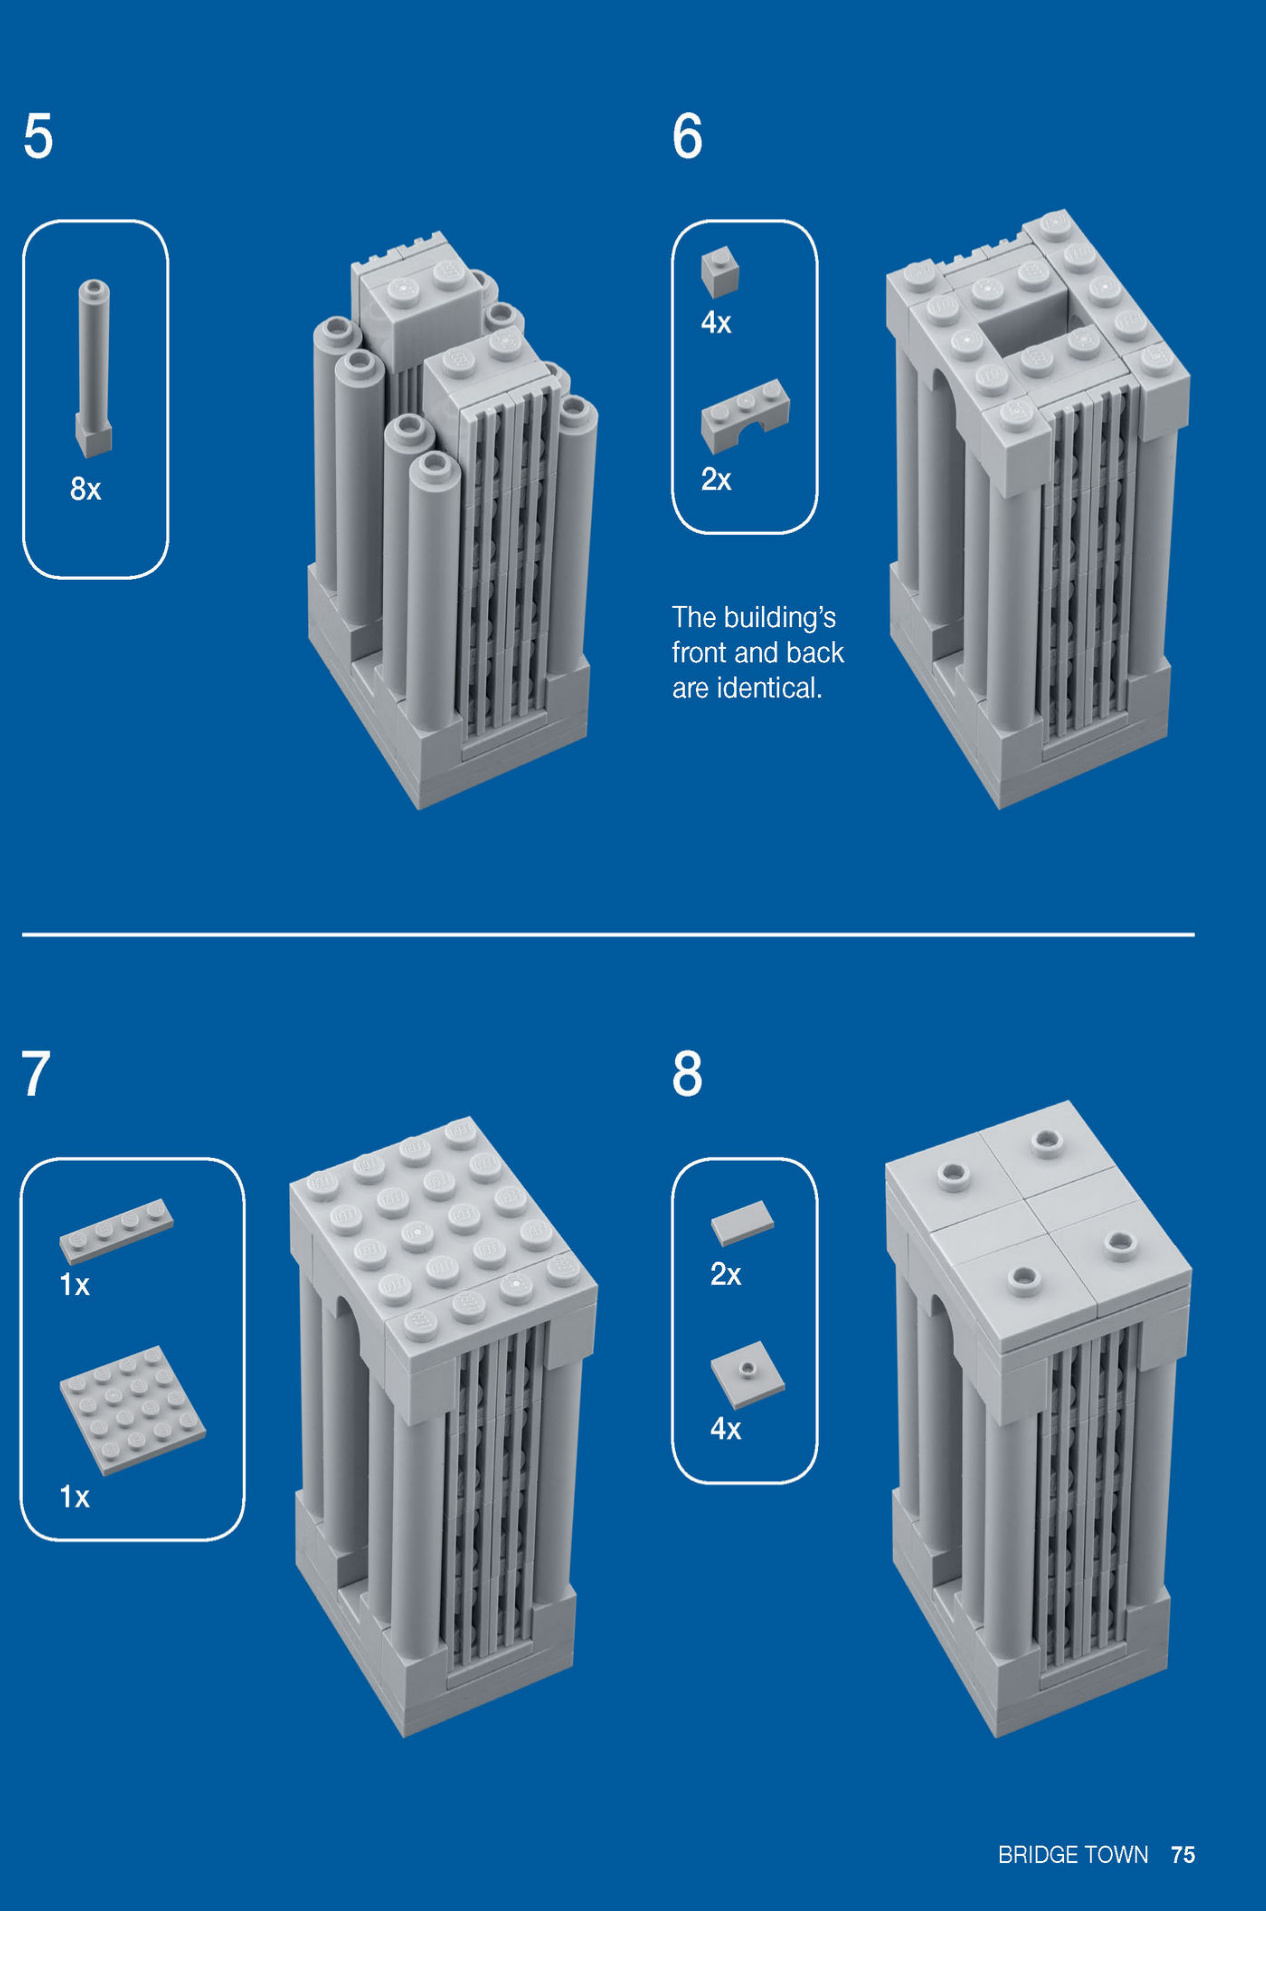
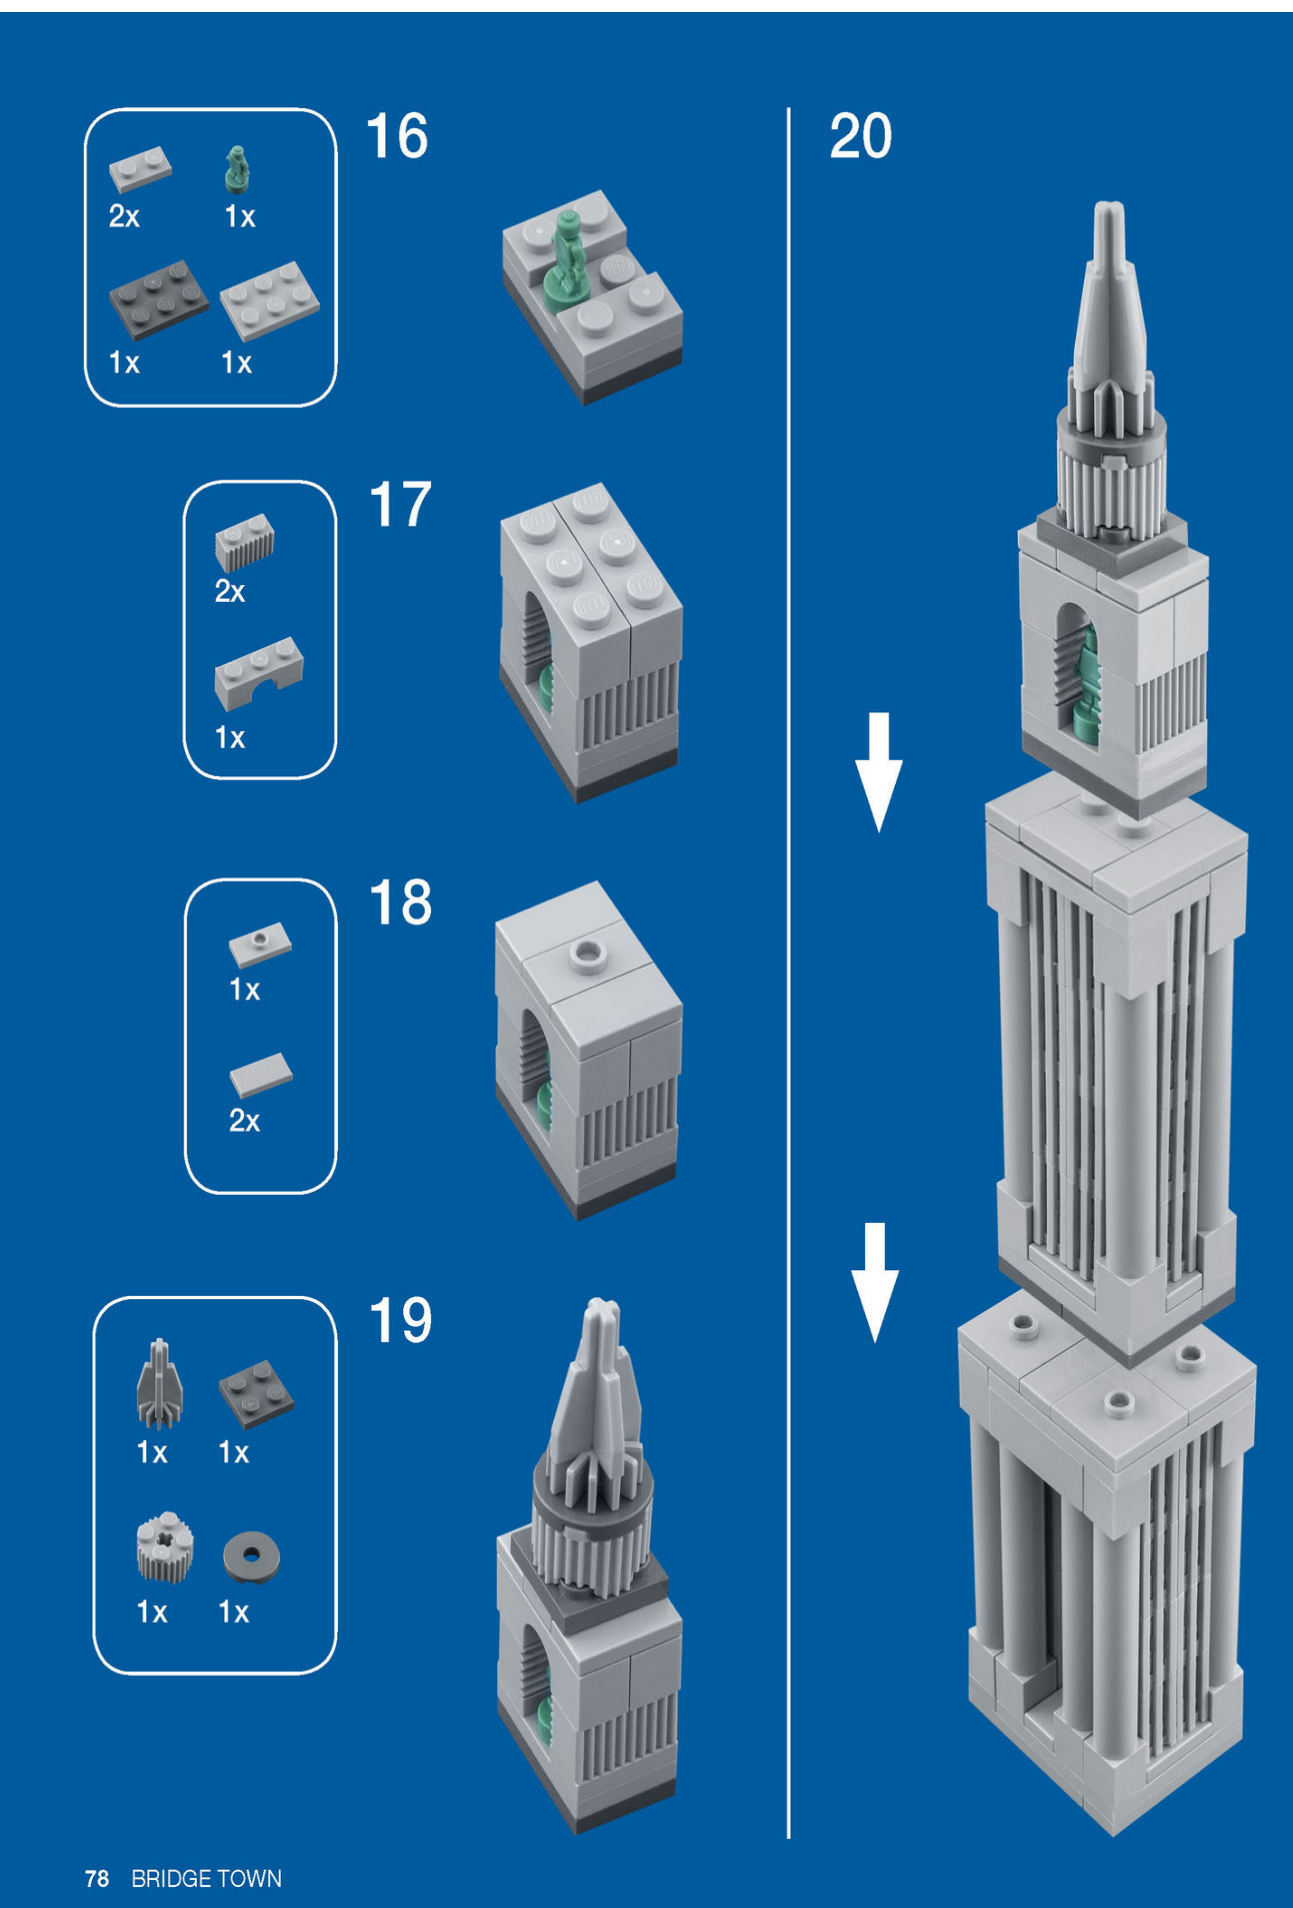
We’ll use two of the modules from step 5 in this build, but you can make your skyscraper taller by adding more modules.
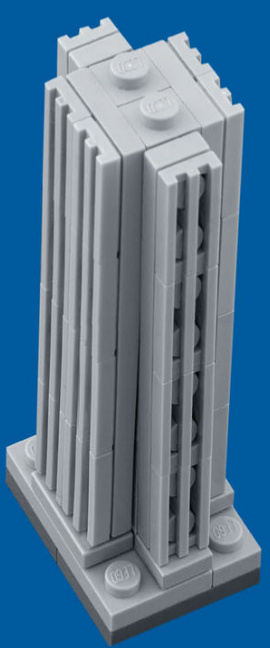
Here’s where everything comes together. Stack the three modules and behold the sight of your own skyscraper coming together.
It’s a long way down!
MAKE IT YOUR OWN
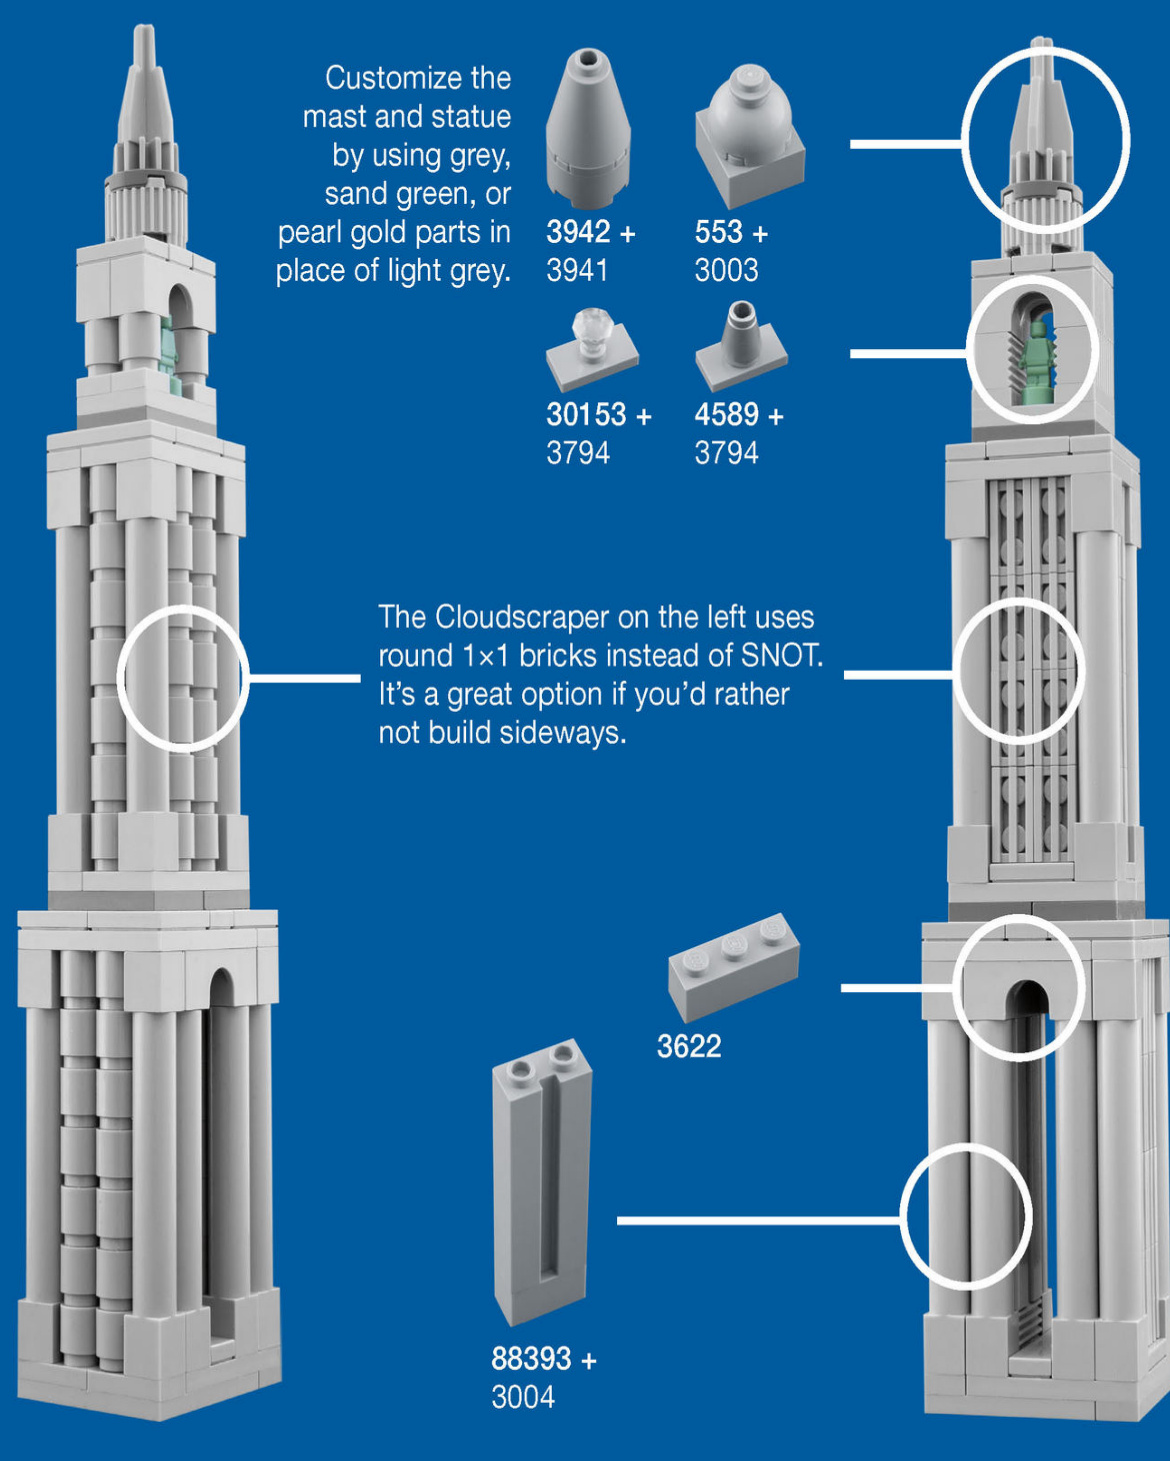
To replace the SNOT windows with a studs-up build, remove the existing 2x2 brick structure and the 1x1 slope tiles. Then stack six 1x2 log bricks or 1x2 bricks with grille where the slope tiles used to be.
Stack plain old 1x1 bricks to replace the 1x1 round bricks and make angular columns instead. To add even more texture, try 1x1 round plates. If you don’t have enough bricks to stack, simply use 1x1x6 solid pillars.
MAKE IT YOUR OWN
You can use light grey, dark grey, or black slope bricks in place of sand green ones.
Replace the 1x4 fence bricks with thicker columns made of 1x1 round bricks for a more substantial look.
UPPER BRICK SIDE
The true sign of a civilized city is not its buildings, but rather a place where no buildings stand: the public park. The best cities always have a spot where their citizens can retreat to a pocket of the natural world and relax under the open skies. Those who have the foresight to set aside valuable city land for public parks give a gift to every generation that follows.
Adding a public park to your LEGO micro city is as easy as laying down a few green plates to represent grass. The park will provide some breathing room for your constructions in the same way that negative space is important to a painting’s composition. Parks also provide refreshing color contrast against neutral-colored buildings.
One side effect of public parks is that they tend to drive up the real estate values of nearby properties, sometimes to stratospheric heights. This micro city is inspired by the opulent apartment buildings that surround New York City’s Central Park like a baroque castle wall.
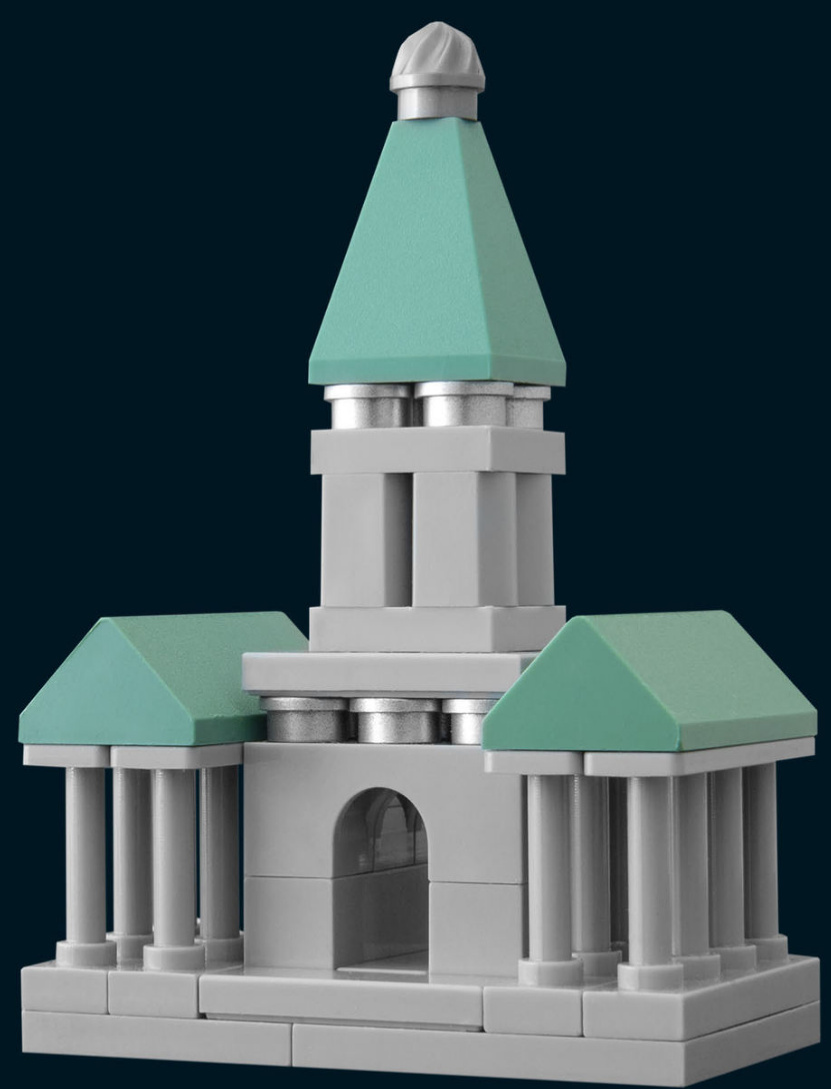
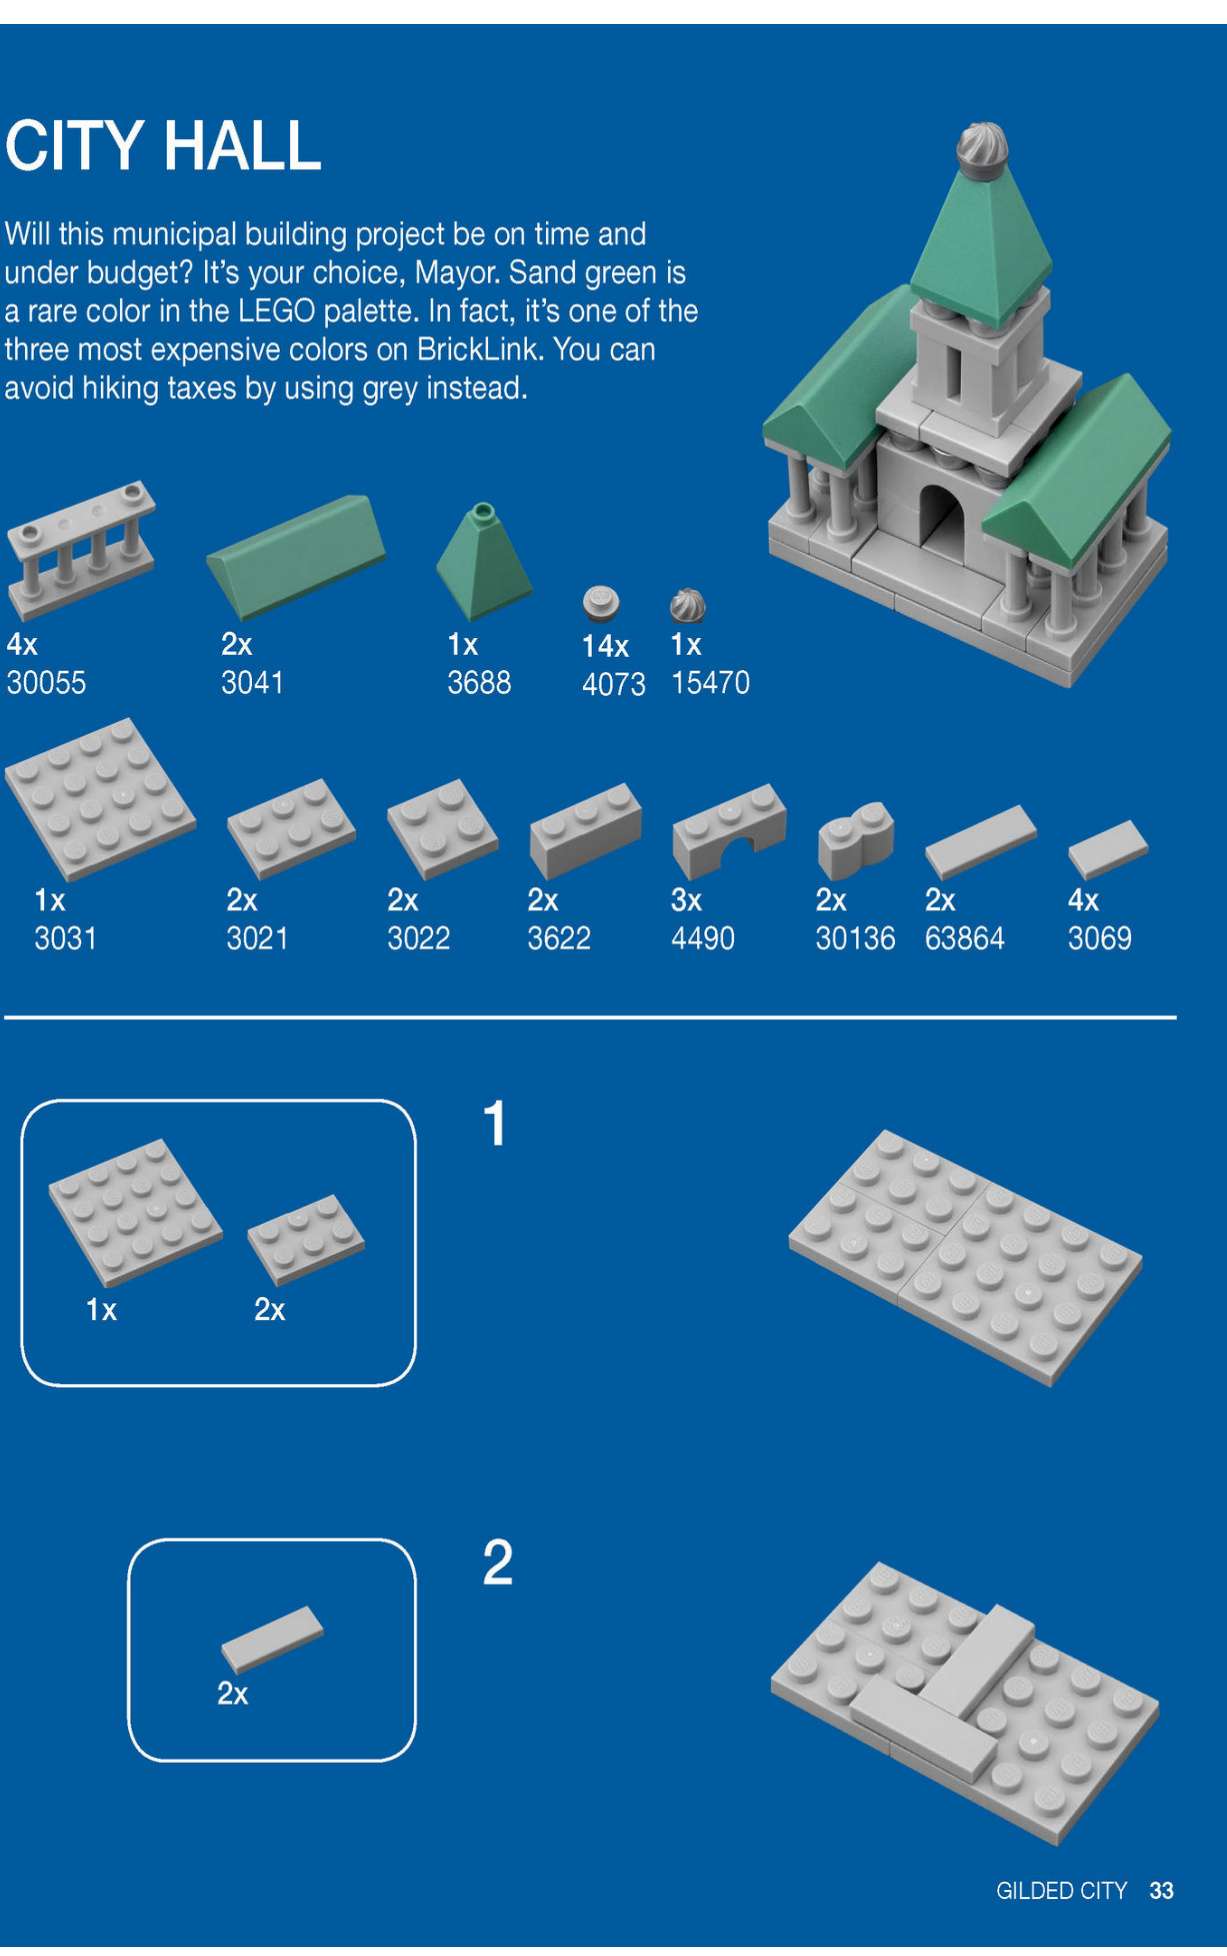
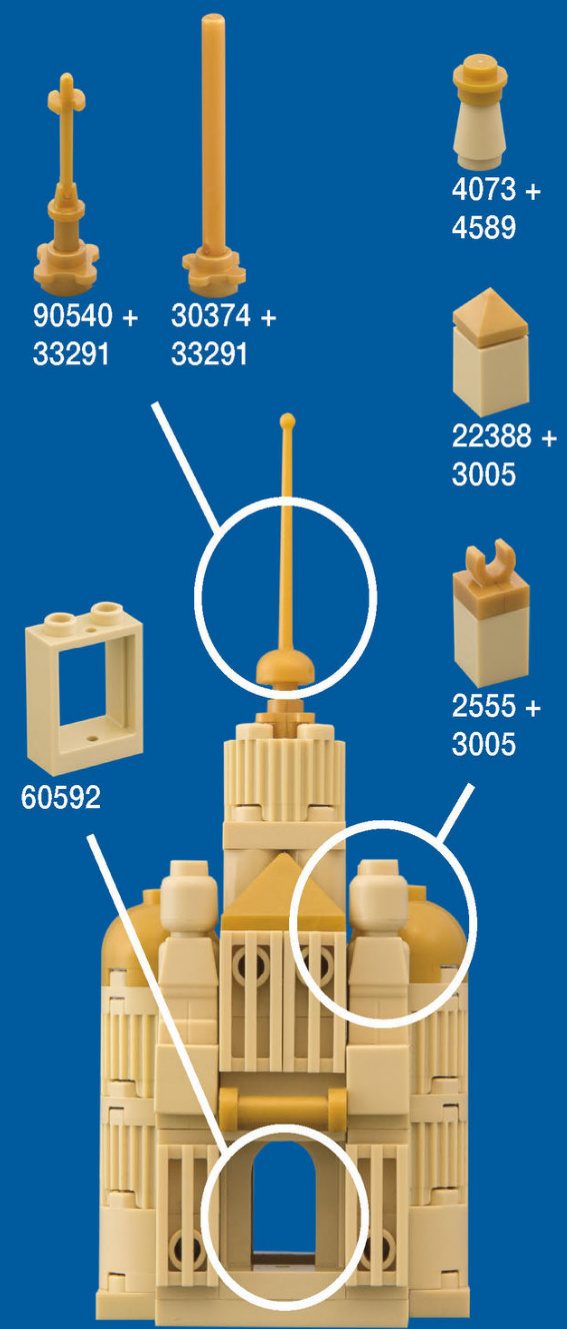
BRICK TEMPLE

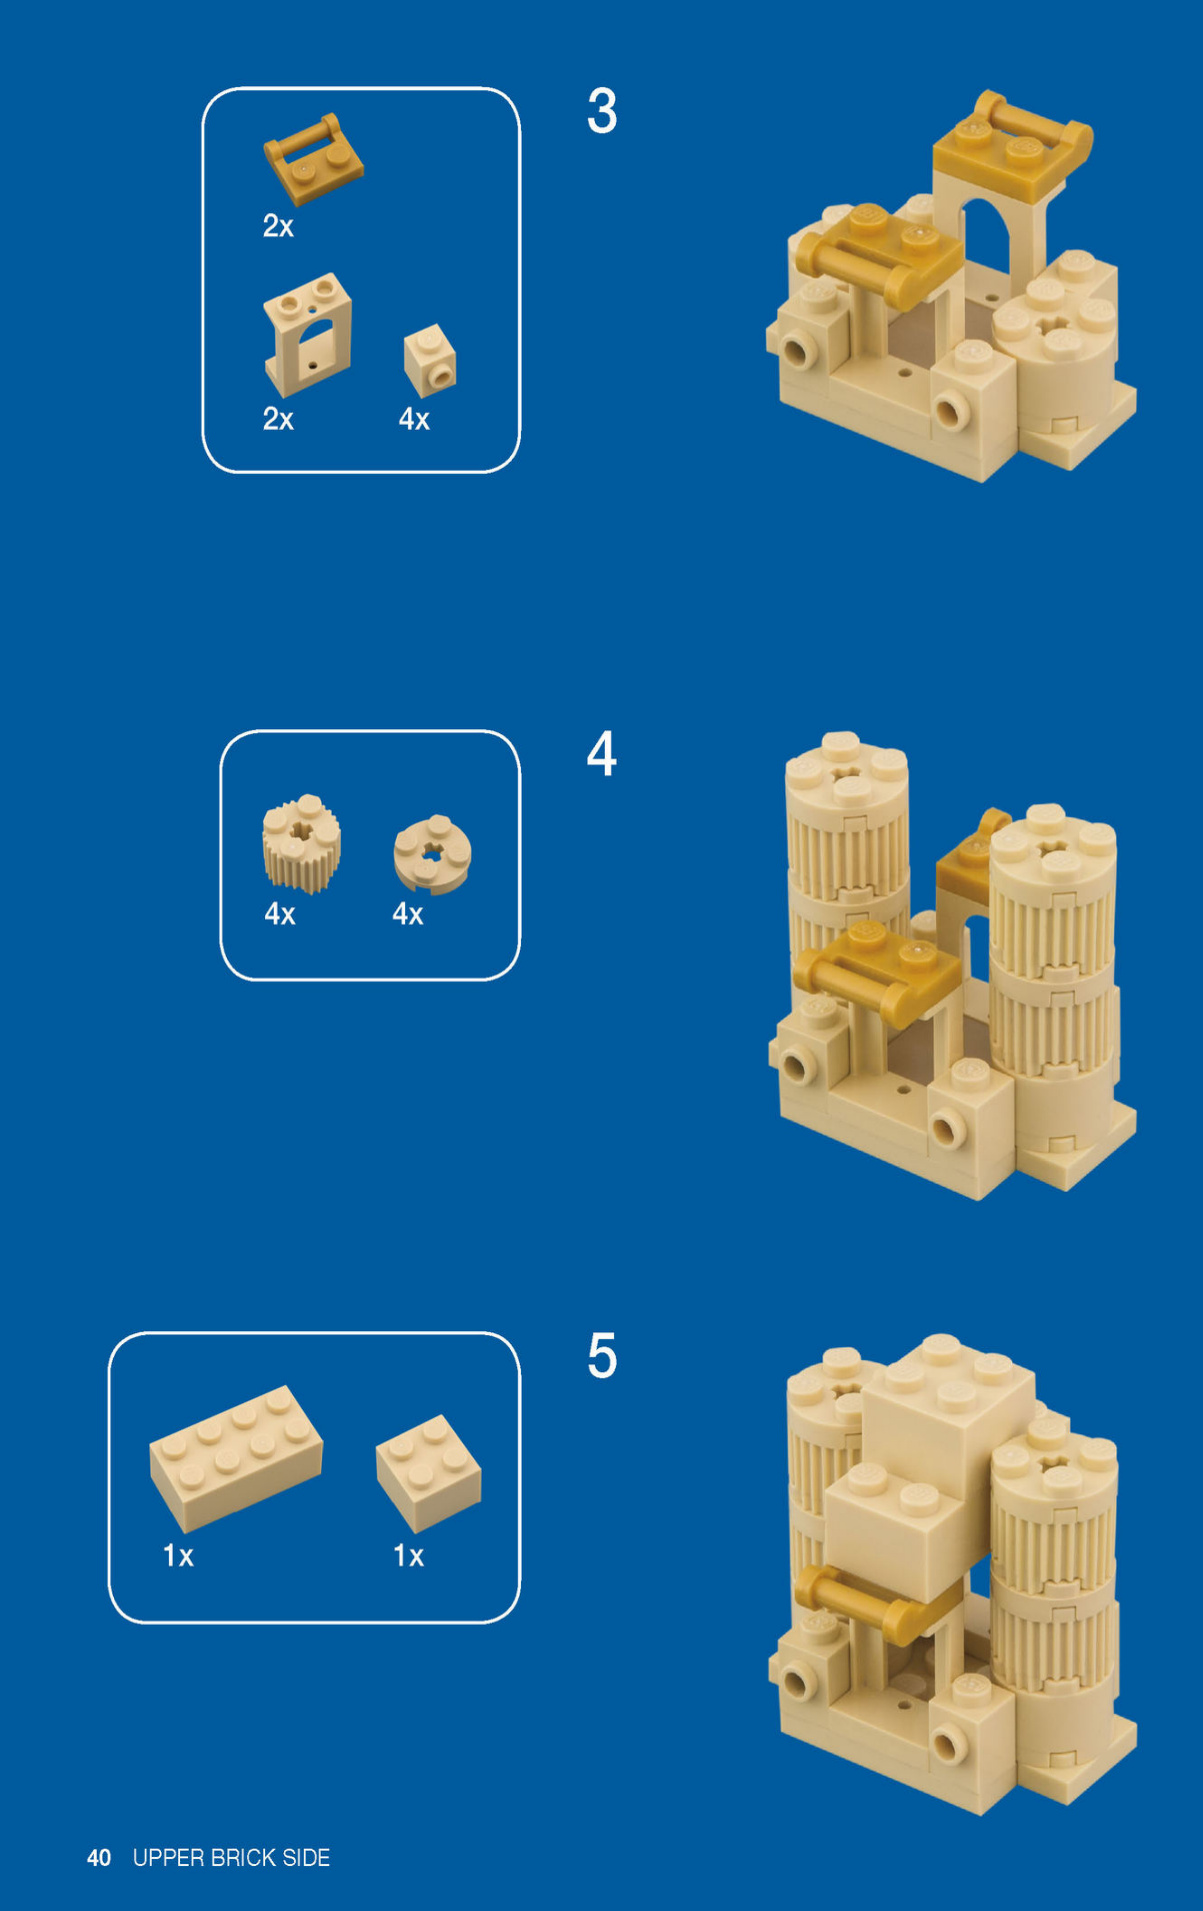
Attach the grille tiles and 1x1 tiles to the SNOT bricks as shown. The Brick Temple’s front and back are identical, as are its sides.

MAKE IT YOUR OWN
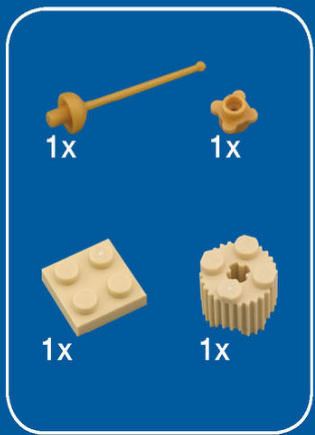
You can use minifigure accessories, such as fencing sabers and ski poles, to re-create intricate temple spires, but a plain bar works just as well.
If you don’t have the microfigures used here as statues, try regular 1x1 bricks topped with clips or round tiles instead.
BUILDING BIG IN MICROSCALE
Just because you’re building in microscale doesn’t mean you can’t make something awe inspiring. Apply the same techniques used for the Brick Temple to build this Mega Brick Temple. Just add more bricks as you see fit.
If you’re limiting the city to a 20x20 stud base, remember not to exceed 20 studs in length with this build!
The Mega Brick Temple uses just three extra parts that aren’t in the original Brick Temple. Can you find them?
Hint: They are stacked on top of one another.
THE FALCON’S ROOST
The Falcon’s Roost has a purposely built nesting niche for red-tailed hawks in its cupola. The hawks keep the rats away, but they do attract birders with big binoculars.
Stacking headlight bricks creates convincing square window frames for microscale buildings.
Staggering the bricks helps strengthen the wall.
Make two stacks and then attach each one to the top of a doorframe to create the windows.
MAKE IT YOUR OWN
You can customize the window stacks by using different modified plates between the headlight bricks. Two great choices are the 1x2 plate with door rail (part #32028) and the 1x2 plate with a free-ended handle (part #2540).
The 1x2 plate with door rail provides a simple windowsill for an austere building.
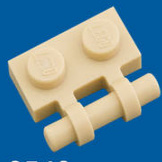
The 1x2 plate with a free-ended handle evokes carved stonework for an expensive or old-fashioned building.
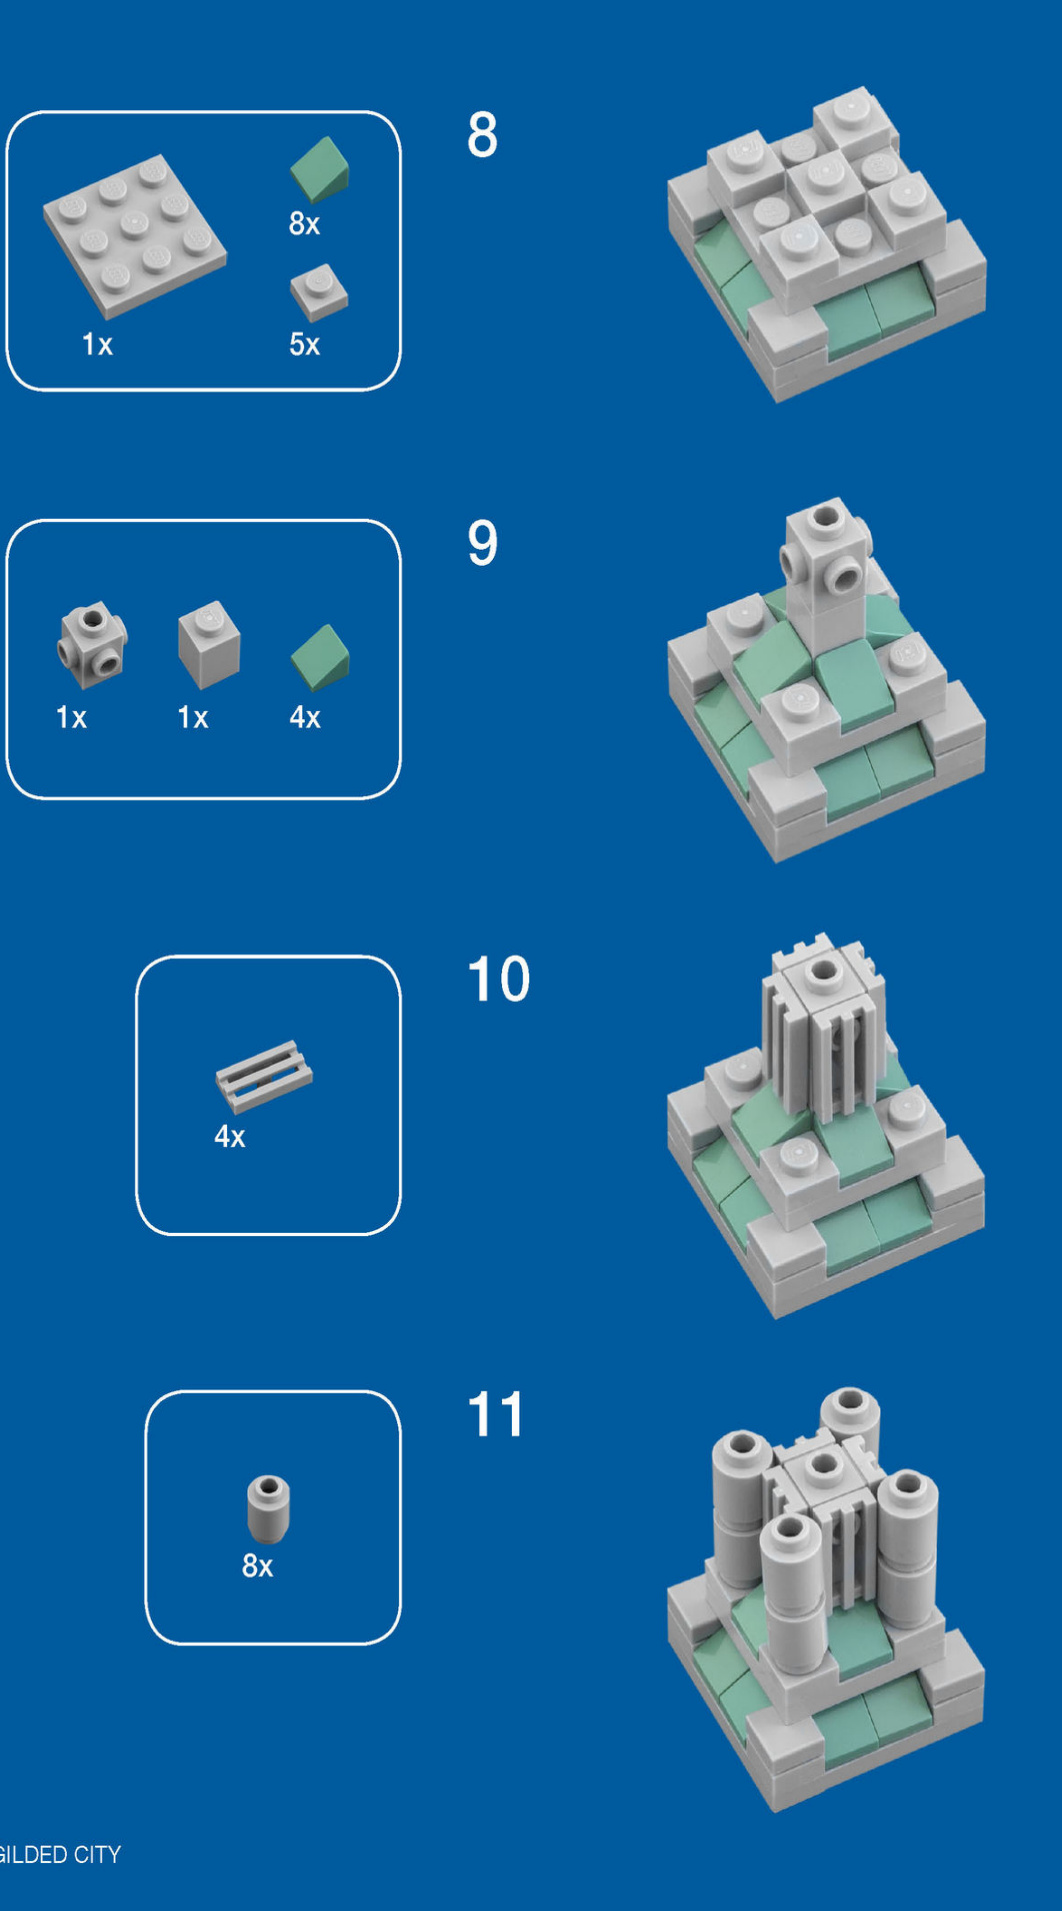
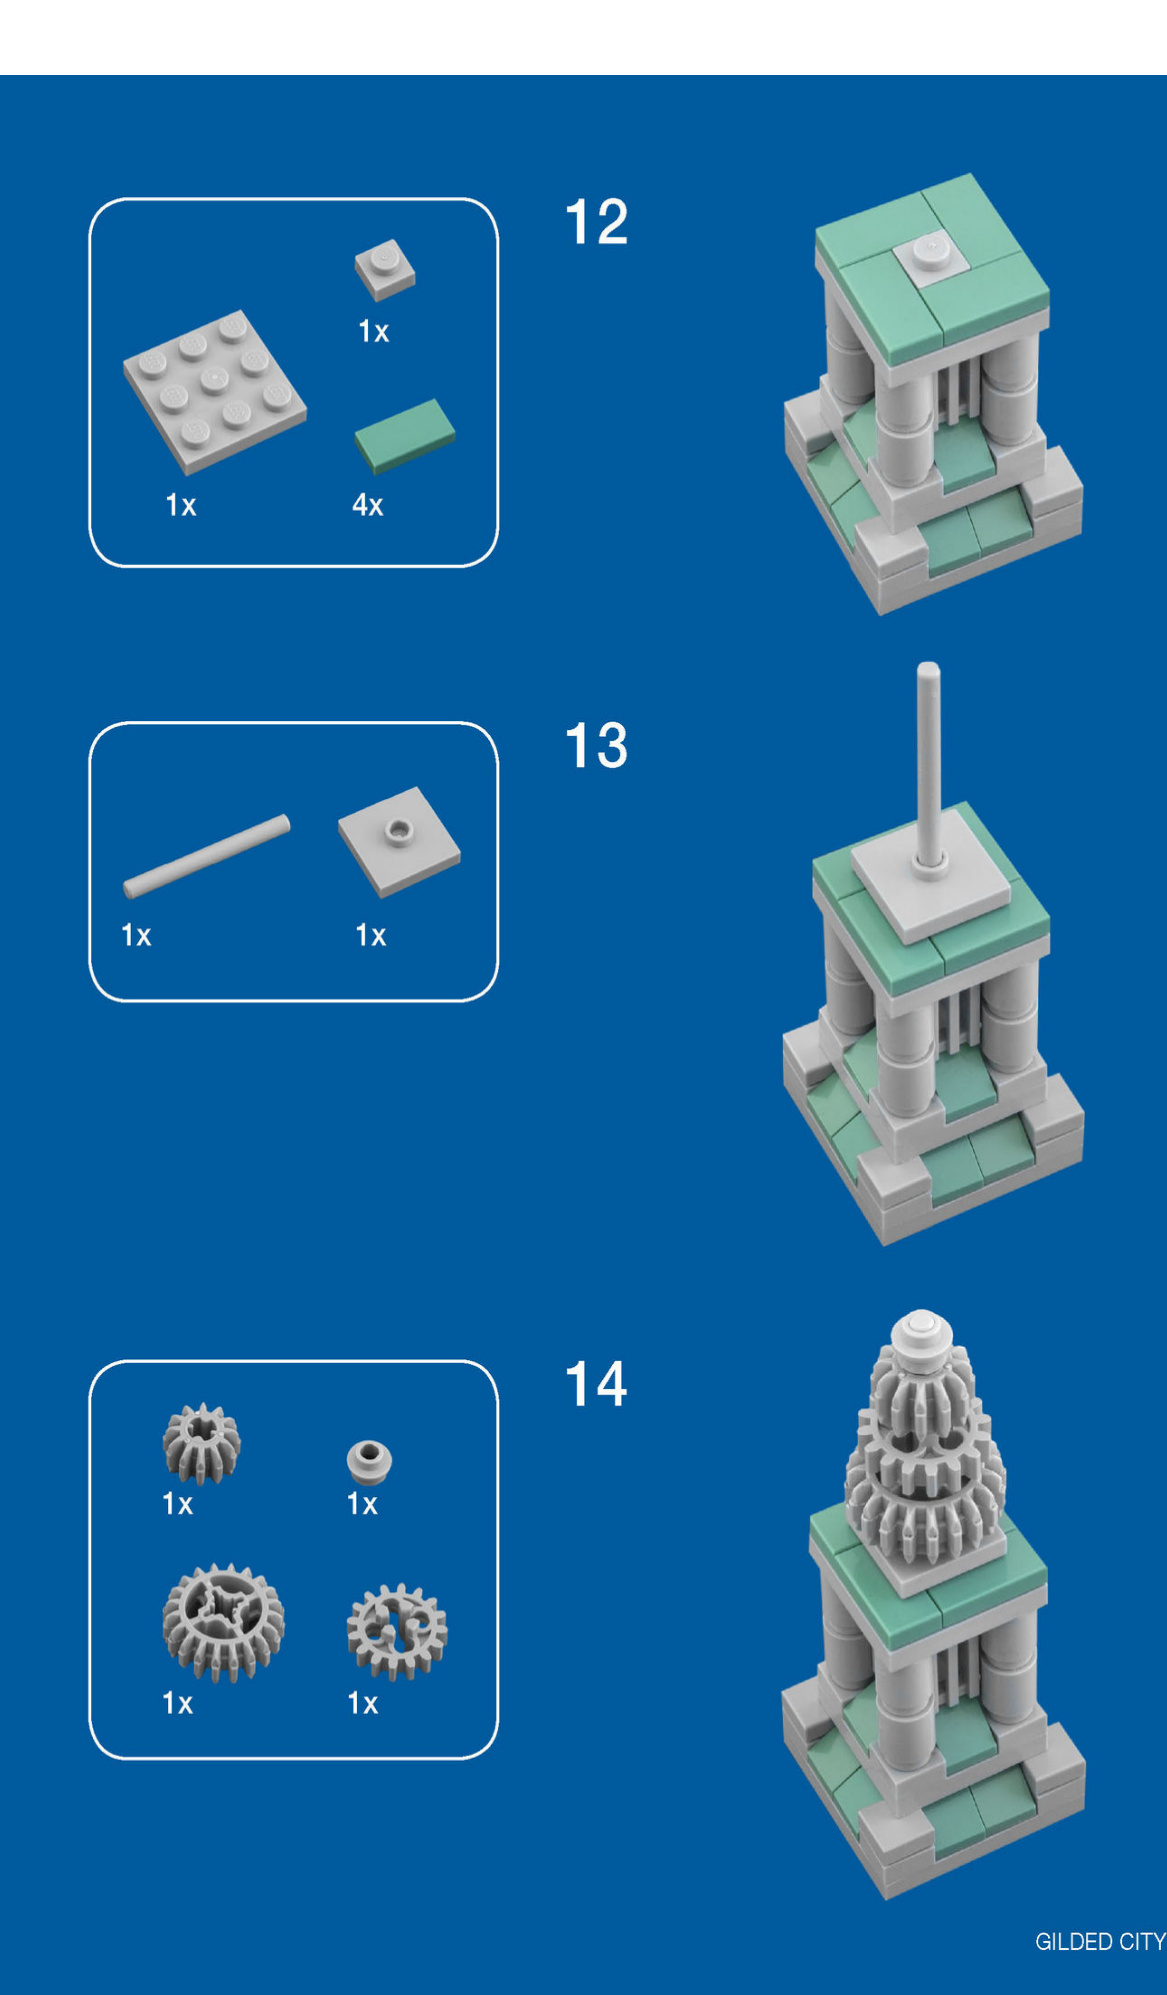
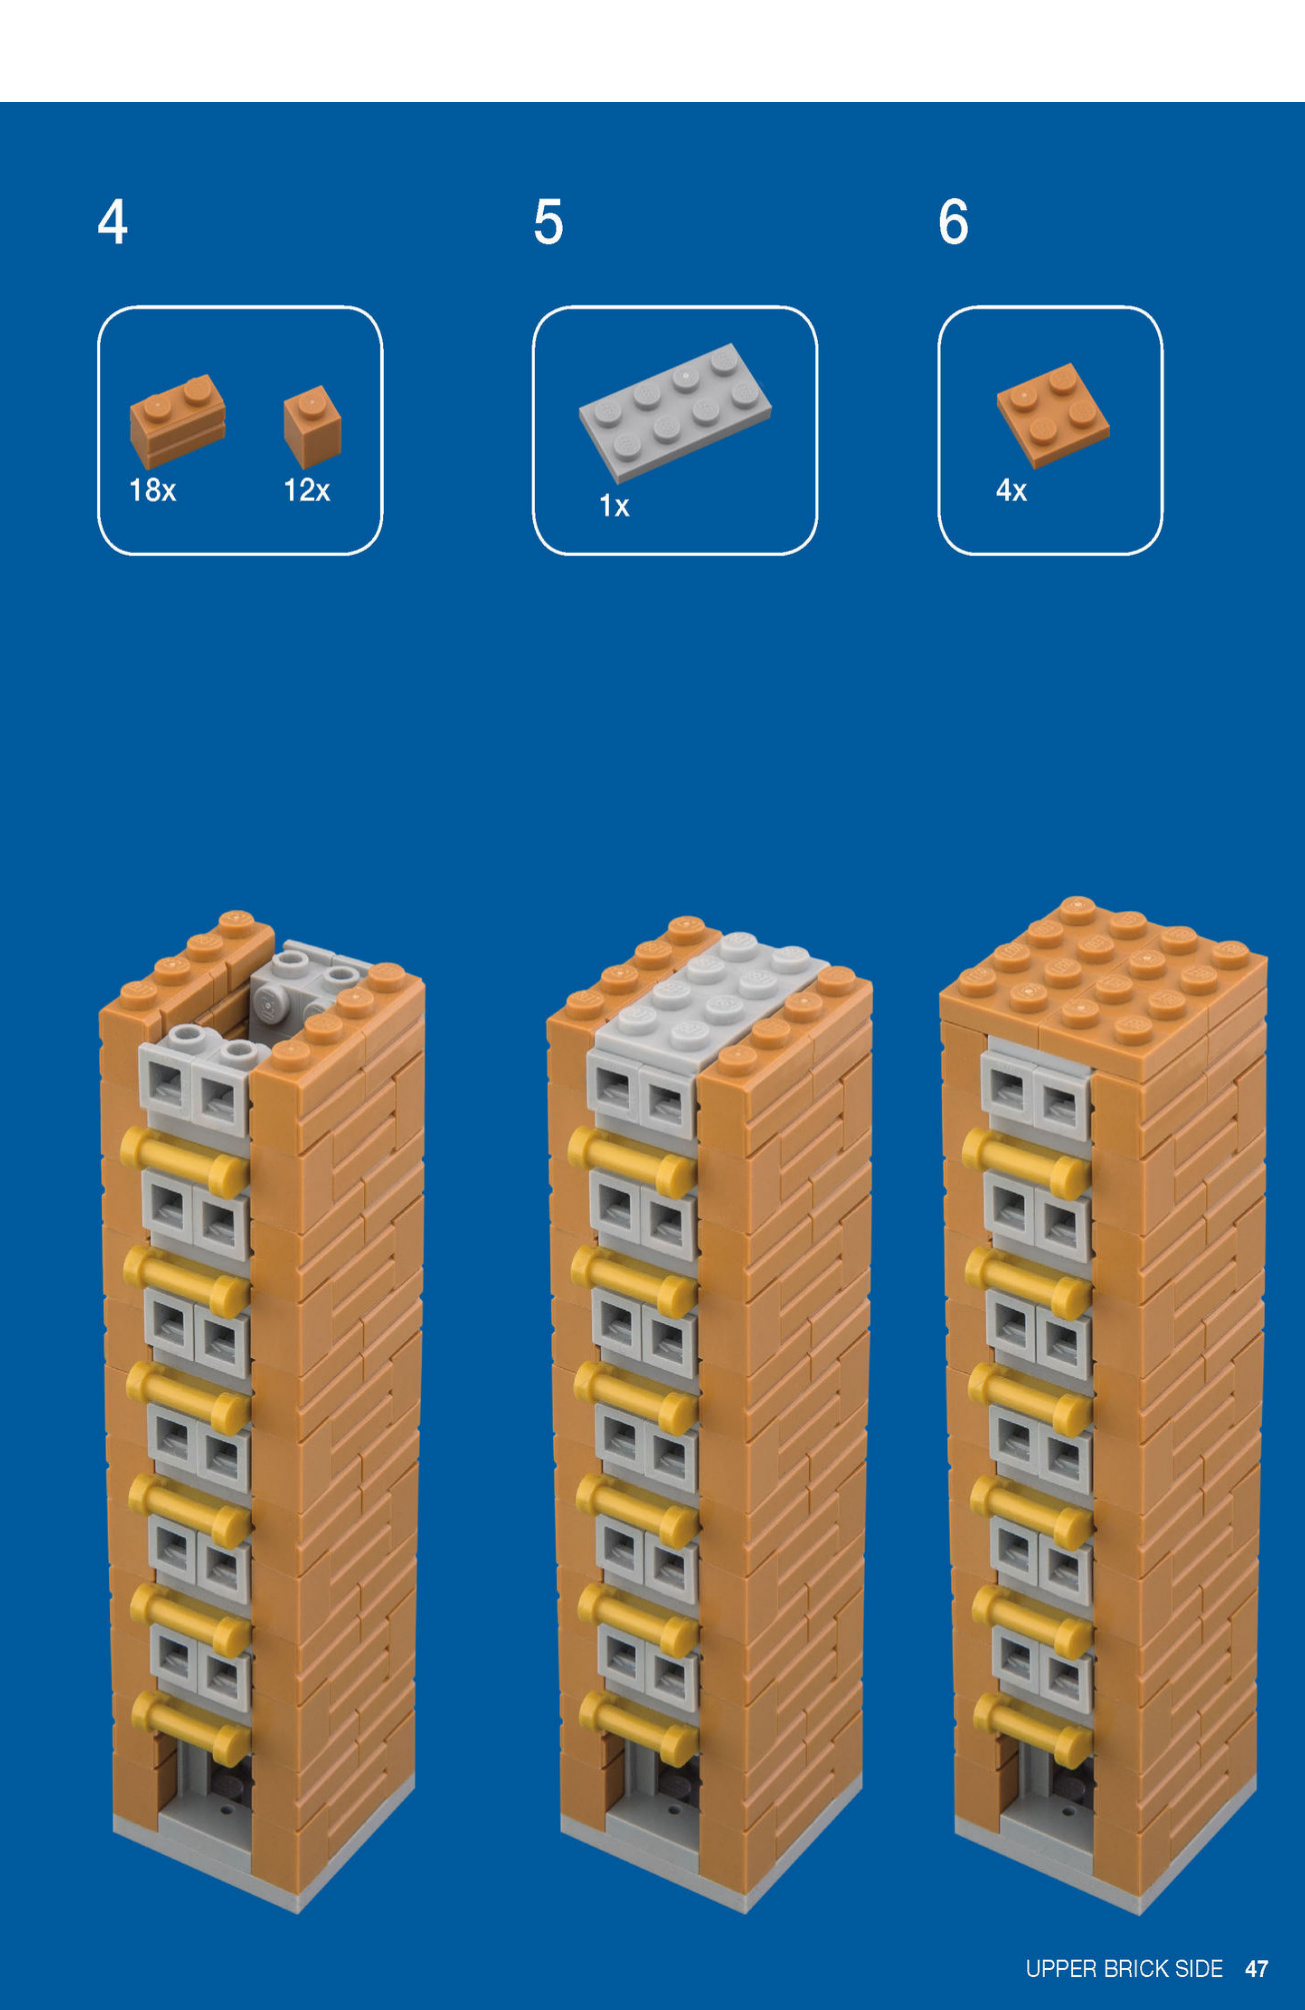
CROWNING GLORY
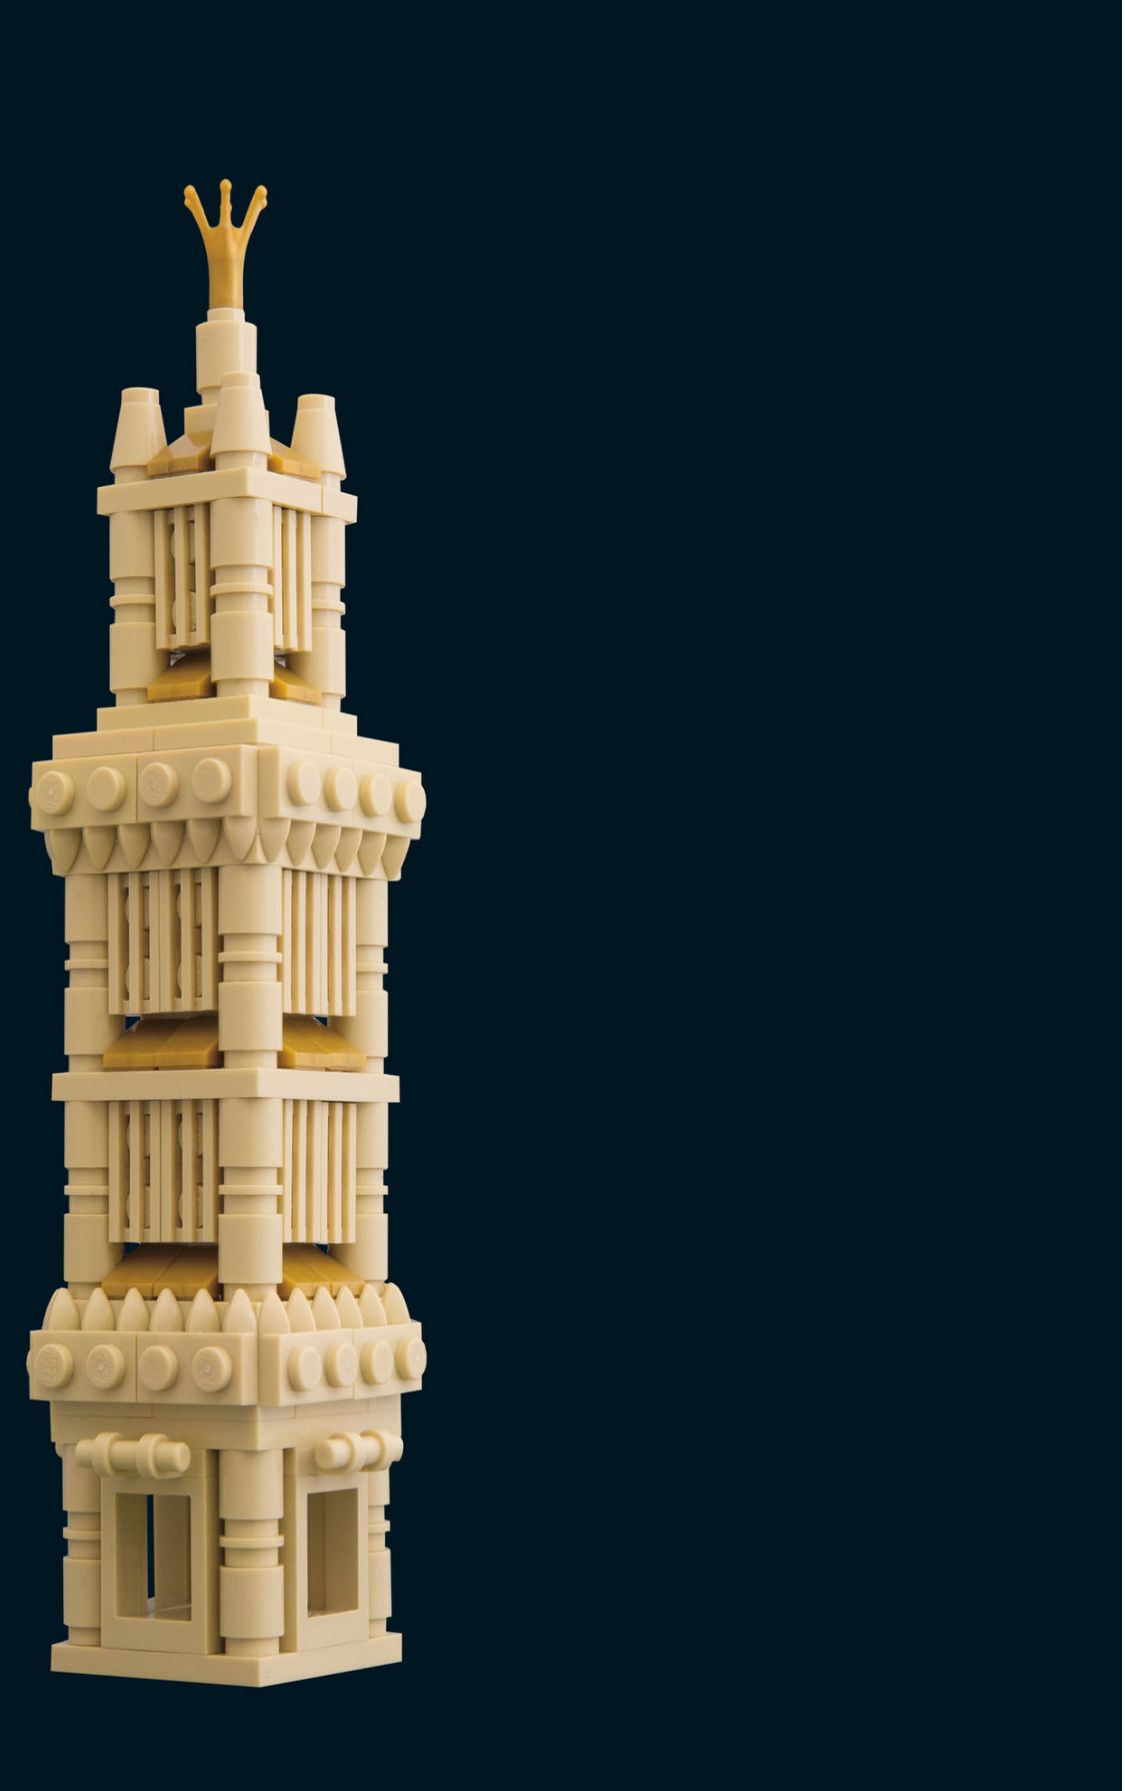
The Crowning Glory was hand-carved by renowned sculptors from around the world who were especially selected for the job. The sculptors had a dust-up about stylistic differences, but they eventually chiseled out an agreement to stop throwing hammers at each other.
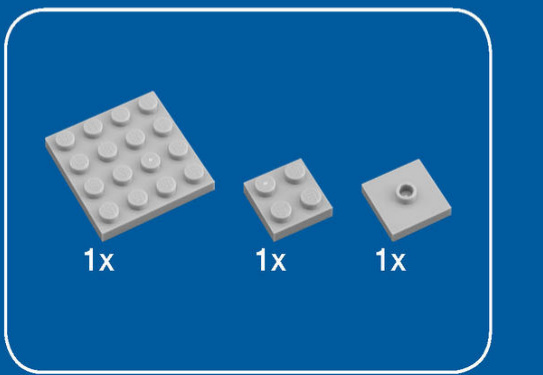
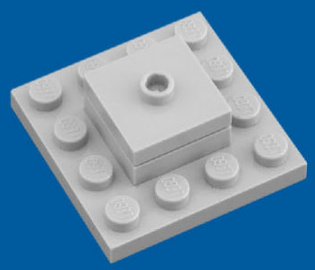
Set on a mere 4x4-stud footprint, this building stretches the limits.
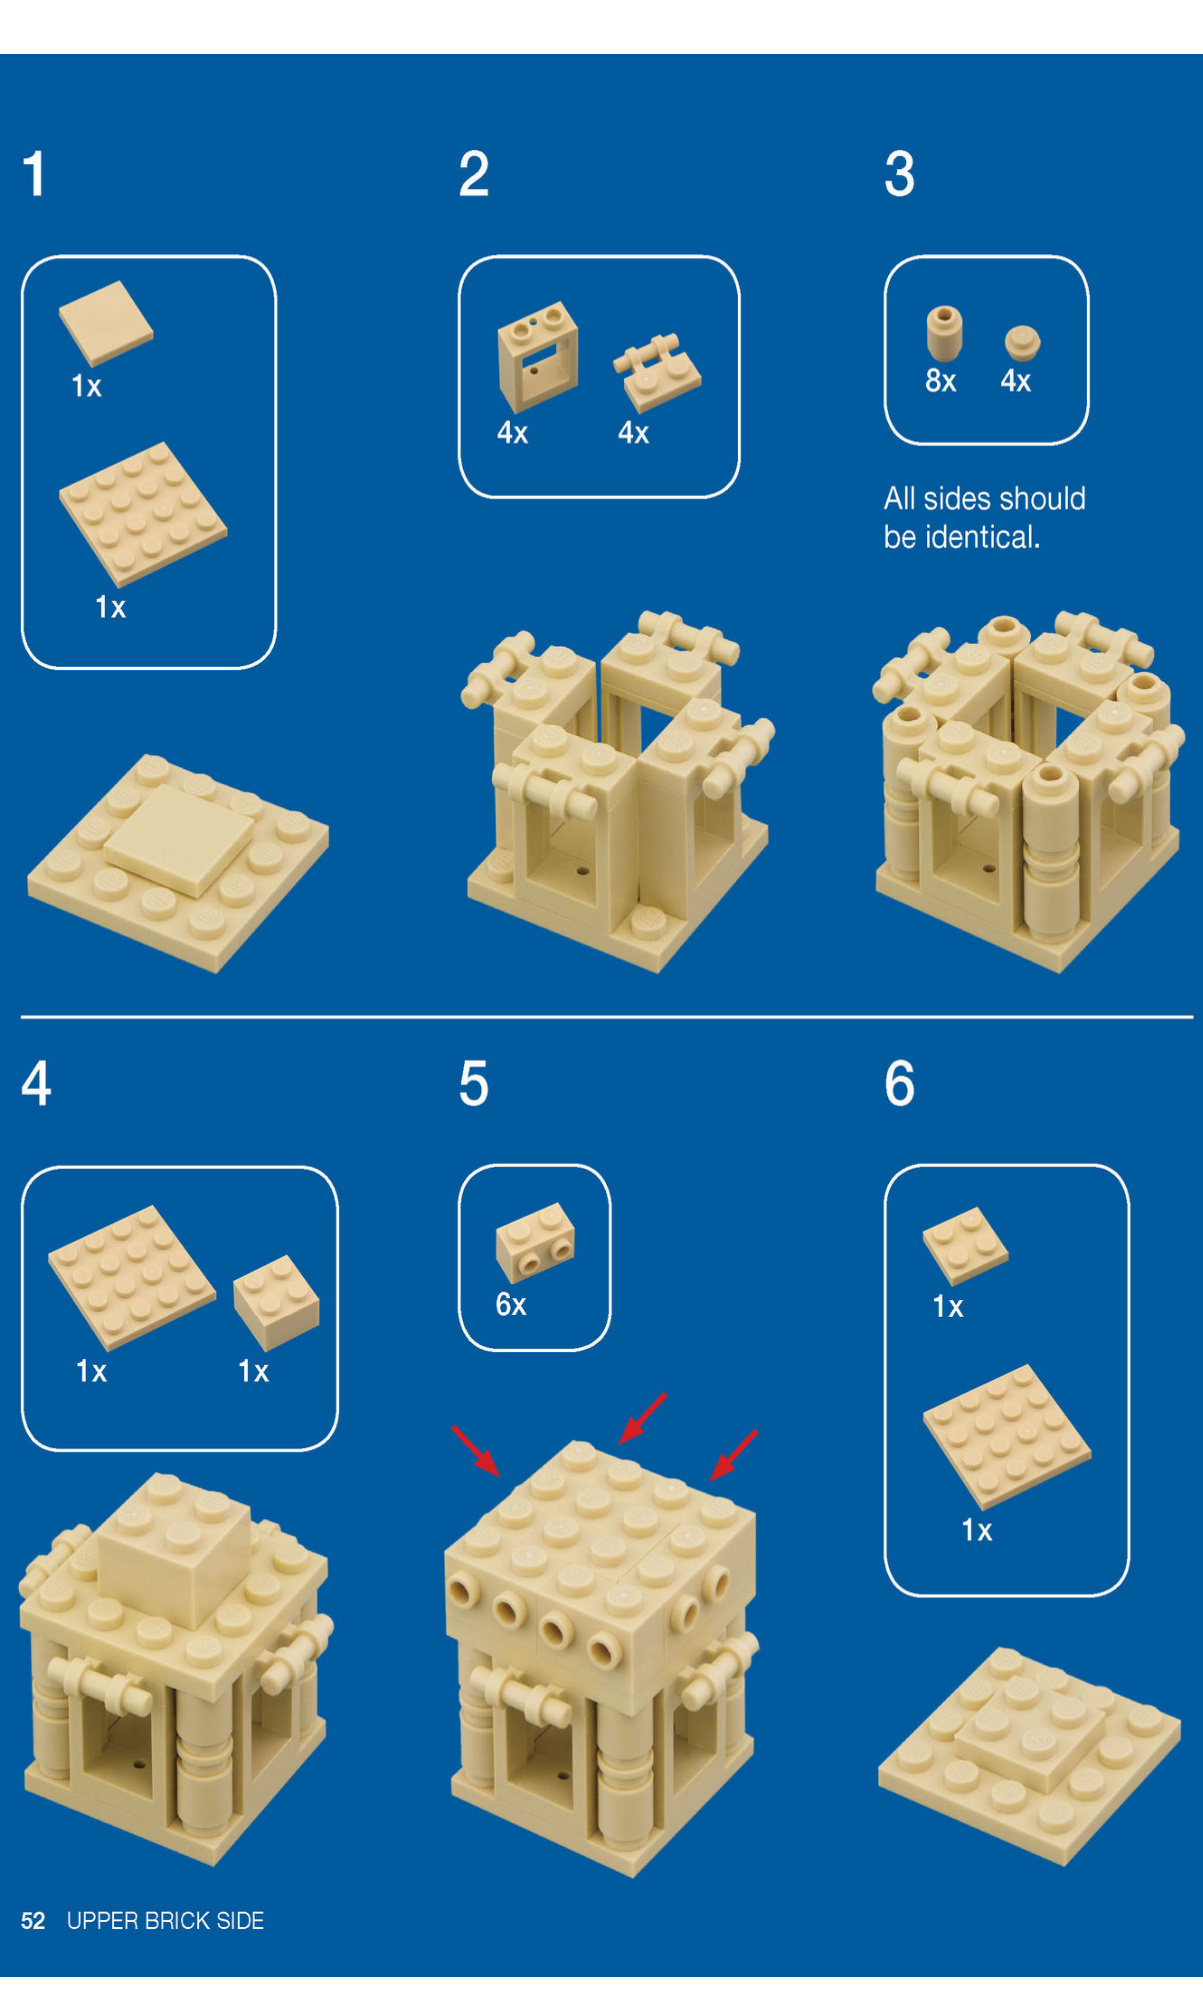
All sides are identical from step 7 to step 10.

Attach the 2x2 plates to the SNOT bricks.
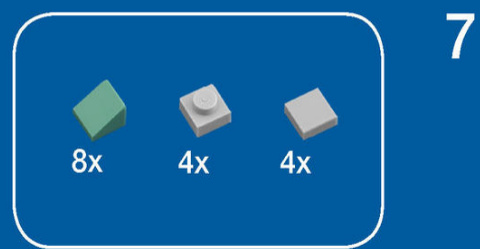
8x 4x
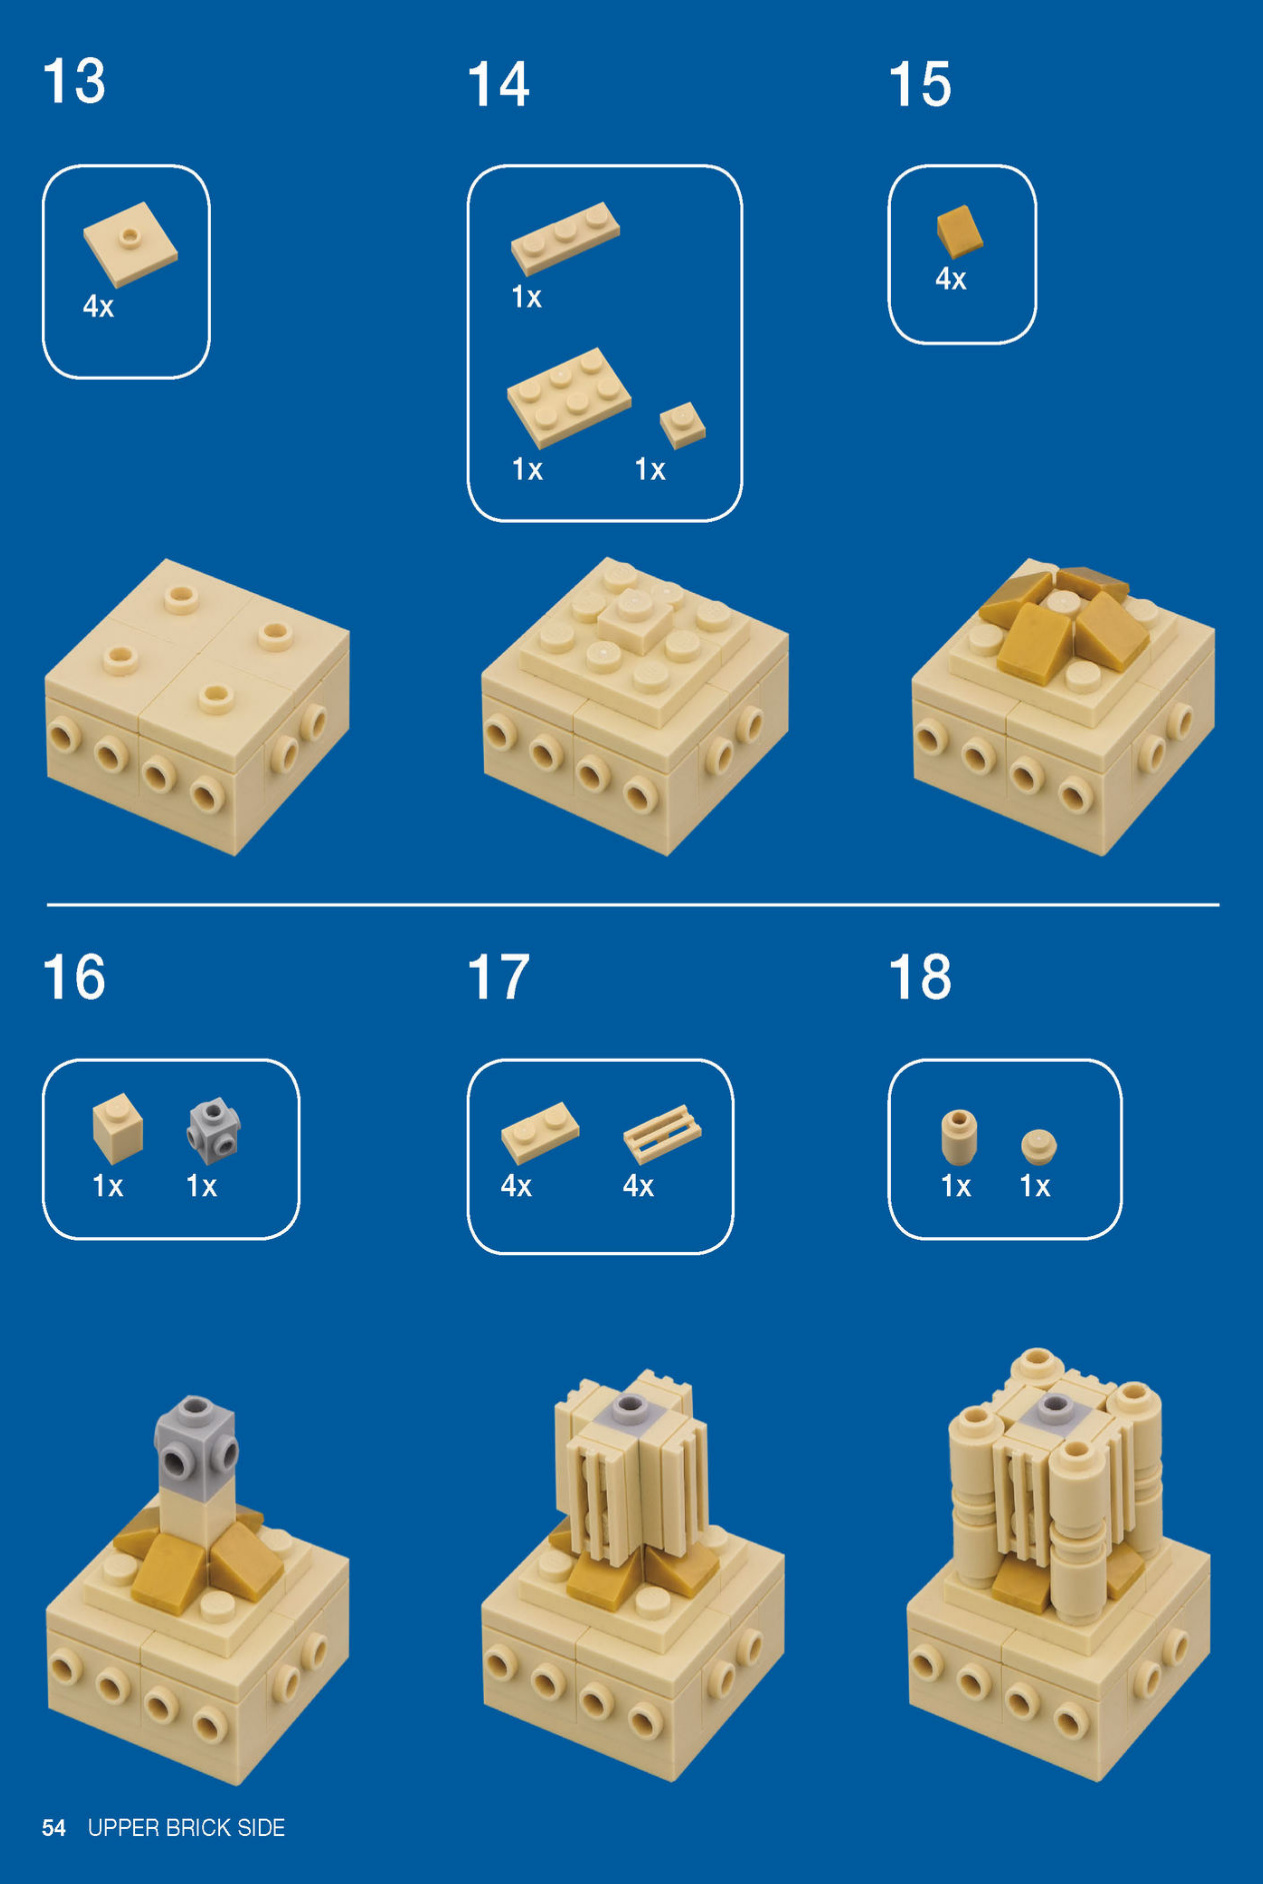
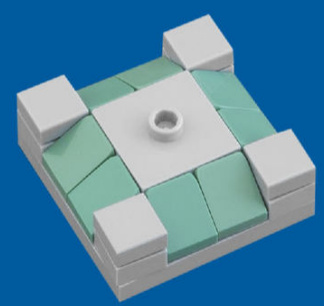
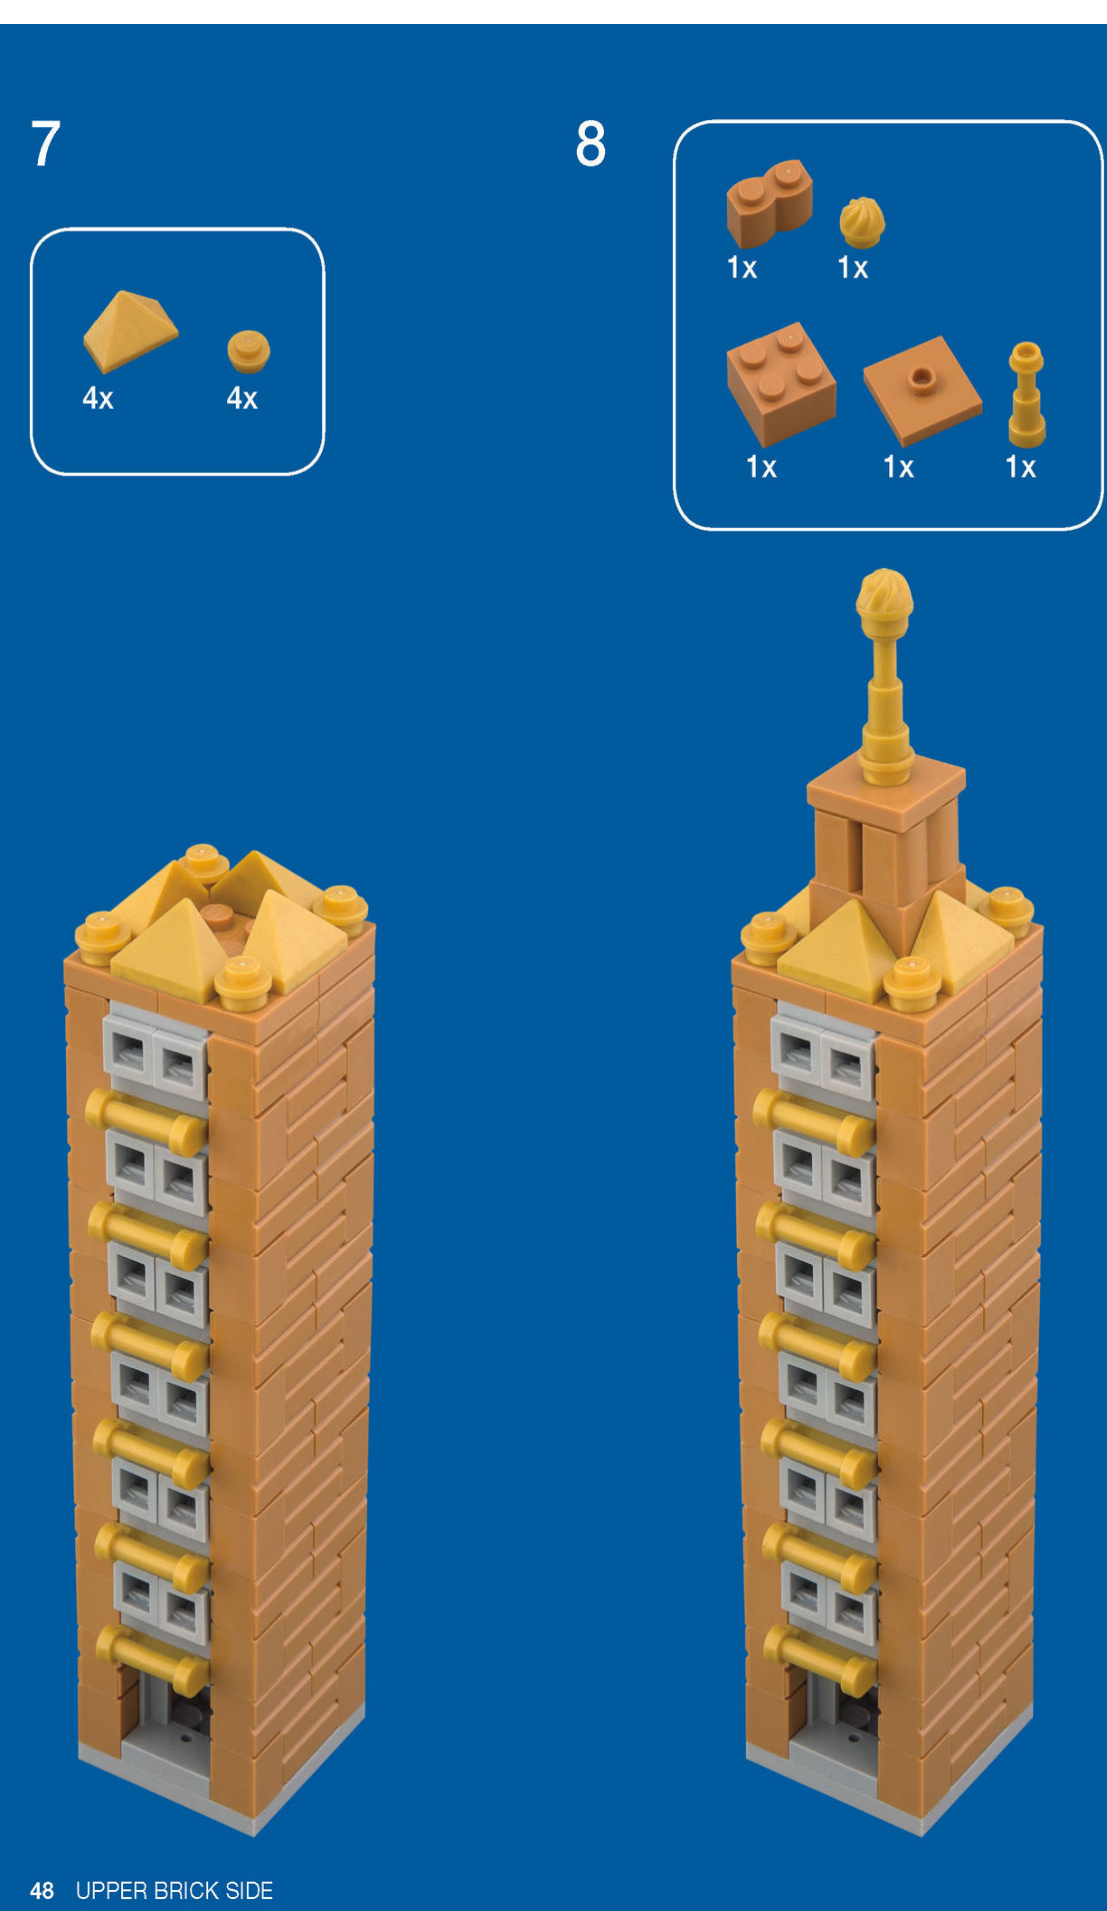
Stack all the modules together and admire the glory of your hand-sculpted creation.
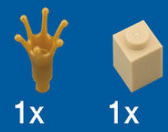
1x 4x
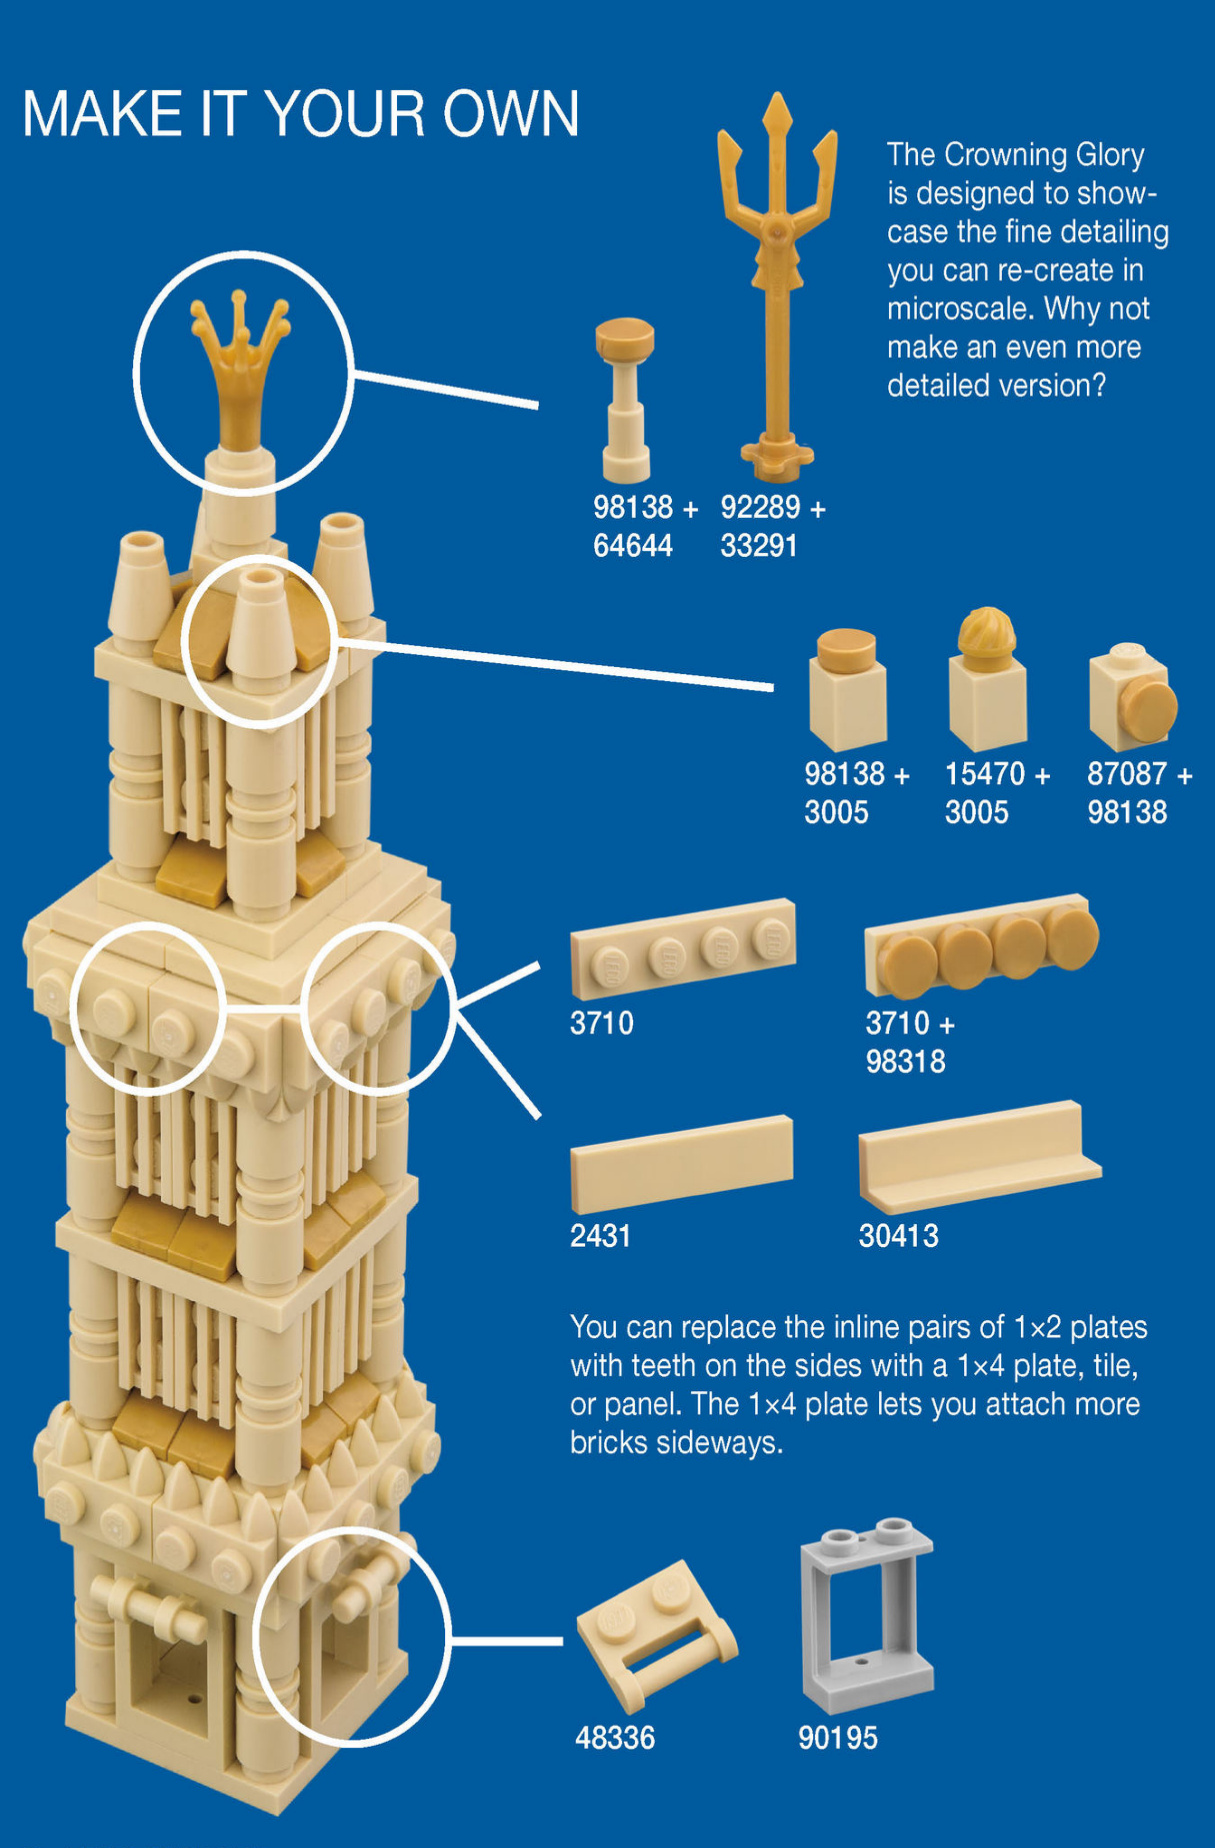
MAKE IT A DOUBLE
The Crowning Glory is like a chocolate truffle: sometimes you need more than one to satisfy your craving. Thanks to LEGO’s precise engineering, it’s easy to build two identical buildings if you have the parts.
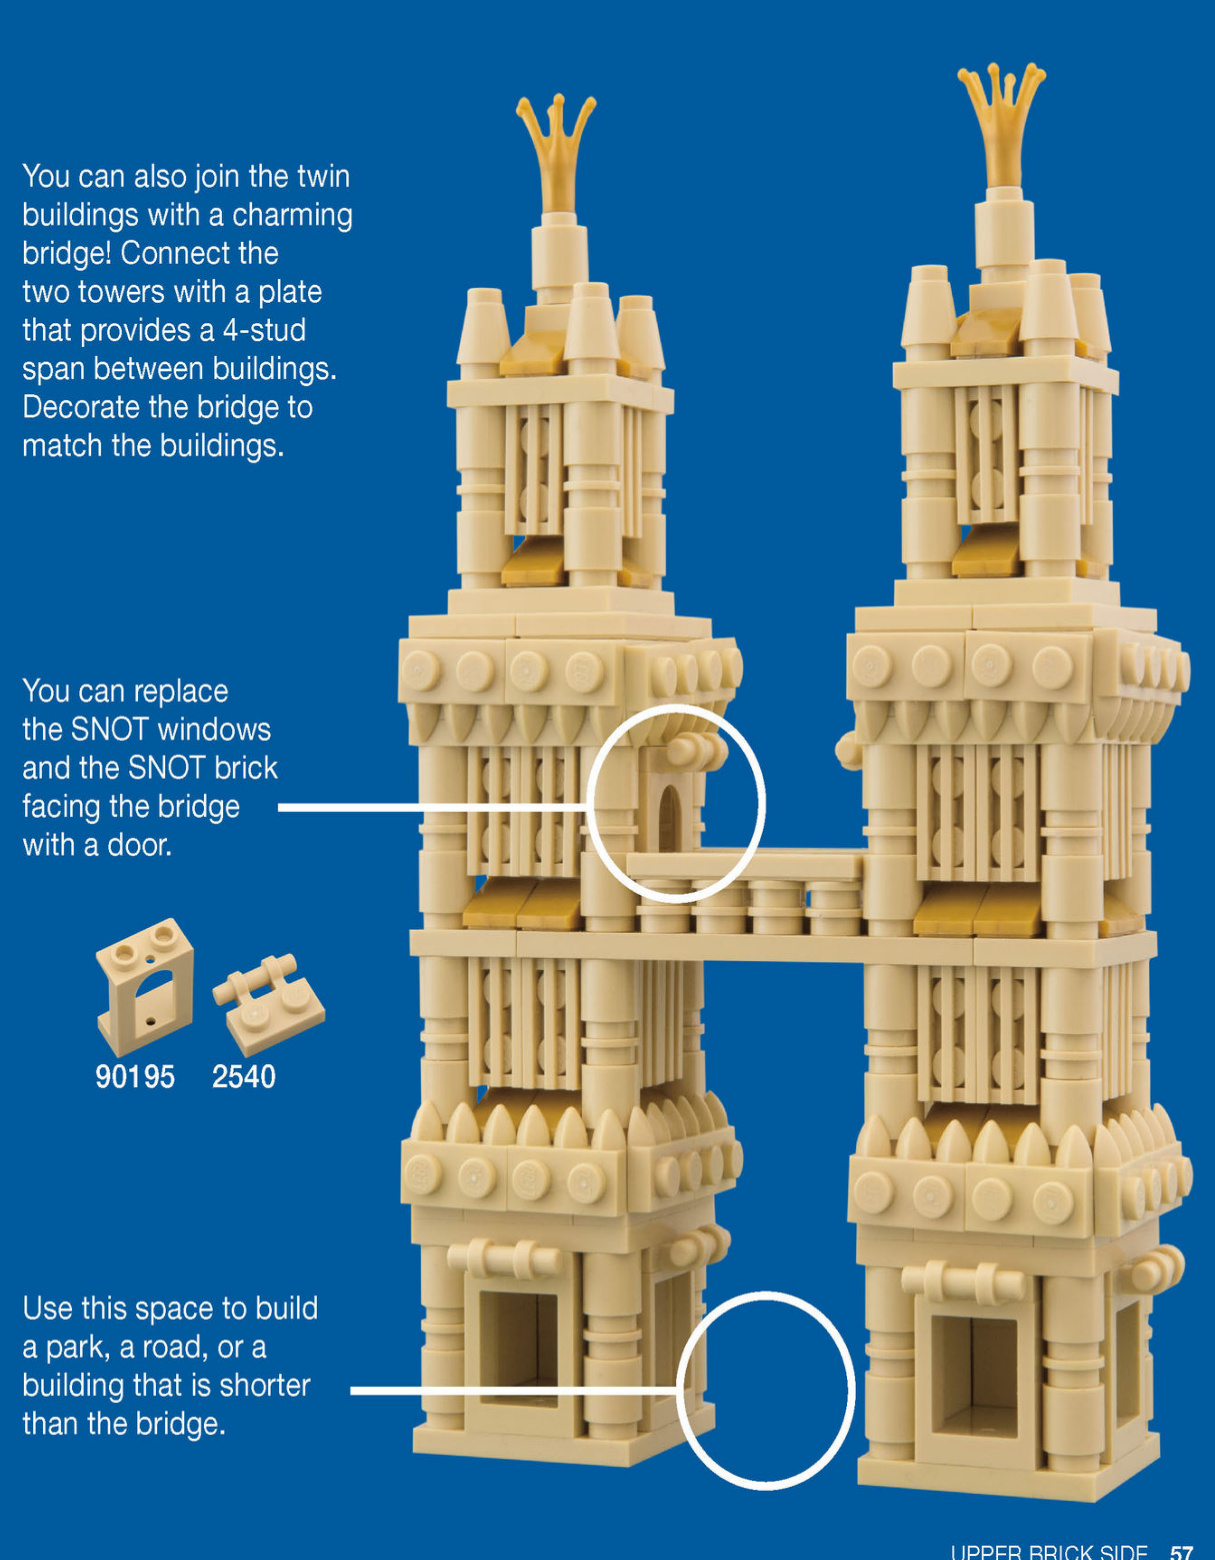
BRIDGE TOWN
Bridges are celebrated in a way that most other public works are not. In New York City, for example, the Brooklyn Bridge is a cherished landmark while the Lincoln Tunnel, which serves essentially the same purpose, is something you have to endure. Bridges transcend their practical function and cross into a realm of poetry and metaphor usually reserved for natural wonders.
In the same way, bridges can provide multiple levels of delight in a LEGO micro city. You can use them not only for practical purposes like providing passage over water and linking your cities together, but also to make an artistic statement. Your bridge design can be as individual as your fingerprint. You can build a simple plank bridge to cross a creek or construct a soaring wonder that becomes the centerpiece of your city’s architecture. What will your bridge’s story be?
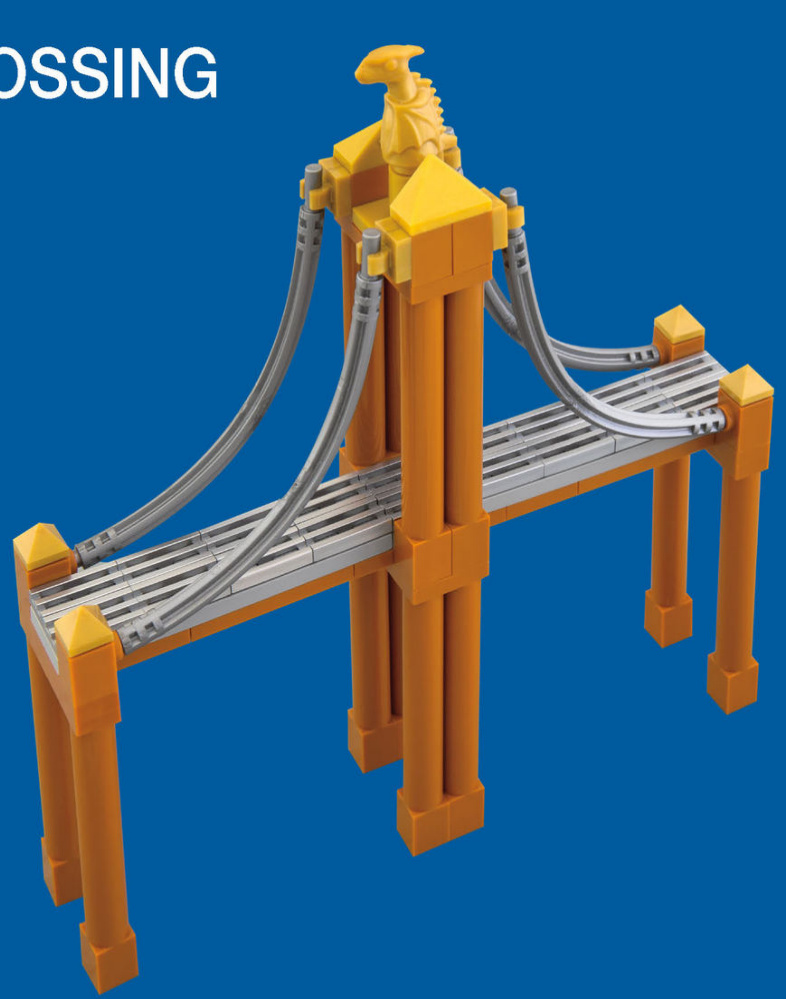
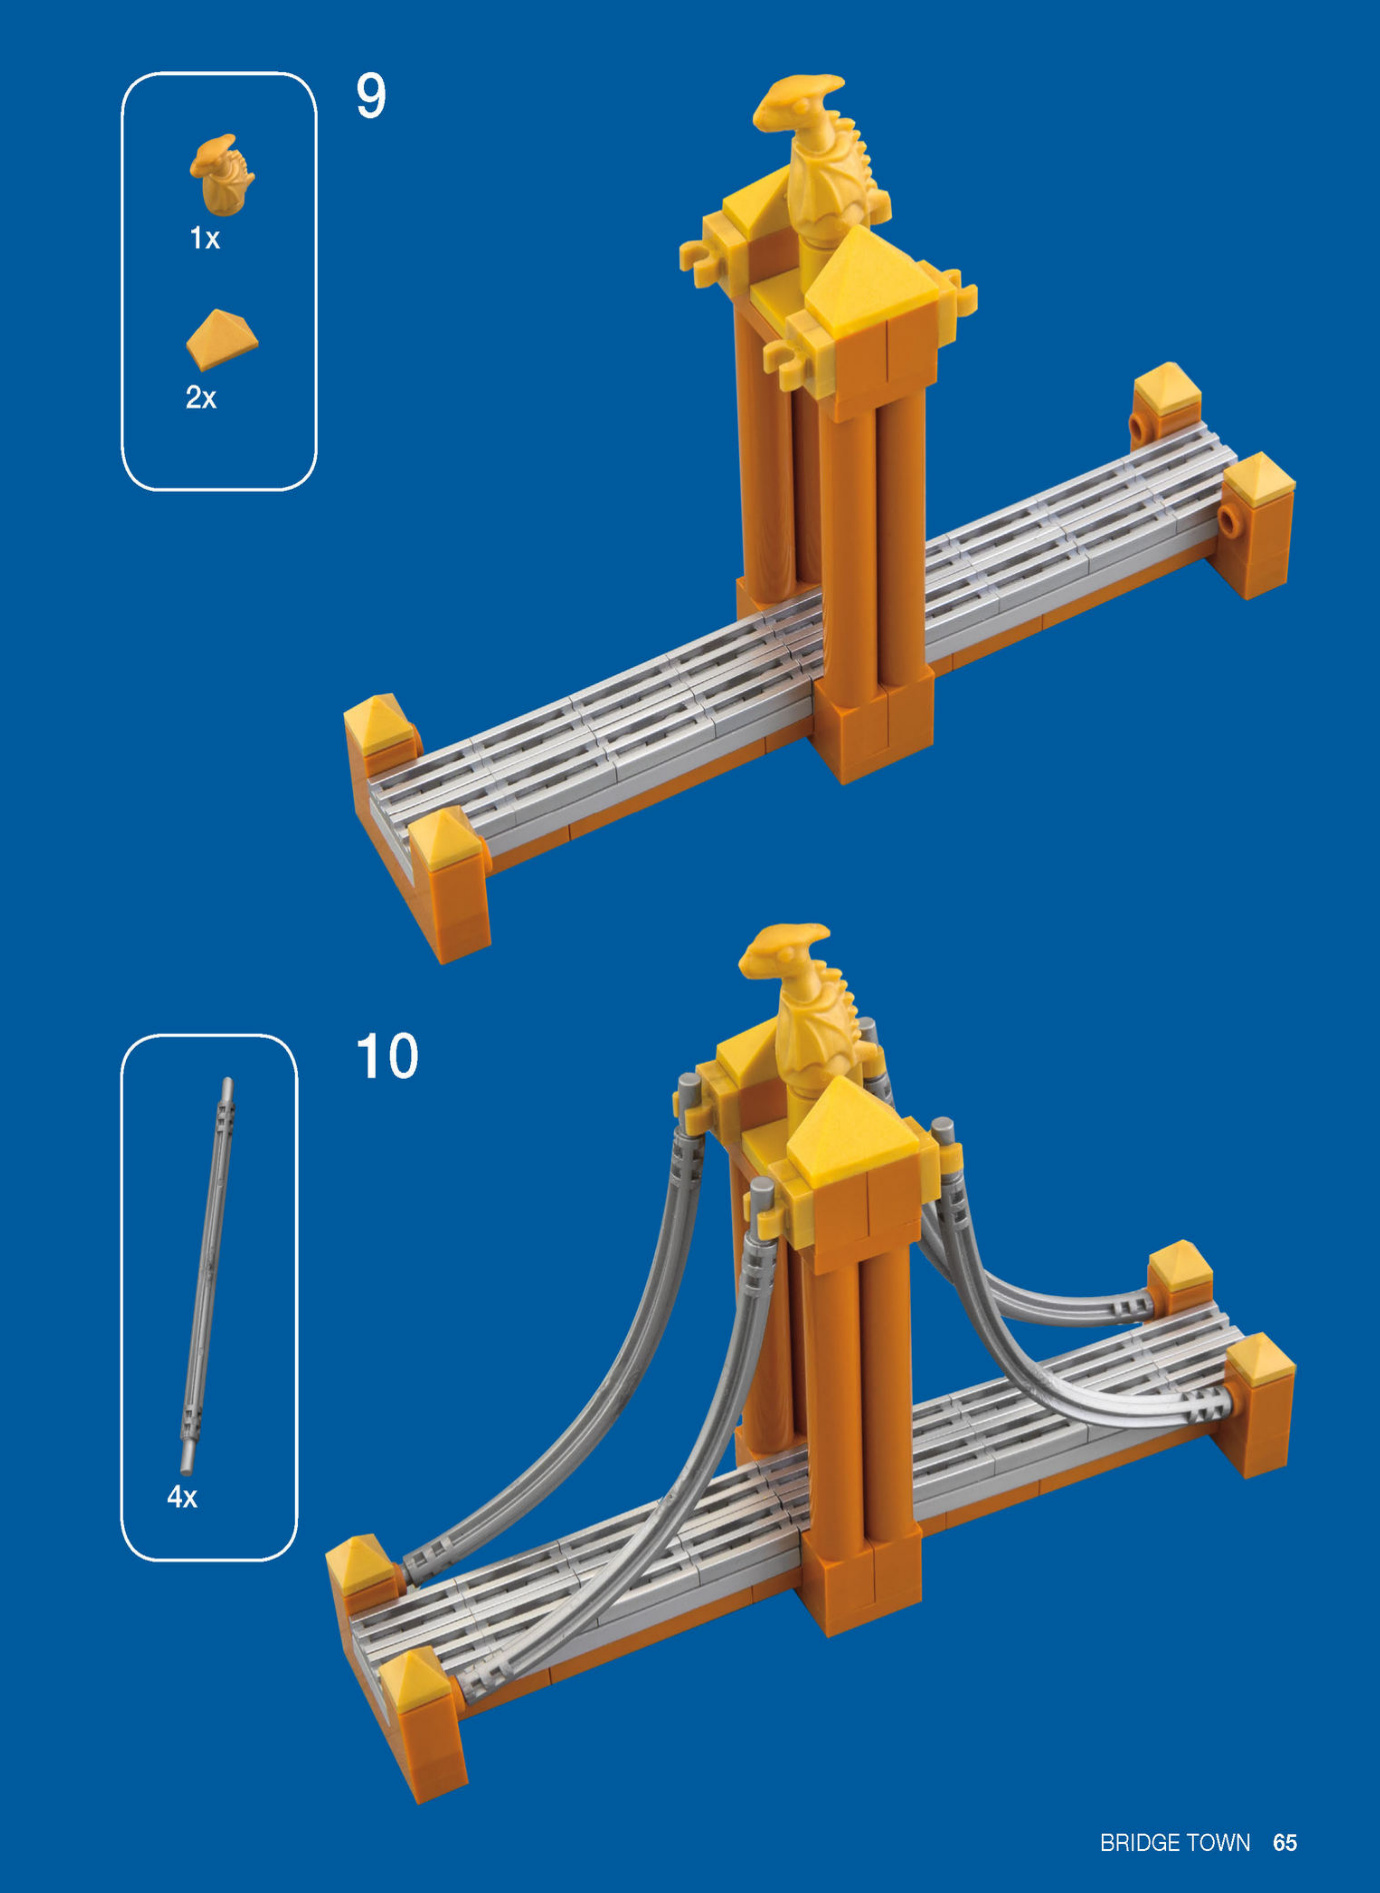
DRAGON CROSSING
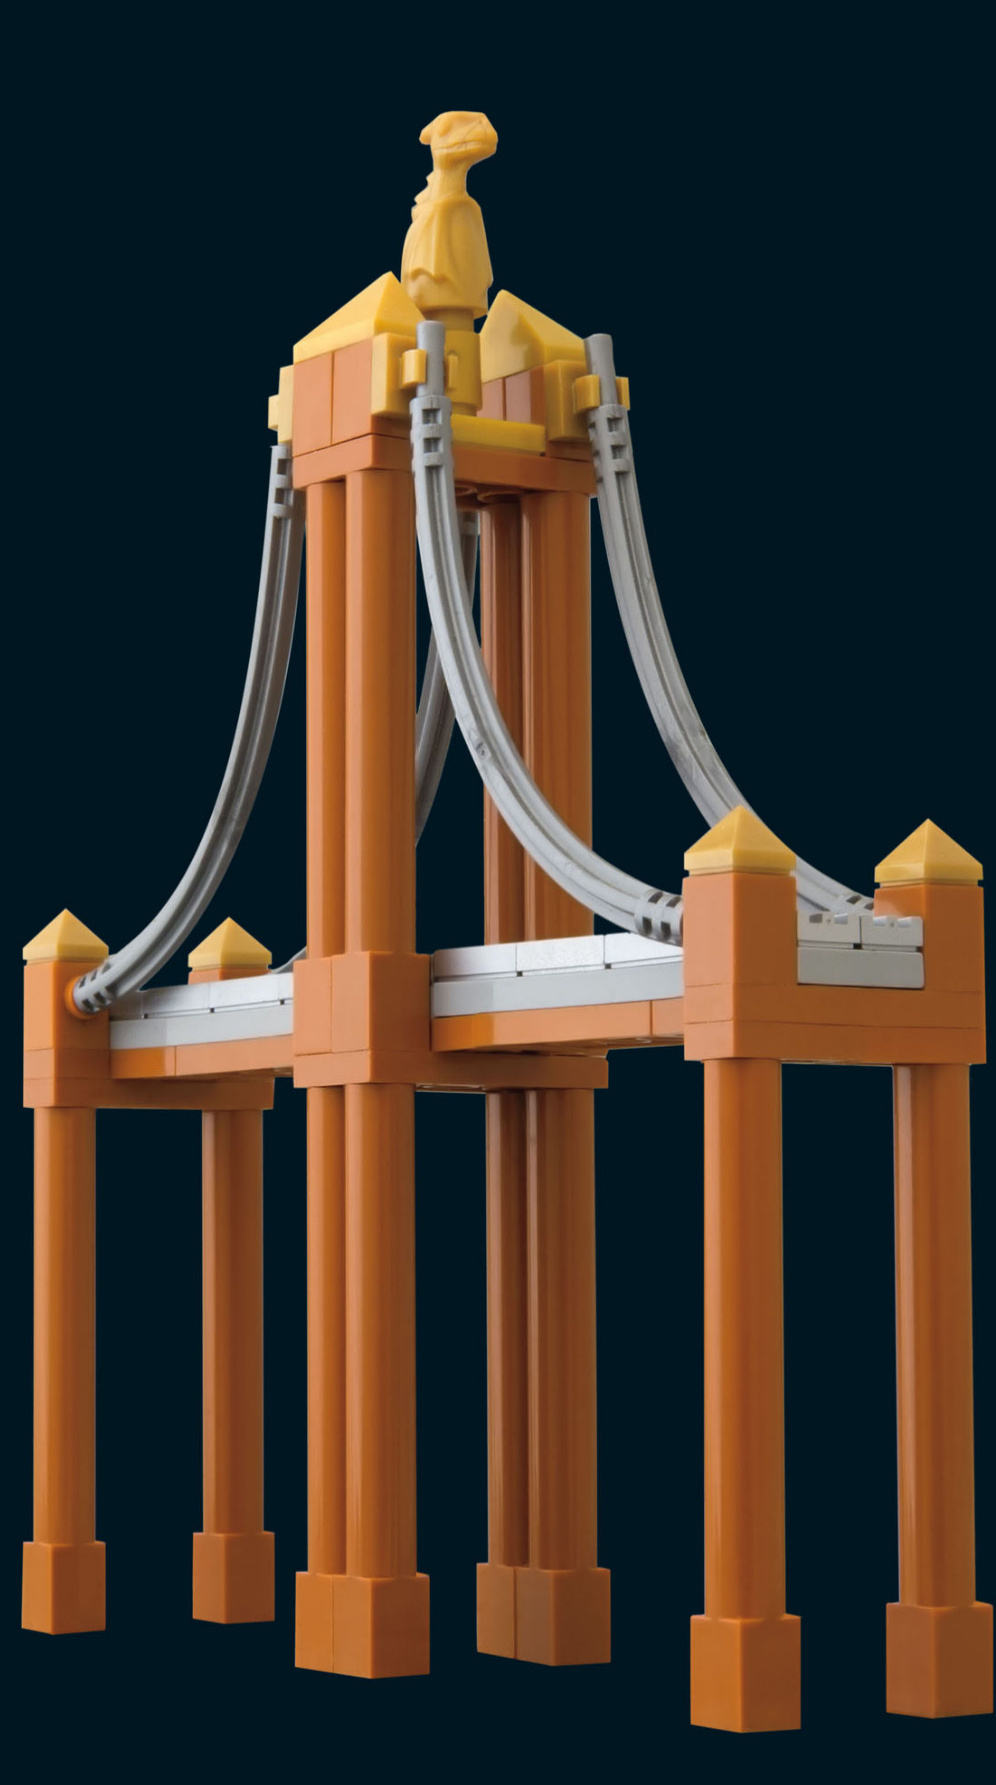
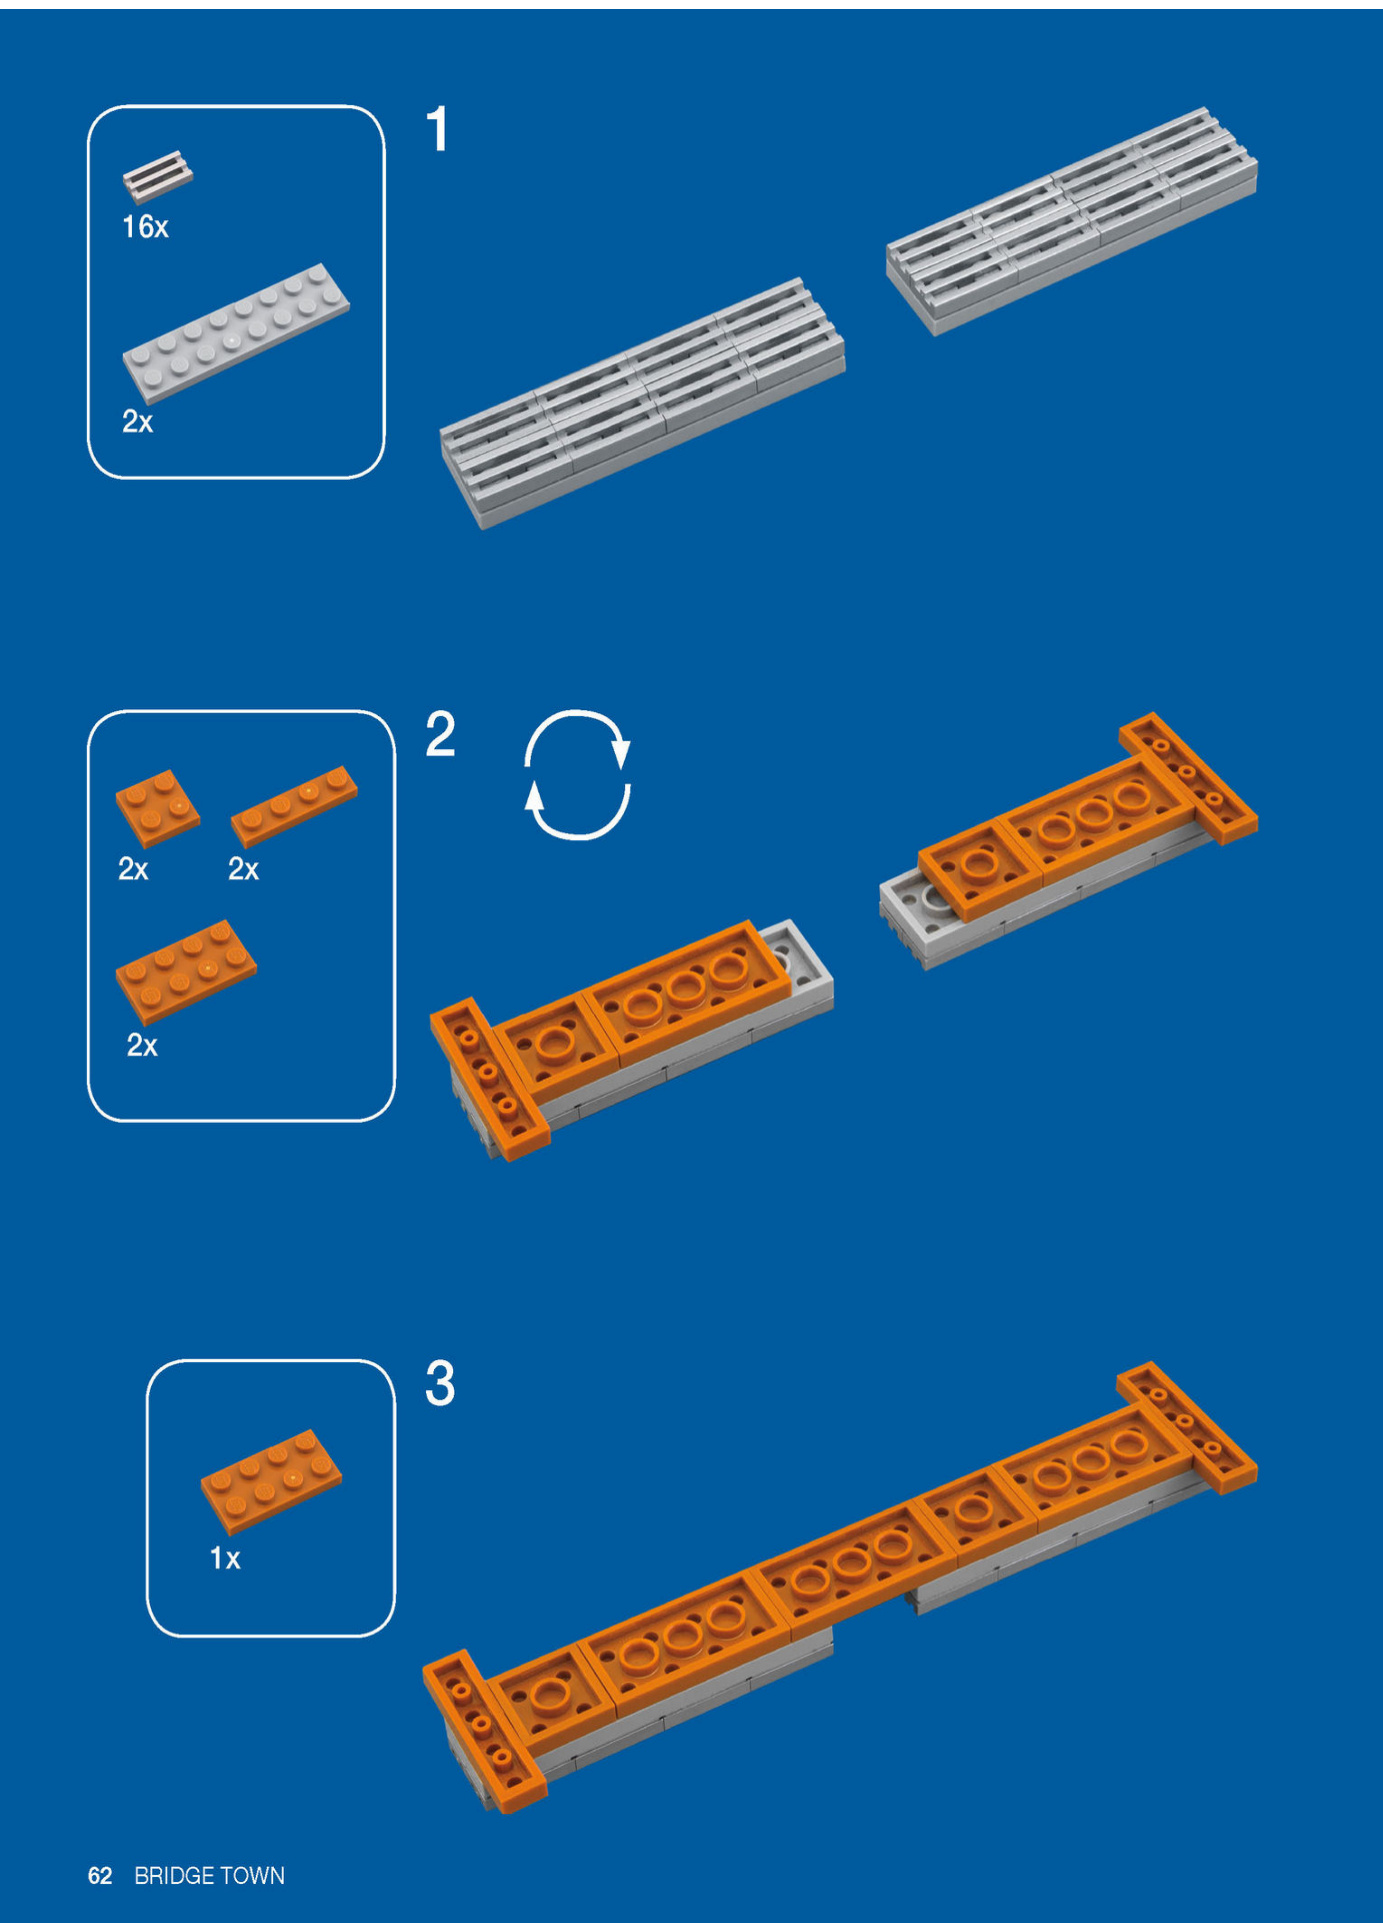
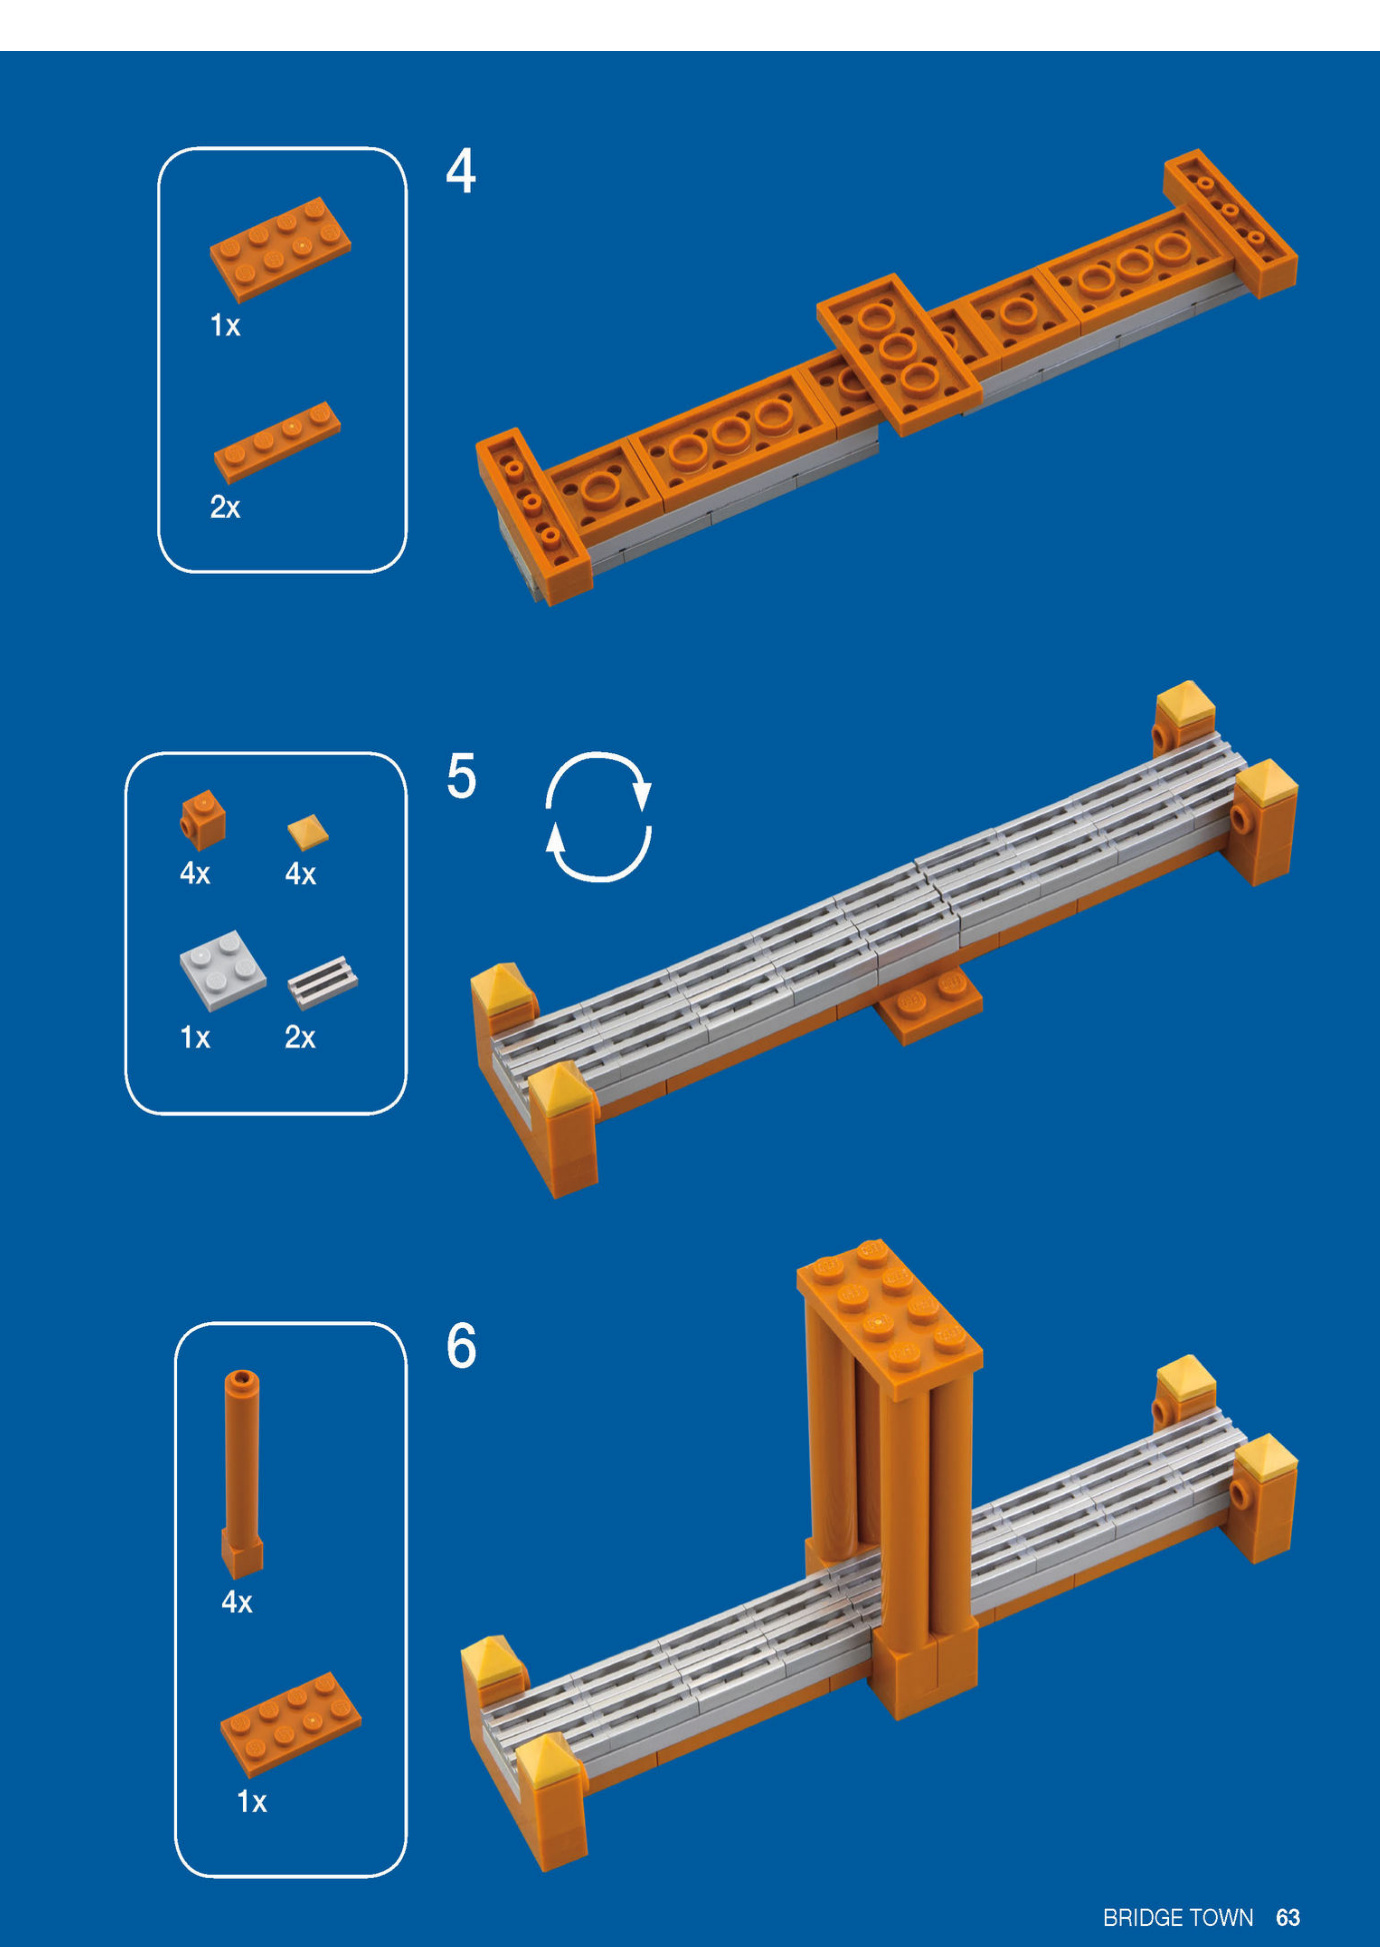
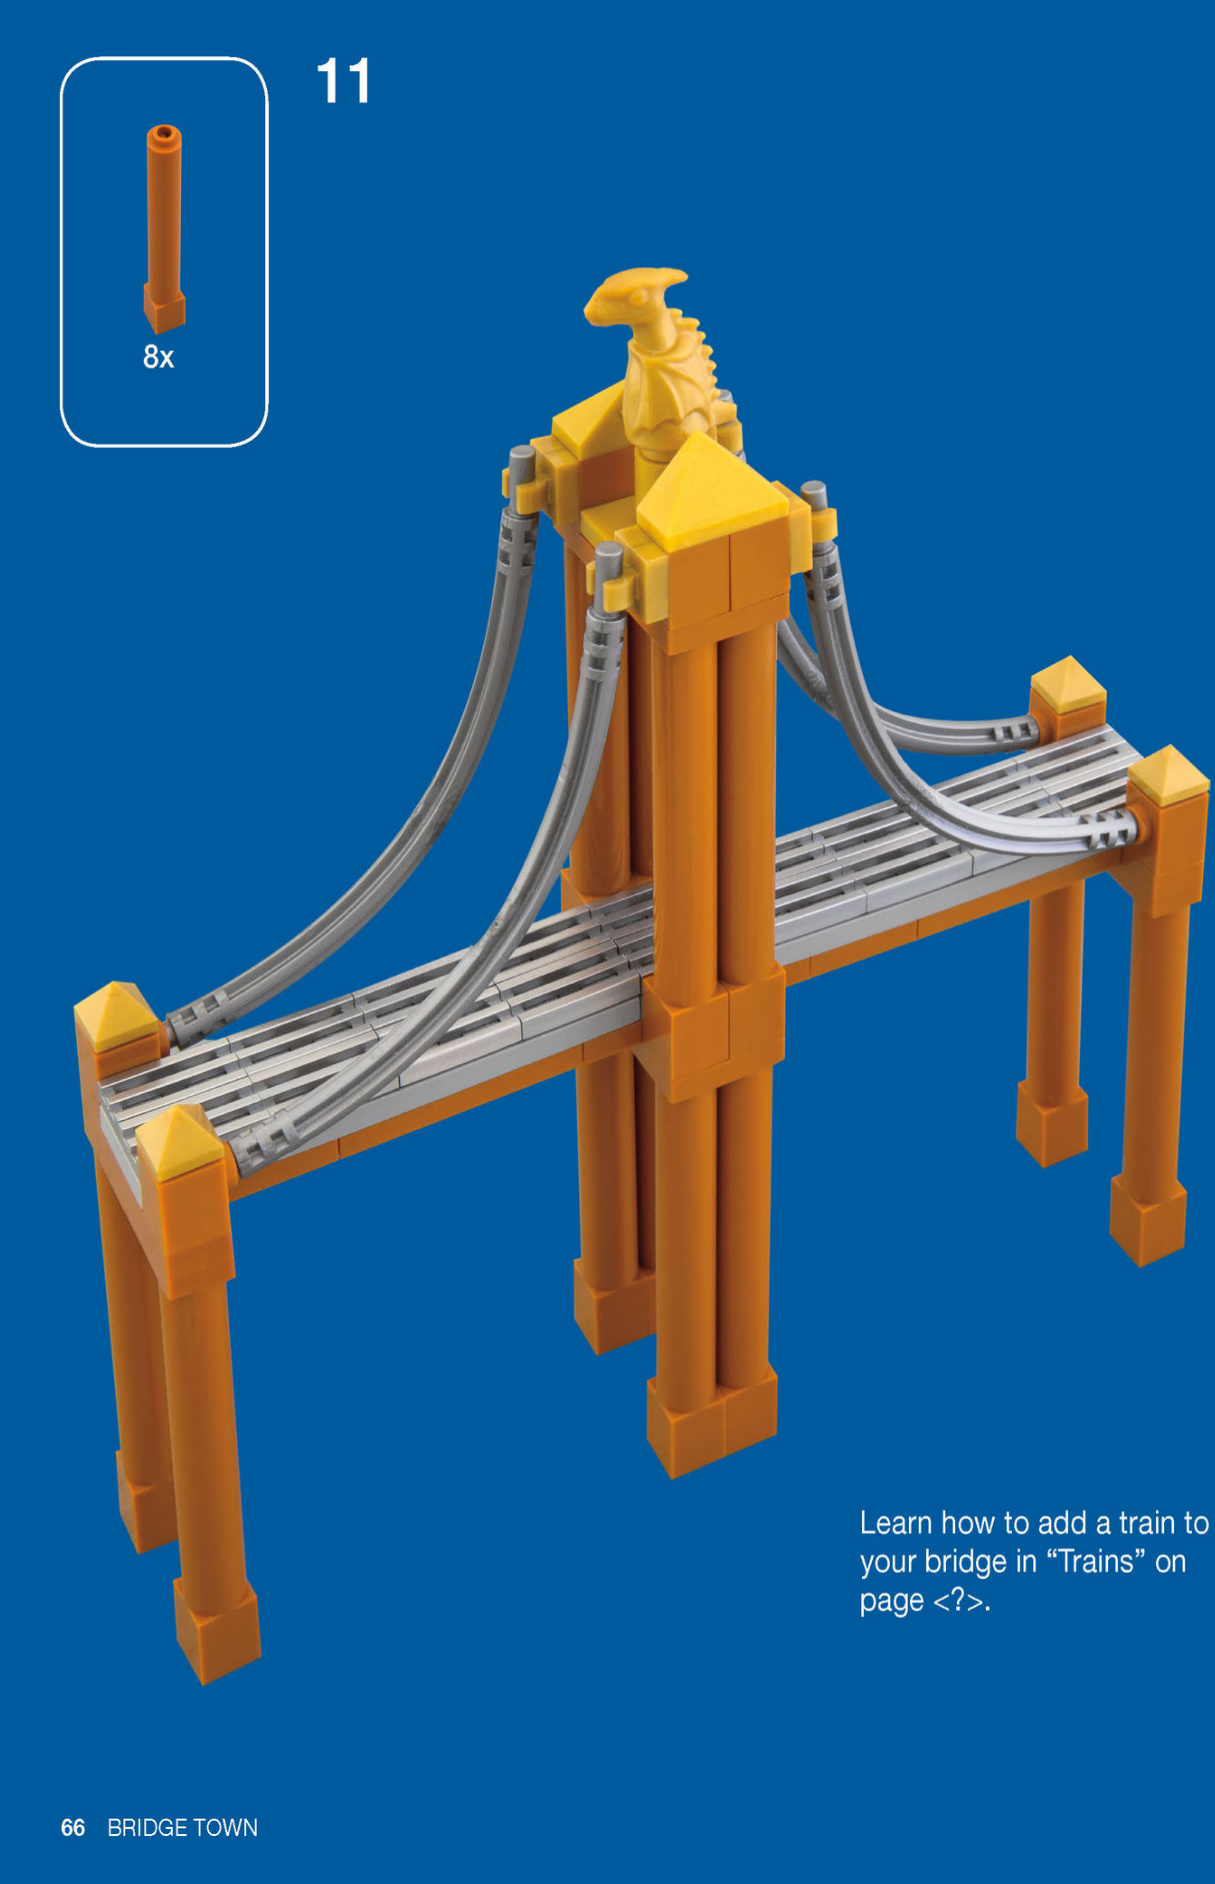
The Dragon Crossing bridge stands at an ancient ford called Dragon’s Path, named after a curving pile of half-submerged boulders resembling a dragon’s back. According to local lore, the golden dragon on top of the bridge comes to life and breathes out the fog that shrouds this city on autumn mornings.
With just a handful of bricks, this iconic bridge adds so much character to your LEGO city. You can add plates or bricks to the bridge’s foundation as necessary to adjust to the varying terrain of your city.
MAKE IT YOUR OWN
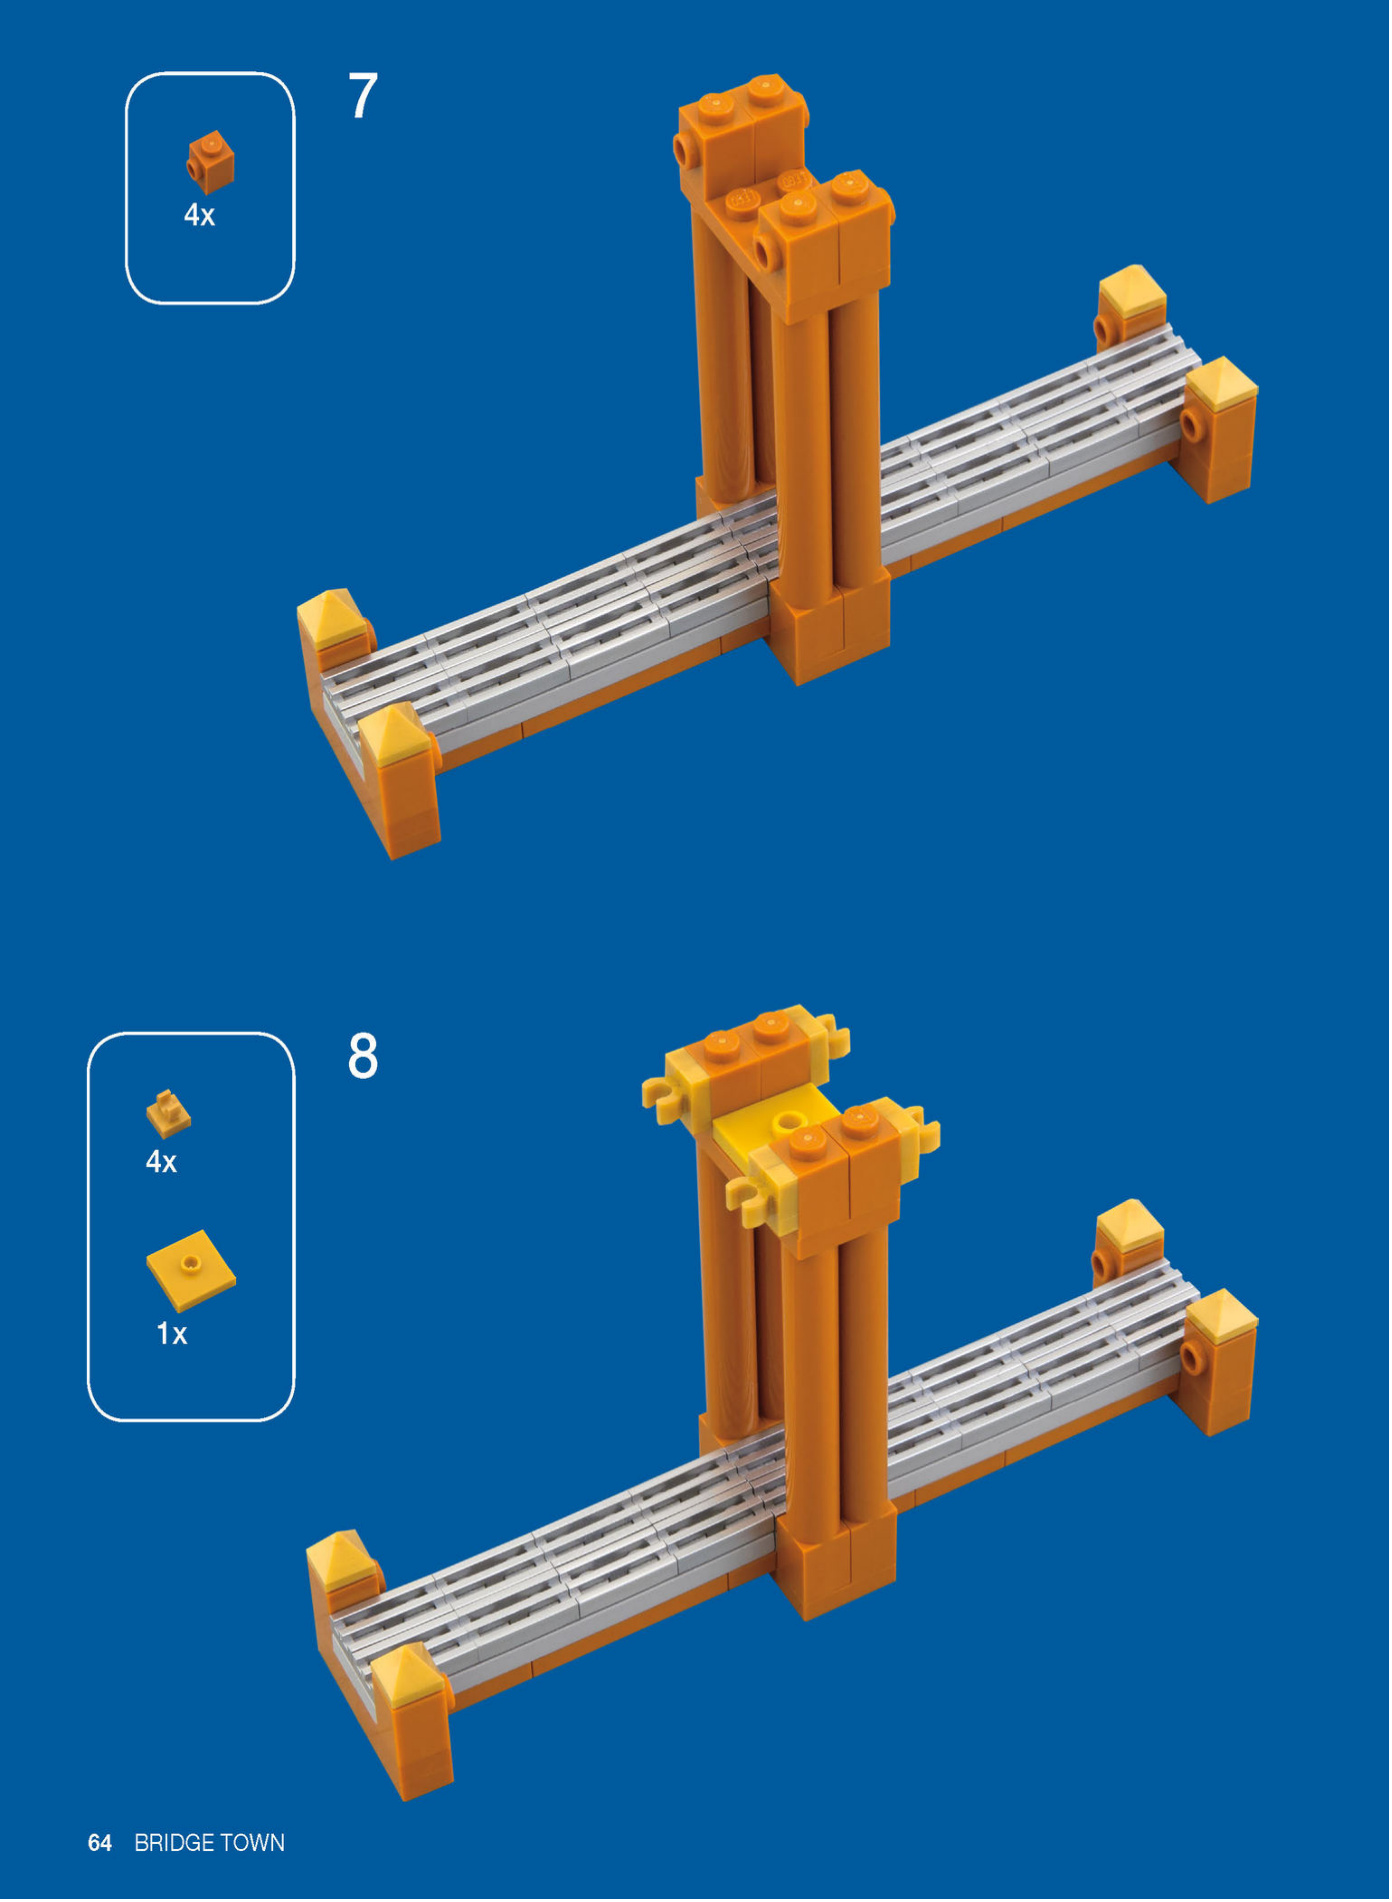
Customize the look of your bridge by changing the gold ornaments on top. Why not make a bridge dedicated to the humble river-dwelling frog instead of a dragon?
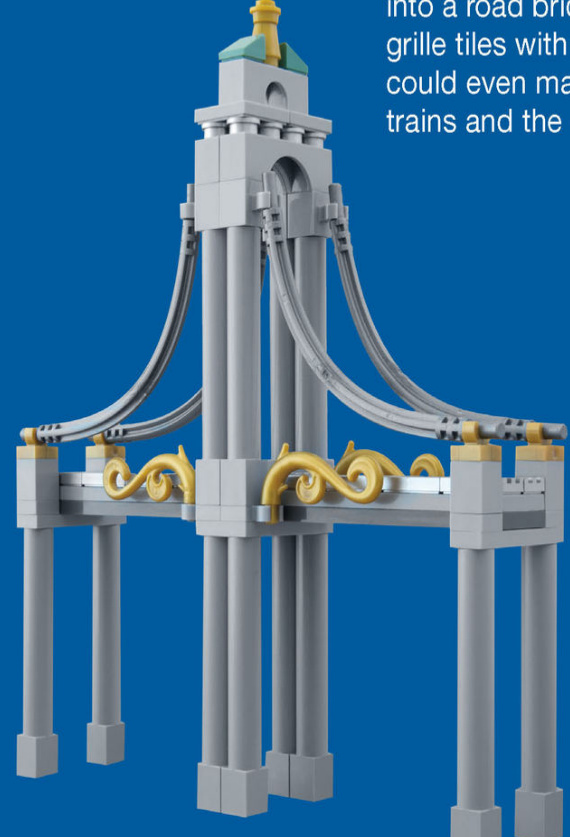
You can turn this rail bridge into a road bridge by replacing grille tiles with regular tiles. You could even make one lane for trains and the other for cars.
Chains can replace the soft axle hoses used for the suspension cables. You could also do without suspension at all and have a mid-supported plank bridge instead.
SHADES OF GREY
If you decide to build a grey bridge, you’ll have a wider variety of parts to choose from. This bridge uses horizontal clips to attach fancy golden railings to its sides and features double arches on the middle tower.
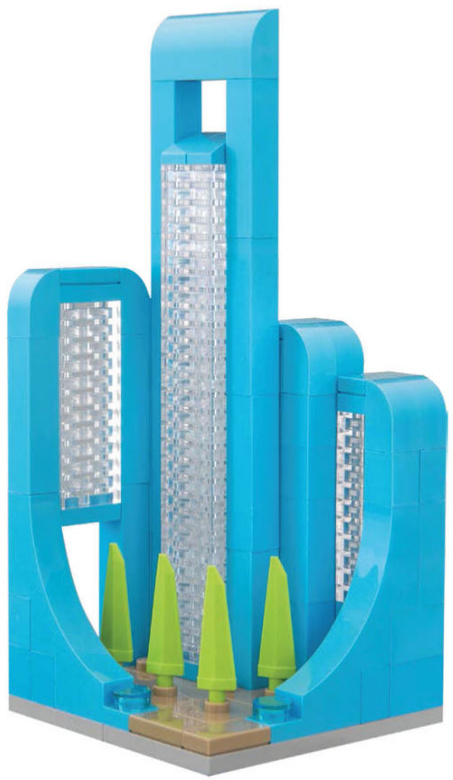
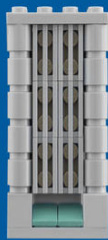
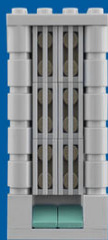
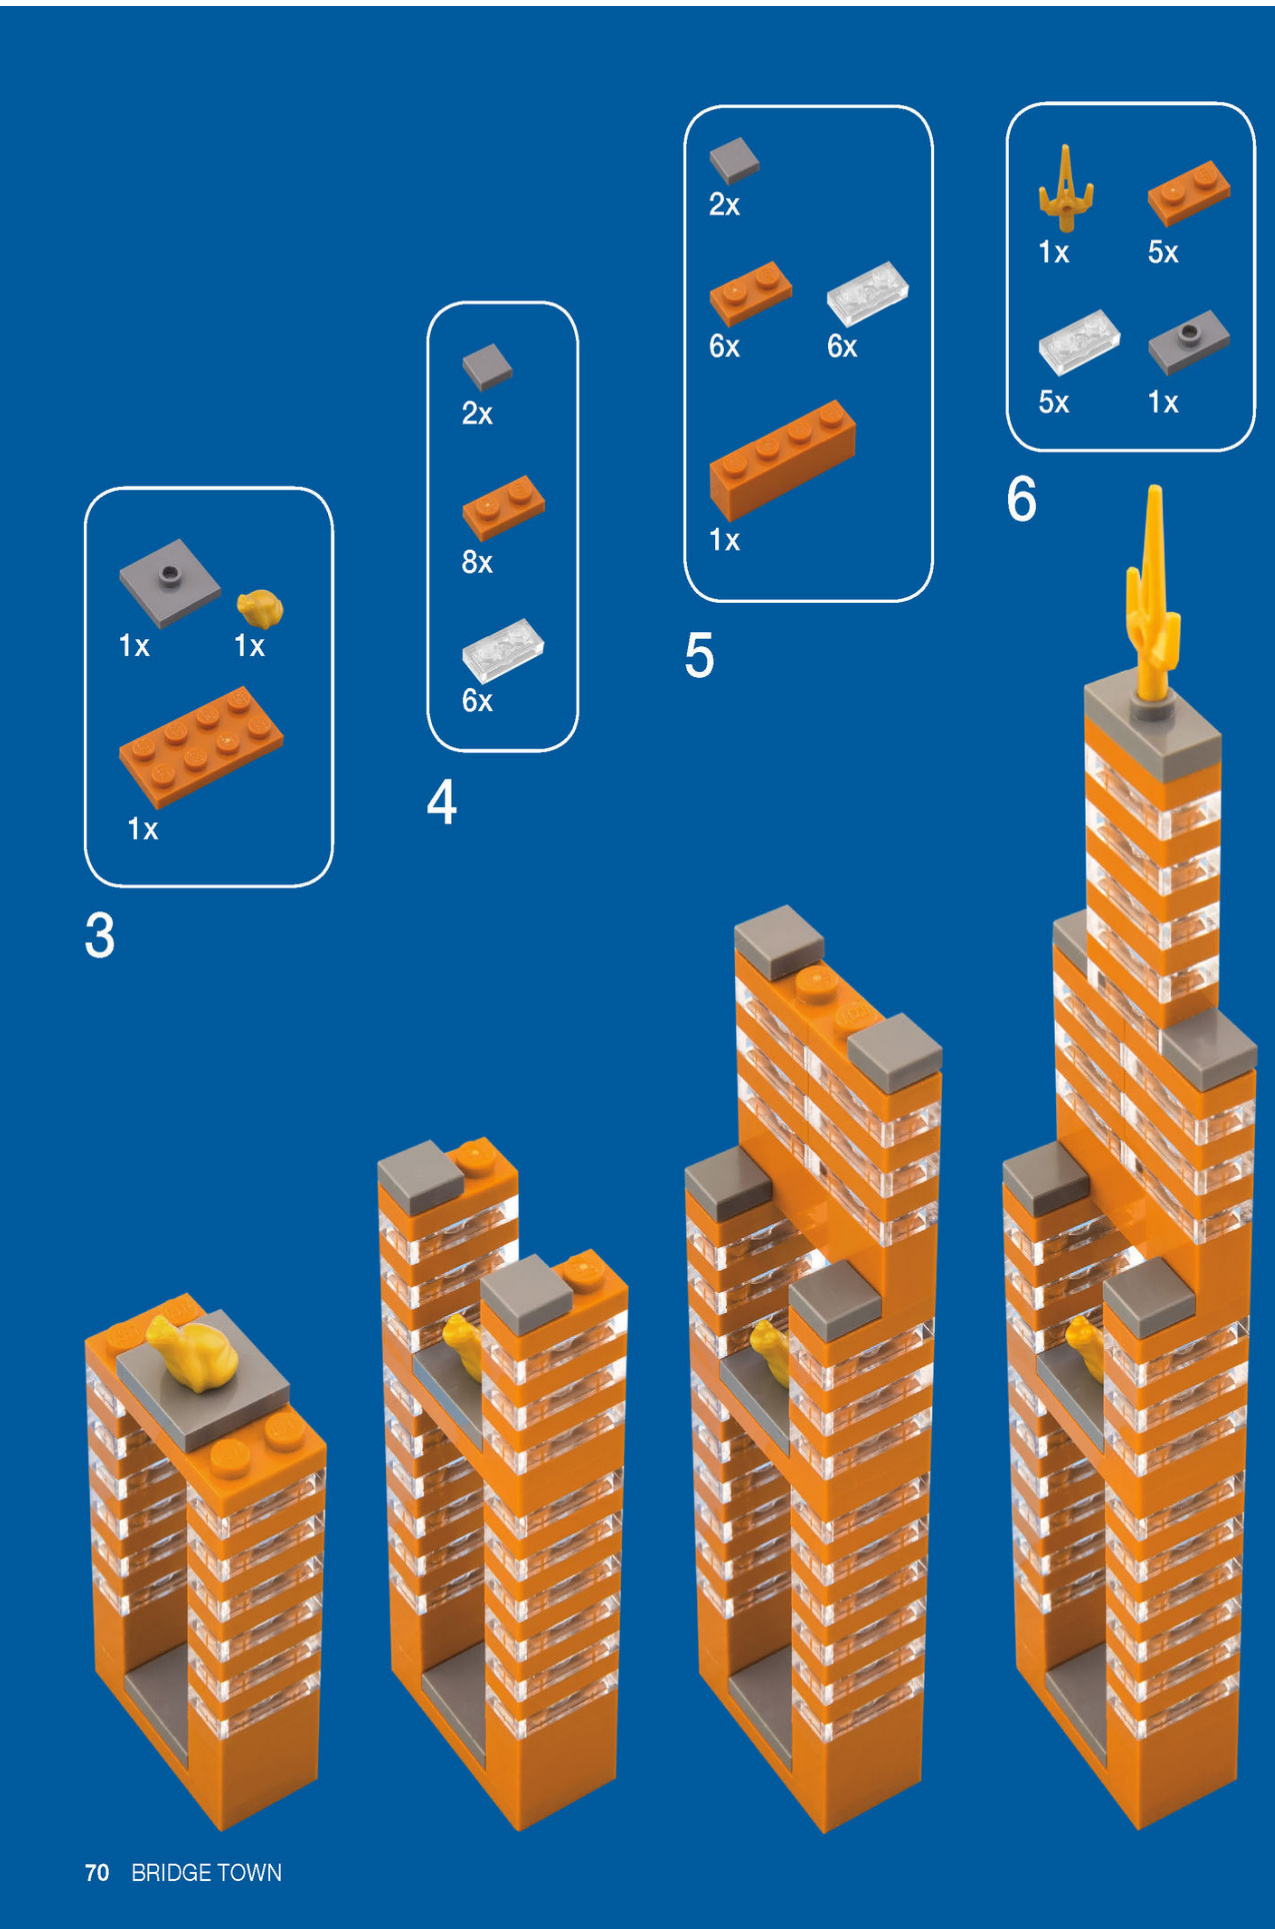
GLASS HOUSE CONDOMINIUMS
In the Glass House Condominium building, throwing stones is explicitly prohibited according to bylaw 398. It is also illegal to throw pianos out the window, so passionate musicians should take note.
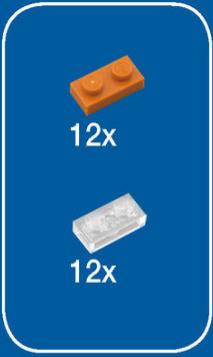
The Glass House Condominiums are built using a simple but highly versatile method of stacking 1x2 plates. Alternating transparent plates with plates in a solid color can produce a wide array of architectural forms. A technique doesn’t need to be complicated to be effective.
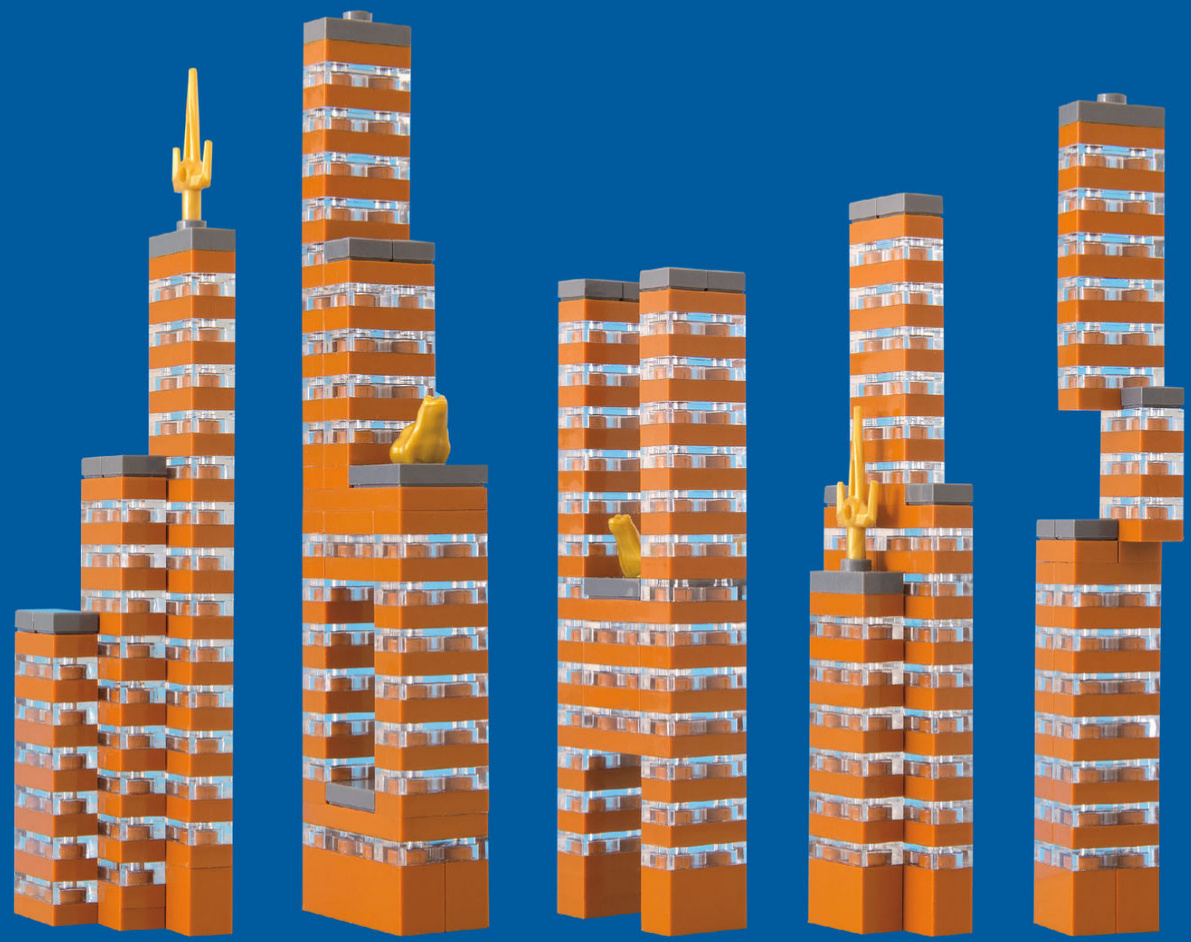
MAKE IT YOUR OWN
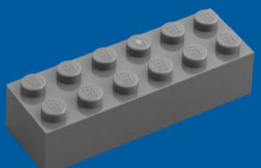
You can rearrange the plates in infinite ways. In fact, a mathematician named Soren Eilers calculated that six 2x4 LEGO bricks can be combined in 915,103,765 different ways. Just imagine what you can do with 60 1x2 plates!
Because 1x2 plates are common pieces, they can be found in almost every color. That includes rare colors such as sand green, dark azure, and the dark orange you see here.
Here are five other ways to build the Glass House Condominiums. Remember: not every building in your city needs to be an architectural wonder. In fact, utilitarian buildings can make your showstoppers stand out even more.
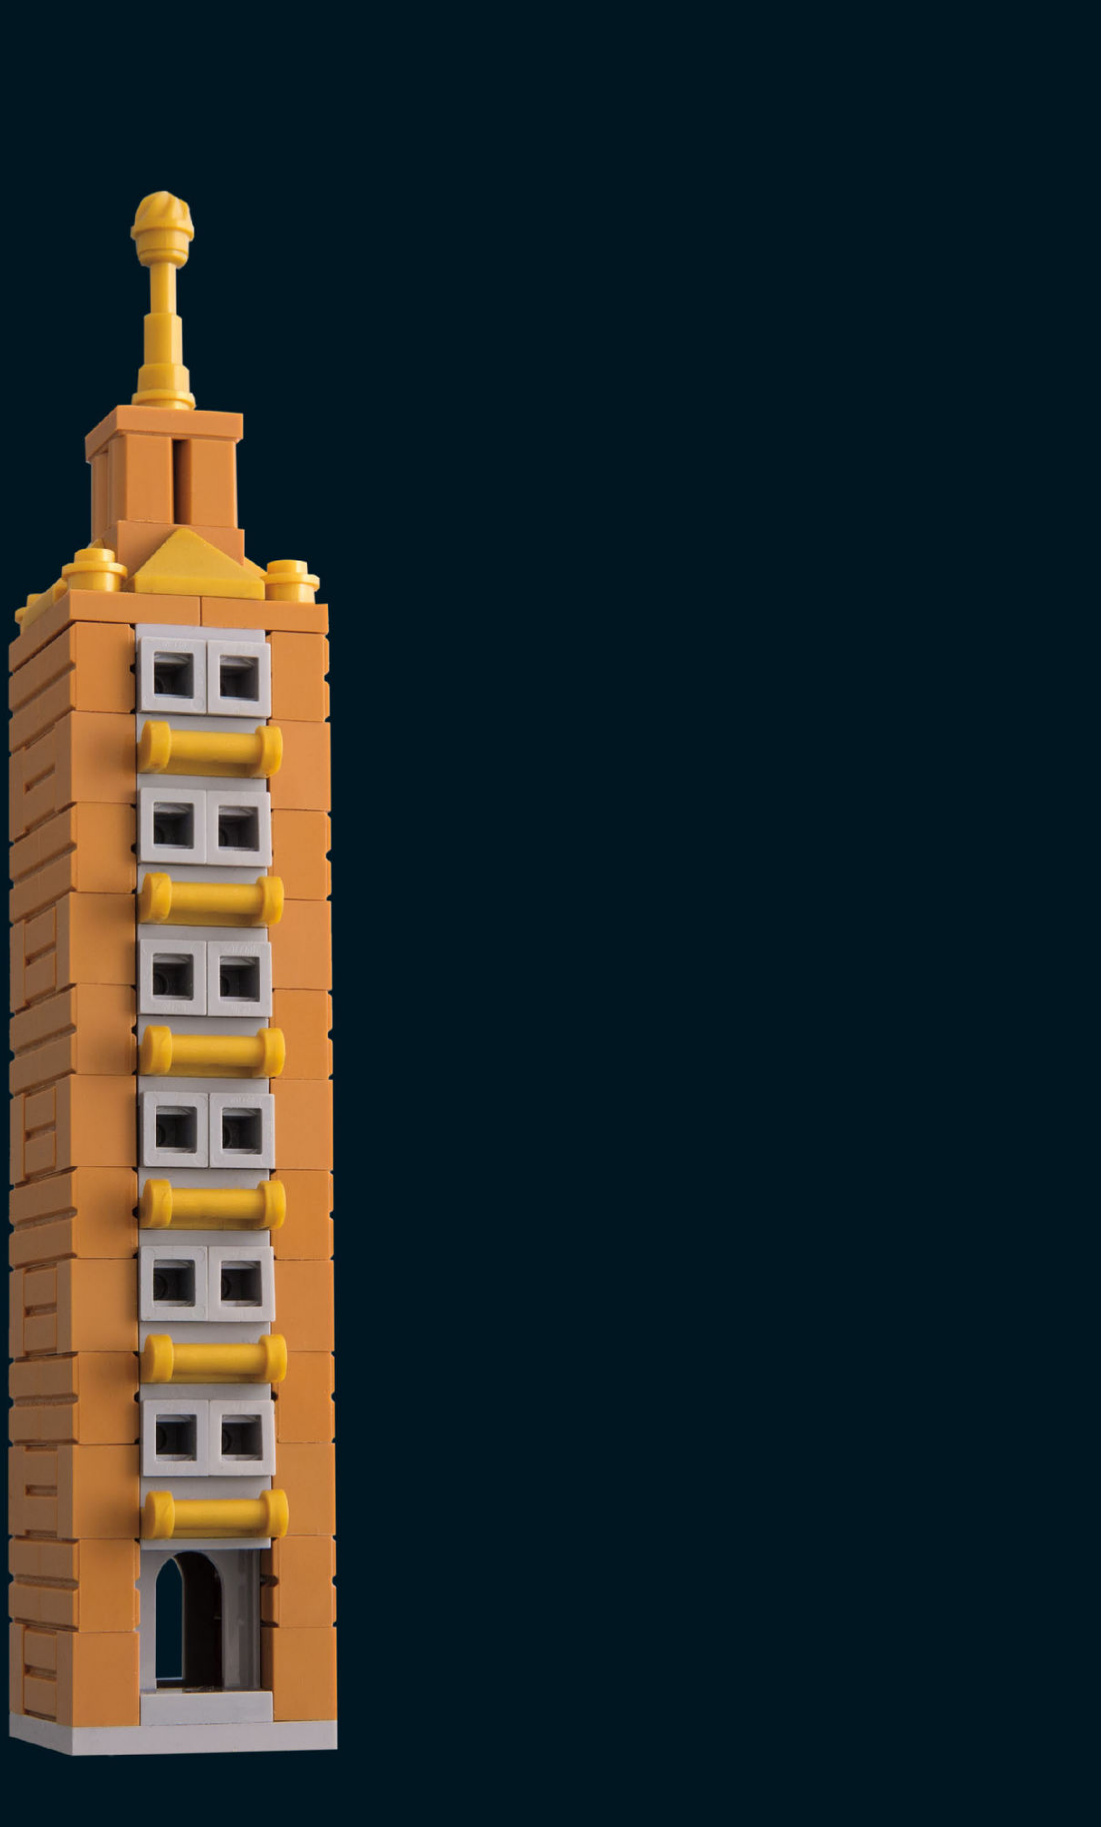
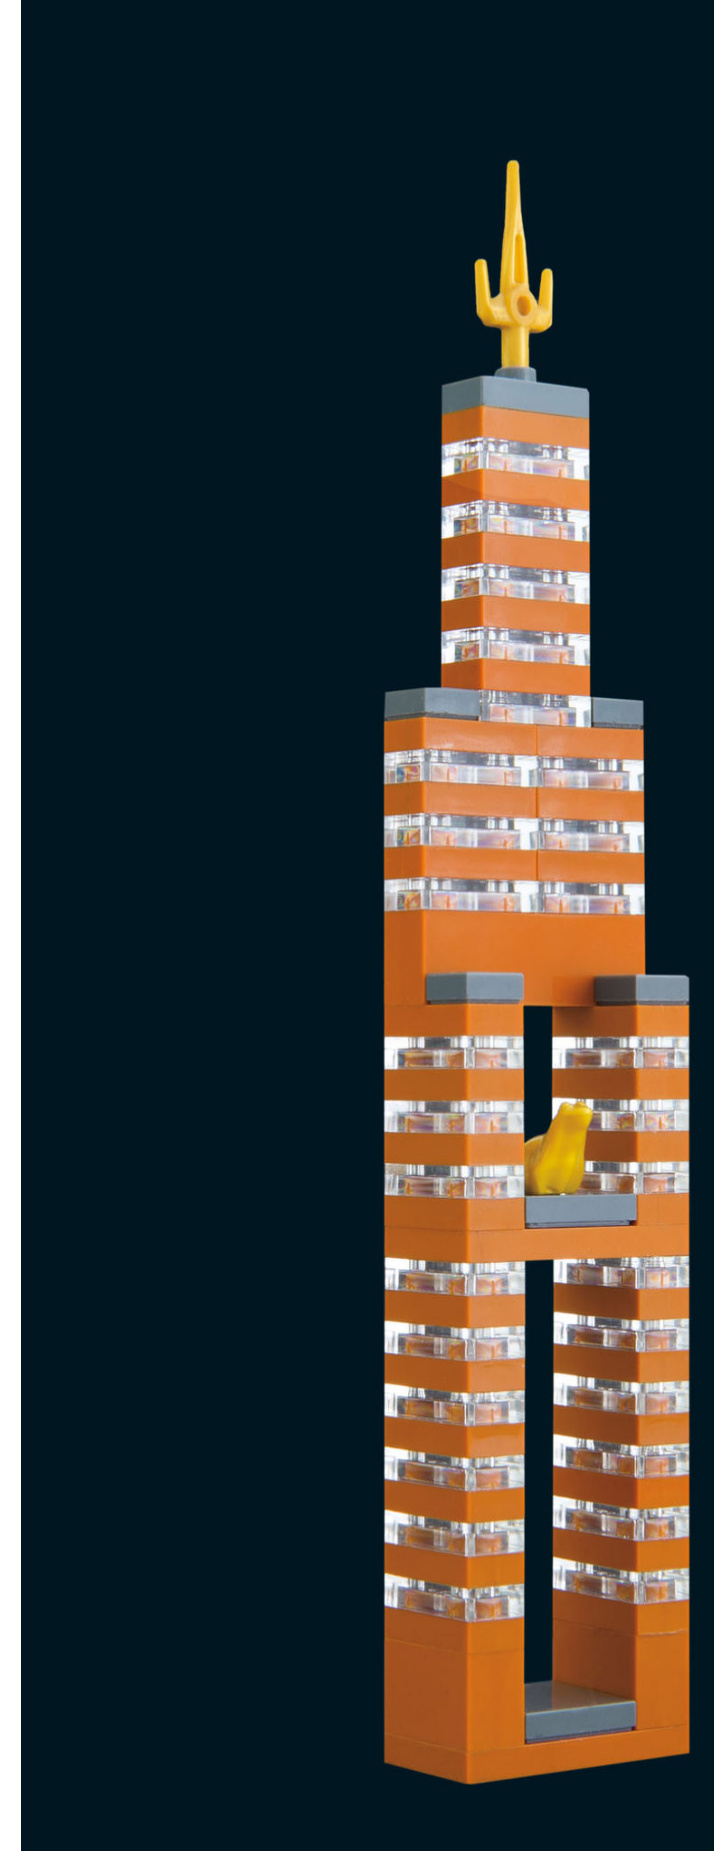
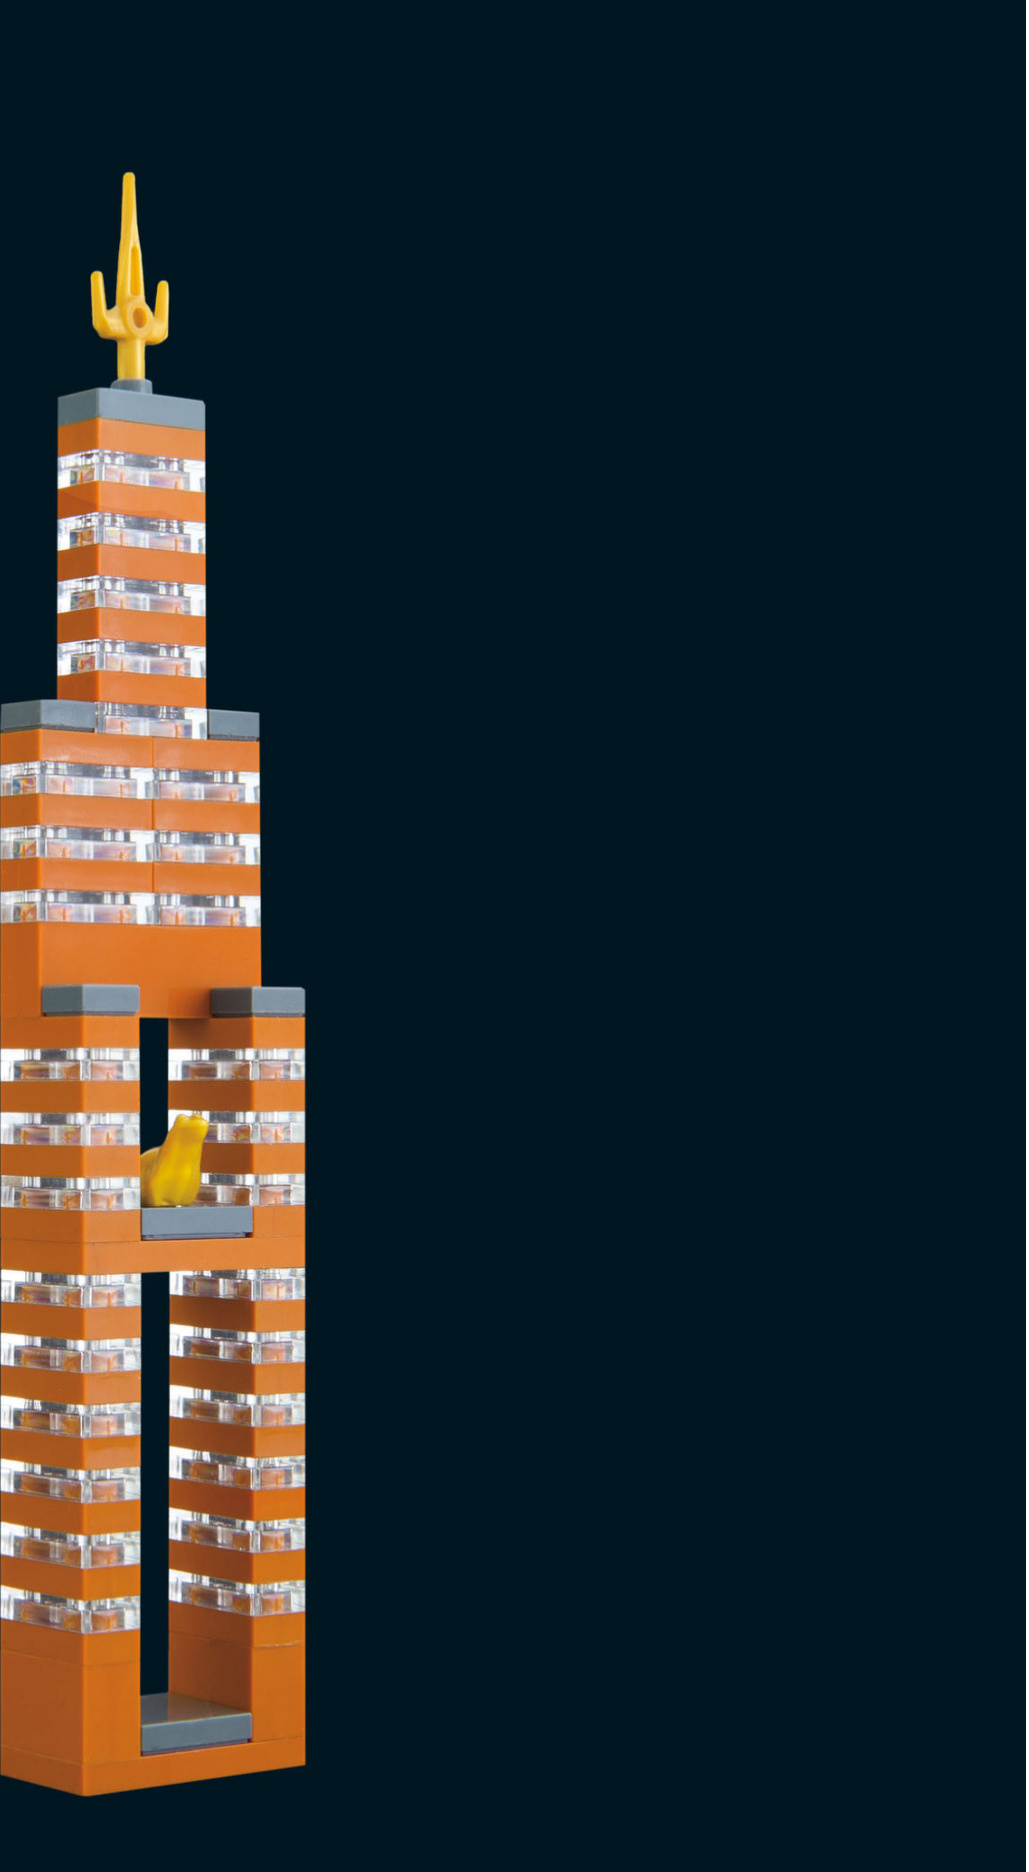
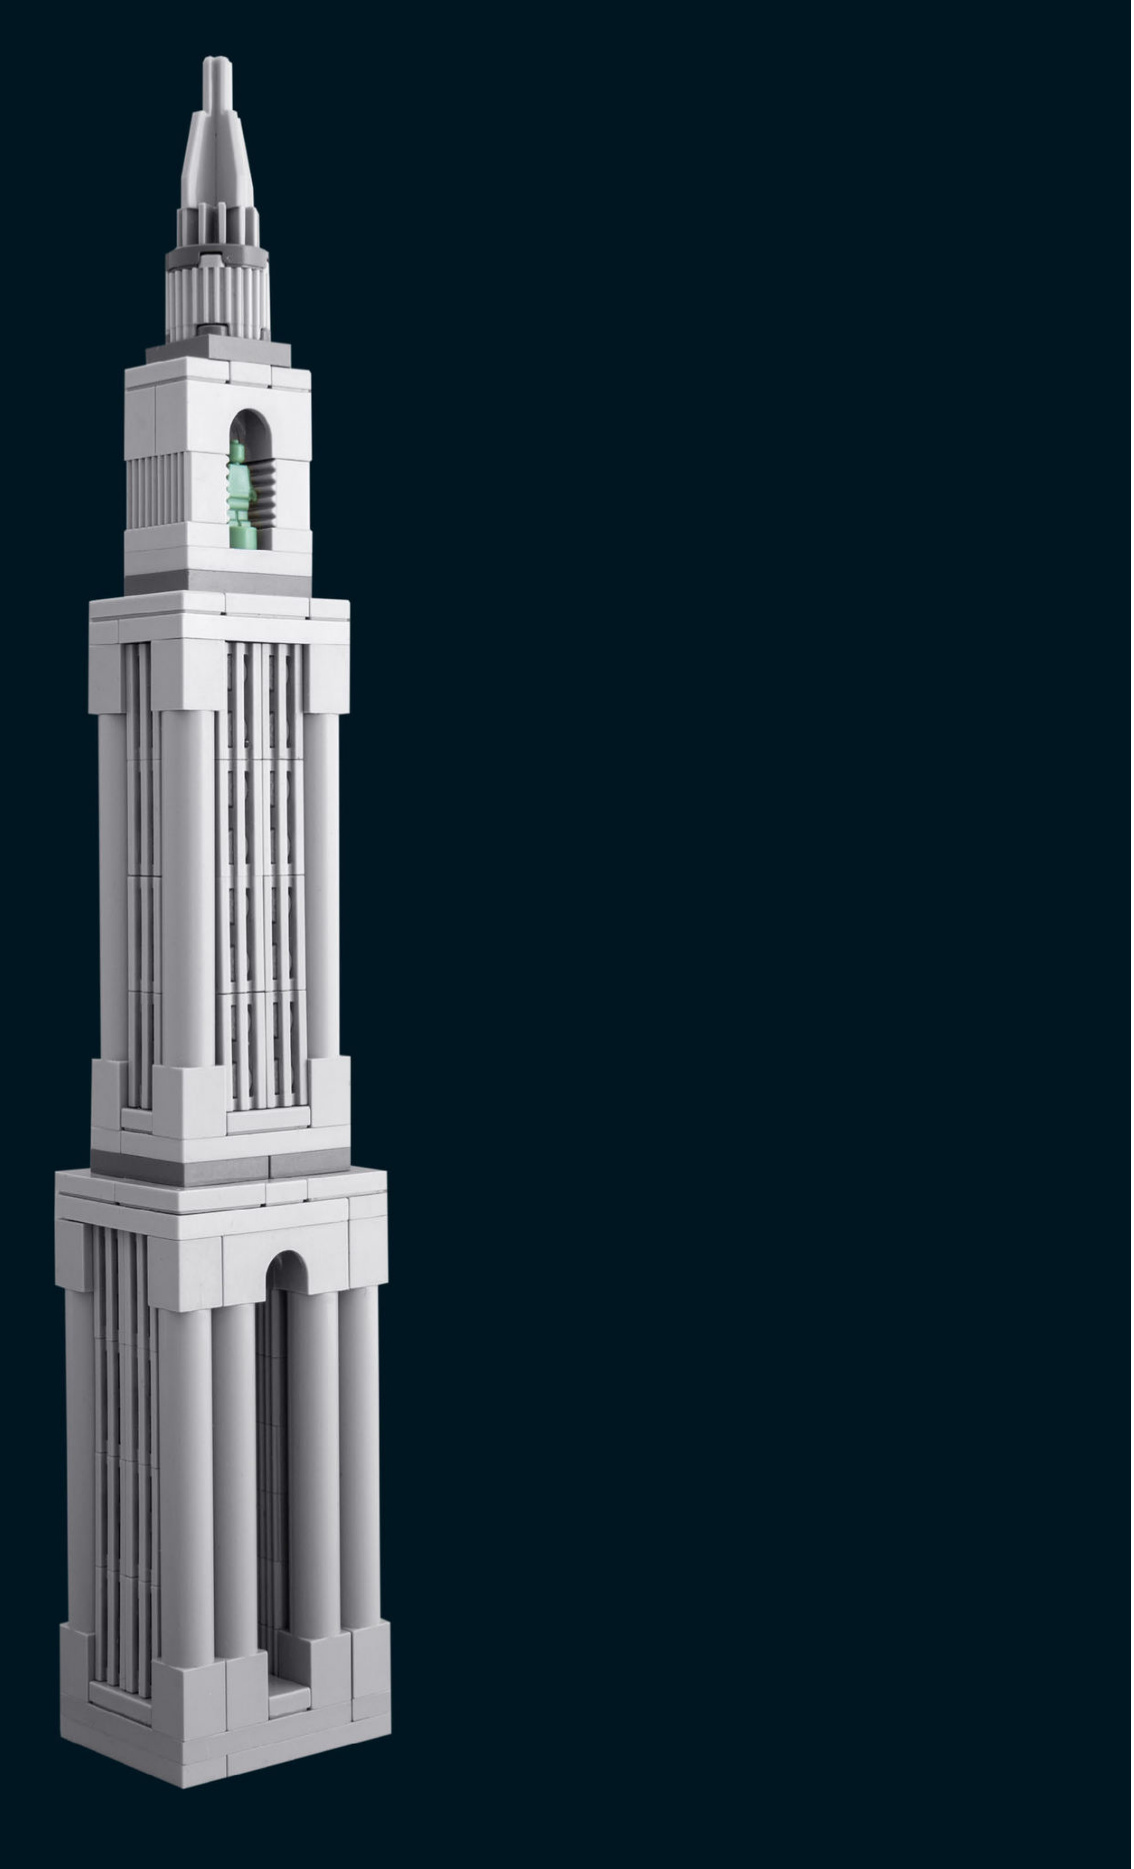
THE CLOUD SCRAPER
The Cloudscraper got its name from ironworkers who installed the building’s mooring mast during a series of squalls. The mast seemed to scrape rain out of the clouds as they swooshed past. The soaked ironworkers began using the word “cloudscraper” instead of “skyscraper,” and the name stuck.
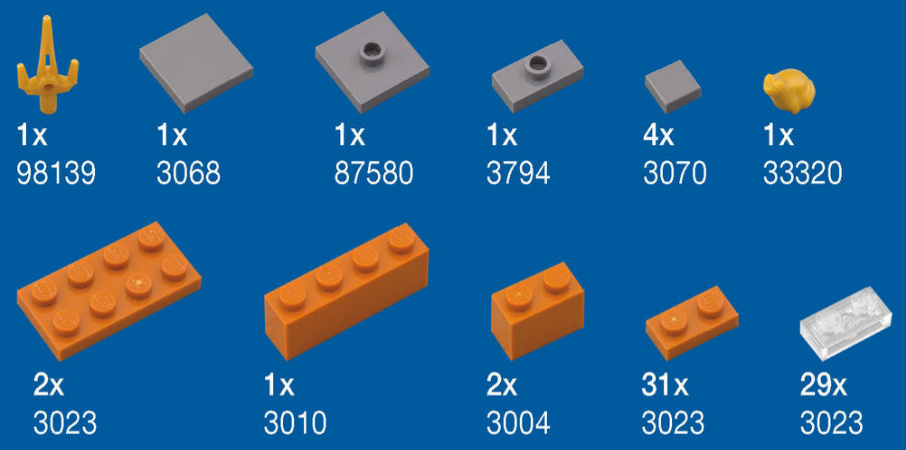
In this build, we use jumper plates to make a skyscraper that gets narrower as it gets taller — a design known as a setback or step-back skyscraper.
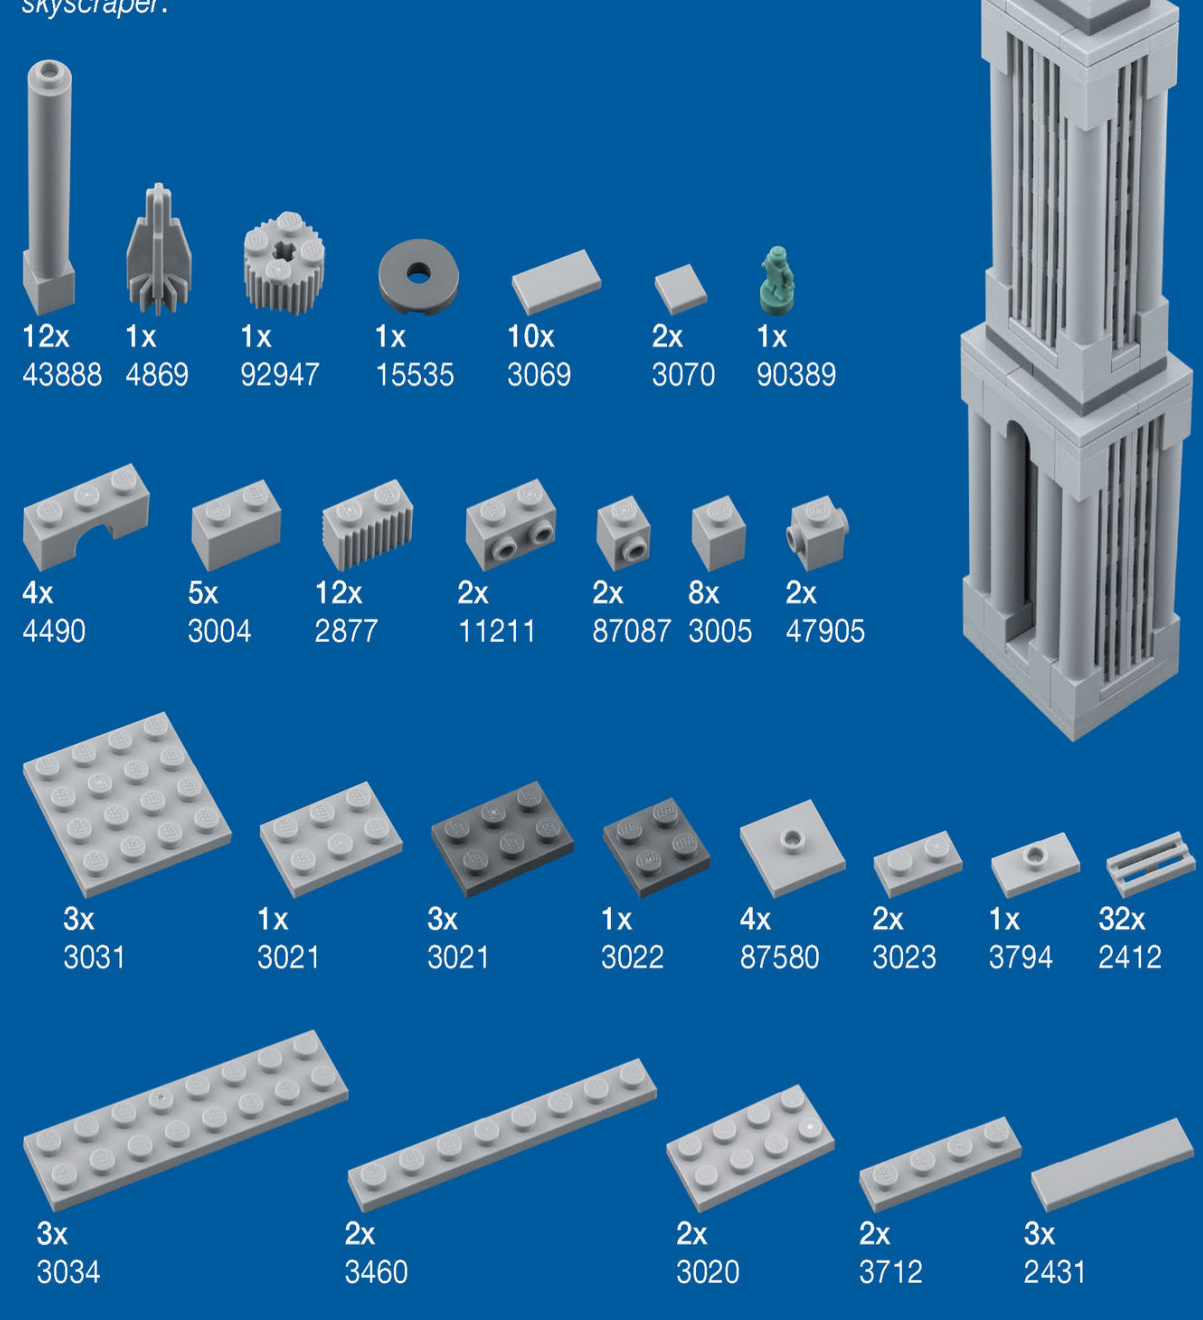
Attach the four plates you built in step 11 to the side-facing studs on the building’s center. Then attach the 1x8 plates to the narrower sides, and attach the 2x8 plates to the front and back.

MAKE IT YOUR OWN
The Cloudscraper has a tall narrow arch on the bottom floor that you can run a road or railroad through. You could even run two levels of transportation through the arch if your city demands it.
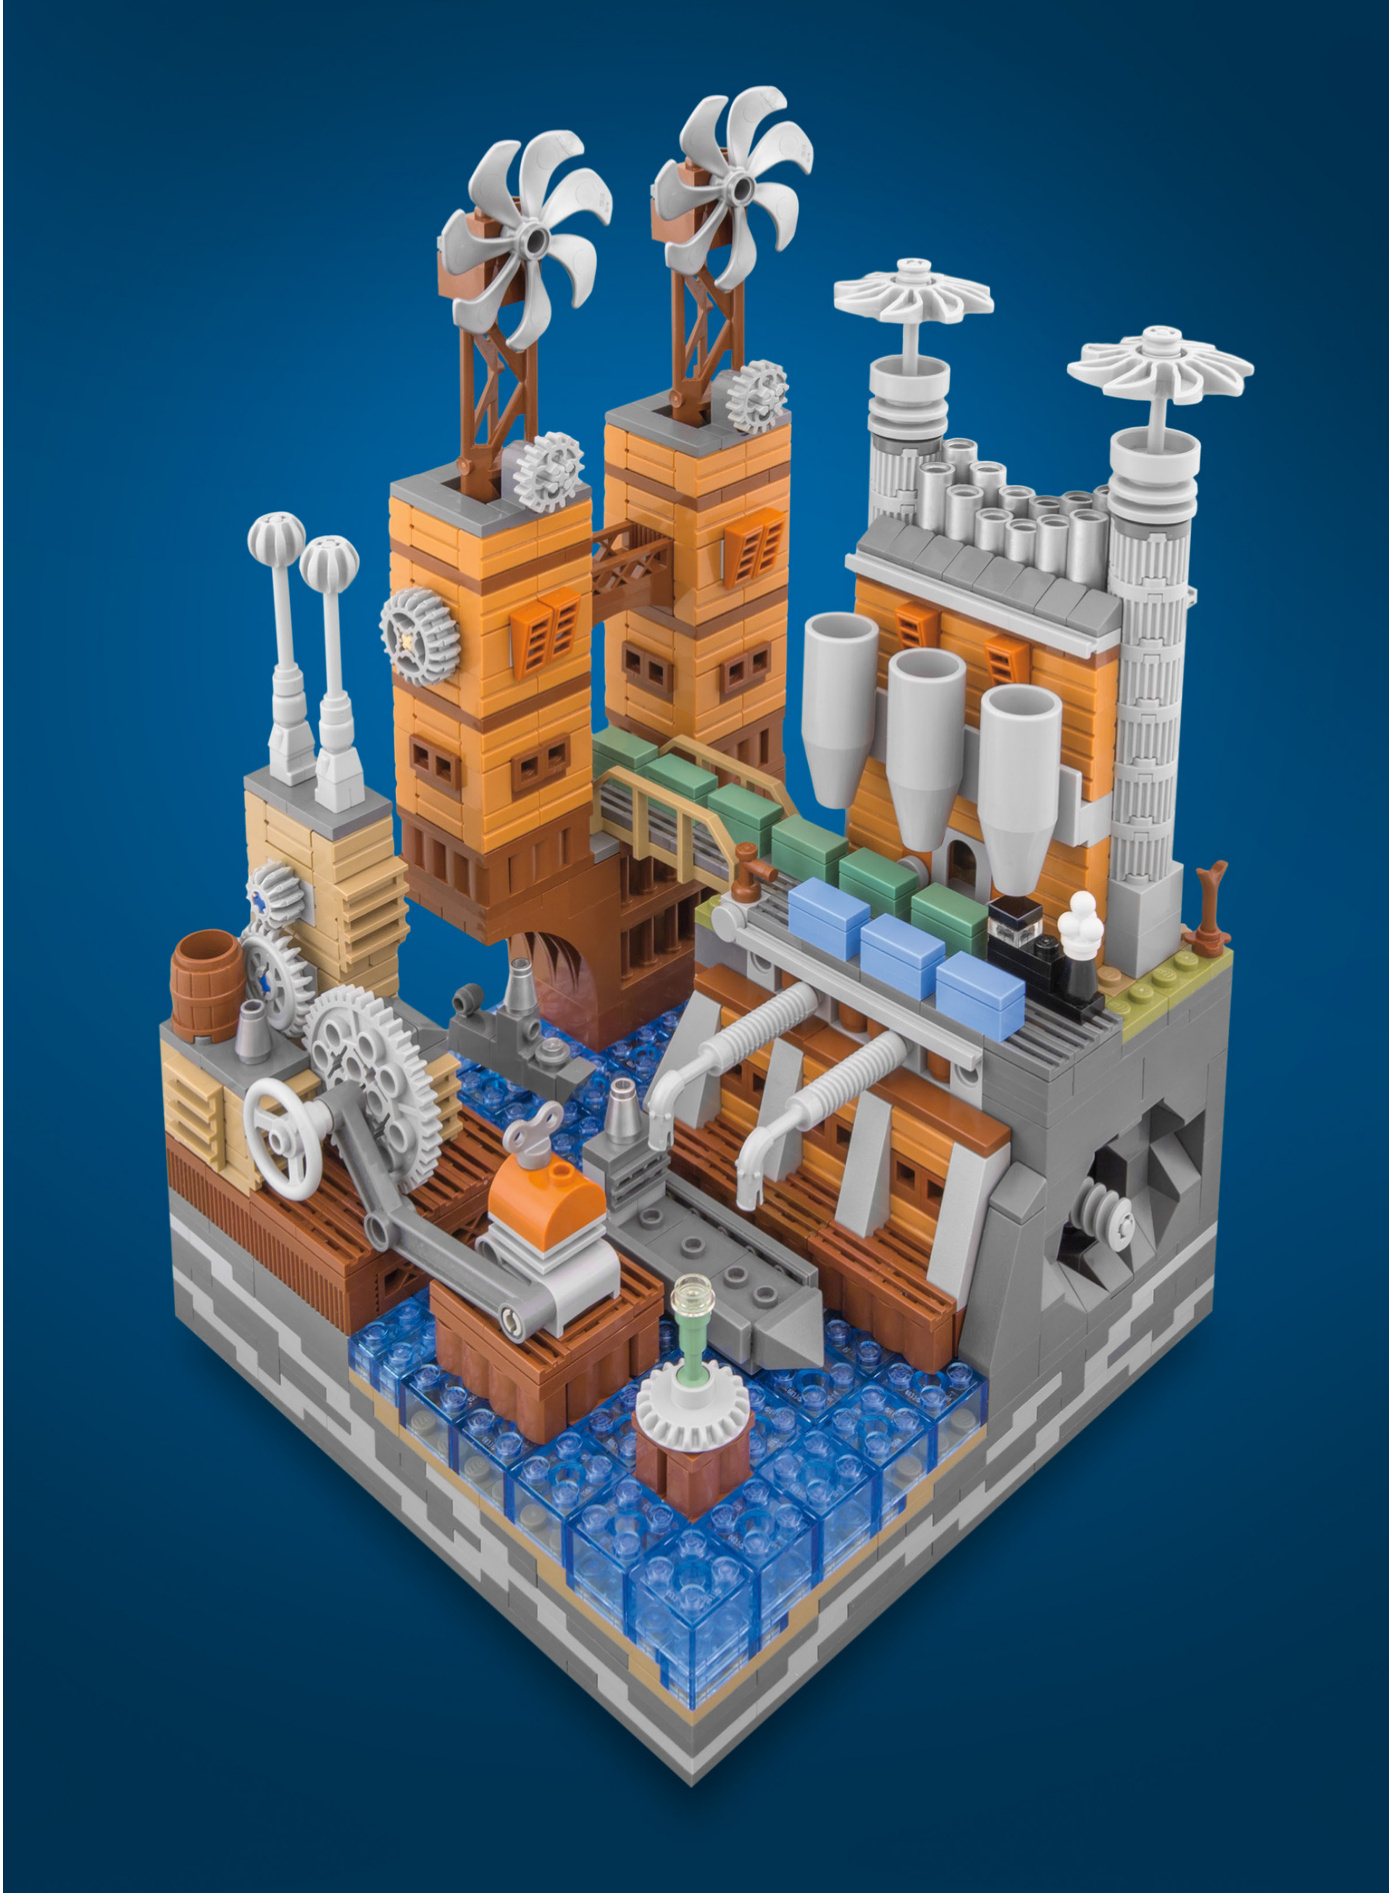
STEAM WORKS
If you can overlook the smog, hard labor, and environmental catastrophes of the Industrial Age, the era is a rich source of architectural inspiration. Massive brick factories loomed overhead like the great temples of antiquity. Their maze-like complexity and imposing bulk towering over the smoky skyline inspired awe in onlookers.
This LEGO micro city gives the industrial era a steampunk spin for added fun. Steampunk is a style inspired by the first science-fiction novels from the late 1800s, which featured steam-powered technology, considered cutting-edge at that time. A steampunk theme liberates your city from strict realism and lets you explore fantastical designs.
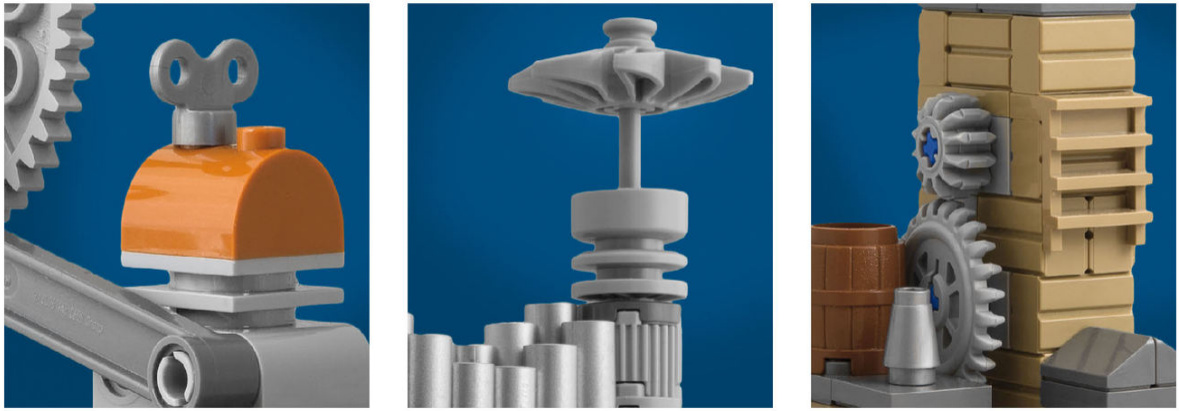
Generous use of LEGO Technic gears quickly establishes an industrial theme, along with any brick that can be used as a chimney. This city uses windmills in an effort to run on clean-power technology, but unfortunately, the wind is generated from coal-fired hot air.