乐高窗户建造技术大全
来源:《乐高建筑师》终章 | 完整内容保留,含 502 张图片 | 乐高知识库完结篇
本章详细介绍了各种乐高窗户的建造技术,从微尺度到大型凸窗,涵盖了透明零件堆叠、科技砖应用、铰链零件创意使用等高级技巧。这是《乐高建筑师》系列的最后一章,标志着整个乐高知识体系的完整收录。
完整内容
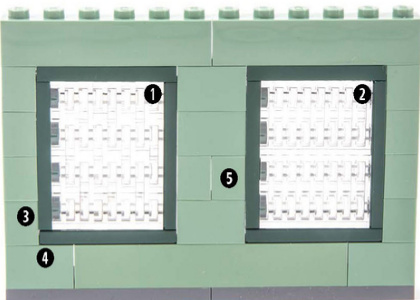
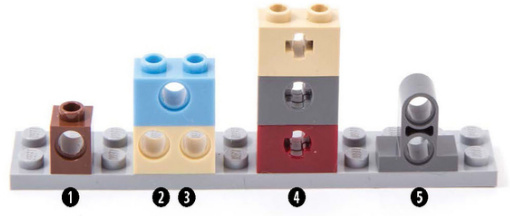
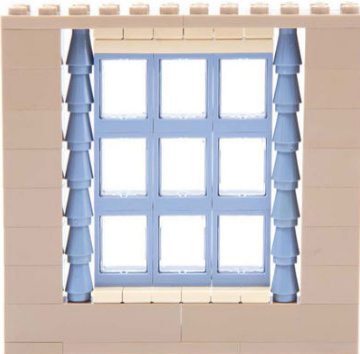
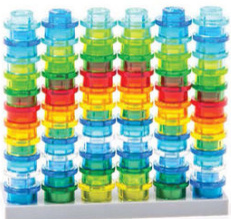
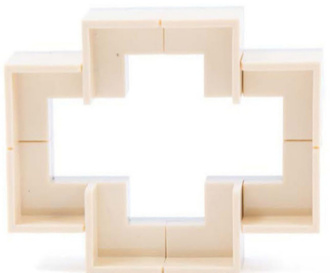
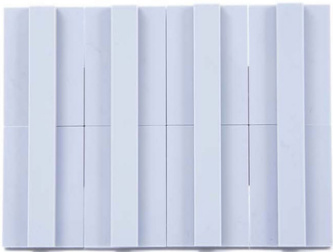
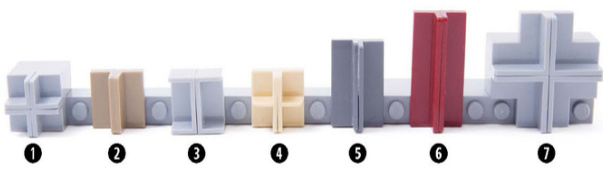
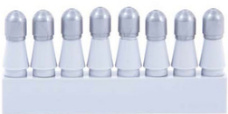
Microscale Windows
Stacking transparent plates and bricks creates frameless windows that are particularly useful in microscale buildings.
How To
Clear plates and bricks create minimalist windows.
0 1x1 brick #3005
2 1x1 plate #3024
? 1x1 cheese slope #54200
4 1x2 brick without tube #3065
? 1x2x1 panel #4865
6 1x2 plate #3023
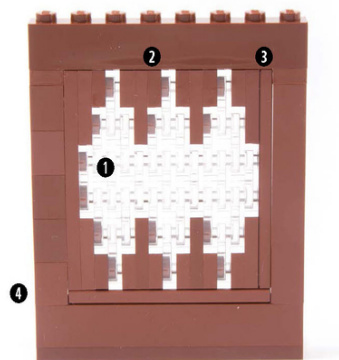
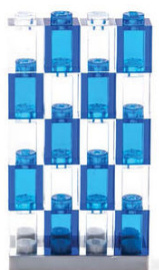
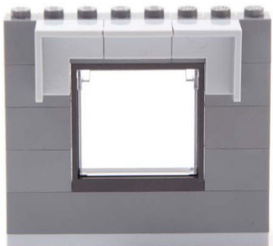
You can use the subtle lines created by the edges and studs as window pane divisions.
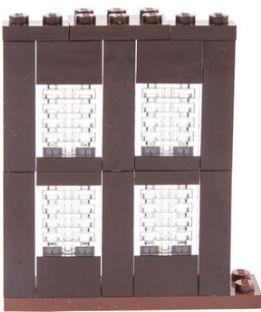
Stackedplates make even smaller subdivisions than bricks and create the look of leaded glass panes.
0 1x2 plate #3023 ④ 1x4 tile #2431
1x1 plate #3024 ? 1x1 brick with stud
1x4 plate #3710 on side #87087
1 1x2 plate #3023 ? 1x6 tile #6636 1x1 plate #3024 4 1x1 brick with stud on side #87087
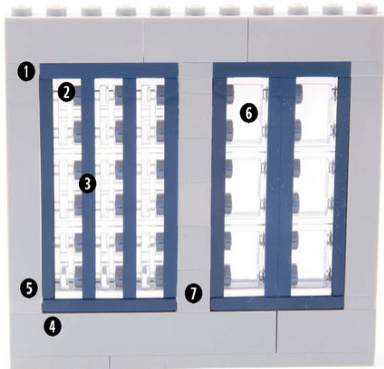
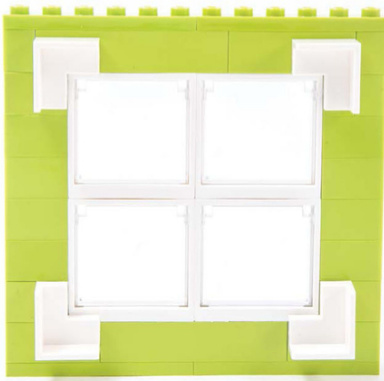
Unlike regular bricks,transparent bricks have no tube on the bottom for a stud.
0 1x4 plate #3710 ? 1x6 tile #6636
2 1x2 plate #3023 6 1x2 brick without tube #3065
3 1x6plate #3666 0 1x1 brick with studs on 2 sides
4 1x4 tile #2431 #47905
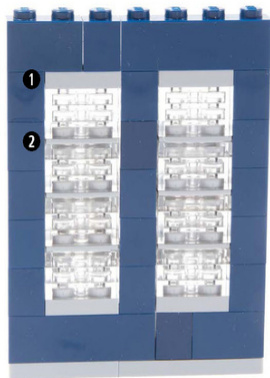
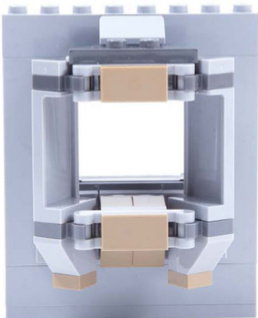
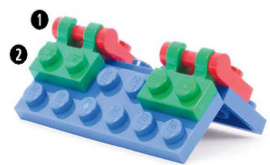
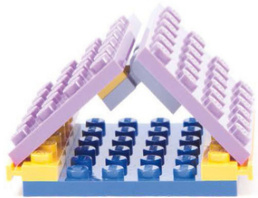
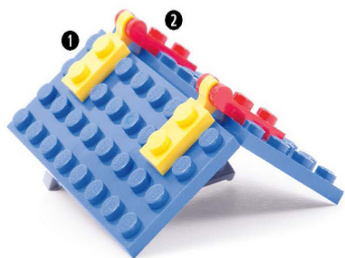
Use hinge brick tops to create super-thin muntins that pair well with microscale windows.
1 1x2 plate #3023
2 1x2 hinge brick top #3938
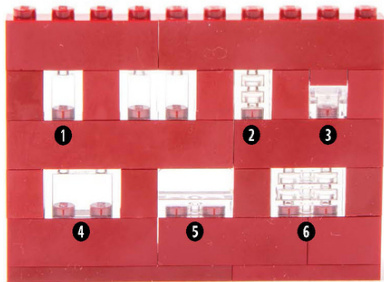
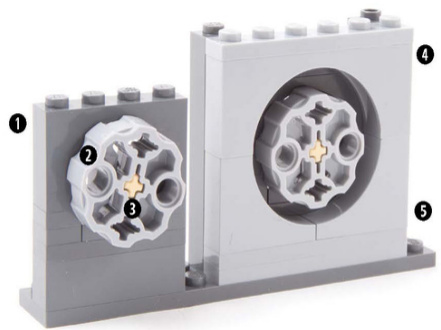
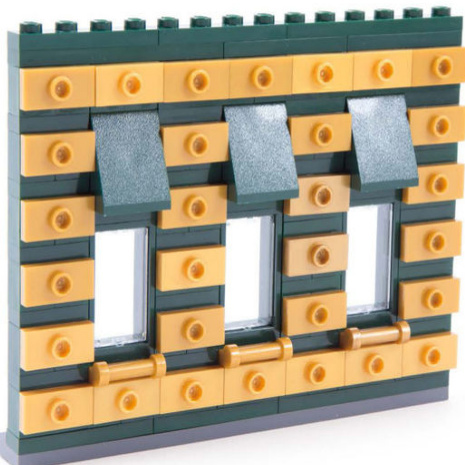
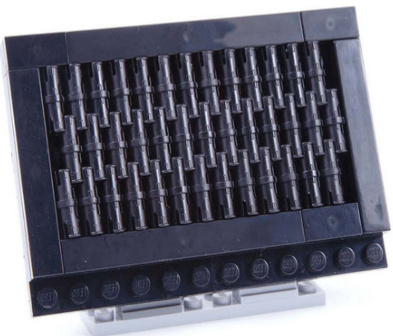
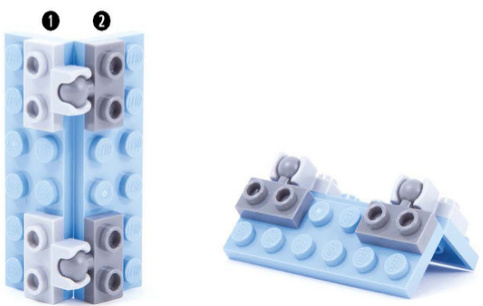
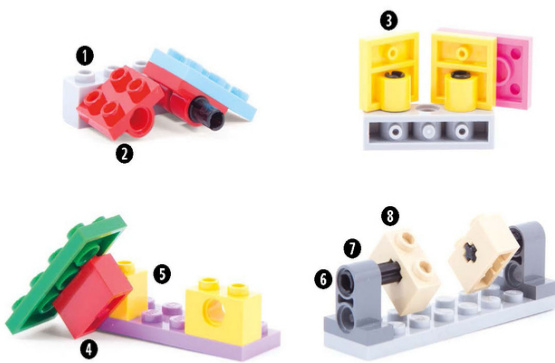
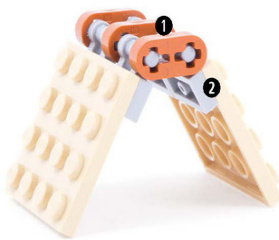
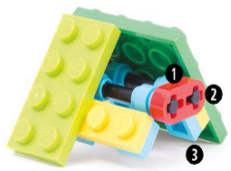
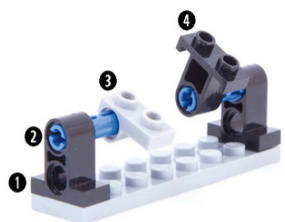
Tiny Windows
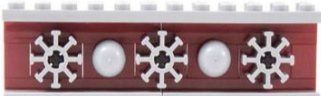
The holes in headlight and Technic bricks can be used as tiny windows for your microscale structures.

You can also use the backs of 1x1 headlight bricks (#4070)to create windows.
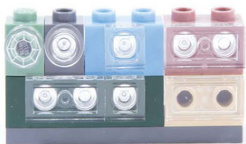
Fit Technic bricks with transparent plates and tiles to give them the look of glass.
HowTo
Technic bricks have holes for pins and axles, but these holes also work well as tiny windows.
1x1Technic brick #6541
1x2Technic brick with 1 hole #3700
1x2 Technic brick with 2 holes #32000
4 1x2 Technic brickwith axle hole #32064
? 1x2 Technic pin connector plate #32530
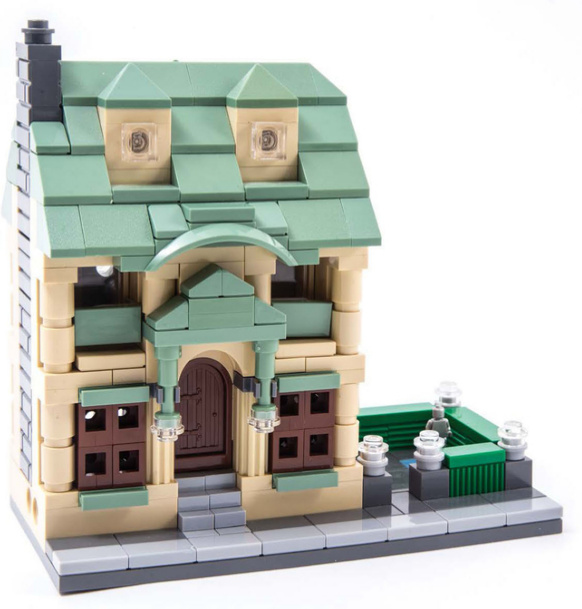
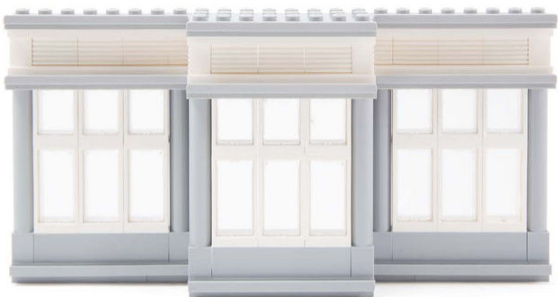
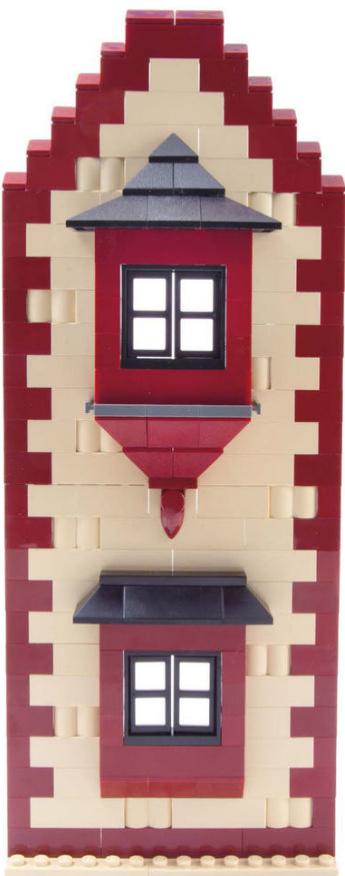
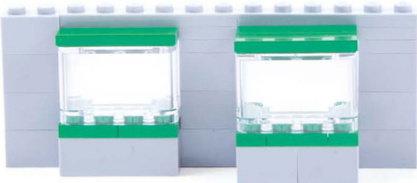
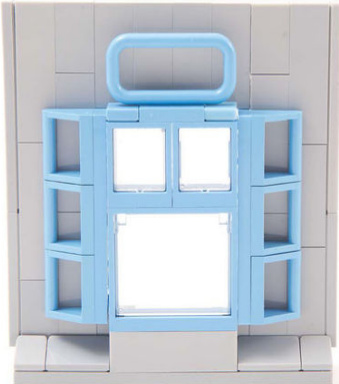
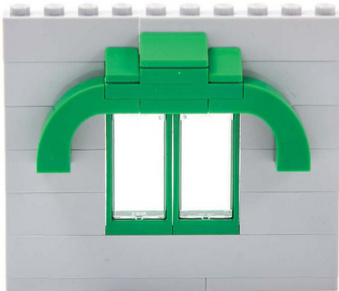
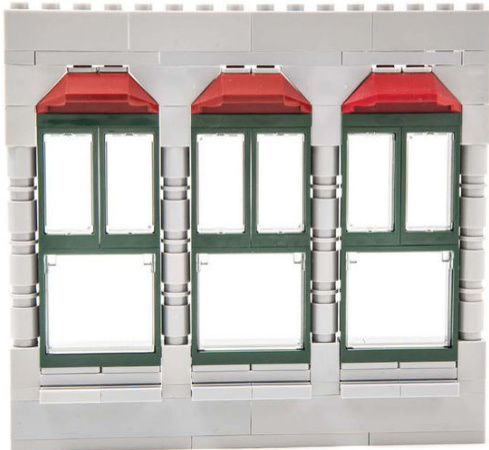
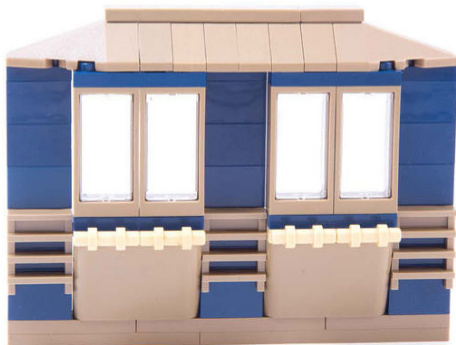
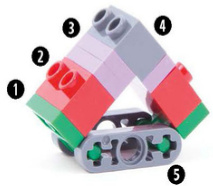
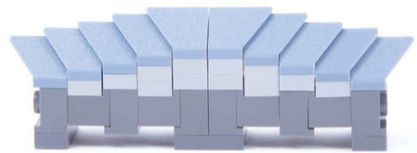
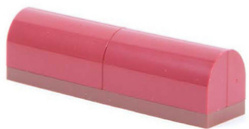
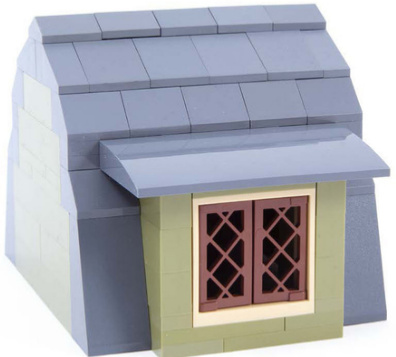
Bay Windows
Bay windows project outfrom the surrounding walls.They commonly have a flat front and two angled sides.
The 3x8x6 baywindow (#30185)is a ready-madebaywindowwith transparent glass glued into the frame.
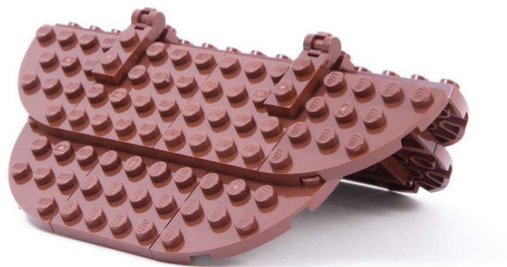
The bay window piece fits perfectly on the wedge brick (#30505).
Stack 2x6x2 train front windows (#17454) for a quickand easybaywindow.
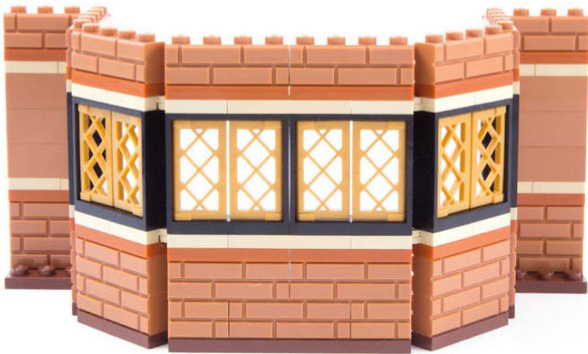
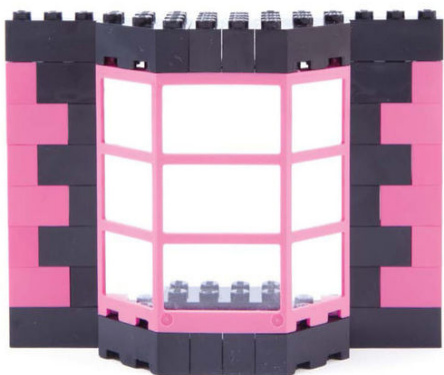
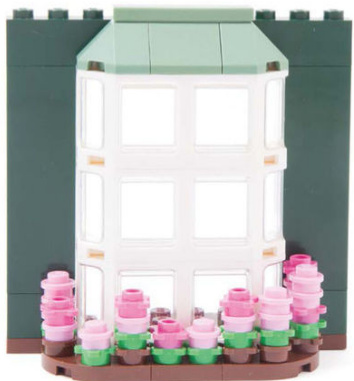
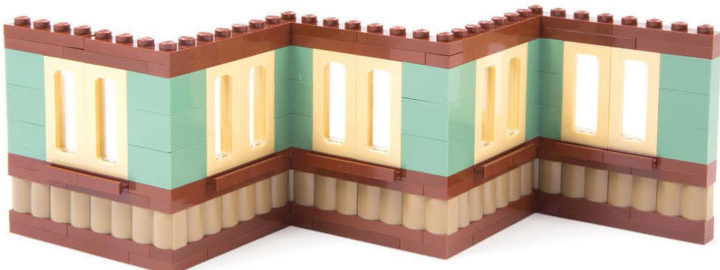
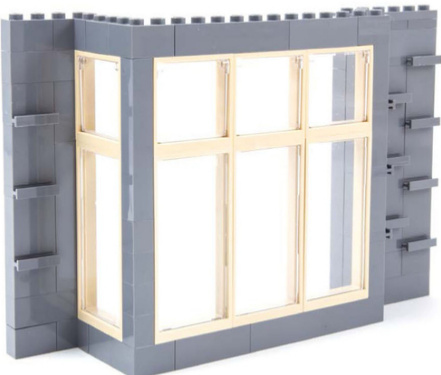
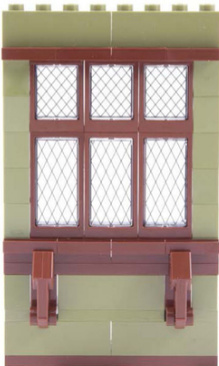
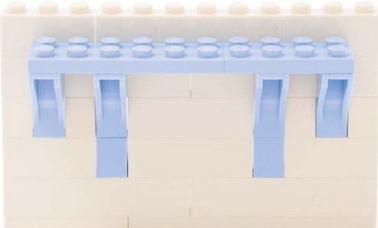
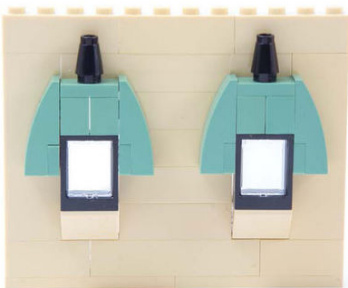
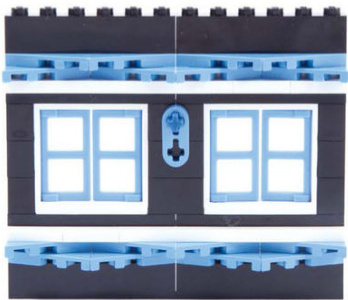
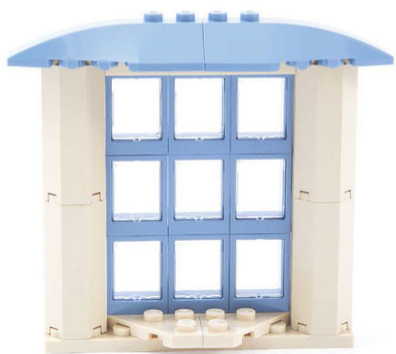
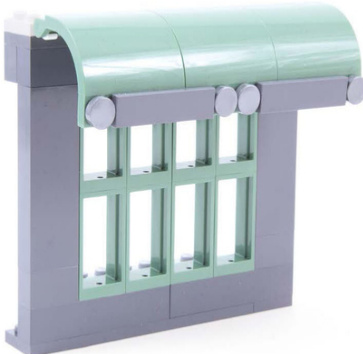
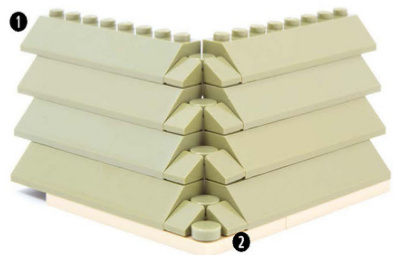
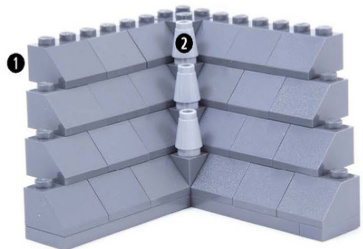
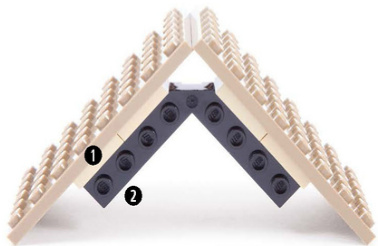
You can also build baywindowswhere the windows span the entire length of the walls.
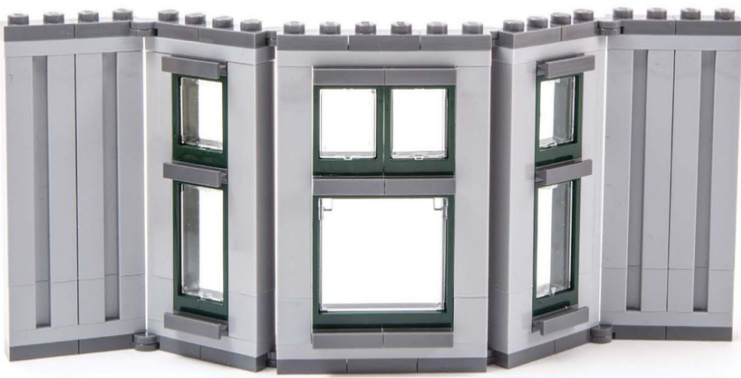
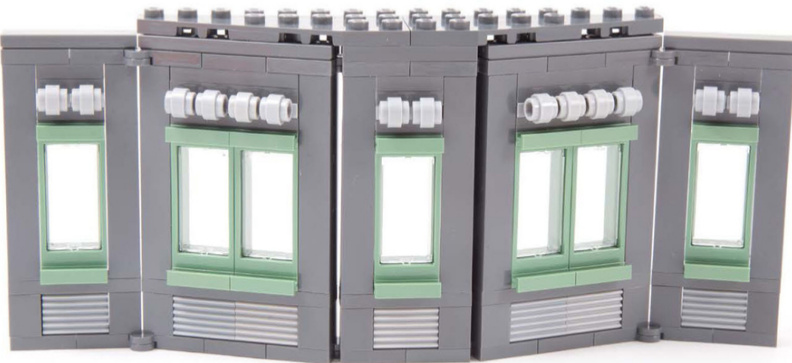
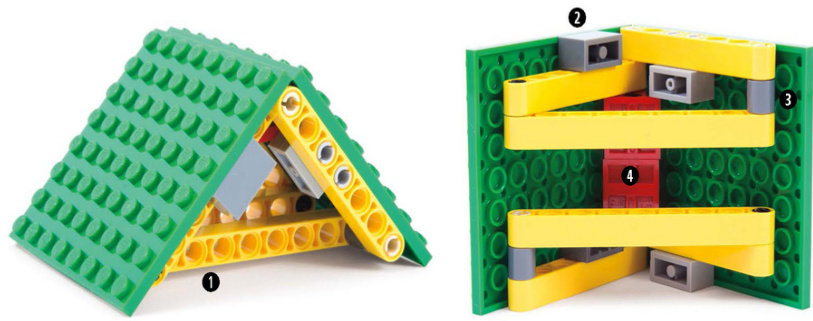
You can vary the angle of the side windows by using hinge plates to connect the walls.
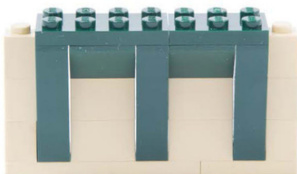
Or you can use wedge plates for a fixed angle.This gives your window a very subtle bay shape.
A small window in the center of each wall segment allows for wall detailing.
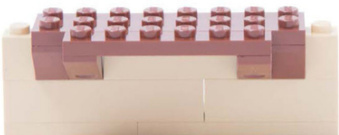
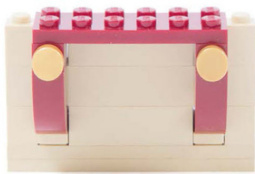
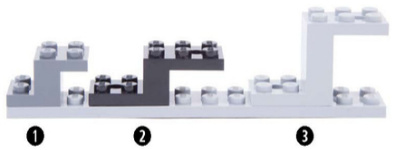
Use 2x3wedge bricks (#6564/#6565)and plates (#43723/#43722) to make a small bay window.
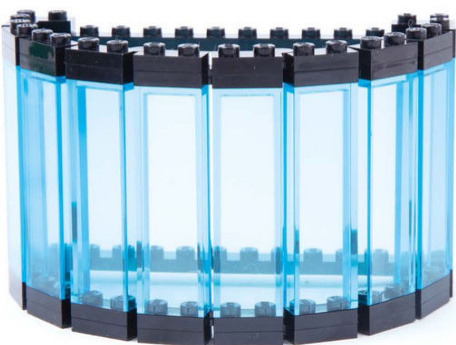
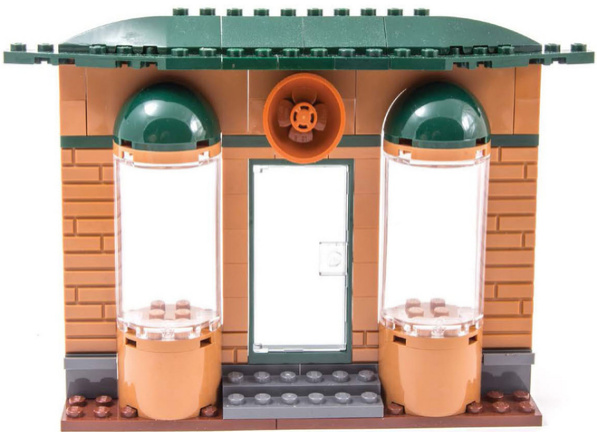
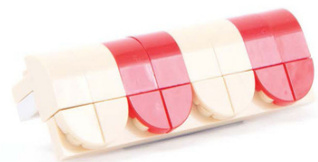
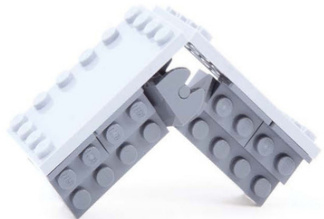
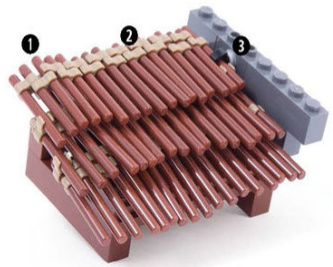
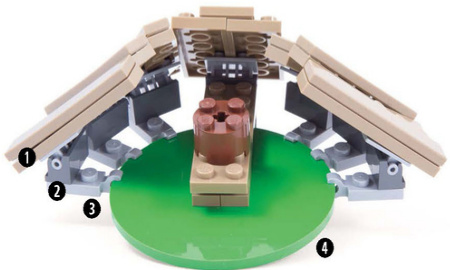
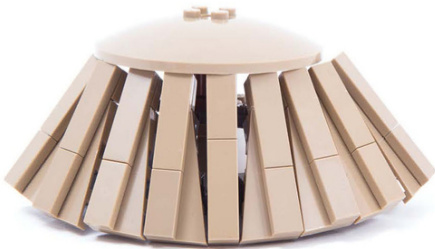
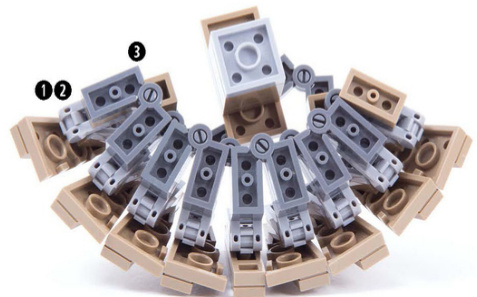
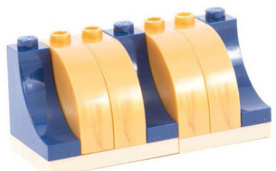
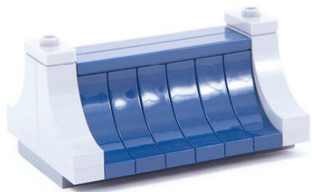
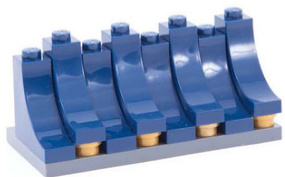
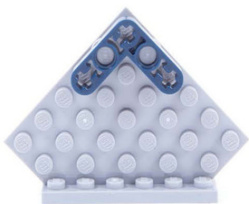
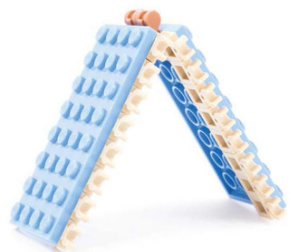
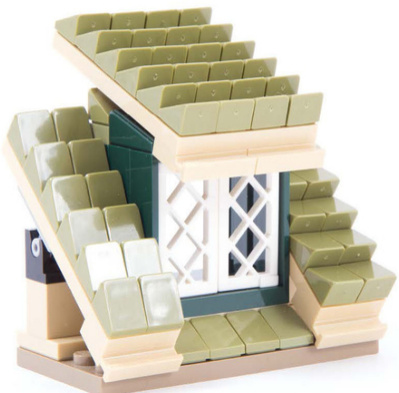
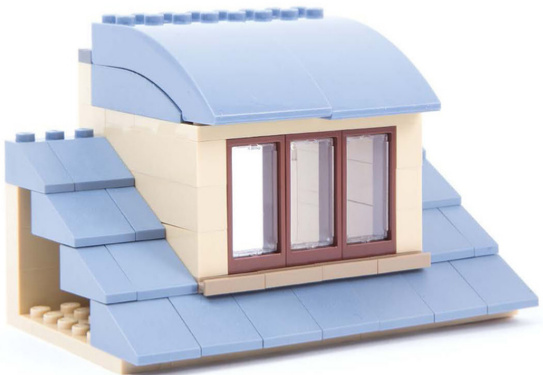
Bow Windows
Bow windows are bay windows that have more than three sidesand may even form a more curved shape.

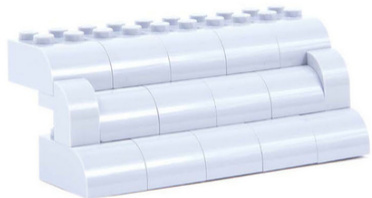
Thisbowwindowismadecompletelyoutof 1x4x3 windows (#60594).
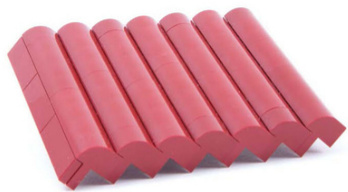
This bow window is made completely out of transparent1x2x5bricks(#2454).
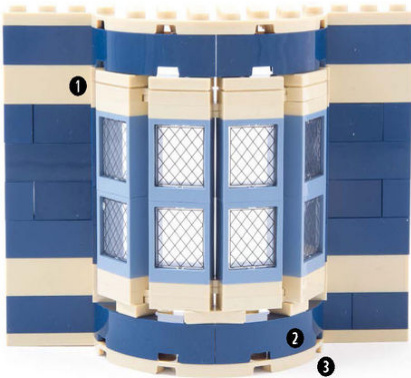
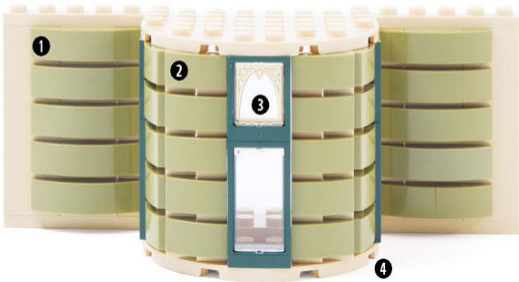
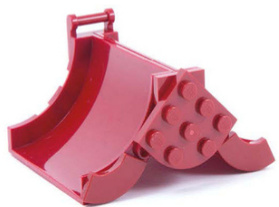
01x4hingeplate 2429with2430
2 4x4 macaroni brick #48092
4x8 round plate #22888
1 1x4double curved slope #93273
21x2curved slope #11477
3 1x2x2 printed glass (from set #41174)
0 4x8 round plate #22888
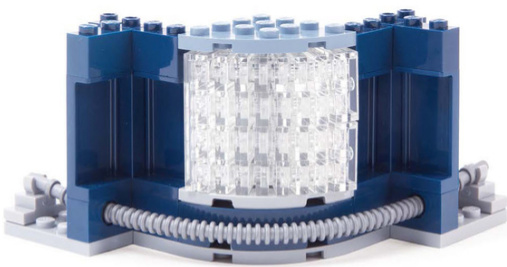
1x2plate #3023
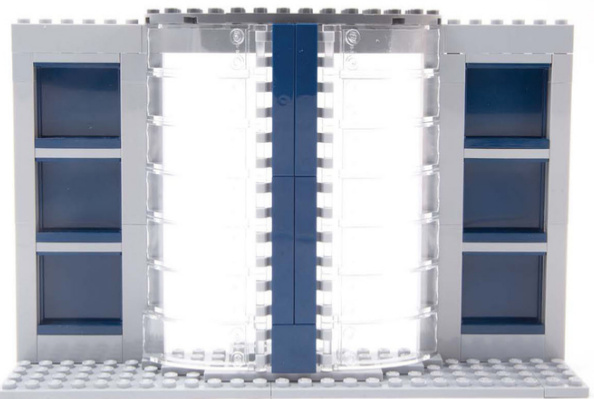
6x2x2windscreen #92474
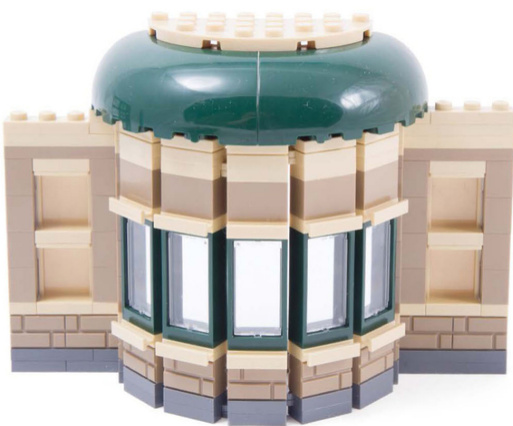
6x6x2 round corner brick #87559
2x4x5 half cylinder bricks #85941
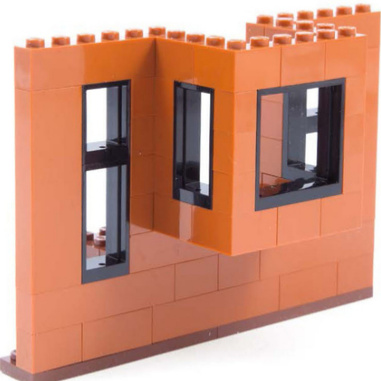
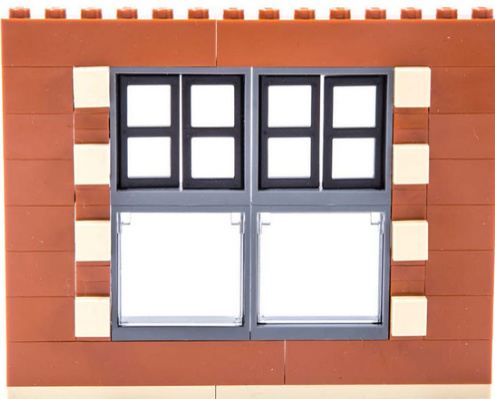
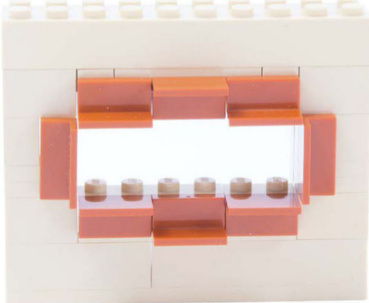
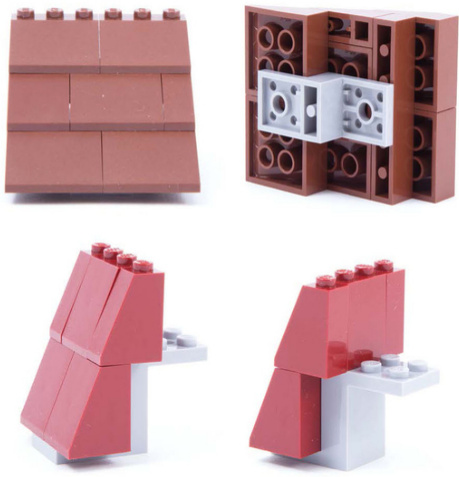
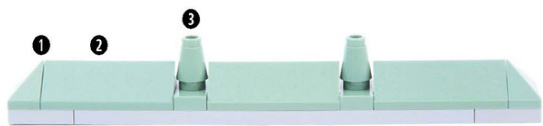
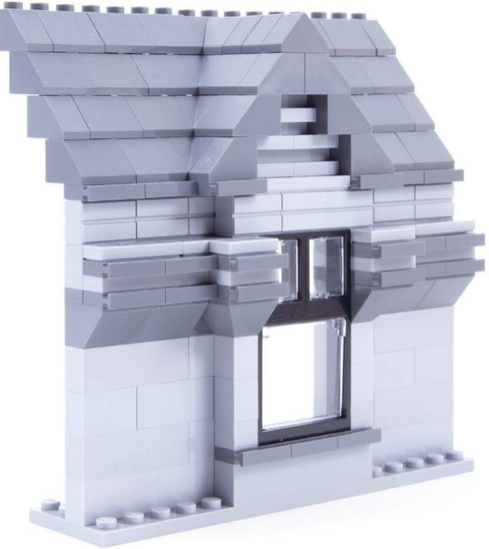
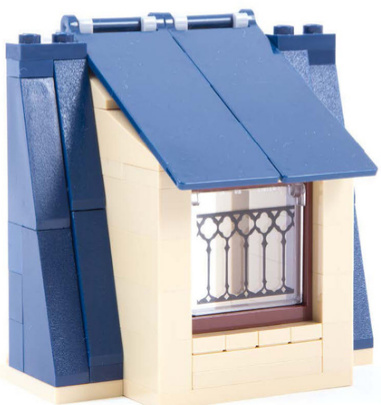
Box Windows
Box windows are bay windows whose sides form a right angle
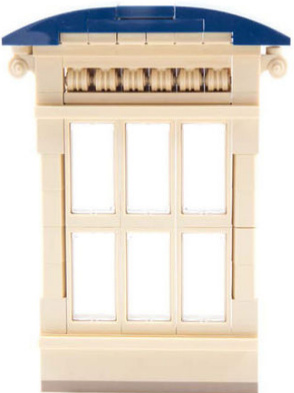
Use columns and cornices to frame a box window.
1x2x3trainwindow#4035
You can mix different window framing and roof treatments.

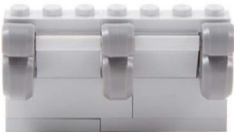
Use hingeplatesto createflexible angles or cornerplatesforfixedangles.
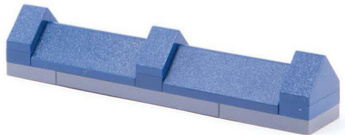
Use a shallow popout to emphasize a window.
2x3 tile with 2 clips #30350
Kitchen box window
Box windows don’t have to be symmetrical!
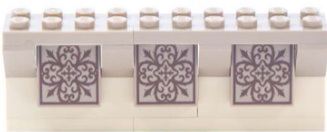
Contrasting panels and bricks
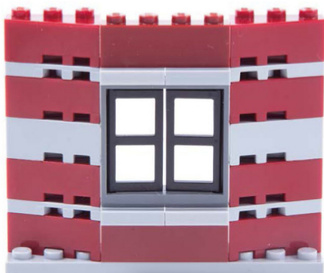
Pop out a window by 1 or 2 studs.
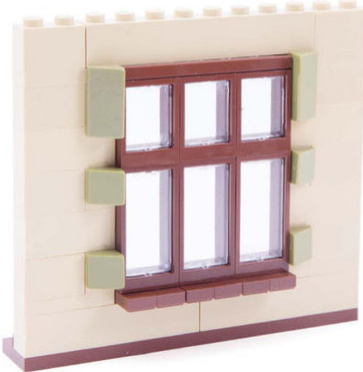
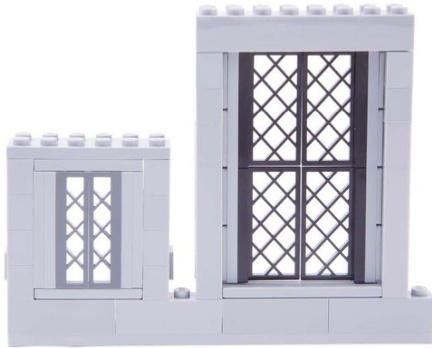
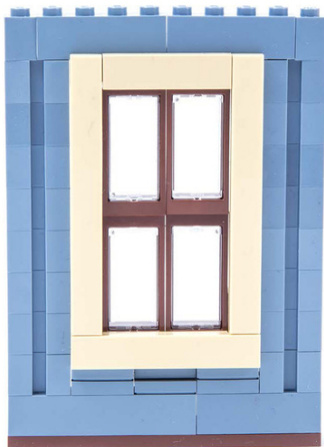
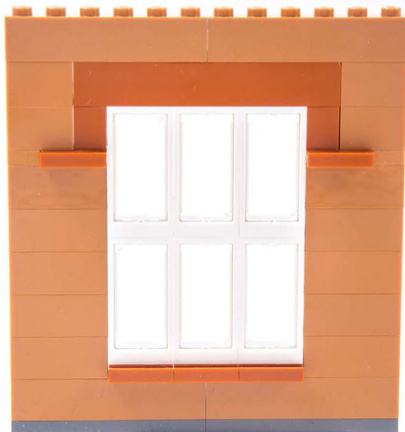
Recessed and Raised Windows
Regardlessof howyou buildyour window,how it sits inthewallis importantto its overall look.
Use1x2jumper plates (#3794/#15573) to offset windows by half a stud.
Or use jumper platesto insetwindowsbyhalf a stud.
Youcanalsouse1x4offsetplates (#4590)for a half-stud offset.
Offset a window so it can sit on a windowsill.
Set back a window by one stud tocreatea decorativewindowbox.
This window is offset one stud forward and framed with 1x2 tiles with handle (#2432).
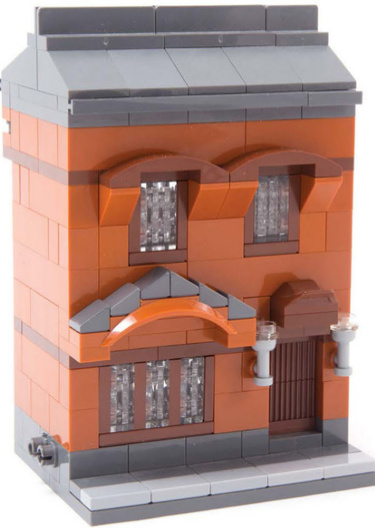
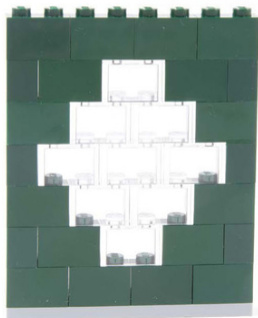
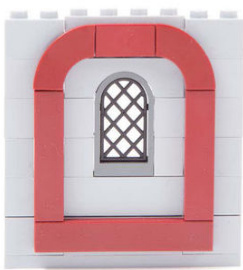
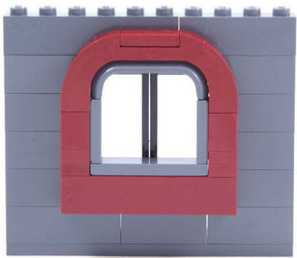
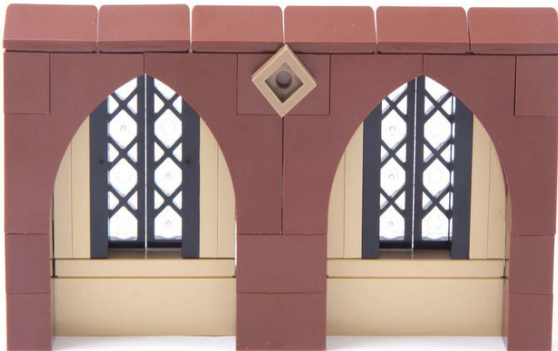
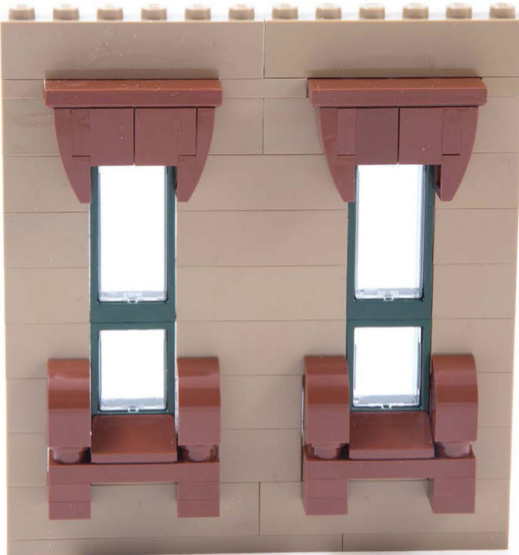
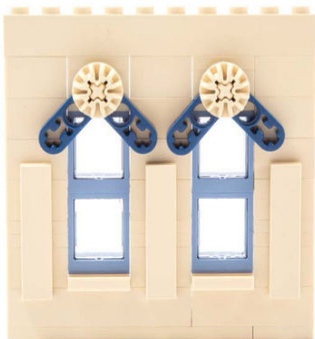
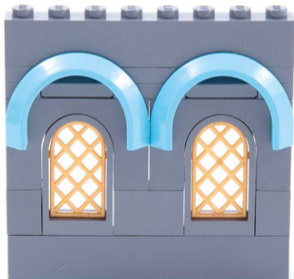
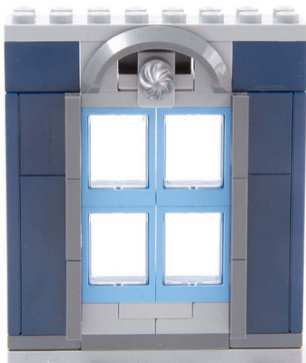
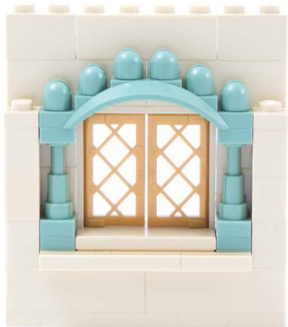
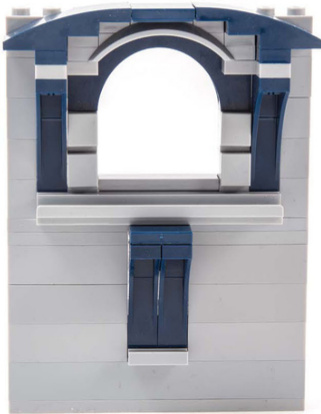
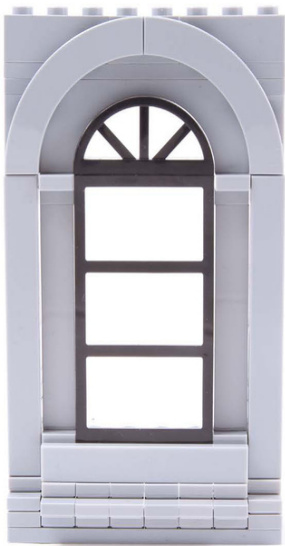
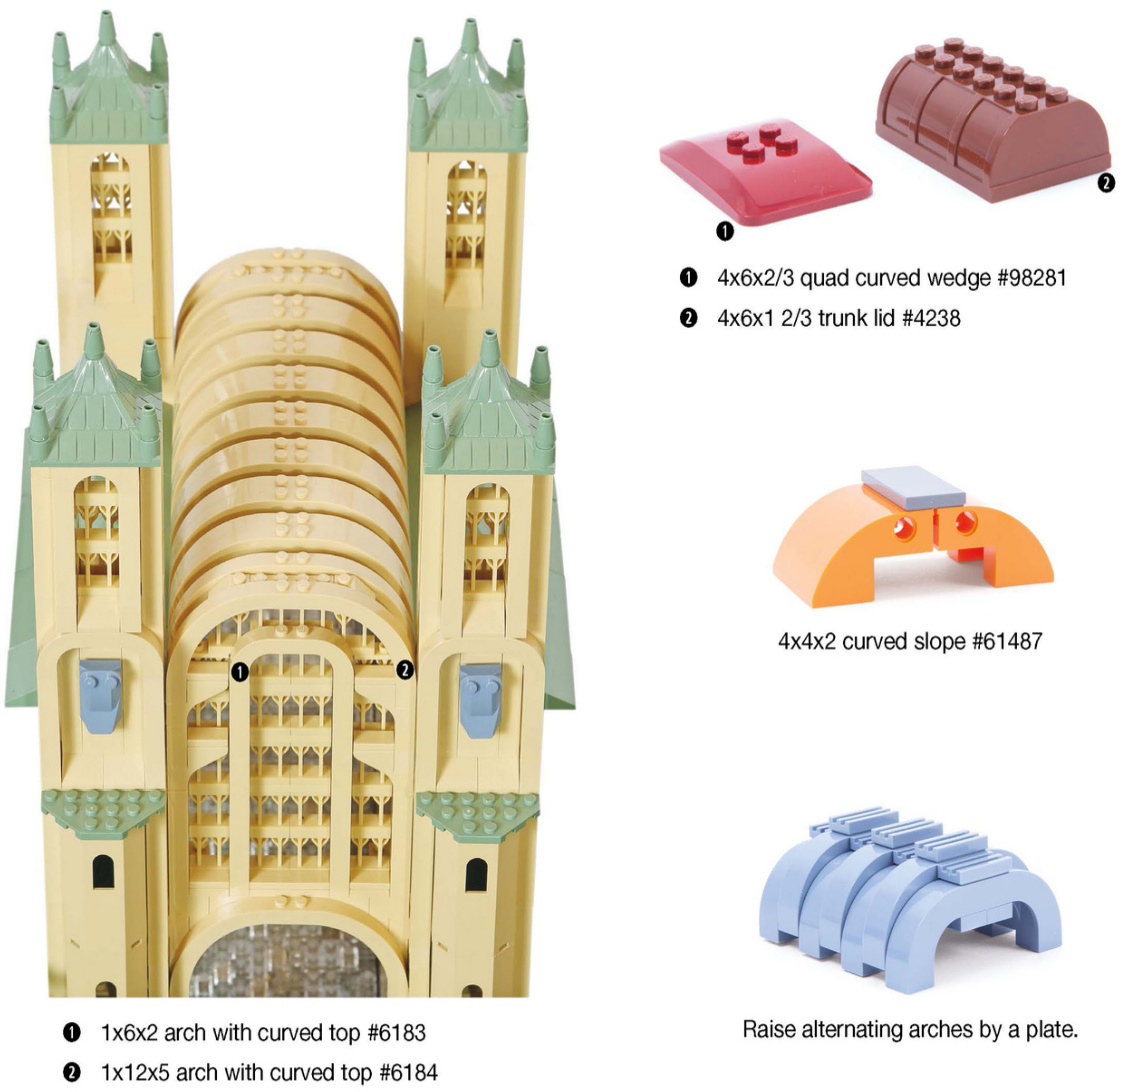
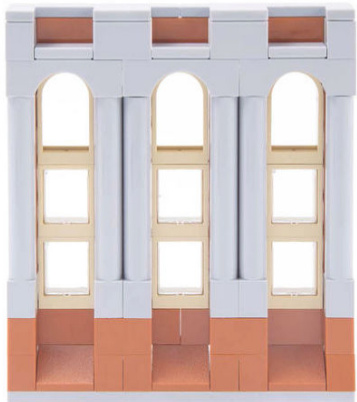
Ornamental Windows

Romanesque Windows
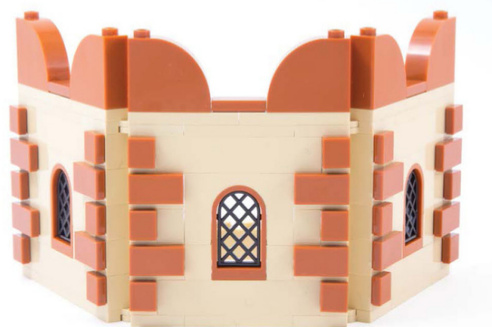
Set arched windows flush with the wall or create a recessed romanesque window by setting rectangular windowsbehindan arch.
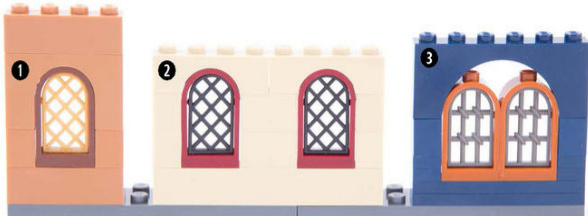
Top1x2x22/3 windows with roundedtop (#30044)with arched bricks.
0 1x4x2arch #6182
2 1x4arch#3659
3 1x6x2arch#3307/#12939/#15254
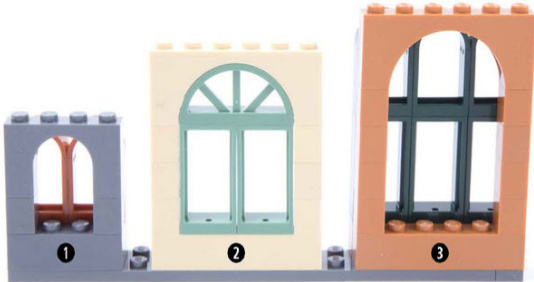
Setwindow framesbehind archedbricks or mixwindowswithroundtopswithbasicwindowframes.
1 1x2x2 2/3 window withrounded top 300441x4x2arch6182
2 1x4x12/3windowwithroundedtop 15254
3 1x2x22/3windowwithroundedtop#300441x2x3window#605931x6x2arch#3307/#12939/#15254
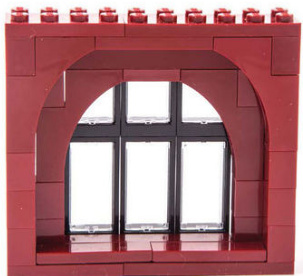
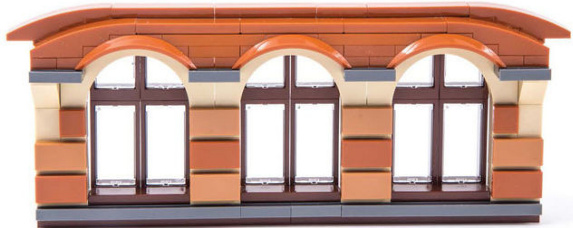
Thesewindows are setbackby a full studbehind the arches and create an interesting muntin-mulion pattern.

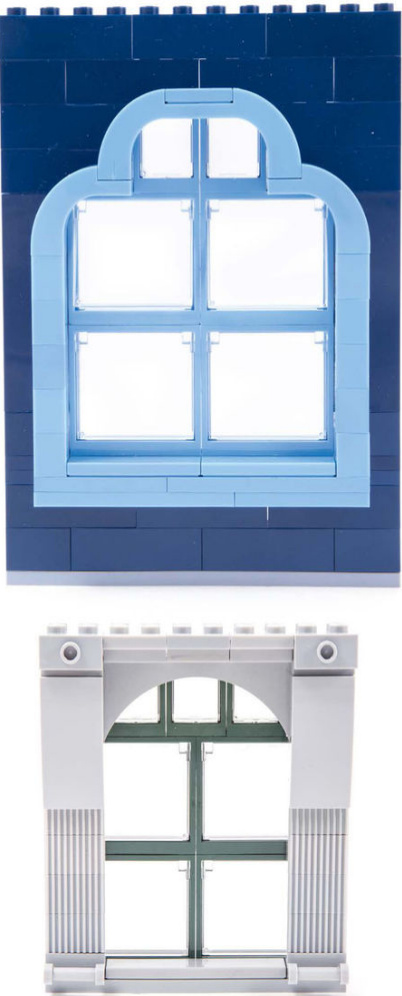
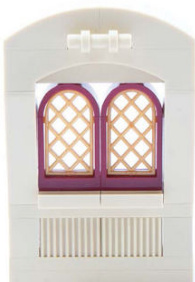
Use macaroni tiles (#27925) to create a roundedtrim that mimics the shape of the arched window.
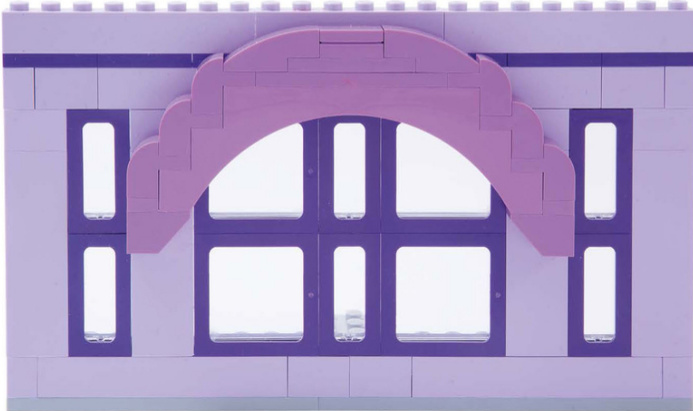
Contrasting colors and layeredframing create a nice double arch.
Cap a square openingwith a 1x6 raised arch (#92950).
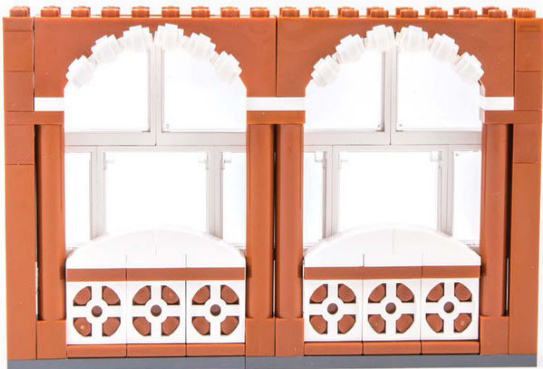
Adddecorativeelementslike 1x1 plates with ring (#4081).
Thedouble arch gives this large-scale divided window a more ornate look.
The 4x3x1 mudguard (#28326)fits neatly under a pairof arches with curved top (#6005).
Framemultiplewindowswiththe11/2x6x1arch mudguard (#62361)for a unified look.
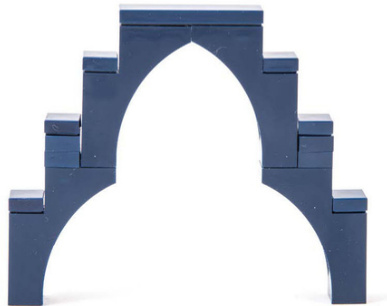
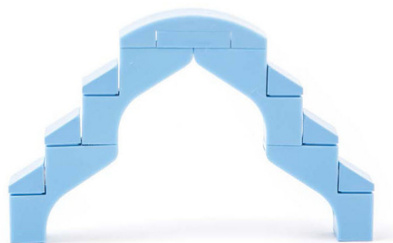
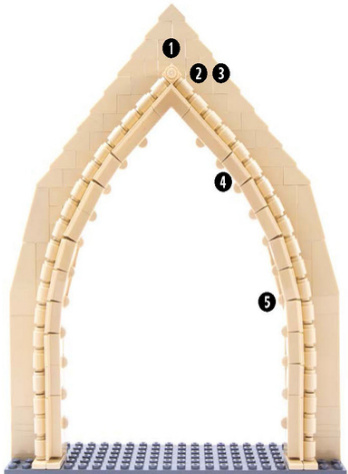
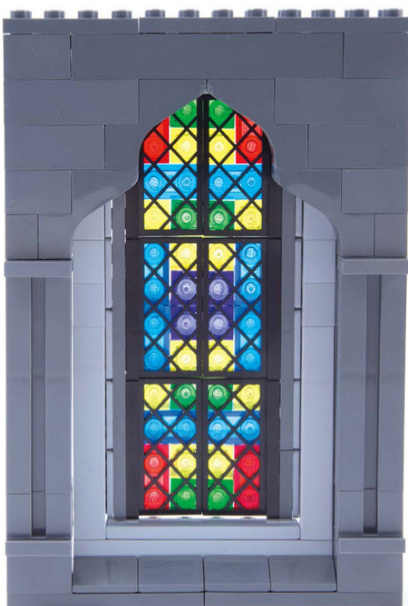
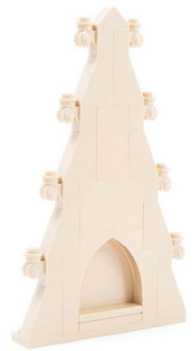
Gothic Windows
Half-arches can be used to make the pointed arches that are characteristic of gothic architecture.

Use the 1x3x2 inverted arch (#18653) to create a teardrop window.
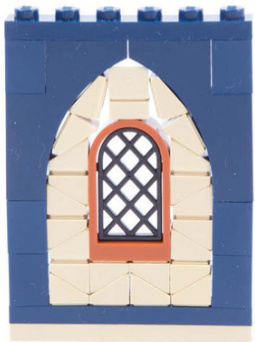
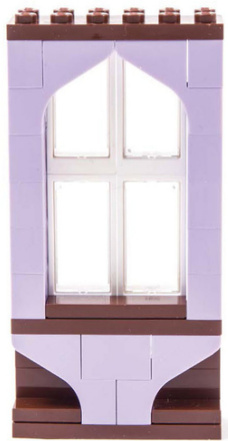
This lancetwindow also uses half-arches as its base.
Filling in the space surrounding the window with slopes creates the look of masonry.
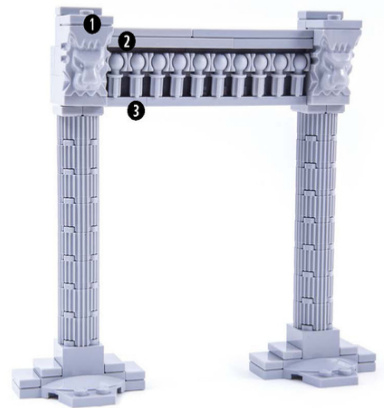
1x3x3arch #13965

1x3x2 archwith curvedtop #6005 1x2 triple slope #3048
1x3x2 arch #88292
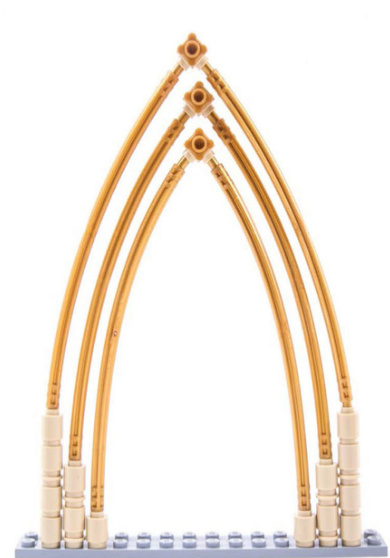
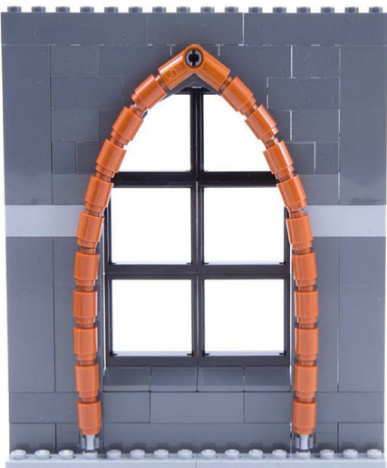
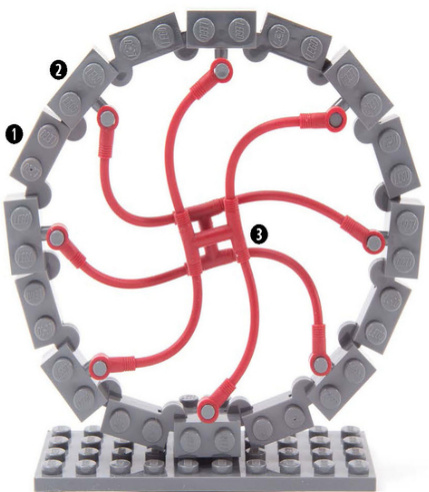
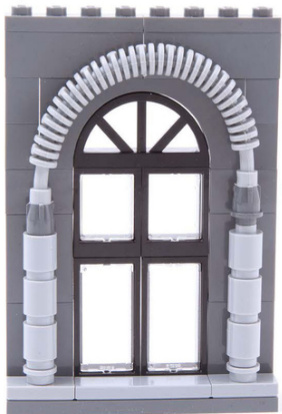
A 16L soft axle hose (#32202) creates a triple arch.
Fit 1x1 round bricks (#3062) on a 3mm hose (#75), whichthen fits into the end of a #5 angled axle connector (#32015) at the top. Control the shape of the arch with the length of the hose.
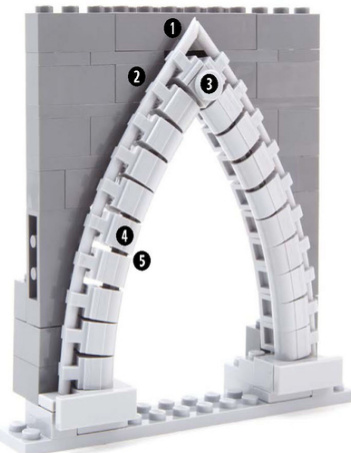
0 3mm rigid hose #75
1x2 plate with clip on top #92280
1x1 brick with stud on 2 adjacent sides #26604
4 1x2 plate with pin hole on bottom
? 11L soft axle hose #32199 (inside pin holes)
0 1x1 brick with stud on 2 adjacent sides #26604
1x1 round brick #3062
? 3mm rigid hose #75 (inside round bricks)
4 1x2x1 panel #4865
? 1x4 hinge plate #2429 with #2430
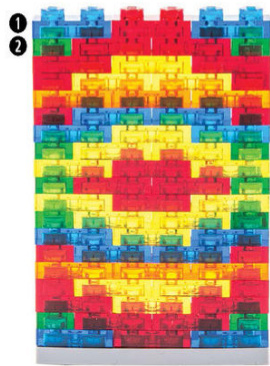
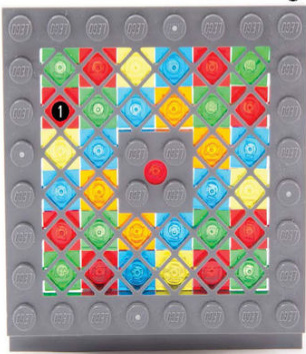
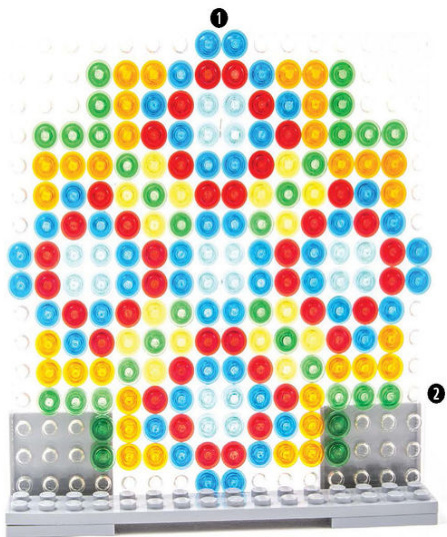
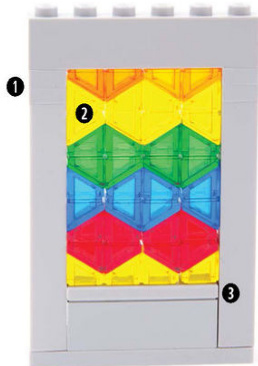
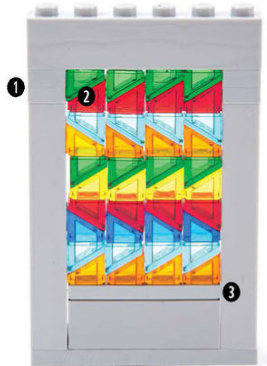
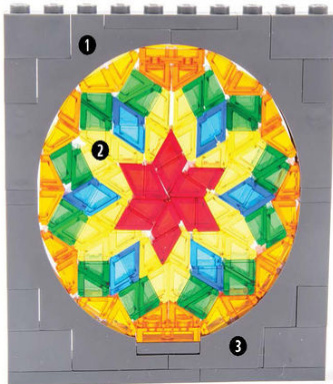
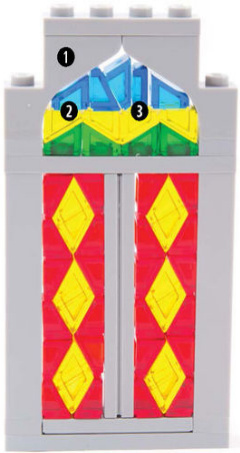
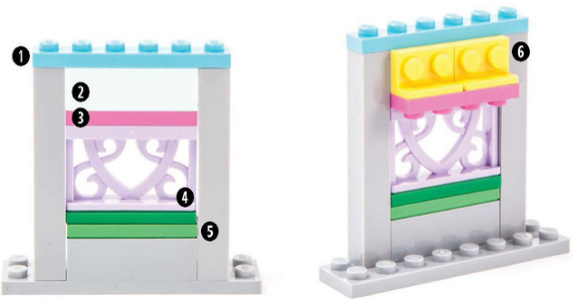
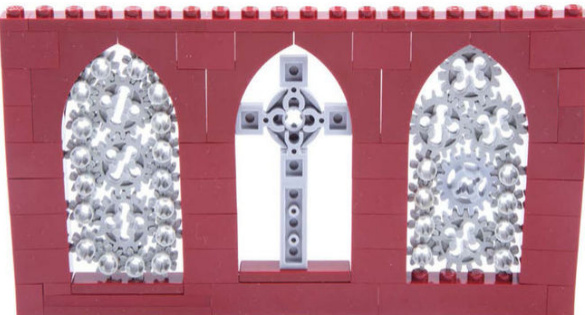
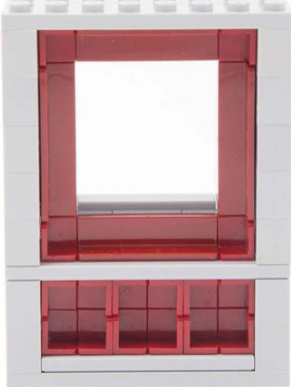
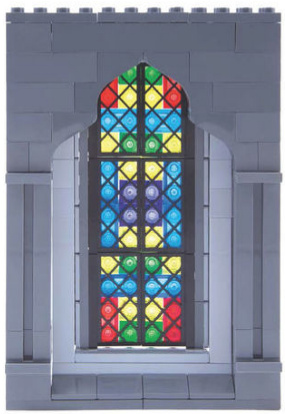
Stained Glass
Use multicolored transparent plates and slopes with tiles for a beautiful stained-glass effect.Experiment with different colors and patterns.
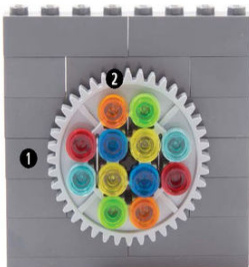
40toothgear#3649
2 1x1 roundplate #4073
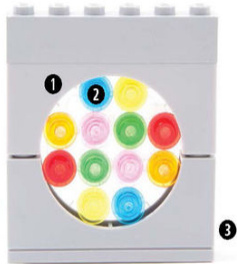
0 4x4 roundplate #60474 2 1x1roundplate#4073 3 arch with thin top #12939
1x1roundplate#4073
1x1brick#3005
0 1x2 plate #3023
2 1x1plate #3024
1 1x1plate#3024
2 8x8plate with grate #4151
1 1x1 round plate #4073
2 16x16 baseplate #3867
0 1x1plate #3024
②1x1cheese slope #54200
? 1x4tile#2431
0 1x1plate#3024
②1x1cheese slope #54200
③ 1x4tile#2431
0 1x1 tile #3070
2 1x2 tile #3069
1x1cheeseslope #54200
4 3mm9Lrigid hose #75
? 16Lbarwithtowballandopenstud#30219
6 1x1cone #4589
1x2 jumperplate 15573
0 1x5x4arch #76768
2 1x1cheeseslope #54200
③ 1x5x4invertedarch#30099
0 1x3x2arch #88292
2 1x1cheese slope#54200
③ 1x1tile#3070
1x1 cheese slope #54200
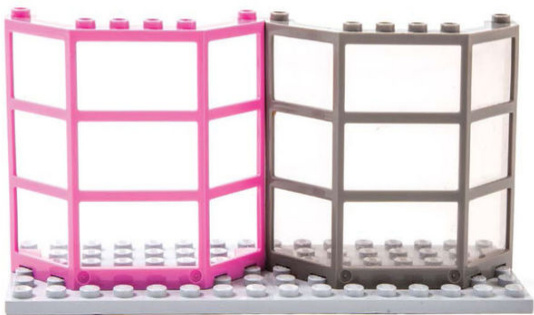
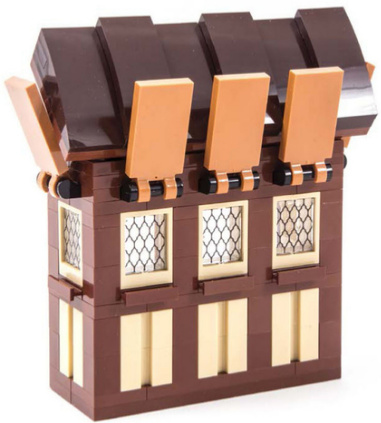
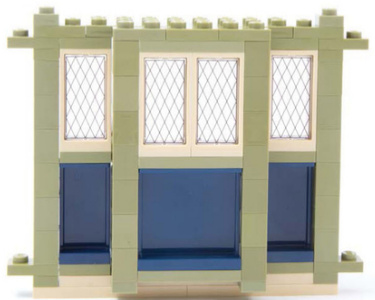
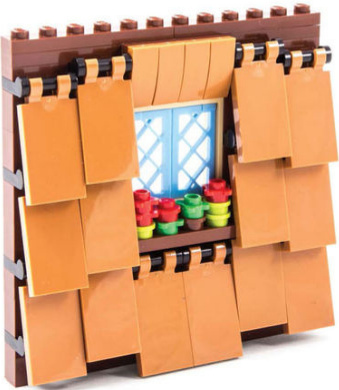
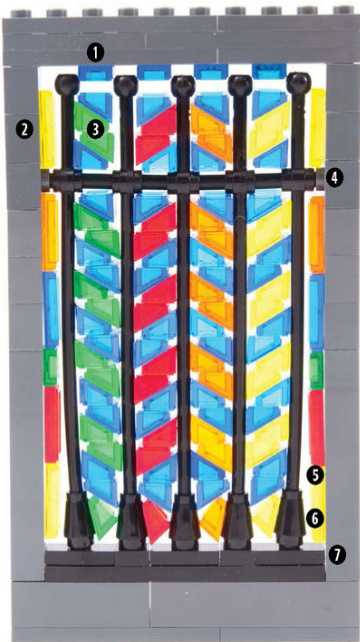
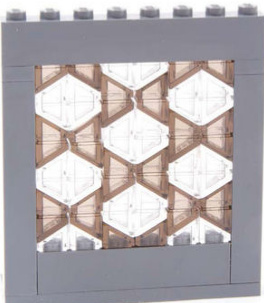
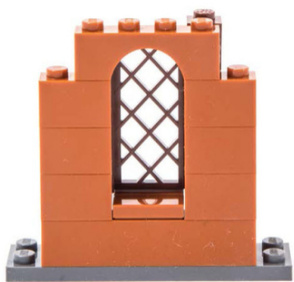
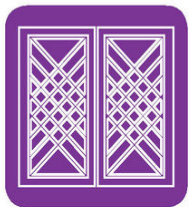
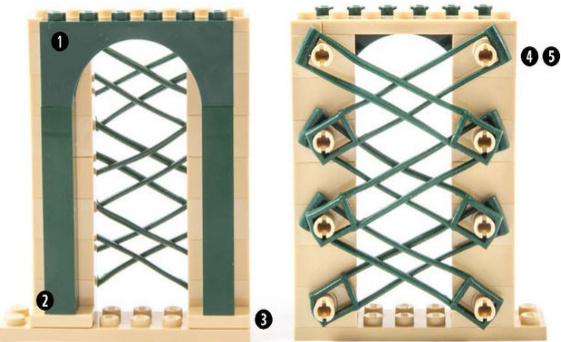
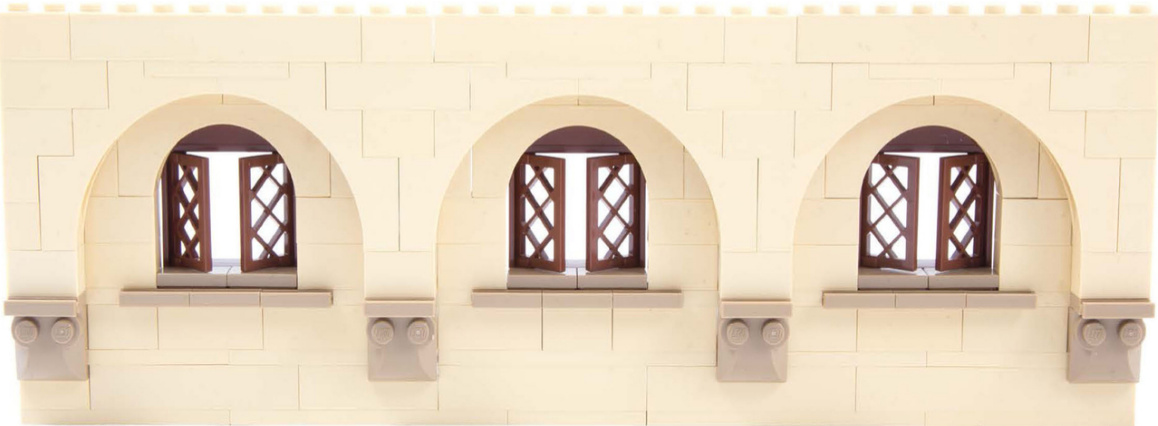
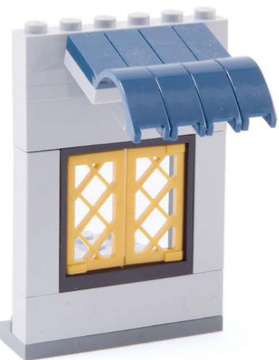
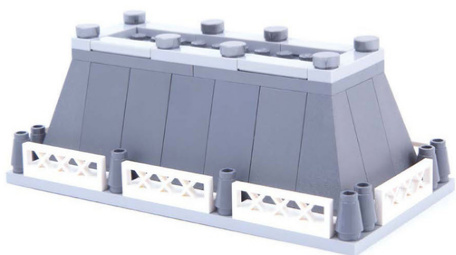
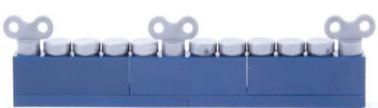
Lattice Windows
Combine fence and fence gate pieces to re-create fancy latticework.
Mount fences using 1x1 bricks with stud on side (#87087).
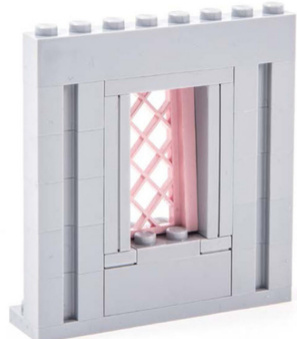
Wedge the side edge between the studs of a 2x2 plate (#3022) or brick (#3003).
The 2x2 girder by Alt Bricks gives a similar effect.
HowTo: Ornamental Fence Latticework
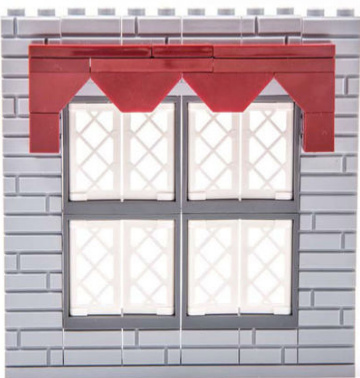
You can also use 1x4x2 ornamental fences (#19121) for latticework,mounted either right-side up or upside down.
0 1x6 plate #3666 ? 1x4x2 ornamental fence #19121
2 1x4 brick #3010 ? 1x4 tile #2431
③2x4plate #3020 6 1x2-1x2 inverted bracket #99780
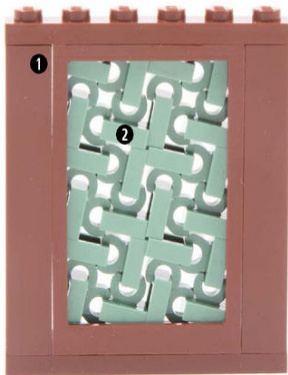
Paired fences create a central vertical line that mimics a latticed casement window.
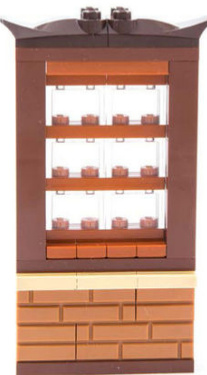
HowTo:Double-FenceLatticework
The 1x1 headlight brick is key to double-fence latticework.
Use colored transparent plates or bricks behind fence pieces to mimic stained glass.

0 1x1 headlight brick #4070 ④ 1x4 plate #3710
2 1x1 plate #3024 ? 1x4x1 fence #3633
? 2x4 plate #3020
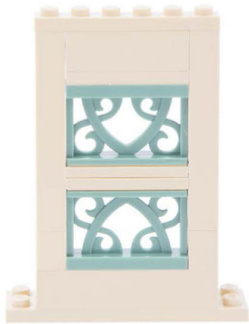
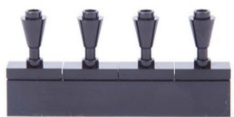
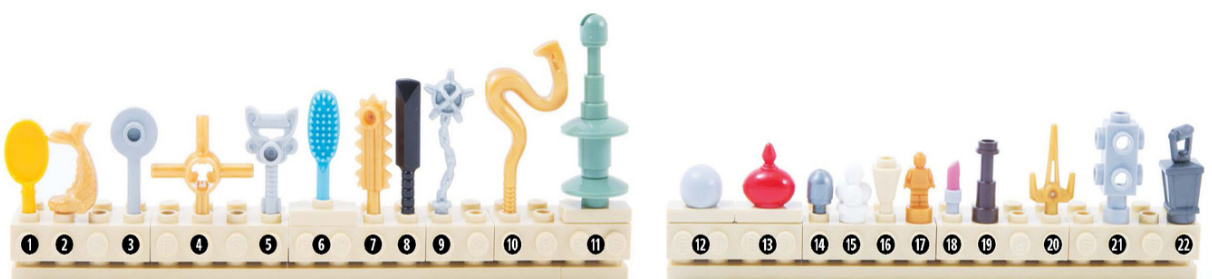
Window Tracery
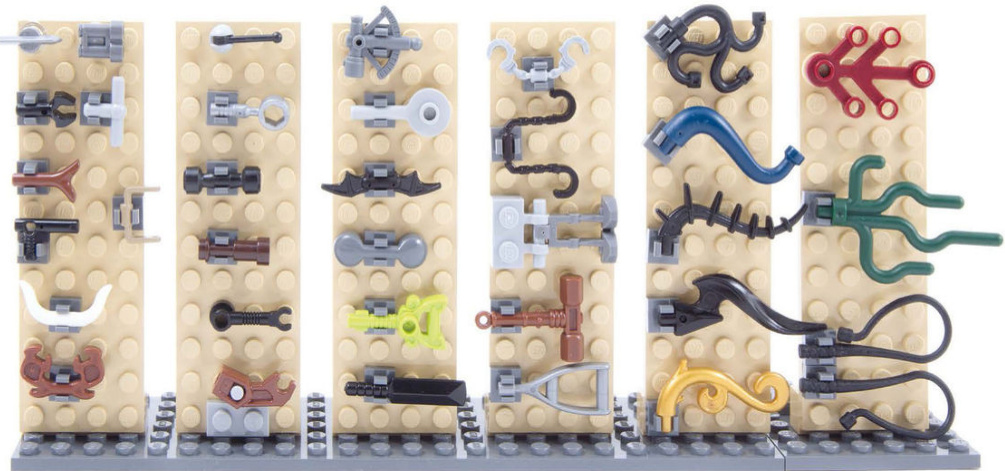
You can use a variety of pieces to add tracery to your windows,including bars with clips,plant and animal parts,minifig parts, and tools.
Gears,plates,and clipscan be used as tracery.
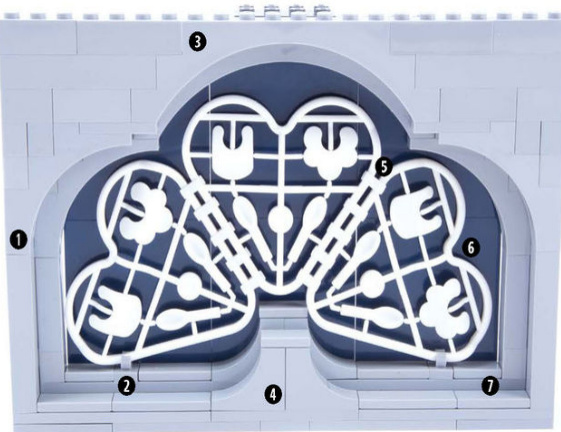
① 1x5x4 arch #76768 ? U-Clip (by BrickArms) 2 1x1 tile with clip #15712 6 Belville bib sprue 3 1x12x3 arch #14707 30111c01 ? 1x3x2inverted arch 0 1x3 tile #63864 #18653
0 archwiththicktop#15254
2 1x1x5brick#2453
? 1x2 jumper plate 15573
4 1x2 brick withpin #2458
? Horse reins (by BrickForge)
1x4x5window #2493
1x1 tilewith clip #15712

Onlyclipswithcurvedsides (shown indarkred) have enoughflextocliptothemselves.Clipswithstraightsides (shown inblack)willnotworkwith thistechnique.
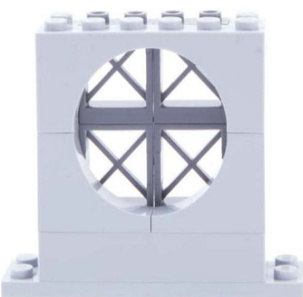
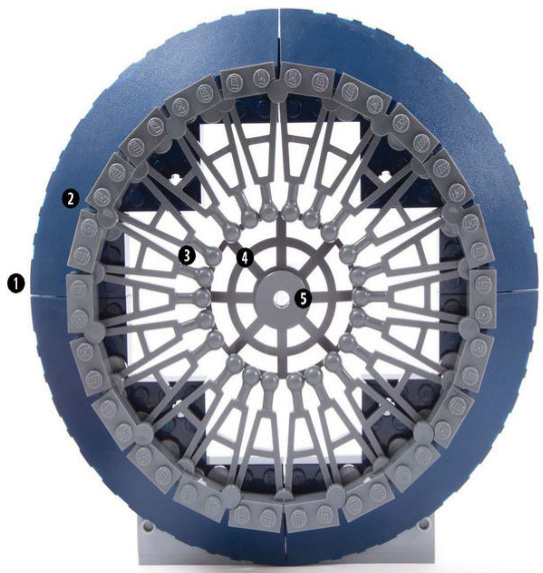
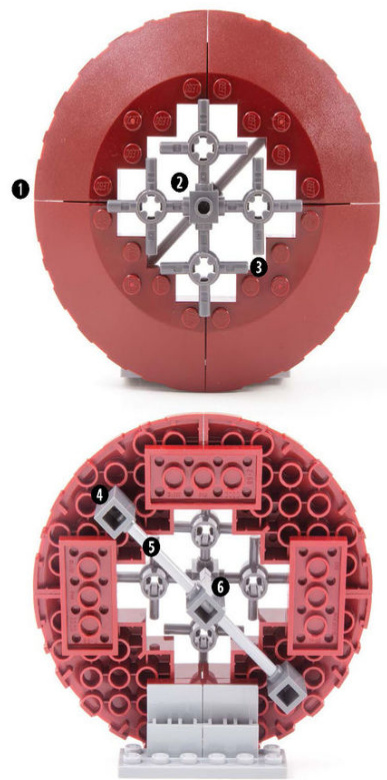
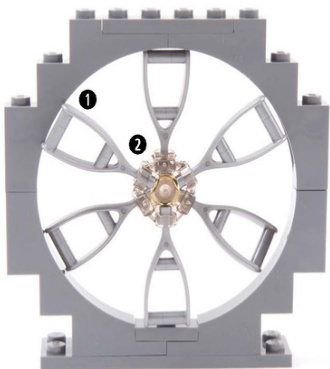
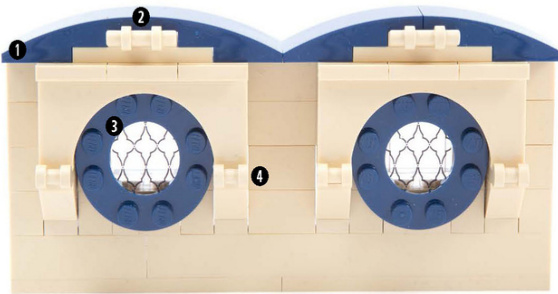
Rose Windows
A rose window is a round window that uses radiating tracery to hold the glass.
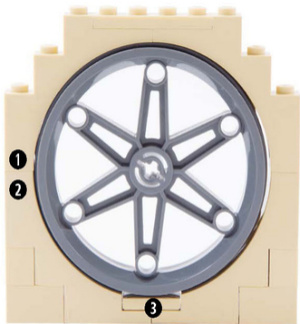
The circle created by 1x5x4 arches fits a wheel or an 8x8 dish.
You can have the parts protrude or set back so that they are flush with the wall.
0 1x5x4arch#76768
2 1x5x4 inverted arch #30099
③ 61.6mm wheel #2903
0 1x4x2 arch #6182
②Weapon barrel #98585
? Technic axle pin #3749
4 1x6x2 arch with thin top #12939
? 1x3x2 inverted arch #18653
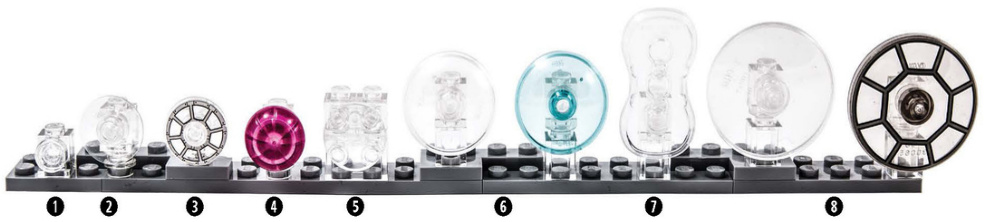
1 1x1 round plate #4073
2 2x2 dish #4740
3 2x2 dish with cockpit printing 4740pb005
4 Chef hat#3898
? 2x2 boat plate #2654
6 3x3 dish #43898
7 2x4 modifiedplatewith curvedsides #88000
8 4x4 dish #3960
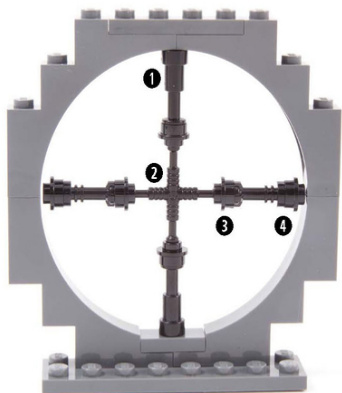
Build your own radiating tracery by attaching handles or small decorative pieces to a 2x2 platewith octagonal handles (#30033).
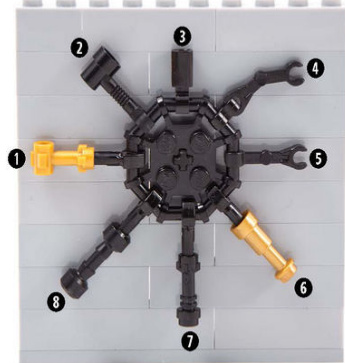
1 Handlewithsidestuds#92690 ? Robot arm straight#59230
2 1x3barwithclipandstud #4735 6 Telescope #64644
3 Barholderwithclip#11090 0 Lightsaber hilt#64567
4 Robotarmbent#30377 ? Skateboardwheelmag#45918
0 10x10quarter dish #58846
2 1x4 hingeplate 2429with #2430
? 1x2 modified plate with long towball #2508
④ 6x6dishwith cutouts
? 2x2 round tilewith hole #15535
0 6x6 quarter dish #95188
2 1x1 brick with studs on 4 sides#4733
3 Technic axle hub #48723
4 1x1brickwith stud on side #87087
6 4Lbar #30374
6 1x1 brick with studs on2 sides #47905
1 Crutch #24077
2 Weapon holder ring #20612
0 Telescope #64644
2 Wheelwrench 11402d
m 1x1 round plate with hollow stud #85861
●Lightsaber hilt #64567
1 1x4 hingeplate 2429with2430
2 1x2plate with vertical bar #4623
3 Stretcher holder x169
1 Ornate key #19118 1x4 hinge plate #2429 with #2430 1x2 plate with clip #11476
●Lightsaber hilt #64567
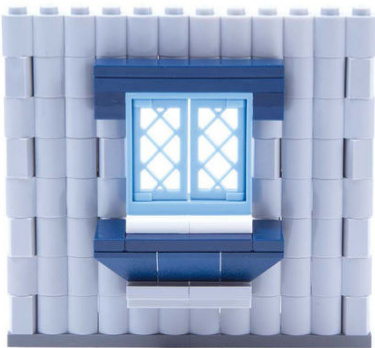
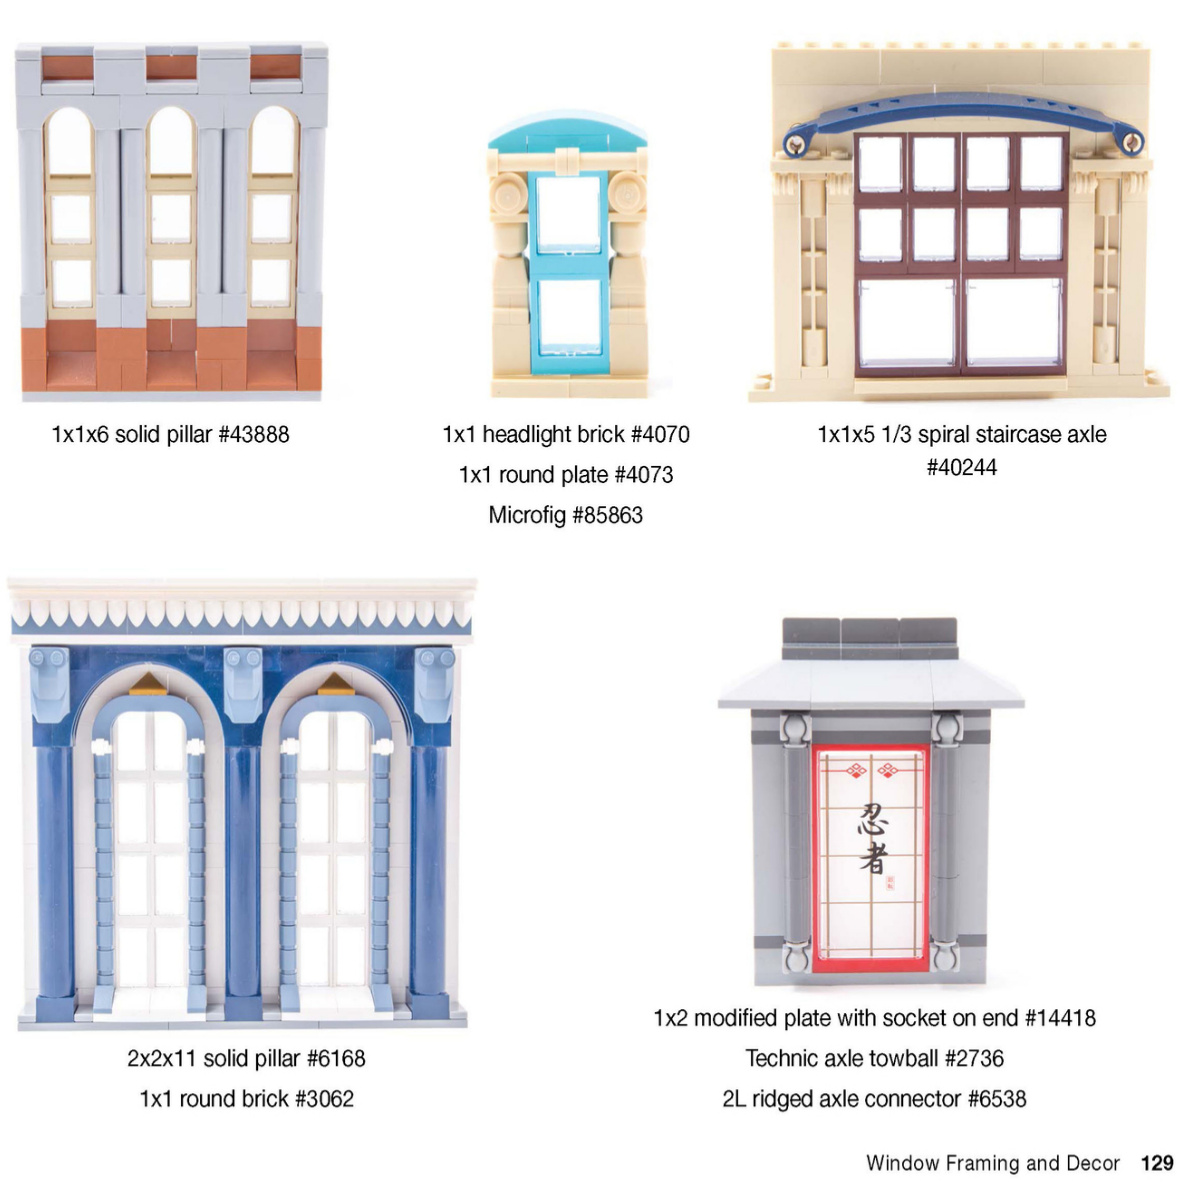
Window Framing and Decor
Windowsills
A sill is the bottom ledge of a window and can be dressed up in many ways.
1x2platewithrail #32028
Mechanicalarm #98313

1x6 doubleinverted slope#52501
1x2 inverted slope #3665
1x3 inverted slope #4287
2x2 custom printed tile
Cat tail #15429
1x3x2 arch #88292
1x2x3invertedslope#24492x2 inverted slope #3660
1x3x2 arch with curved top #6005
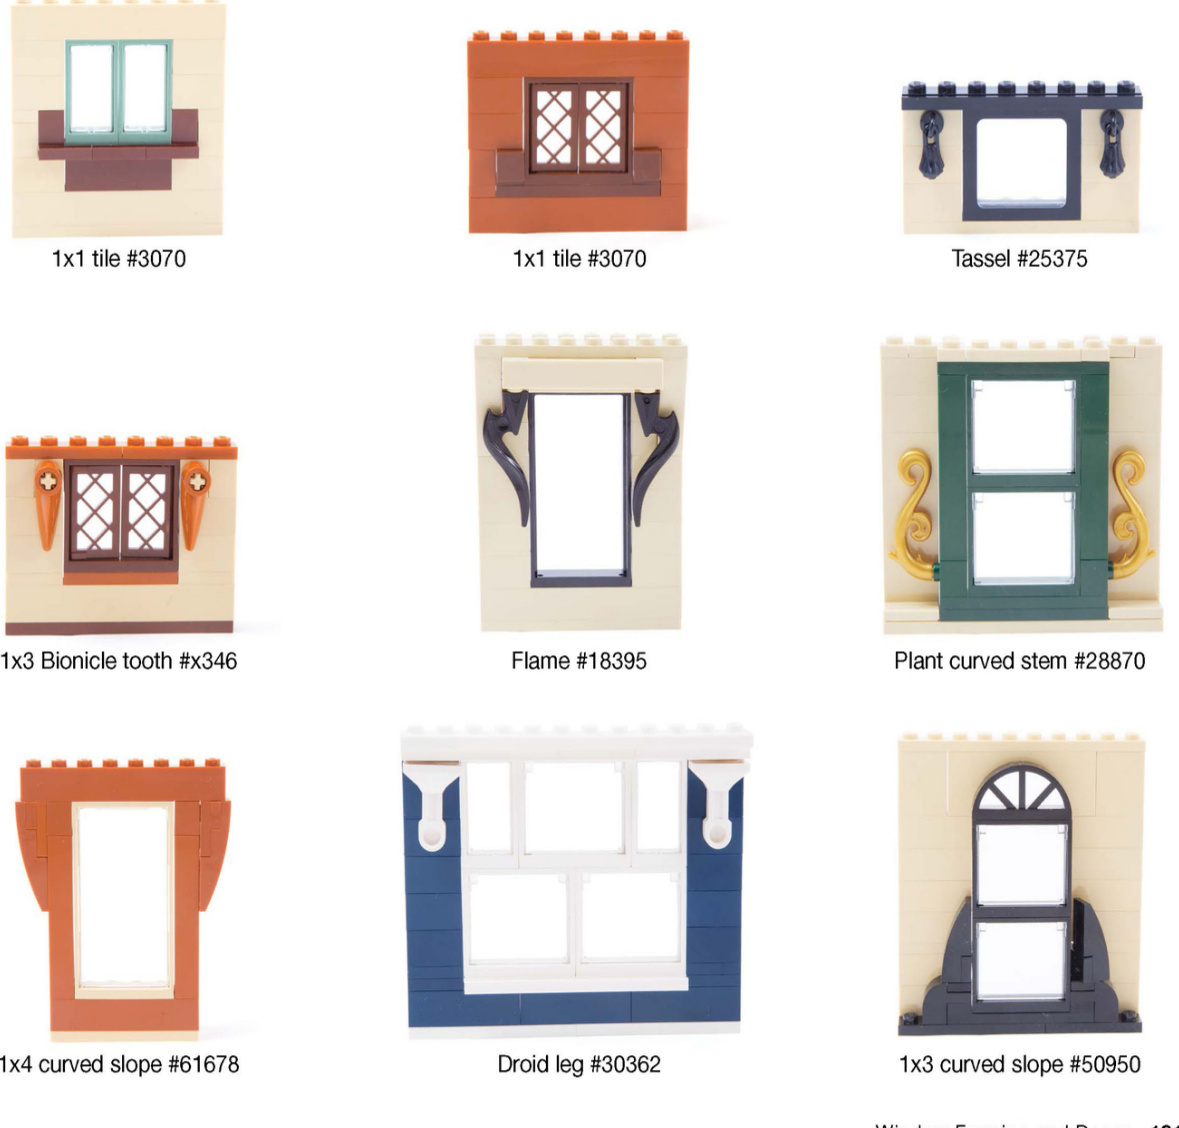
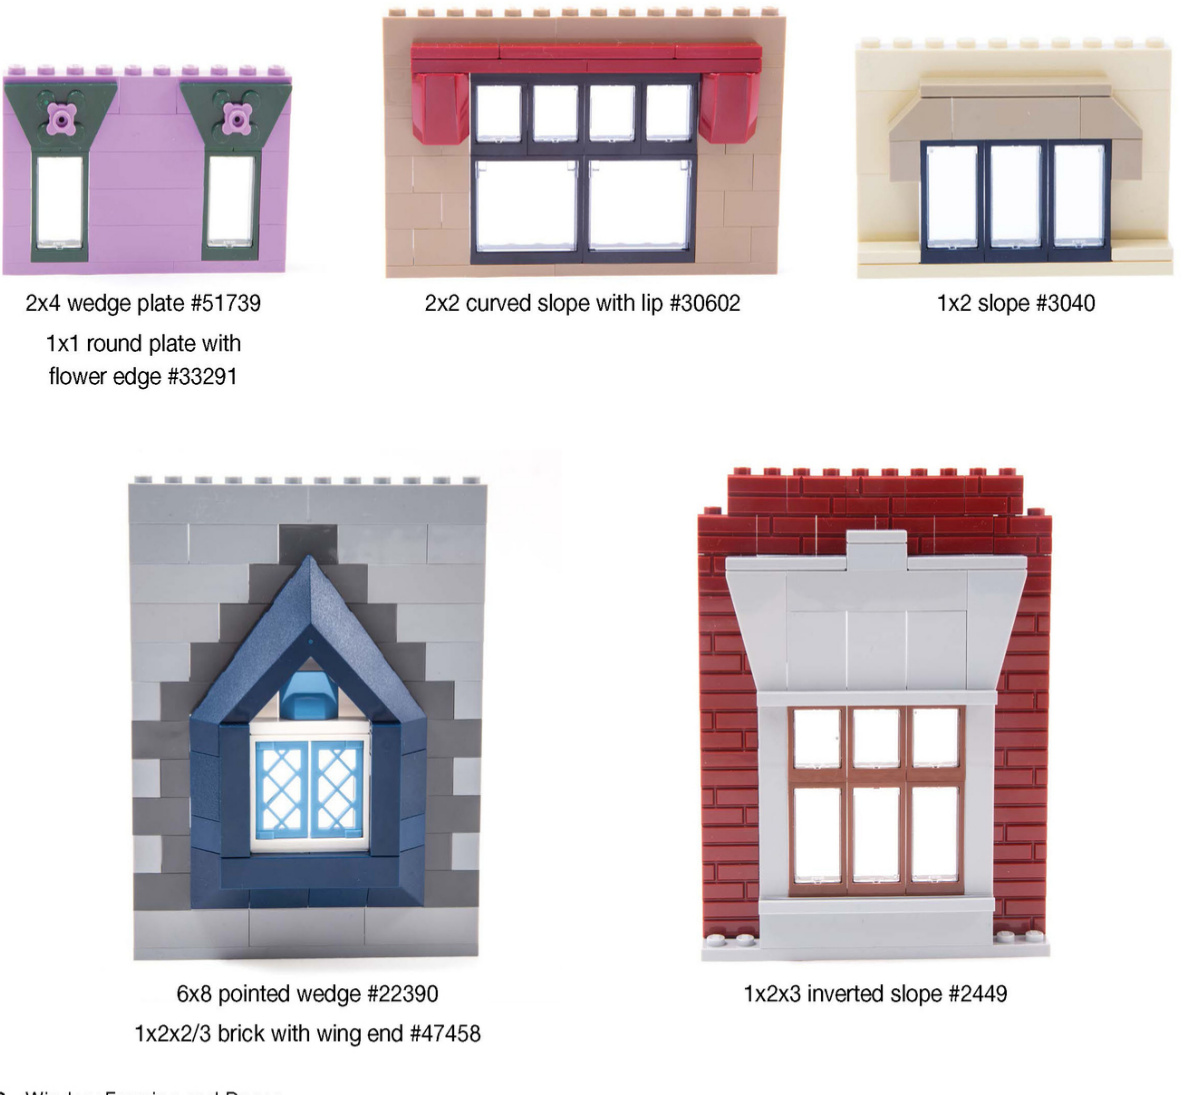
Window Trims
Trims refer to headers, jambs, and other decorations around the perimeter of a window.
Add 1x1 tiles (#3070) in a contrasting color.
Create realistic upper and lower window sashes using setbacks at different depths.
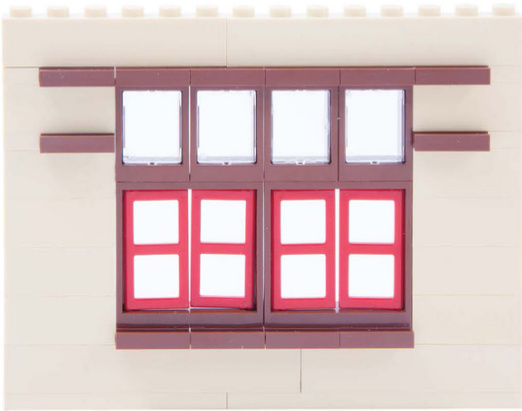
Use plates with rail to accentuate windows that are flush with the wall.
Emphasize the lintel above the window using bricks and plates in a coordinating color.
Giveindividual windows their owntrims.
Group multiple windows within the same trim.
These windows are connected by a repeating arched trim.
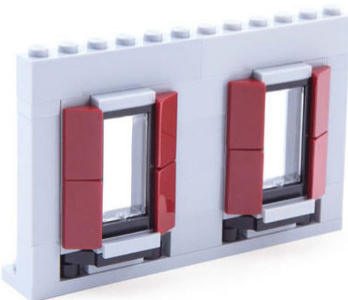
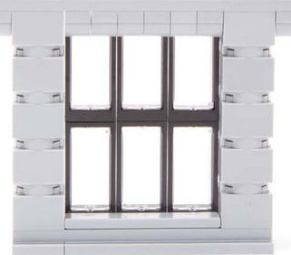
Recessed Panel Trims
Use panel pieces to create the look of deep-set, modern window trims.
BE
Frame an entire window with panels and extend the trim into the wall details.
Create a pattern by placingpanel pieces in alternating directions.
Use panel pieces to create unusually shaped trims.
Create a ledge above a window.
Use panel pieces to emphasize just the corners.
Combine panel pieces with wedge plates andplateswith clip to create a deeply recessedwindow.
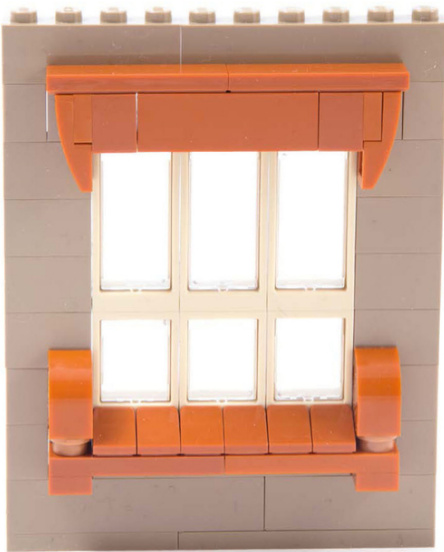
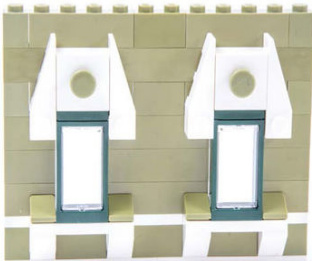
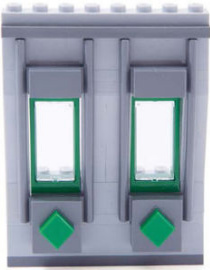
Side Trims
Add matching parts on each side of your windows to create support for an overhang or to emphasize the sills.
Window Crossheads
Top your windows with crossheads-horizontal moldings that can run the length of either the window or the entire facade.
3x4wedge#50373/#2399
Horse hitching #2397
1x2 curved slope #11477
Technic gear timingwheel 8tooth#32060
3x3thinL-shapeliftarm#32056 12-tooth gear #6589
2x3wedgeplateright/left#43722/#43723
1x1brickwithscroll#20310
1x3doubleinvertedslope#2341
2x3x2/3brickwithwingend#47456
Arched Crossheads
Mudguards and arches make for excellent window coverings,but you can also use a variety of pieces to re-create this shape.
round arch mudguard #50745
4x21/2x1 round arch mudguard #98282
1 1/2x6x1 arch mudguard #62361 Small lever base #4592
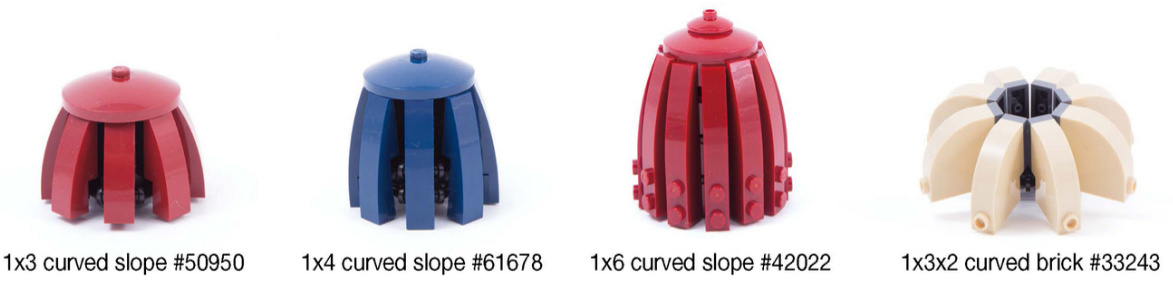
1 1/2x6x1 arch mudguard #62361 1x4 curved slope #61678
1x12x3 arch #14707 1x2x1 1/3 modified brick with curved top #6091
●1x4 curved slope #61678
2 1x2 modified plate with handle on side #2540
4x4 round plate with 2x2 hole #11833
●1x2 modified plate with handle on end #60478

1 1x1 round plate with swirled top #15470 2 1x2 jumper plate 15573 3 1x2x1 modified brick with curved top #6091
4x4 macaroni tile #27507
1x2 cheese slope #85984 1x1 cheese slope #54200 arch with curved top #6005
12L tabbed flexible hose x131
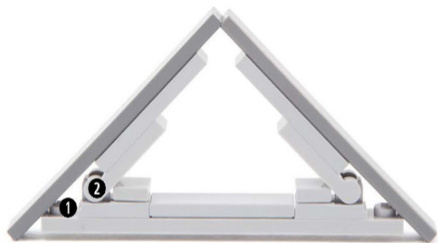
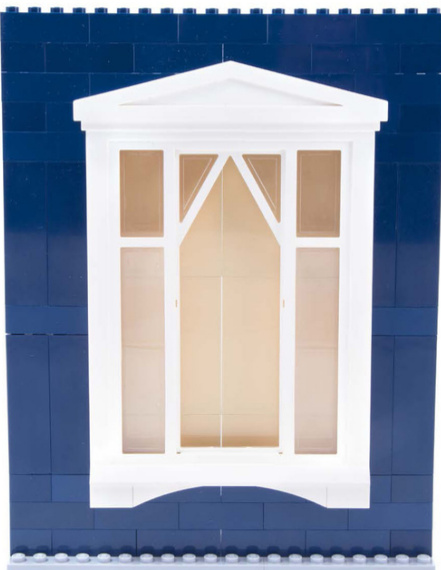
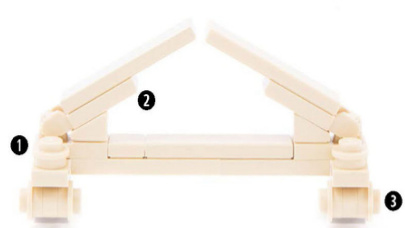
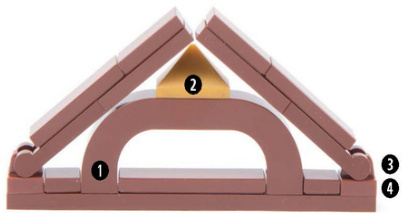
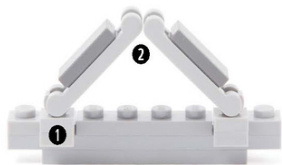
Classical Pediments
Pediments are decorative elements that sit on top of crossheads. Classical pediments are usually made of stone and triangular in shape.
0 1x2platewith clip on top #92280
1x2 modified plate with handle on end #60478
1 1x6x2 arch with curved top #6183
②1x2triple slope 15571
③1x2 modified plate with handle on end #60478
●1x1 tile with clip 93794
0 1x2 plate with click hinge 1 finger on top #30383
2 1x2 plate with click hinge 2 fingers on end #44302
1x1 plate with ring #4081
1 1x1 tilewith clip 93794
? 1x2 plate with handles on 2 ends #18649
14x3x15 1/3 Scala window frame
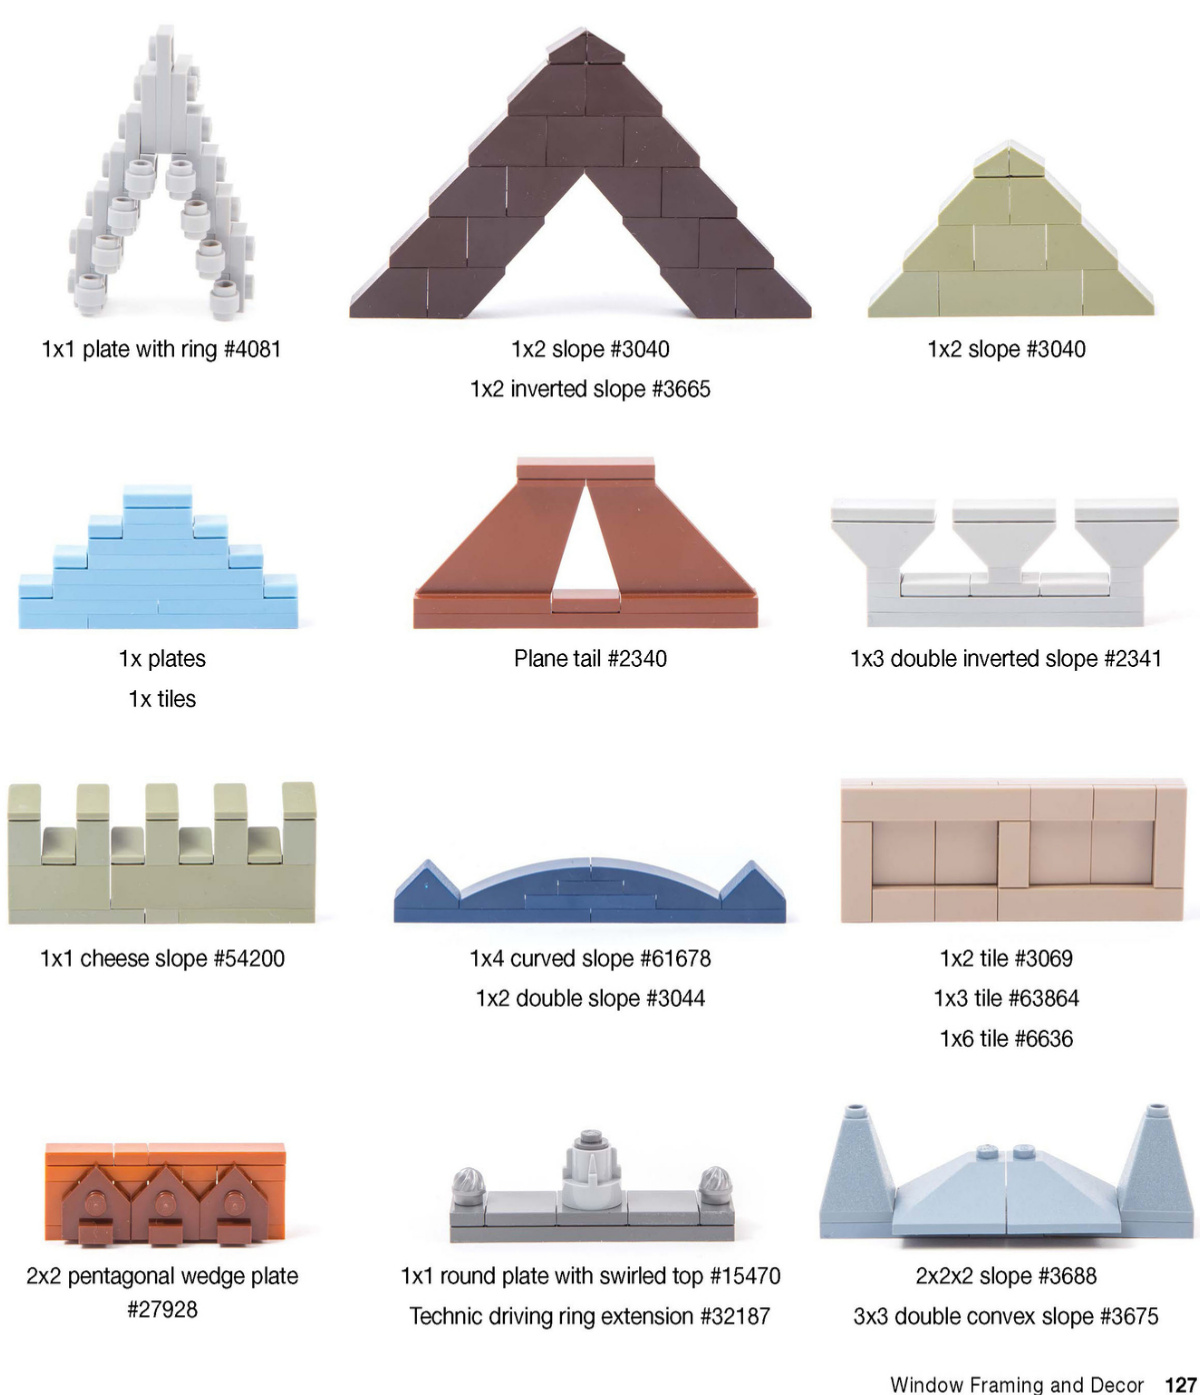
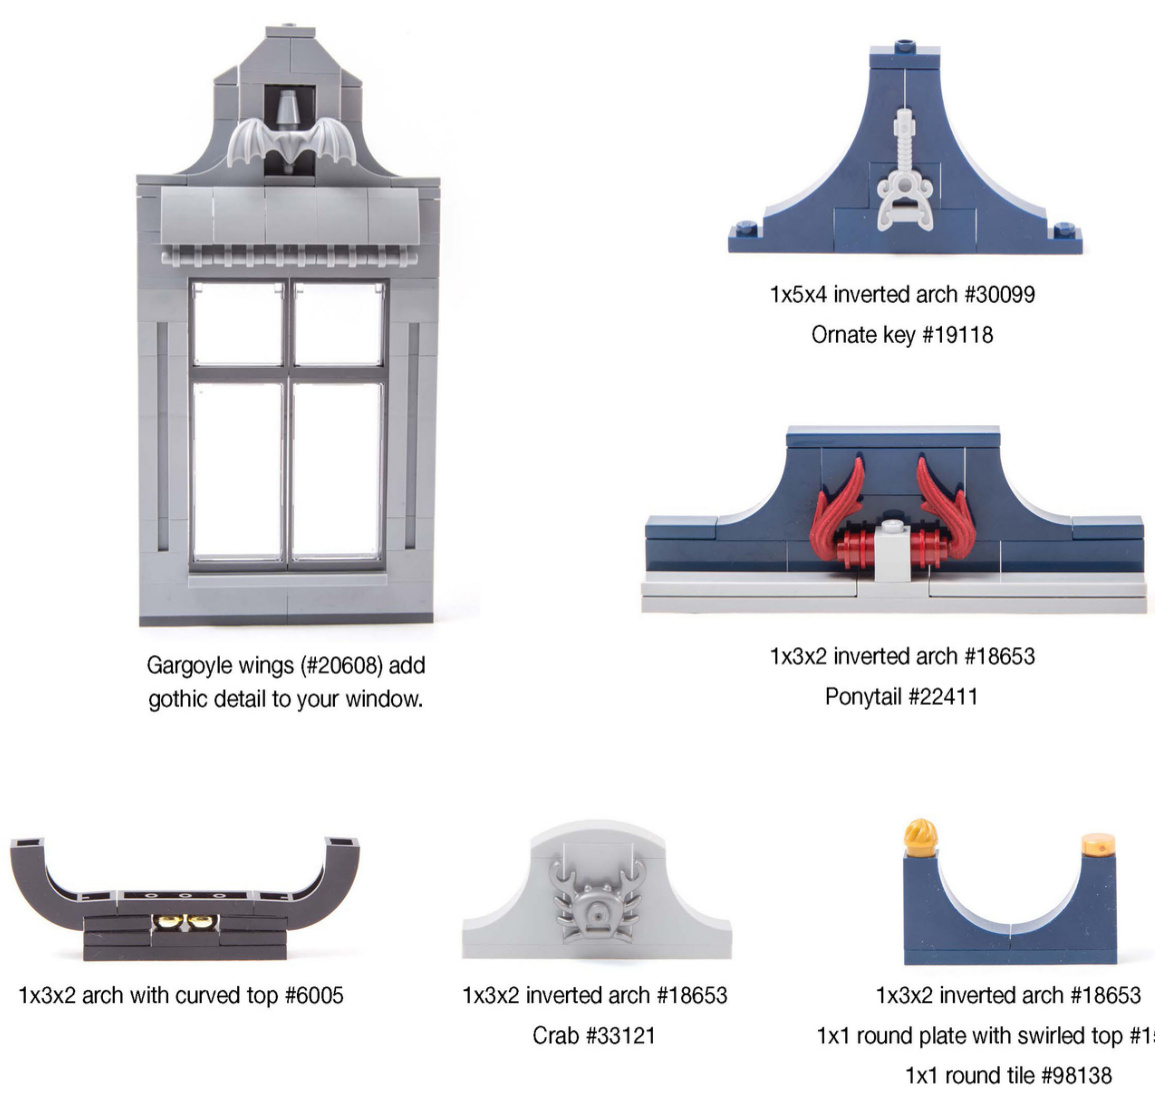
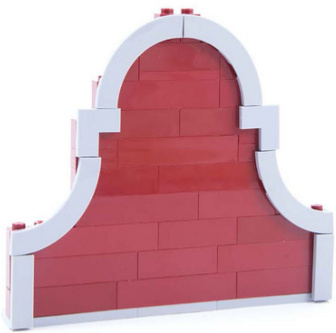
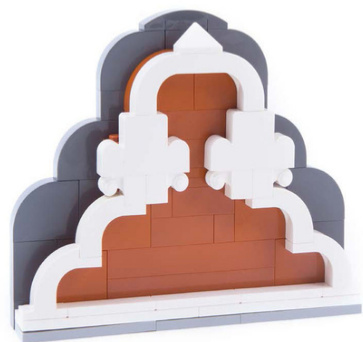
Decorative Pediments
While classical pediments are usually triangular, you can use arches to create rounded variations and add interesting sculptural details for decoration as well.
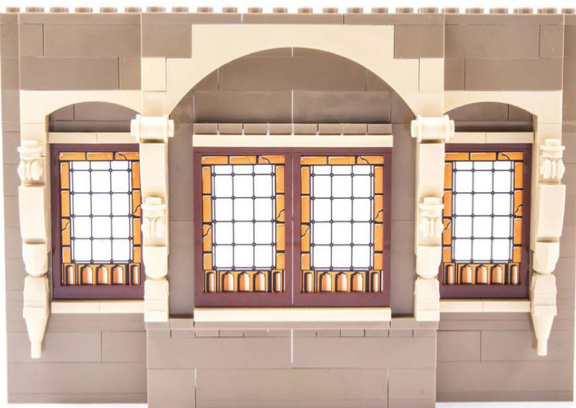
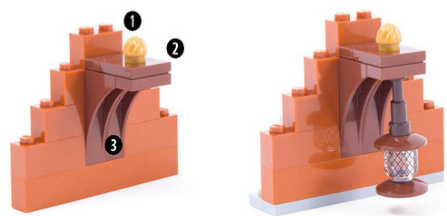
Window Pilasters
Pilasters are decorative column elements that nicely frame a window.
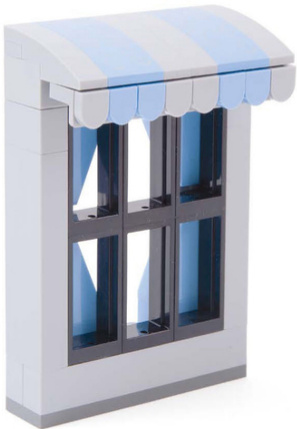
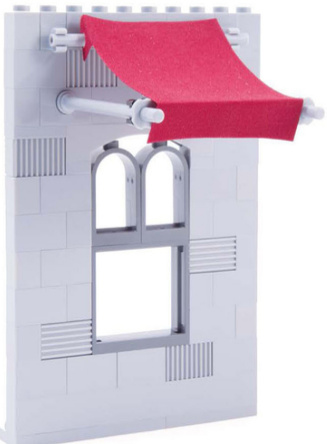
Canopies and Awnings
Slopedpieces makefor great canopies and awnings,which are often found over storefront windows.Awnings can add a lot of character to the exterior of a building.
2x2x3slope#3684
2x4triple wedge #47759
6x2wedge left#41748 6x2 wedge right #41747 2x2x31/3 octagonalbrick #6037
4x2triplewedgeleft/right 43711 1x2 slope #3040 2x4x2inverted windscreen#4284
3x4x3 curved panel #18910
1x41/2 mudguard #50947

1x3x2 arch with curved top #6005
1x2x1 modified brick with curved top #6091 1x1 quarter round tile #25269
1x4 curved slope #61678 1x1 half rounded tile #24246
Cloth awning #45700 8L bar with stop rings and pin #2714
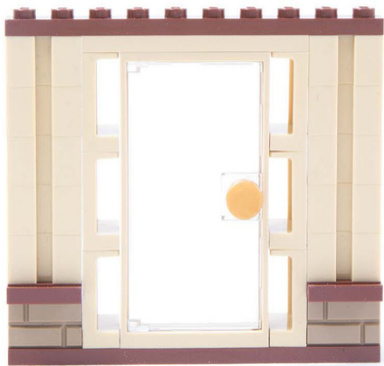
Basic Doors
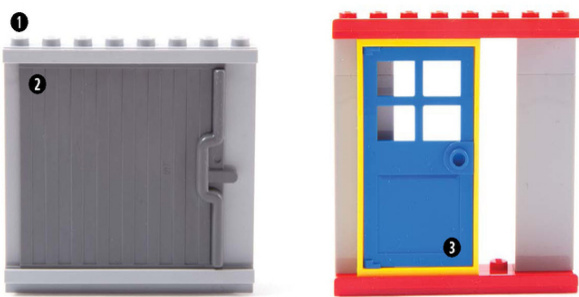
Premade doors are the simplest way to add a door to your models. Rectangular doors fit comfortably in 1x4x6 frames, or you can use bricks to frame them.
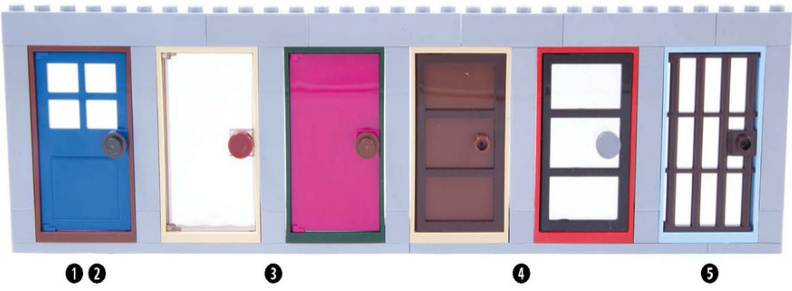
0 1x4x6 door with 4 panes #60623
2 1x4x6doorframe 60596
? 1x4x6 door with stud handle #60616
4 1x4x6 door with 3 panes #60797
? 1x4x6 barred door #60621
The studs on the 1x5x7 1/2 stockade door (#30223) alow for easy decoration. You can add silver 1x1 round tiles (#98138) to mimic metal studs and a 1x8 tile (#4162) across the back for a locking bar.
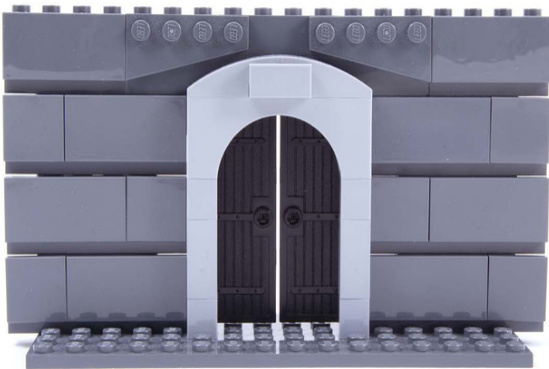
ArchedDoorsand Gates
Most arched door pieces fit onto shutter tabs,whereas gates fit onto clips.
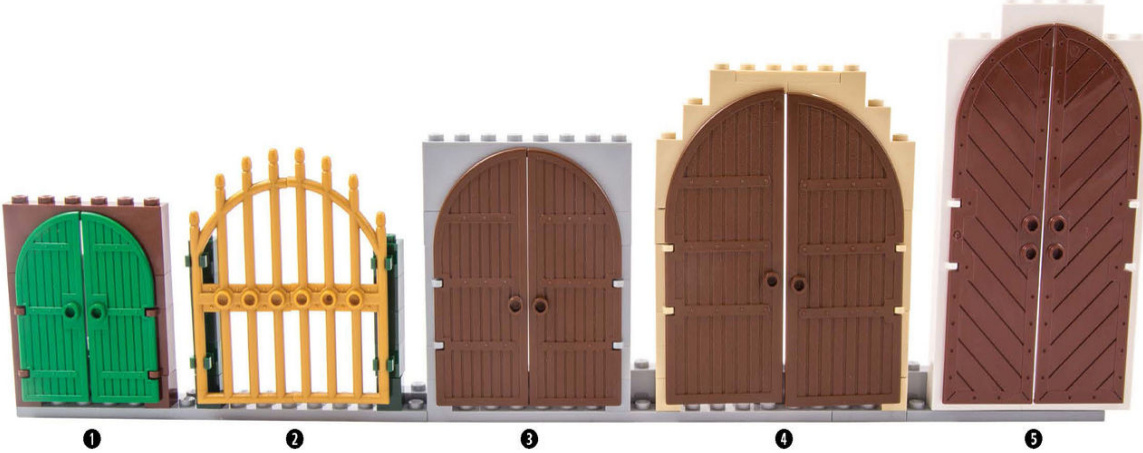
1 1x3x6 curved top door #2554 1x1x2brickwith shutterholder#3581 1x6x2arch#3307/#12939/#15254
2 1x4x8 arched gate #42448 1x1brickwithclip#30241
3 1x4x8curvedtopdoor#6105 1x1x2brickwithshutterholder#3581 1x8x2arch#3308/#16577
4 1x5x10 curvedtop door #2400 1x1x2brickwithshutterholder #3581 1x5x4 arch#2339/#76768
5 1x4x11 archedtopdoor#33216 1x10x12doorframe#33240
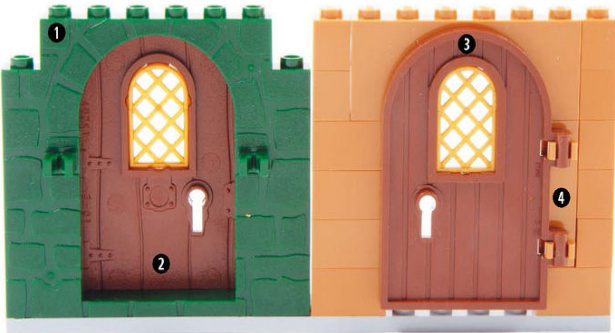
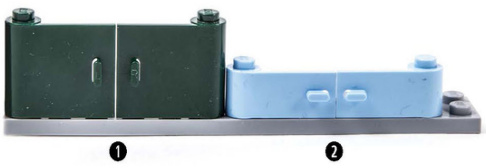
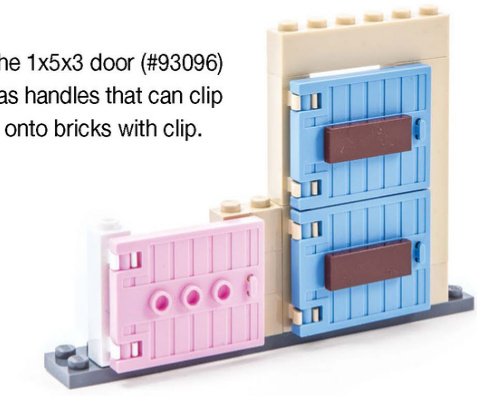
The 1x4x6 round top door has two variants: one has shutter tabs that can be attached directly to adoorframe,while the other has handles to clip onto bricks with clips.
1 1x8x6doorframe #40242
2 1x4x6 round top door #40241
3 1x4x6roundtopdoorwithreinforcededge#64390
④ 1x1x3brickwith2clips #60583
Dutch Doors
These left-handed and right-handed doors have studs that act as hinges.
1 1x3x2 doorleft/right 3188
2 1x3x1 door left/right 3821
Sliding and Revolving Doors
Use 2x8 plates with wide rail to make a door slide. Some sliding doors are thin enough to fit on a 1x8 plate with rail (#4510).
1 2x8platewithwide rail #30586 Sliding door #4511 ? 1x4x6 door with 4 panes #60623
Four doors can be arranged on an 8x8 round tile (#6177) to look like a revolving door.
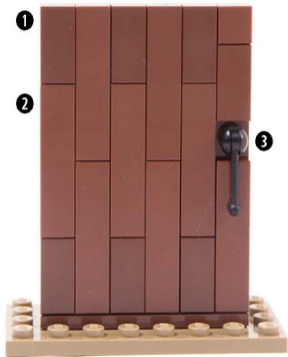
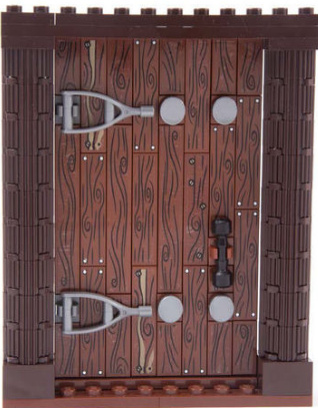
Custom Doors
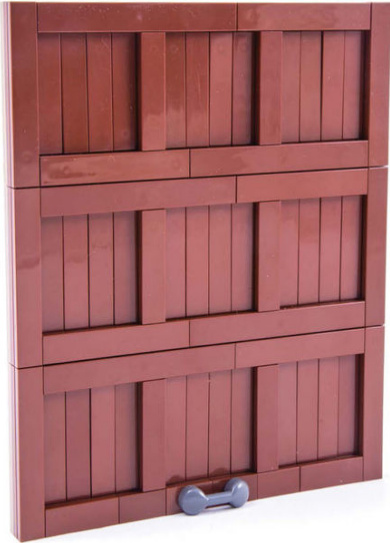
Depending on the scale of your model, you can also build your own doors. Stagger tiles to make wooden doors, or create custom paneled, round, or even sliding doors.
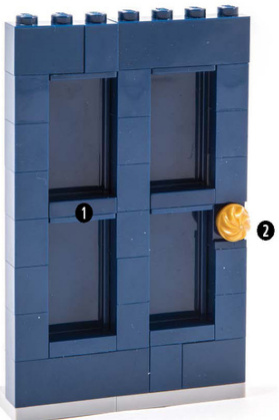
1 1x2x3 panel with side supports #87544
2 1x1 round plate with swirled top #15470
0 1x2 tile #3069
2 1x4 tile #2431
③ Small lever 4592with #4593
① 4x4 macaroni tile #27507
2 2x2 macaroni tile #27925
③ Twin-blade axe 94158f
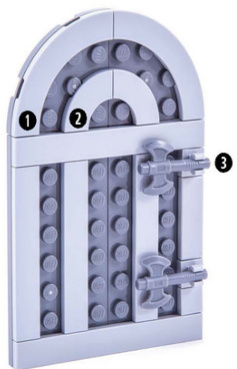

Repurpose unexpected pieces to create door hinges and handles.
1 Binoculars #30162
2 Skateboard wheel mag #45918
Custom Hinges
Buildyour own hingesto add character toyour doors
Plate pieces with handles, clips,and other connectorscanbeusedto createfunctional hinges for attaching a custom-built door.

Createuniquehingesusing smalldecorativepieces likeice skates (#93555),bucket handles(#95344),carrot tops (#33183),mechanical arms (#53989/#98313),signalpaddles (#3900),and more.
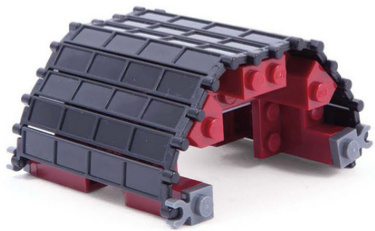
Garage Doors
Rolltopand carriage-style garage doors canbe madefrom windowframes or plate panels.
Build arolltop-style garage door with orwithoutwindows.
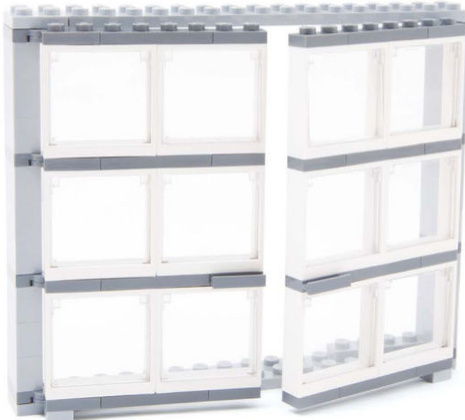
Build acarriage-style garagedoor using plates with hinge and 1x4x3 windows (#60594).
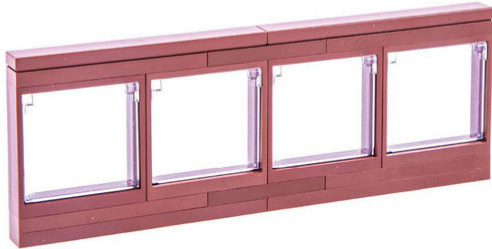
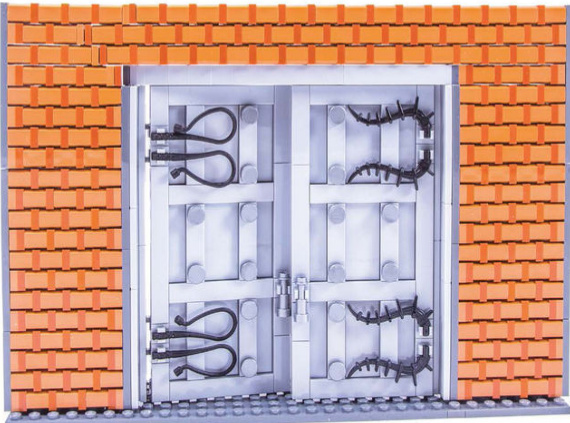
Decoratecarriagedoorswithoversizehinges.
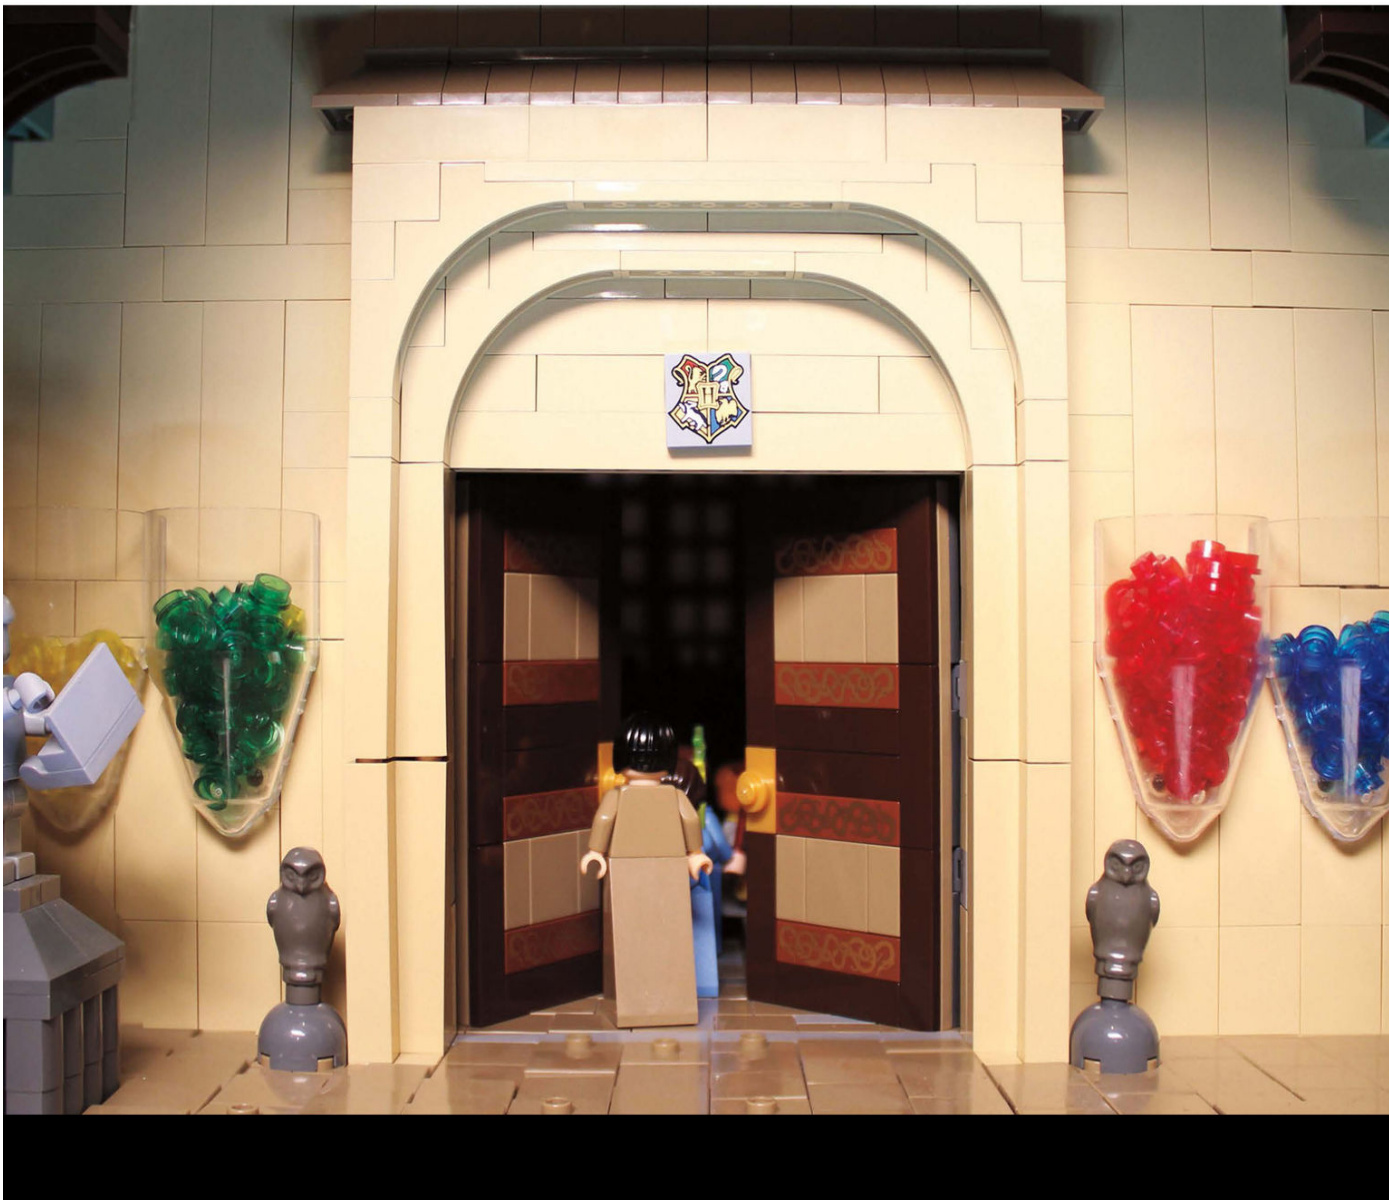
Entryways
Here are some ways to incorporate your doors into your builds.
Integrate doors with sidelight windows.
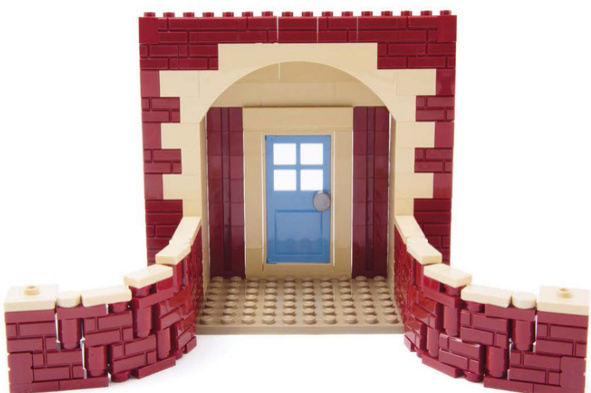
Integrate the doorway into retaining walls.
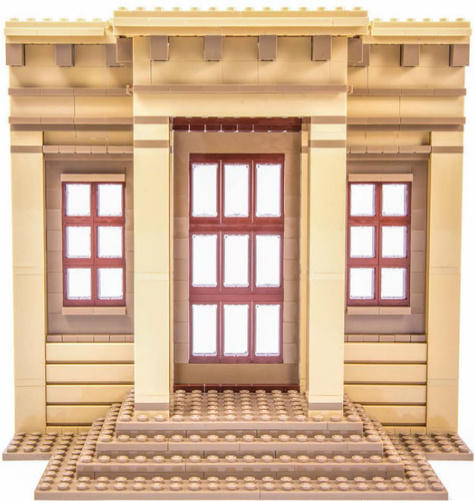
Windows on each side add symmetry to this entryway.
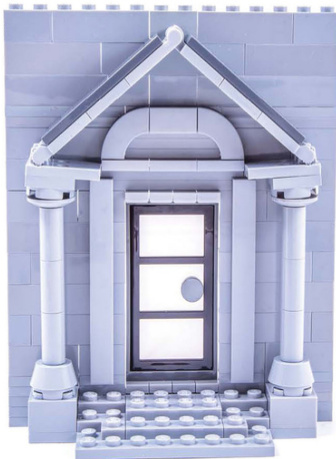
Frame a doorway with a pediment and columns for a neoclassical look.
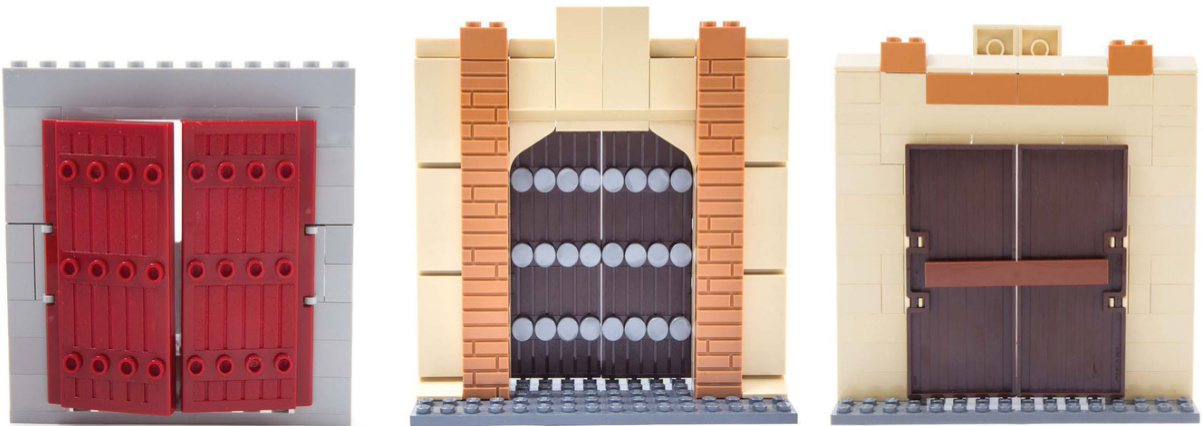
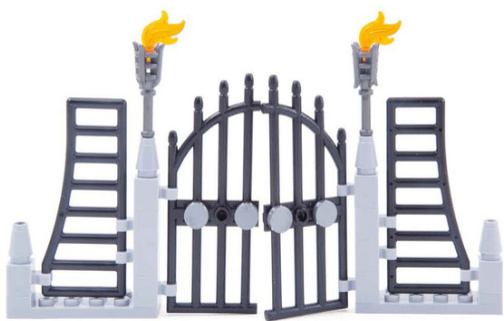
Grand Gates
Here are some ideas and parts to create a dramatic entryway.
1x3x6 curved top door #2554
1x8x3 curved fence bar #95229
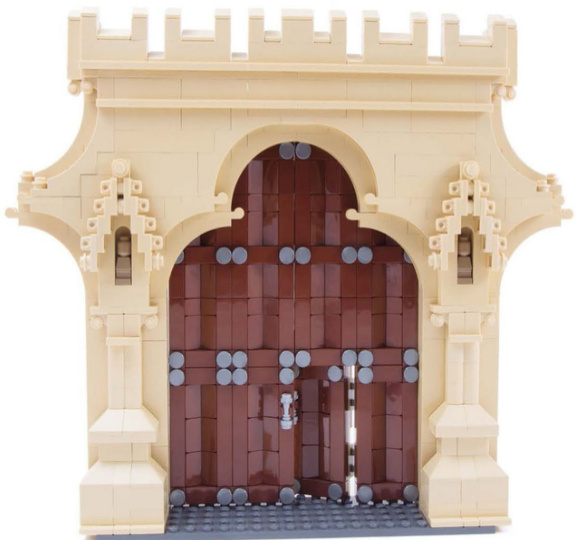
A grand entrance fit for a castle.

Layer surrounding walls for emphasis.
Portcullises
Use bricks with groove to guide a portcullis that you can raise and lower.
#88393 2 1x8x12 portcullis #89519
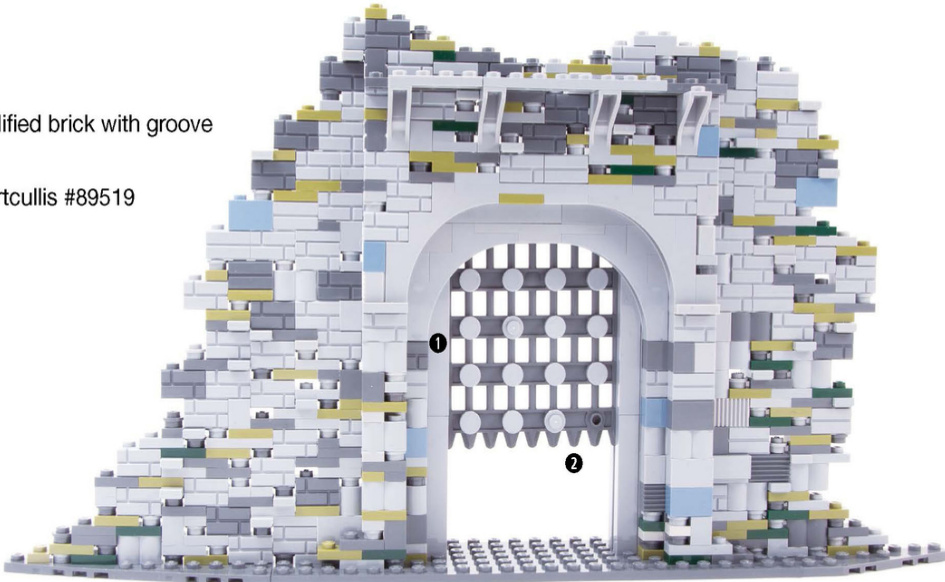
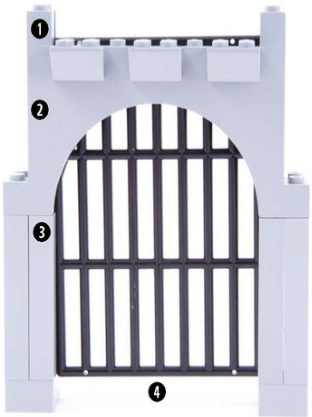
0 1x2 modified brick with groove #4216
2 2x12x6 arch #30272
3 1x2x5 modified brick with groove #88393
4 9x13 bar grill #6046
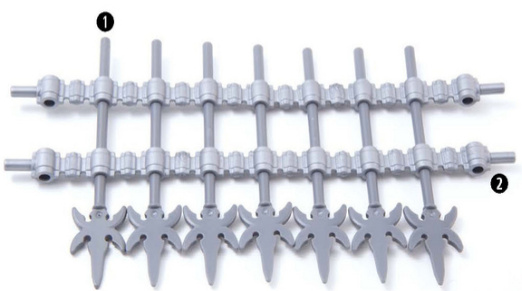
Build your own portcullis to fit an opening of any size or scale.
1 Weaponpikewith 4 sideblades#43899
2 Hero Factory ammo belt #98567
Column Bases
The base of a column is usually broader than the shaft it supports. It can be fluted, square, or round.
2x2x11 solid pillar #6168 1x1 round plate with flower edge #33291 1x5x4 inverted arch #30099
0 1x1x6 solid pillar #43888
? 1x1x5 brick #2453
③ 1x3 curved slope #50950
4 1x4 curved slope #61678
0 1x2 cheese slope #85984
2 2x2 double concave slope #3046
? 1x2 slope #3040
4 1x1 cheese slope #54200
0 6x6 tile with 4 studs #45522
2 1x2x3 slope #4460
① 4x4x2 cone #3943
2 4x4 round brick #87081
③ Bionicle canister lid #47491
4 3x3x2 cone #6233
6 5x5 dish #6942
2x2 pentagonal wedgeplate#27928
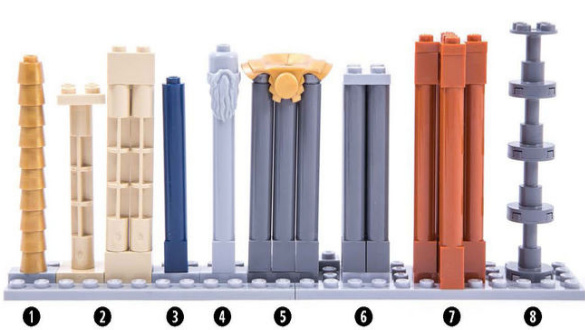
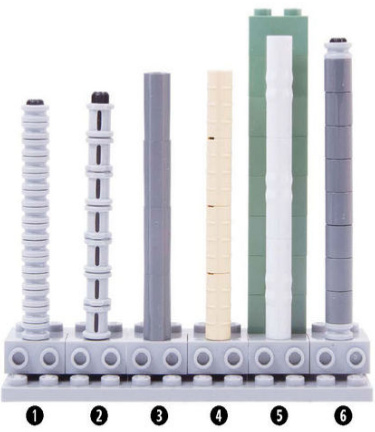
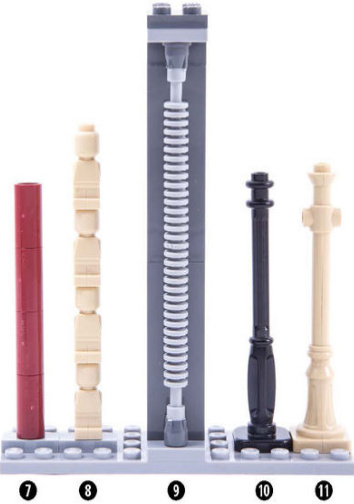
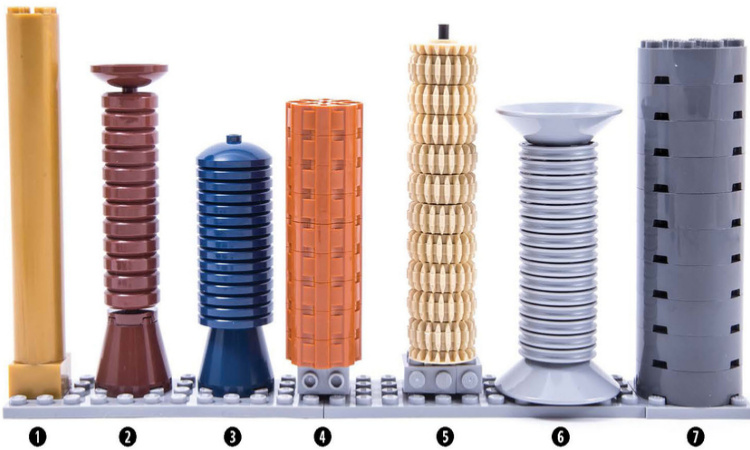
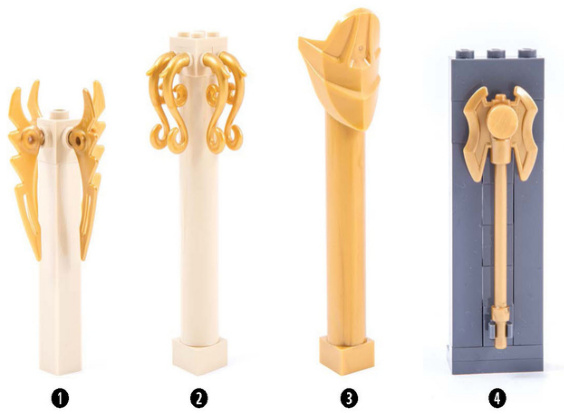
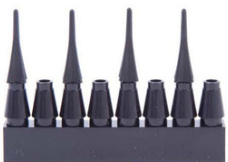
Round Shafts
The shaft is the part of the column between the base and the capital.
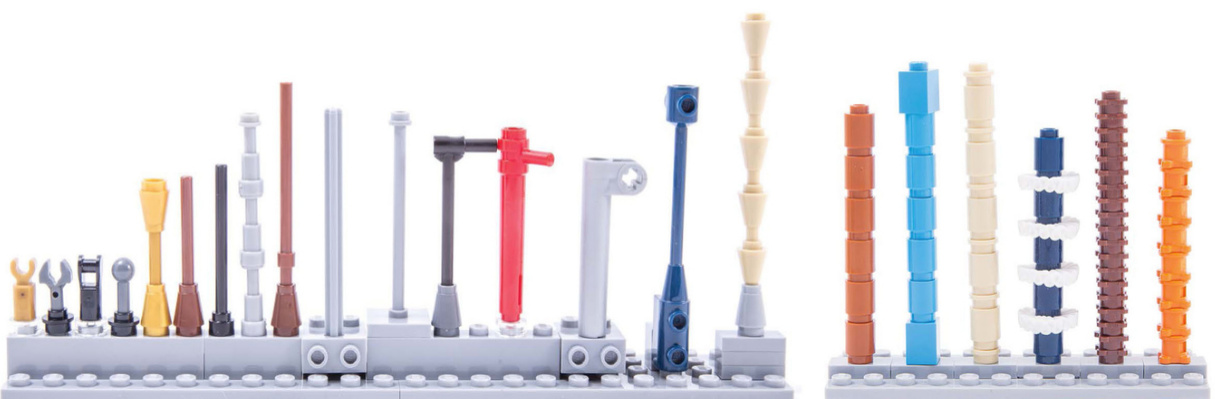
1 Bar holder with clip #11090
2 1L bar with clip mechanical claw #48729
3 Bar holder with handle #23443
? 1L bar with towball #22484
? 1x1 cone #4589 4L bar #30374
6 1x1 cone #4589 4L bar #30374
7 1x4 antenna #3957
8 Telescope #64644
9 1x1 cone #4589 6L bar with stop ring #63965
10 5L axle #32073
2x2 tile with bar and stud #98549
5L bar with handle #87618
1x5 1/2 cylinder with handle #87617
Axle and pin connector with extension #53586
1x8 bar with 1x2 brick #30359
Ice cream cone #11610
1x1 round brick #3062
1x1 brick #3005 1x1roundbrick #3062
1x1 round brick #3062 1x1 roundplate #4073
1x1 round brick #3062 Ruff #99251
1x1 round plate with flower edge #33291
1x1 round brick with flower edge #33286
1 Fez#85975
2 1x1x51/3spiralstaircaseaxle#40244
3 1x1x6solidpillar#43888
4 1x1x6 solidpillar #43888 Beard#10052 Head#3626
5 1x1x6 solidpillar#43888 Minifig armor shoulderpads #15066
6 1x1x6 solidpillar #43888 2x2plate #3022
7 1x1x6 solidpillar#43888 3x3 plate cross #15397
8 2x2x2 support withstand #3940
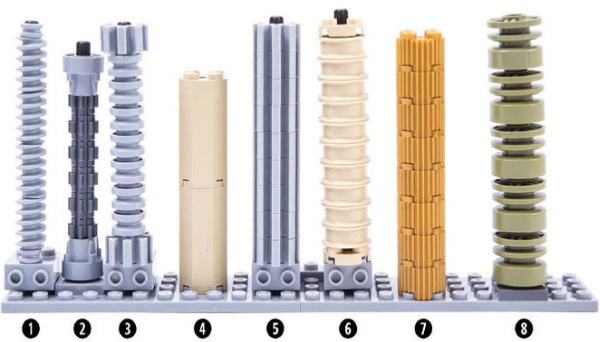
1 Technic gear worm screw long #4716
Technicgear8toothtype2#10928
Technic driving ring extension #32187
3 Technic gear timingwheel8 tooth #32060
11mmx8mmwheelwithgroove#42610
4 2x2x31/3 octagonal brick #6037
? Technic geartimingwheel8tooth #32060
6 2x2wheelspokedwithpinhole#30155
0 2x2roundbrickwithflutes#92947
? 18mmx14mmwheelwithpinhole#55981
0 Technic1/2bush#4265
2 Technicbush#3713
? 2Laxleconnector#6538
0 2Lridgedaxleconnector#6538
? Driving ring connector #18948
6 1Lpin connector #18654
0 2L pin connector #75535
8 Microfig#85863
9 12Ltabbedflexiblehose#x131
0 2x2x7lamppost #2039
= BrickForge lamppost
1 2x2 round plate #4032
2 2x2 round brick #3941
3 2x2plate #3022
2x2 round brick #3941
4 2x2 dish #4740
0 2x2x11 solid pillar #6168
2 3x3 dish #43898 Wheel hockey puck #47576 2x2 round tile with stud #18674 3x3x2 cone #6233
3 3x3 dish #43898 3x3x2 cone #6233
4 Weapon barrel #98585
5 Bevel gear #32198 Double bevel gear #32269
6 5x5 dish #6942 Pulley #4185
D 4x4roundbrick#87081
Balusters
Balusters are small decorative columns used to support railings or parapets.
1 1x1x5 1/3 spiral staircase axle #40244 Bevel gear #32198 2x2 truncated cone #98100
2 1x1 round brick #3062 Gearwith clutch #6542
3 2L Technic pin connector #62462 Technic driving ring extension #32187
④ 1x1 round brick #3062 Doublebevel gear #32269 2x2x2 dome with cross cut slots #33287 2x2 dish #4740
5 2L axle connector #6538 2x2 round tile with stud #18674
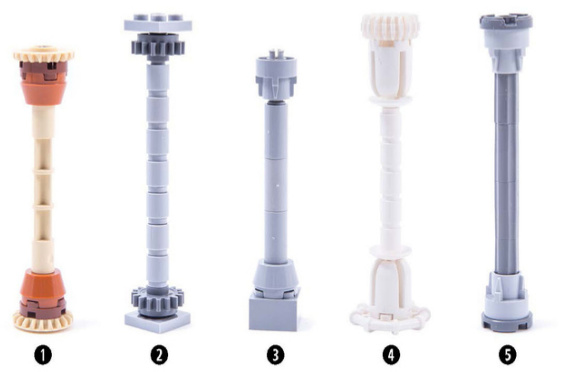
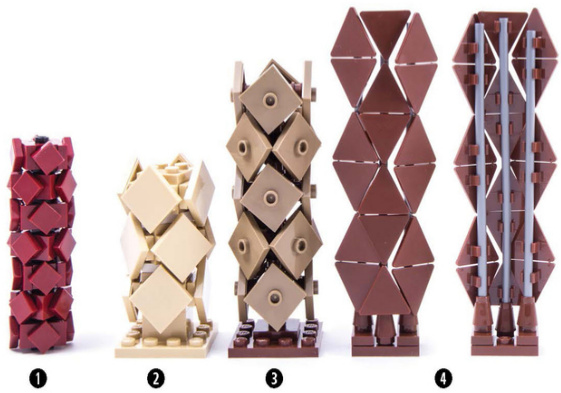
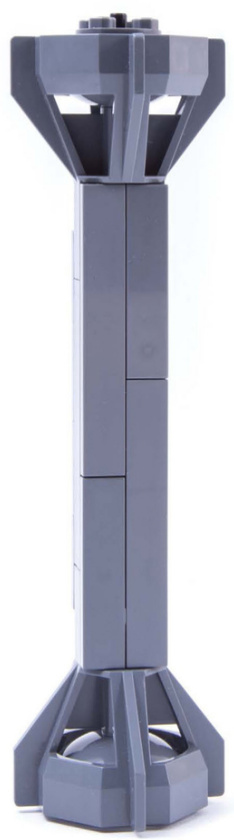
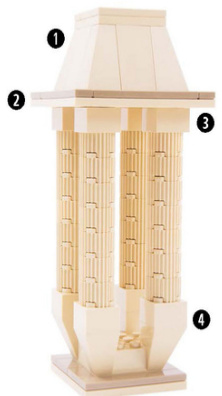
Multiple Shafts
Make wider columns from multiple shafts or from parts that have built-in symmetry.
1x1 brick with scroll #20310 1x1x6 solid pillar #43888 2 1x1 round brick #3062 1x2 plate #3023 3 1x5 1/2 cylinder with handle #87617 1x2liftarm #43857 ? 1x3 liftarm with ball joint #98577
1 2L axle connector #6538
2 2L axle connector #6538 #1 angled axle connector #32013
3 1x1 round brick #3062 4x4 round plate #60474
4 Bar holder with clip #11090 6L bar with stop ring #63965 1x2 thin liftarm #41677
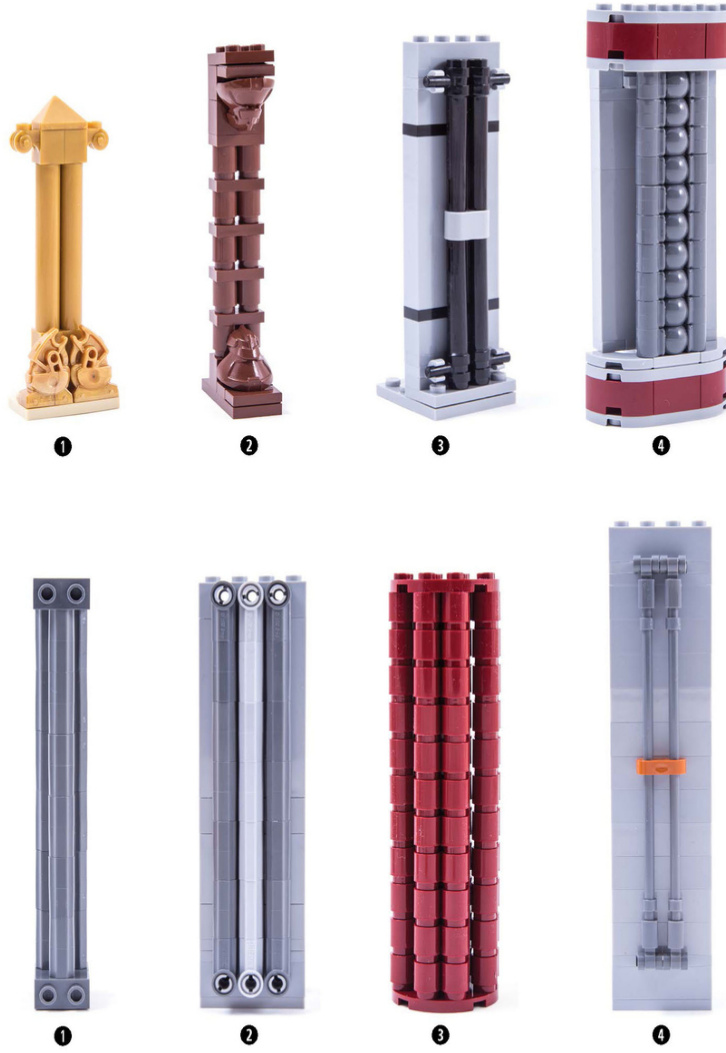
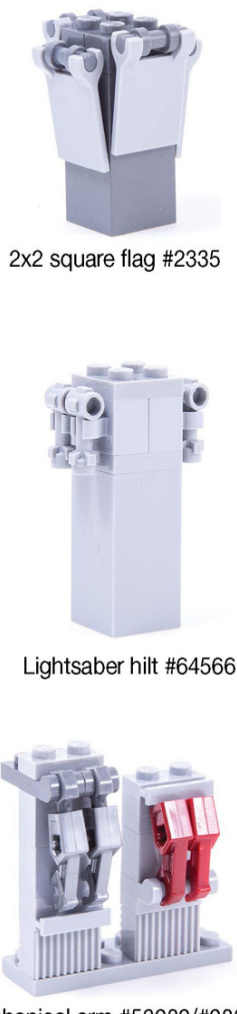
Square Shafts
Add interest to square shafts by incorporating round pieces,pieces with handles or clips,and grooved pieces to mimic the look of classical fluting.
1 1x1brick #3005,withsmall gapsbetweeneachbrick
2 1x1x5brick #2453
3 1x1brick#3005 1x1roundplate #4073
④ 1x1brickwith handle #2921
6 1x1brickwithhandle #2921
1x2platewithrail#32028
6 1x1brickwithclip#30241
6Lbar withstop ring #63965
1 2x2x3brick #30145
2 1x2modified log brick #30136
? 2x2brick#3003
2x2 roundplate#4032
4 2x2x2container#61780
6 1x2modifiedbrickwithgroove#4216
6 2x2x8supportwithgrooves#30646b
0 2x2x8supportwith groovesand lattice
on2 sides#30646a
8 2x2x8 Scala support with grooves x7
9 1x1 brickwithstuds on 4 sides#4733 1x2tile#3069 2x2jumperplate#87580
2x2x10supportgirdertype4#95347
1x2modifiedbrickwithgrill #2877
1x2modifiedbrickwith grill #2877 2x2modifiedbrickwithslopedend #47457
1x2modified log brick #30136 1x2brick #3004
1x2Technic brick #3700 Technicpinwithtowball#6628 1x9Technic link #32293
2x2 jumper plate #87580 1x8tile#4162 1x2brick with 2 studs on side #11211
1x2Technicbrick#3700 Halfpin#4274 1x8plate#3460 1x2 grill plate #2412
0 1x2 cheese slope #85984
2 1x1brickwithstuds on 4 sides #4733 1x3 double inverted slope #2341 1x8 tile #4162
③1x2 jumper plate 15573 1x6 tile #6636 1x1 brick with stud on 2 adjacent sides #26604
4 1x1 modified plate with vertical tooth #15070 1x2 plate with rail #32028 2x4 tile #87079 2x2 tile #3068
? 2x2Technic brick with ball receptacle #92013
2x3 plate #3021 1x2 jumper plate 15573 1x2 modified brick with grill #2877 1x2 tile with groove #3069
7 2x2 modified brick with grooves and axle hole #90258 1x2 jumper plate 15573 1x1 brick with stud on 2 adjacent sides #26604 1x1 tile with clip #15712 16L 3mm rigid hose #75 6x6plate #3958
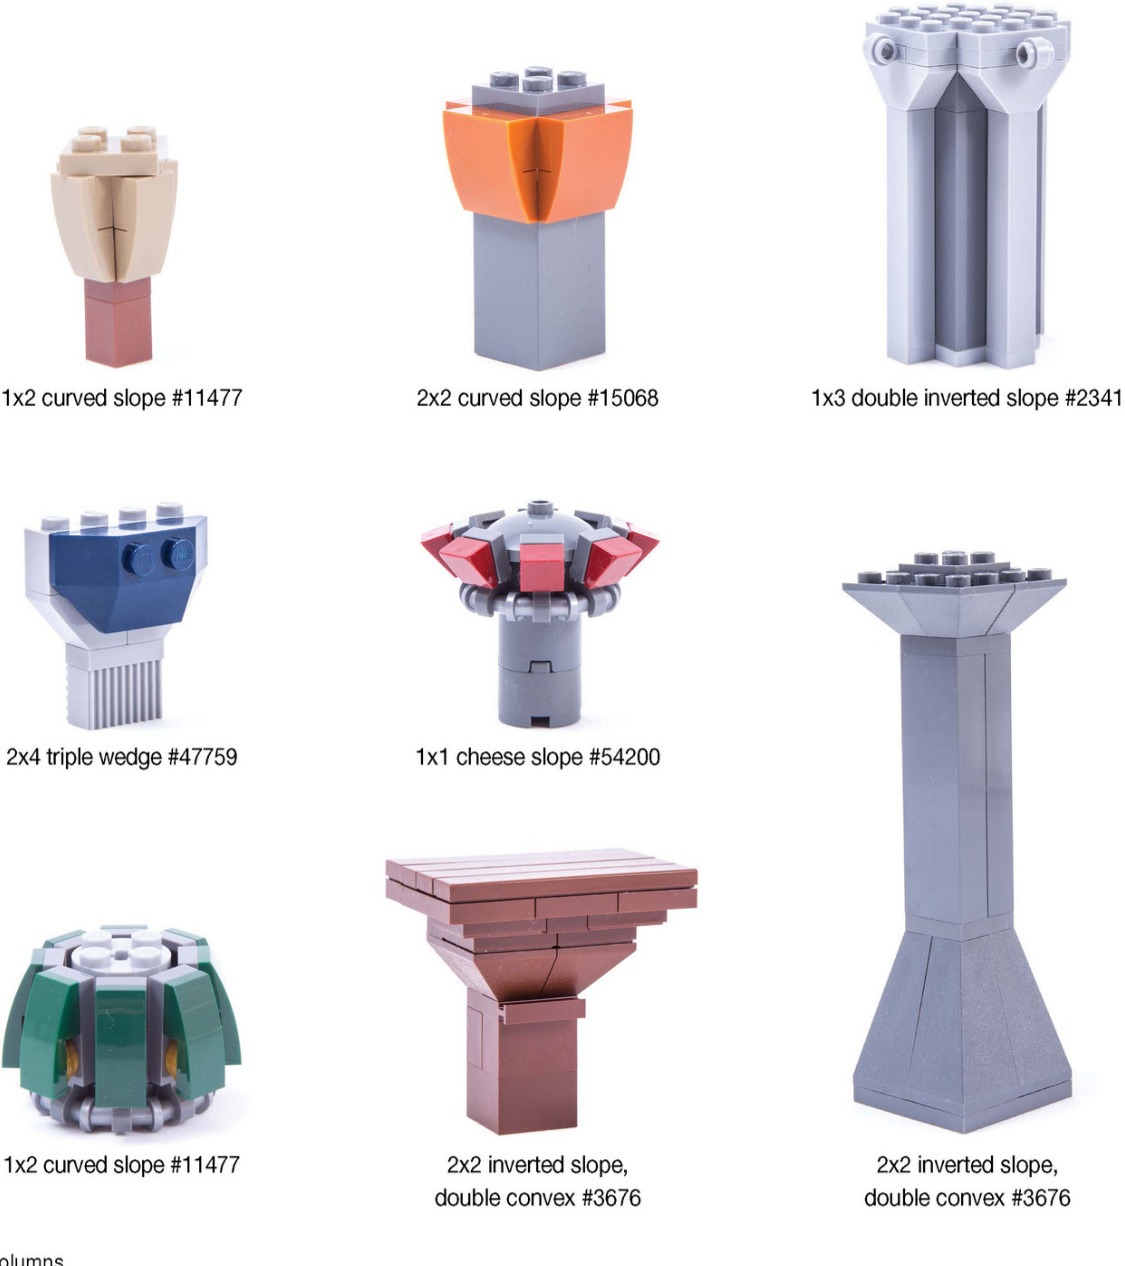
Decorative Shafts
Use decorative elements to add unexpected flourishes to the shafts of your columns, or use tiles to build faceted shafts for a more modern look.
1 Weapon crescent blade #98141
② Plant curved stem #28870
Hero Factory Shoulder Armor #15369
4 Twin bladed axe head #11096
1 1x2 modified plate with handles #3839
?Mechanical arm 98313
3 6.6L bar with stop ring #4095
41x1 round brick #3062
Faceted shafts work well without bases or capitals.
●1x1 brick with studs on 4 sides #4733 1x2 jumperplate 15573 1x1tile #3070
2 2x2 tile #3068
3 2x2 jumper plate #87580
4 2x2 triangular sign #892
Capitals
A column’s capital sits on top of the shaft and is typically broader than the shaft to support the entablature above.

Short droid leg #17486
The base can be mirrored in the capital, like with this propeller housing (#6040).
Mechanical arm 98313
Doric Capitals
Create simple Doric capitals with slope and wedge pieces
lonic Capitals
Re-create the look of lonic capitals with 1x1 bricks with scroll (#20310).
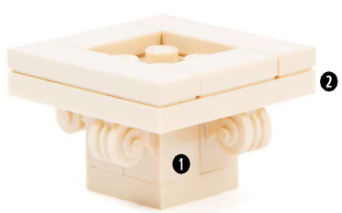
1 1x1 brick with scroll #20310
2 4x4 plate #3031
1 1x1 brick with scroll #20310
2 1x2 jumper plate 15573
1 1x1 brick with scroll #20310
2 Cat tail #15429
●1x2 curved slope #11477
1x1 brick with scroll #20310
③1x2x1 1/3 modified brick with curved top #6091
4 1x6 tile #6636
1x1 brick with stud on side #87087
1x2 tile #3069
You can also use Technic pieces and plates with ring to mimic this effect.
1x2 modified plate with 1x1 round plate #4073 handle on side #2540 4 1x1 plate with ring 2 Technic 1/2 bush #4265
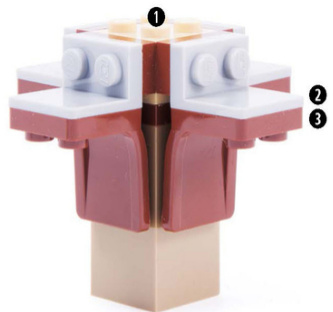
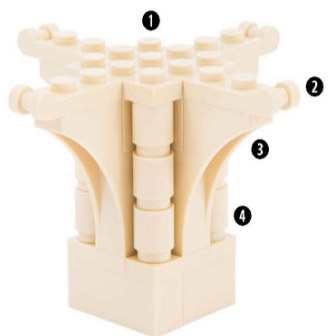
Corinthian Capitals
You can use curved slopes and arches to emphasize the four corners of a capital, hinting ata Corinthian design.

0 1x3x3 arch #13965
② 1x2 inverted slope #3665
? 1x4 brick #3010
? 1x2 brick #3004
1 1x1 brick with stud on 2 adjacent sides #26604 invertedbracket#99207 2x2 minifig utensil seat #4079
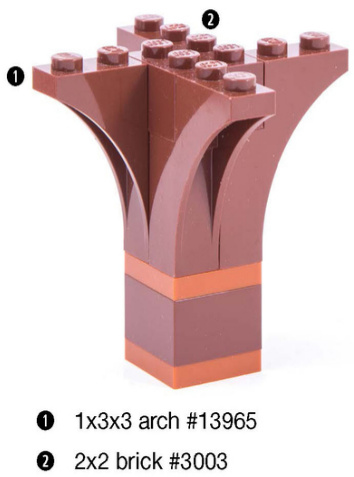
1 3x3plate #11212
2 1x2modifiedplatewith handle on end
#60478
3 1x3x3 arch #13965
? 1x1 round brick with open stud #3062
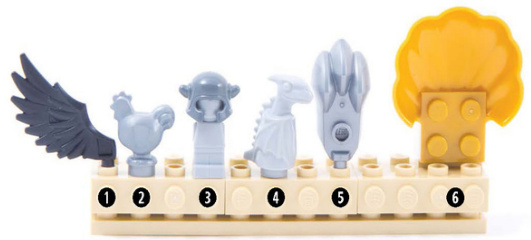
Decorative Capitals
Custom decorative capitals can be colorful and playful.
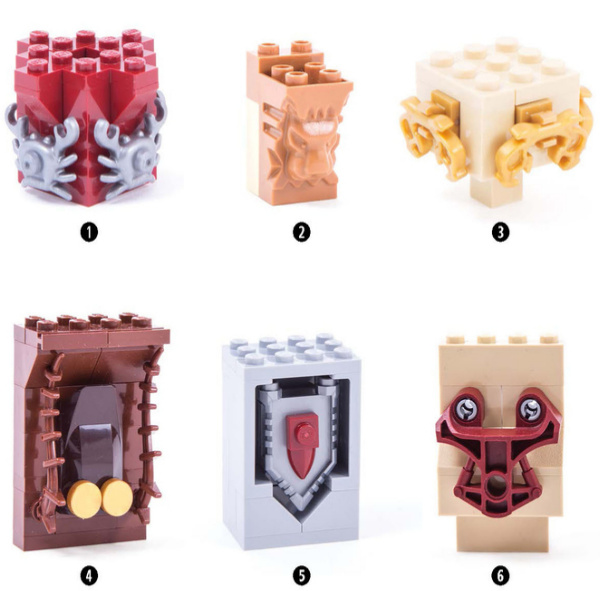
0 Crab #33121
? 2x3x3 modifiedbrick with cutoutand lion head #30274
③ Antler #11437
4 brick with wing end #47456 1x1 round tile #98138 Plantvine #55236 2x2 inverted slope #3660
5 Pentagonal shield#22408 1x1 modified plate with horizontal tooth #49668
6 Bionicle chest cover #49423
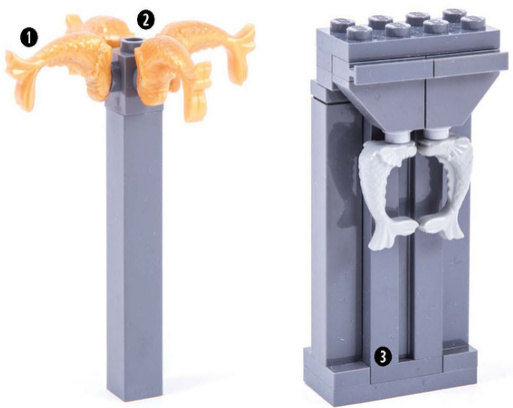
0 Ornamental fish x59
1x1 brick with studs on 4 sides #4733
? 1x2x5 modified brick with groove #88393
Even a small column can have a custom capital!
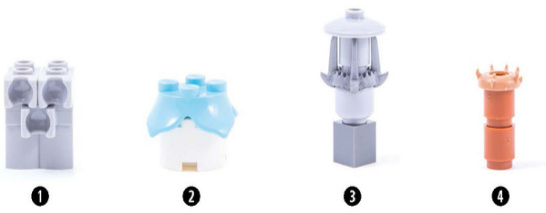
01x2 modifiedplate with socket on end #14418
1x2 modified plate with socket on side #14704
2 2x2 round brick with petal base #15469
③ Crown with 4 spikes #18165
4 Zabrak horns #95747
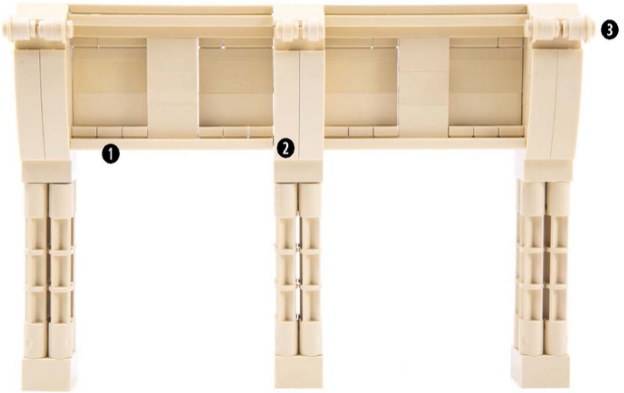
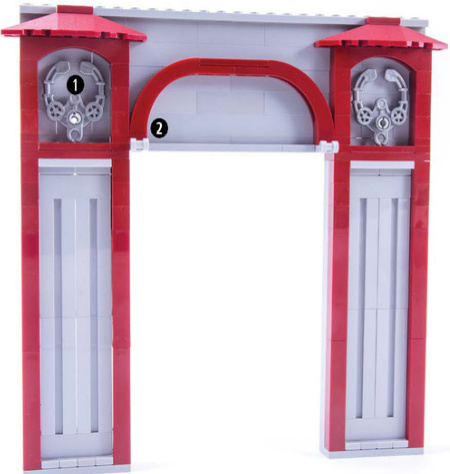
Connected Columns
Connect your columns using arch and tile pieces as entablatures to build a grand archway or a colonnade.
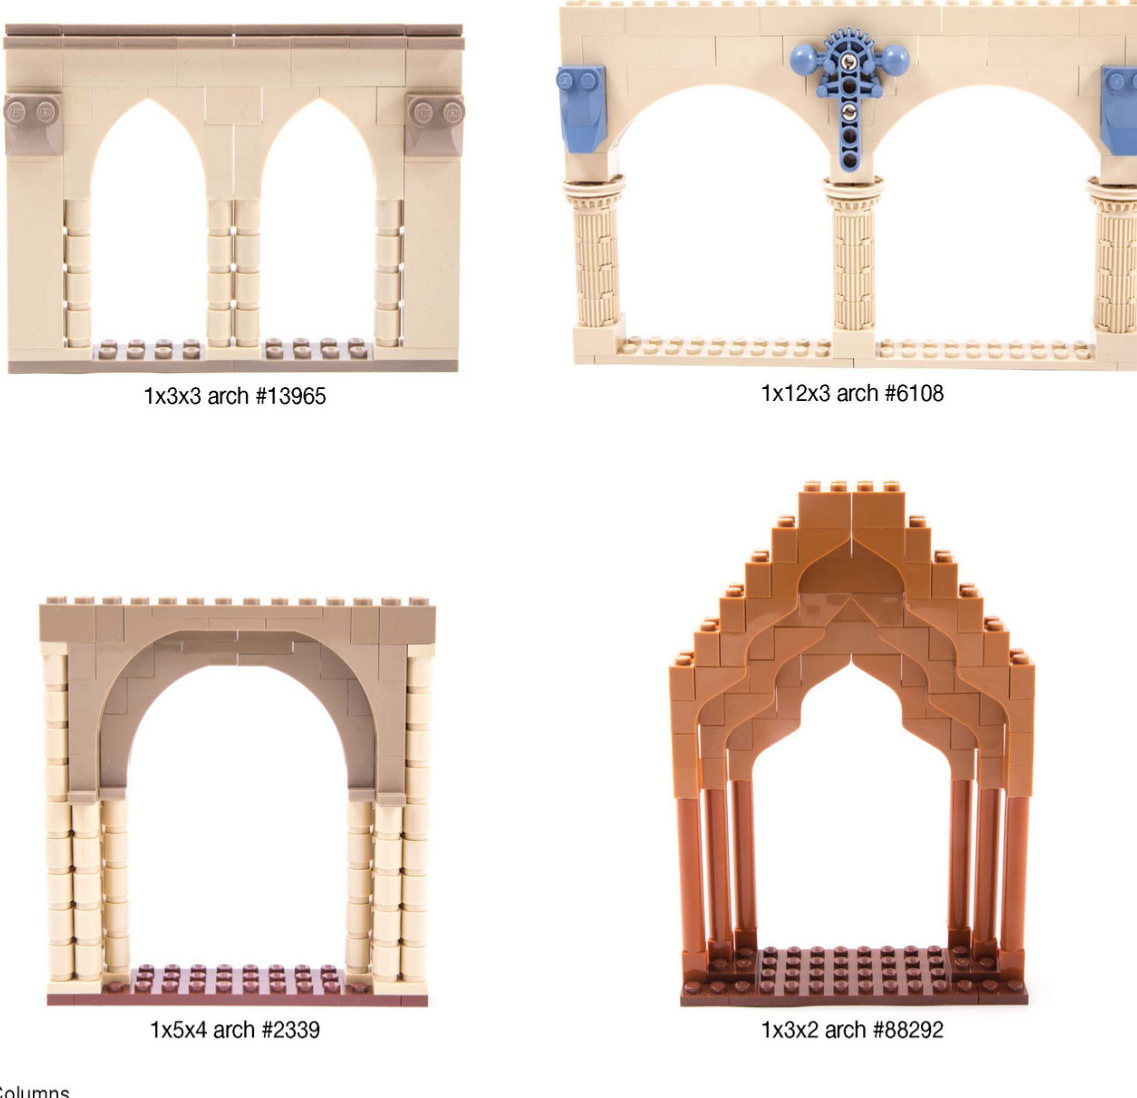
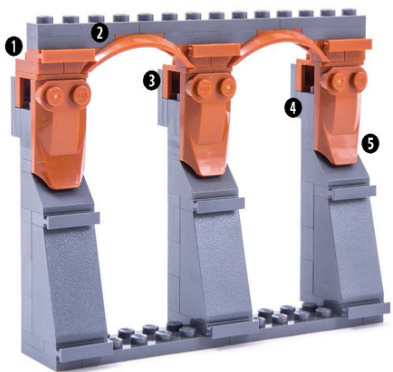
1 2x3x3 modified brick with cutout and lion head #30274
2 1x2 modified plate with socket on end #14418
3 Technic axle towball #2736
0 2x2x3 double convex slope#3685
2 6x6plate #3958
③ 2x2 brick #3003
4 6x6x2 inverted slope withcutouts#30373
0 1x2 plate with rail #32028
2 1 1/2x6x1 arch mudguard #62361
③ 1x2-2x2 bracket #44728
4 1x2x1 2/3 brick with studs on 1 side
#22885
? brick with wing end#47456
●1x2 jumper plate 15573
1x4 curved slope #61678
1x1 plate with ring #4081
Hero Factory handcuff #98562 2 1x6x3 1/3 arch with curved top
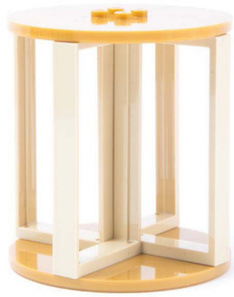
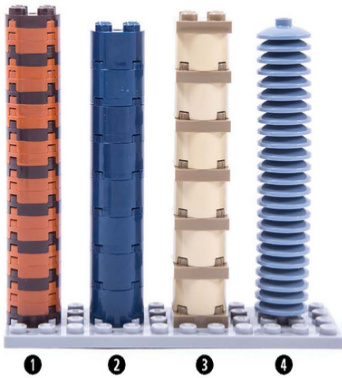
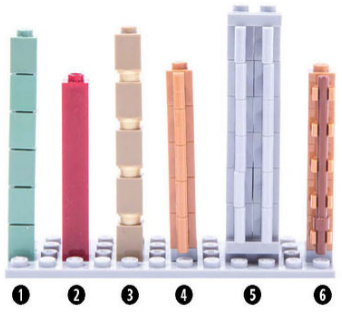
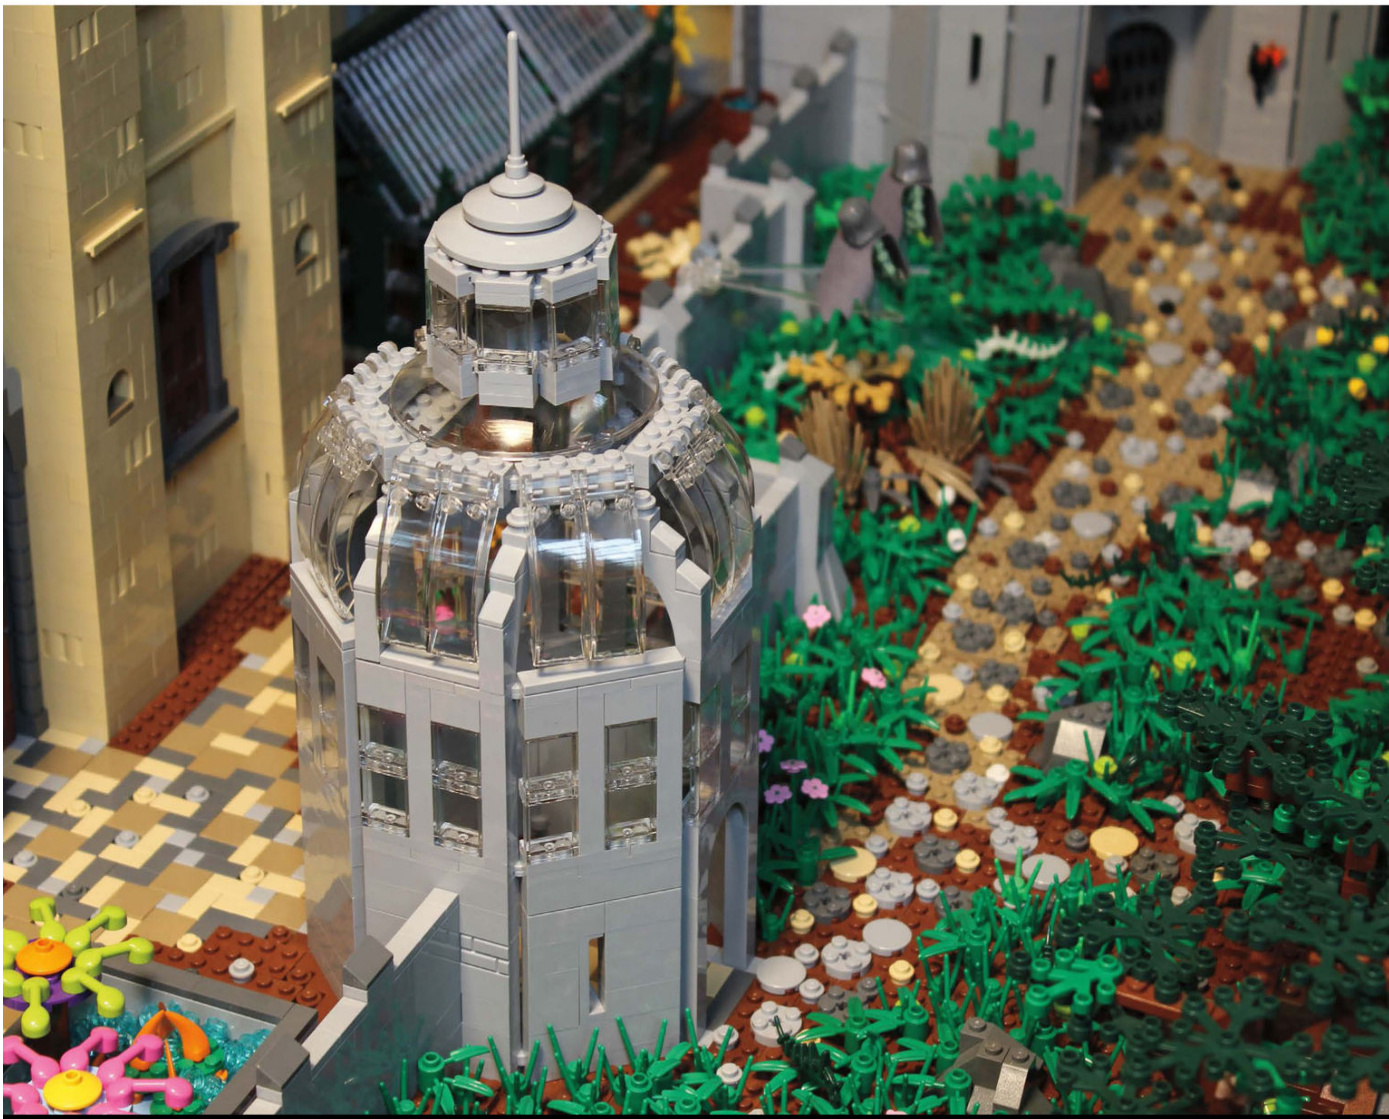
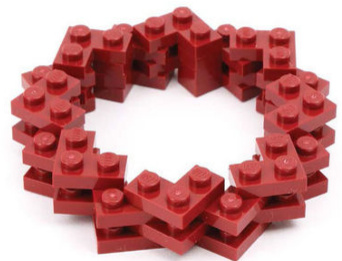
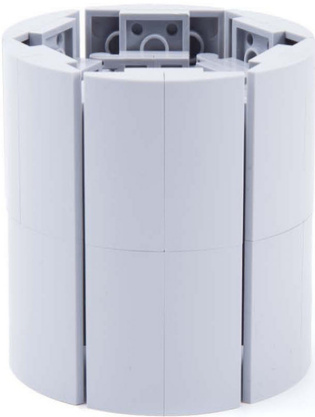
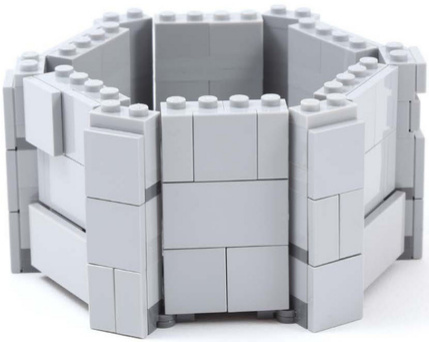
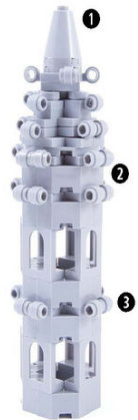
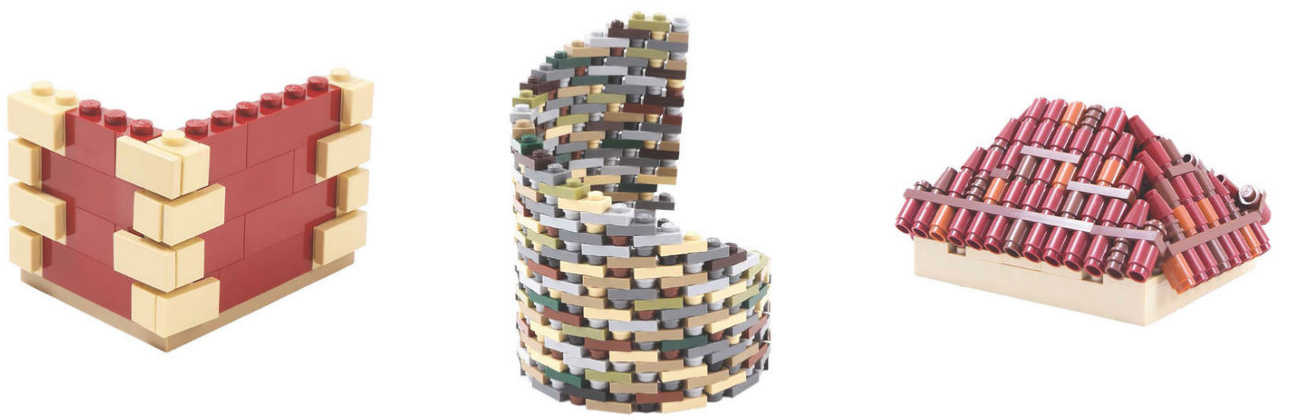
Towers
T
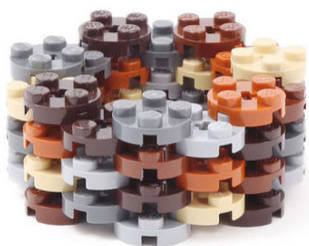
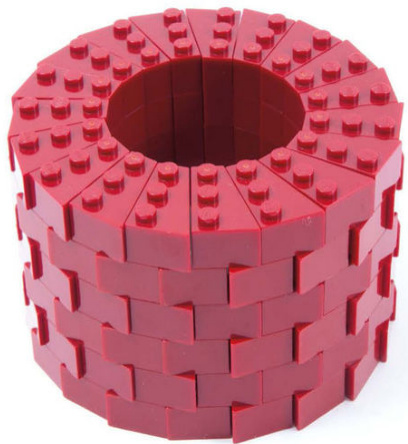
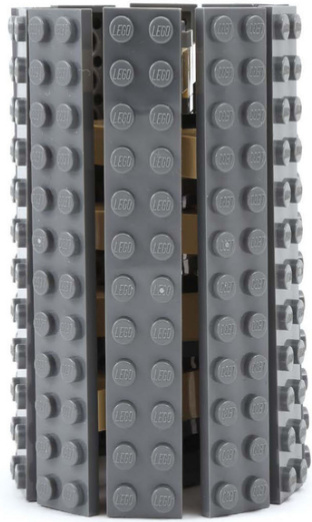
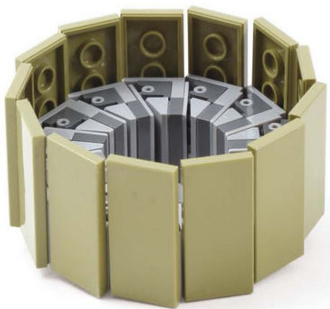
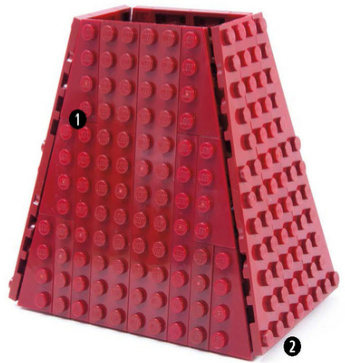
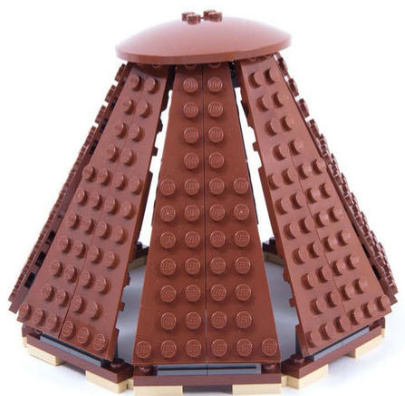
Stacked Towers
Stackbricks or plates in alternating layers to create a subtly textured tower. The larger the diameter of your circle, the smoother the exterior becomes.
2x2cornerplate#2420
2x2roundplate#4032
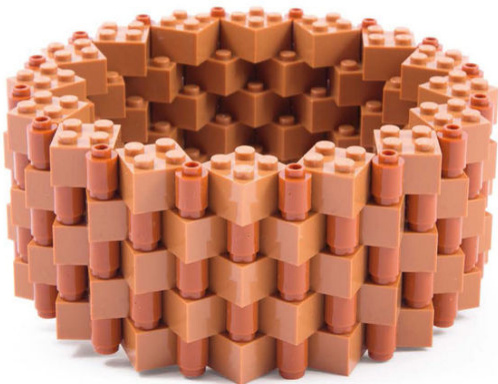
When using 2x2bricks (#3003),fill in thespace of theprotruding stud with 1x1 round bricks (#3062).
Building atowerwith2x3wedgebricks (#6565/#6564) can be delicate in the beginning asthepiecesaren’tfullyconnectedtoone another.But as you build higher,the tower becomes more stable.
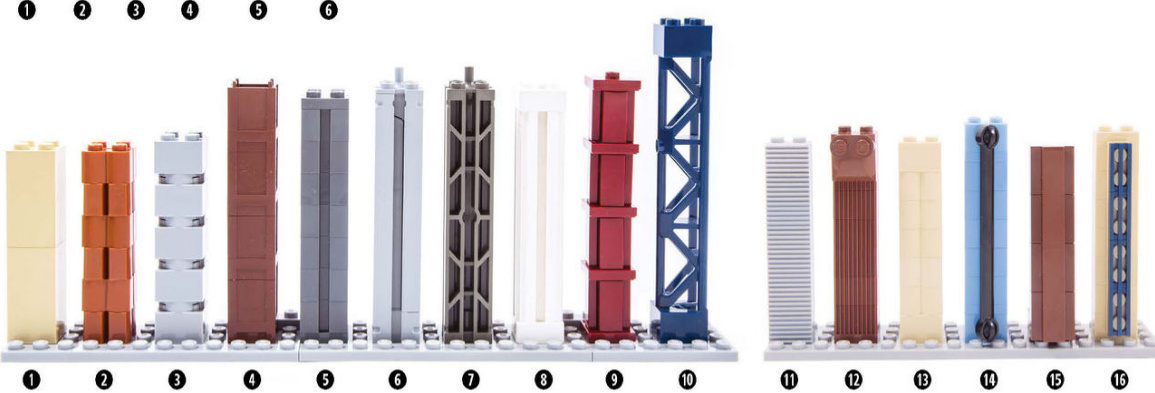
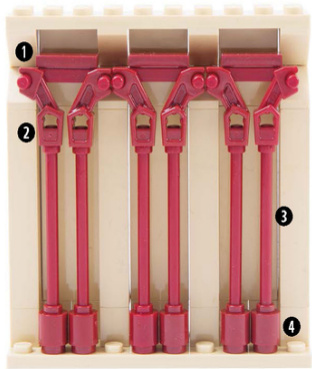
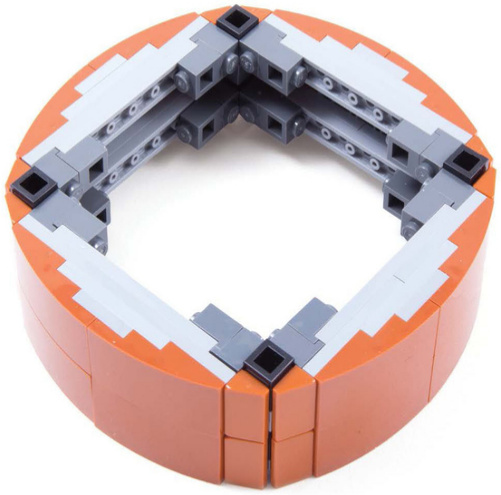
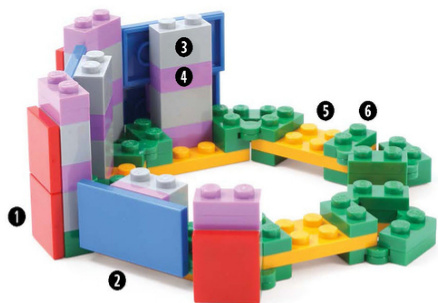
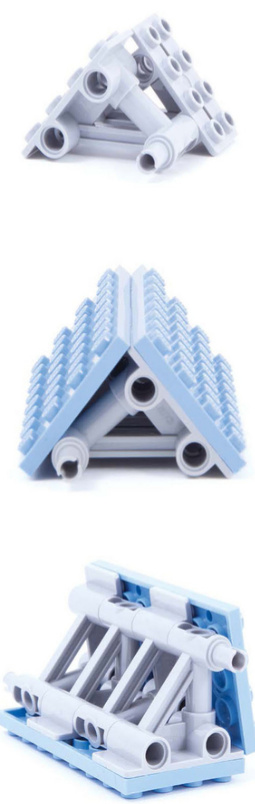
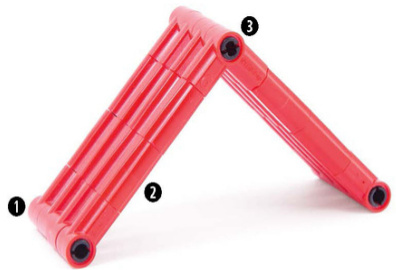
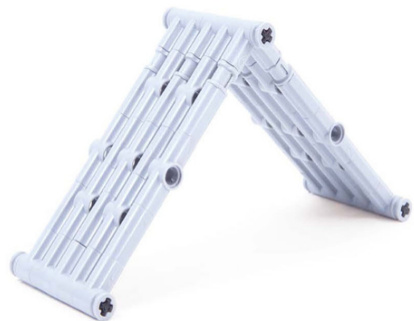
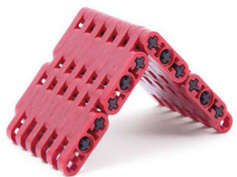
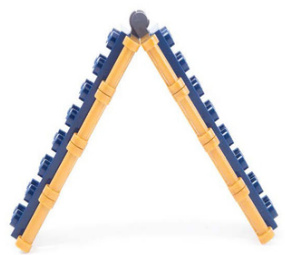
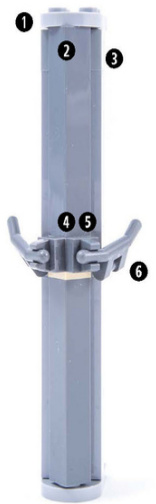
Liftarm Towers
Connect liftarms with pins to form any tower-like shape.
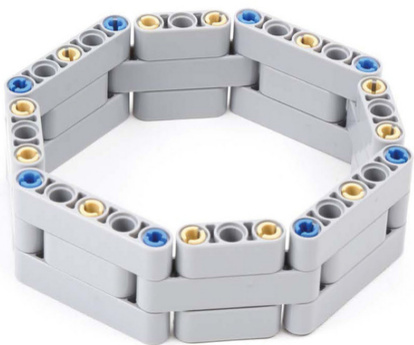
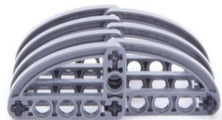
Create a simple octagonal tower by alternating 1x3 liftarms (#32523) and 1x5 liftarms (#32316).

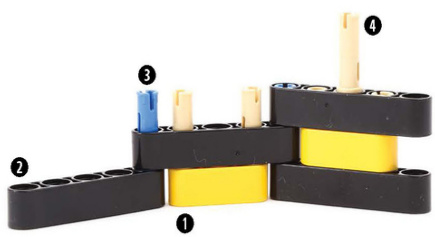
Layer 3x3 T-shape liftarms (#60484) with staggered pins to form a tower with protruding corners.
How To
The longer the liftarms,the larger your tower will be.Add or remove sides to change the shape.
0 1x3liftarm #32523
2 1x5 liftarm #32316
3 3L pin #6558
4 3L pin without ridges #32556
T
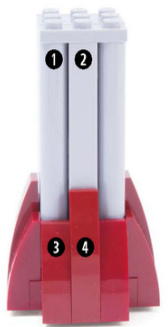
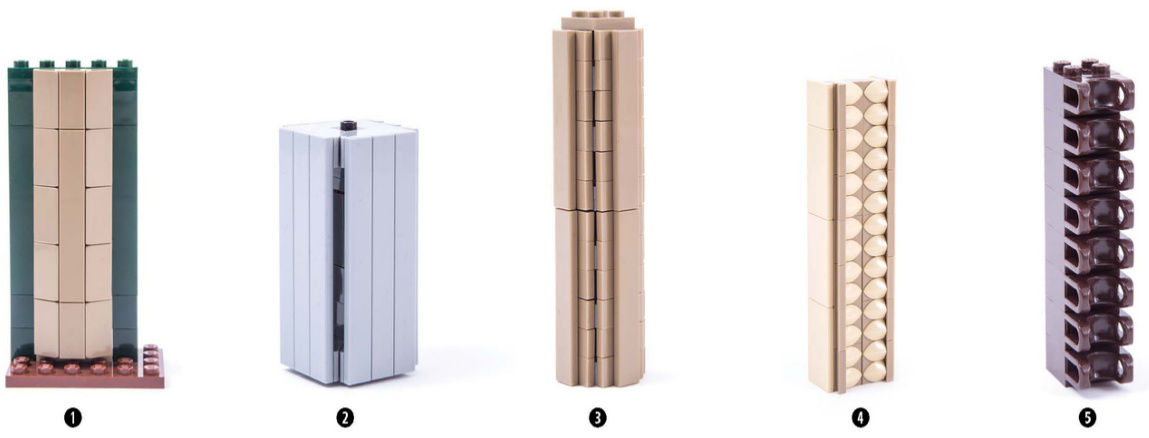
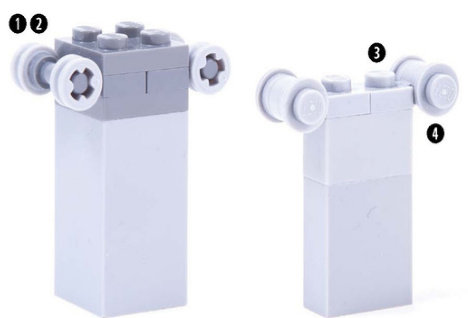
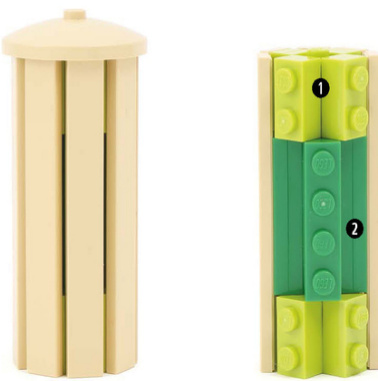
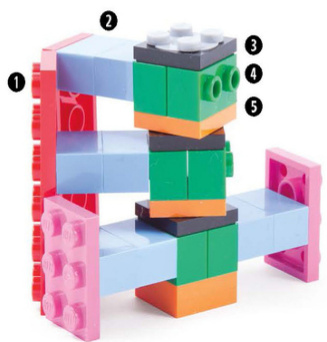
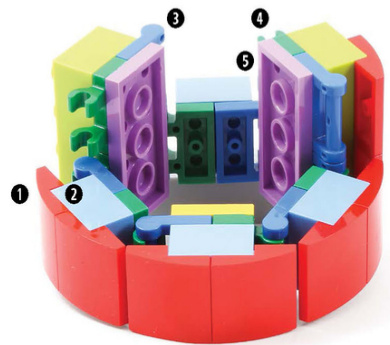
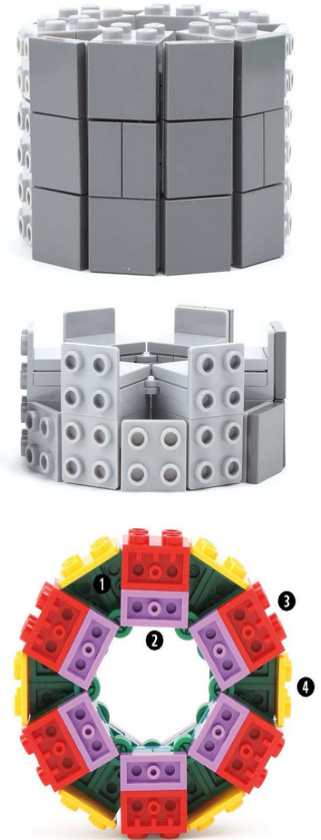
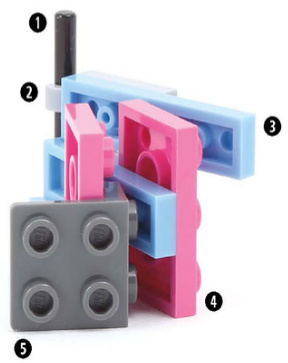
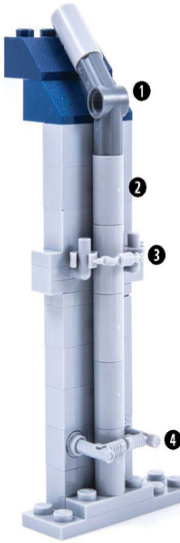
Brick with Stud Towers
Use bricks with studs on side as a central column and then attach exterior plates or tiles.
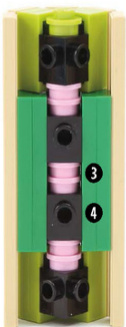
1 1x2plate #3023
2 1x4 plate #3710
3 1x1 round plate #4073
? 1x1 brick with studs on 4 sides #4733
0 2xplates 4 1x2 brick with 2 studs
2 1x2 brick #3004 on side #11211
③ Turntable 3679with #3680 ? 2x2 plate #3022
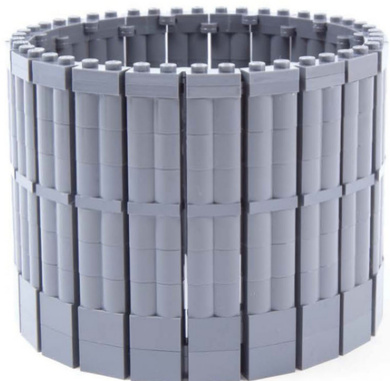
T
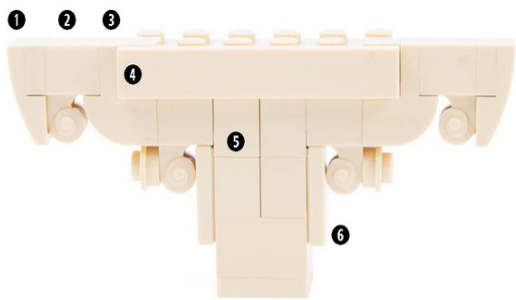
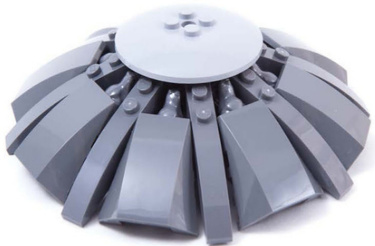
Curved Slope Towers
Arrange curved slopes around a core of plates with handle and plates with clips to create towers with smooth, rounded exteriors.
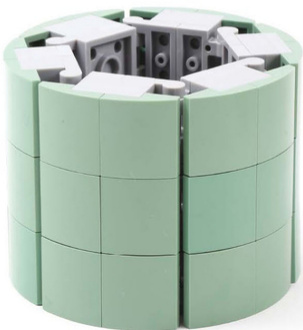
2x2 curved slope #15068
2x4 curved slope #88930
HowTo
You can use any length of 2x bricks and plates and build this tower as high as you want.
0 2x2 curved slope #15068
2 2xbrick
?1x2platewith handle on side #48336
●1x2 plate with 2 clips #60470
2x plate
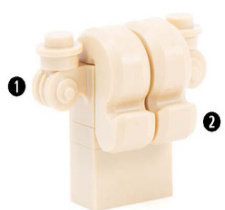
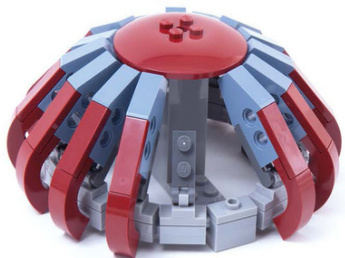
Small Curved Slope Towers
Bracket pieces are the key to making a compact tower of these curved slopes.
1 2x2 curved slope with lip #30602
②1x2-2x2bracket #44728
3 1x2 brick #3004
4 2x2plate #3022
? 2x3 plate #3021
Large Curved Slope Towers
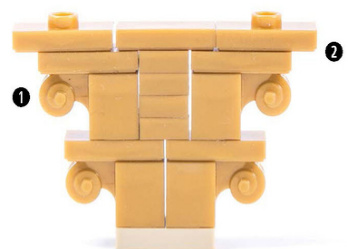
Connect long curved slopes with the 1x1 brick with studs on 4 sides for a tower with a larger diameter.
1 2x4 curved slope #93606
2 1x2 cheese slope #85984
3 1x1 brick with studs on4 sides #4733
4 1x1 round plate #4073
? 2x4plate #3020
6 1x1 headlight brick #4070
0 1x8 plate #3460
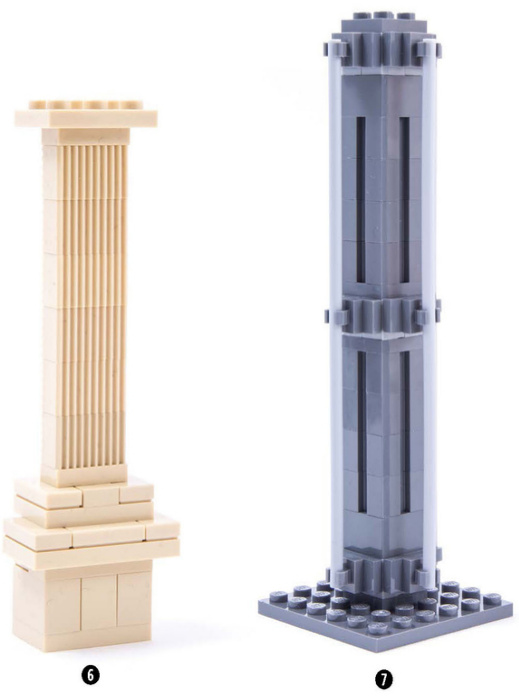
T
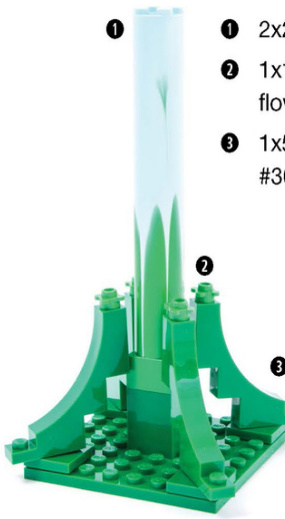
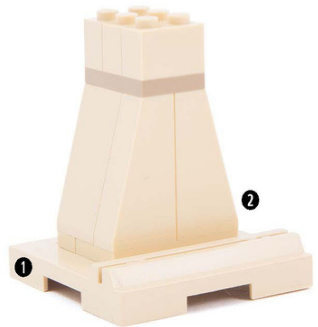
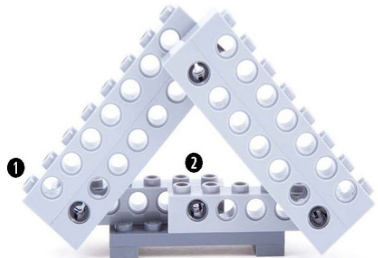
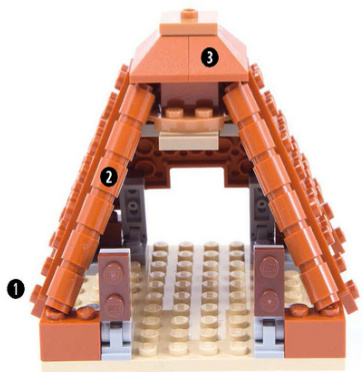
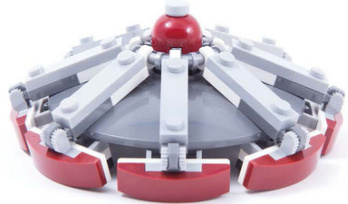
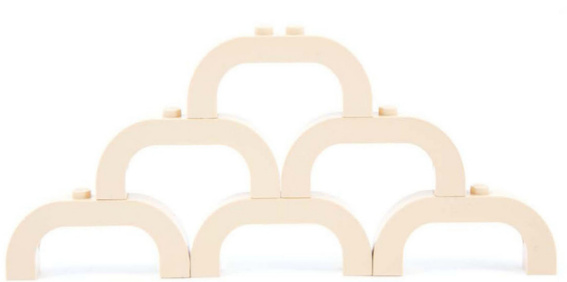
Tower Bases
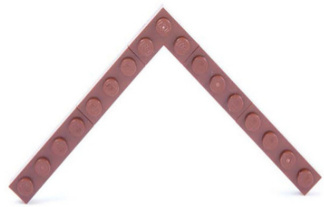
Combineregularplateswith A-shape,wedge,or hingeplates to createthe circular basefor a tower.
1 1x4x5panelwithwindow ③ 2x3plate#3021 #60808 ? 1x4plate #3710 2 A-shapeplate#15706 6 1x1roundbrick#3062
0 2x4plate#3020 2 A-shapeplate#15706 3 1x4 hingeplate #2429 with#2430
4 1x2-1x2inverted bracket#99780
5 2x3plate#3021
6 2x2x2/3 modifiedplate #99206
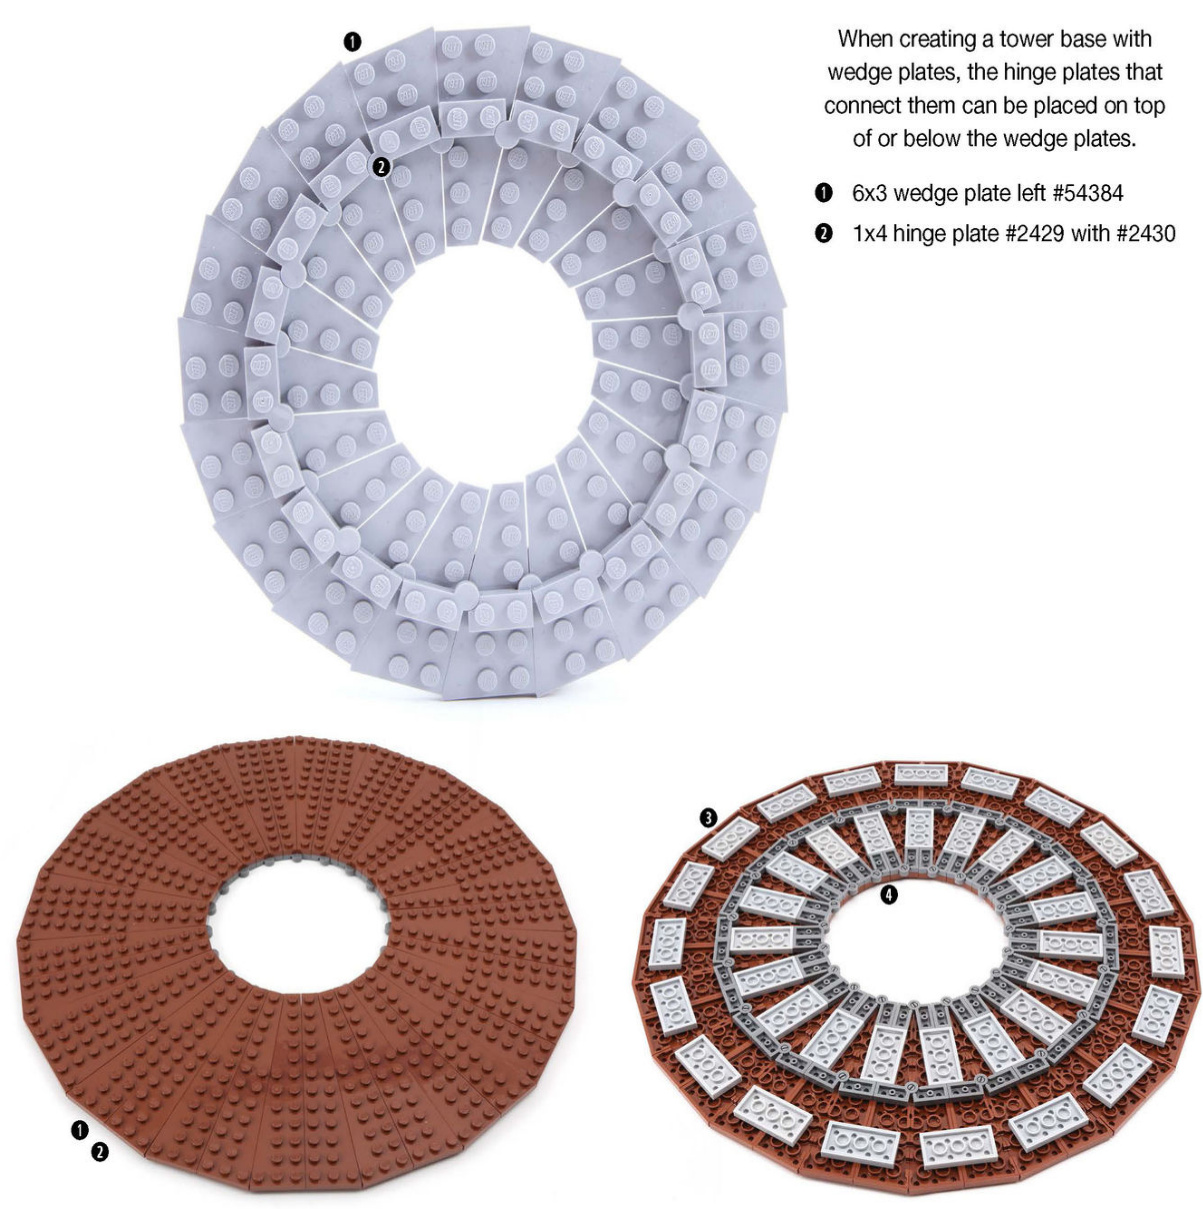
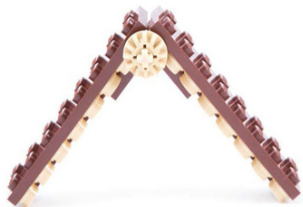
1 3x12wedgeplateleft#473972 3x12wedge plateright #47398
3 2x4plate#3020
4 1x4 hingeplate#2429with #2430
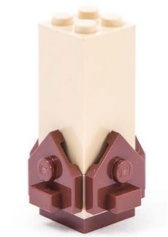
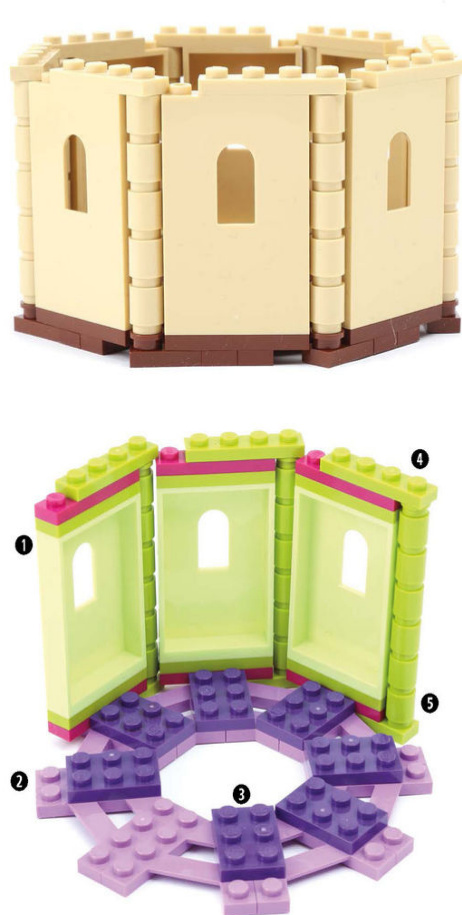
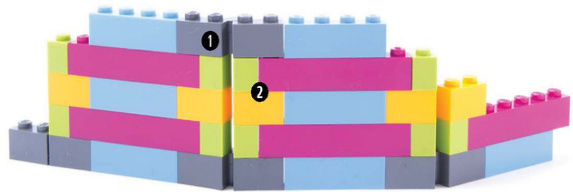
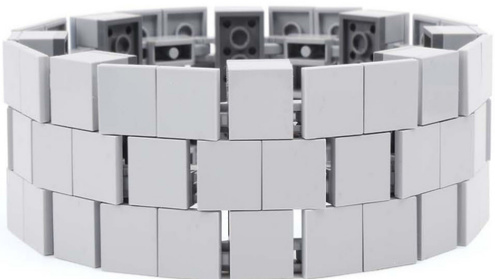
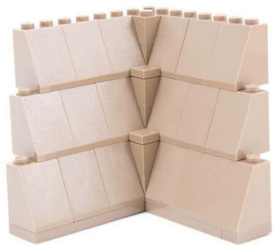
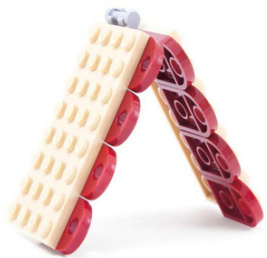
Hinge Towers
Hinge plates and hinge bricks give you lots of flexibility in a tower. You can even add decorative quoins to emphasize each corner.

Addvisual interestwith texturedbricks like the 1x2 modified log brick (#30136).
Use 1x1 bricks with stud on side (#87087) with 1x1 tiles (#3070) to re-create decorative quoins.
How To: Hinge Brick Quoins
Hinge bricks can perform double duty as connectors and decorative quoins.
1 1x4 hinge brick #3830 with #3831
2 1xbricks
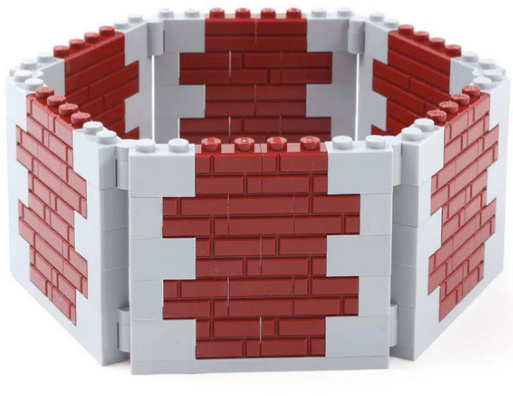
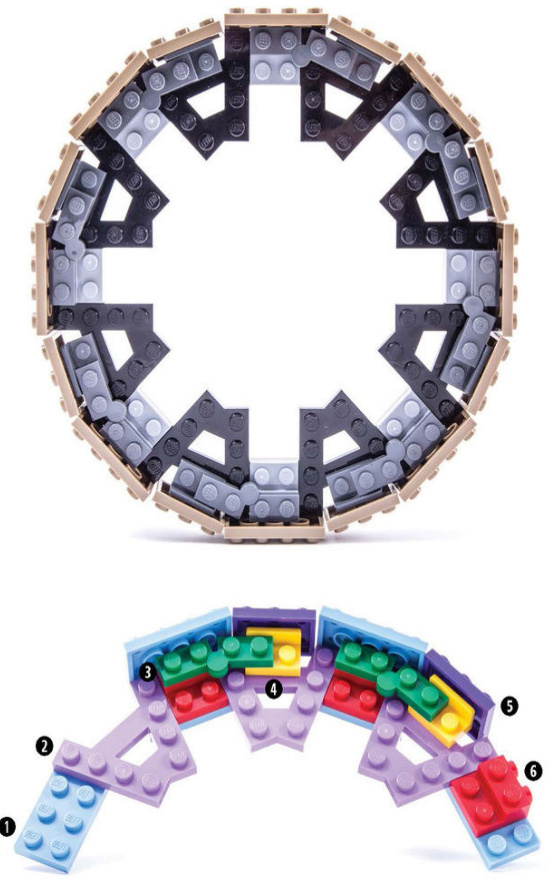
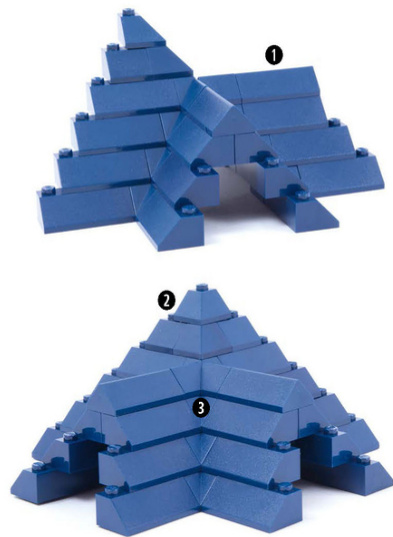
Towers with Reinforced Quoins
The base of each corner of this tower is a triangle made up of three hingeplates.Bricks with studs form the walls,which are finished with tiles.
0 2x2 tile #3068 ④ 1x2 plate #3023 2 2x4 tile #87079 ? 2x4 plate #3020 ? 1x2 brick with 2 studs 6 1x4 hinge plate #2429 on side #11211 with#2430
Finger Hinge Towers
Hinge bricks with fingers click into place, creating a fixed angle. The plates hold the rows together, andthe bricks provide support between the layers of hinge bricks.
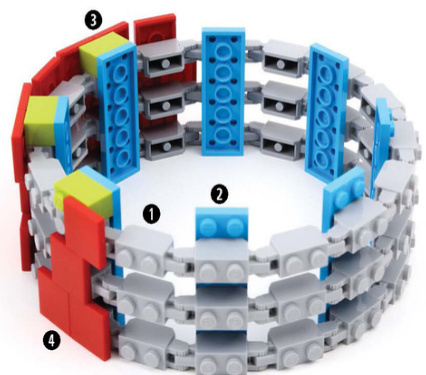
1 1x2 hinge brick locking 3 1x2 brick #3004 with fingers #30386 4 2x2 tile #3068 22x6plate#3795
T
Hinge and Bracket Towers
This massive tower uses hinge bricks to create its curved walls, and then the exterior is covered with tiles.
T
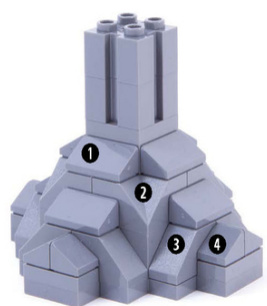
Cheese Slope Towers
Use plates with clips and handles to create the angle needed to match up cheese slopes at each corner of these towers.
Using a single color scheme creates a smooth finish that looks like masonry.
0 1x2 cheese slope ●1x2platewith2 clips #85984 #60470
? 1x6 plate #3666 2x2 plate #3022
3 1x2 plate with handle on side #48336
Compared to the 6-sided version, this tower features subtler corner angles.
0 1x2 cheese slope #85984
2 1x2 plate #3023
③ 2x3plate #3021
4 1x4 hinge plate #2429 with #2430
? 1x1 brick with stud on side #87087
Cheese Slope and Vertical PlateTowers
Thistower is built sidewaysby layering cheese slopes,regularplates,plateswith clips,and plates with handles.
Stagger plates of varying lengths to keep the tower stable,and mix in 1x1 roundplates (#4073) foramoreweathered look.


0 1x2platewithhandle onside#48336
2 1x2platewithclipontop#92280
? 1x2plate#3023
0 1x2cheese slope #85984
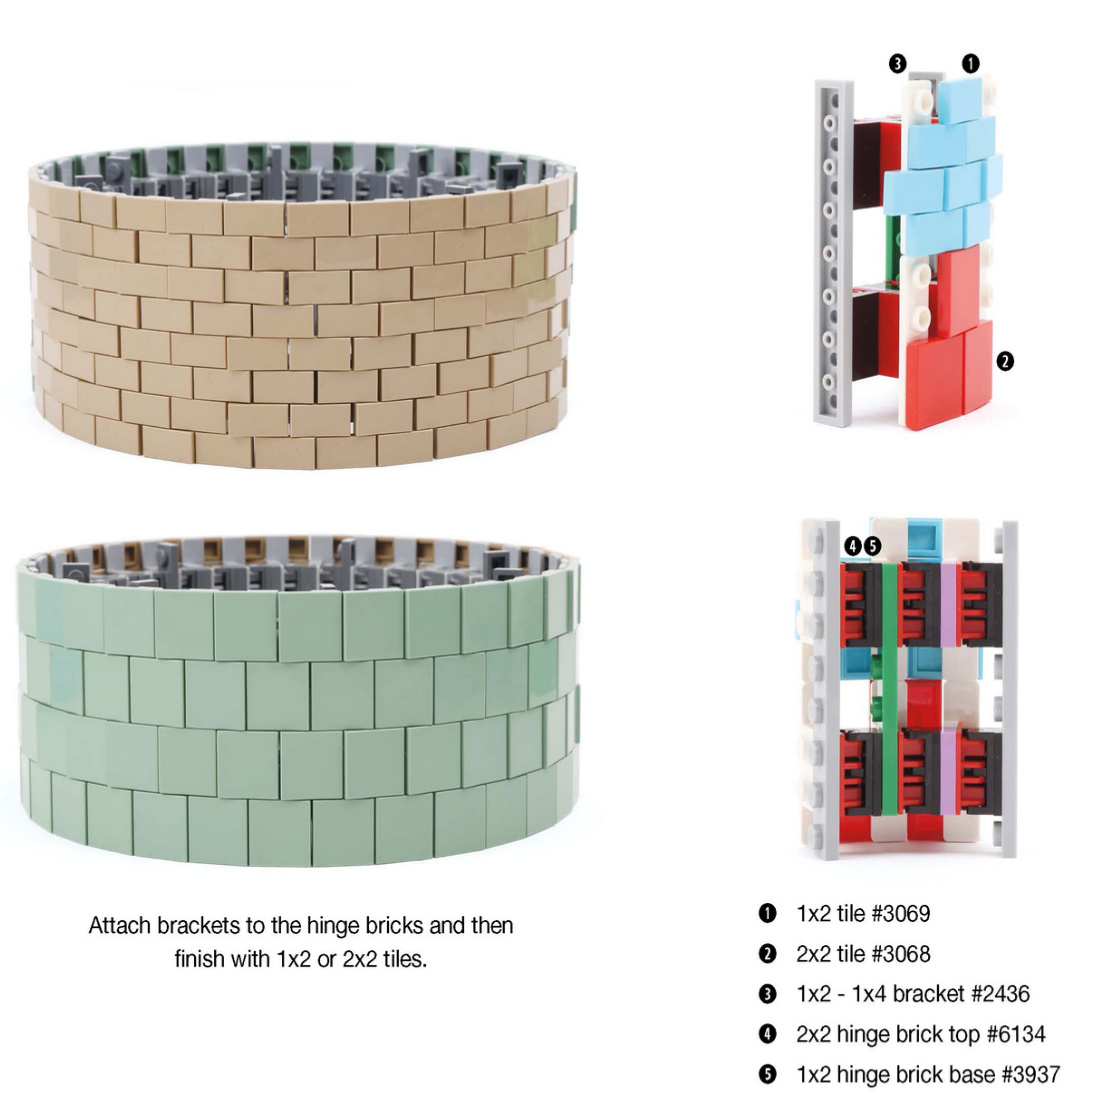
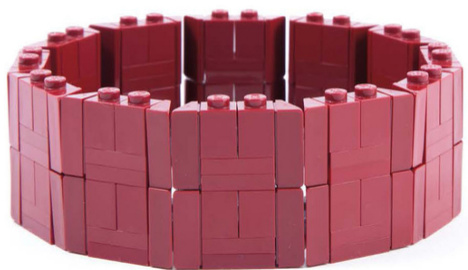
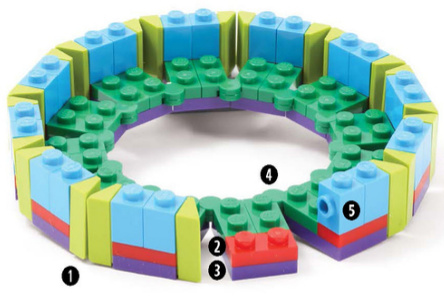
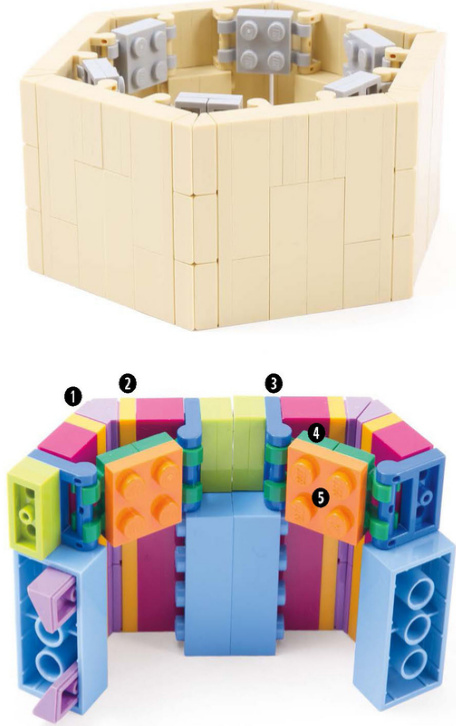
Cheese Slope and Hinge Brick Towers
Combine cheese slopeswith hinge bricks to create a roundbasefor thistower and then coverthe hinge bricktopswith tiles.

0 1x2 hinge brick base 4 1x2 cheese slope #85984 #3937 ? 1x2-2x2inverted 2 2x2 hinge brick top #6134 bracket#99207 ? 1x2plate#3023 6 2x4 tile #87079
?
Bracket Towers
Use brackets to create the structure of a tower and then cover the sides with plates, tiles, or slopes.
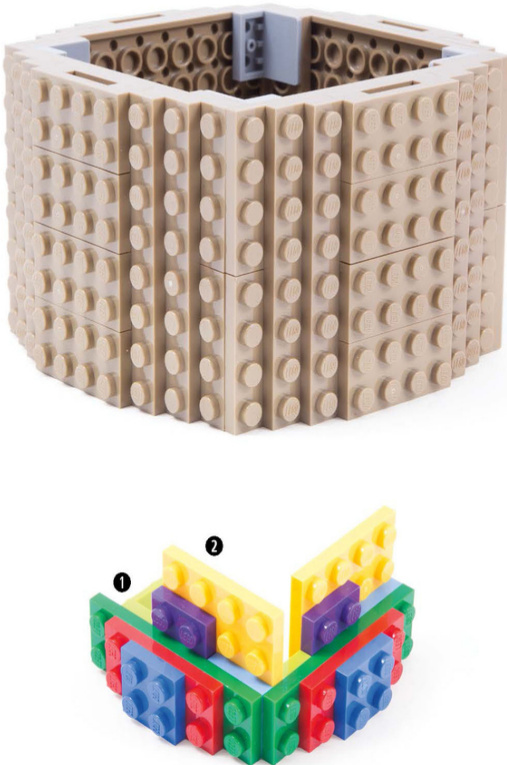
Arrange hinge plates into hexagons and then alternate layers ofbrackets and inverted brackets to make a 12-sidedtower.
0 1x4 hinge plate #2429 ③ 1x2- 2x2 inverted bracket with#2430 #99207 2 1x2 plate #3023 ? 1x2- 2x2 bracket #44728
Brackets connect four sides built by layering plates, creating a tower that can then be covered with tiles or shingles.
1 1x2-2x2bracket #44728 @2xplates
?
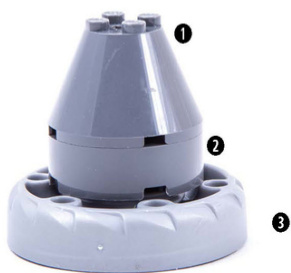
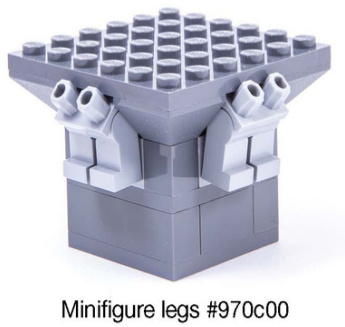
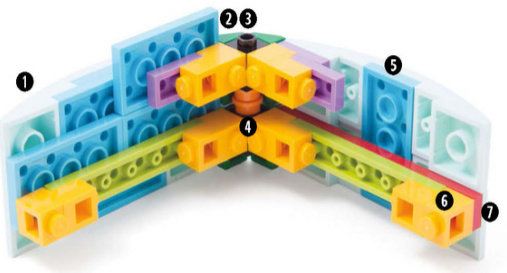
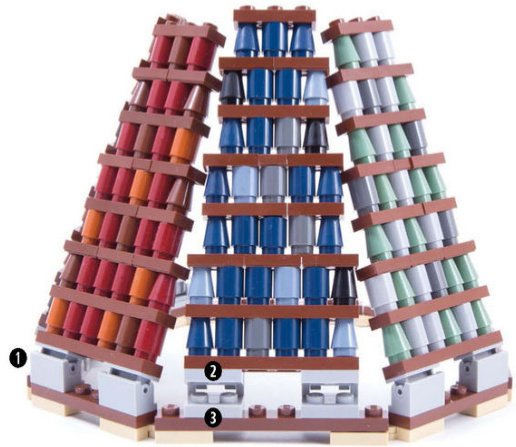
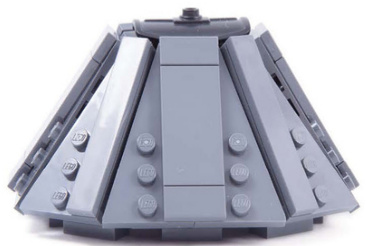
Axle Towers
Attach axles to a central, vertical axle to create the skeleton of a tower, and then cover the exteriorwith plates or tiles.
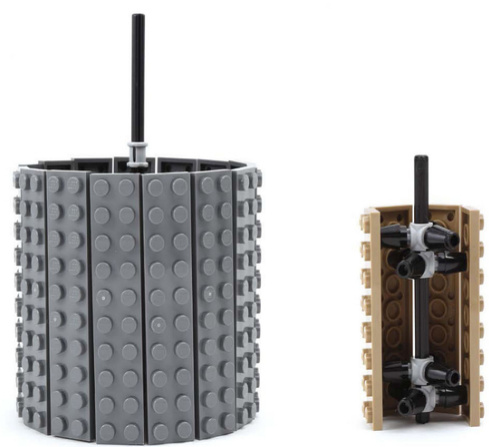
You can adjust the diameter of the tower by changing the length of the radiating axles. The smallest tower you can create with this method uses the triple axle hub (#57585).
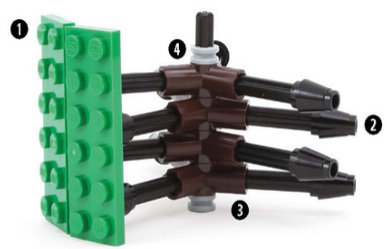
Bushes hold the triple axle-pin connectors in place. Each exterior plate needs two points of connection to the central axle.
0 2x6 plate #3795
2 1x1 cone #4589
③Triple axle-pin connector #10288
4 Technic 1/2 bush #4265
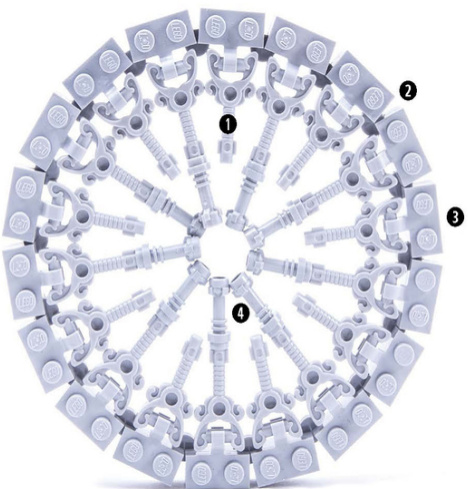
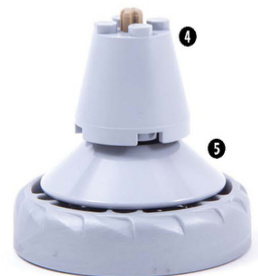
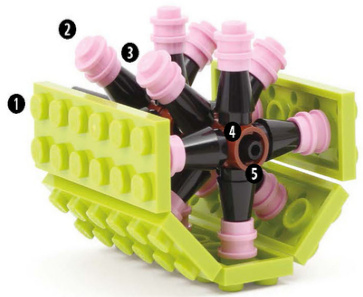
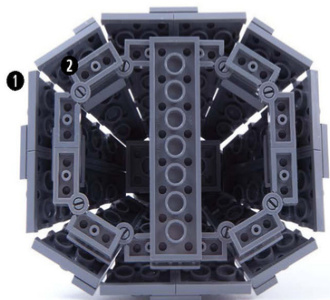
How To: Hose Towers
Using the Technic axle hub makes a tower with eight sides.
0 2x6plate #3795
2 1x1 round plate #4073
③ 1x1 cone #4589
4 Technic axle hub #48723
3mm rigid hose #75
?
Clip-on Plate Towers
This tower uses a hose at the center, with clip-on plates and brackets that fan outward.Use tiles to finish the exterior.
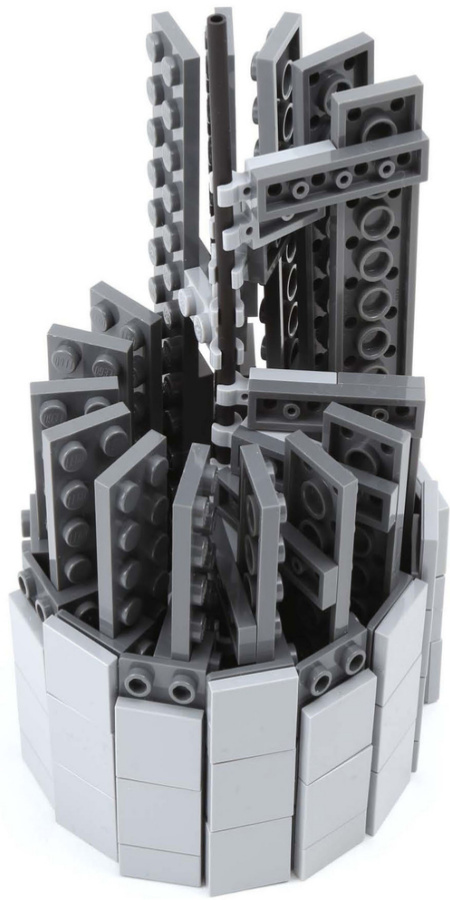
HowTo
Attach 1x2plateswith clip to thecenter hose and then back them with 1x4 plates.Then attach 2x3 platesto the top andbottom to create radiating leaves.Then add brackets.
1 3mm rigid hose #75
2 1x2 plate with clip horizontal on end #63868
3 1x4 plate #3710
4 2x3plate #3021
? 1x2 - 2x2 bracket #44728
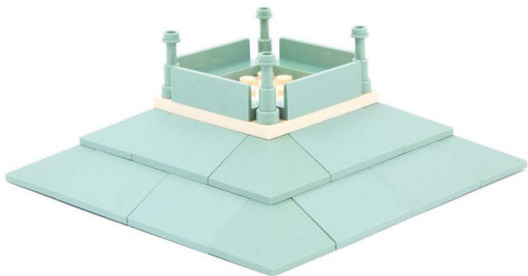
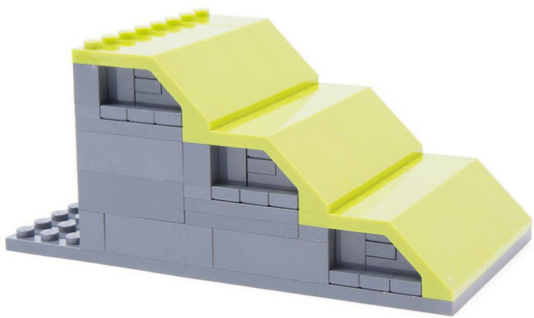
Basic Roofs
Sloped Roofs
One of the simplest ways to create a roof is to stack slopes directly on top of your walls.
1x2x2/3 slope with cutout#92946
1x2 inverted double slope #3049
1x2x2/3 slope with 4 slots #61409
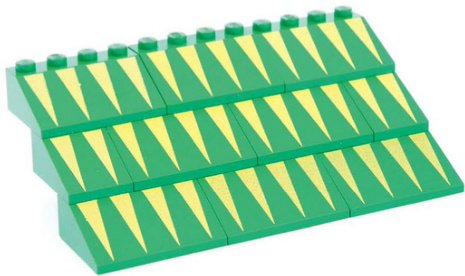
Create a graphic design with printed slopes like these green-and-yellow 2x3 slopes (#3298).
Mix slopes of different sizes to get staggered seams.
Offset slopes by a plate for subtle variation in pattern.
Alternate slopes of different sizes and colors.
Combine slopes of different angles to create a curving roofline.
Alternate slopes and inverted slopes on their backs for a roof with a shallower pitch.
You don’t need to build with slopes to the very top.
Create a mansard roof by combining 2x2x3 slopes (#3684) and 2x2x3 double convex slopes (#3685).
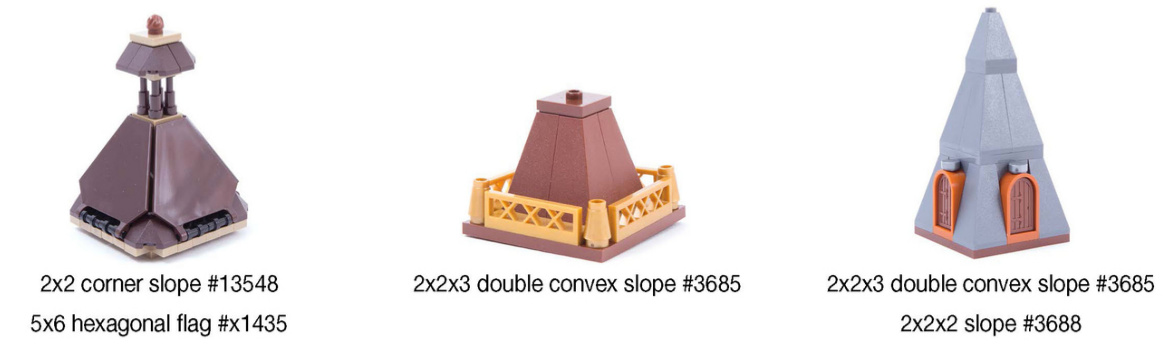
Use a large slope, like this 6x8 slope (#4515),to create a simple shed roof.

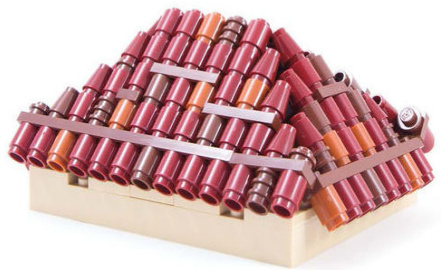
Emphasize the corners of this pyramid roof using round bricks.
1 1x2 triple slope #3048 2 2x2 double convex slope #3045
3 1x1 cheese slope #54200 ●2x2 slope #3039
Small windows add interest and color to a sloped hip roof.
Add some curves and texture to your roof with the 1x4 inverted curved slope (#13547).
Stagger1x2x2/3 brickswith wing end(#47458) to create a textured roof.
Use 2x5x1 2/3 windscreens (#6070) to create a continuous slope with no visible studs.
Create a stepped hip roof with 1x2x2/3 bricks with wing end (#47458).
0 2x3x2/3brickwithwing end#47456
2 2x2x2/3 modified brick with sloped end #47457
Add a layer of bricks between windscreens to create a contrasting trim.
Roof Corners
Combine slopes in different ways to negotiate the interior and exterior corners.
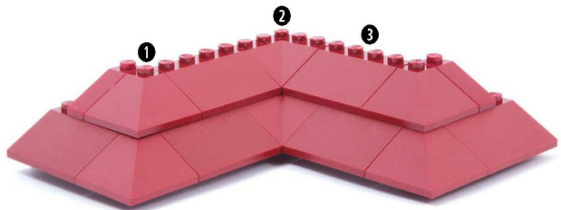
1 3x3 double convex slope #3675 3x3 double concave slope #99301 3 3x4 slope #3297
0 2x4 double slope #3041
2 2x2 double convex slope #3045
3 2x2 double concave slope #3046
0 2x8 slope #4445
2 1x1 cheese slope #54200
0 2x2 slope #3039
2 1x1 cone #4589
2x2x2 slope #3678
Roof Supports
Although sloped roofs are fairly stable on their own,you can reinforce them with brackets and other pieces.
Stepped brackets make a good base for a roof.
1 3x2x11/3bracket#18671
2 5x2x1 1/3 bracket #11215
3 5x2x21/3 bracket #6087
You can also use 7x4x6 straight stairs (#30134) to support 45-degree slopes.
Combine bricks and plates with handle to form a triangular roof support.
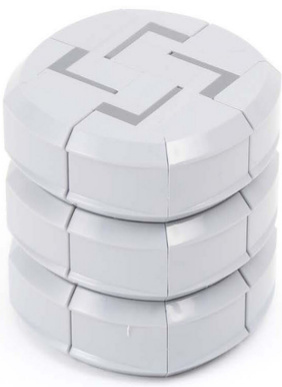
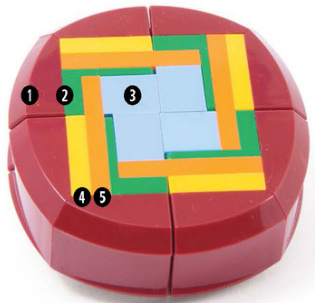
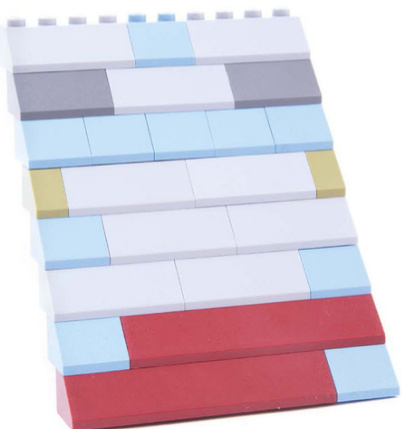
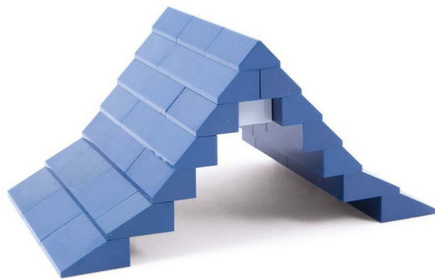
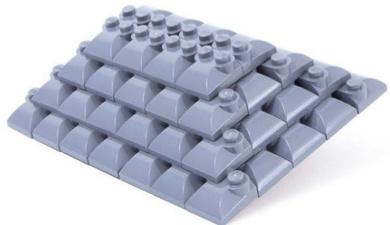
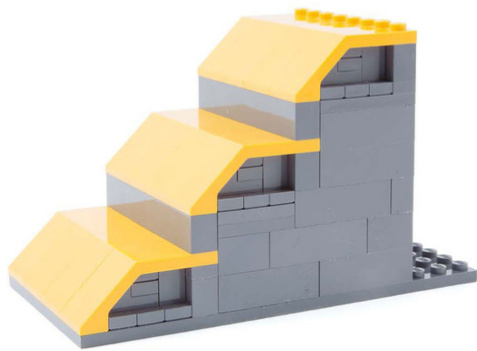
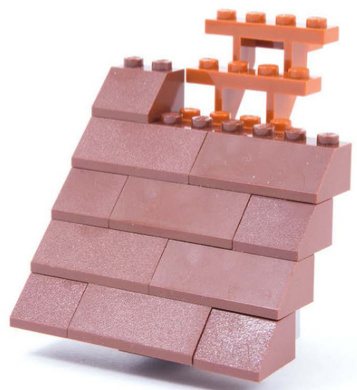
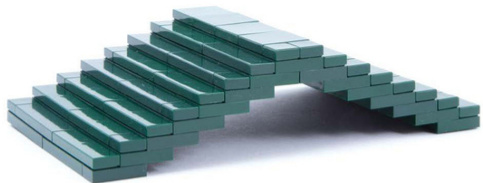
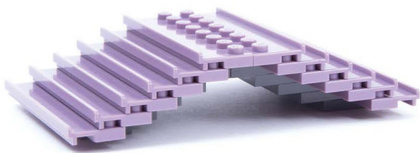
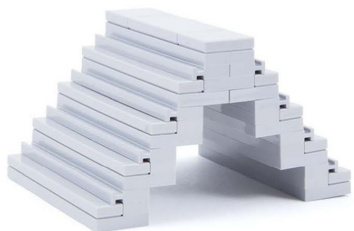
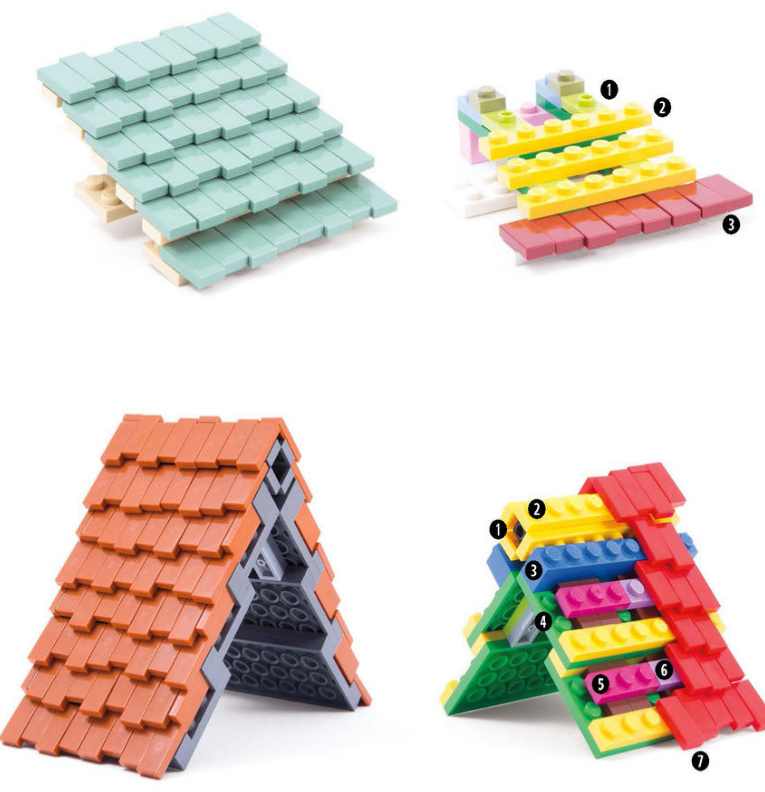
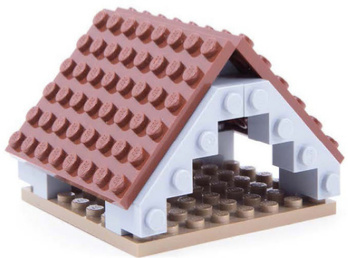
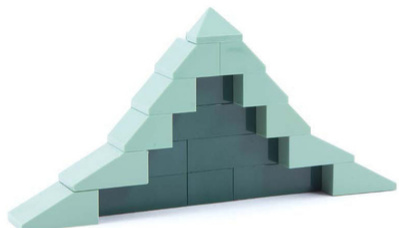
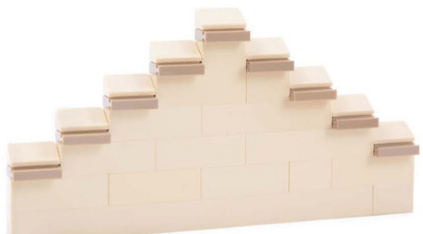
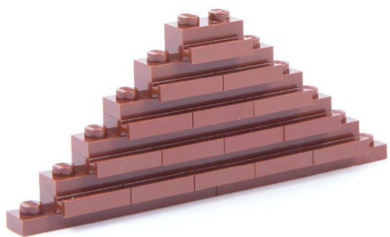
Stepped Roofs
Stacking staggered layers of bricks, plates, or tiles can create an interesting pyramid-like hip roof or a simpler gable-style roof.
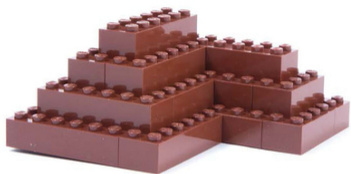
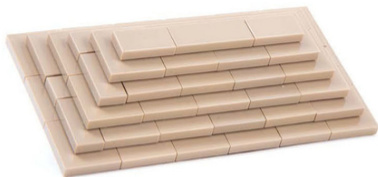
Staggering bricks creates a simple stepped roof design or the base for a more intricate roof design.
Use 1x1 round plates to make a textured hip roof.
Stack jumper plates and tiles to create a smooth gabled roof.
Or stagger 1x2 and 2x2 jumper plates and then finishwithtilesfora sleeklook.
Mix plates and tiles, and to add interest, leave some pieces not firmly pressed down.
2x8 plate with wide rail #30586
Alternate betweenregularplates and plates with rail for a steeper roofline.
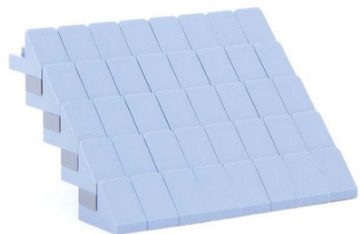
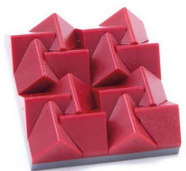
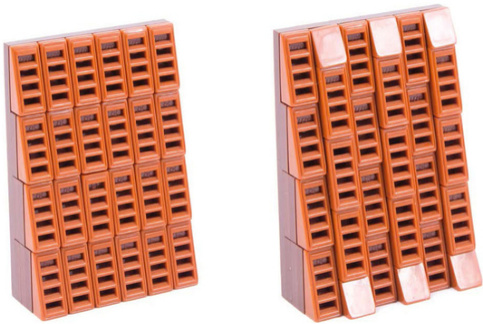
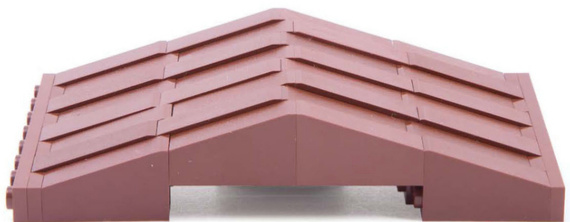
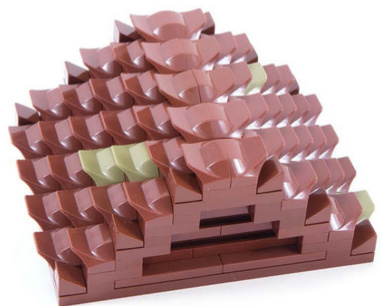
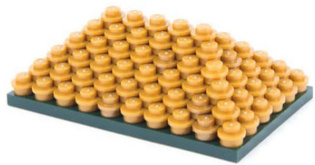
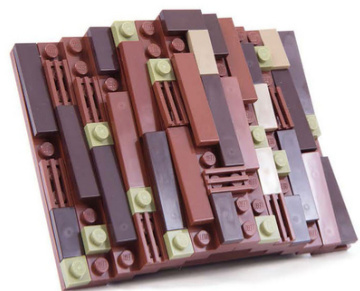
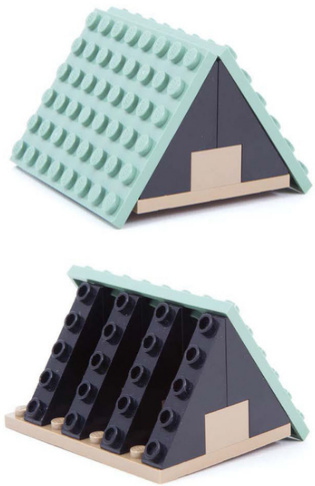
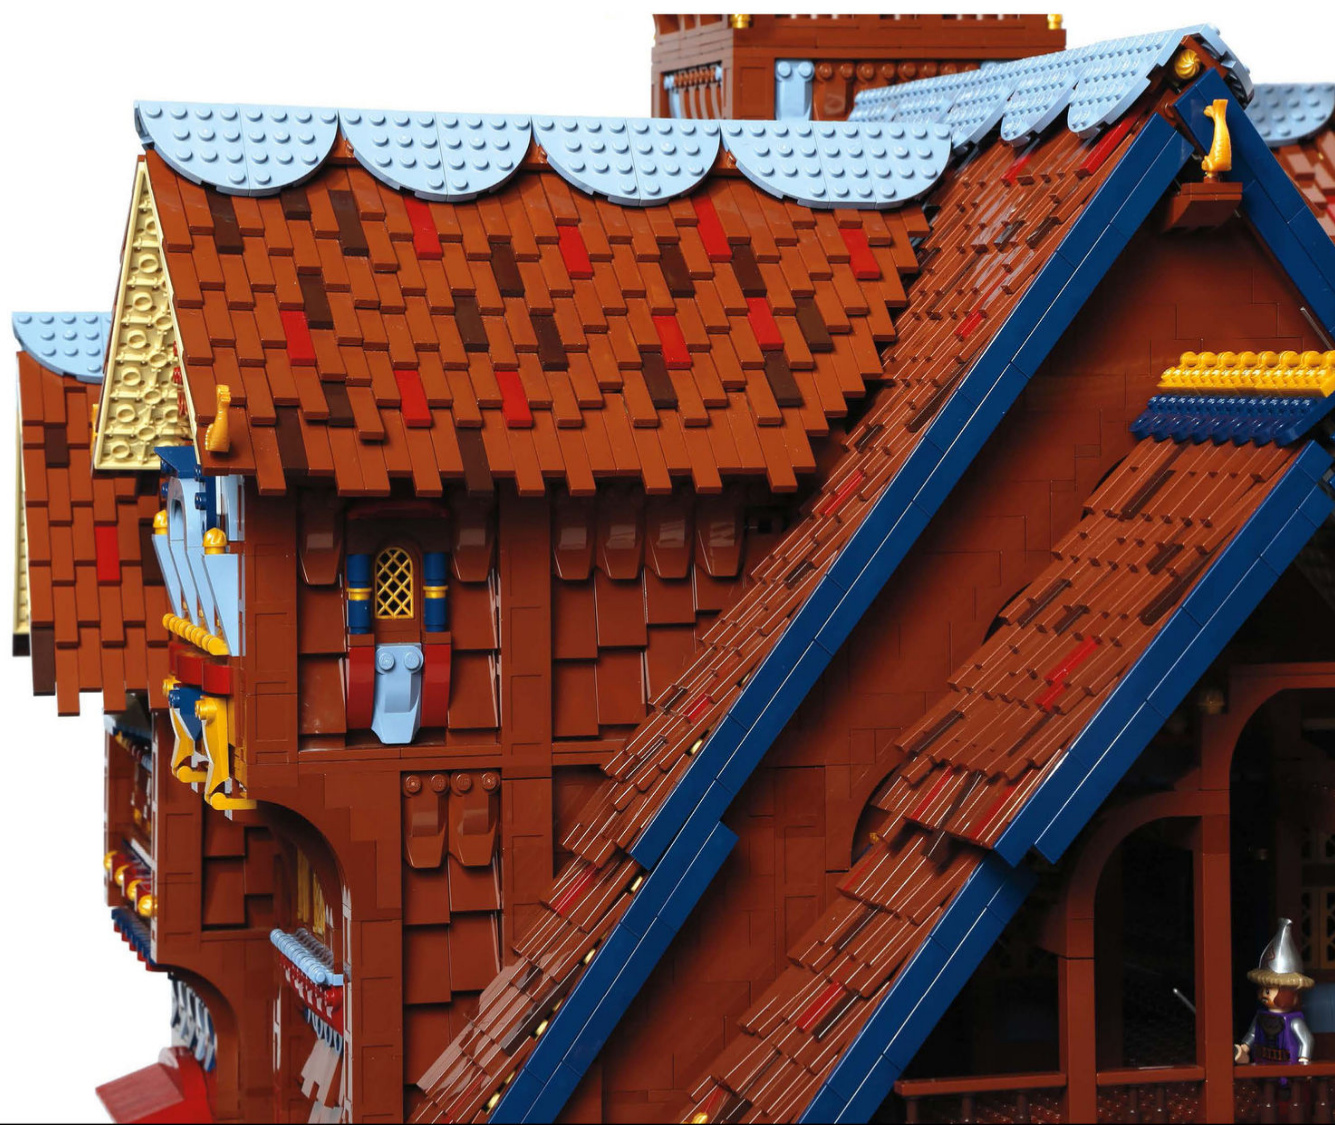
Shingle Roofs
Tiles make for great shingles,butyou can alsouseplates,slopes,plants,and other unusualpartsforevenmorevariation.
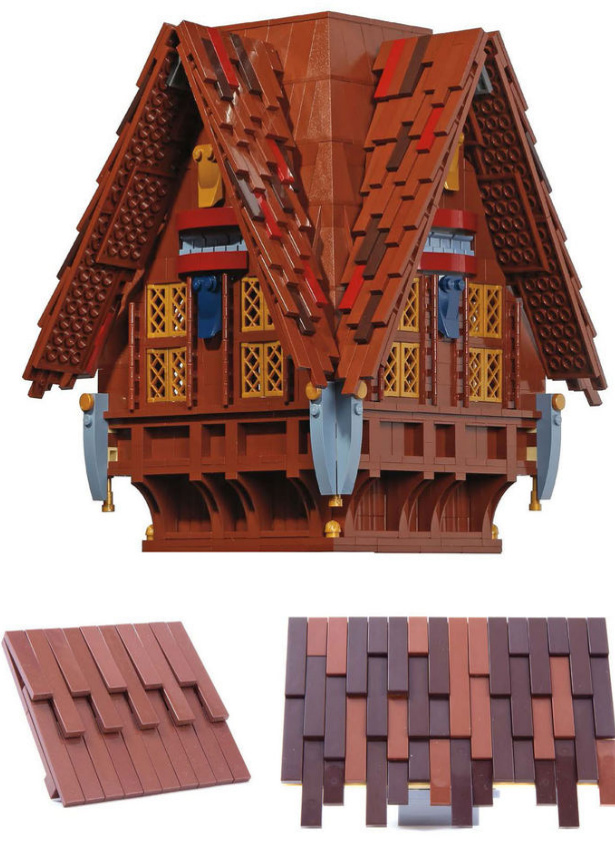

Staggertiles of different lengths,like1x2 tiles (#3069),1x3 tiles (#63864),and1x4tiles(#2431), forasimpleshingle-styleroof.You canstaggerthe bottom edge and vary the color for more interest.
You can also stagger other thin pieces, likeflippers(#2599),2x3pentagonal tiles (#22385),andeven1x3x1doors(#3821/#3822).
Decorative Shingles
Mix plates, tiles, slopes, and plants to give your roof some character.
Mix in white curved slopes to mimic snow.
Place tiles on 3x4 tiles with 4 studs (#88646) to create a slightly corrugated pattern.
You can also create a corrugated pattern by staggering pins with friction ridges (#2780).
Use tiles on large plates to create panels.
Plates or tiles in sand green and dark orange make the roof look old and weathered.
Curved Shingles
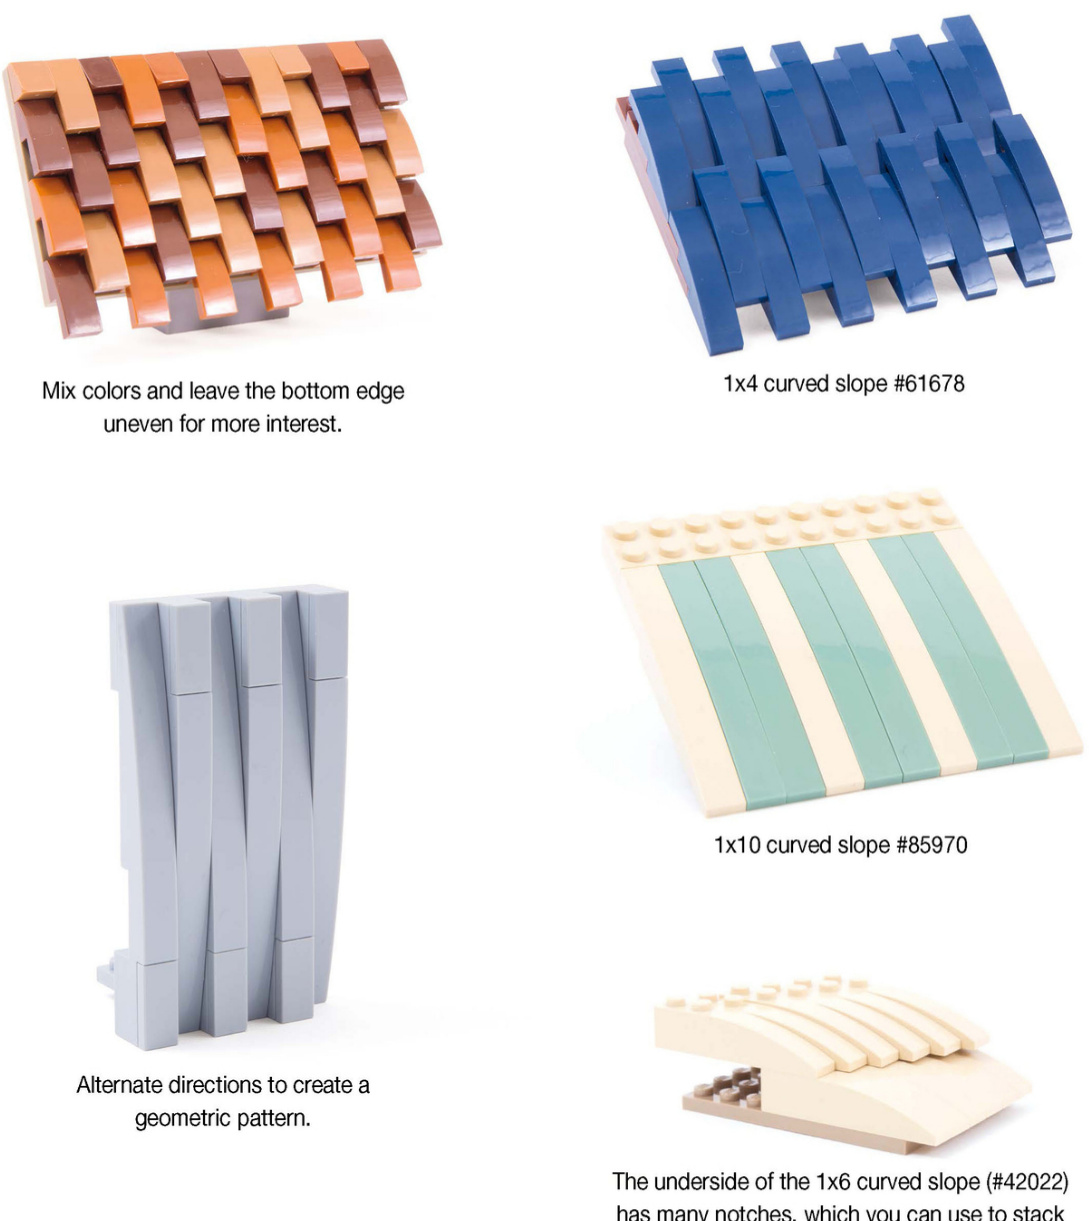
these pieces in irregular ways.
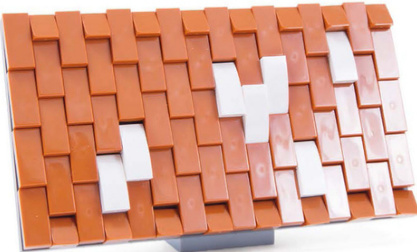
Offset Shingles
You can offset shingles by half a stud with jumperplates so that each row is one-anda-halfstudssetbackfromthenext.Because a1x2tile is openon the bottom,the tiles canbeplacedanywhereonthestudbelow for arandomizedeffect.
0 1x2jumperplate#3794/#15573 2 1x plate (can be any length) ? 1x2 tile #3069
Theyellowplatesare1x8, sothe offset rows betweenthemhavetobeonestudshorter (7 studs long) to accommodate the offset.
0 1x1 brick with studs on4 sides #4733
2 1x8plate #3460
③ 1x8brick #3008
? 4x8plate #3035
? 1x3plate #3623
6 1x4plate#3710
0 1x2 tile #3069

You canalsostagger tilesaround theedge of aroof. This technique uses alternating raised tiles,along with flush tiles and layered tiles that are only partially attached.
Fixed-Angle Bases
Build a fixed base for your shingled roofs and other plate-based roof techniques.
Attach plates directly onto 3x1x3 1/3 studded slopes (#6044).
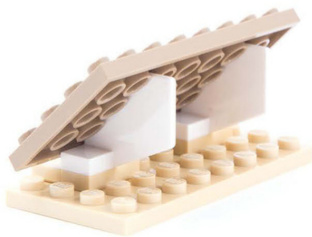
Use aplane tail (#2340) to support the roof plates.
Alternate these triangular pieces, 2x4 plates with bottom struts to pins (#42608), so that the roof plates can attach on both sides.
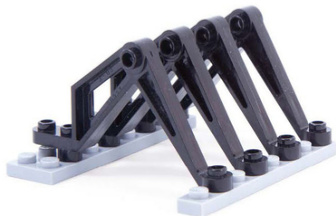
These asymmetric support legs (#30211) provide a surprisinglyfirm basefor a roof.
4x4modifiedfacetbrick#14413
0 1x8Technic brick #3702
2 1x6 Technic brick #3894
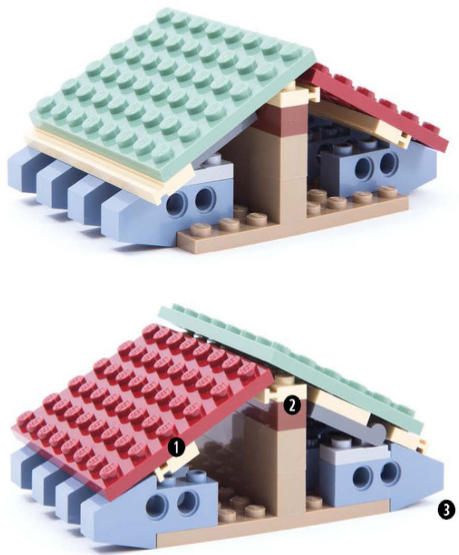
Fix the angle of your roofs by using 2x4 hinge plates (#3639 with #3640) to lock in the plates at the top.
0 2x2 plate with pin on bottom #2476
5x5 right angle Technic brick #32555
Lay garage roller door sections (#4218) over 4x8x2 1/3 castle turret tops (#6066)

0 1x2 modified plate with handle on side #2540
1x2 brick with 2 studs on side #11211
? 1x2 plate #3023
4 Technic brick with 2 holes #32000
1x3thin liftarm #6632
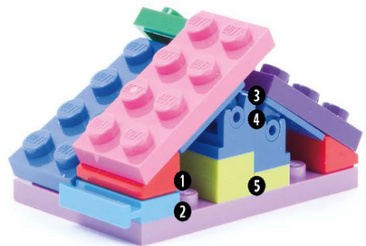
0 1x2-2x2 bracket #44728
2 1x2 tile #3069
3 1x2 brick with 2 studs on side #11211
4 1x2 brick with handle on side #30236
6 1x2 thin liftarm #41677
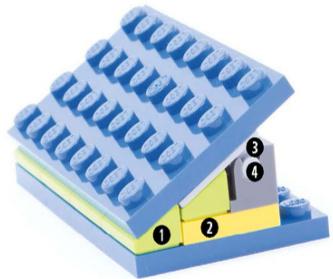
0 1x7liftarm #32524
2 1x2 brick with 2 pins #30526
3 1L pin connector #18654
4 1x2 Technic pin connector plate
#32530
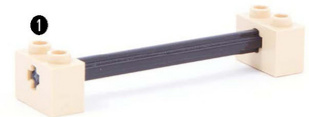
HowTo: Masonry Bricks
Angle a 1x4 plate to fit into the grooves of 1x2 or 1x4 masonry profile bricks attached to a brick with studs on the side.
1x2 (or 1x4) modified brick with masonry profile #98283 (#15533) 2 1x4 brick with 4 studs on side #30414 3 1x4 plate #3710 4 2x6 plate #3795
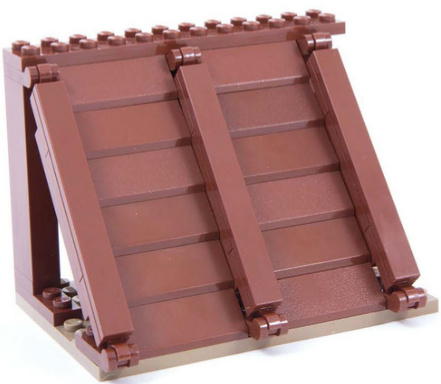
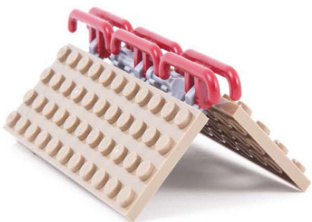
Flexible-Angle Bases
Use clips,handles, hinge bricks, and Technic parts to build a more flexible base for your roofs.
Clips can support a roof plate from the top or the bottom.
1x2 plate with handle on side #48336 2 1x2 plate with clip on top #92280
1x2 plate with handle on side #48336 2 1x2 plate with 2 clips #60470

The clips can also be mounted in the middle.
1 1x1 cheese slope #54200
2 2x8 plate #3034
3 1x2 plate with 2 clips #60470
4 1x2 plate with handle on side #48336
The clips can also be mounted on the outside of the roof.
1x2 plate with handle on side #48336 2 1x2 plate with 2 clips #60470
Some 1x2 plates with rail (#32028) help hold this angle in place.
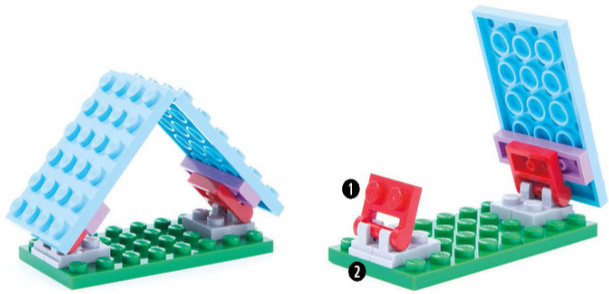
Ball and socket joints work well as hinges.
1 1x2 modified plate with socket on side #14704 2 1x2 plate with ball on side #14417
0 1x2 plate with clip horizontal on end #63868
1x2 modified plate with handle on end #60478
Roof plates rest on slopes that look like rafters. You can use a plate with rail to catch the top of the slope that sticks up (red roof), or use it as a gutter (green roof).
0 1x2 plate withrail #32028
2 1x8 plate with rail #4510
3 Short Technic slope #2743
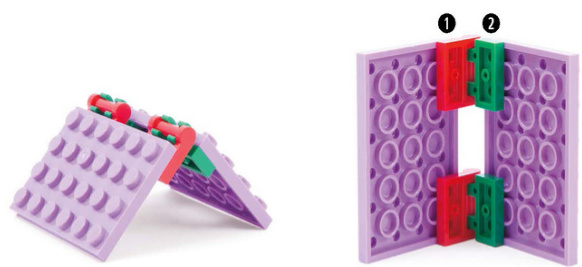
Hinge Bricks

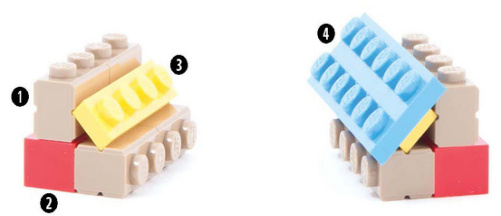
Use a jumper plate to give the roof a slight overhang (left) or place the hinge brick directly on stud to make the roof plate flush with the edge of the base (right).
0 2x2 hinge brick top #6134
2 1x2 hinge brick base #3937
? 1x2 jumper plate 15573

For a steeper pitch, stack the hinge bricks on regular bricks and then use tiles to hide the studs of the base.
0 1x2 tile #3069
2 2x2 hinge brick top #6134
? 1x2 hinge brick base #3937
? 1x2 brick #3004
Rest the roof plate on cheese slopes.
0 1x2 cheese slope #85984
2 1x2platewith rail #32028
③ 2x2 hinge brick top #6134
4 1x2 hinge brick base #3937
? 1x2 plate #3023
Rest the hinge top on the inner row of slopes. The roof plate rests on the front slope for a secure fit.
1 1x2 cheese slope #85984
2 2x8plate #3034
? 2x2 hinge brick top #6134
4 1x2 hinge brick base #3937
Technic Parts
You can extend an axle from wall to wall and rest your roof on the axle.
1 1x2Technicbrickwith axle hole#32064
The pivotpoints of pin holes can be used to create an angle.Both pins and axles work.
0 1x4Technicbrick #3701
2 2x2 platewith 2 pin holes#2817
③ 2x2plate with 1 pin hole #2444
4 1x2 brickwith pin #2458
? 1x2 Technic brick #3700
6 Axle pin with 2L axle #18651
0 1x2 Technic pin connector plate #32530
8 1x2Technicbrickwith axle hole #32064
Liftarms work like hinges to hold plates together.
1x2 thin liftarm #41677 1x2 modified plate with handle onside #2540
0 1x2 thin liftarm #41677 3mm rigid hose #75 ? 1x1 plate with ring #4081
Plates with pin holes can hold roof plates in position.
1 1x2 Technic pin connector plate #32530
2 3L pin 32556
3 1x2 plate with pin hole on bottom #18677
④ 1x2 Technic pin connector plate with 1 hole #32529
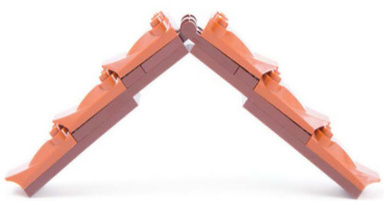
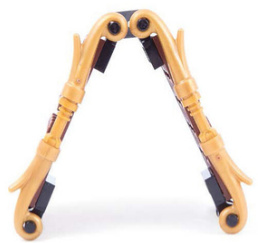
Technic Gable Roofs
Use Technic piecesto create simple gable roofs.
1 #1 angled axle connector #32013
22Laxle connector#6538
?#6 angled axle connector #32014
Mix in bushes and other Technic connectors to add more visual interest to your roof.
1x3thin liftarm #6632
3x5 thin liftarm with quarter ellipse #32250
1 Technic axle towball #2736 #3 angled axle connector #32016 ? #5 angled axle connector #32015
0 1x3liftarm #32523
2 1x9 liftarm #40490
? 1x9 bent liftarm #32271
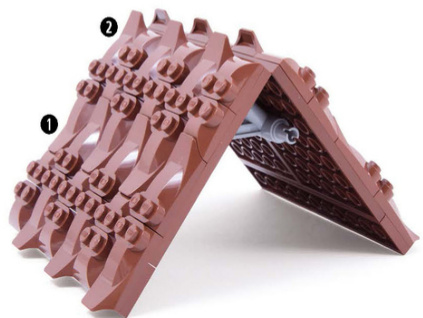
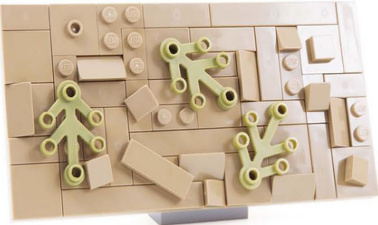
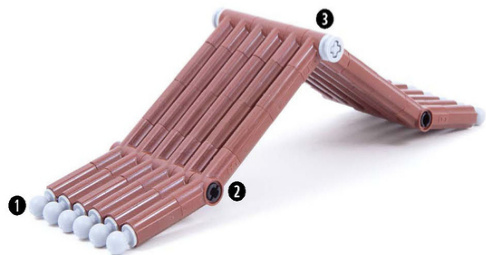
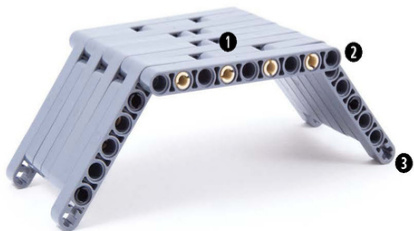
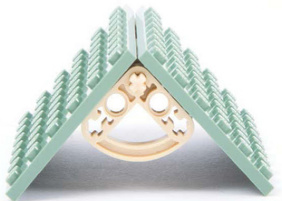
Thatched Roofs
Re-create more organic-looking roofs using the side edges of plates or by joining other stick-likepieces.
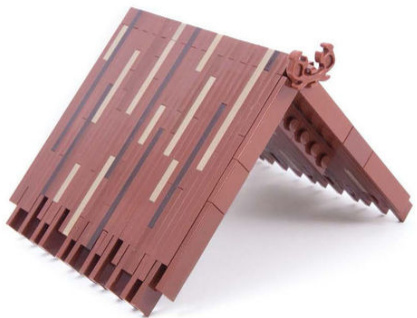
This technique primarily requires plates, exceptattheedgeswheretilesareused to cover up studs.
Combine barswith U-Clips to create rows of thatch.
0 4Lbar#30374
2 U-Clip (by BrickArms)
? 1Lbar with clip mechanical claw #48729
Layer4x4roundedcornerplates(#30565) tocreate a softeredge,whichcanbeused to finish off the ridgeline.
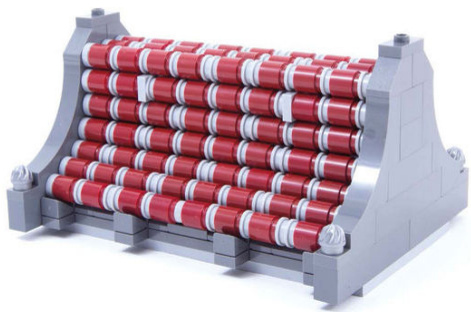
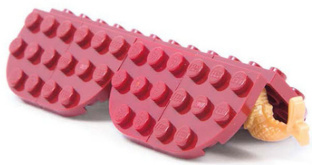
Terra-cotta Roofs
You can also stack curved pieces to look like the clay tiles used in terra-cotta roofs.
2x3 modified brick with curvedtop #6215
1x2x11/3 modified brick with curved top #6091

1x3x2 arch with curved top #6005
Alternate rows of plates and 1x1 round bricks.
Cones in alternating orientation nest nicely and can be attached to clips on top or bottom.
0 1x1 round brick #3062
1x1 round plate #4073
1x1 round tile #98138
0 1x1 cone #4589
2 4Lbar #30374
③ 1x1 plate with horizontal clip #61252
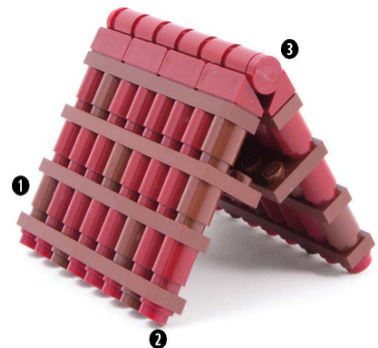
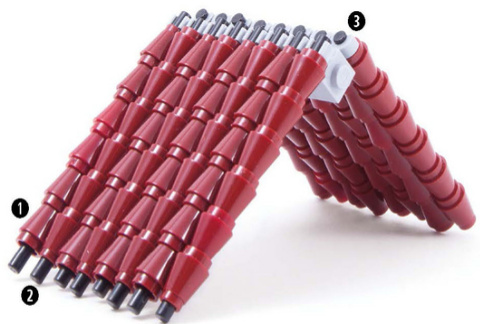
Terra-cotta Neck Gables
You can insert rows of 2L pin connectors (#75535) betweentwogablesto mimicthetextureof terracotta roofing.
Or use round bricks and plates,mixing in extra plates as mortar to adjust the length as necessary. Use1x4 plates (#3710)to connectthetwo sides so the rows don’t slide down.
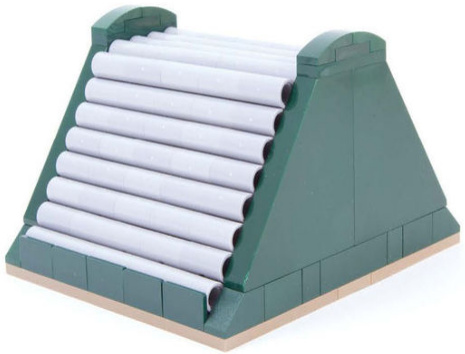
Terra-cotta Hip Roofs
You’ll need at least one supporting plate to hold round bricks and cones together, but you can add in smallerplates to makeyour roof sturdier.
1 1x2hingebrick 3937with #3938
2 1x2platewith 2 clips #60470
③ 1x2platewith handle on side#48336
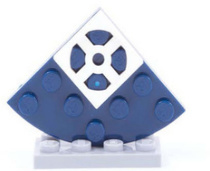
Wedge Plate Roofs
Because the point of a symmetrical wedge plate or a pair of left and right wedge plates is two studs wide, these pieces are well suited to creating flat-top roofs.
3x6 wedge plates left/right 54383
Emphasize the corners of a wedge plate tower using round bricks and finish off the top with slopes.
Larger wedges can accommodate larger roofs.
0 2x4wedge plate left/right 41769
2 3x12 wedge plate leff/right 47398
0 8x8wedgeplate with 3x4 cutout #6104
2 1x1 round brick #3062
? 2x2 double convex slope #3045
Wedge plates on hinge plates form an octagonal roof held together by a 2x8 plate (#3034) on the bottom. Use a shield to top it off.
1 3x6 wedge plate left/right 54383
2 1x4 hinge plate #2429 with #2430

Use clip plates around a round tile to create a more circular roof and then finish off with a dish.
1 2x2 hinge brick top #6134 ③1x2plate with clip 2 1x2 hinge brick base horizontal on end #63868 #3937 4 8x8 round tile #6177
Another variation creates a circle using interconnecting hinge plates.
0 1x2 modified plate with handle on end #60478
2 1x2 plate with clip horizontal on end #63868
? 1x4 hinge plate #2429 with #2430
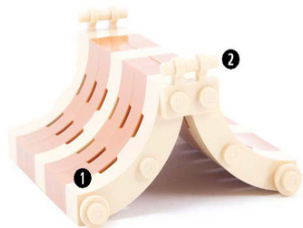
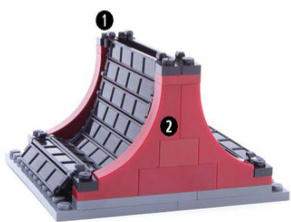
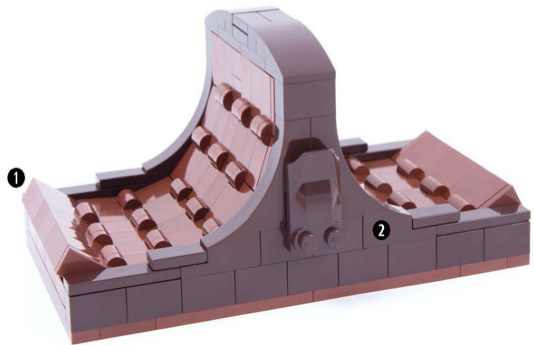
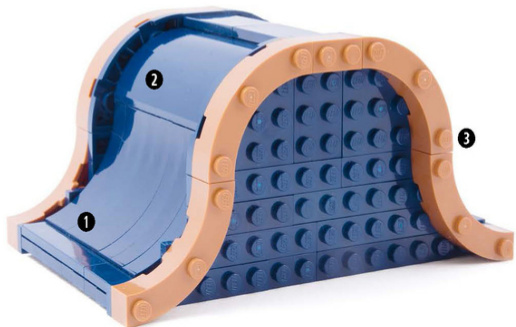
Curved Roofs
You can use arches and other round pieces to make both concave and convex curved roofs.
Create a pattern by alternating inverted arches (#18653)with curved bricks (#33243).
Finish the look with a contrasting color on each raised end.
Use an accent color to emphasize offset arches.
4x4x6 quarter cylinder #30562
4x4 macaroni #48092 1x2 modified plate with handle on side #2540
Garage roller door section #4218 2 1x5x4 inverted arch #30099
0 1x4 hinge brick 3830with #3831
2 1x5x4inverted arch #30099
0 1x5x4inverted arch #30099
2 8x8x2 double curved slope #54095
③ 4x4 macaroni #48092
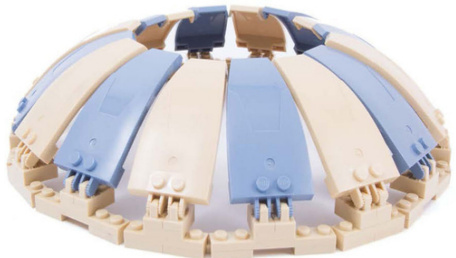
Domed Roofs and Spires
Round Roofs
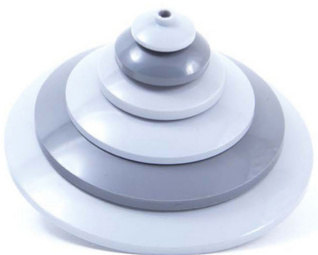
Stack dishes to create low-profile roofs on top of round buildings.
6x6 quarter dish #95188 8x8 dish #3961
6x6x2 round corner brick #87559 8x8 dish #3961
10x10 quarter dish #58846
Join two 4x8x2 1/3 castle turret tops (#6066) to make an octagonal roof.
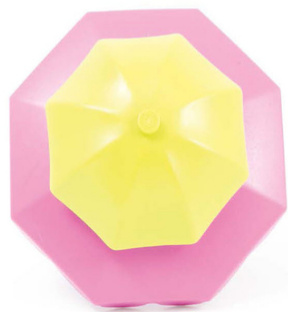
Layer a 6x6 umbrella (#4094) on top of the Belville umbrella (#6252).
Stack dishes ofvarioussizes.
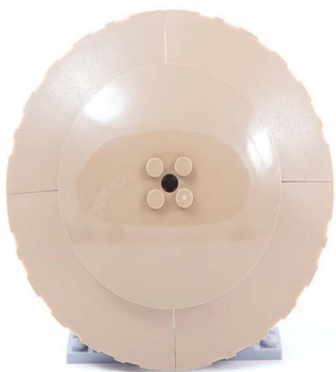
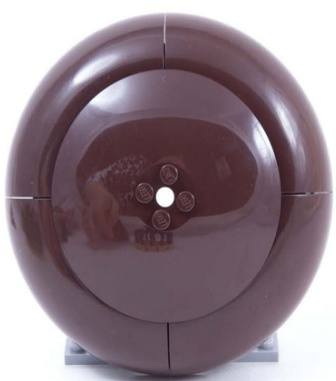
Basic Domes
Domes come in all sizes and shapes. They are an easy way to add curves to your roofs.
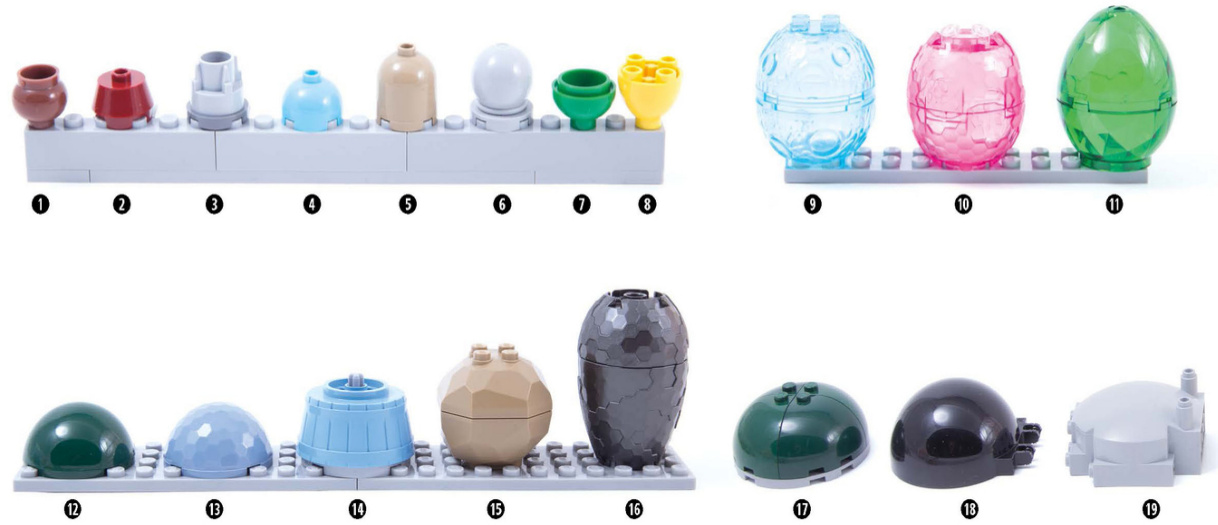
0 Utensil pot #98374
2 2x2 truncated cone #98100
3 Technic driving ring extension #32187
4 2x2 round brick dome top #553
? 2x2x1 2/3 round brick dome top #30151
? 2x2x2 crystal ball #30106
0 2x2 round brick dome bottom #15395
? 2x2 round brick dome bottom with studs #24947
9 Rock arctic top #30286
Rock arctic bottom #30342
= 4x4x12/3facetedpod #13754
= 4x4x1 2/3 dragon egg top #24132
4x4x1 2/3 dragon egg bottom #24130
4x4 cylinder hemisphere #86500
4x4 multifaceted cylinder hemisphere #30208
Large half barrel #64951
Rock boulder top #30293
Rock boulder bottom #30294
4x4x1 2/3faceted pod #13754
4x4x3facetedpod #11598
① 3x3x2 dome corner #88293
6x6x3 windscreen half-sphere canopy #50747
3x6x5 bubble windscreen #30366
1 2x2flower#4728/#98262
2 2x2 dish #4740
3 3x3 dish #43898
④ 3x3x2 dome corner #88293
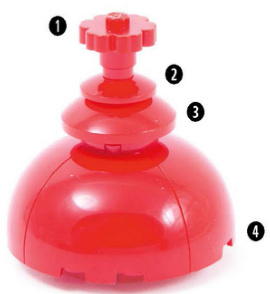
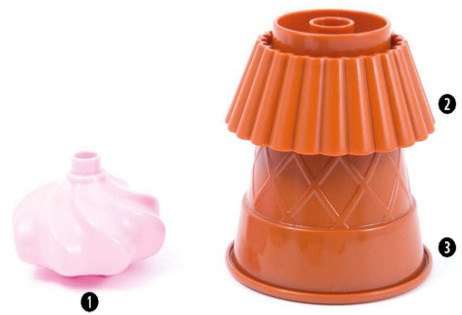
1 Duplo cupcake top #98217
Duplo muffin cup #98215
Duplo waffle cone #15577
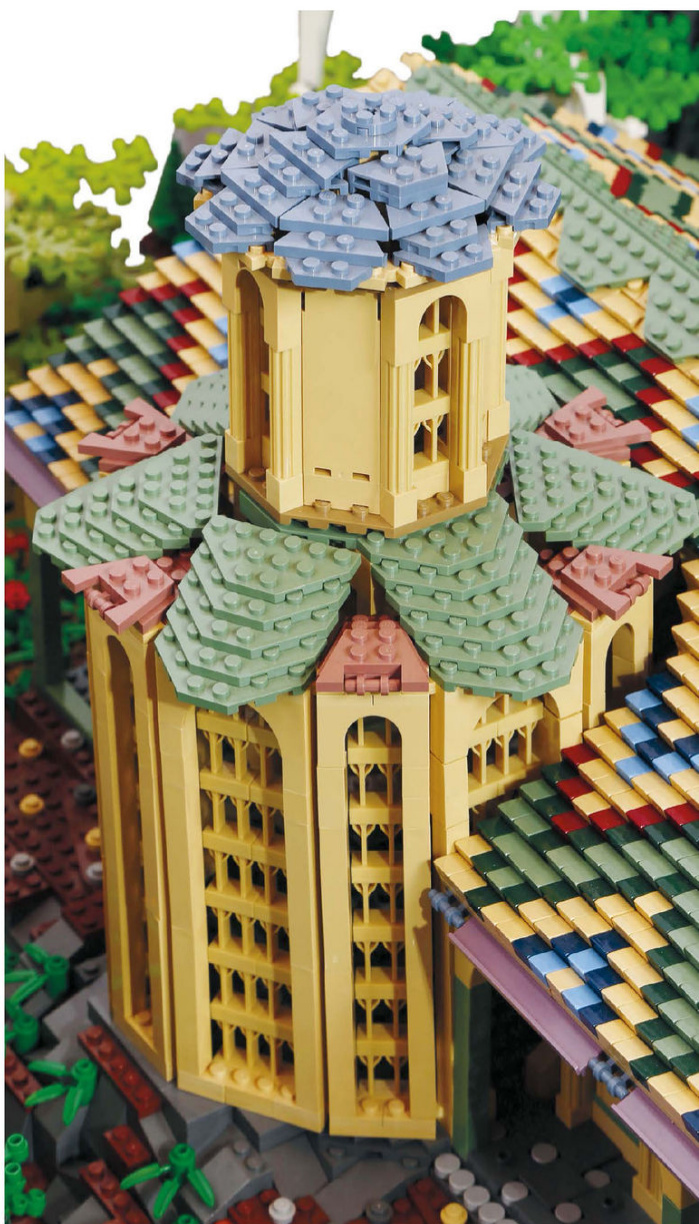
Use this green 11x11 dome (#98107) to re-create an oxidized copper dome.
Top off a turret made from a 10x10x4 octagonal cockpit (#2618) with the matching 10x10x4 octagonal canopy (#2598).
Curved Slope Domes
Use various curved slopes and windscreen pieces to add interesting texture or patterns to your domed roofs.
Short Technic slope #2743 1x3x2 arch with curved top #6005
1x6 curved slope #42022
3x4 triple wedge #64225
4x1 double curved slope #93273
6x2x2windscreen #92474
8x4x2 windscreen #30536
A
Wedge Plate Domes
Use themanydifferenttypes ofwedgeplates to create avariety of domed roof shapes.
6x6hexagonalplate #27255 2x4 wedgeplate#51739
3x12wedgeplateleft/right 47398
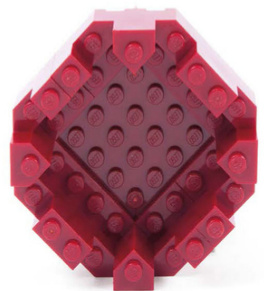
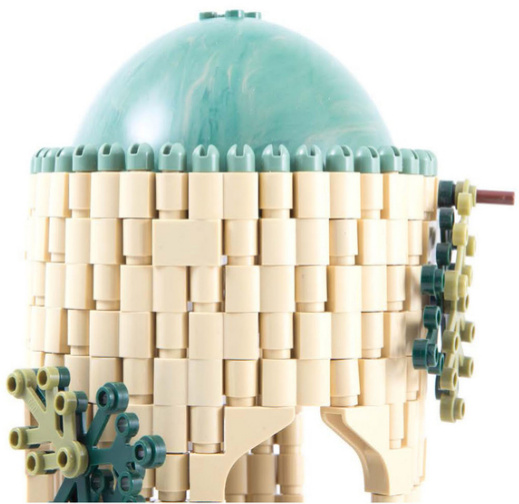
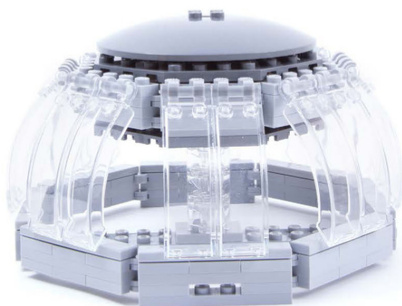
Brick-built Domes
You can also createdomes using bricks andplates.You may want theaid of online LEGO rendering software to virtually construct larger domes before you build.
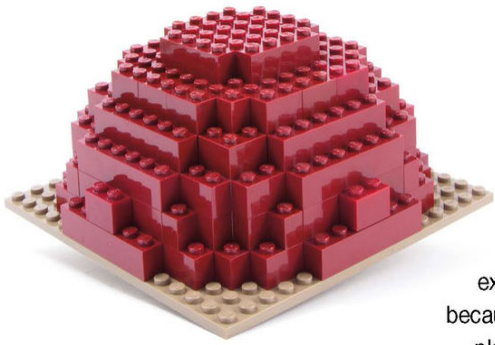
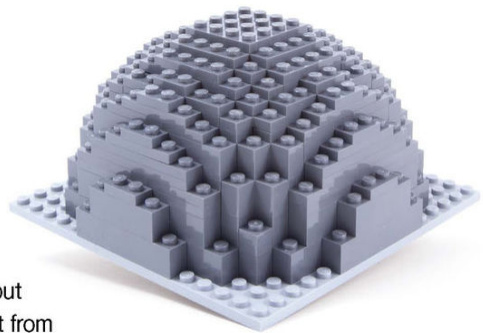
These two domes are exactly the same scale,but because the gray one is builtfrom plates,ithassubtlercurves.
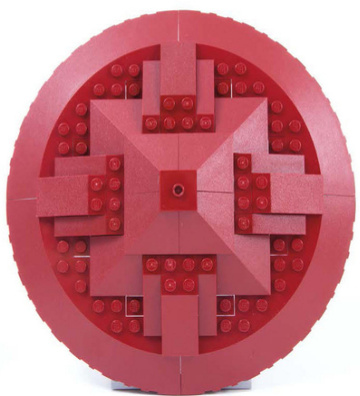
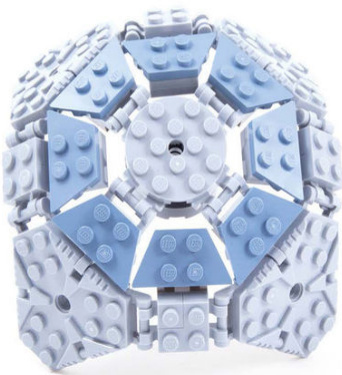
How To: Lowell Sphere
The Lowell Sphere is a special brick-built dome that usesstuds on allsides to create a sphere madeentirely ofplates.
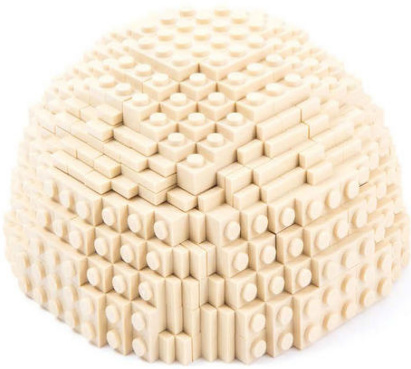

0 2x2plate#3022
2 2x2cornerplate#2420
1x4plate#3710
●1x2jumperplate#3794/#15573
1x2plate#3023
A
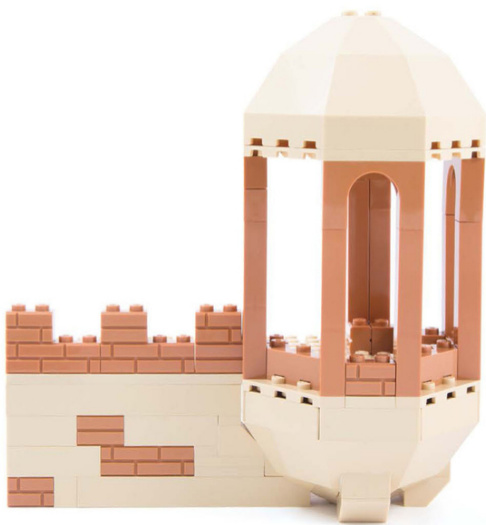
Tower Roofs
You can use the premade tower roof (#33215) alone,in pairs, or with other roof shapes.
Use a tower roof by itself or in pairs.
Create a tower by combining the tower roof with 3x3x6 corner panels (#87421/#2345).
Attachthetower roof to 10x10 quarter dishes (#58846) to cover a round tower.
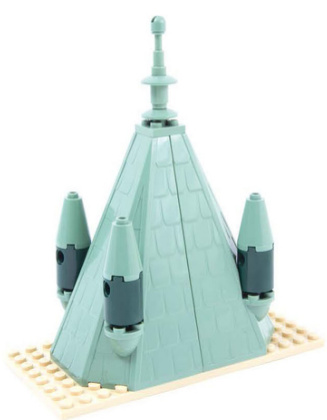
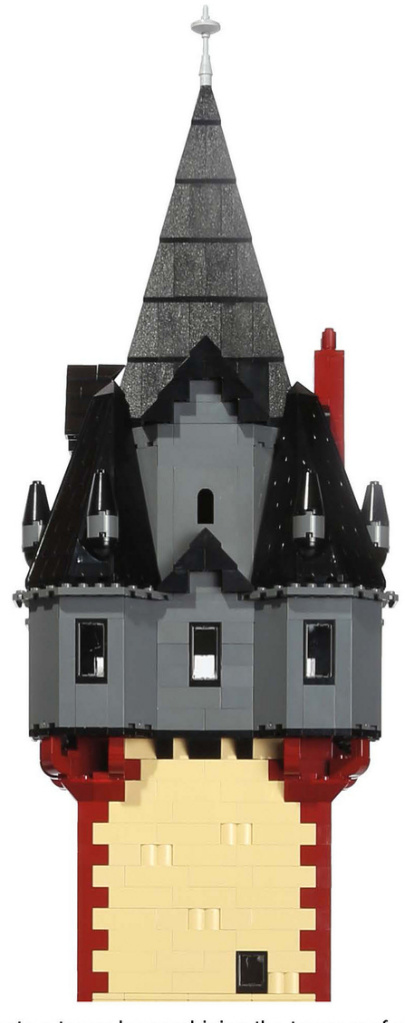
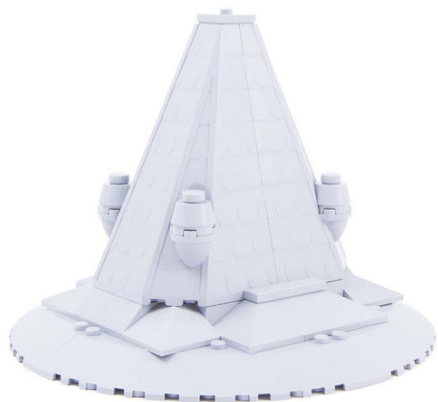
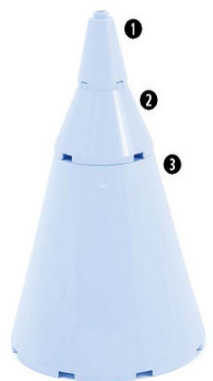
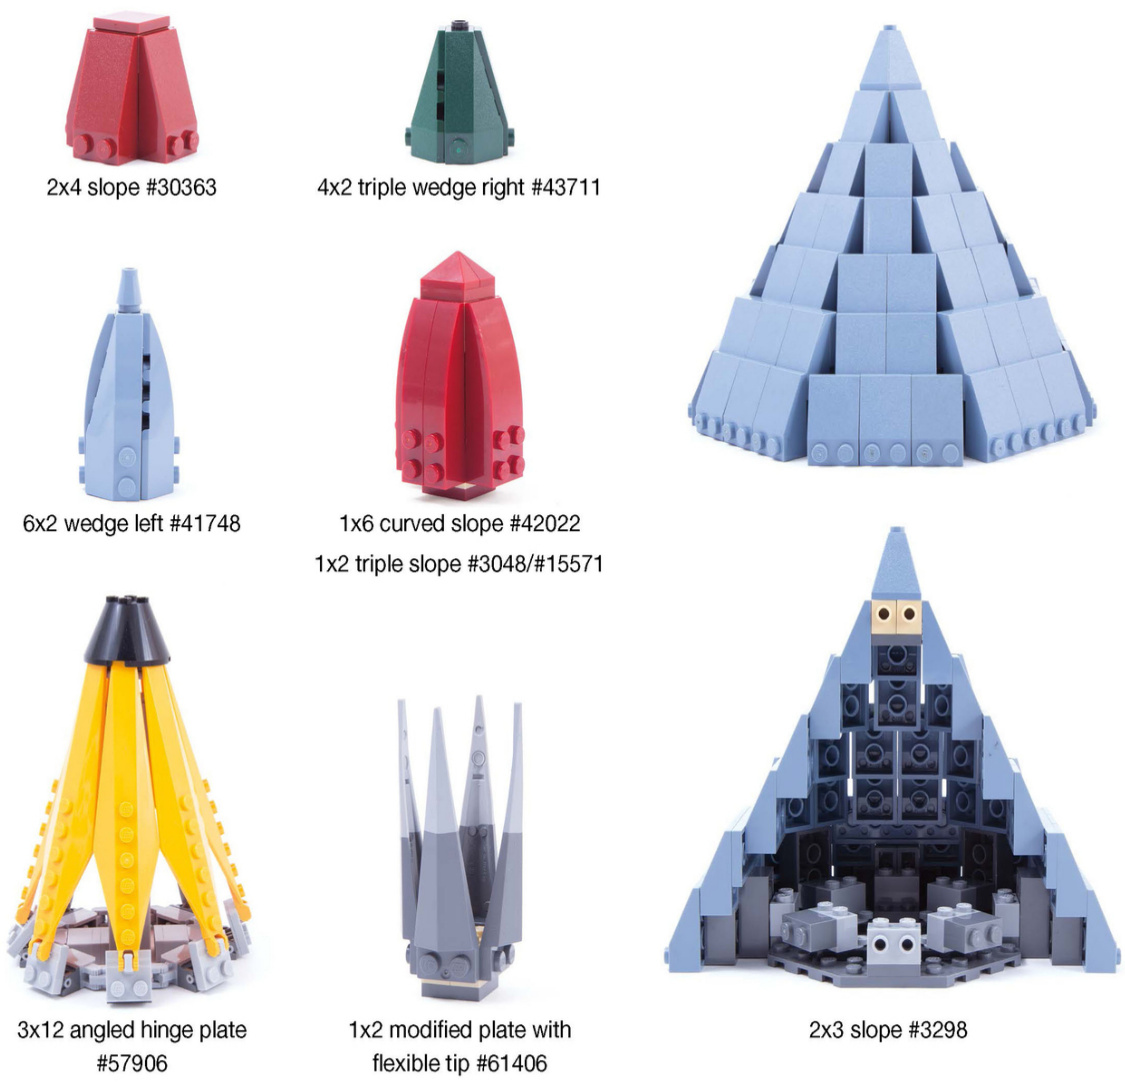
Cone Spires
Usea singleconeor stackseveralconestomakea simplespire
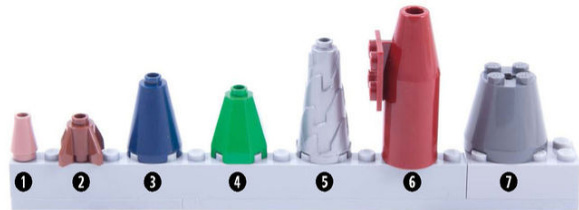
0 1x1cone #4589
2 1x1roundbrickwithfins #4588
? 2x2x2 cone #3942
? 2x2x12/3 octagonalcone #6039
6 2x2x3 jagged cone drill #28598
6 Enginewithtopplate #4868
0 3x3x2cone #6233
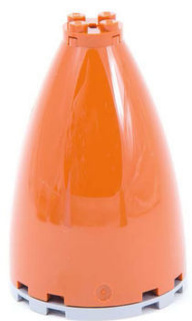
6x3x6cone half #18909
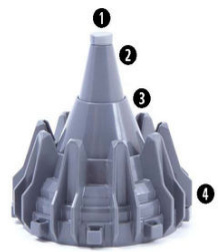
0 1x1 round tile #98138
2 2x2x2cone #3942
3 4x4x2 hollow cone #4742
? Flangedwheel #64712
0 2x2x2cone#3942
2 4x4x2 cone #3943
3 8x4x6 cone half #47543
0 2x2x2cone #3942 2 2x2modified facetbrick #87620 ? 1x1 plate with ring
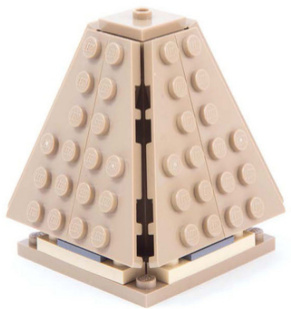
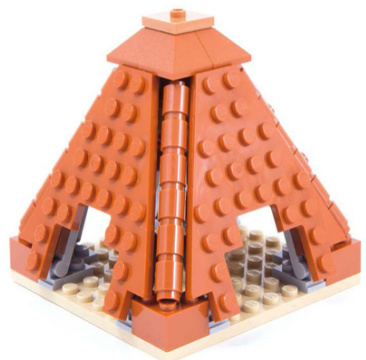
Slope Spires
These techniques require studs on allfour sides of the interior structure and can be used for both round and square roofs.
Ornamental Domes and Spires
Use curved pieces like blades and animal parts to create fun ornamental domes and spires.

Roof Decorations
Roof Ridges
Add in decorative elements to make a roof ridge more detailed and interesting.
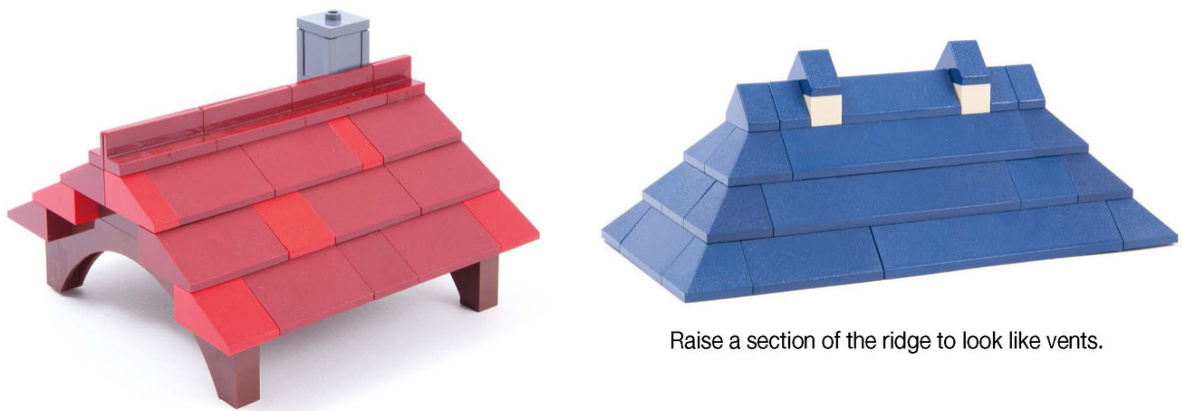
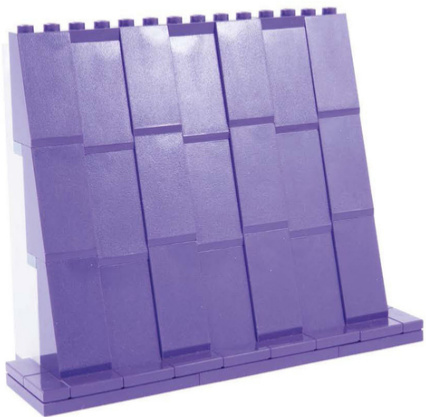
Even a simple panel ridge adds interest to a roof.
Use panels to line the tops of your roofs.
1x2 inverted double slope #3049
0 1x1x1 corner panel #6231
2 1x2x1 panel #4865
? 1x2x1 panel with 2 sides #23969
4 1x2x1 panel with center divider #93095
? 1x3x1 panel #23950
6 1x4x1panel #30413
0 2x2x1 corner panel #91501
1 1x2 triple slope #3048
2 2x4 double slope #3041
③ 1x1 cone #4589
1x2 double slope #3044
2x4 double slope #3041
2x2 curved top brick with 2 studs #30165
1x4x11/3 modifiedbrick with curved top #6191

Pneumatic hose T #4697
Toy winder key #98375
Ice cream cone #11610
Speartip#24482

Claw #87747
Light cover #58176
1x1 cone #4589
3x3 cornerplate #30357
Ornamental fish x59
Pantograph shoe #2922

Bioniclebackblade#44146
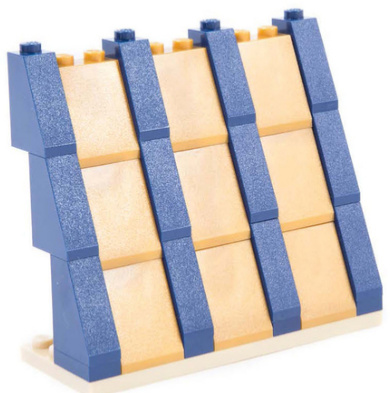
Gable Ends
The gable end is the wall area that encloses the end of a pitched roof. It is typically triangular but can vary depending on the shape of your roof.
Create an overhang by adding an extra row of slopes. You can also change the roof’s pitch by using different types of slopes.
Create a stepped parapet and use a 1x2 plate with rail (#32028)and 1x2 cheese slope (#85984)for emphasis.

1x2 modified brickwith groove #4216
1x2platewithrail#32028
3x3thin liftarm with quarter ellipse #32249
Turntablebase #3680 4x4 rounded corner plate #30565
Attach a 3x3 thin L-shape liftarm (#32056) to a plate to add a gable vent.

Embellish with contrasting colors and lines.
Use shaped tiles to line the outer edges of the gable end.
Alternate 1x1 bricks with scroll (#20310) with slopes.
1x6x2 arch with curved top #6183
0 1x1 round plate with swirled top #15470
2 2x2 jumper plate #87580
? 1x3x3 arch #13965
Roof Trims
Here are some ways to line the rake edge of a roof to frame a gable end.
1x1 plate #3024
1x1 round plate #4073
12-tooth gear #6589
2x3x2/3 brick with wing end #47456

1x1 modified plate with verticaltooth #15070
2x3 modified plate with hole #3176
Plant stem #15279 Lightsaber hilt #64567

1x8 platewithrail #4510
1x2 plate with handle on side #48336
1x1platewith vertical clip #4085
Rooftop Finials
Finials can add a bit of color or interest to a roof, spire, or tower.
1 Mirror #93080
2 Ornamental fish x59
3 Signalpaddle #3900
4 Technic axle hub #48723
5 Ornate key #19118
6 Hairbrush #3852
7 Chainsaw blade #6117
8 Cricket bat (by BrickArms)
9 Spiked flail #59232
10 Snake #98136
1 2x2 dish #4740 1x1 round brick #3062 Telescope #64644 Small leverbase #4592
Technic ball joint #32474
13 Oval perfume bottle #6932
14 Light cover #58176
13 Ice cream scoops #6254
Ice cream cone #11610 D Statuette #90398 Lipstick #93094 Telescope #64644 Sai weapon #98139 modified brick with studs on sides #4595 Lantern (by BrickWarriors)
0 Feathered wing #11100 4 Baby dragon #41535 2 Chicken #95342 ? Paw #15090 3 Microfig #85863 6 Scallop shell #18970 Microfig helmet #94162
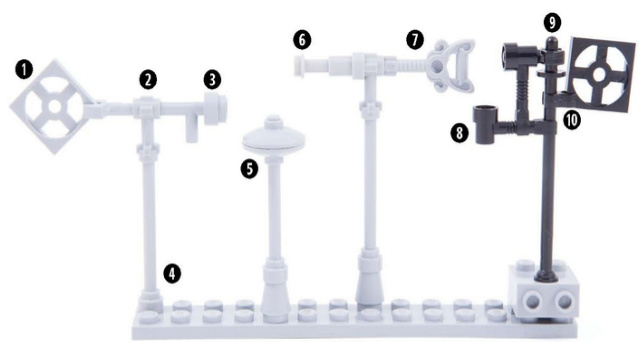
WeatherVanes
Weather vanes are a great way to adda bit of character to a roof.They can be made by attaching all sorts of small decorative pieces to long bar pieces.
0 Turntablebase #3680
2 Handle with side studs #92690
3 Space gun/torch 86208
4 1x4 antenna #3957
? 2x2 dish #4740
? Telescope #64644
0 Ornate key#19118
8 1x3 bar with clip and stud #4735
? 8L bar with stop rings and pin #2714
10 U-Clip (by BrickArms)
Drains and Downspouts
Drains and downspouts fit nicely into corners and can also break up a wallsection.Extra detail can be added with decorative parts that connect the structure to the wall.
0 2x3modifiedplatewith hole #3176
2 1x1x5 brick #2453
? 1x2x5 brick #2454
4 1x1 tile with clip #2555
? 1x1 brick with stud on 2 adjacent sides
#26604
6 Handlebars #30031
1 #4 angled axle connector #32192
2 2L Technic pin connector #62462
3 Handcuffs #61482
4 Nozzle #60849
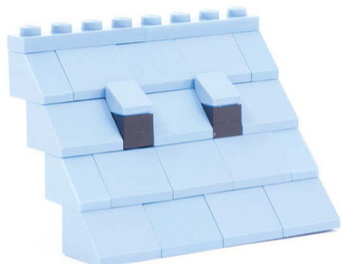
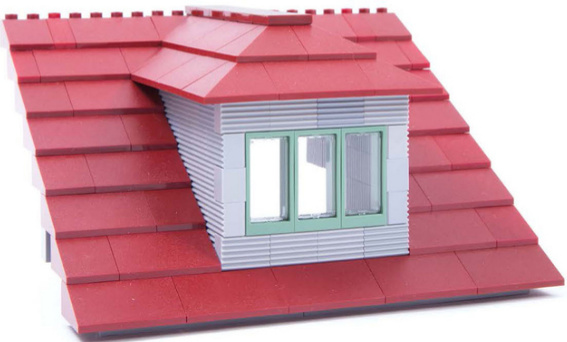
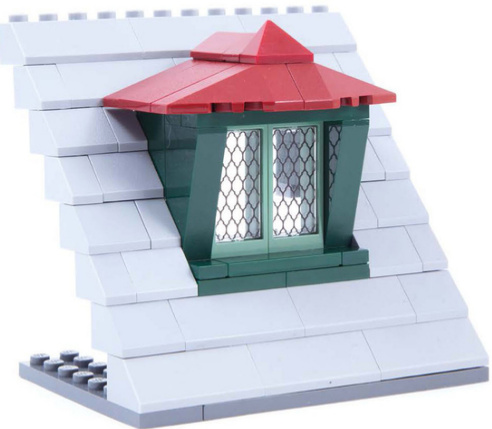
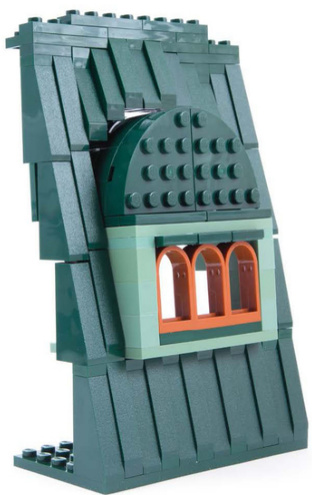
Dormers
A dormer is a window that juts out from a sloping roof. Here are some ideas for integrating dormers into your roofs.
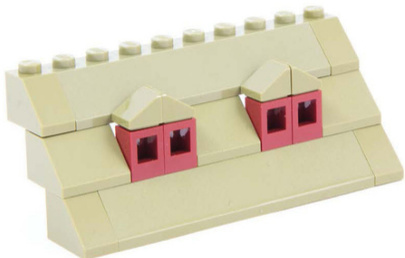
Use the square opening on the back of a 1x1 headlight brick (#4070) to make a small roof vent or window by capping it with a 1x1 cheese slope (#54200).
Regular1x1 bricks (#3005)in a contrasting color can also create a vent dormer to break up a large roof surface.

When working with small dormers, you can usewindowswith orwithoutabrickframe. The dormer on the right is capped with a 2x4 triple wedge (#47759).
To fill the gap between the roofline and the window frame, use a second empty frame behind the first.
Add a hood over the dormer with a differently angled slope-in this case, a curved slope (#15625).
Curved dormer roofs, like this one constructed from 8x4x2 curved windscreens (#46413) on 1x6 curved slopes (#42022),make a nice contrast against a roof of regular slopes.
You can also place a dormer where the wall transitions to the roof.
Use a contrasting color for the wall so it stands out against the roof.
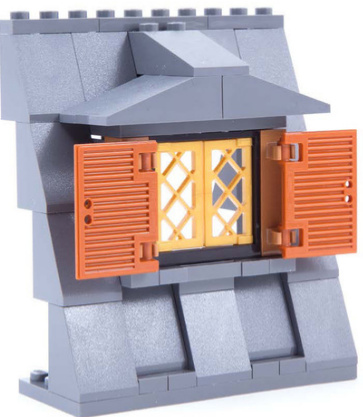
You can use any “material” or shape for the dormer roof-it doesn’t have to match the rest of the roof.
4x2 triple wedge left #43710
triple wedge right #43711
4x4 round corner brick #2577
7x3 flag with rod #30292
BREAKTHE MOLD
Add detail to your original creations with The Architecture IdeaBook! Usearchitectural elements like timber framing,arches,pediments,shingled roofs,and clapboard siding to add realism to any model.
Packed with building tips and photographs,this book provides endless inspiration to helpyou create your very own ornate mansions,spooky shacks,imposing castles,rustic cabins,and charming houses.

相关实体
- 乐高微尺度窗户技术 — 透明零件堆叠、无框窗户设计
- 乐高微型窗户技术 — 头灯砖、科技砖孔位应用
- 乐高凸窗建造技术 — Bay Window 多角度窗户设计
- 乐高弓形窗建造技术 — Bow Window 多面弧形窗户设计
完结纪念
🎉 这是《乐高知识全集》的最后一章。整个知识库共收录:
- 29818 行原始文档
- 10 个批次完整消化
- 3874+ 张图片完整保留
- 乐高建筑、车辆、科技、零件四大知识体系完整收录