乐高室内家具与商业建筑设计
来源:《乐高建筑师》终章 | 完整内容保留,含 665 张图片
本章涵盖从户外街道设施到室内各房间家具的完整搭建指南,以及商业建筑和模块化建筑的案例展示。
章节概览
- 公园长椅与街道设施 - 长椅、公交站、交通信号灯、路灯设计
- 客厅家具 - 茶几、书架、电视、沙发、躺椅、灯具、植物、艺术装饰
- 厨房家具 - 烤箱、洗碗机、咖啡机、微波炉、橱柜、水槽设计
- 餐厅家具 - 餐桌、餐椅、吧台凳设计
- 卧室家具 - 特大床、梳妆台、床头柜、儿童房、赛车床
- 浴室家具 - 洗手台、马桶、浴缸、淋浴间设计
- 商业建筑家具 - 银行、餐厅、酒店的室内家具
- 模块化建筑案例 - 原创建筑设计灵感
完整内容

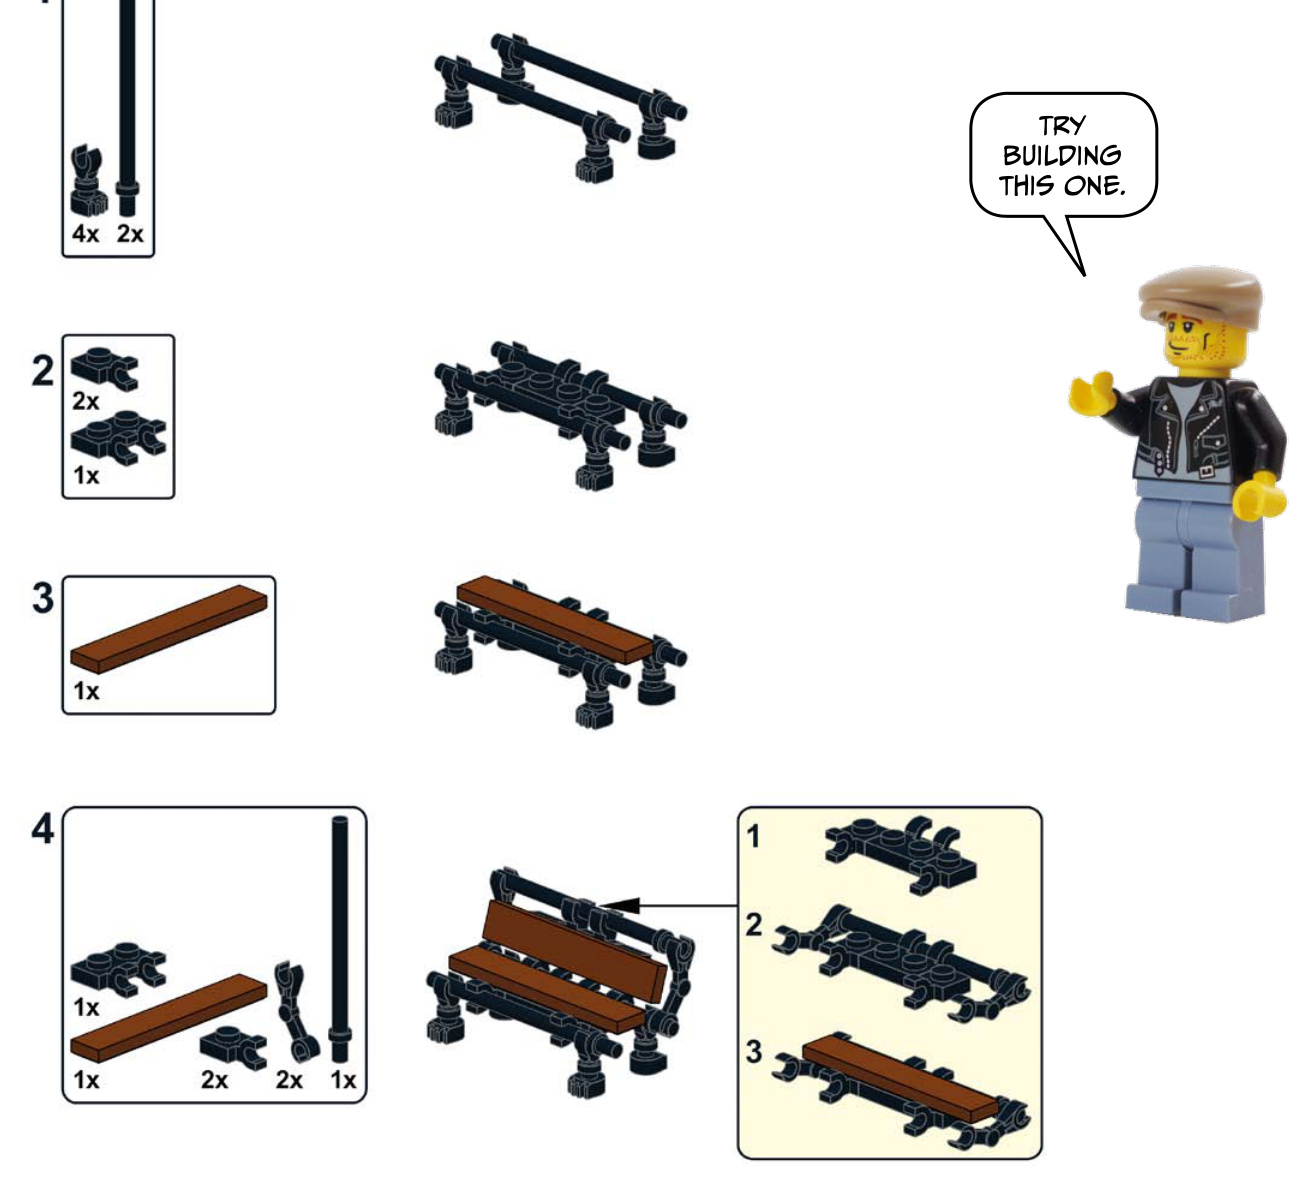
Benches
Here are a few examples of different benches and a bus shelter.
36 Chapter 4
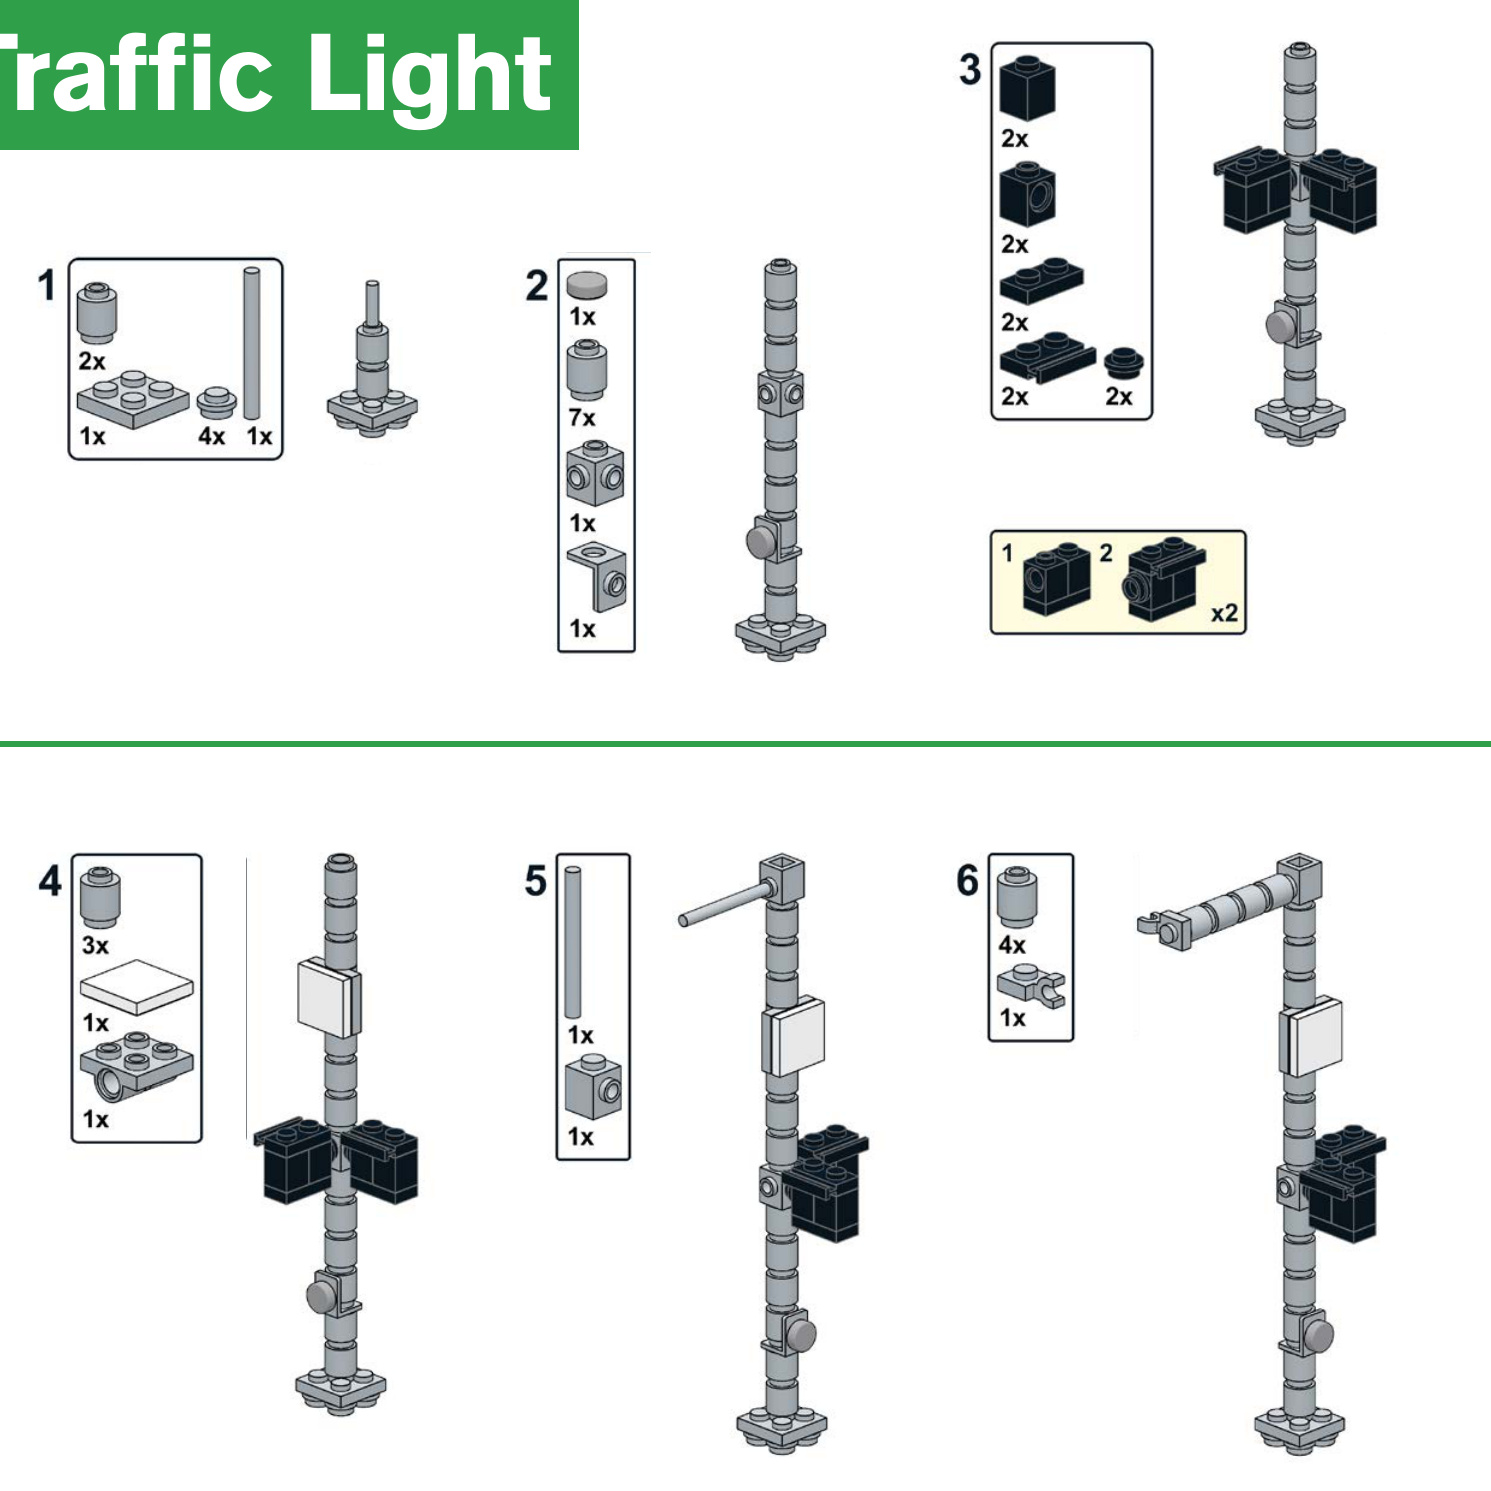
Park Bench


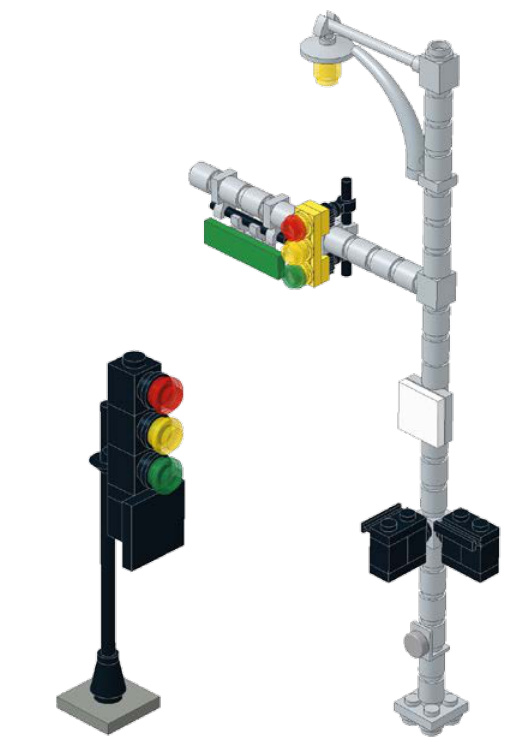
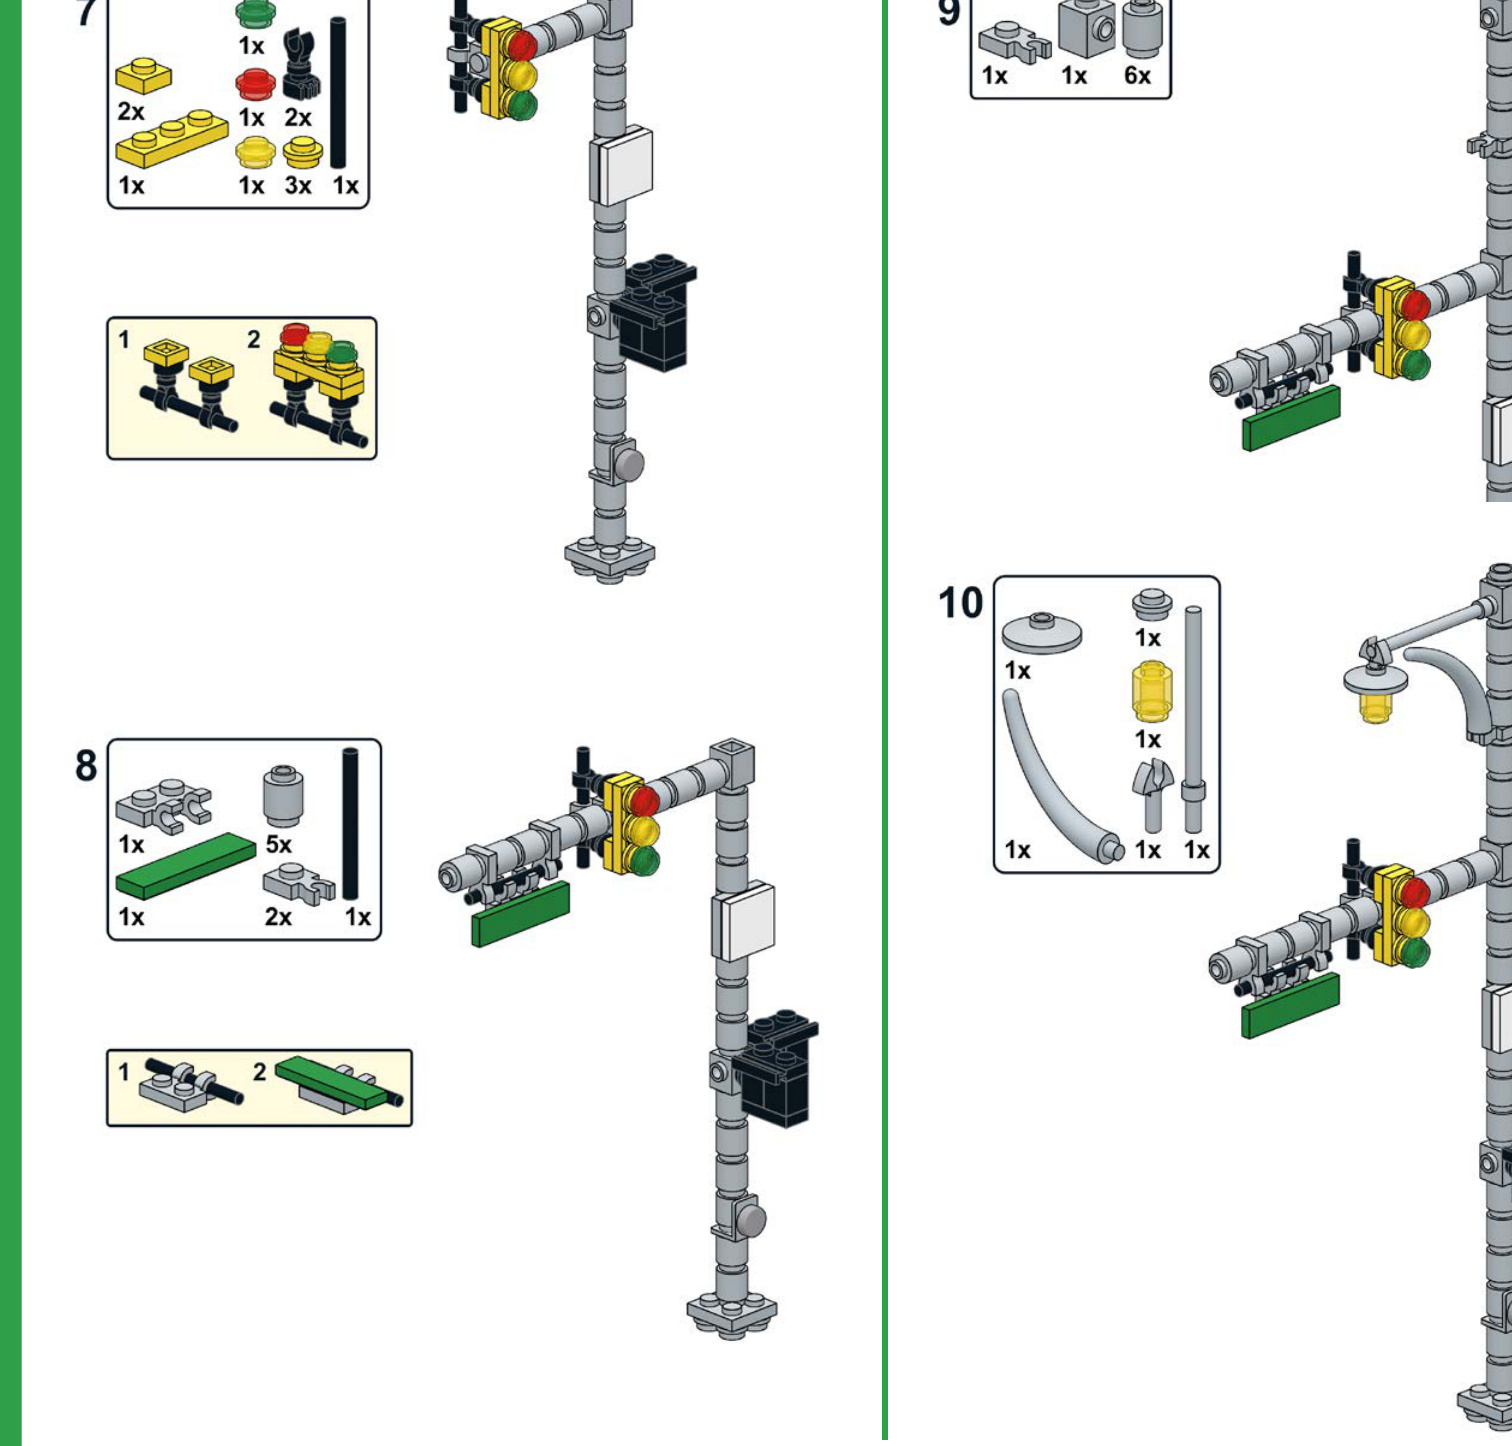
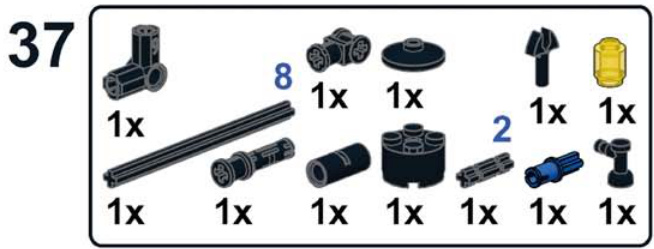
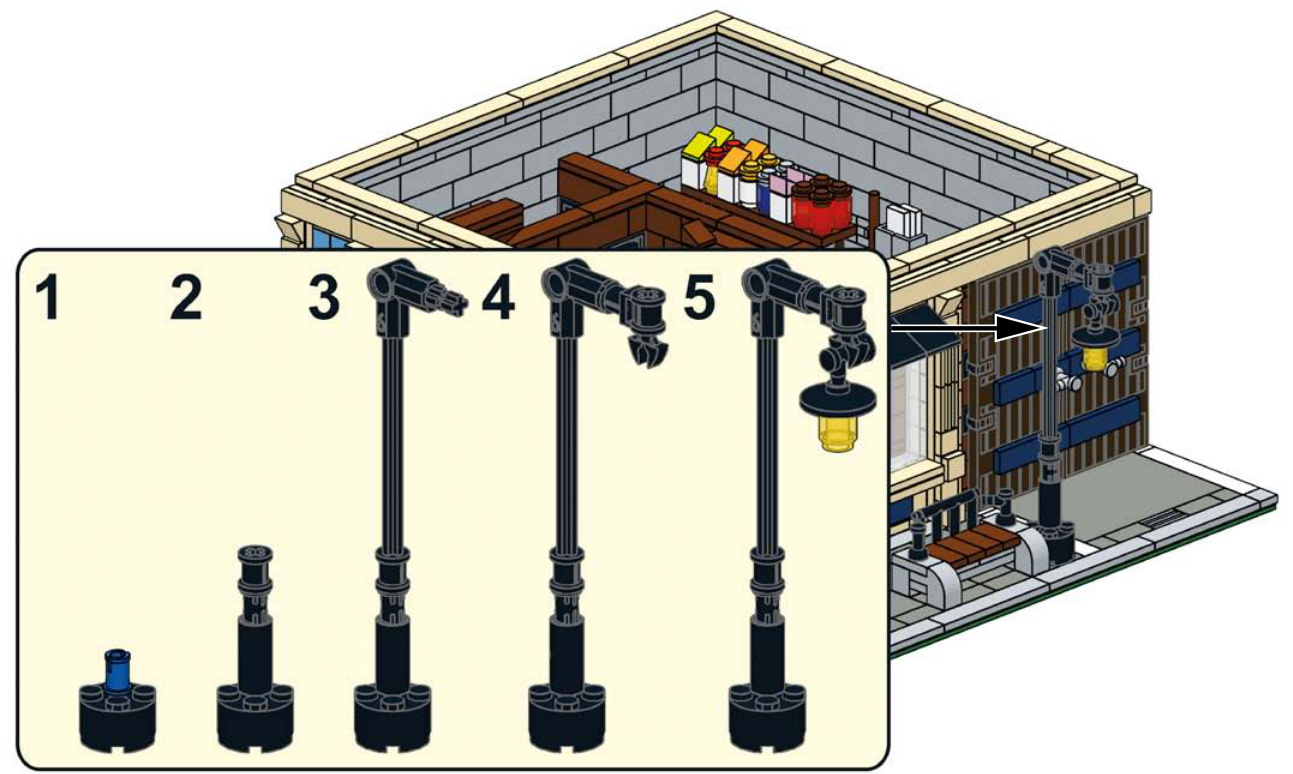
Your city needs stoplights to help control the flow of traffic. You can build a simple light on the side of the street or go more elaborate and have one that hangs over the street.
I’m starting to think that “Push to Cross” button is a placebo just like the “Close Doors” button in an elevator.
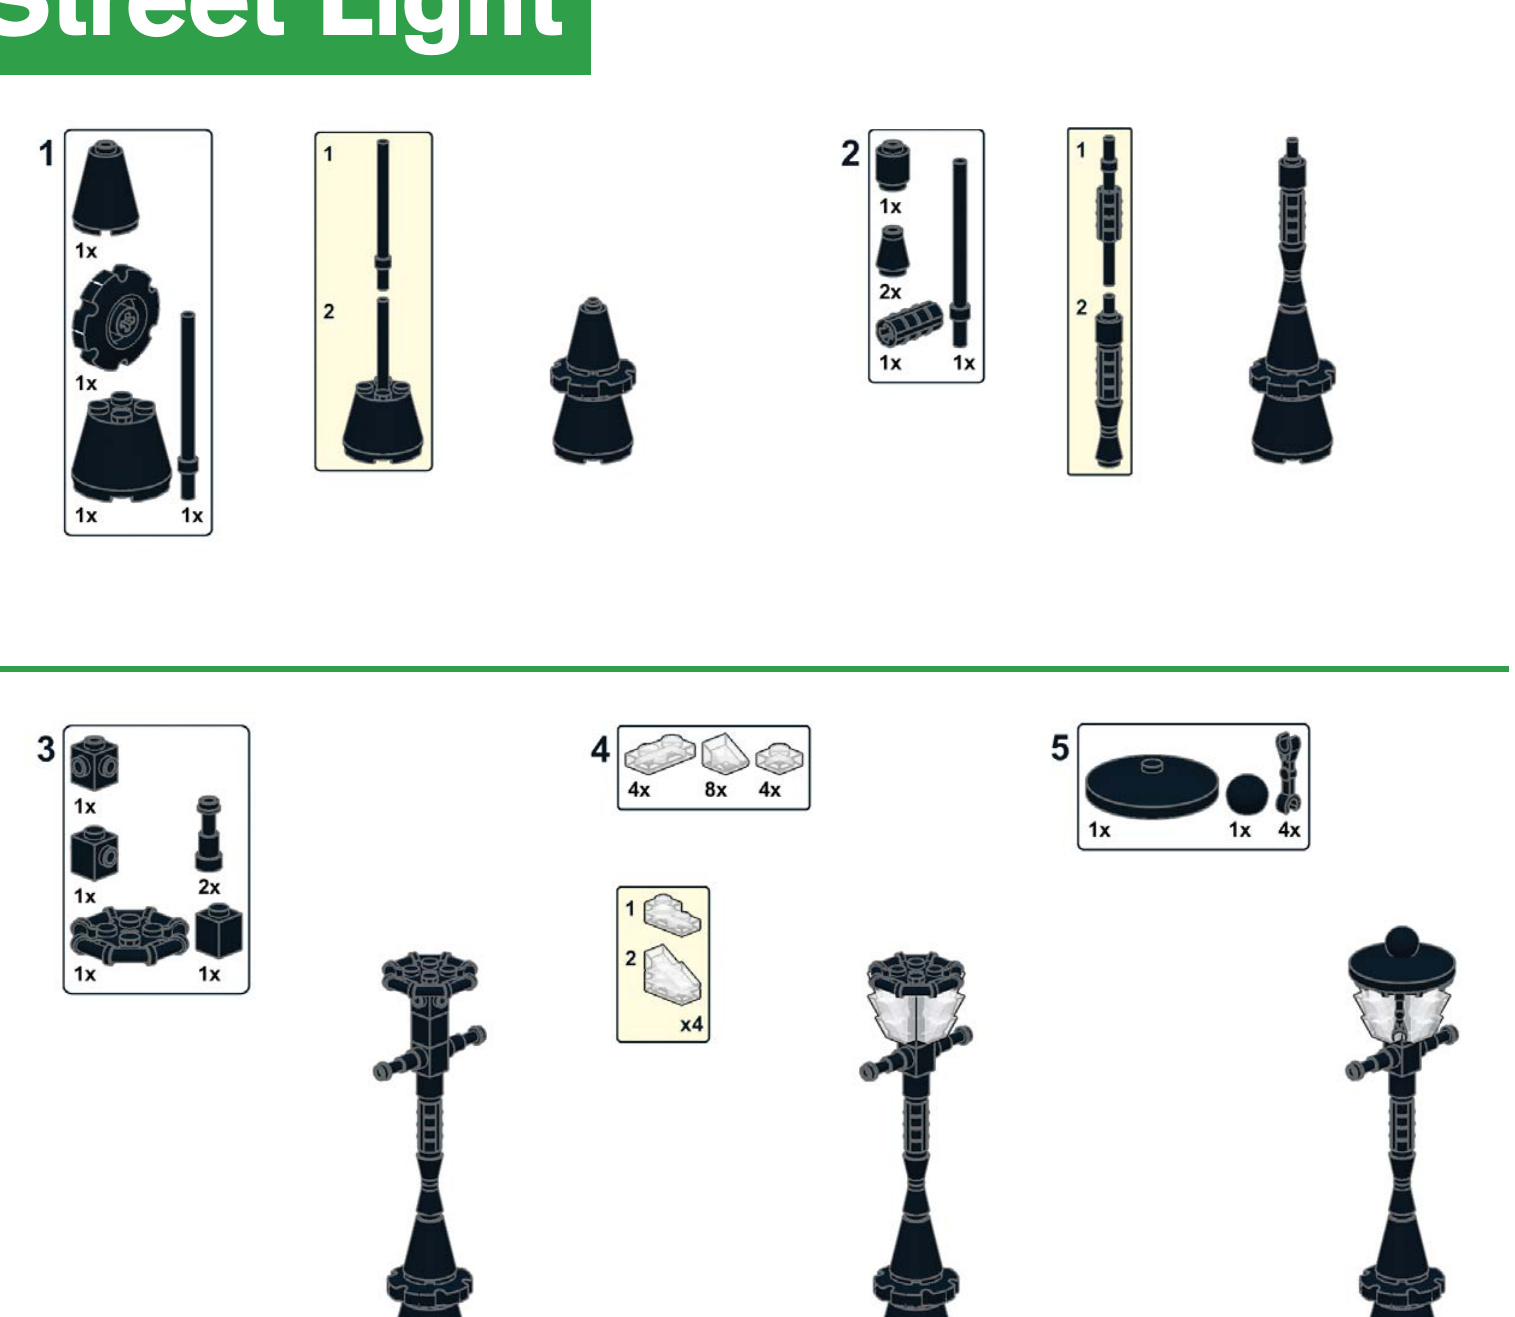
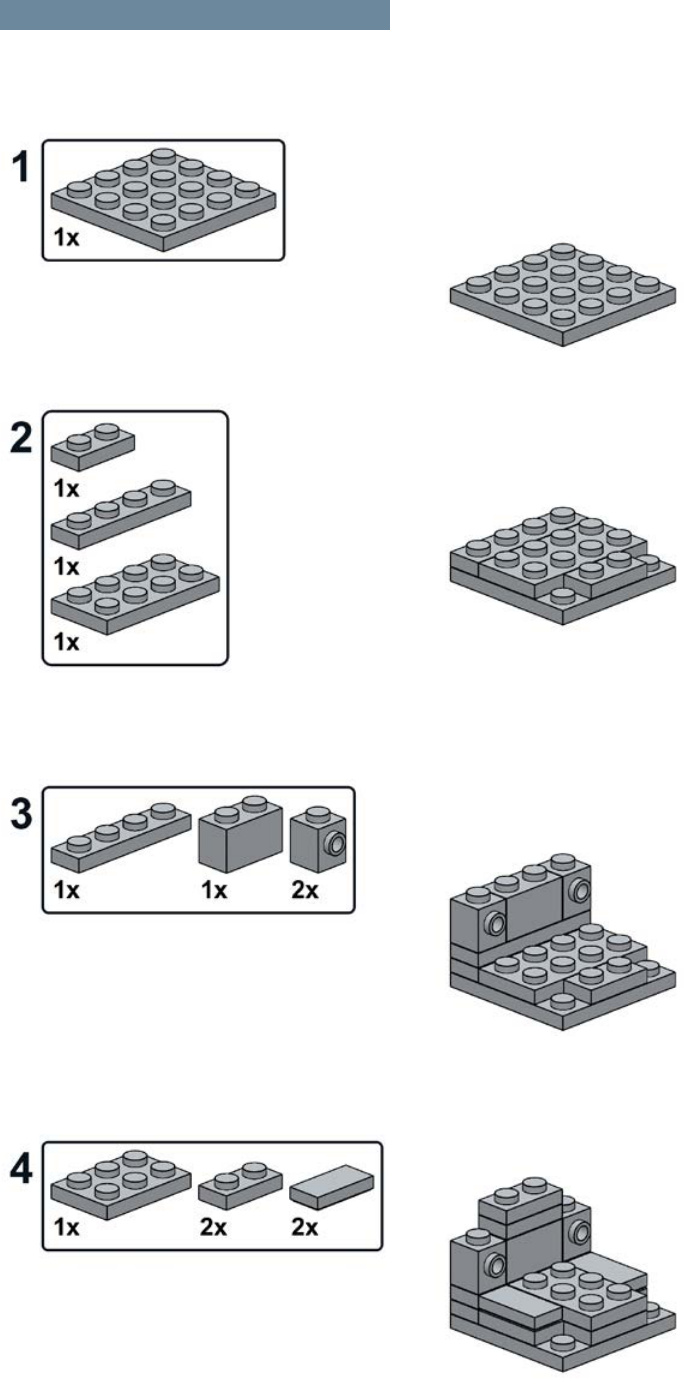
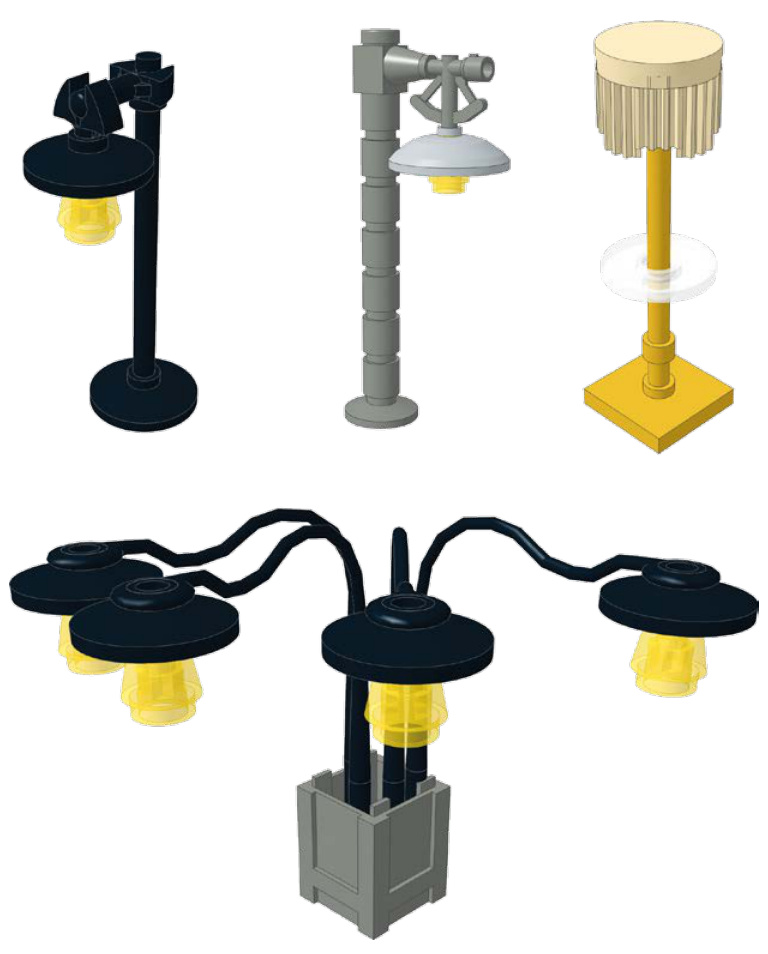
You aren’t limited to the simple lamp post that LEGO provides; there are many unique lamp posts out there that are begging to be made in LEGO scale. Take a look at some of these examples and see if you can figure out how they were made.
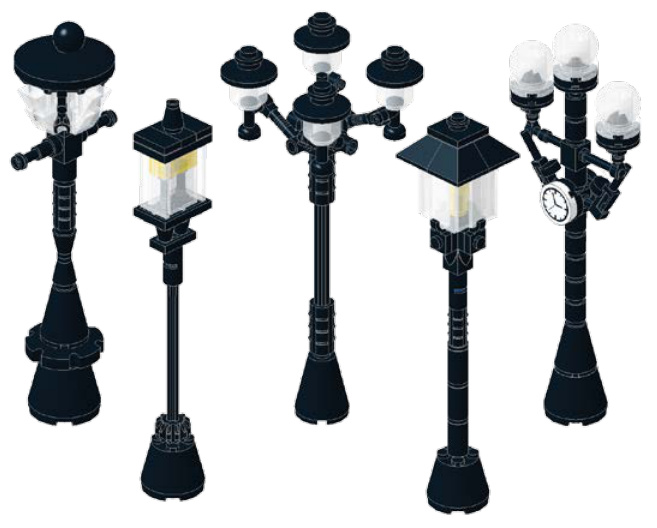

Street Light

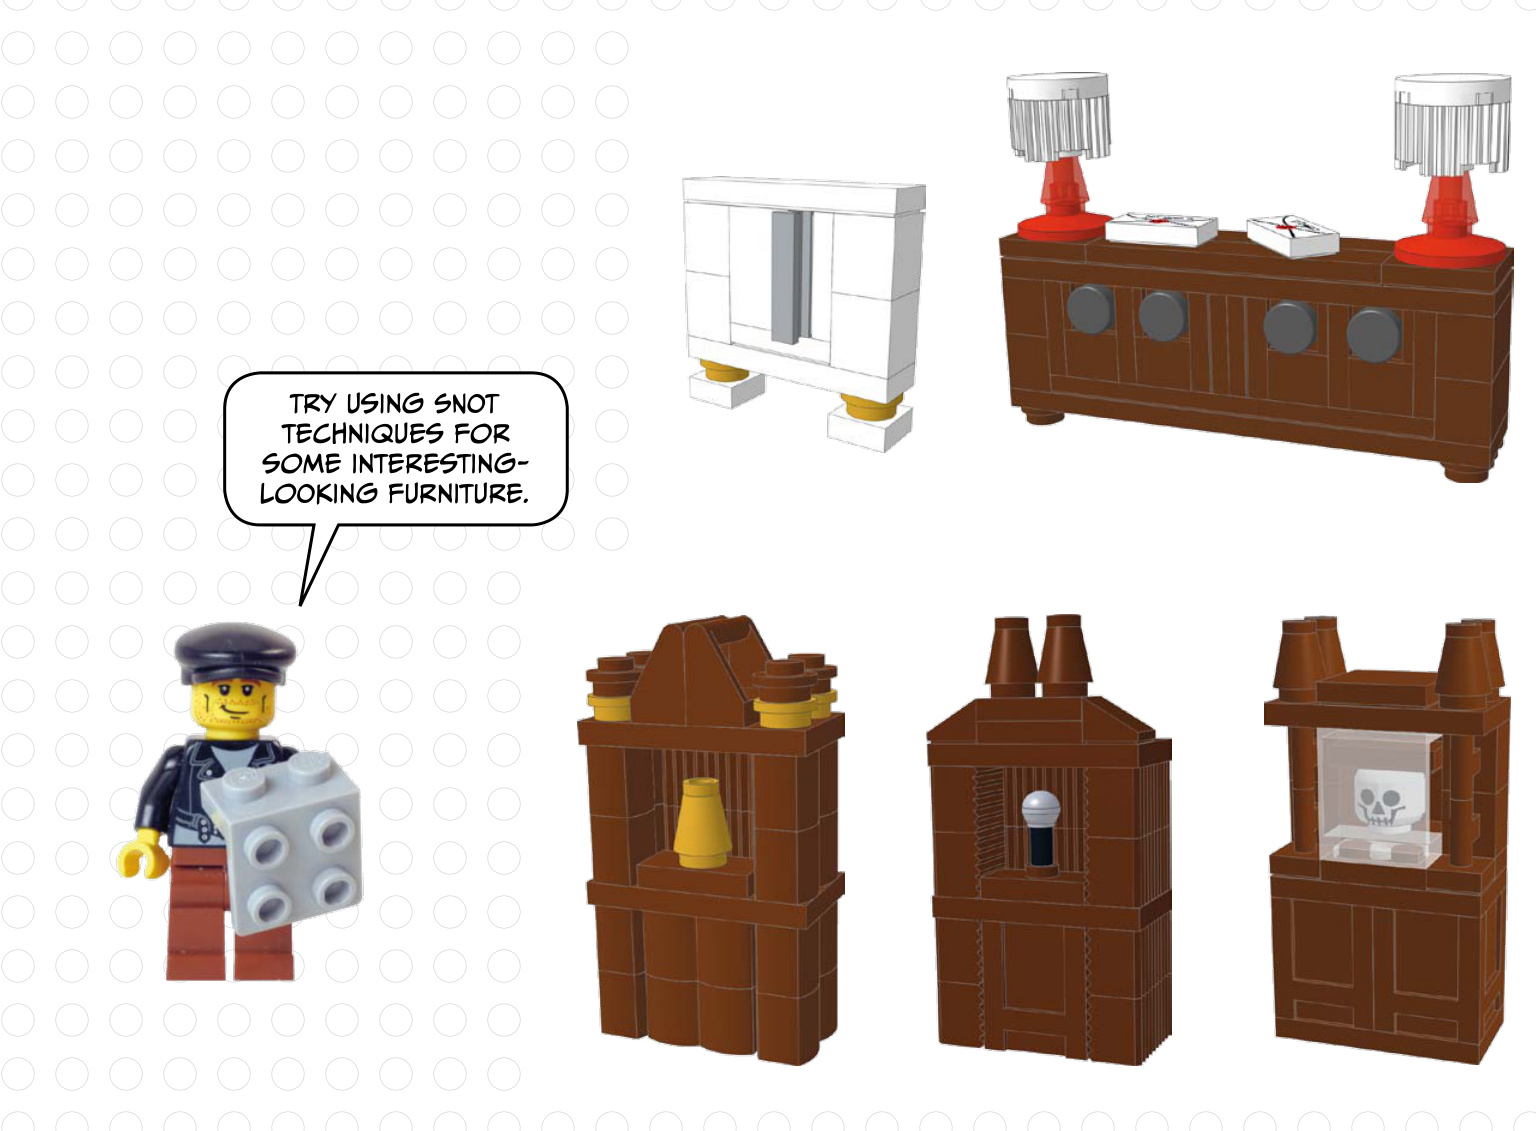
Furnishing the inside of your building can really help complete the overall look of your creation. In this chapter, we will go through each room of a house and show some furniture examples to help you get started. We hope these designs will inspire you to tinker and create your own versions for your building.
Living Room
Let’s start with the living room. Try copying the furniture in your own house as a jumping-off point.
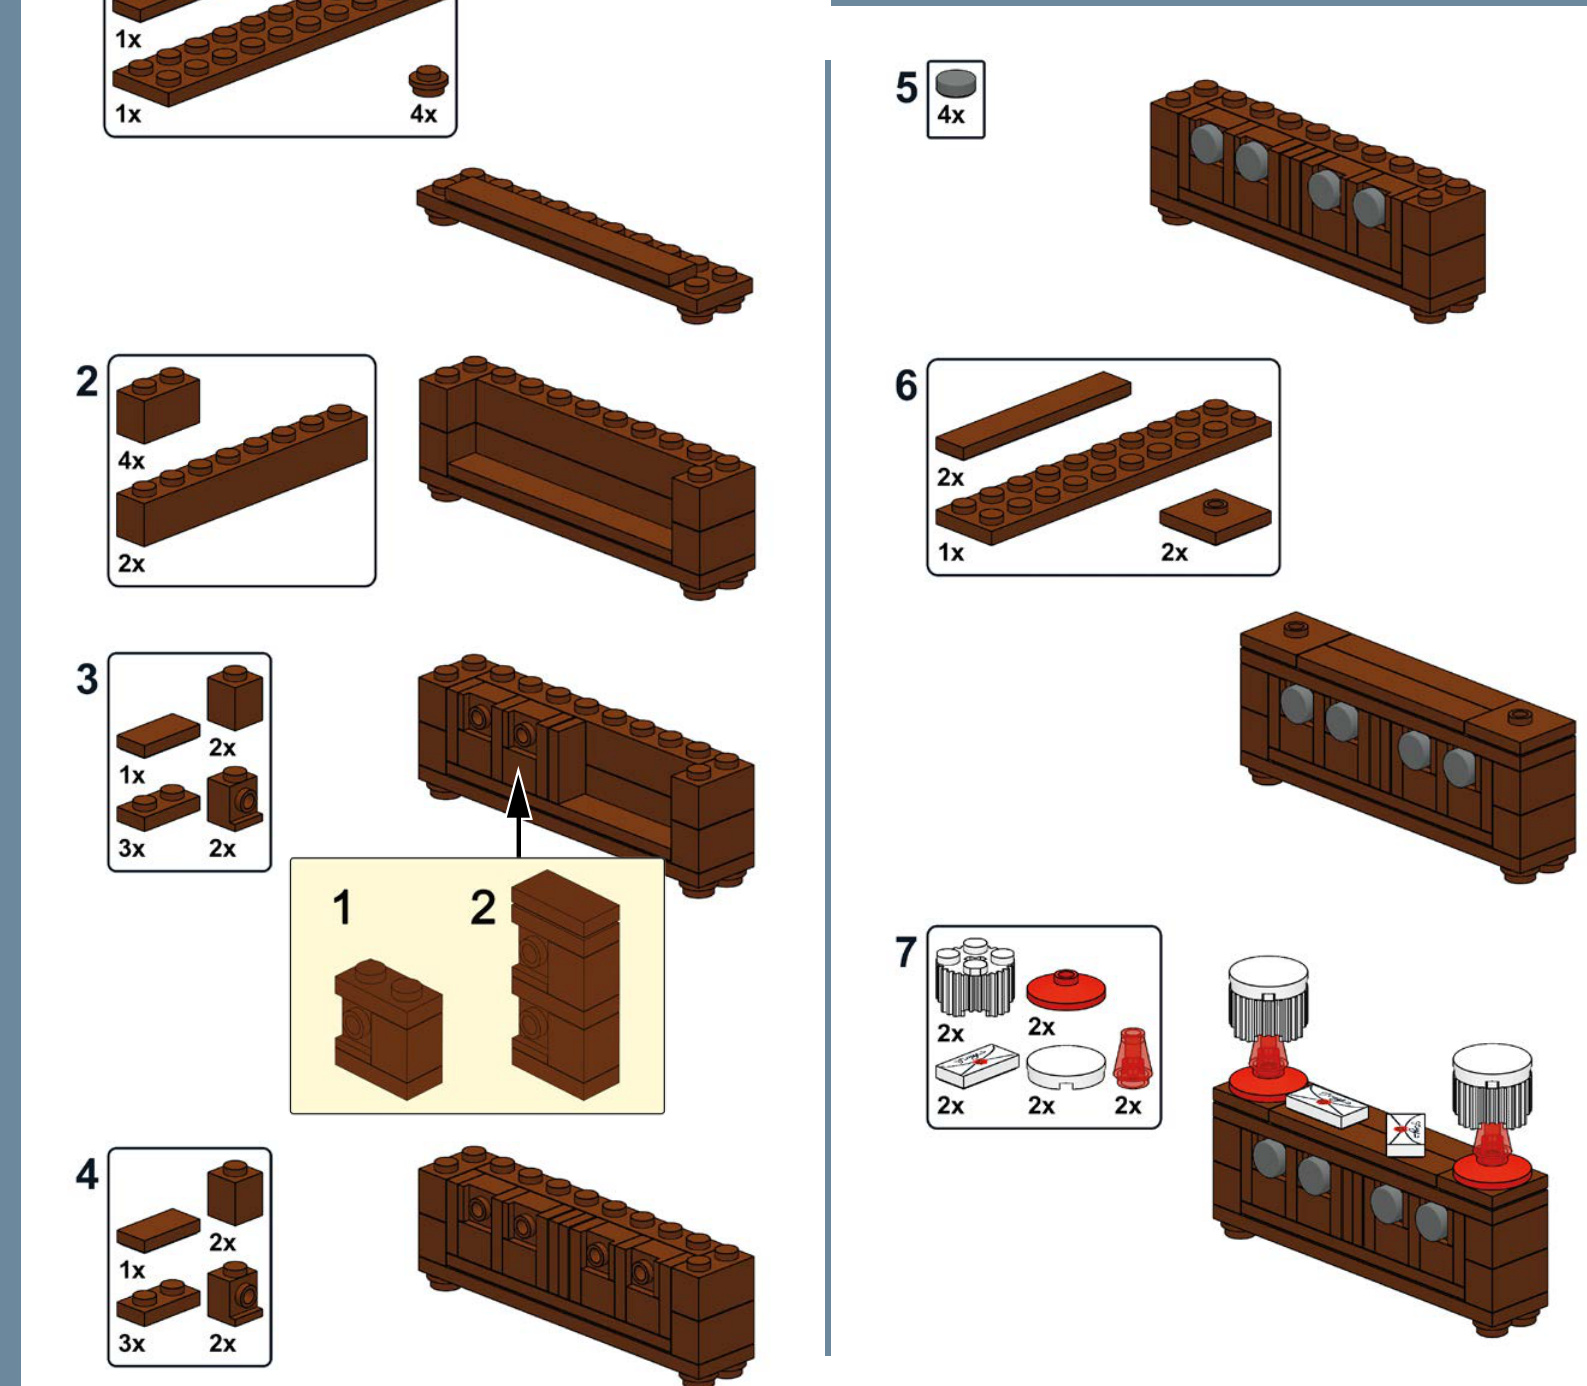
The console table shown here features some nice fringed table lamps for a retro look.
44 Chapter 5

Console Table
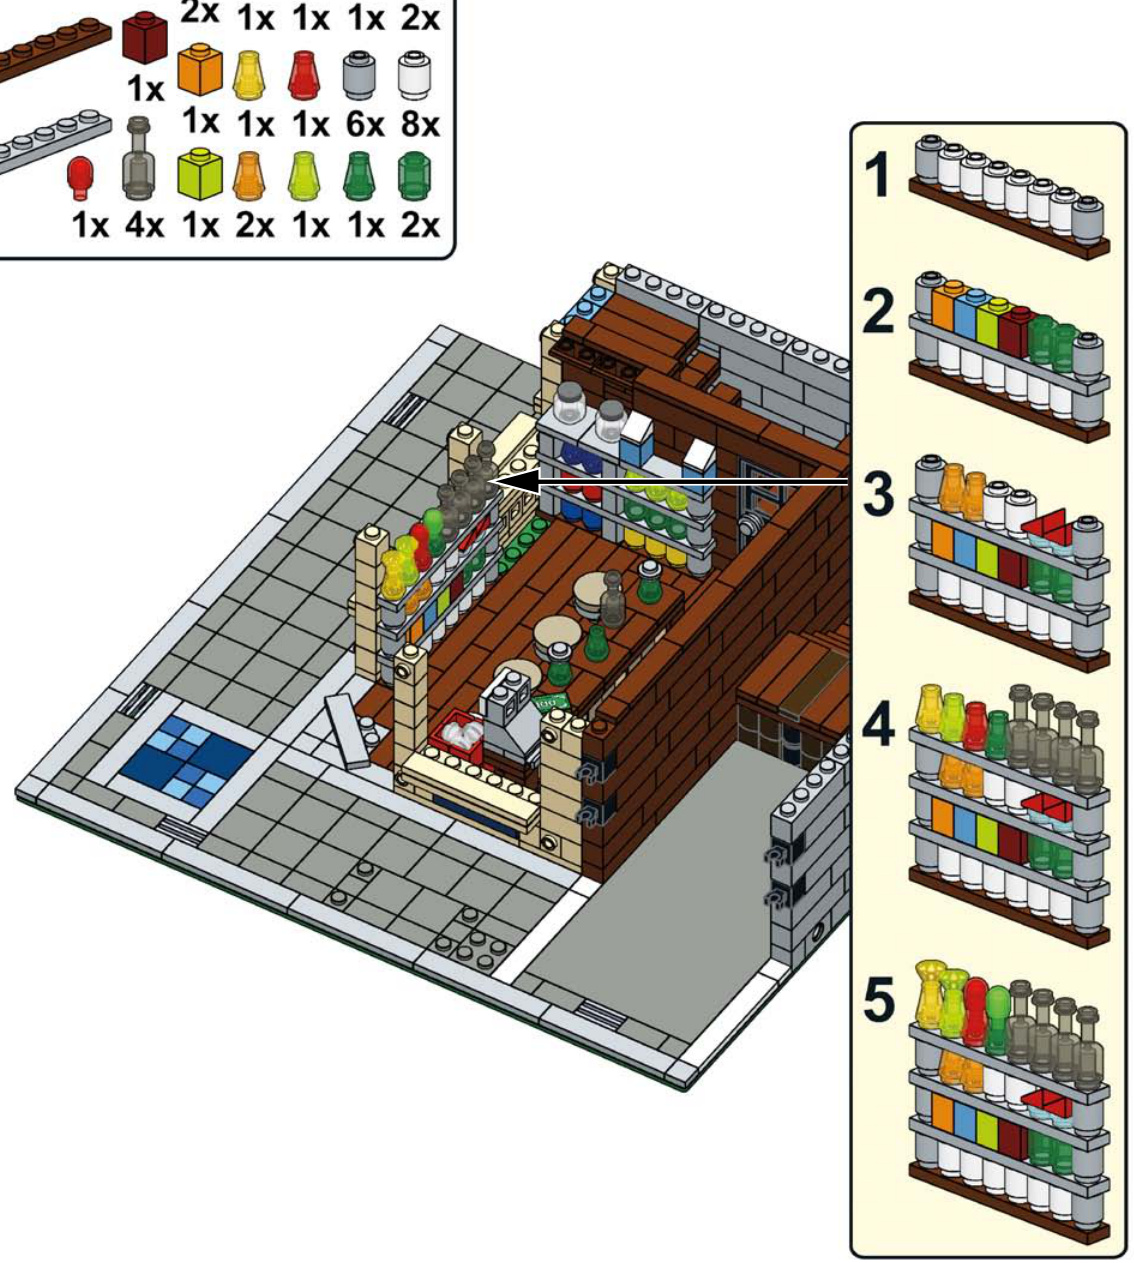
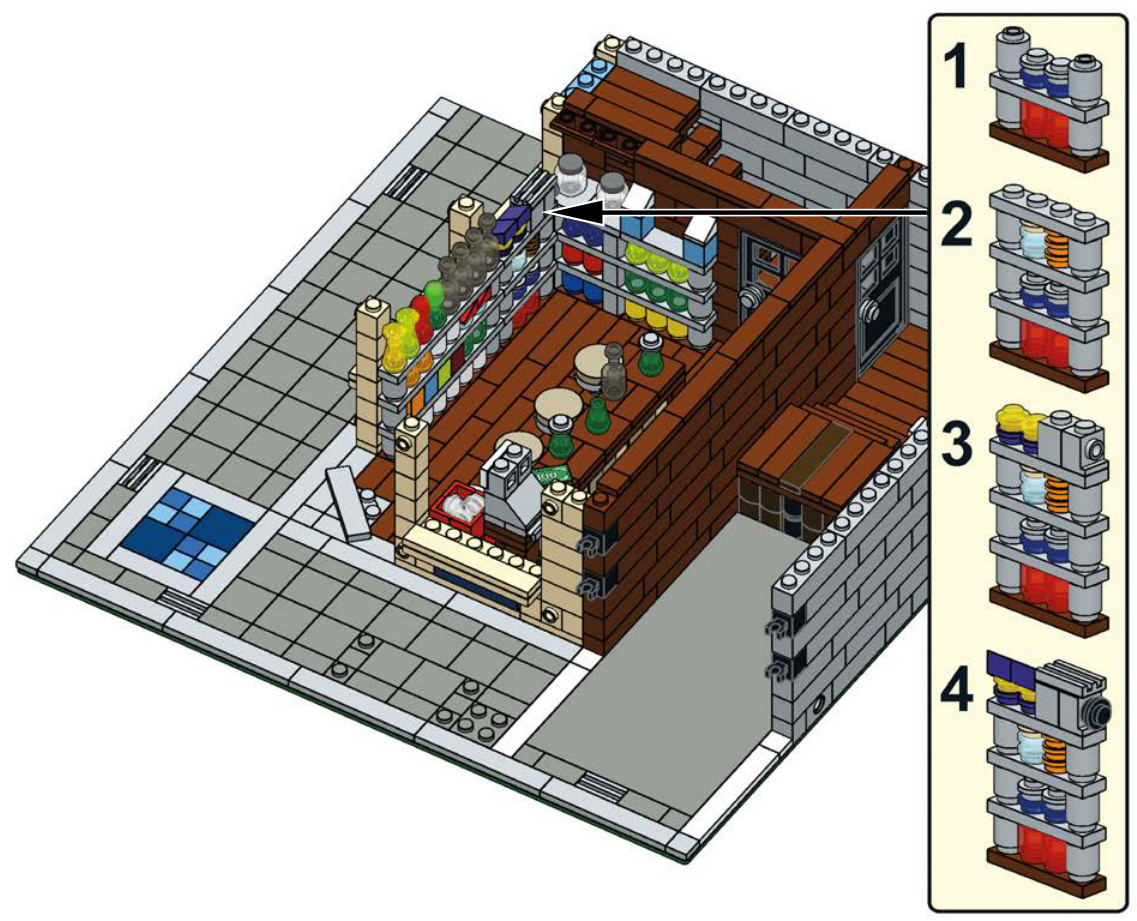
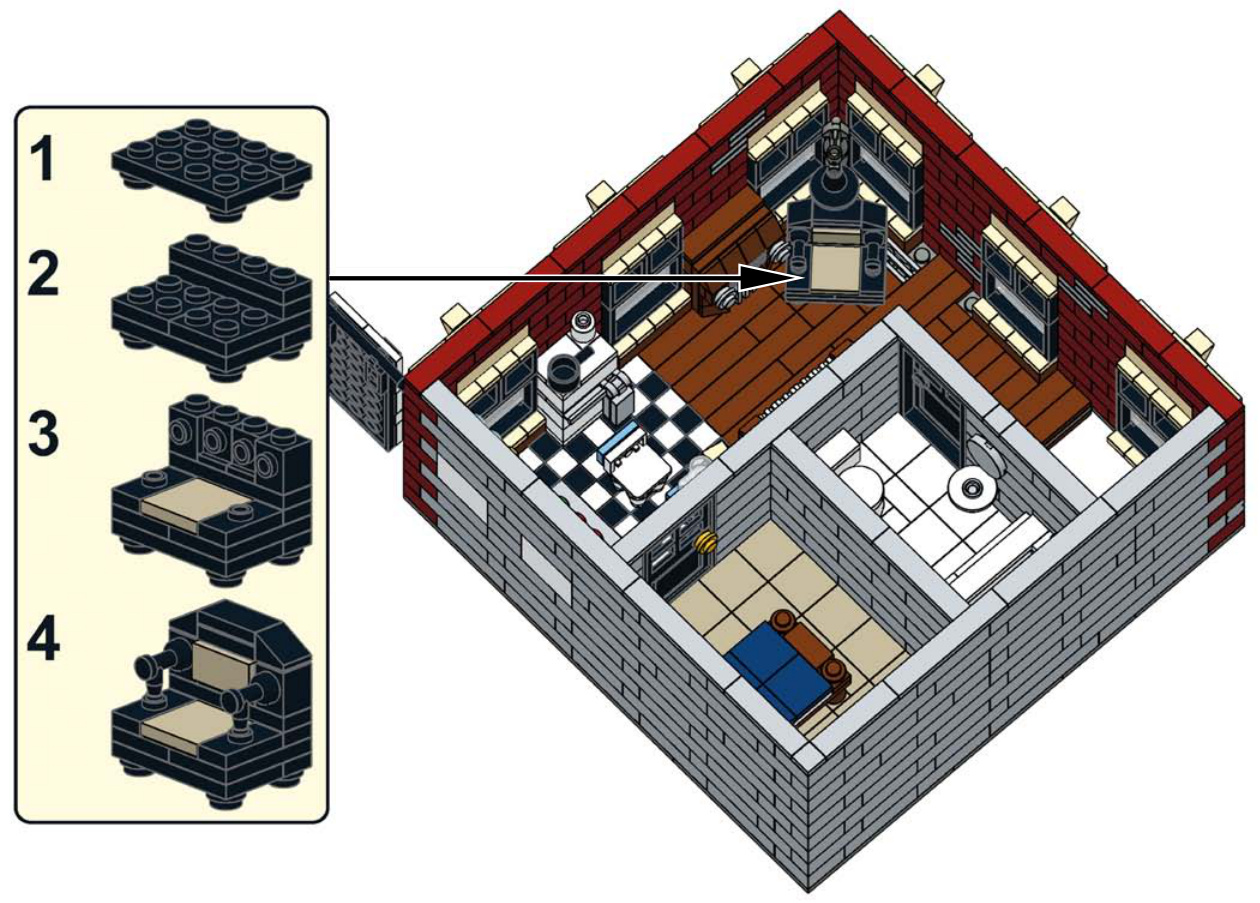
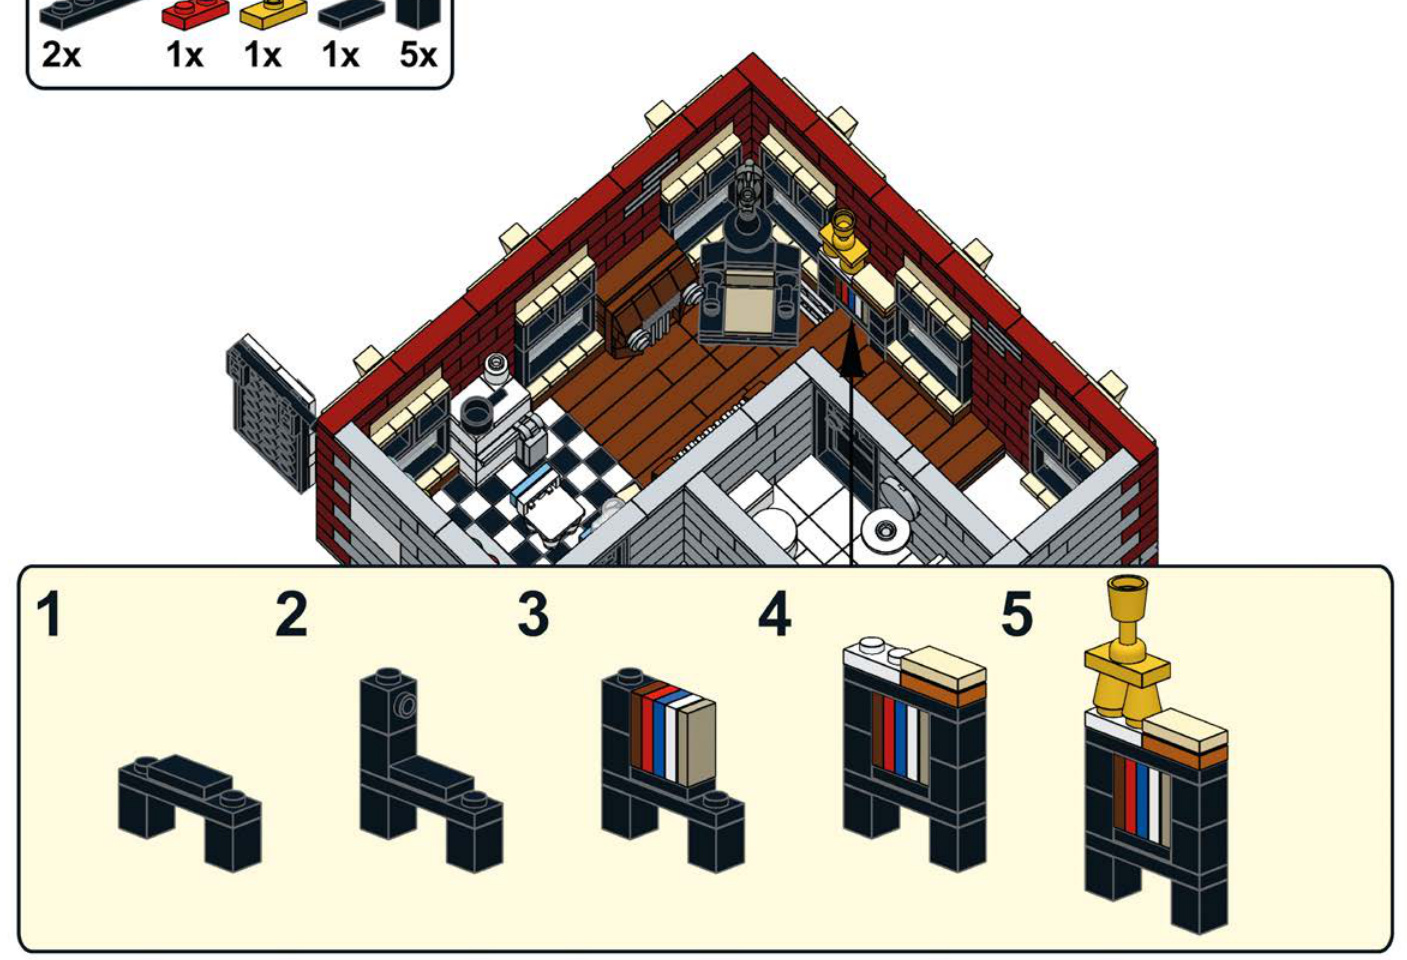
Shelving
Stand-alone sh to the wall can accessories to

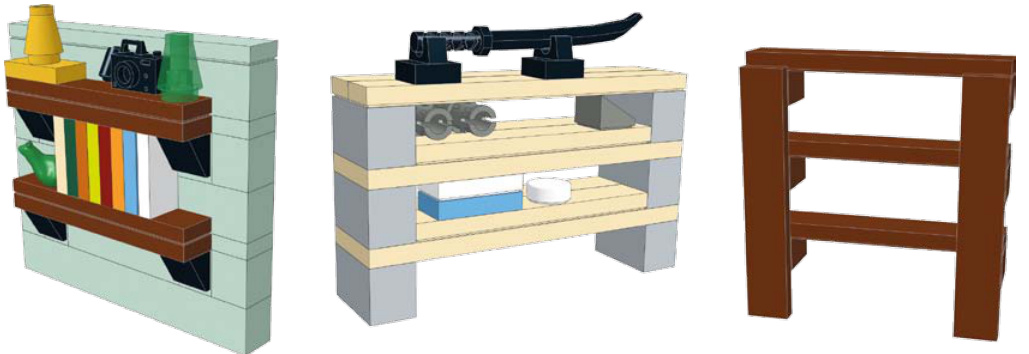
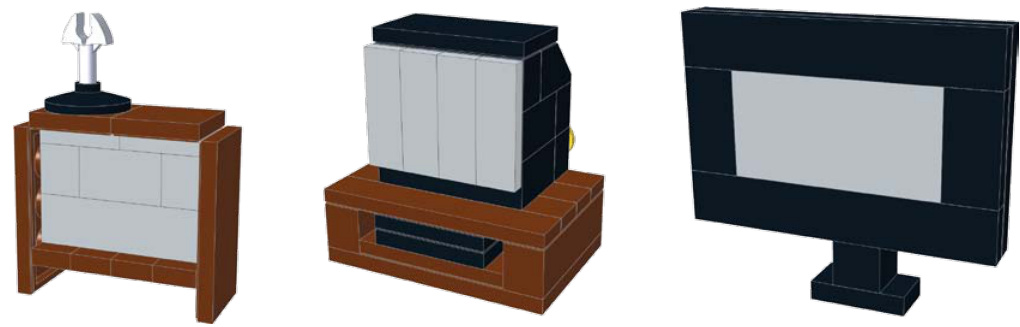
TVs
Your minifigs need entertainment, right? Give them a TV appropriate to the time period of your city.


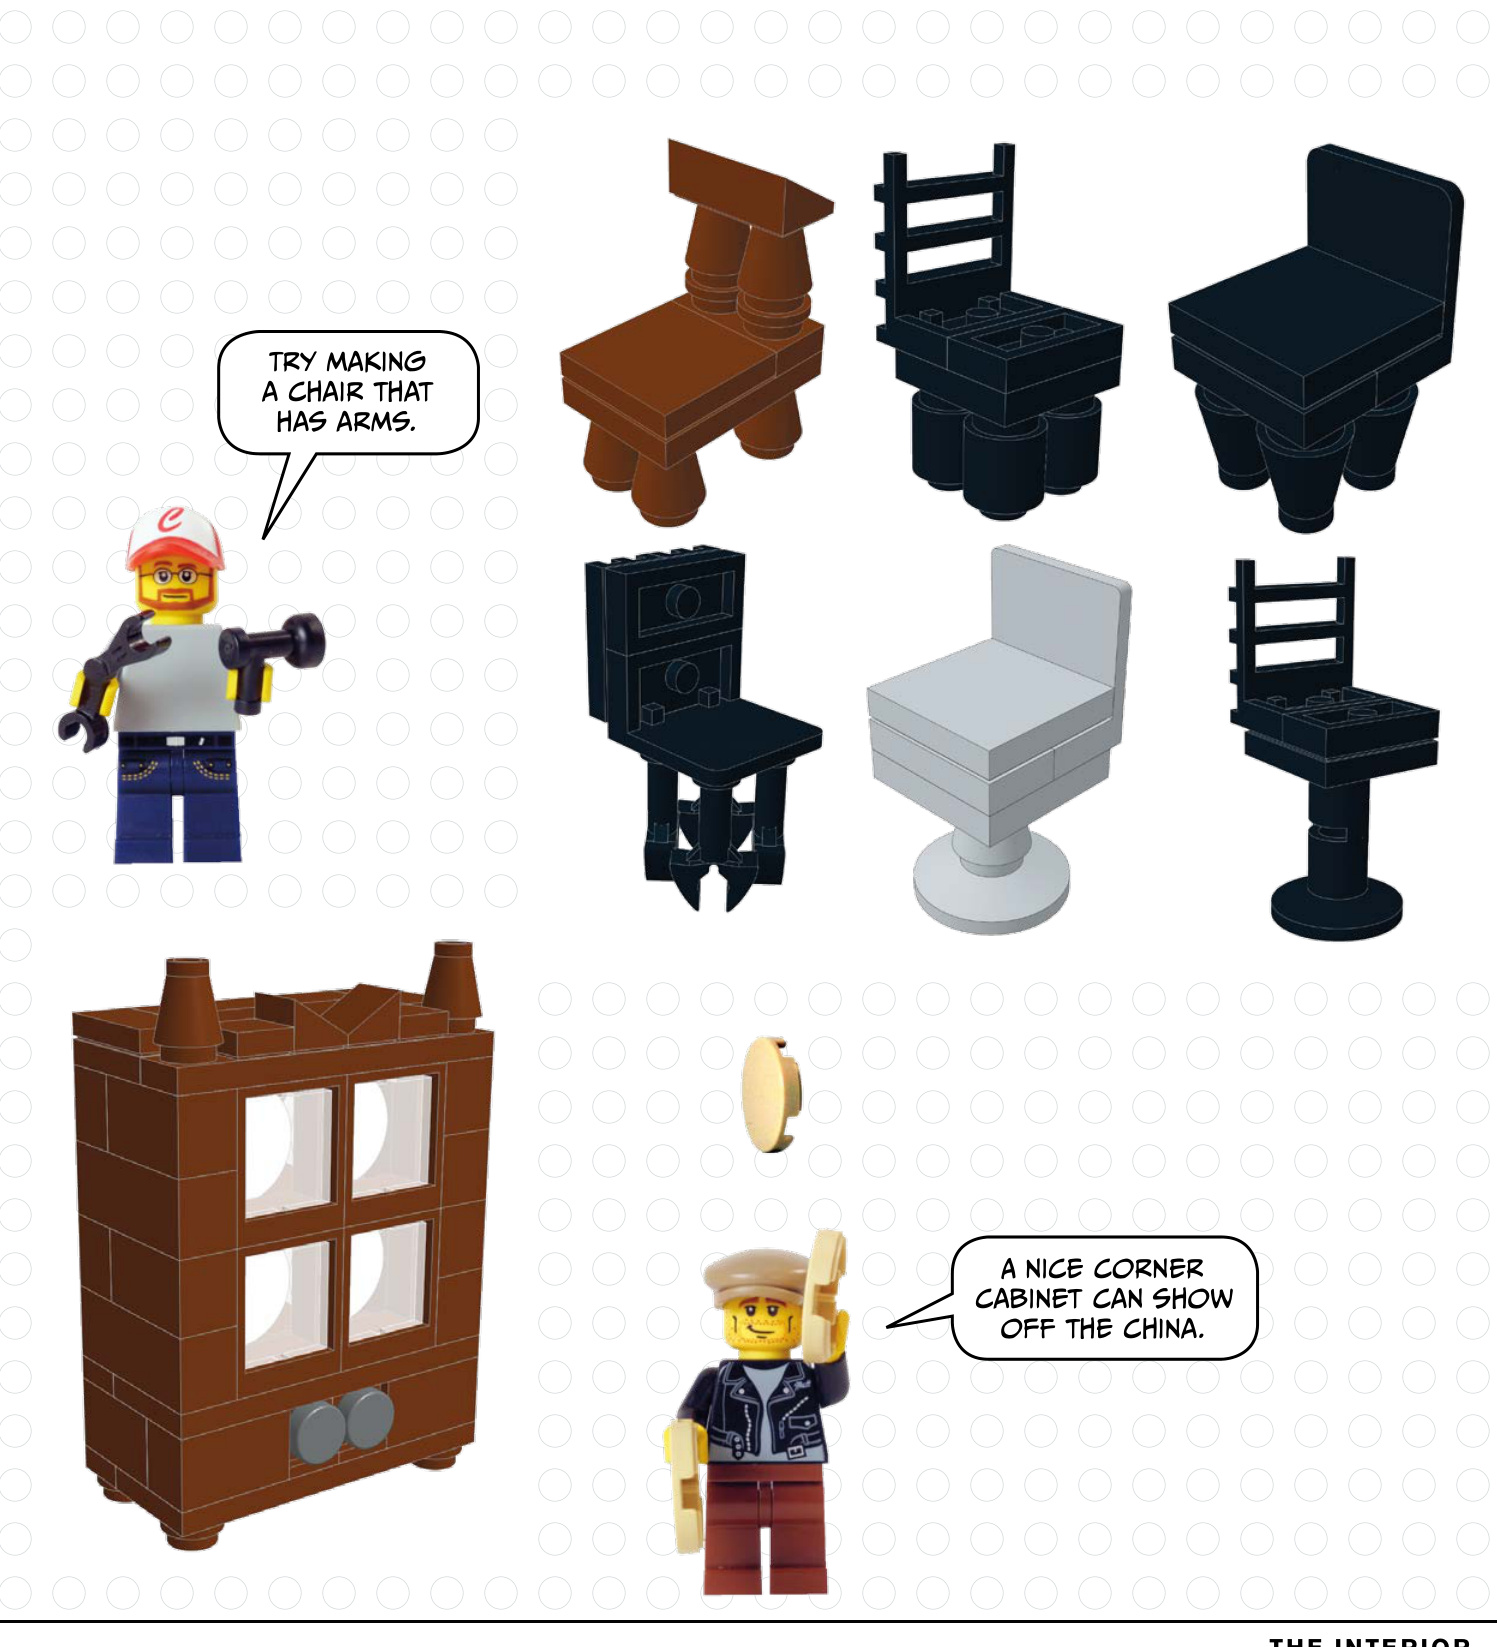
Seating
Using the same color for sofas and chairs creates the look of a matching set.
There are so many ways to make chairs that each house could have something unique.
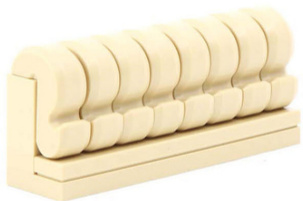
I would love to recline on that sofa.
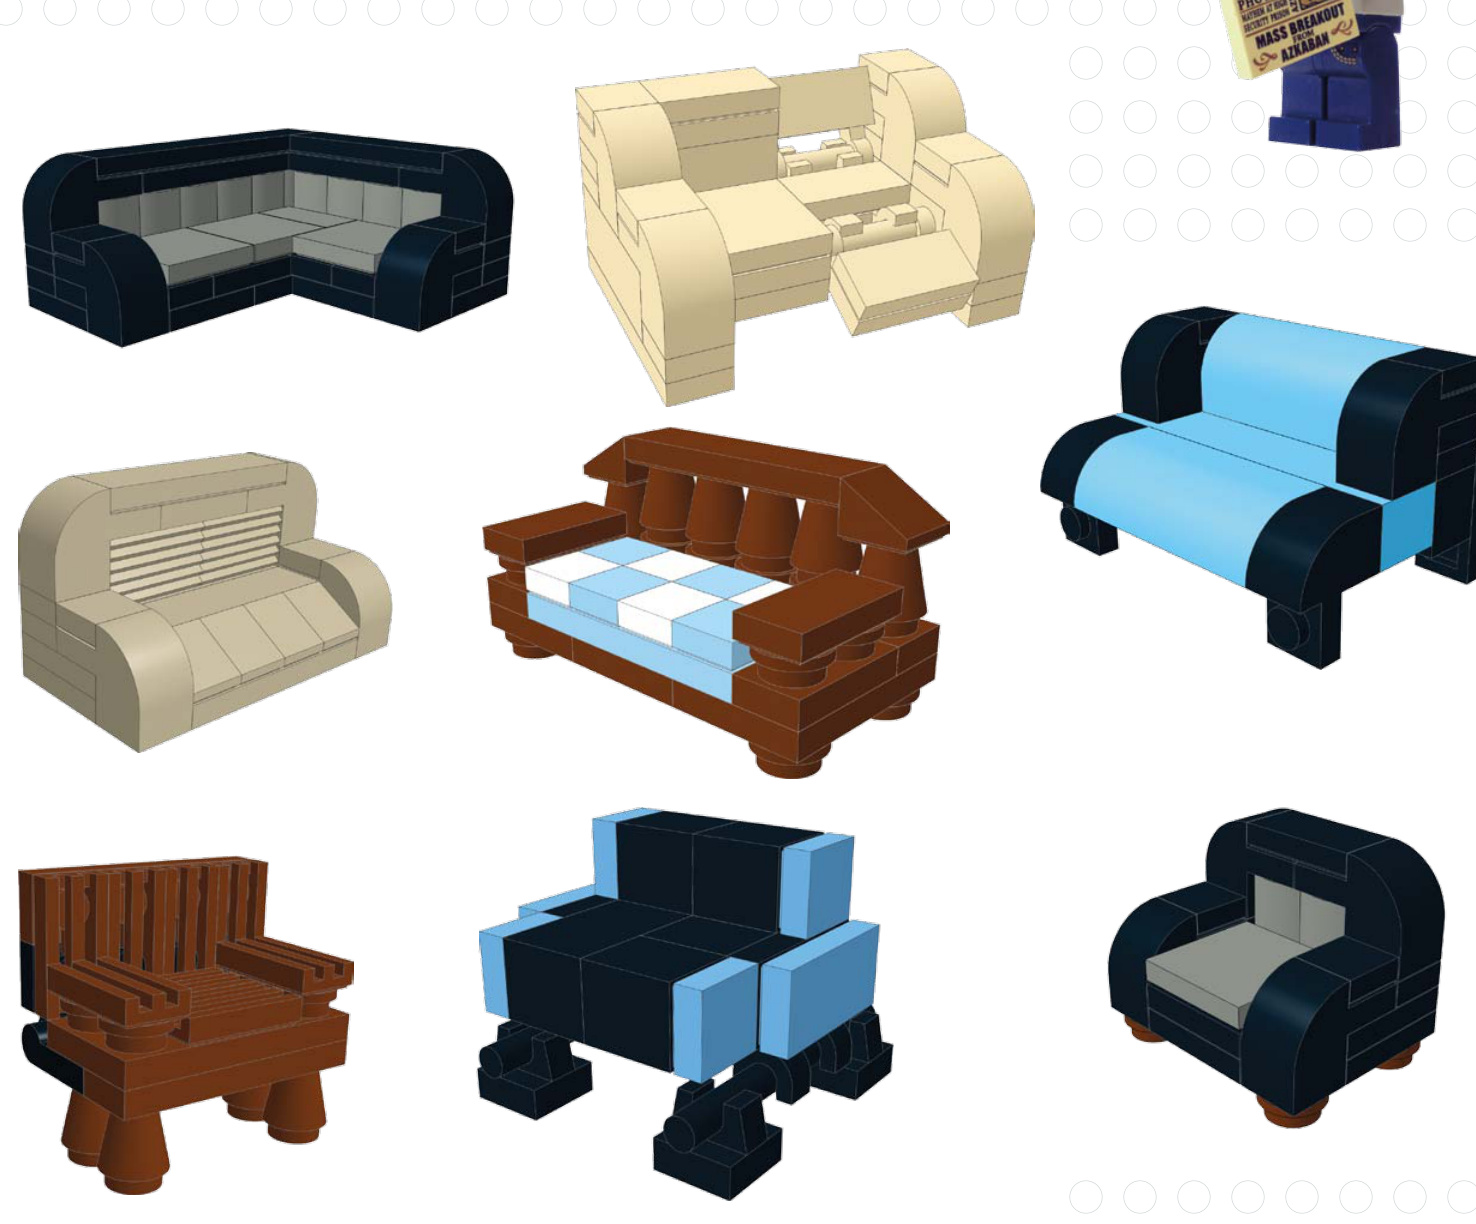
Recliner
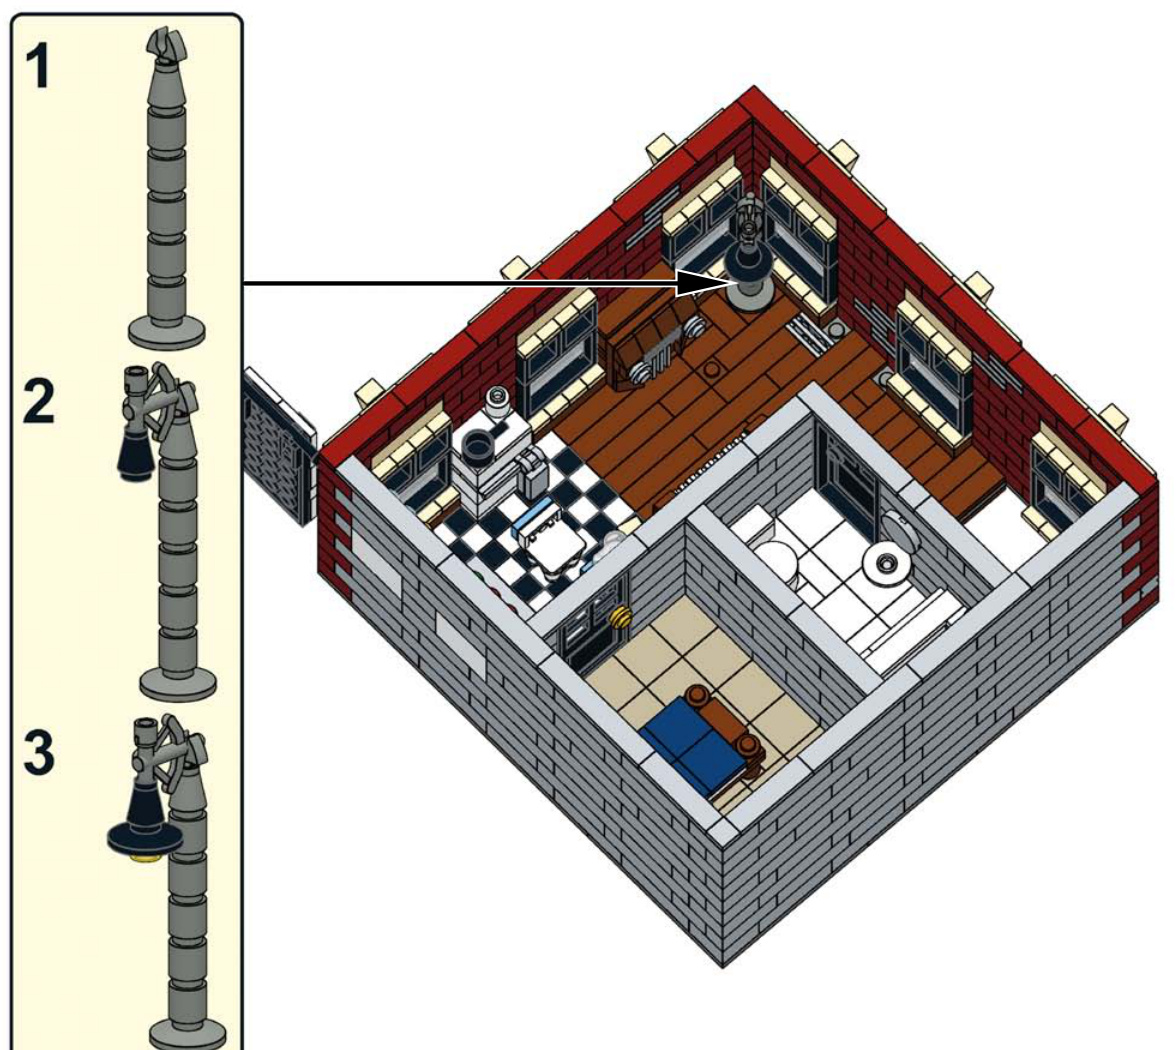
Light
There ar the livin and floo ceiling li
Plant
Including some plants inside the house can make your interiors more colorful.
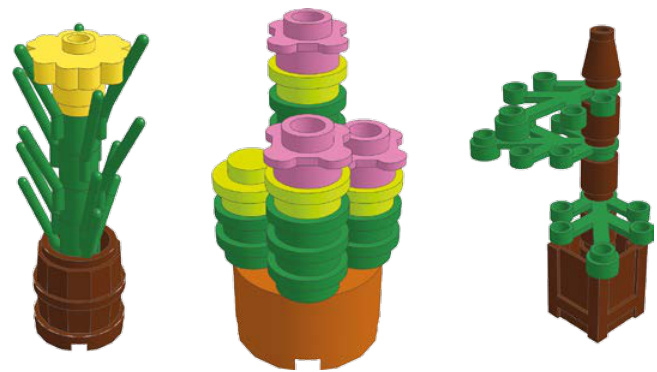
With so many
different plant
pieces and
flower colors,
the possibilities
are endless.
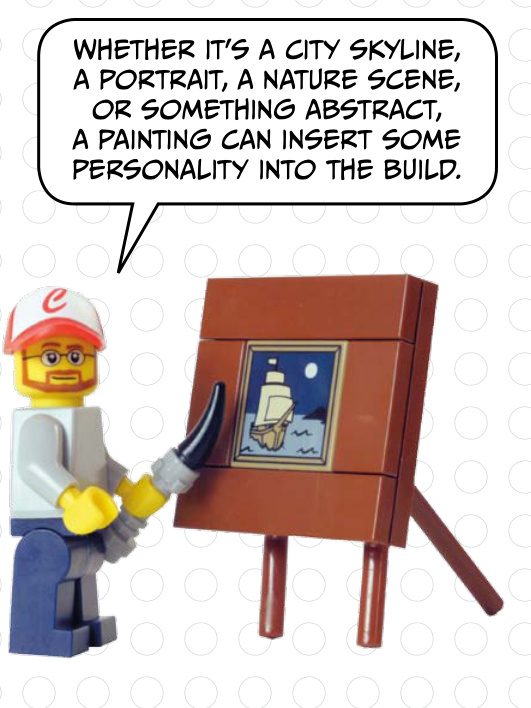
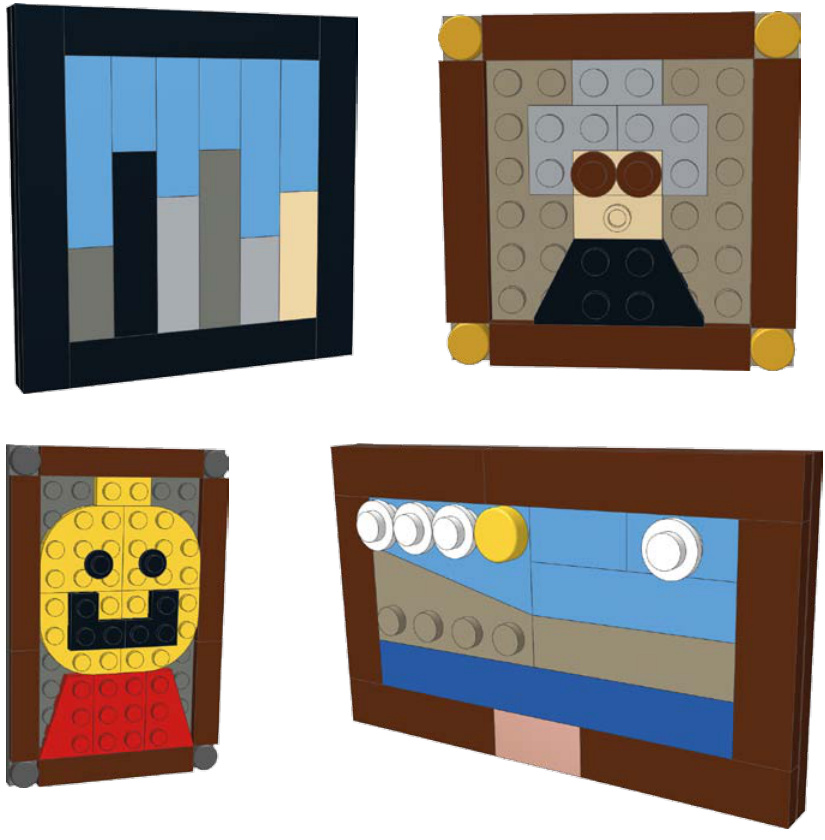
Art
Artwork can really help bring some life into your room.
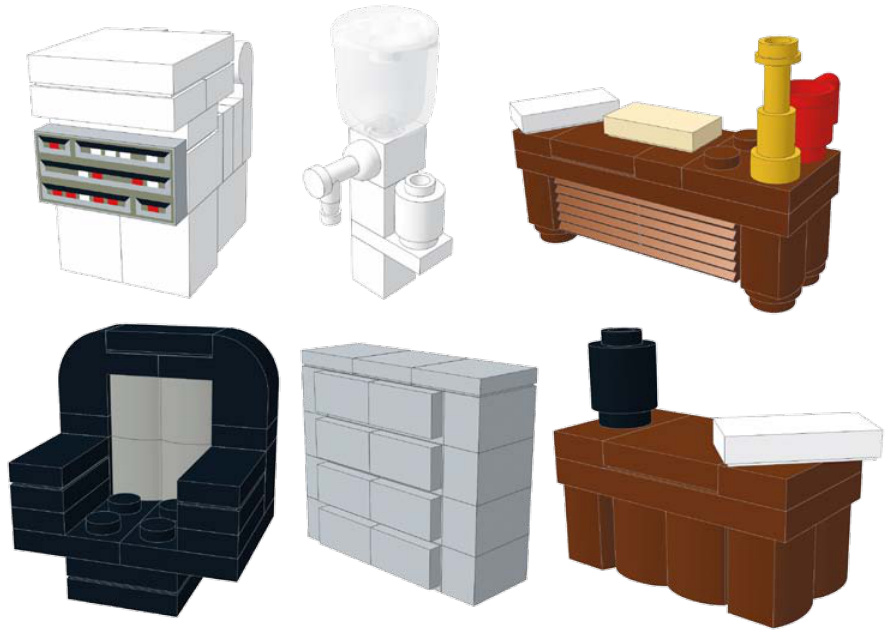
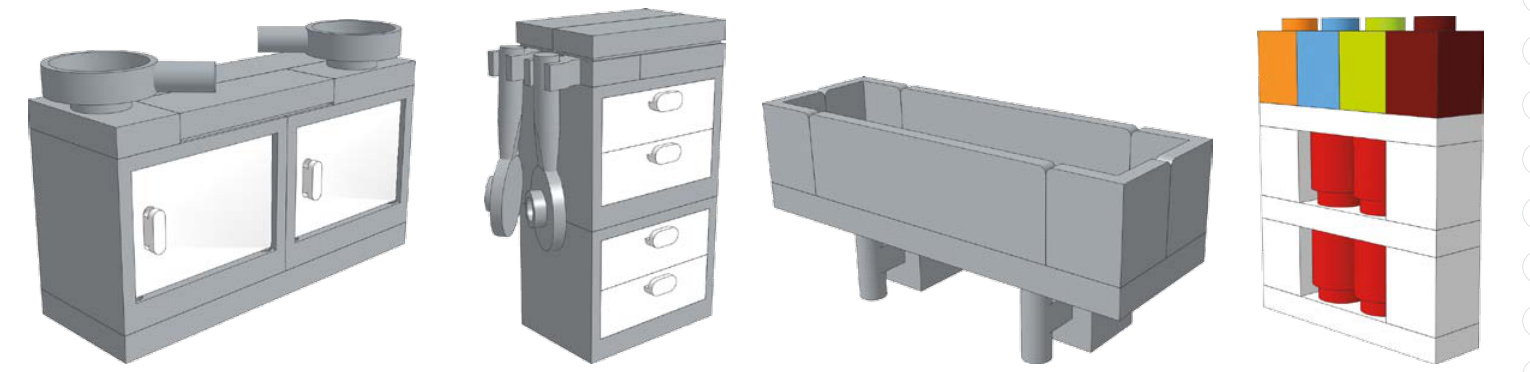
Kitchen
Let’s step into the kitchen and
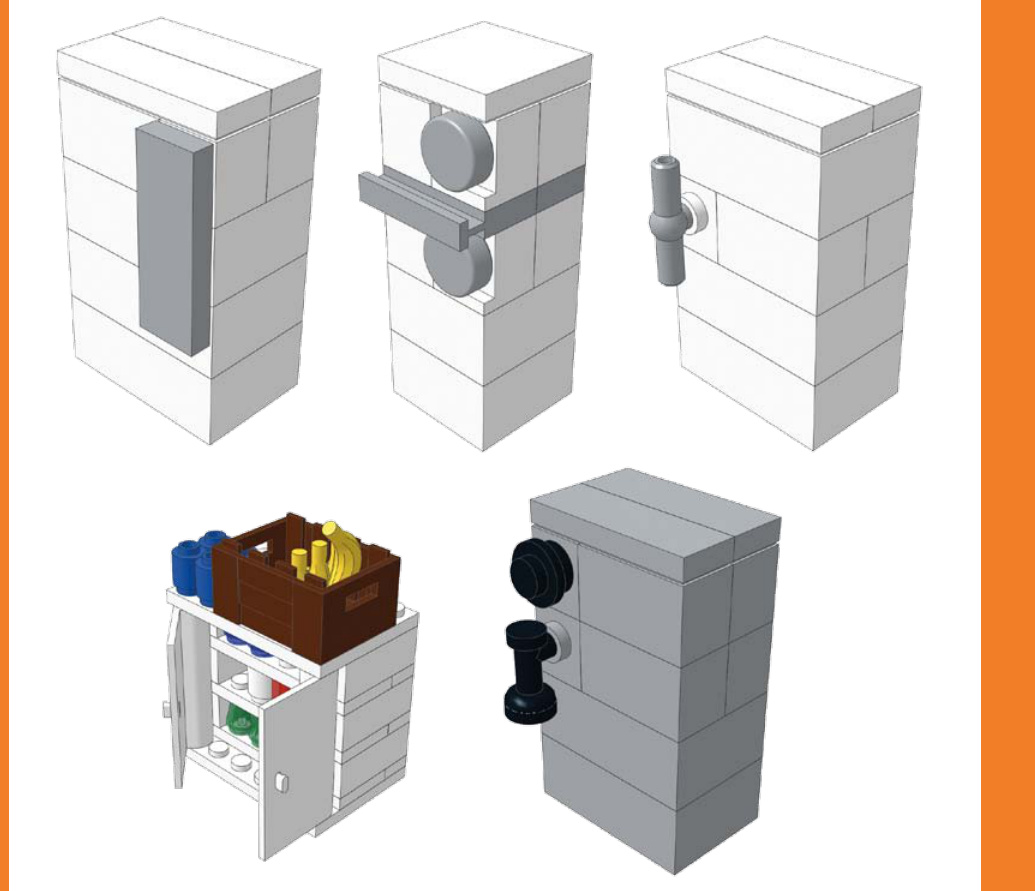
Appliances
These ovens vary only slightly in style, but you can customize the stove by making one of the burners red-hot or putting a pan on top.
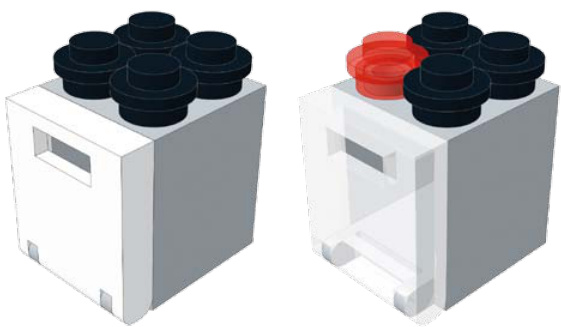
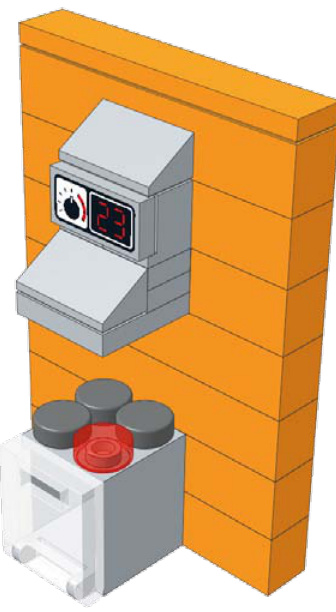
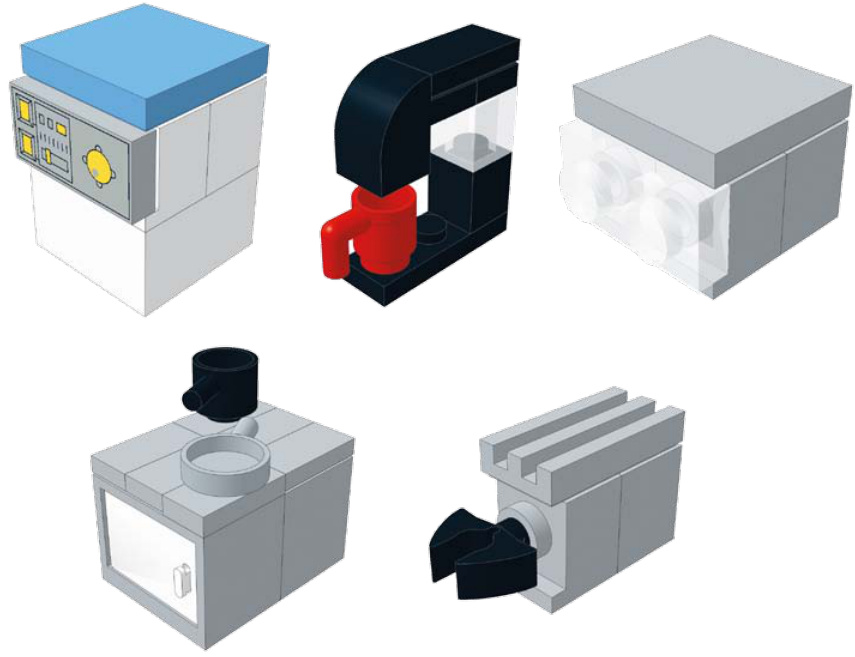
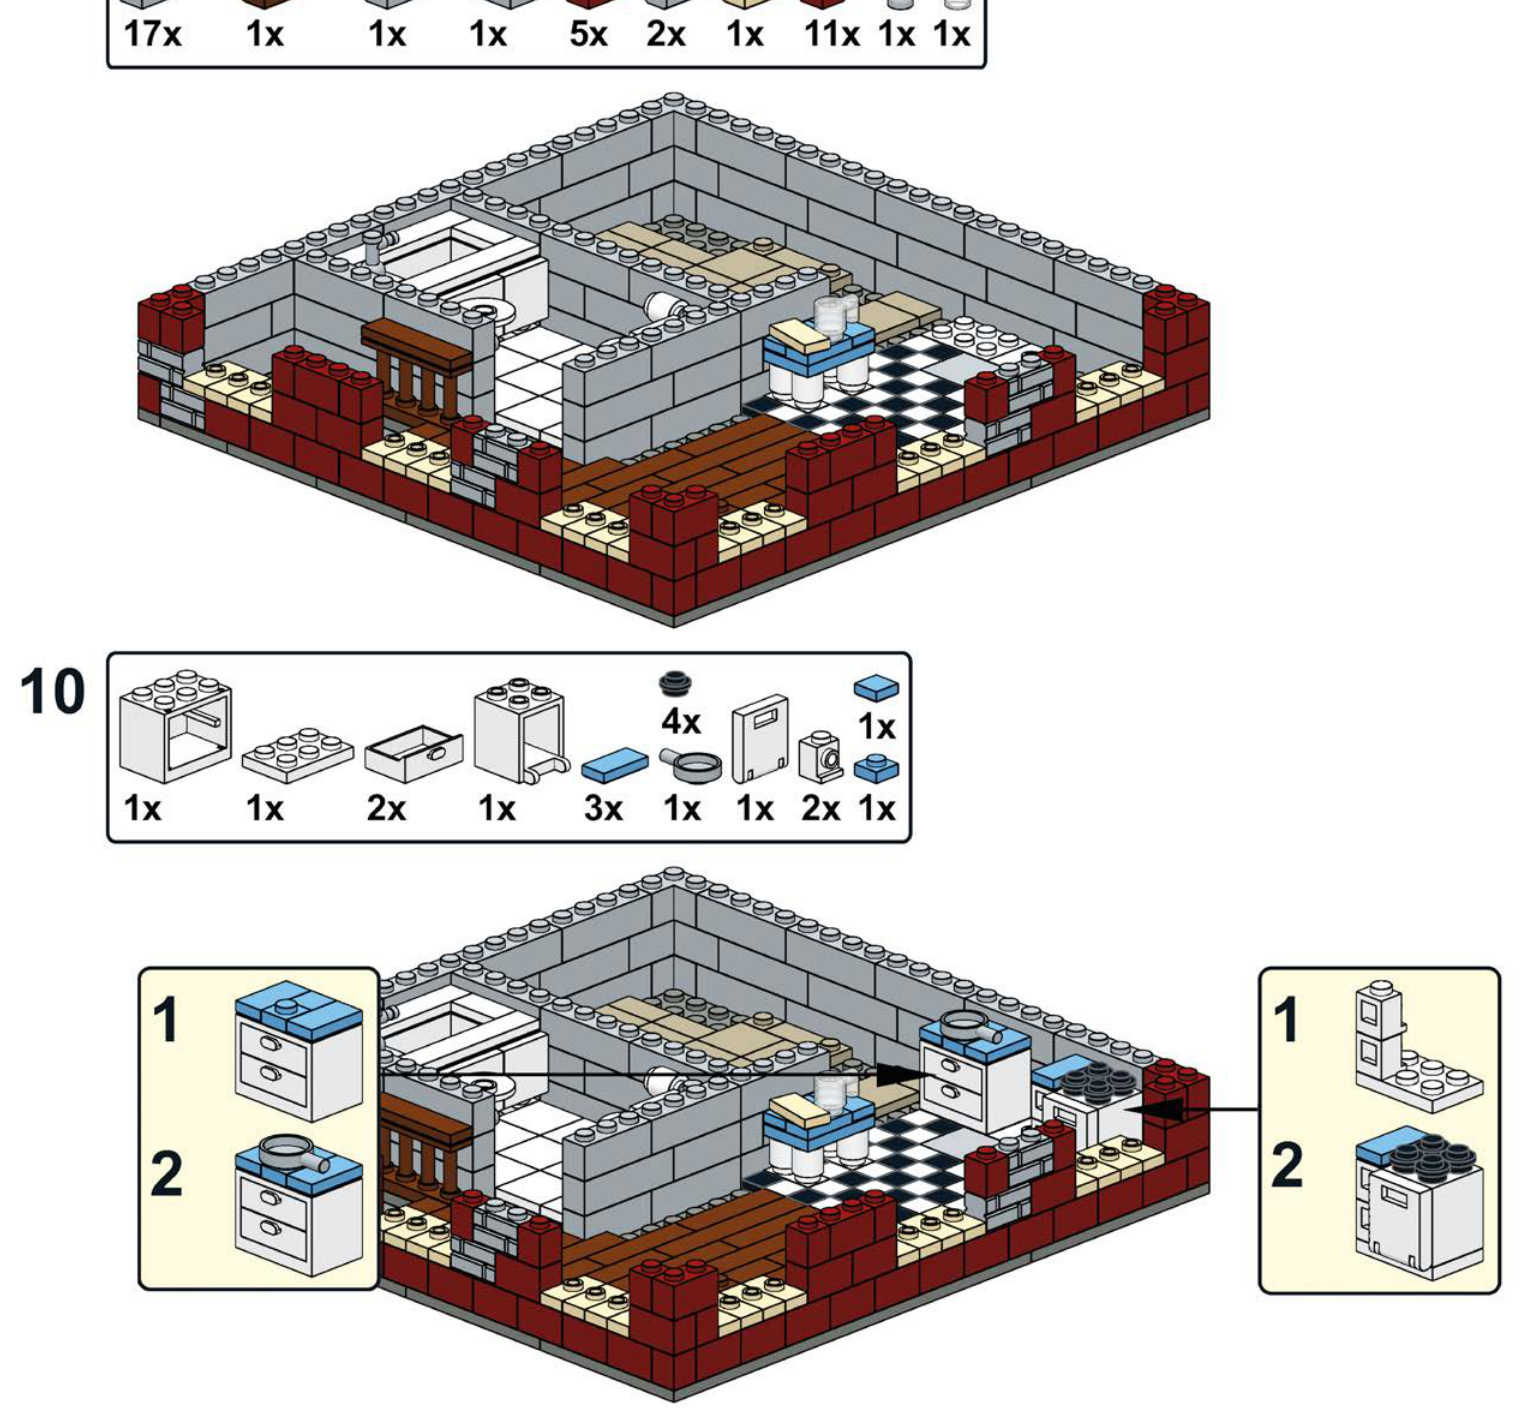
Try creating some items similar to these for your kitchen. A dishwasher, coffeemaker, microwave, island, and toaster are just some of the items that make up the overall look of the kitchen.

Cabinets
Cabinets
Cabinets can conserve spa directly on it.
coordinate ors of the binets, and ertops.
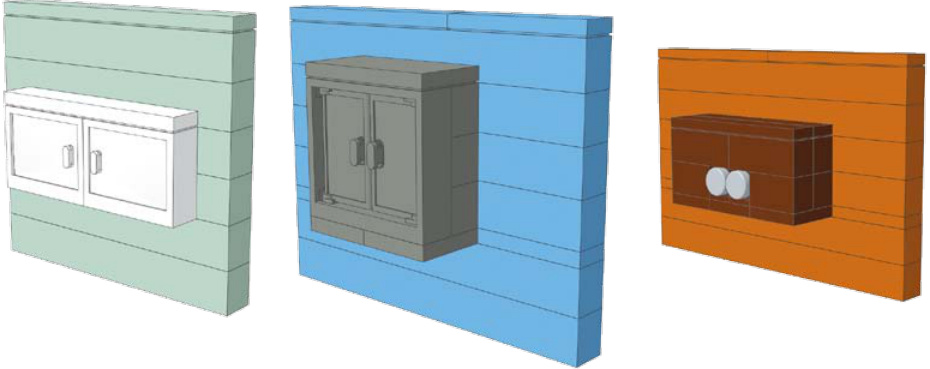
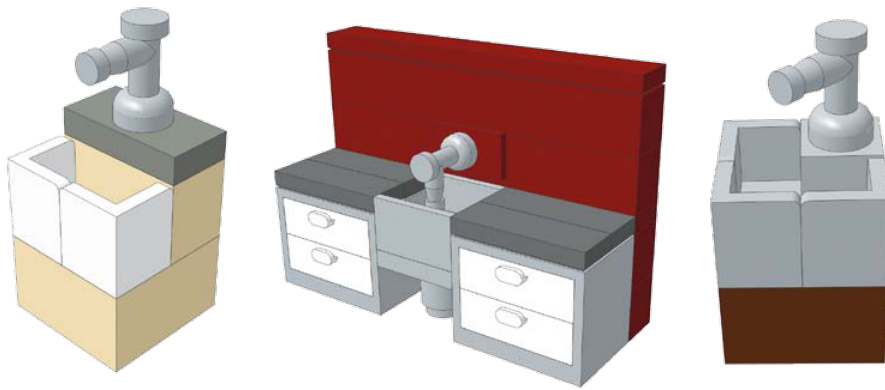
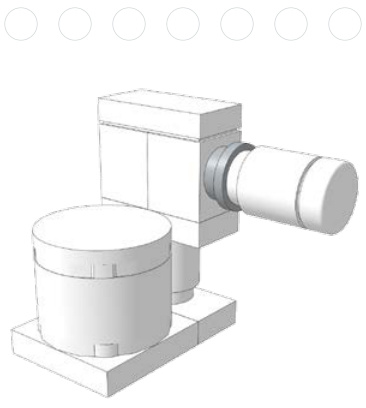
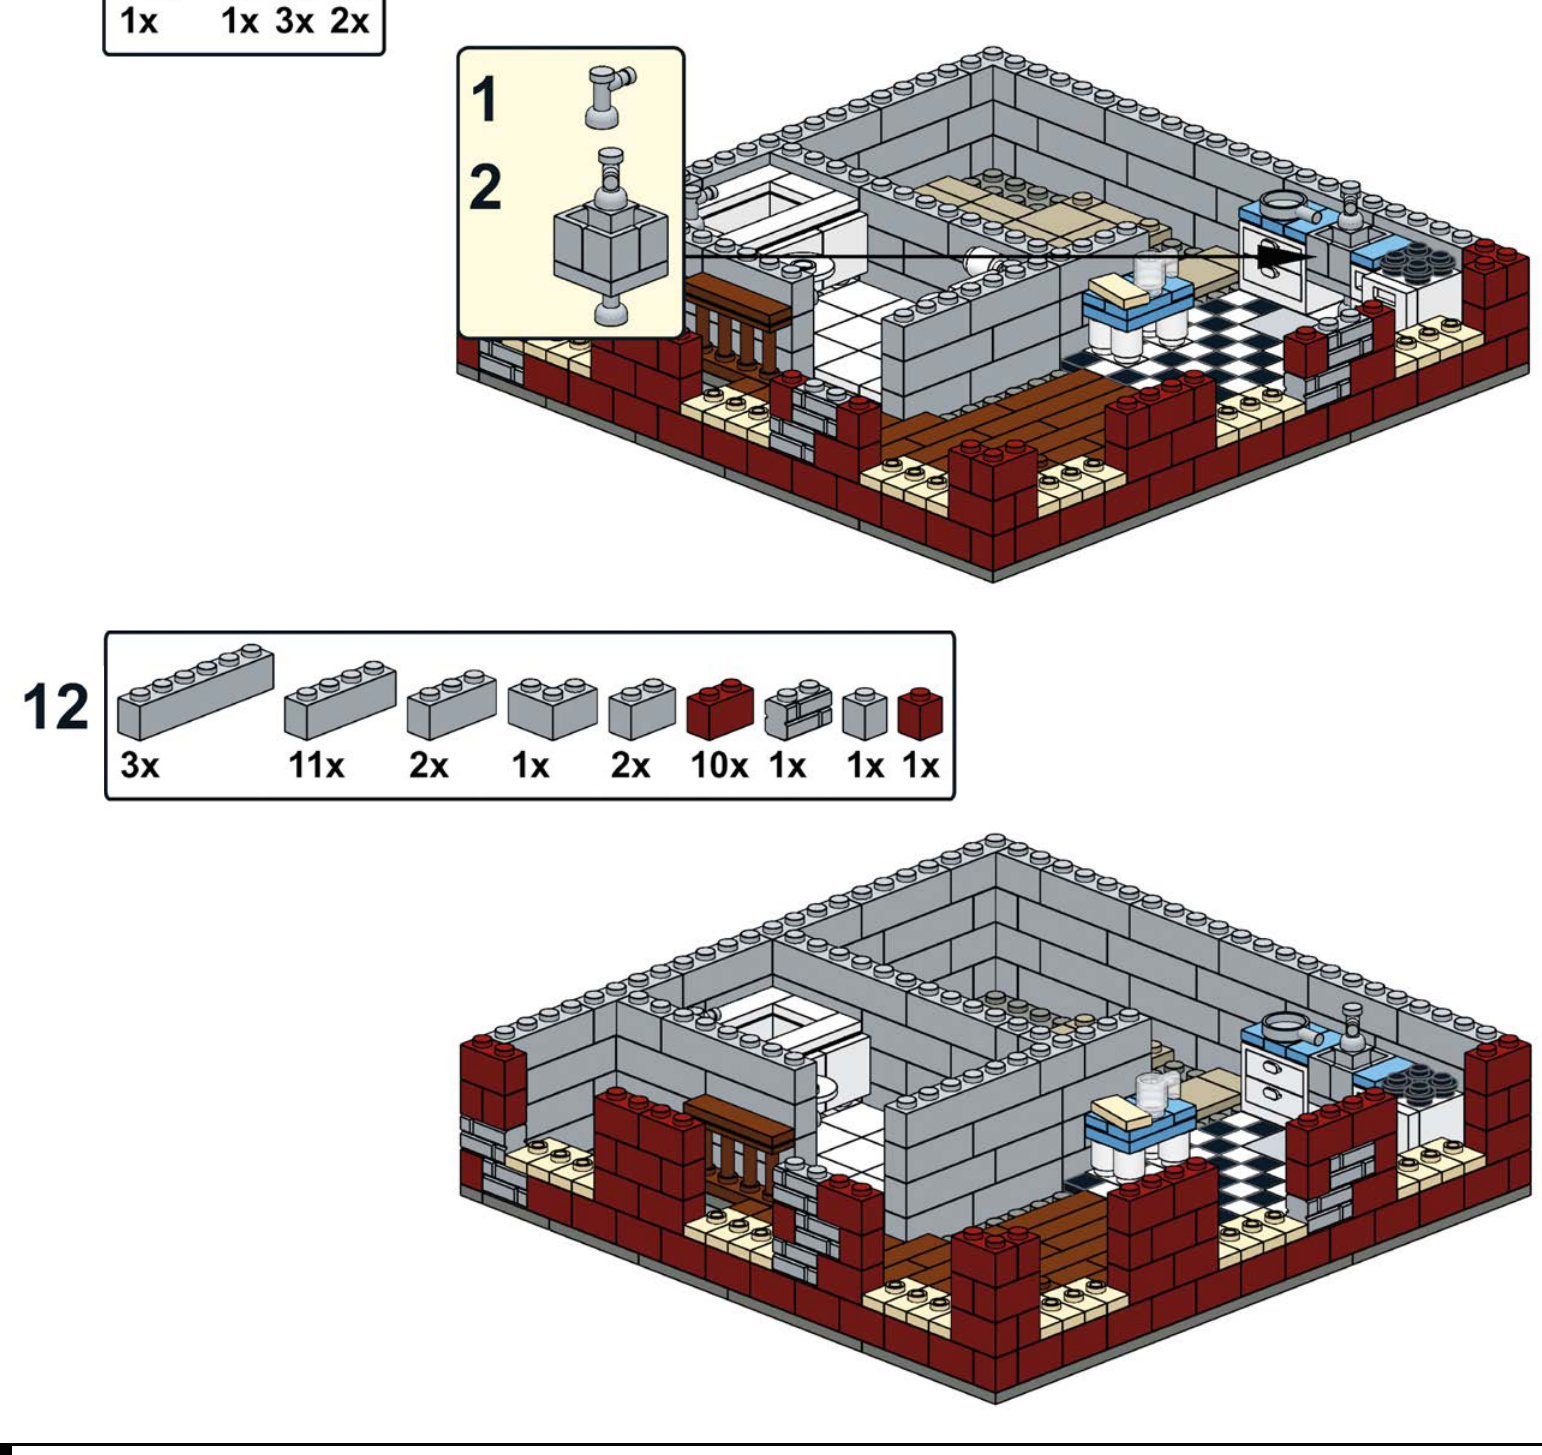
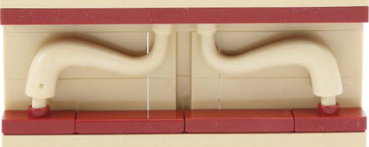
Sinks
Sinks come in different colors, sometimes to match the appliances.
Exposing the plumbing
underneath could
provide the look
of a utility sink.
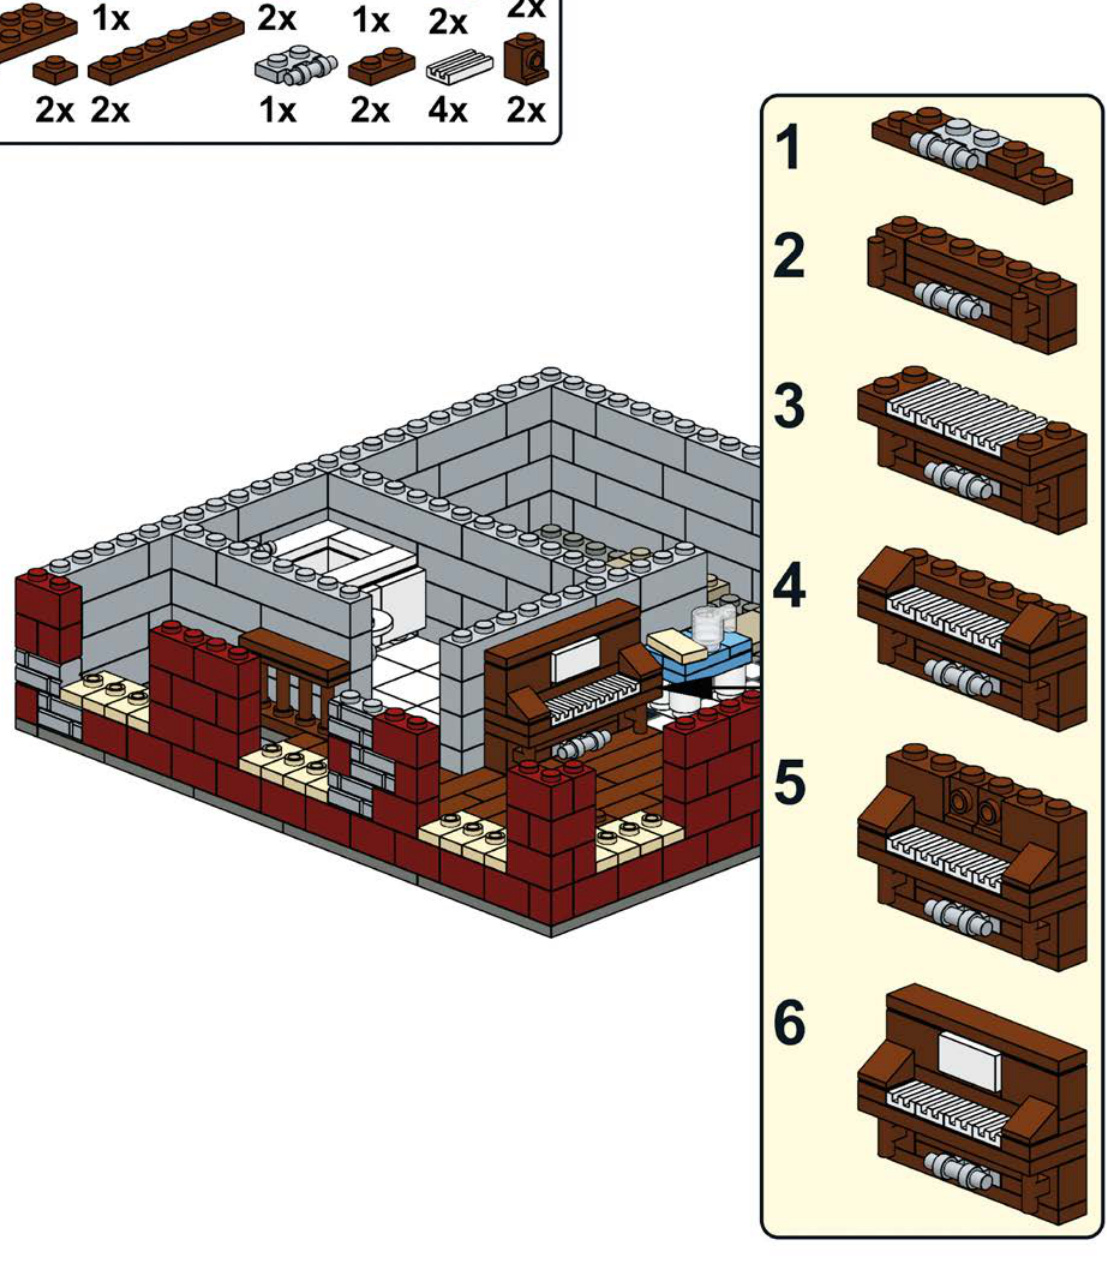
Dining Ro
Let’s take a quick look in the dining roo to see some fancier tables and chairs.
Try making a matching table an chairs or maybe some barstools for counter.


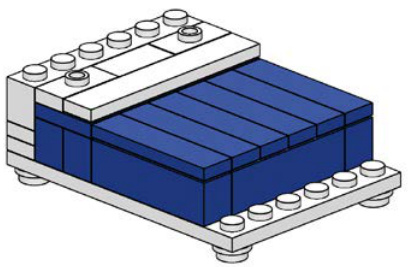
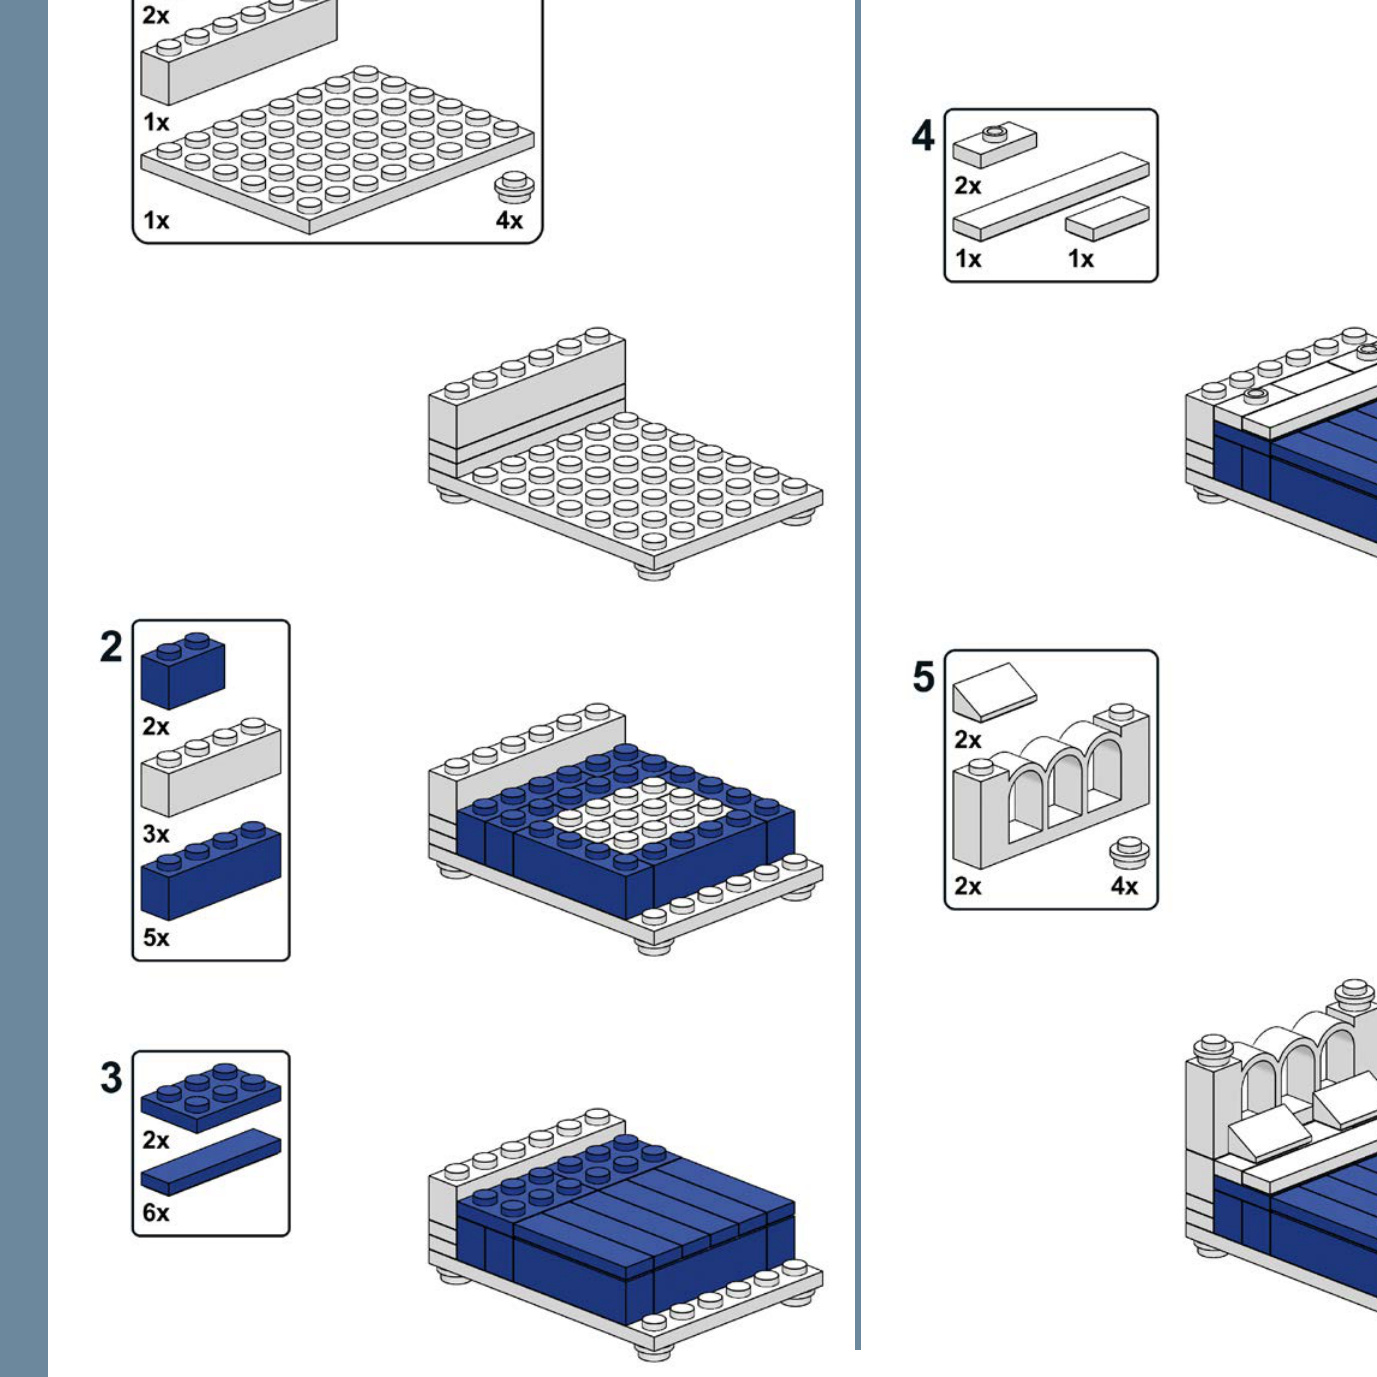
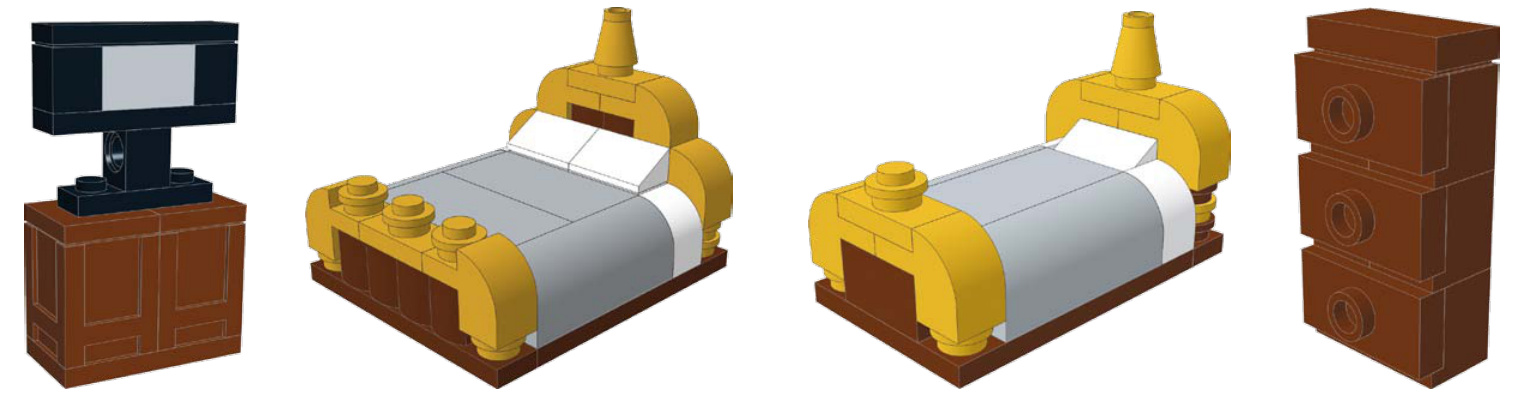
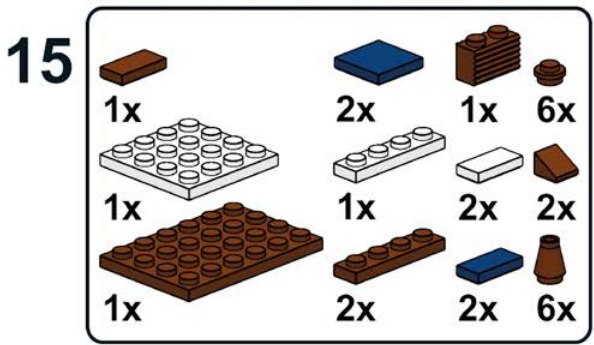
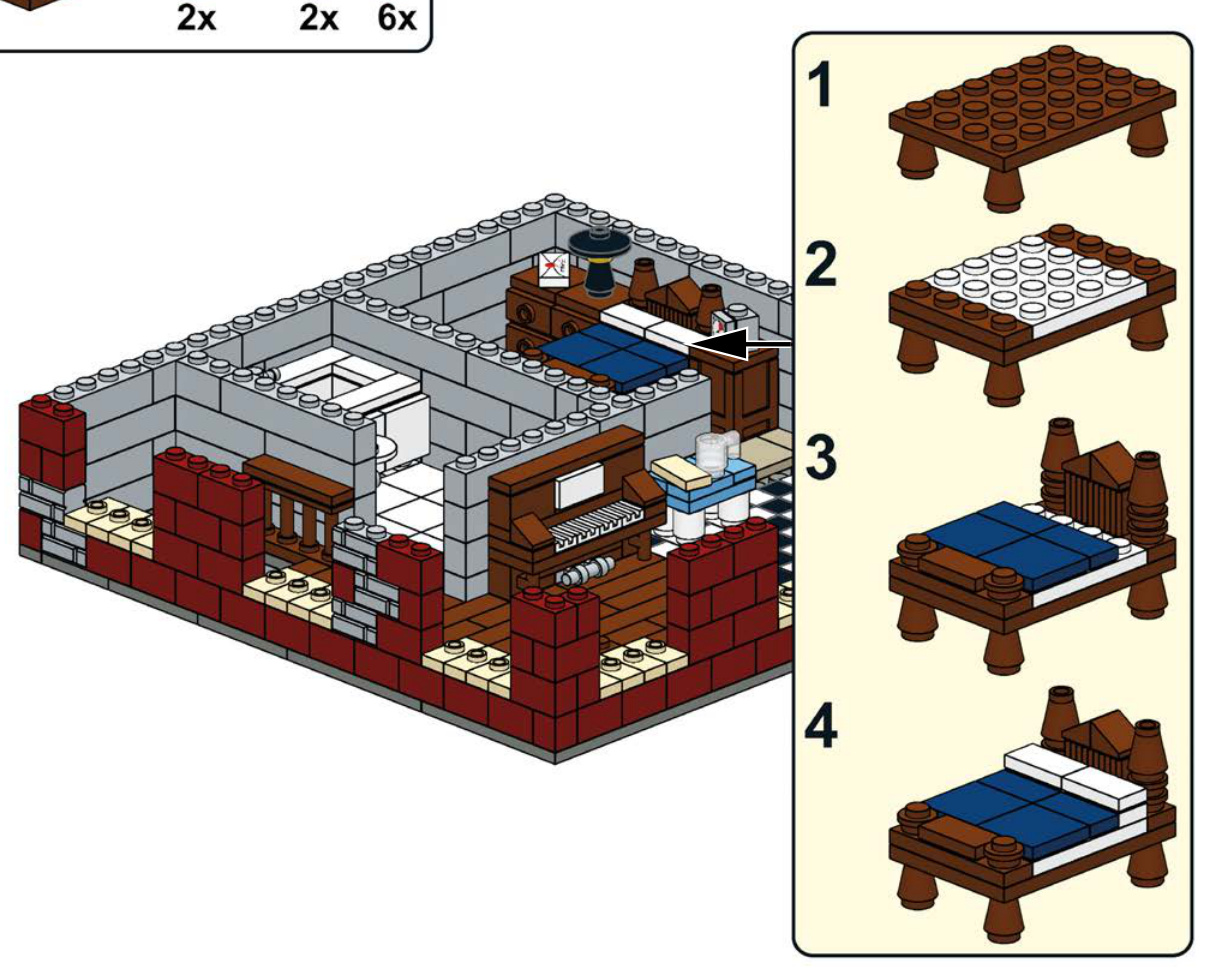
ng the bed t page with olor sheets t to use.
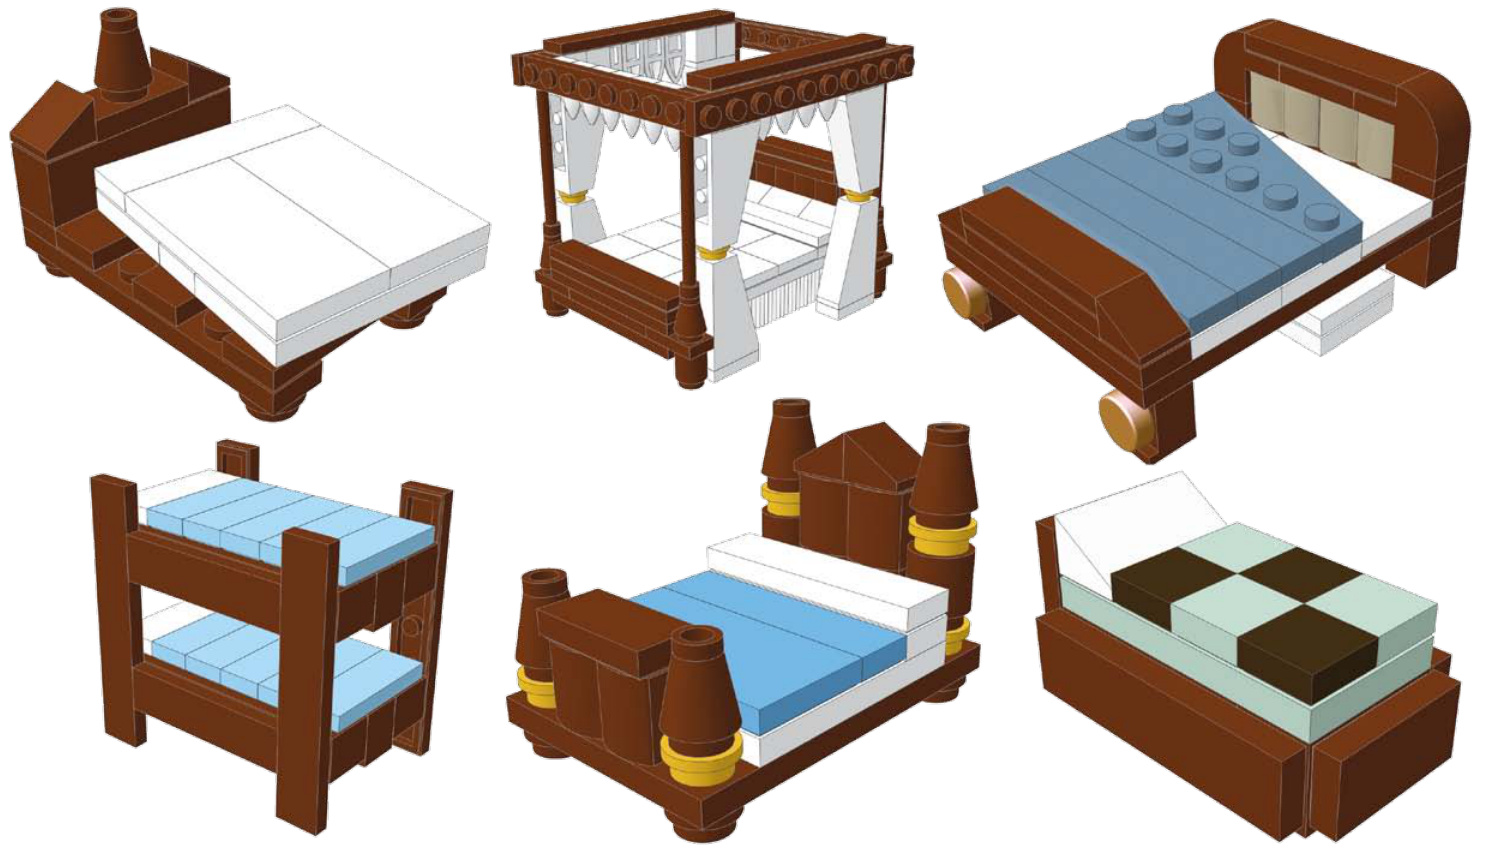

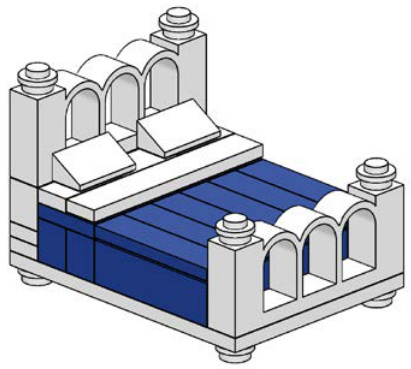
King Bed
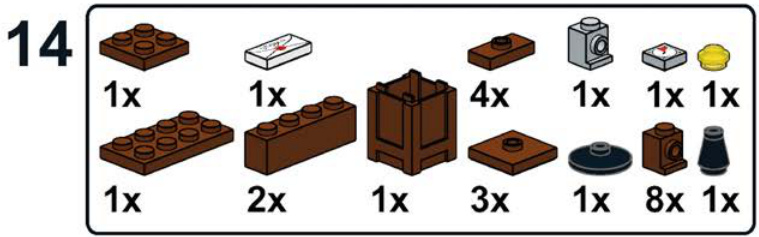
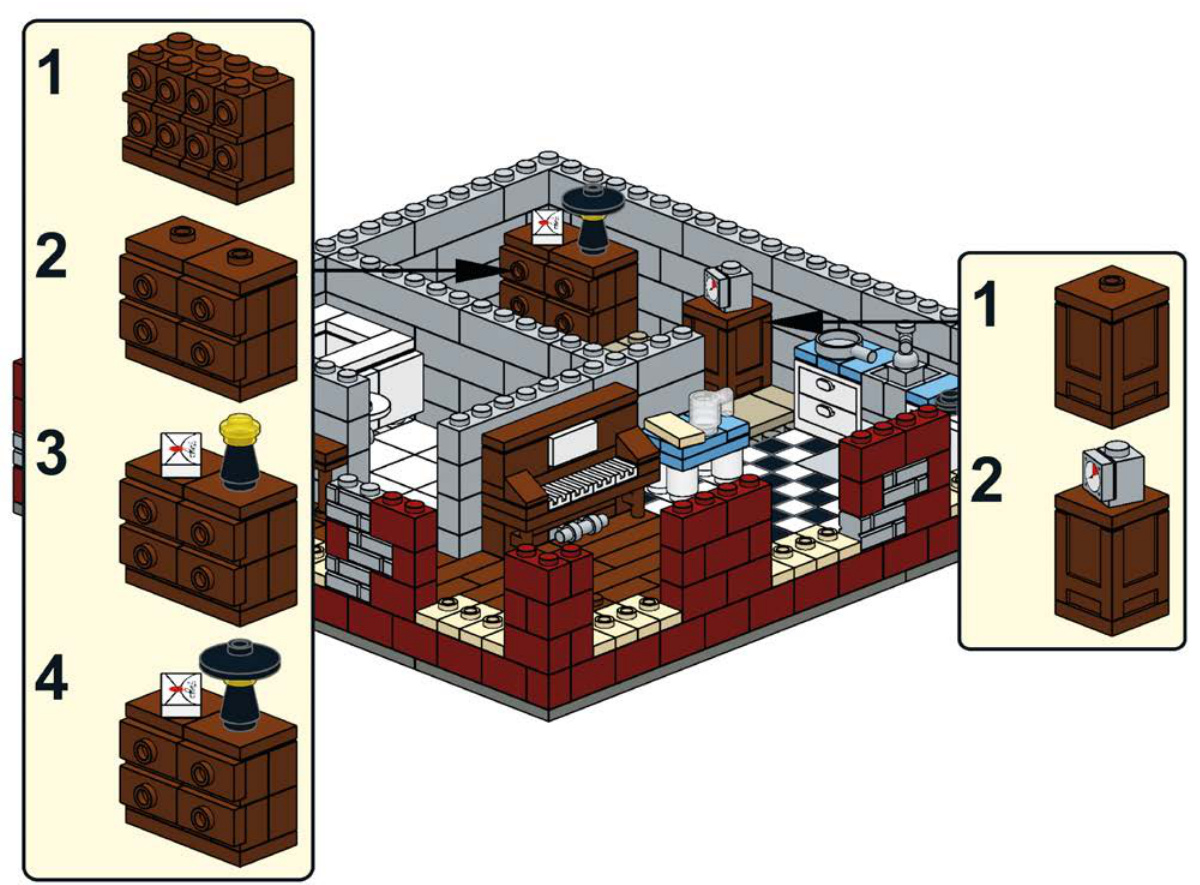
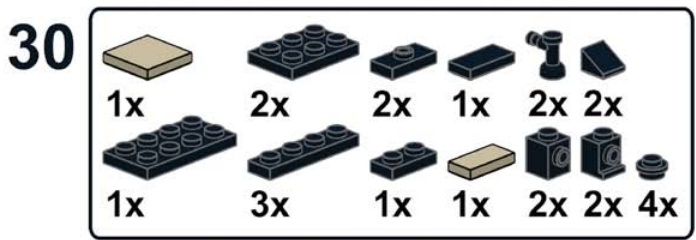
Dressers and Nightstands
Let’s look at a few examples of dressers and nightstands. Nightstands are like bookends for the bed. To add detail, place objects on them such as alarm clocks, lamps, or books.

Kids’ Rooms
A child’s bedroom typically looks really different from an adult’s bedroom and should have furniture and knickknacks to reflect that.
A race car bed, toys, and bright colors can help show that it is a child’s bedroom right away.
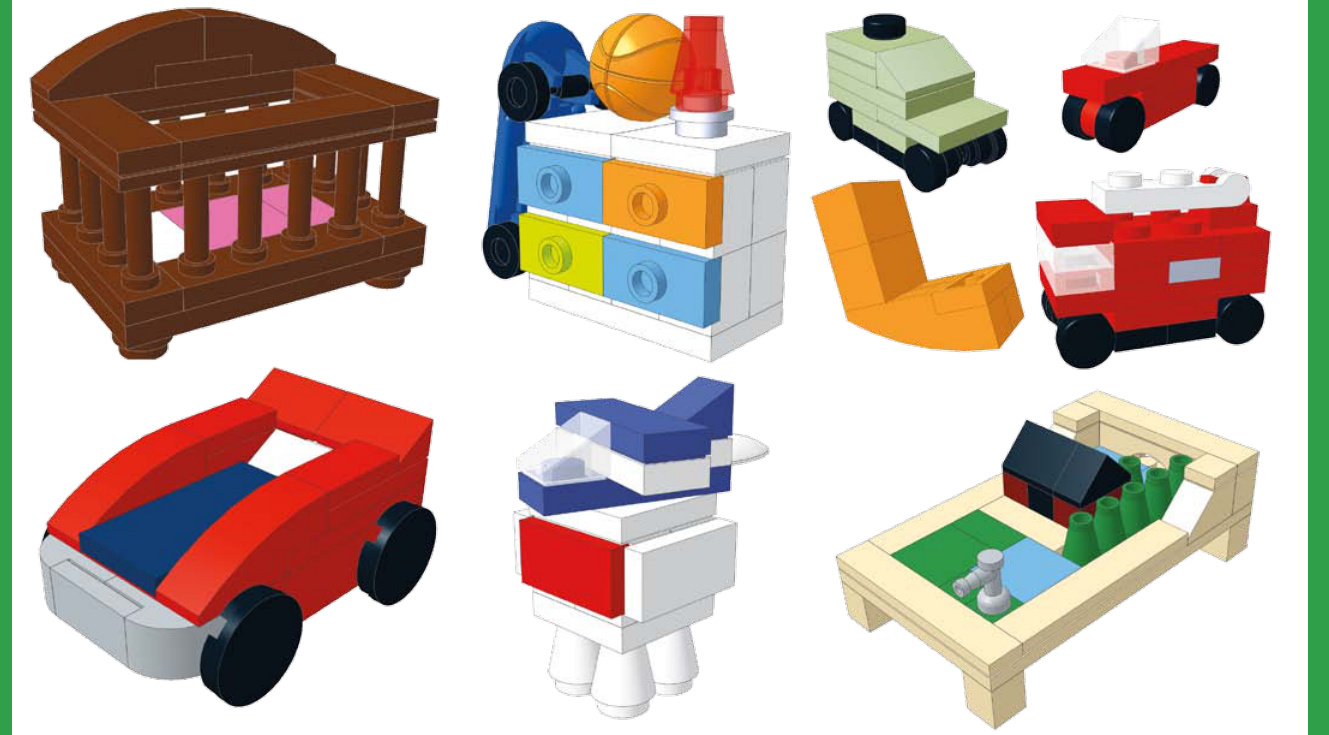
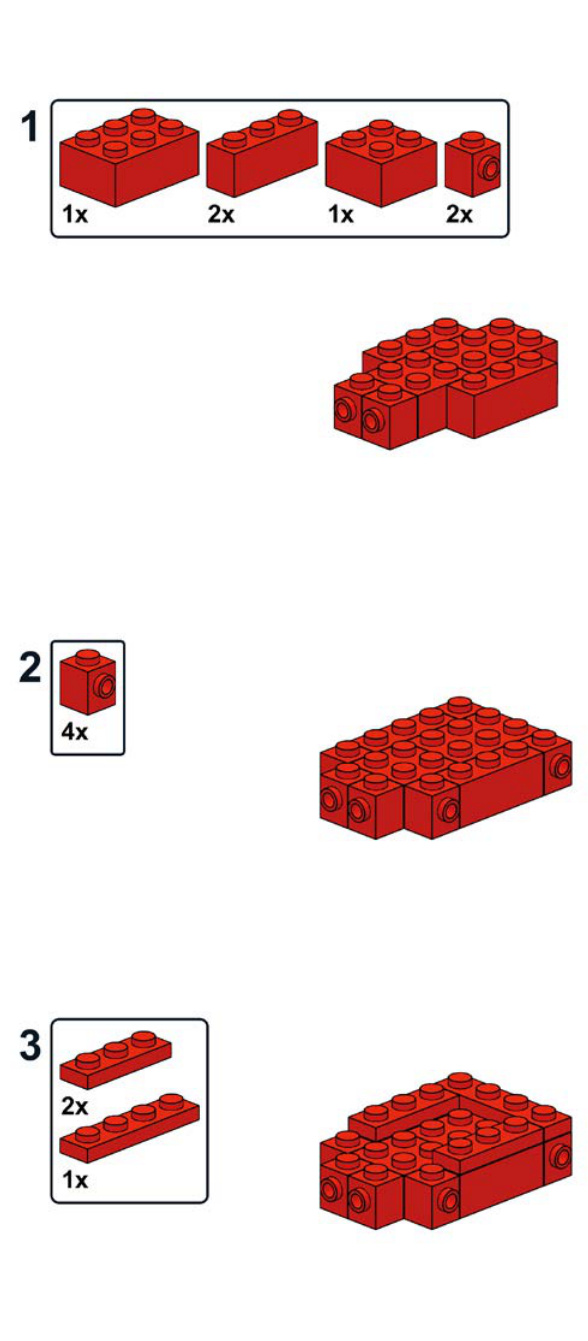
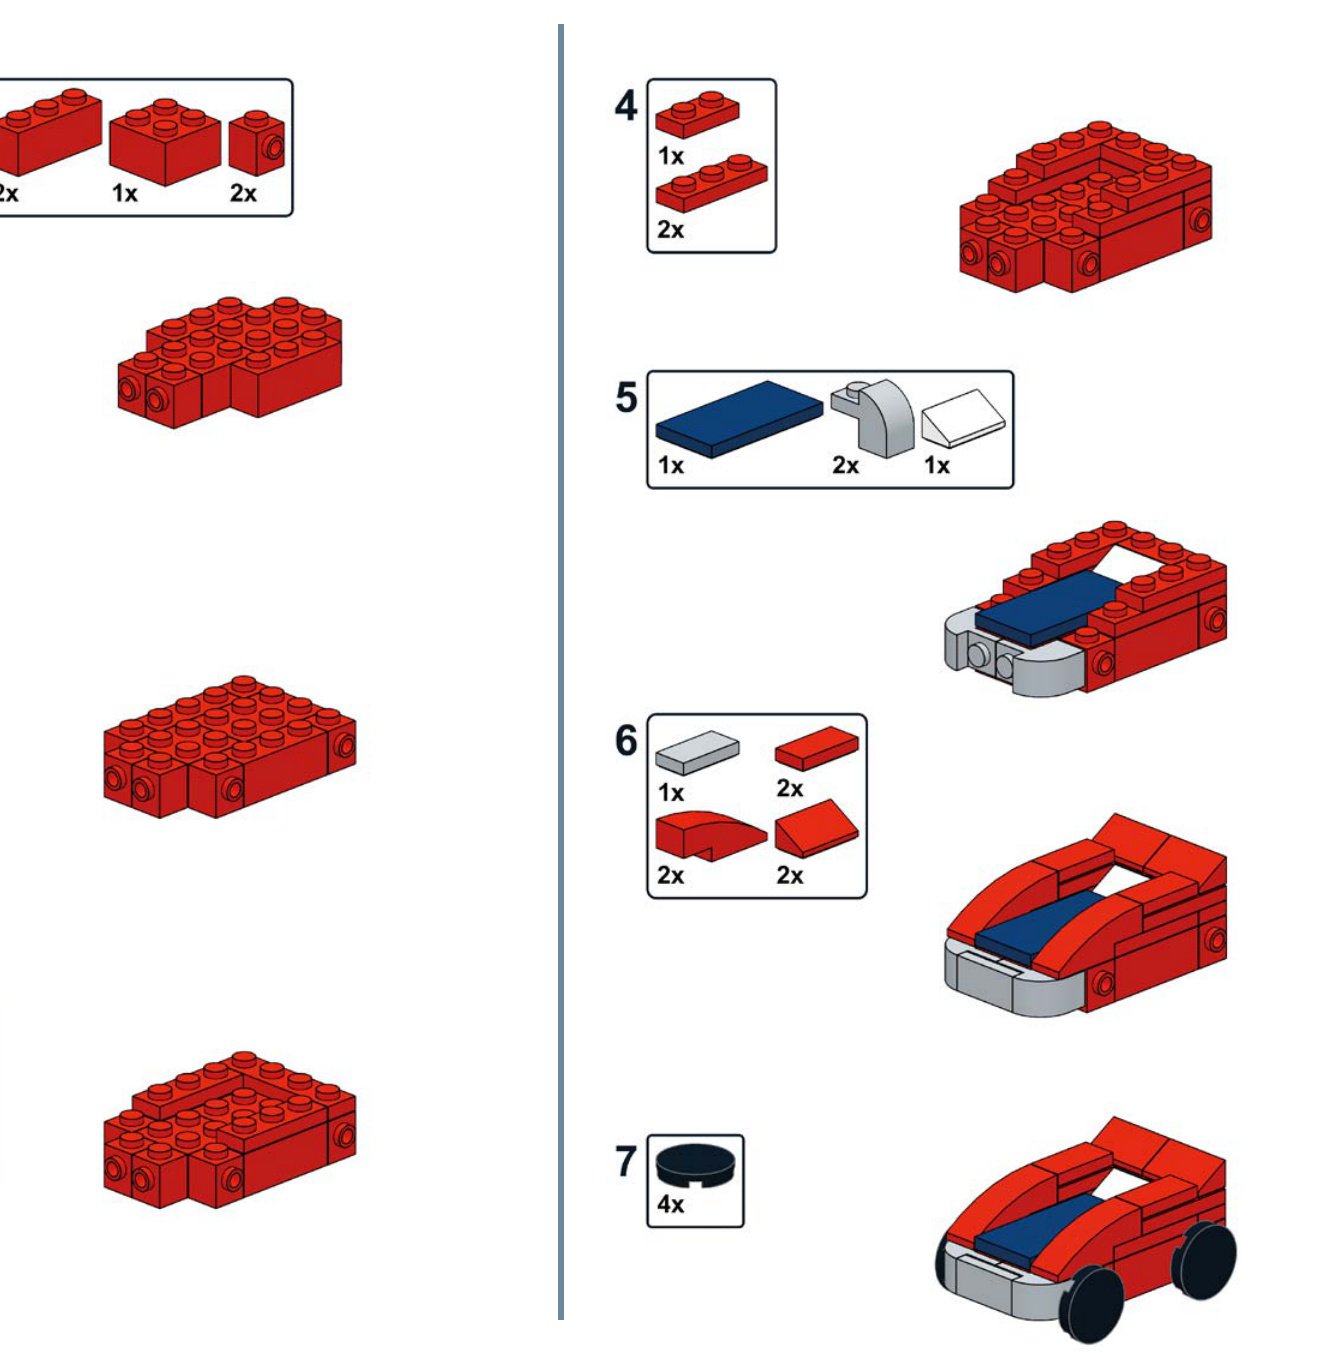
Kid’s Race Car Bed
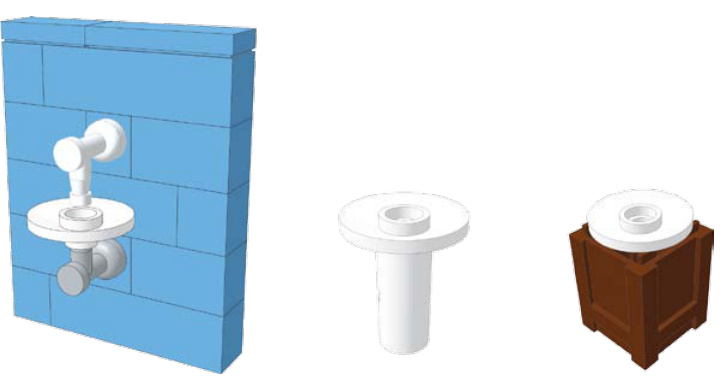
These sinks all use the same bowl but differ underneath. A simple sink with exposed
plumbing, a sink with an attached
cabinet, and a pedestal sink all provide unique looks.
Rounding out the bathroom is the toilet.

Bathtub

These stand-alone tubs are great for larger bathrooms.
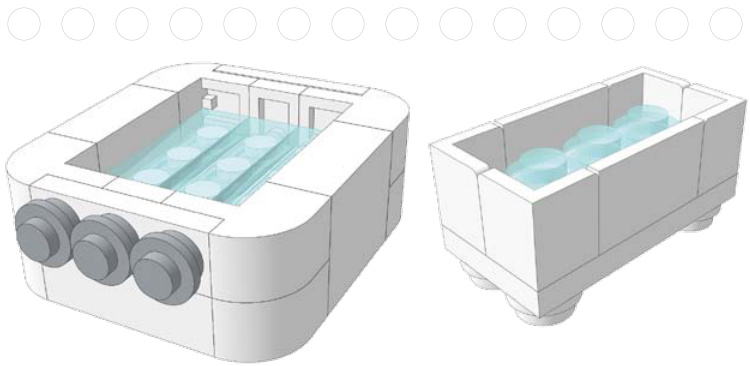
You can choose between this tub with a shower or a stall shower depending on the size of the bathroom.
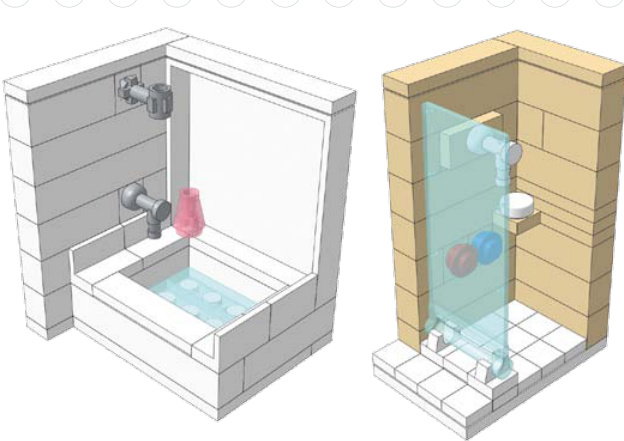
You could put your minifig’s upper half in the tub to make it look like he is submerged in water.
Commercial Buildings
Homes are certainly not the only style of modular building. Here are some examples of furniture from different commercial buildings.
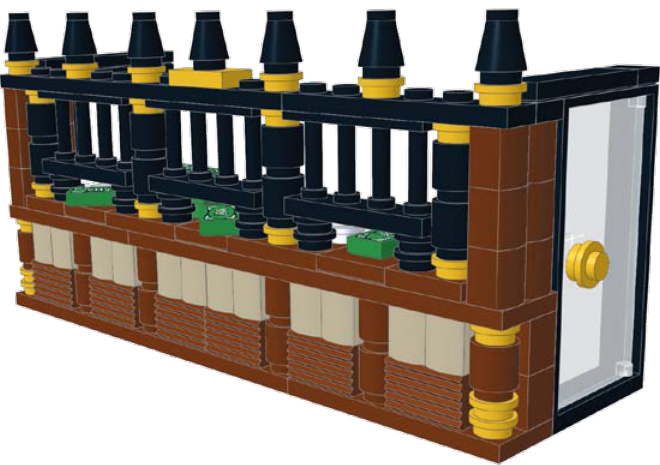
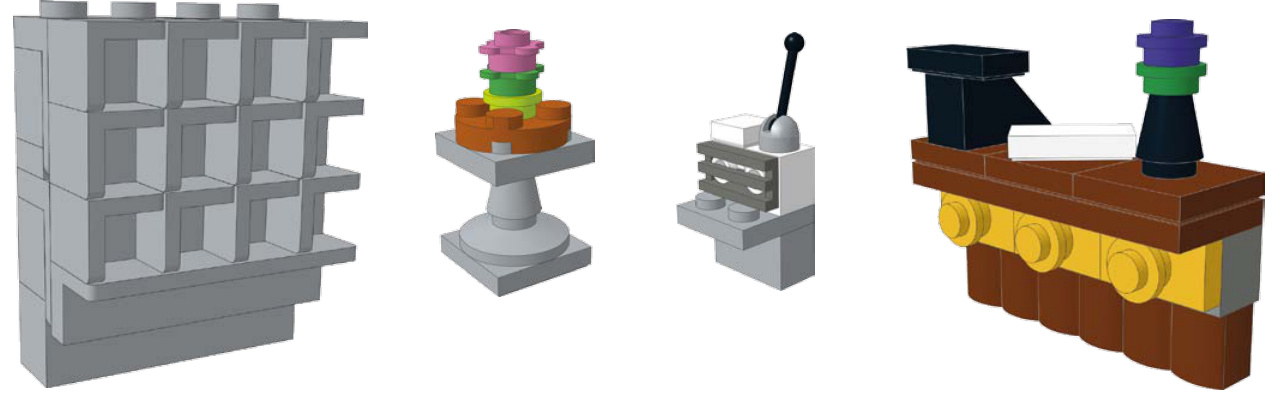
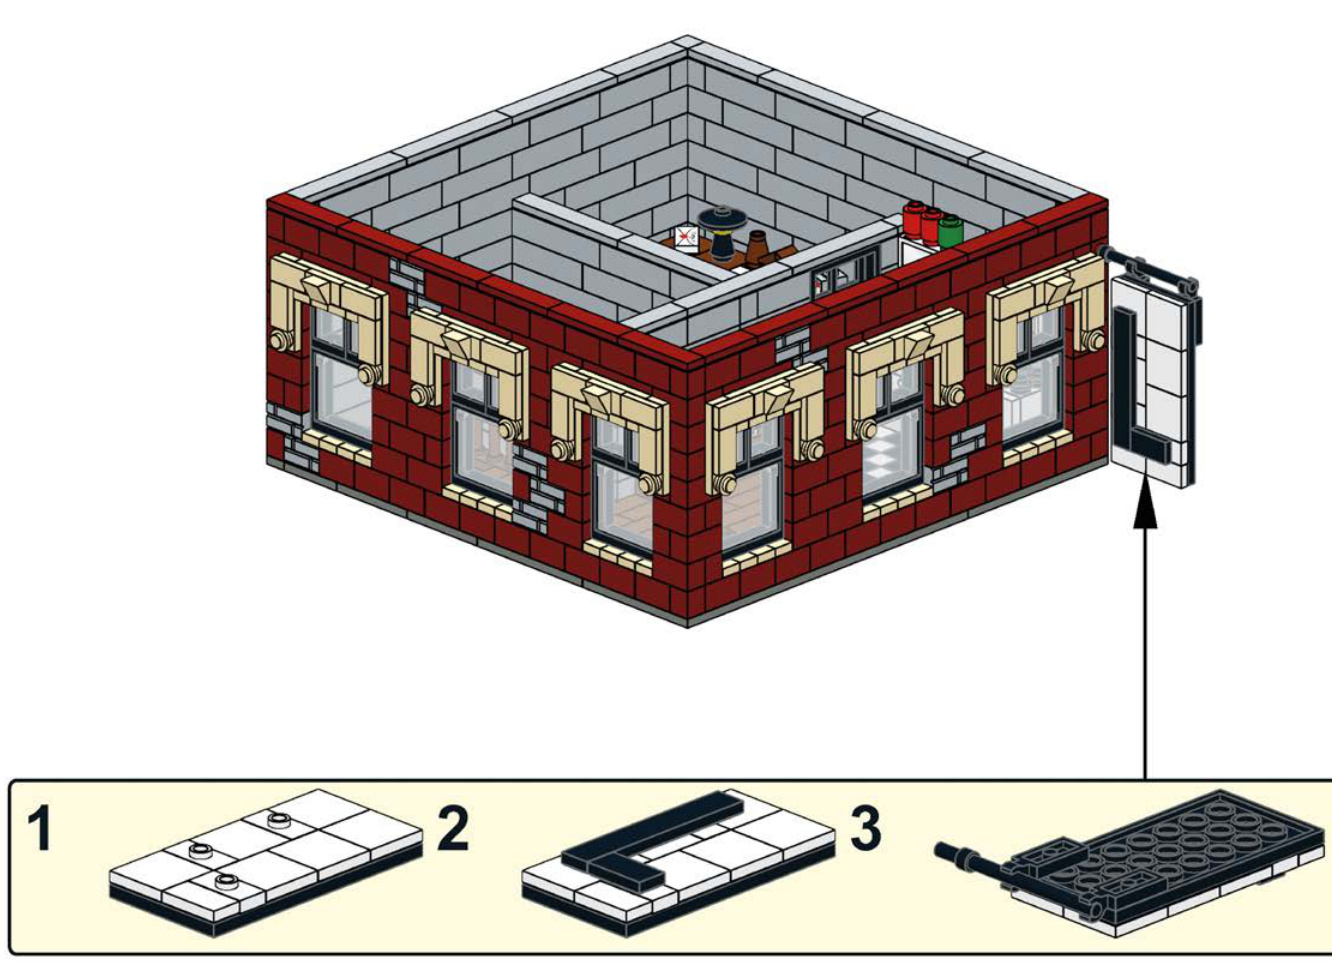
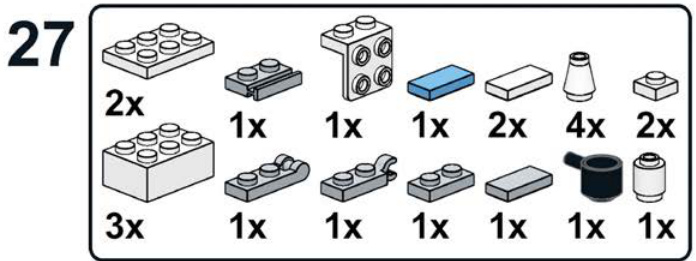
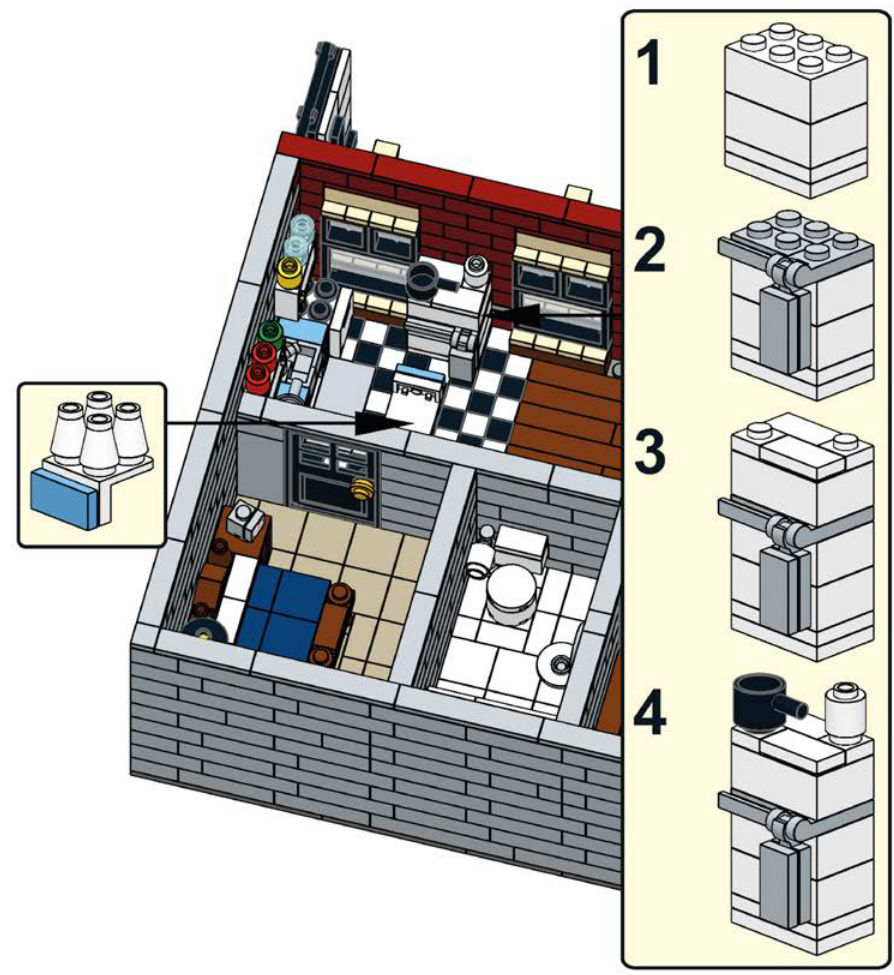
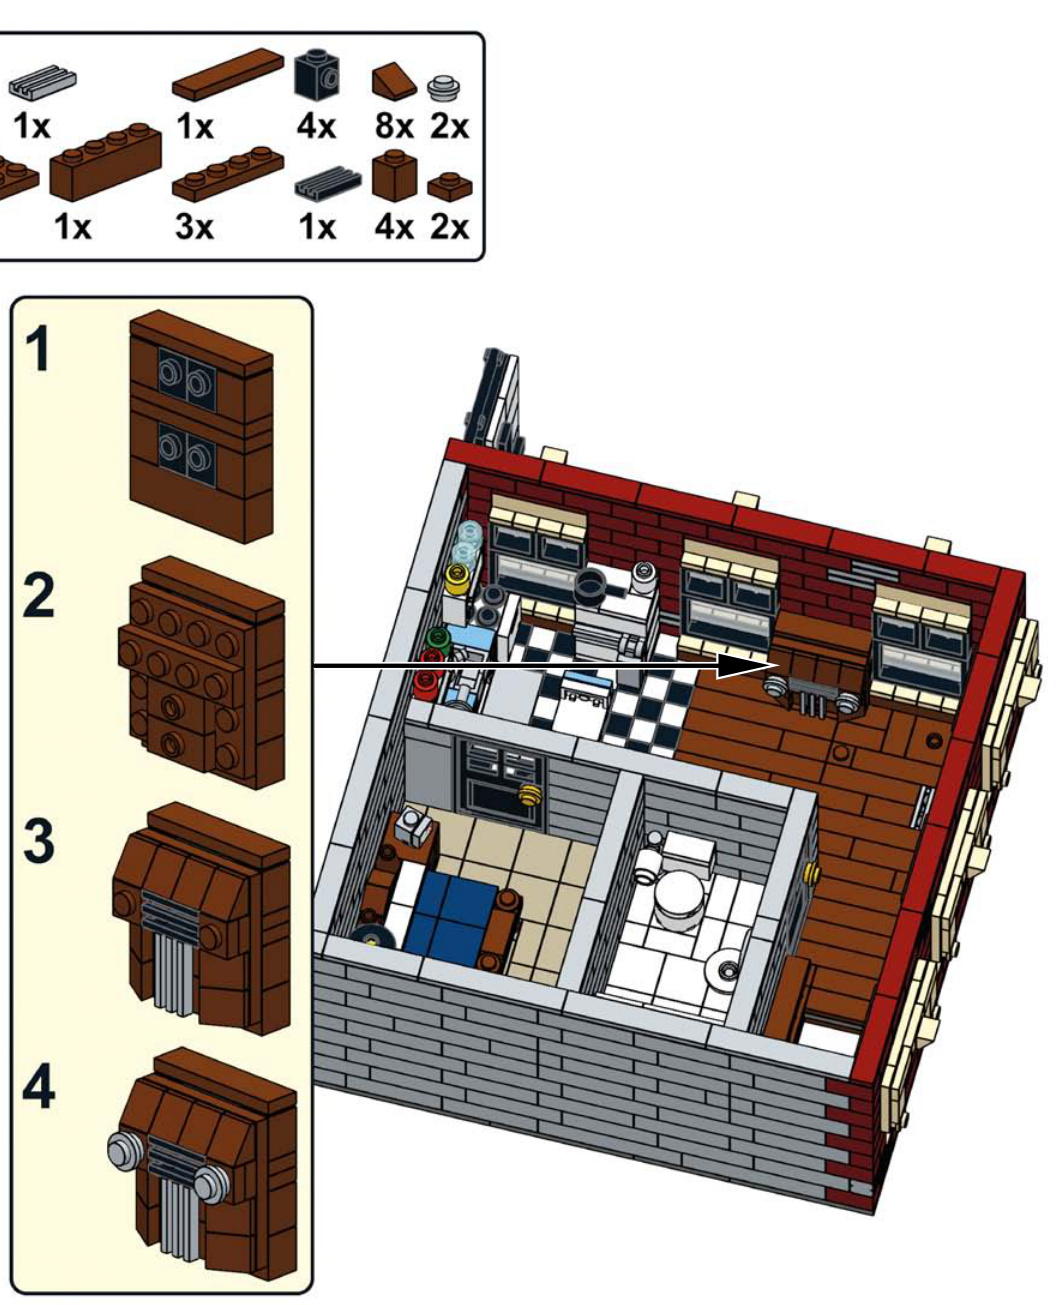
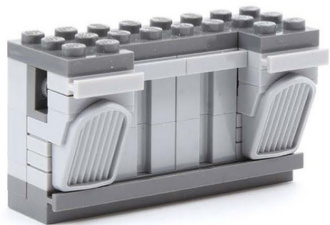
Bank
This group of office furniture was used in our National Bank model.
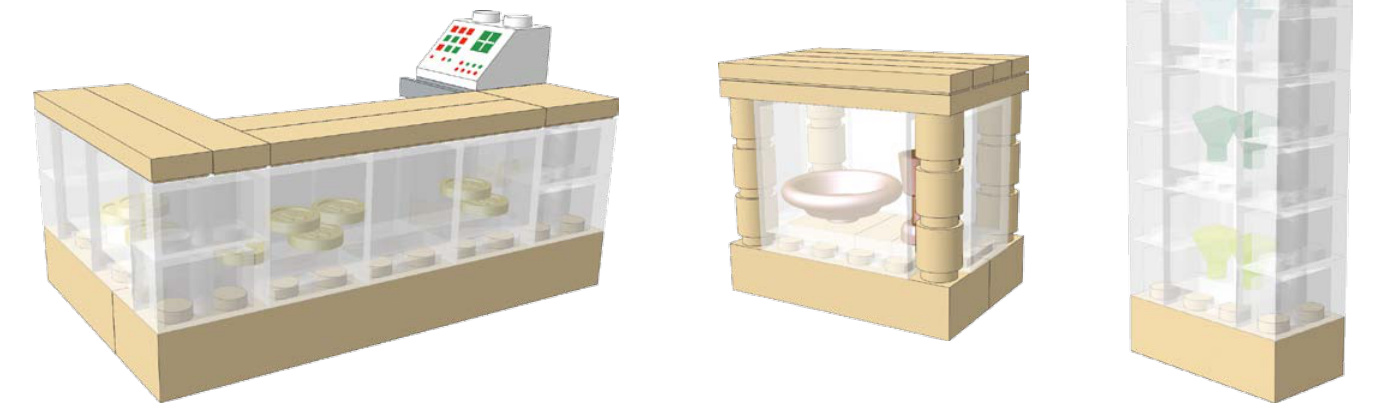
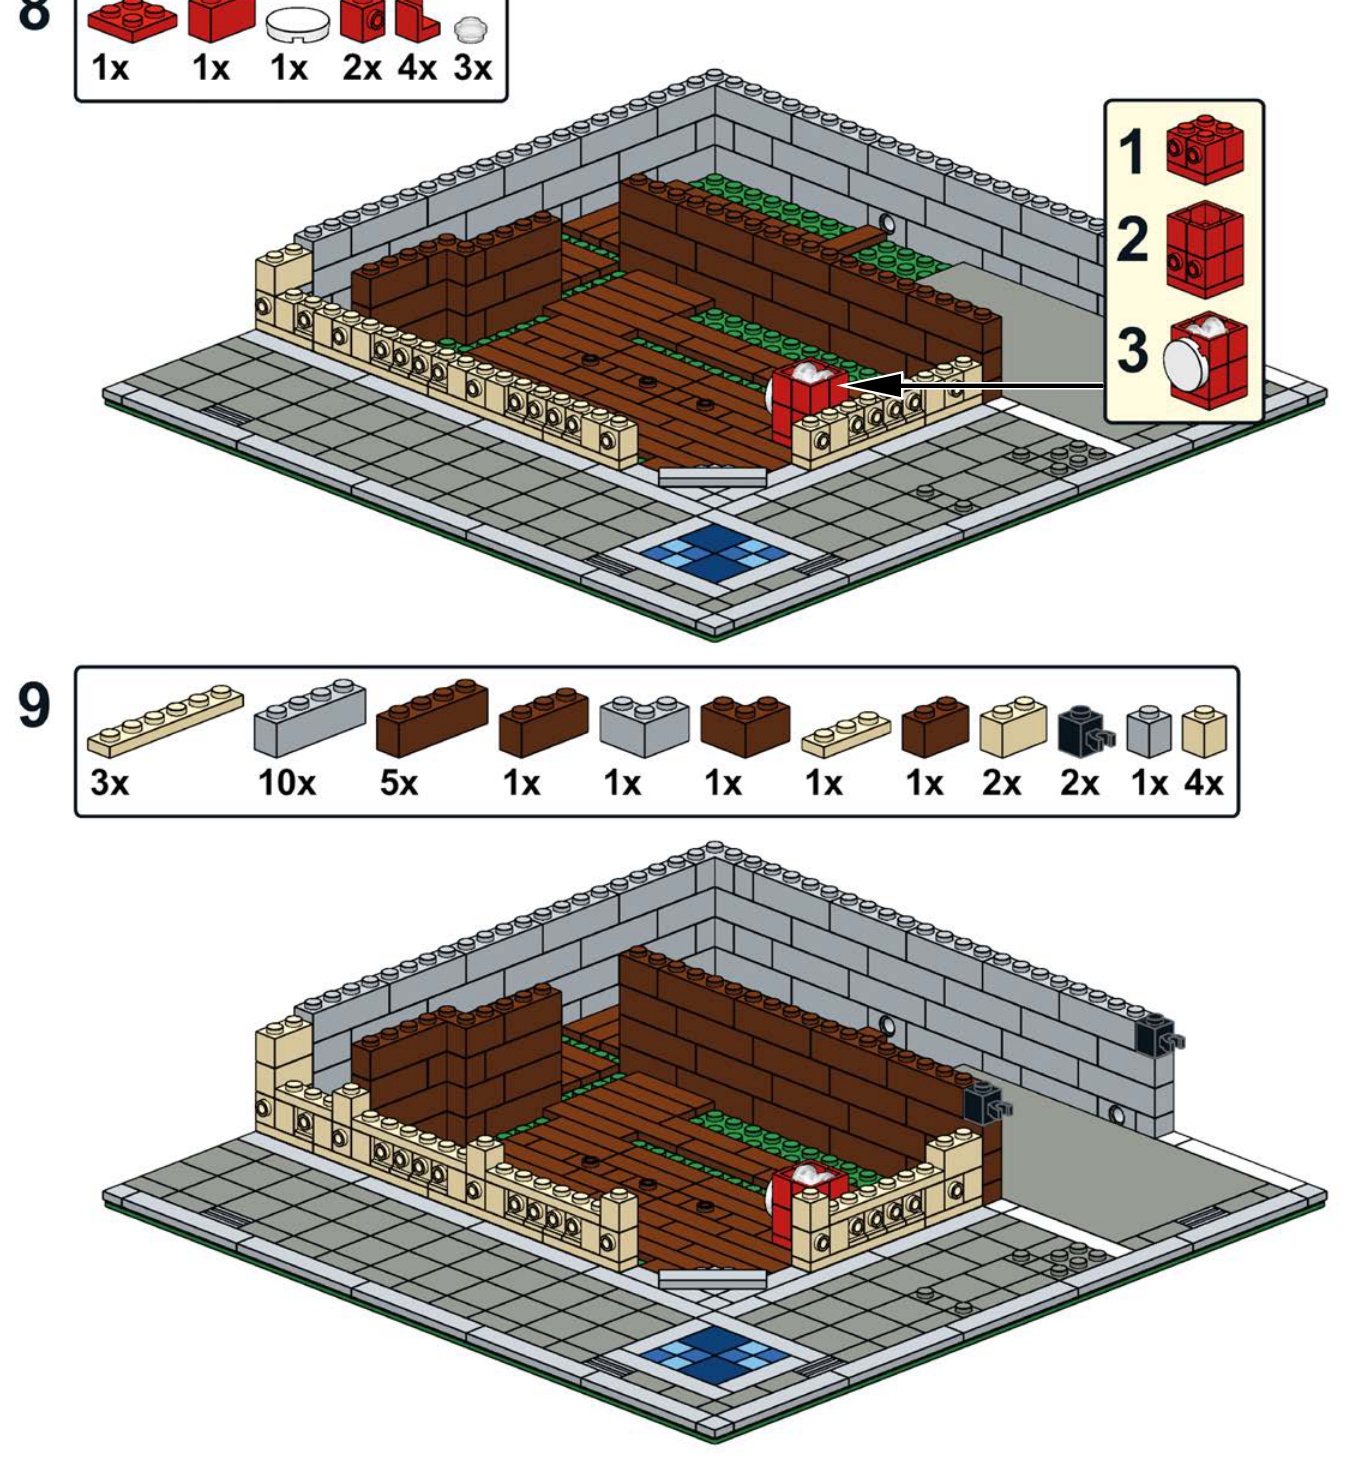
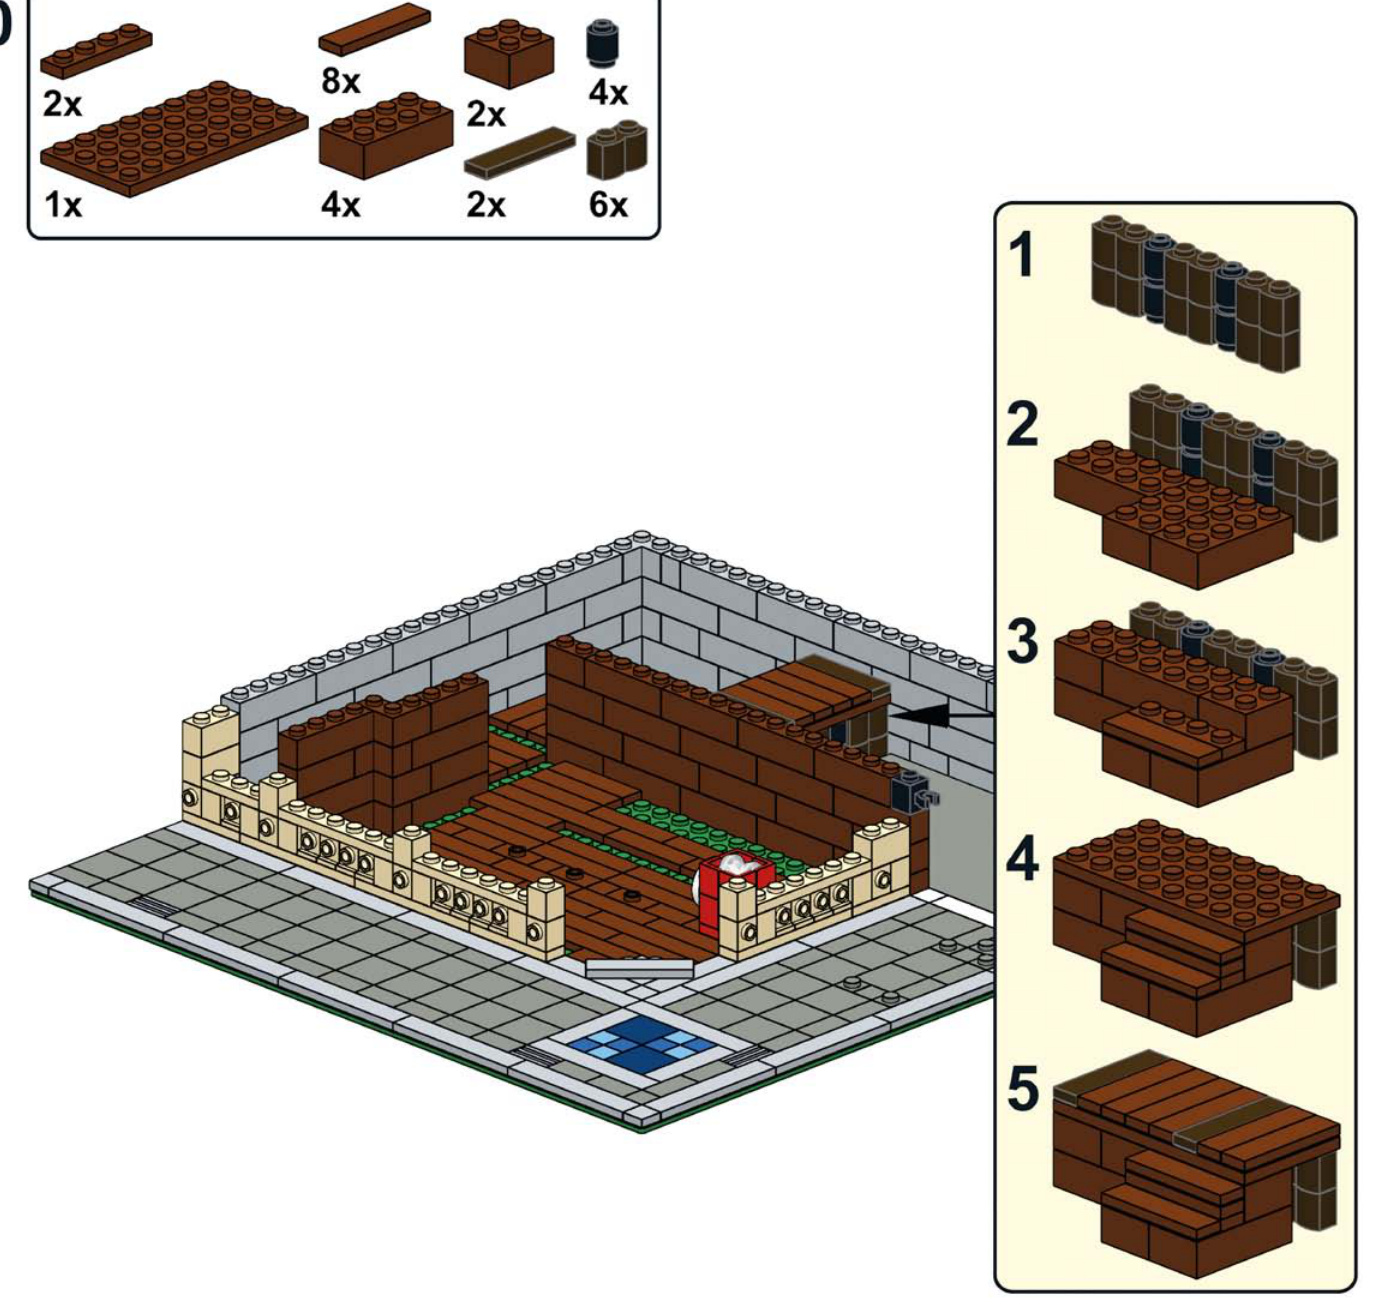
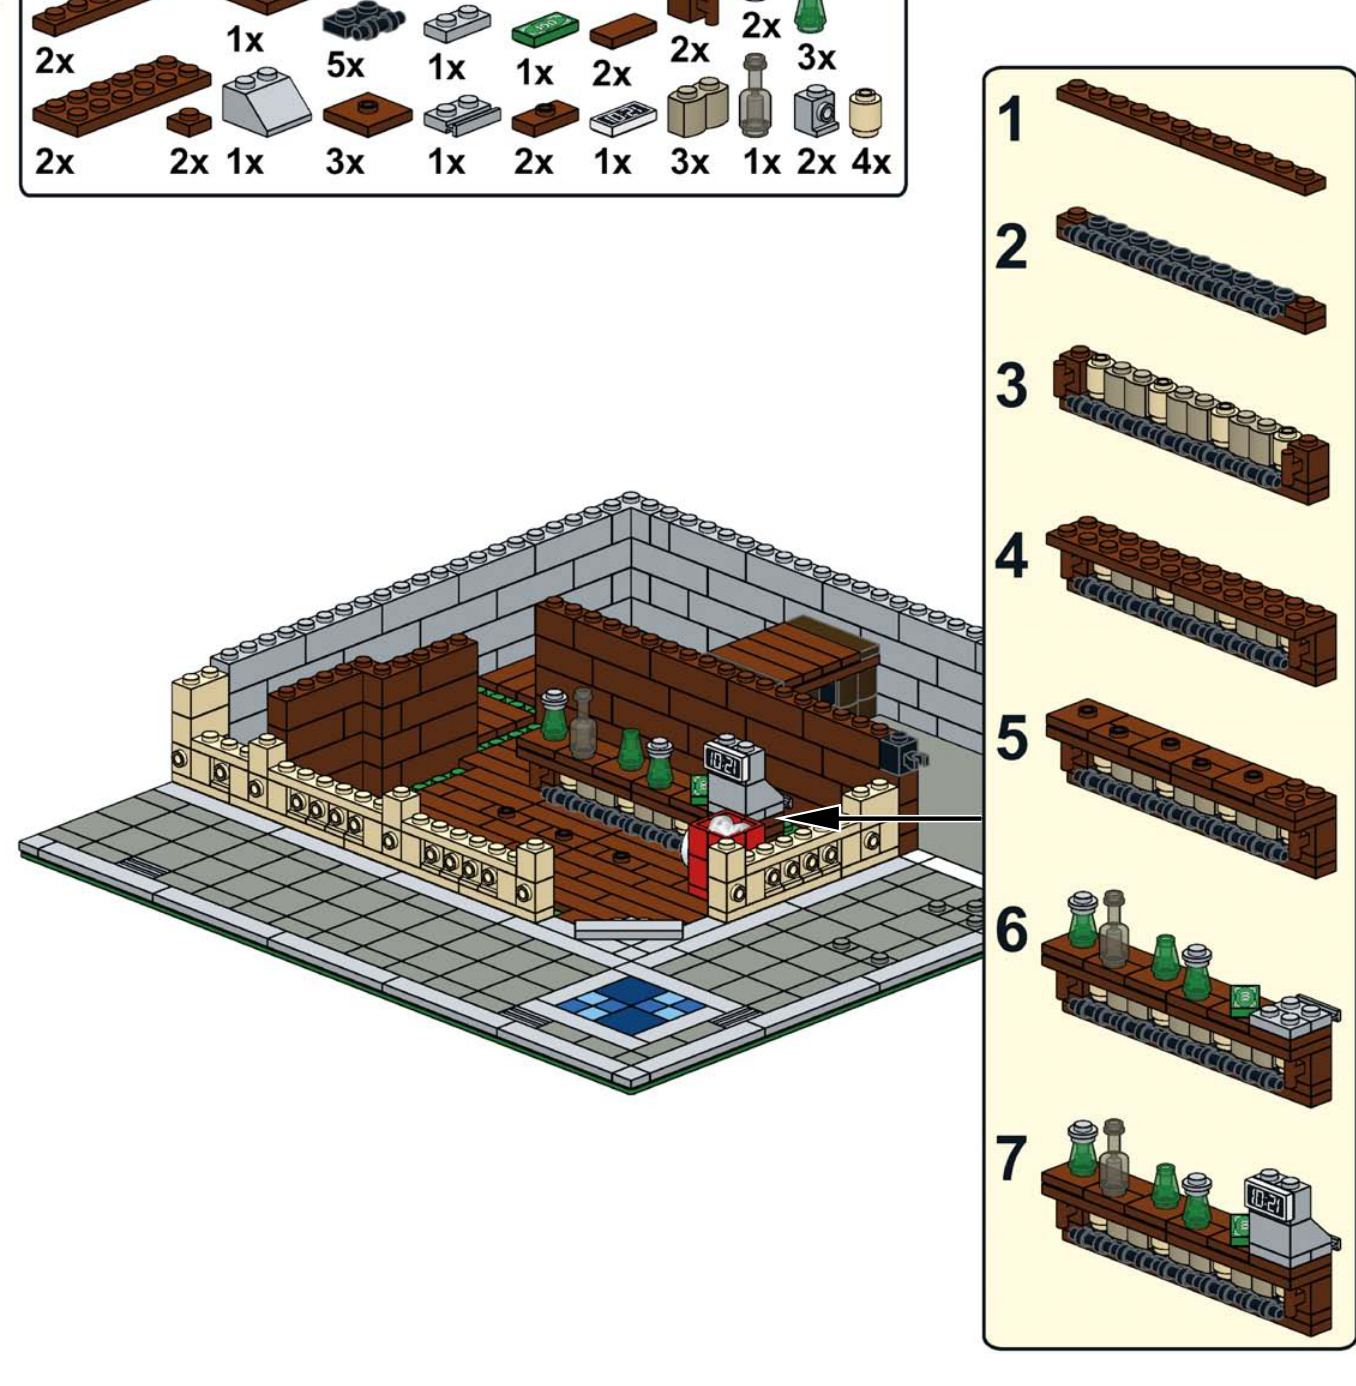
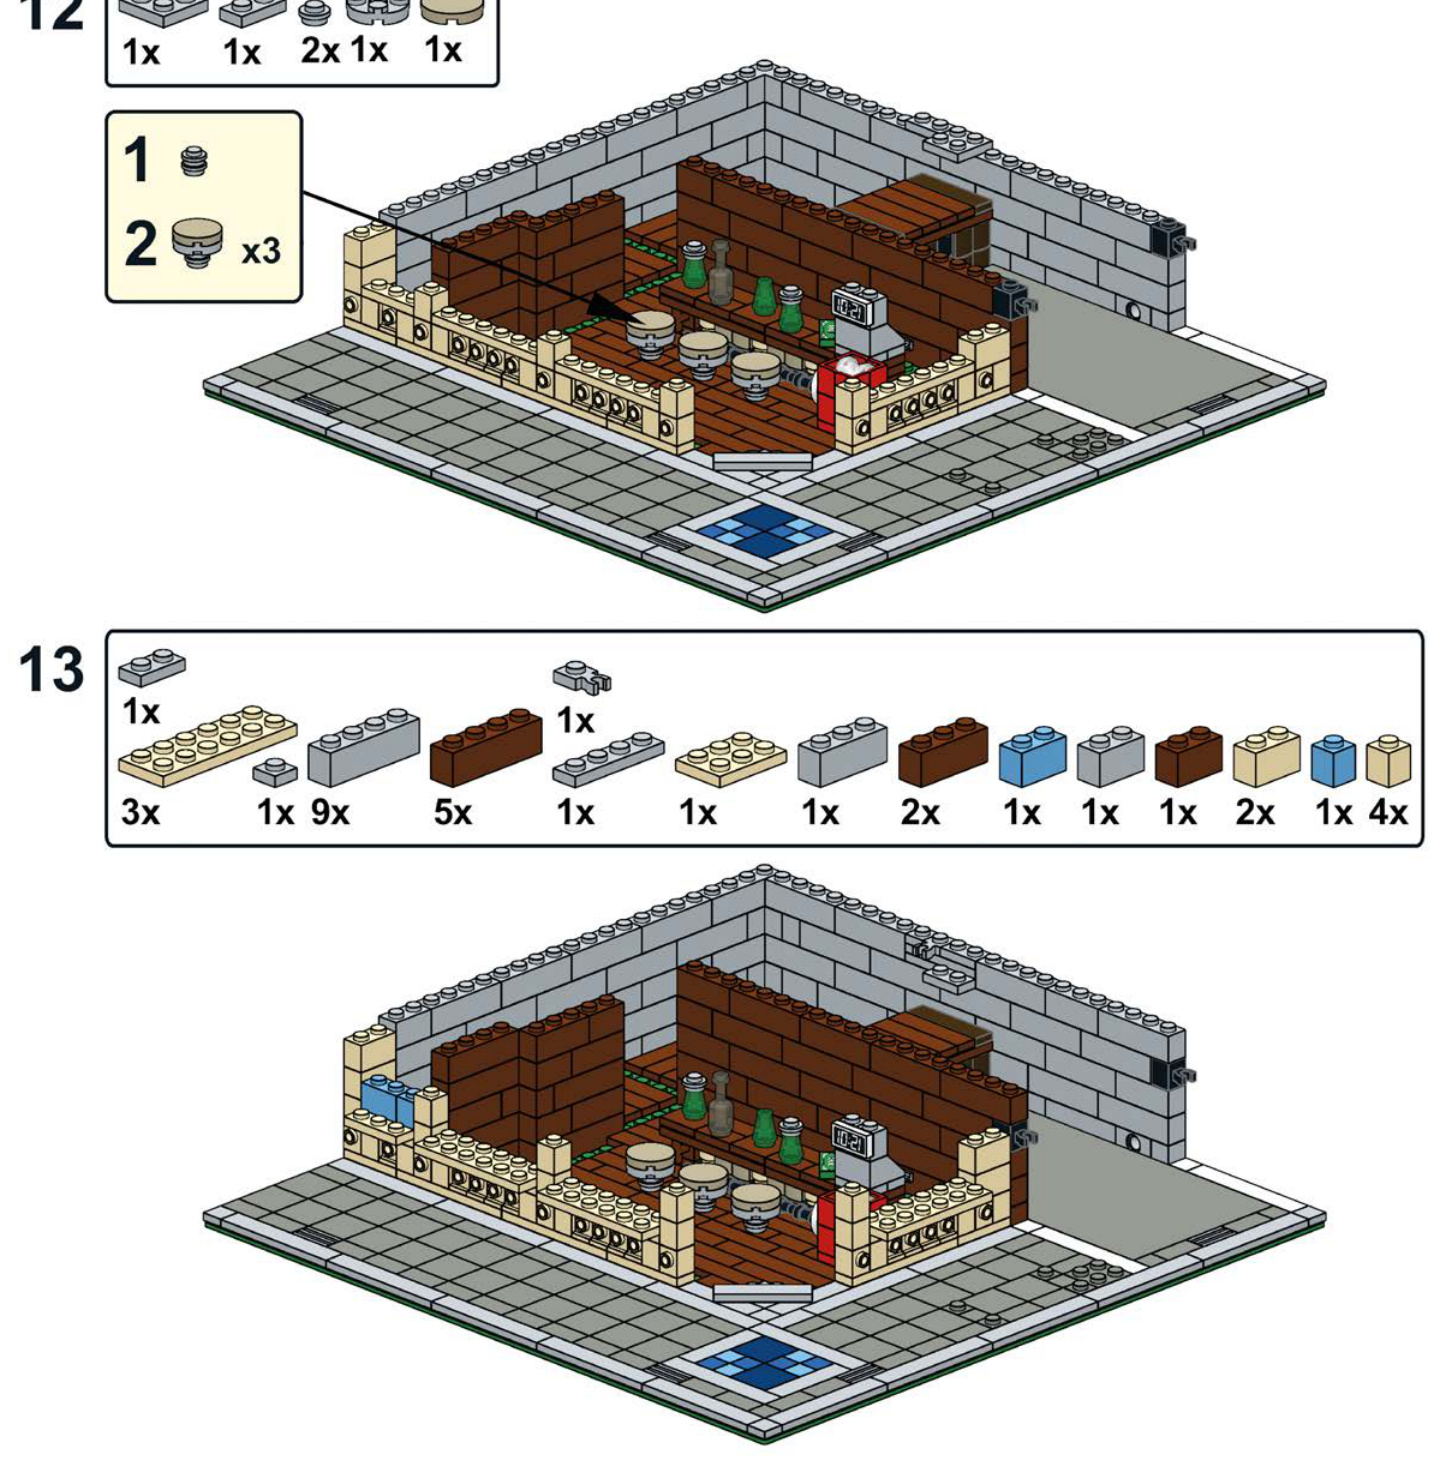
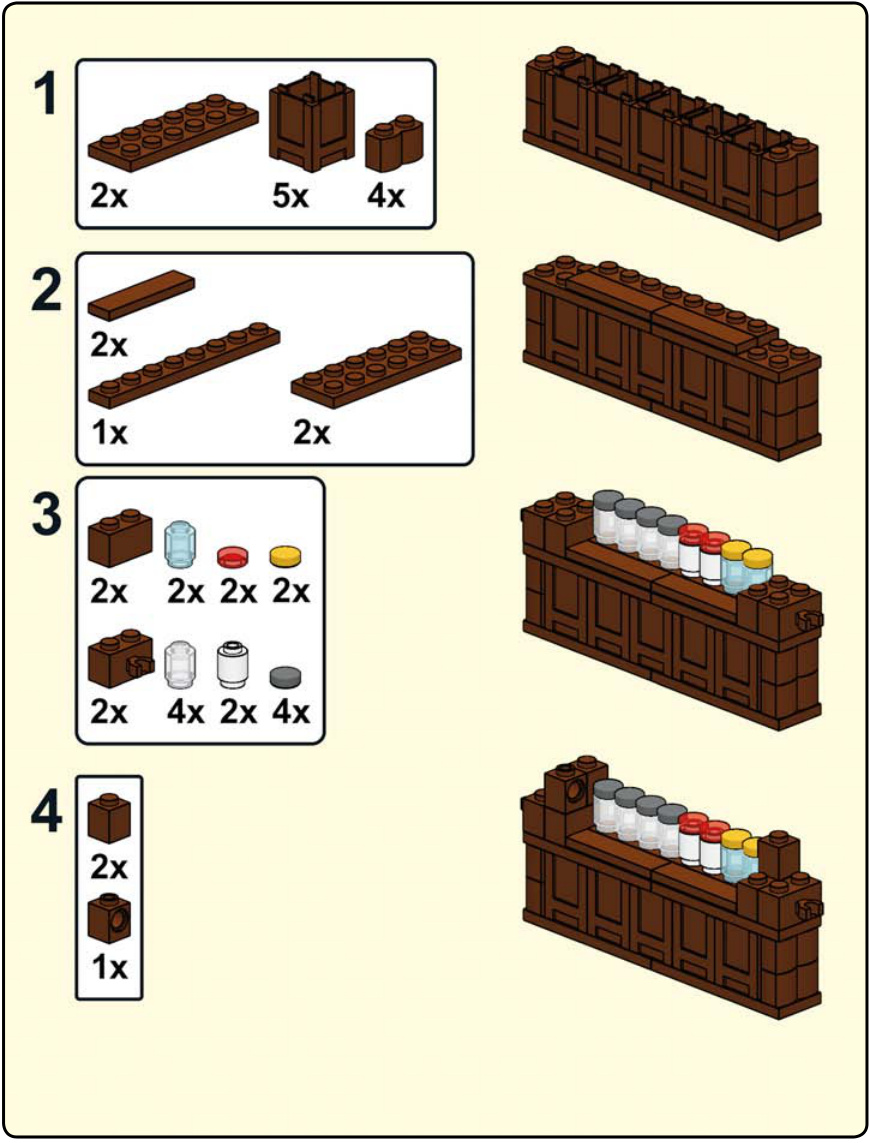
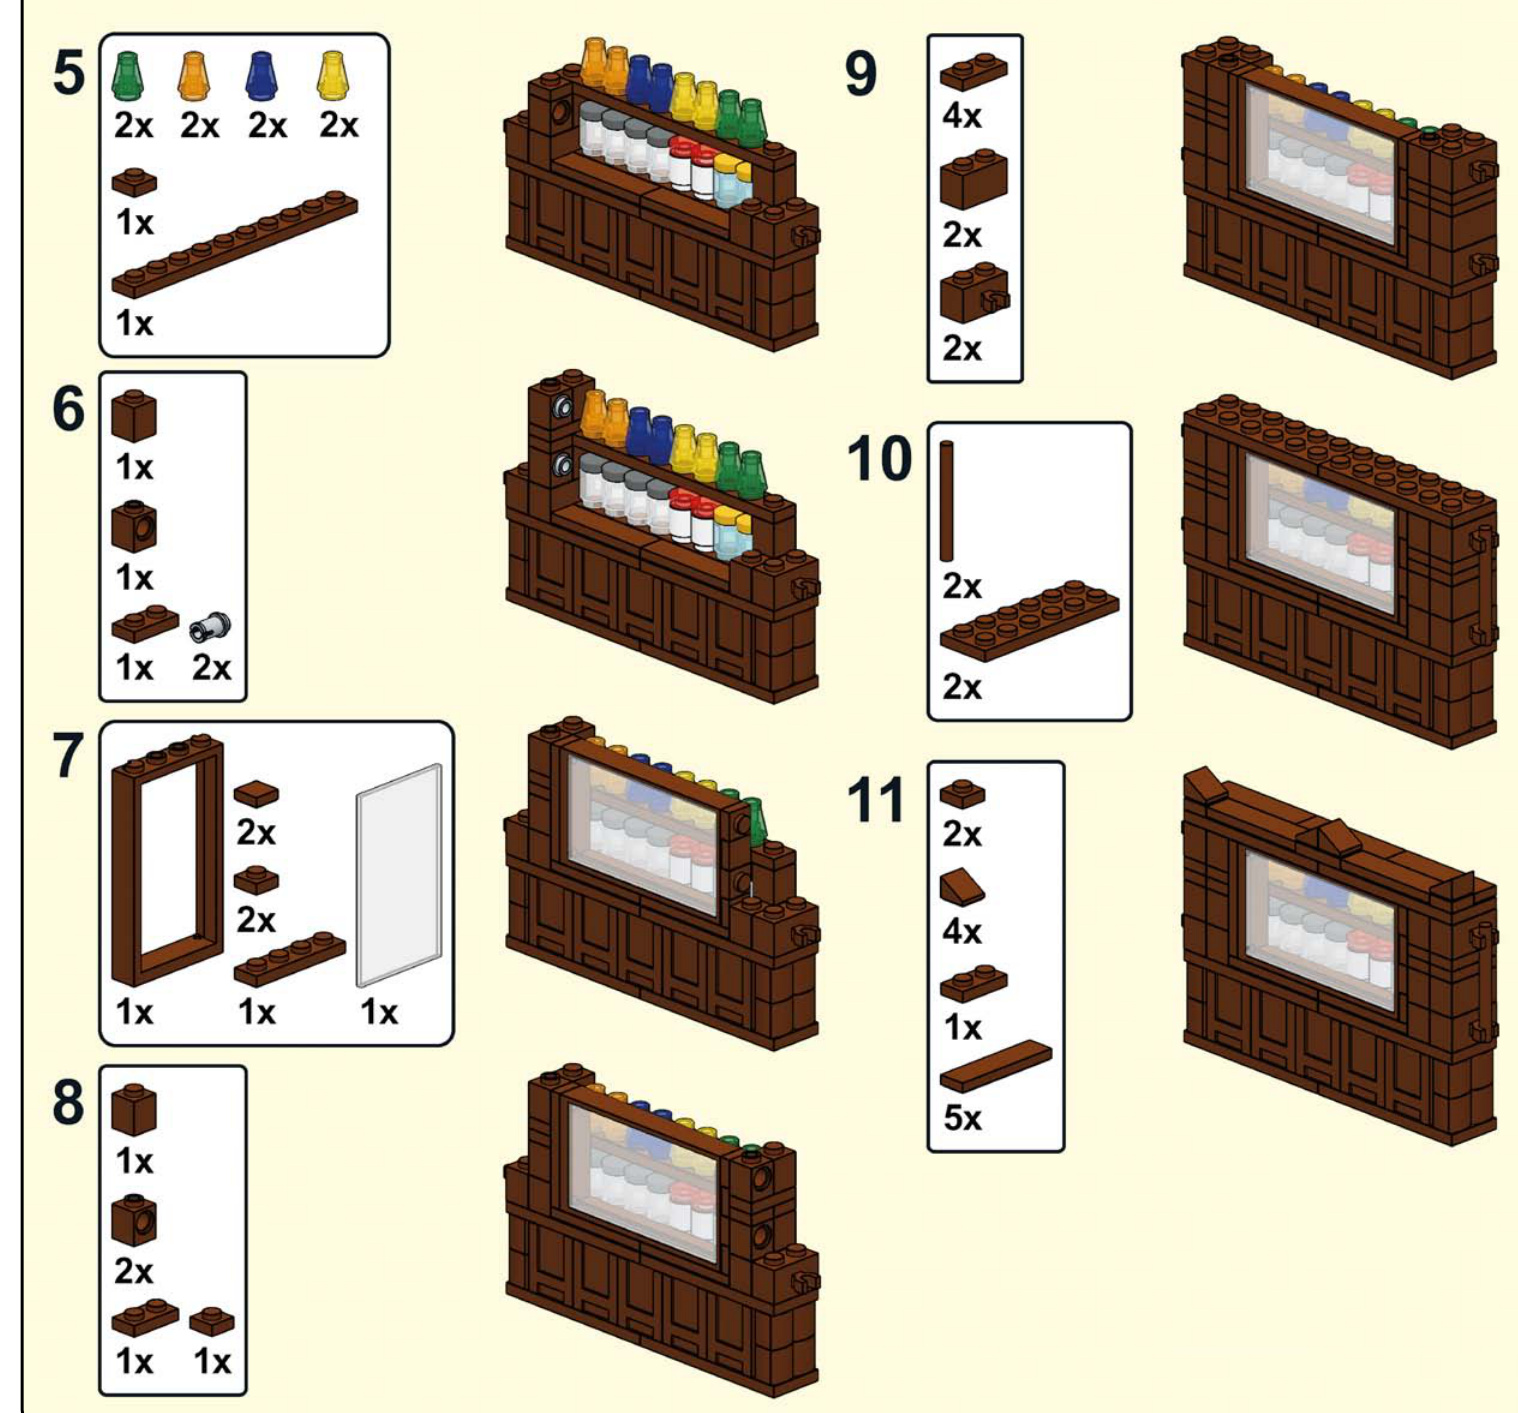
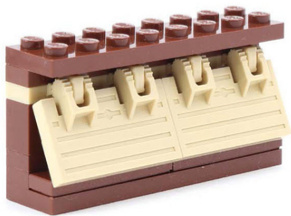
Restaurant
Here are some examples of items foun in a restaurant kitchen. A larger sink, prep table, and shelves of ingredient help fill up the kitchen fast.
The dining area of the restauran usually has booths, tables, chairs, a ba and some decorative elements like plant or pictures on the walls.
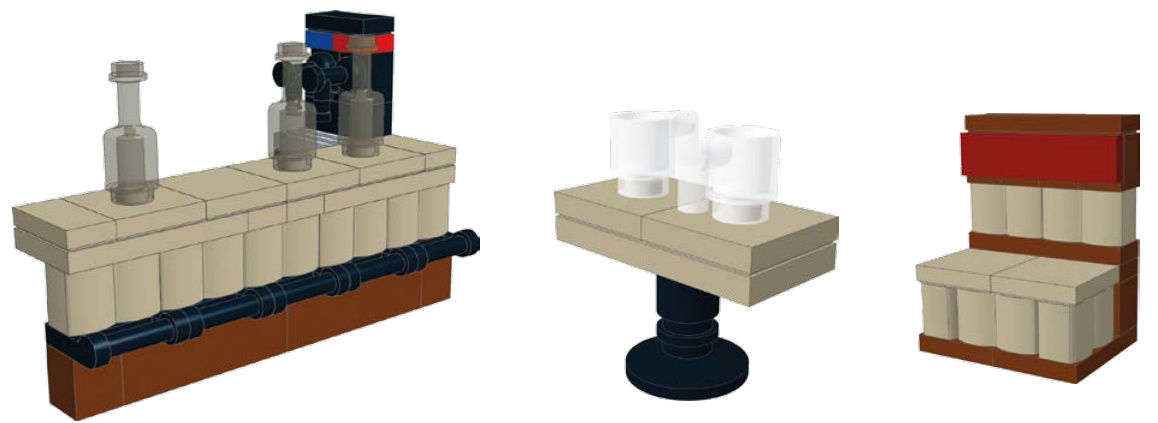
Hotel
Check out these examples of furniture that you would find in a hotel room.
The mailbox, flower pedestal, ke machine, and front desk could be foun in the lobby area.

modular buildings
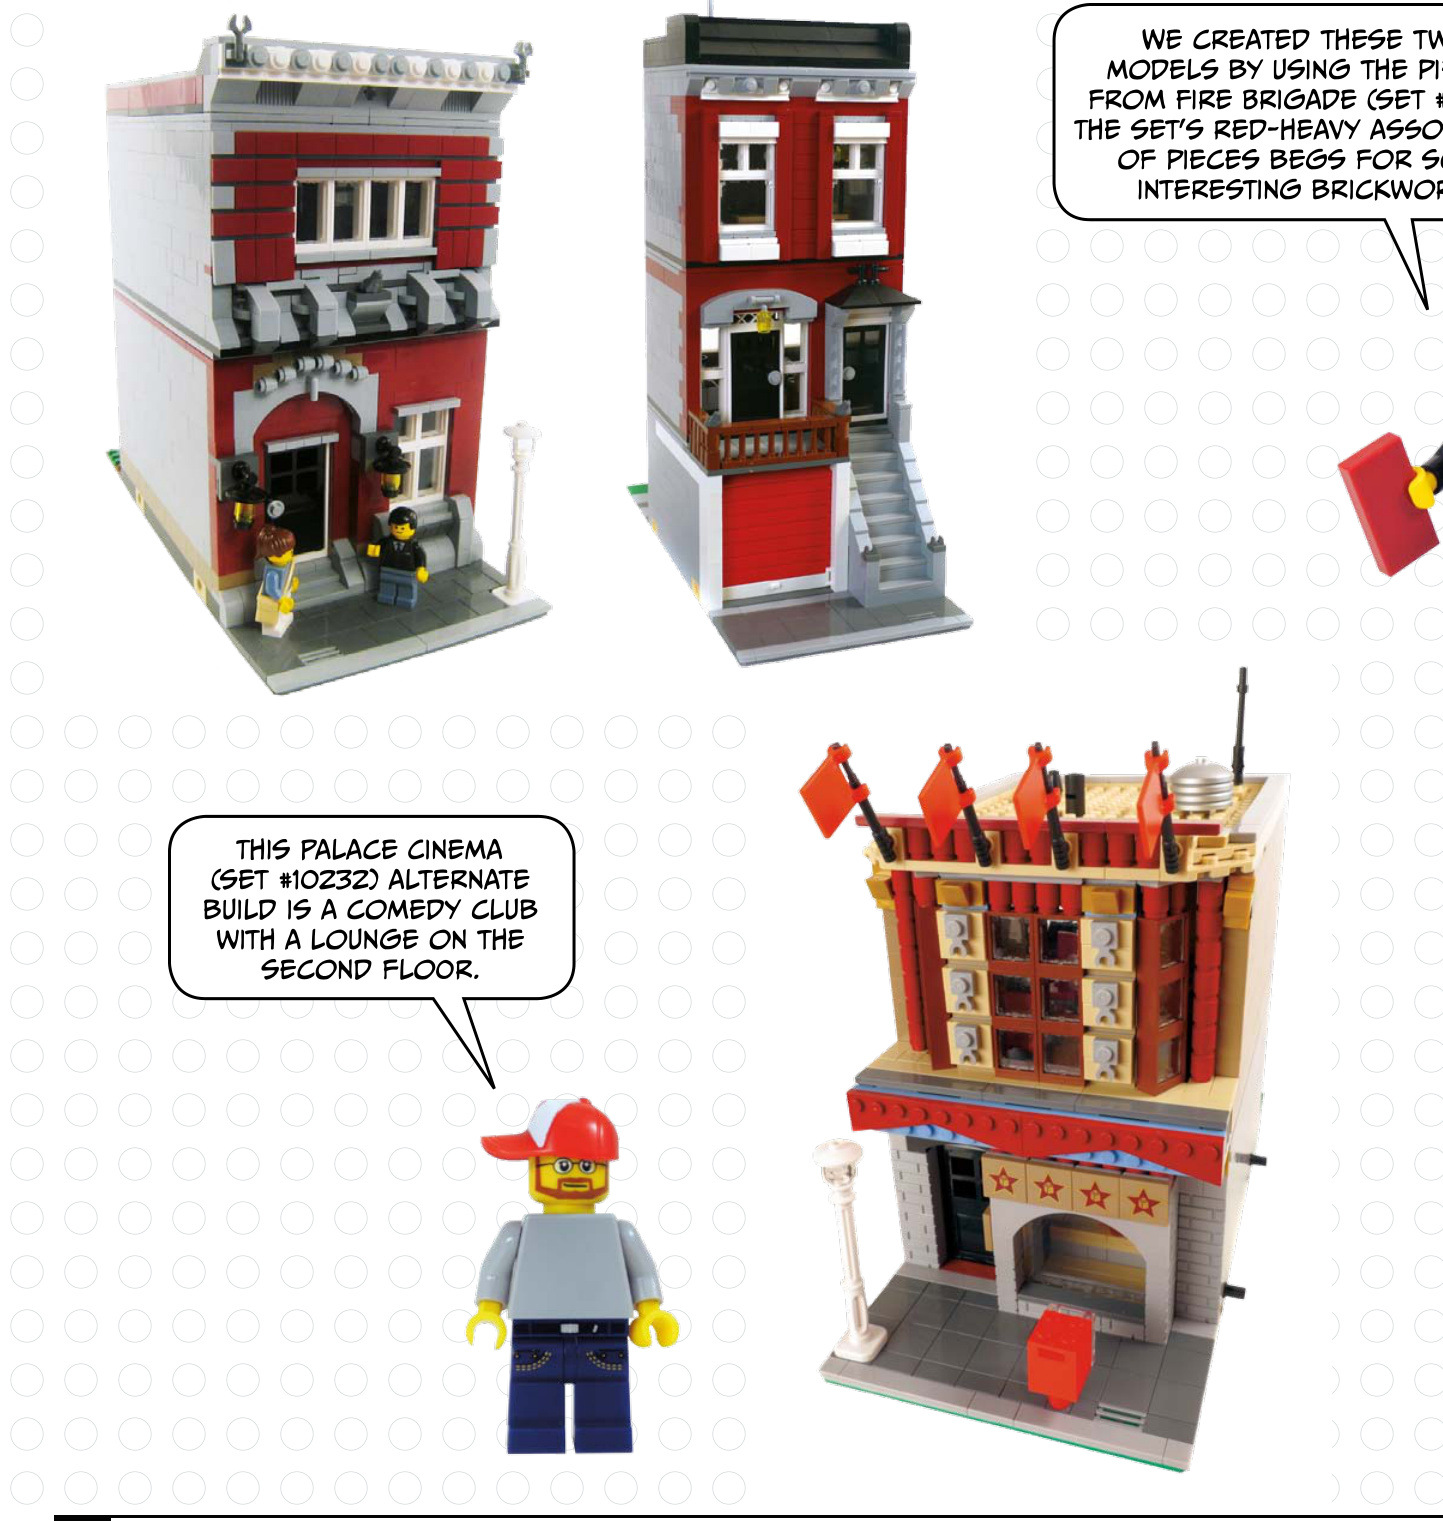
Have a look at some of the modular buildings that we’ve created. If you haven’t yet created an original LEGO build, we encourage you to give it a try. Get inspired by the models in this chapter, as well as those created by the LEGO Group.
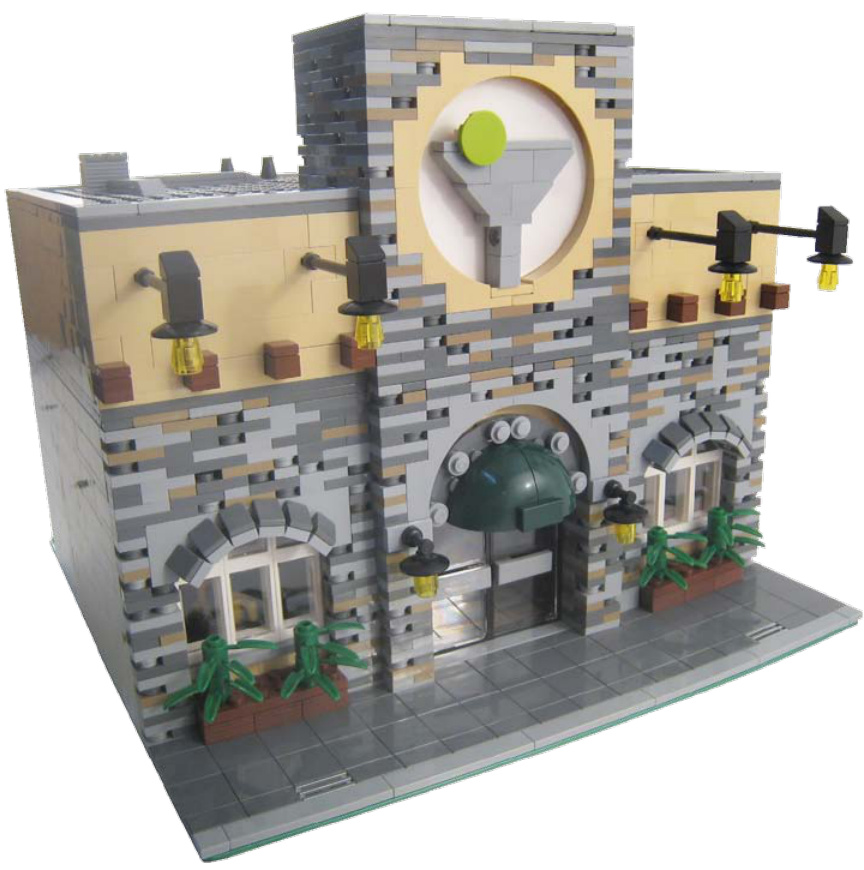
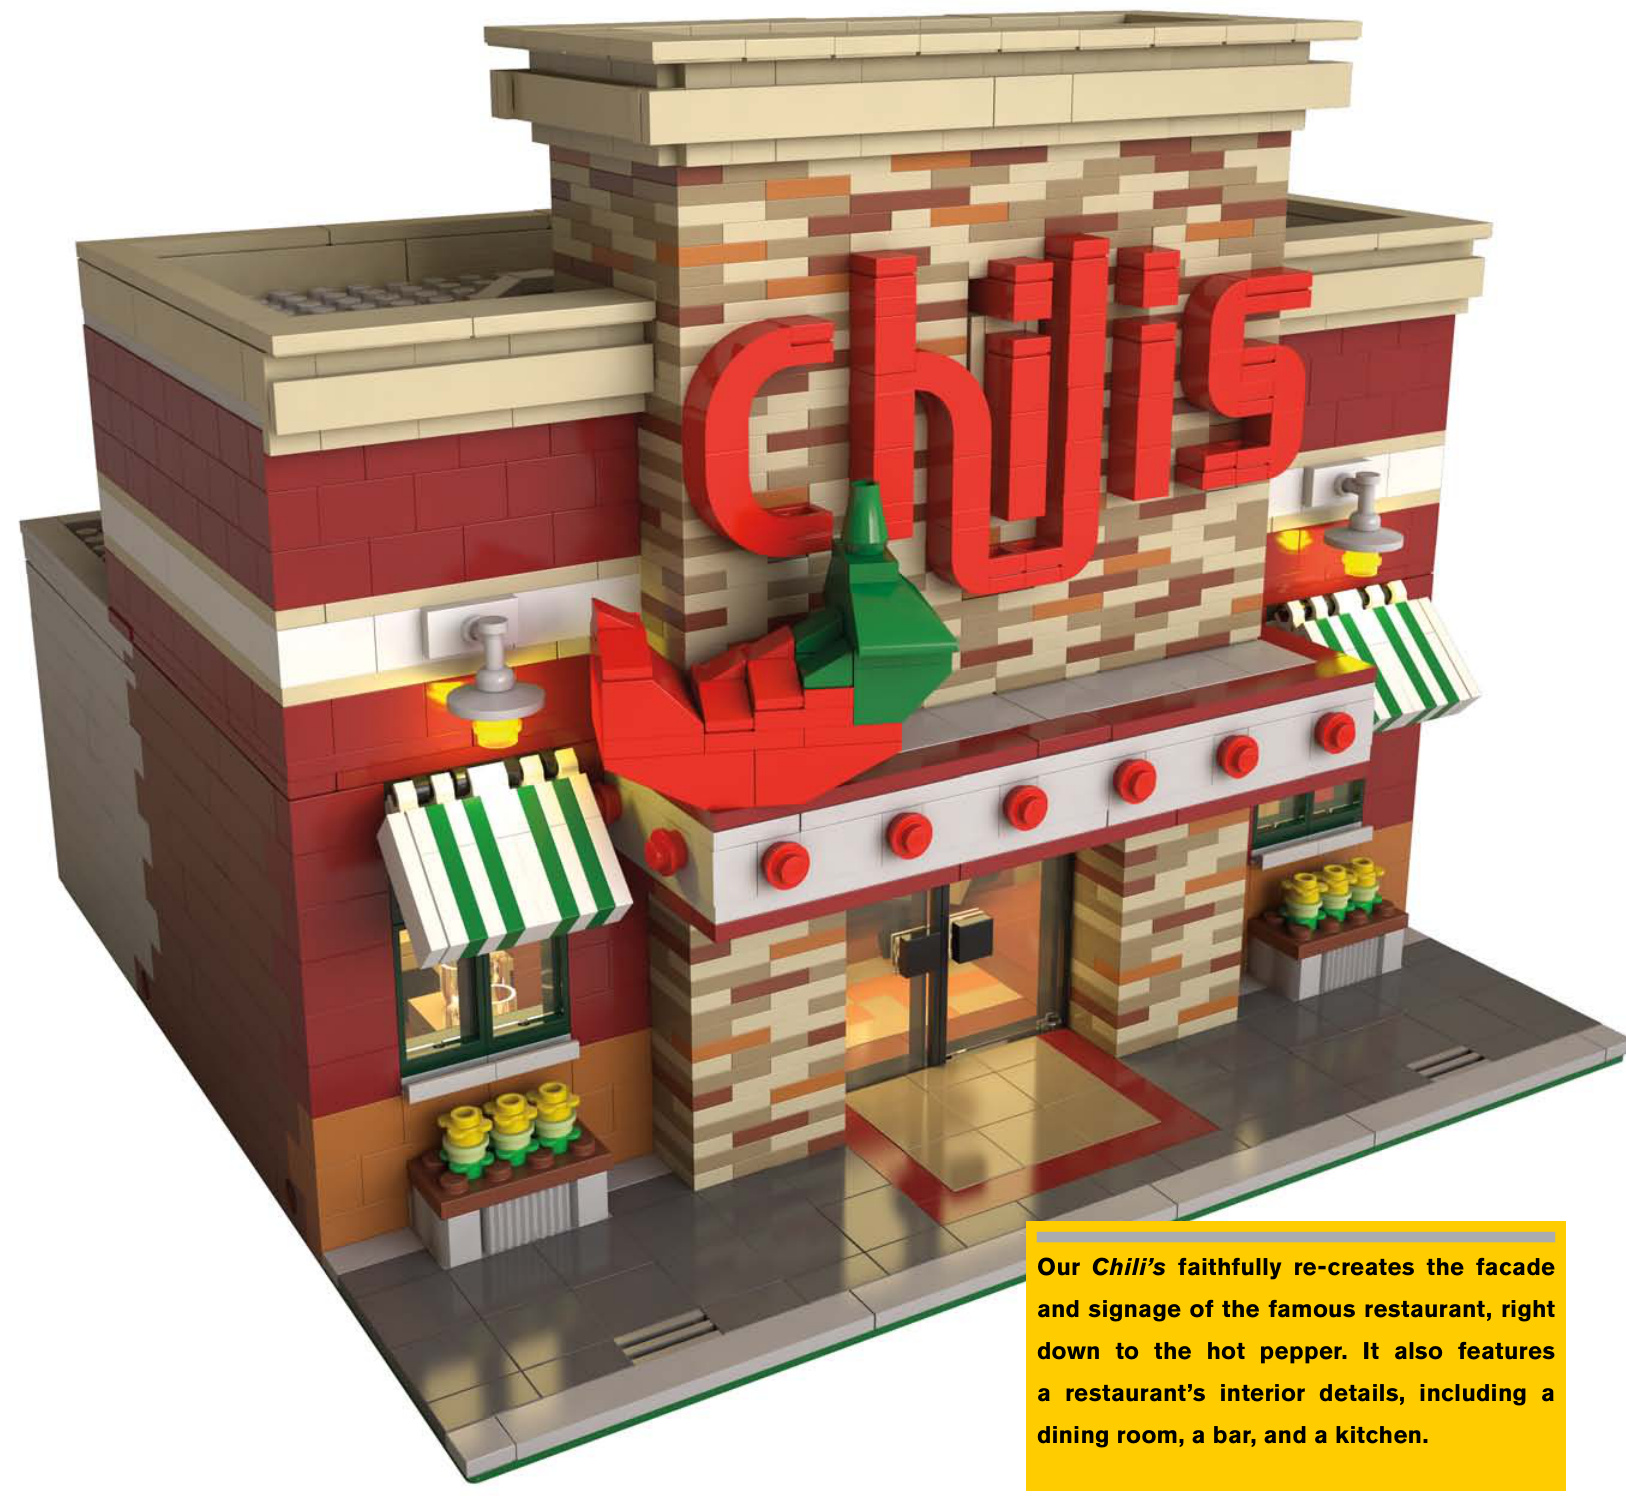
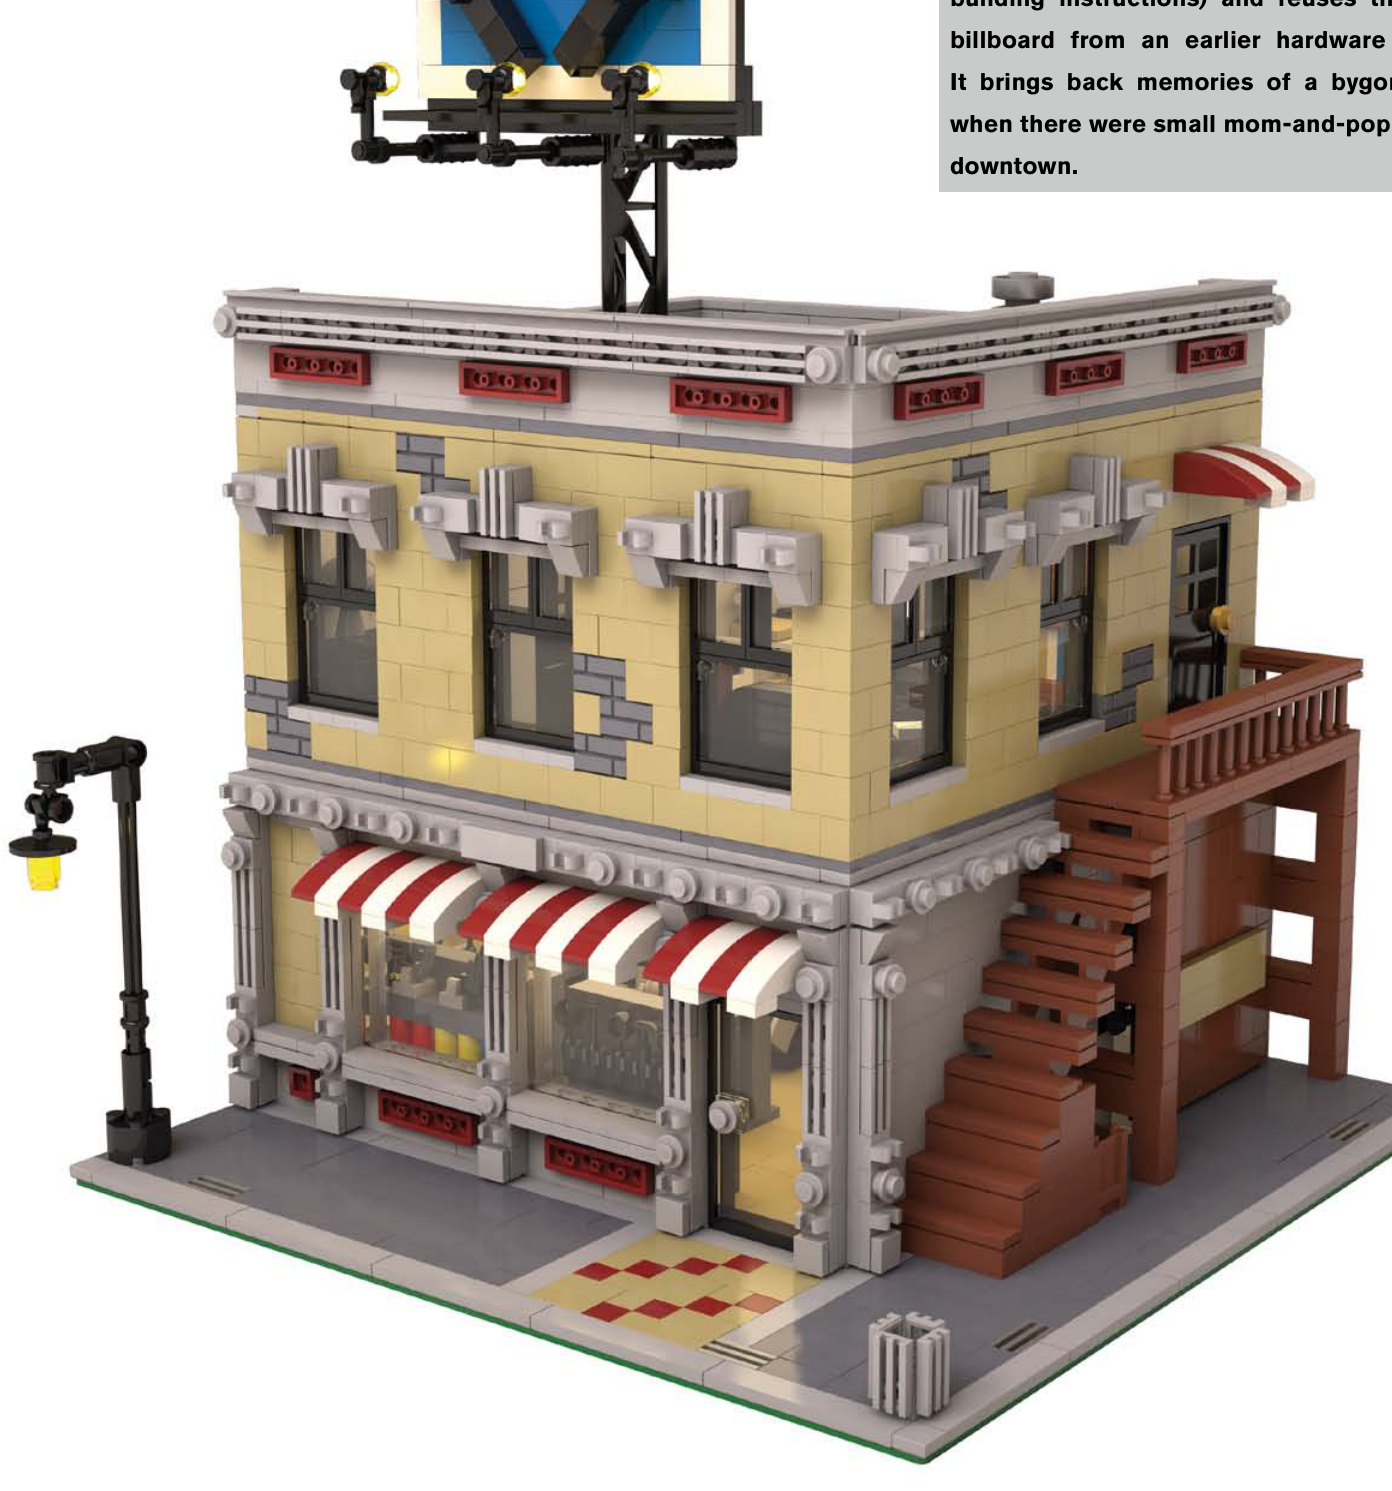
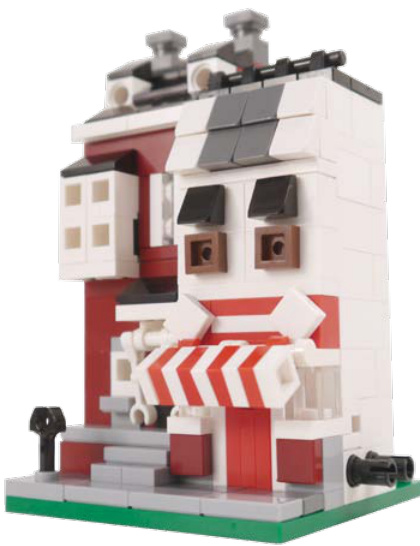
City Restaurant has a great sign, as well as a facade with some creative stonework. It has a full kitchen in the back.

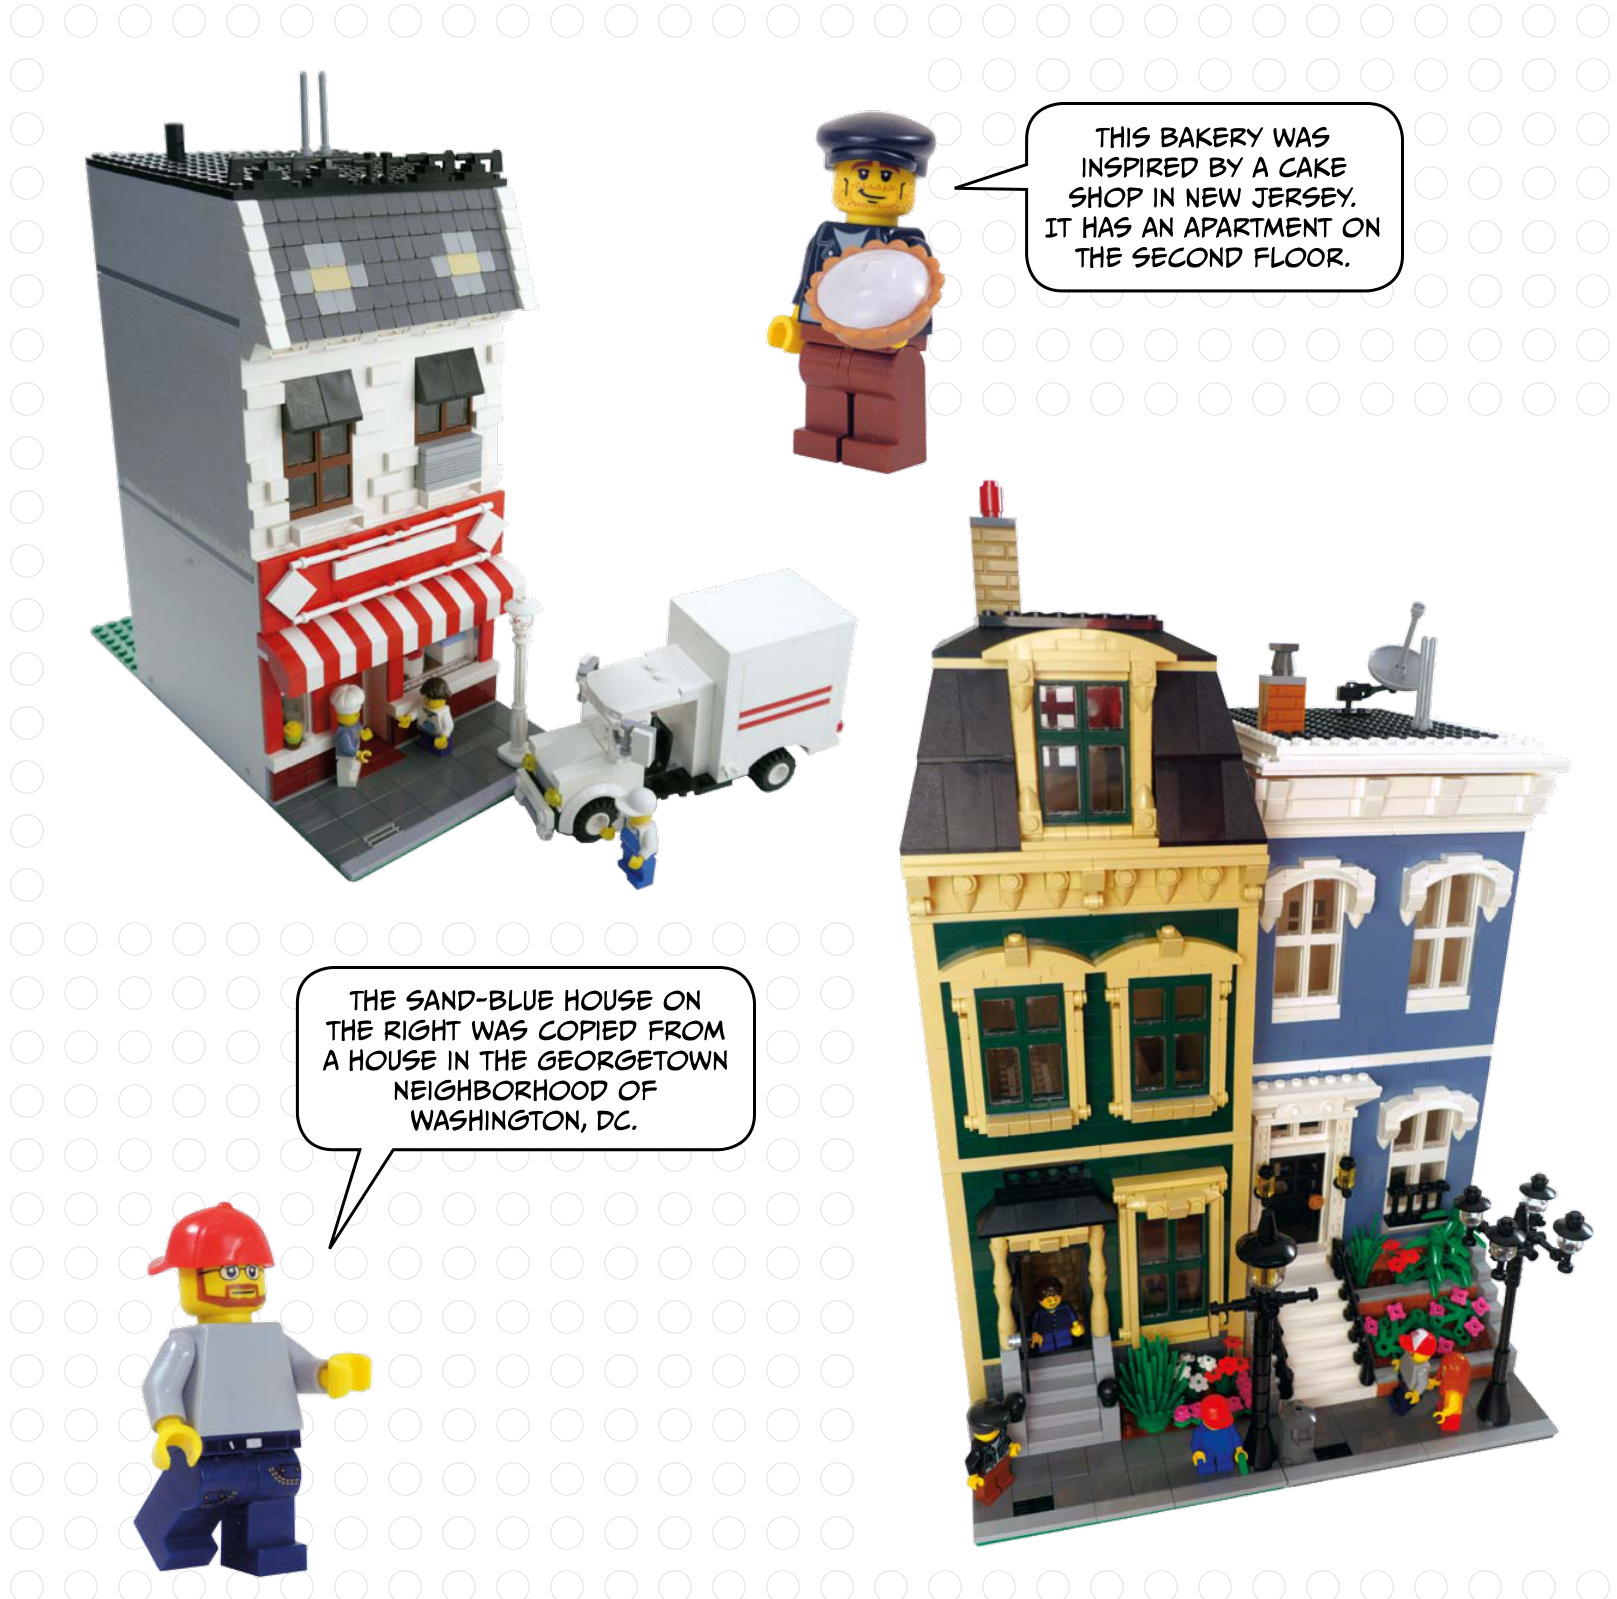
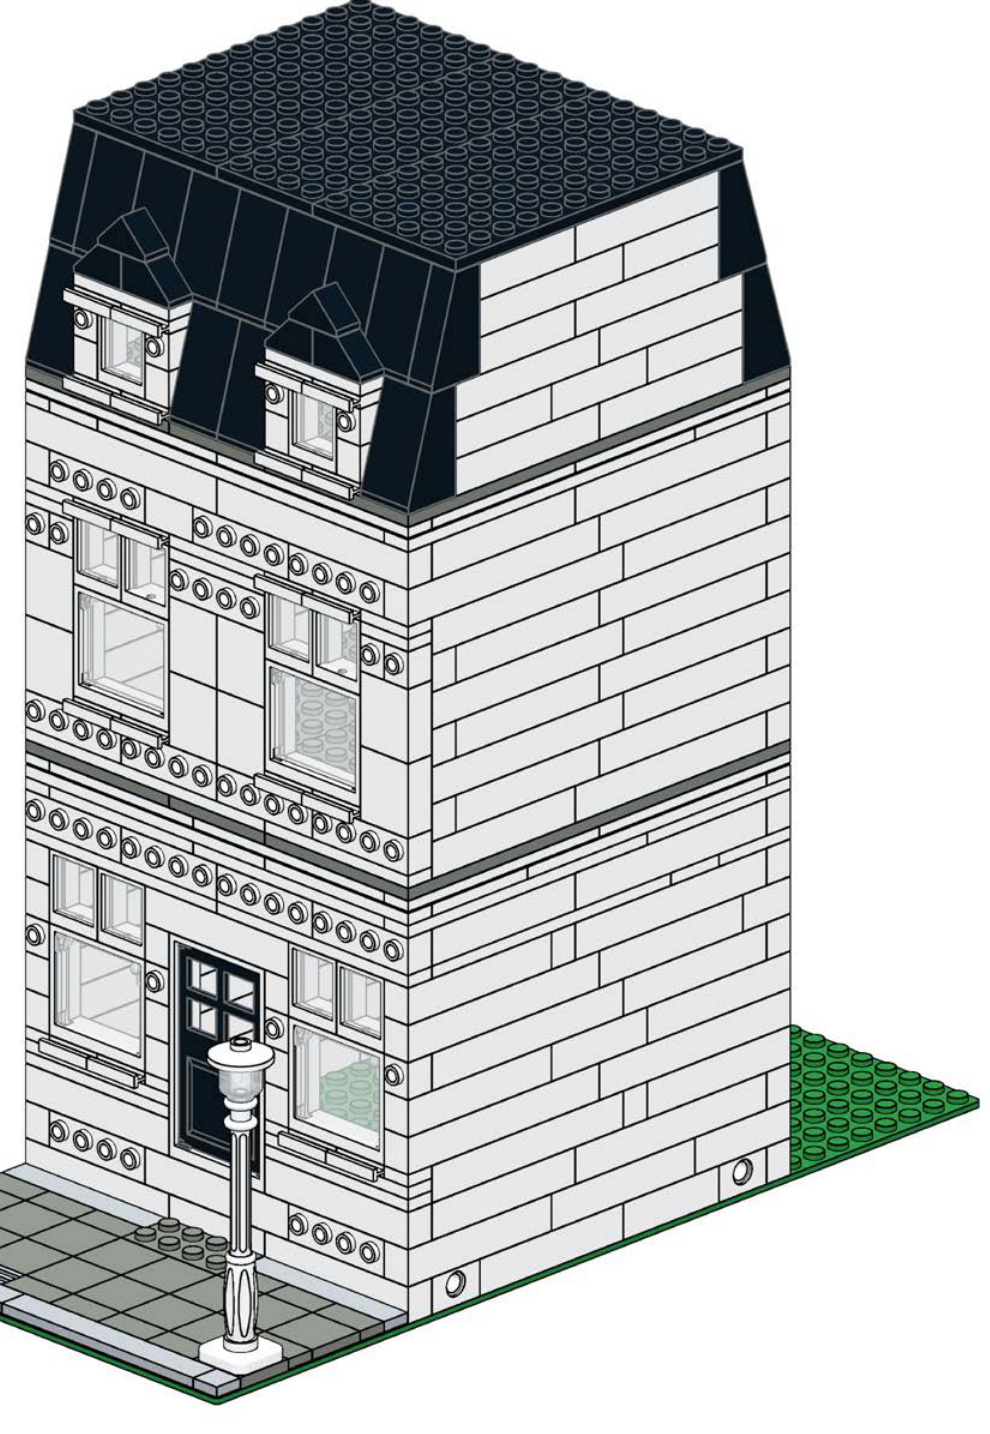
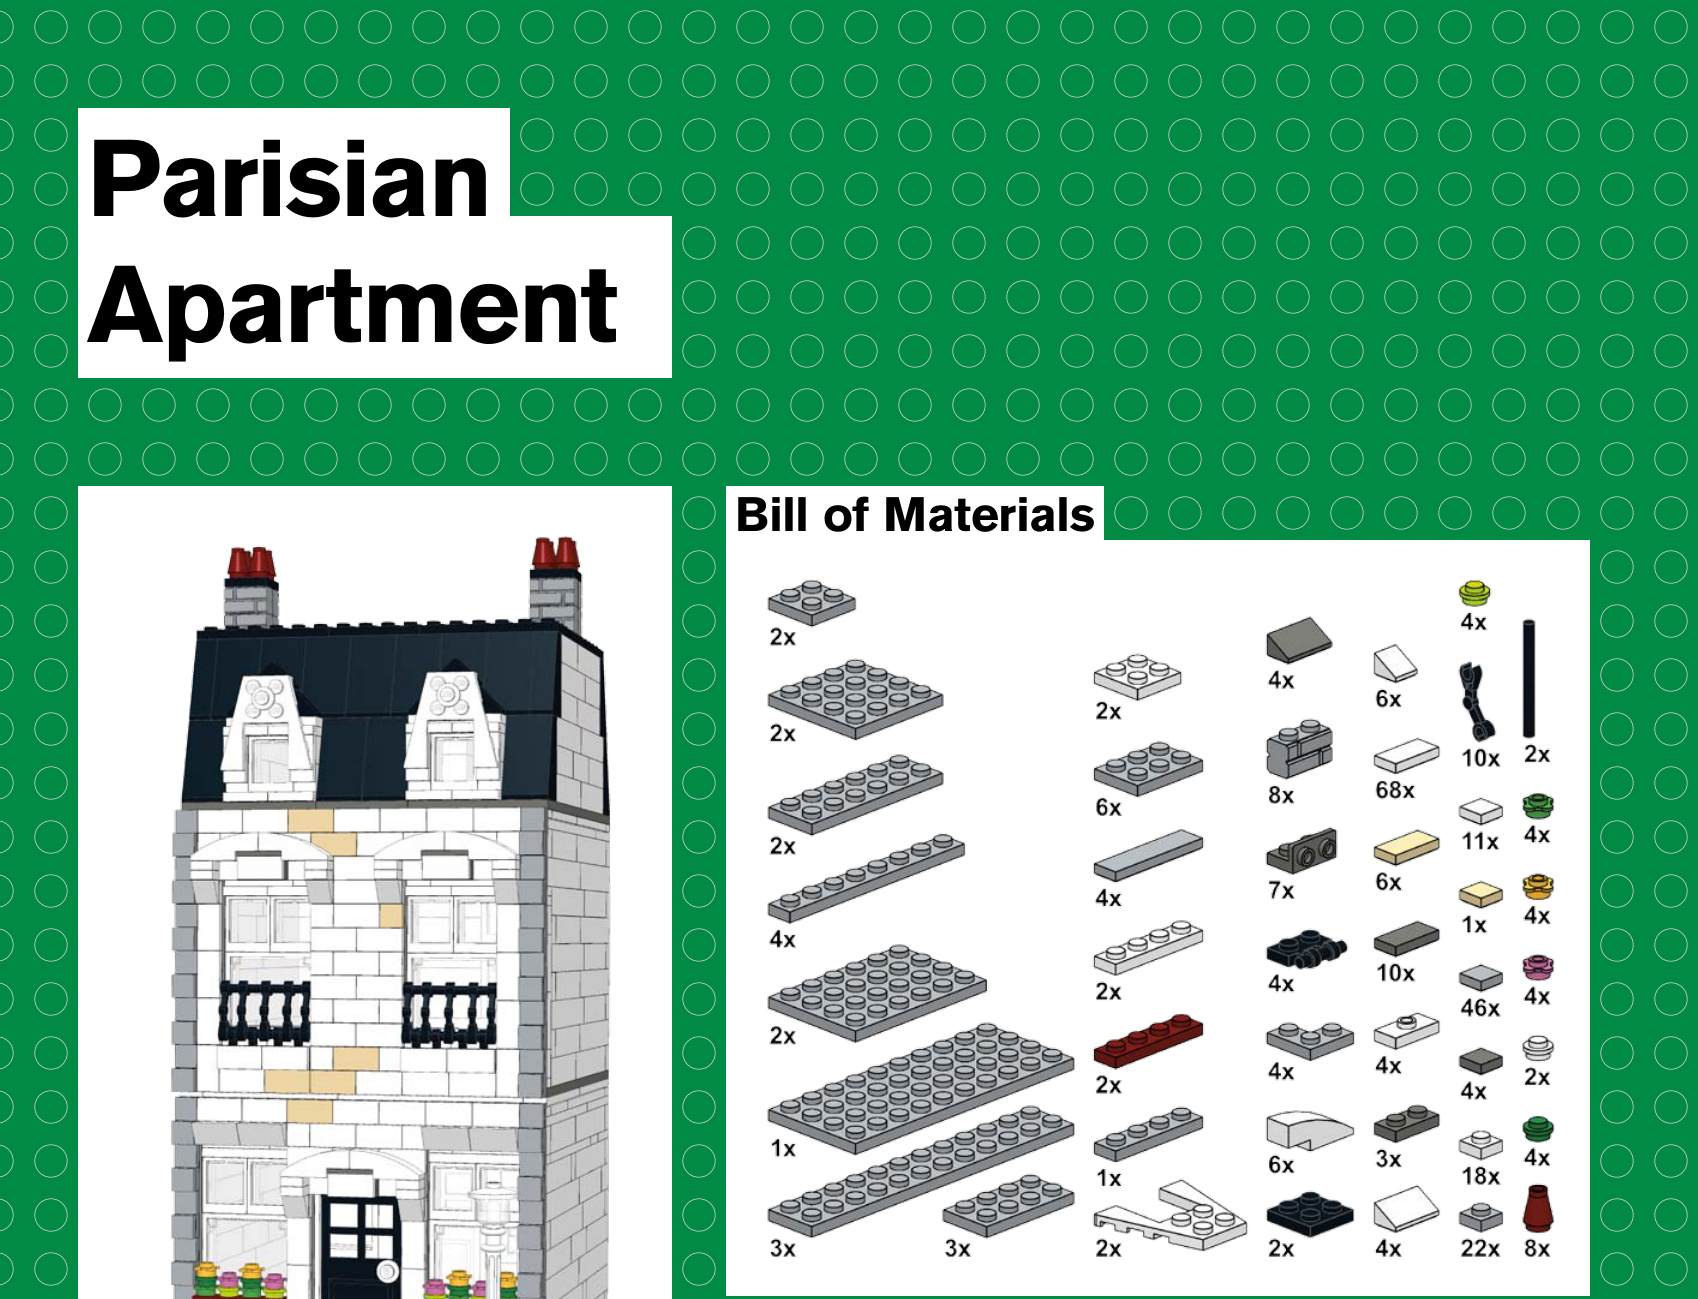
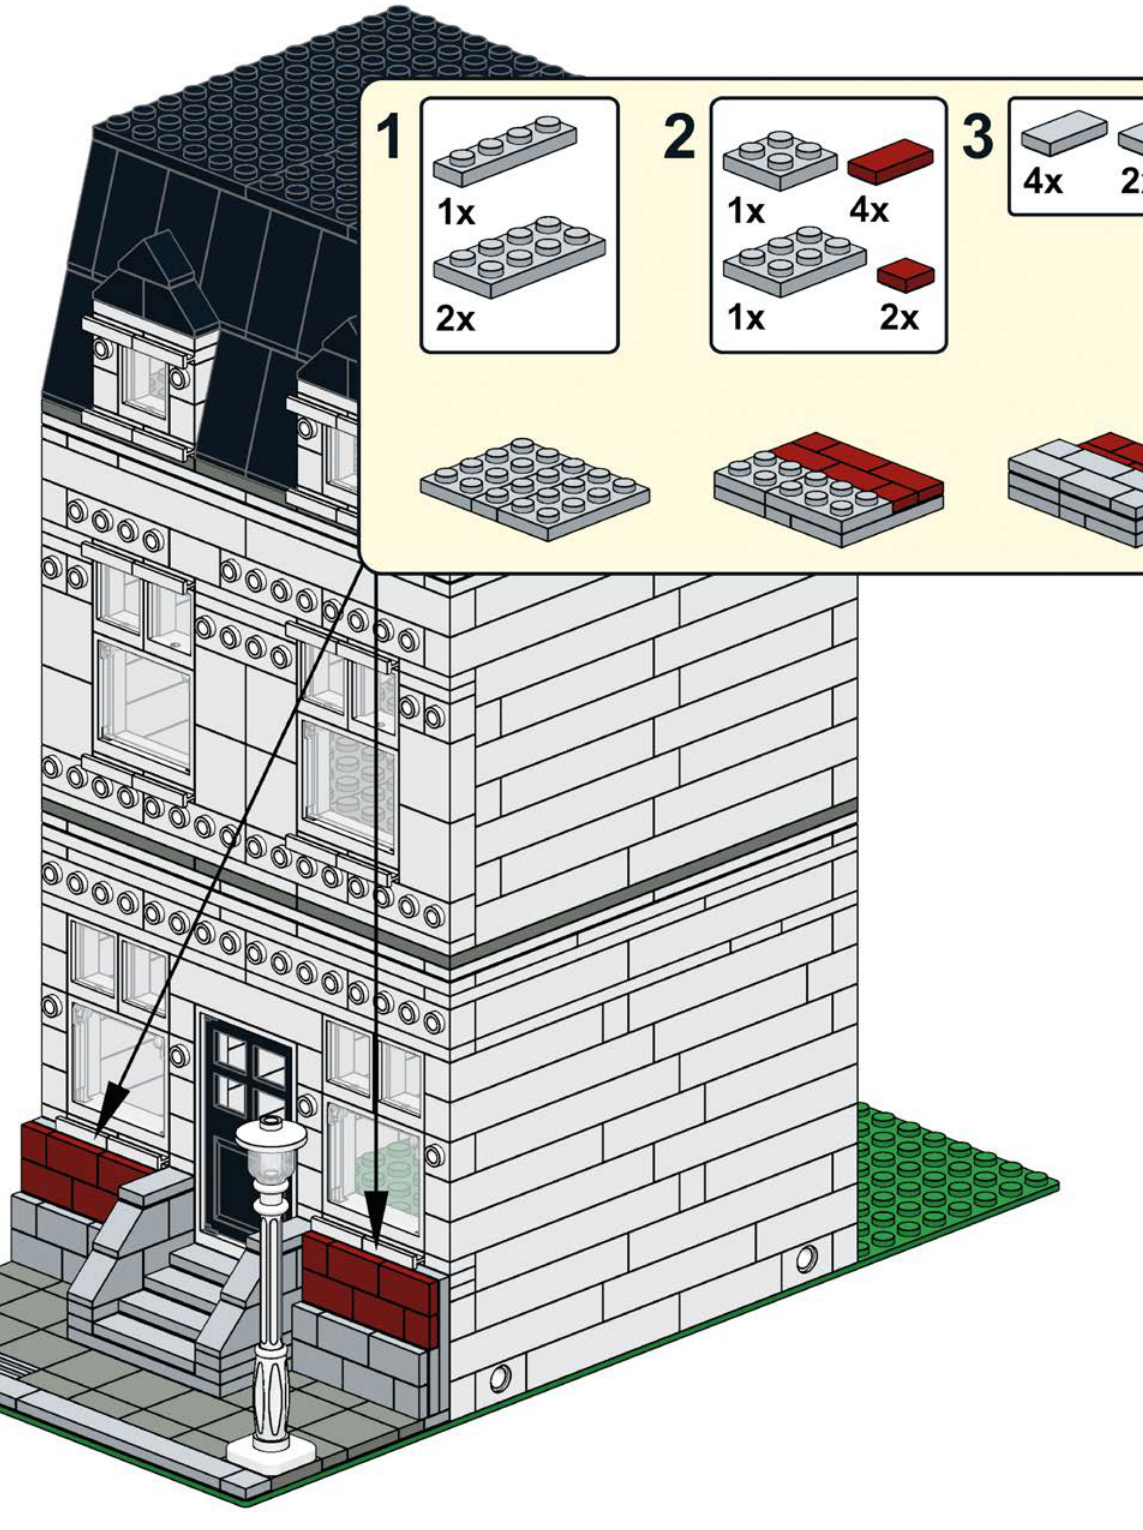
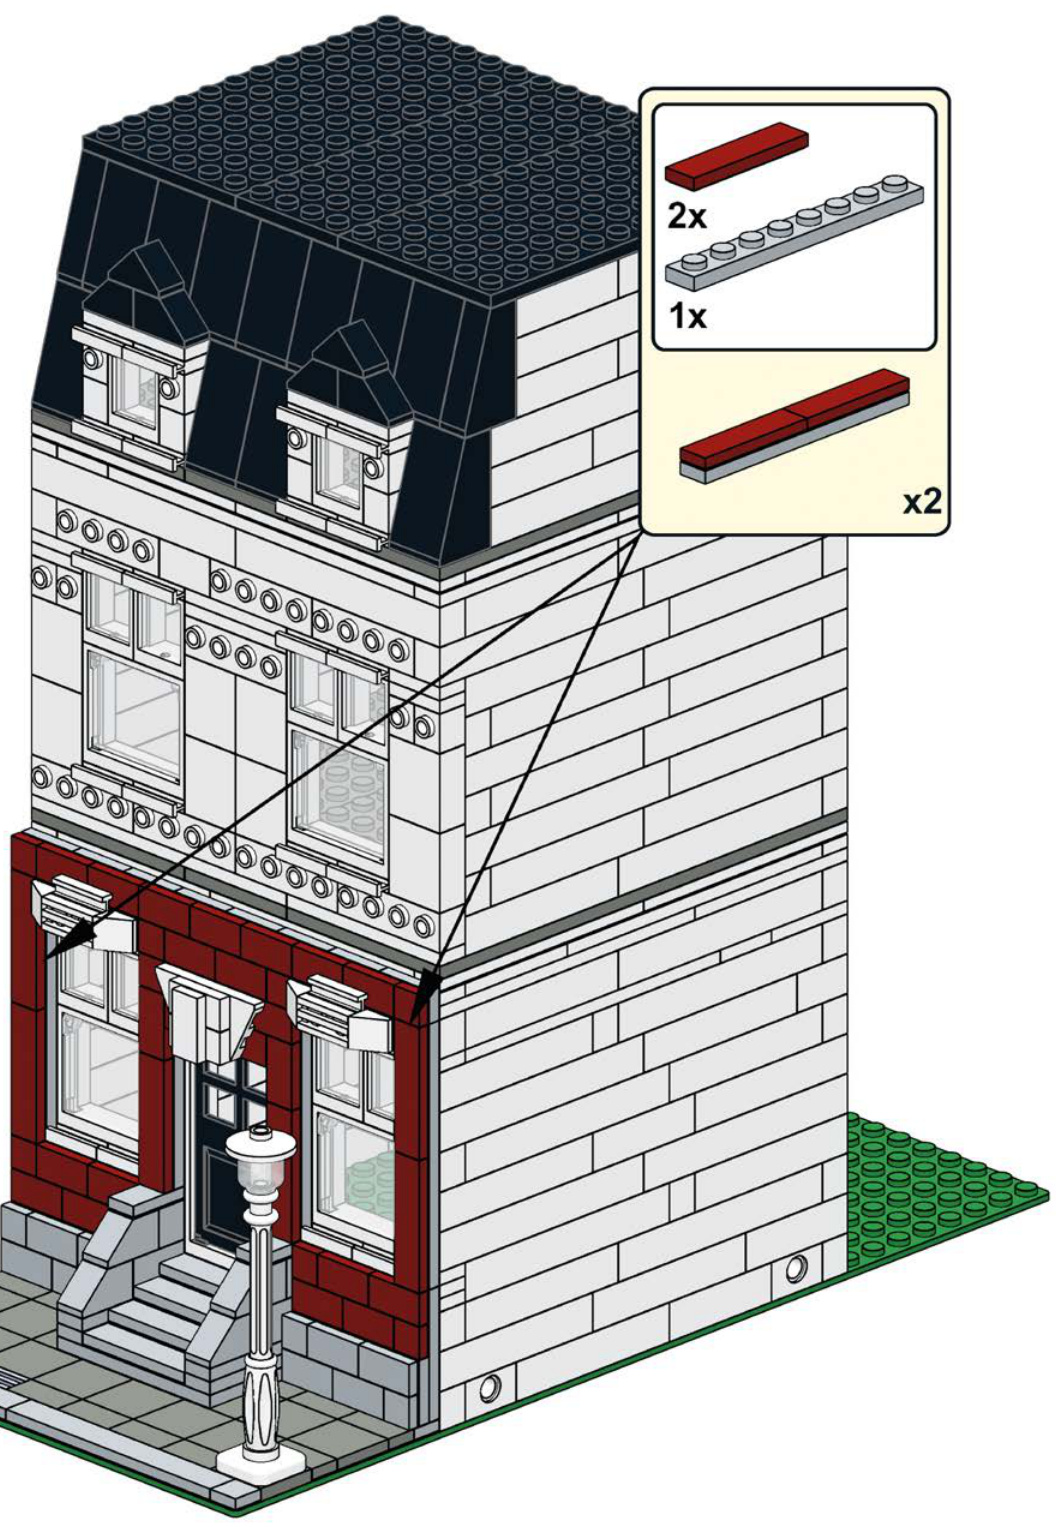
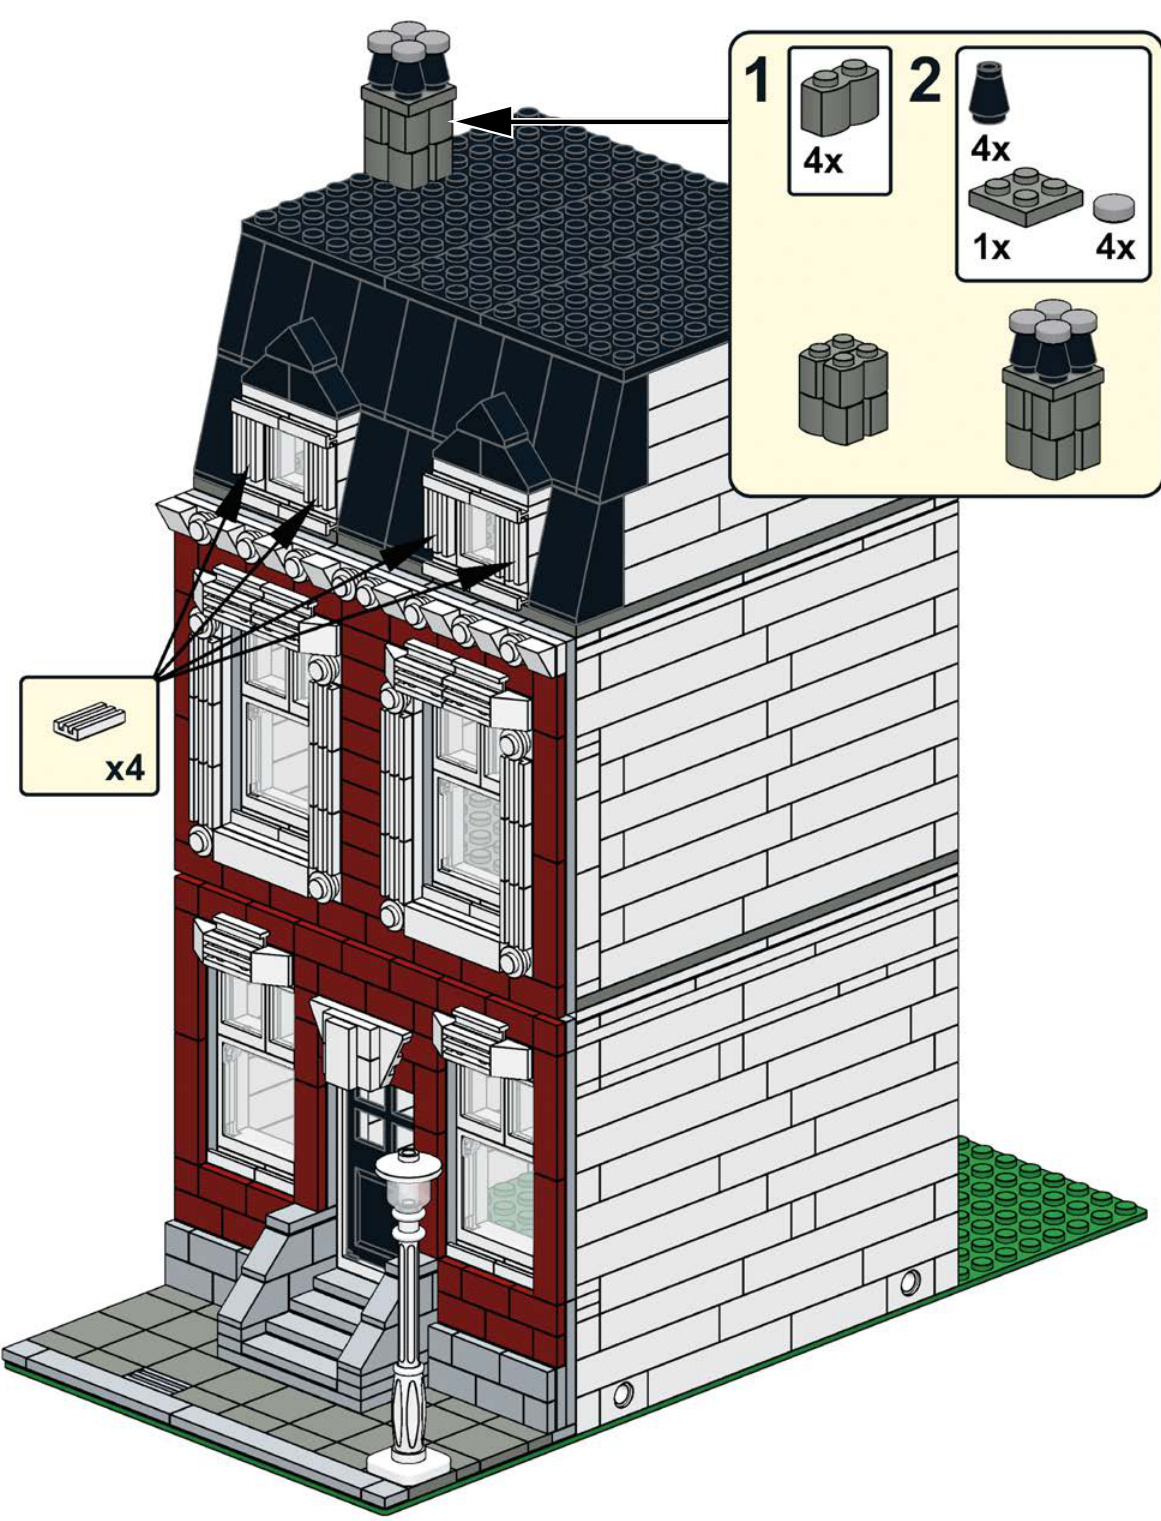
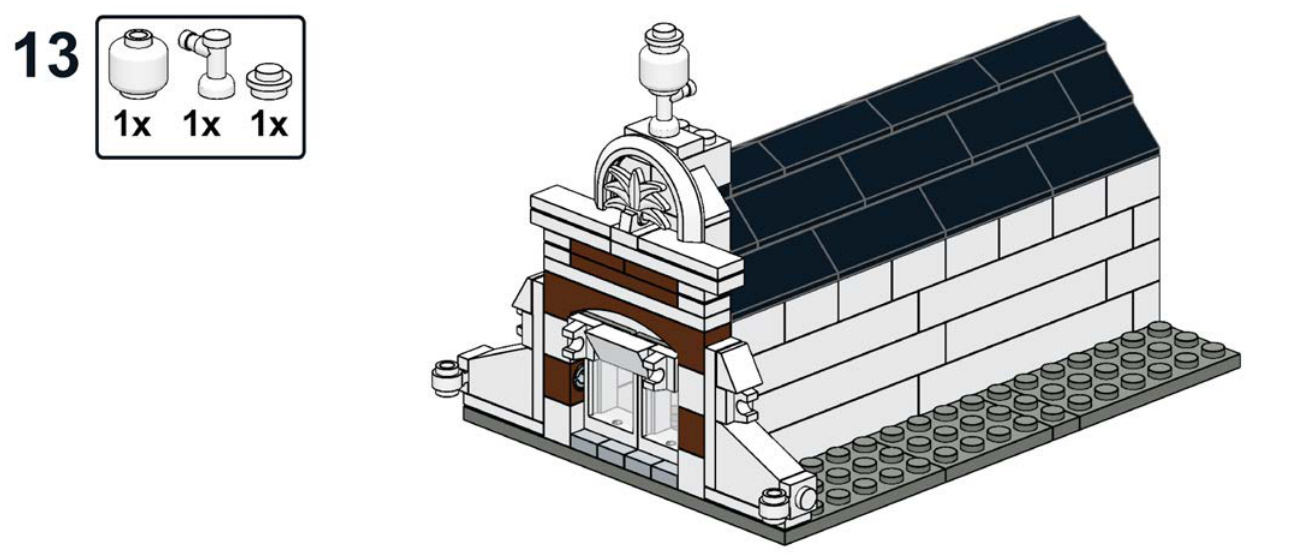
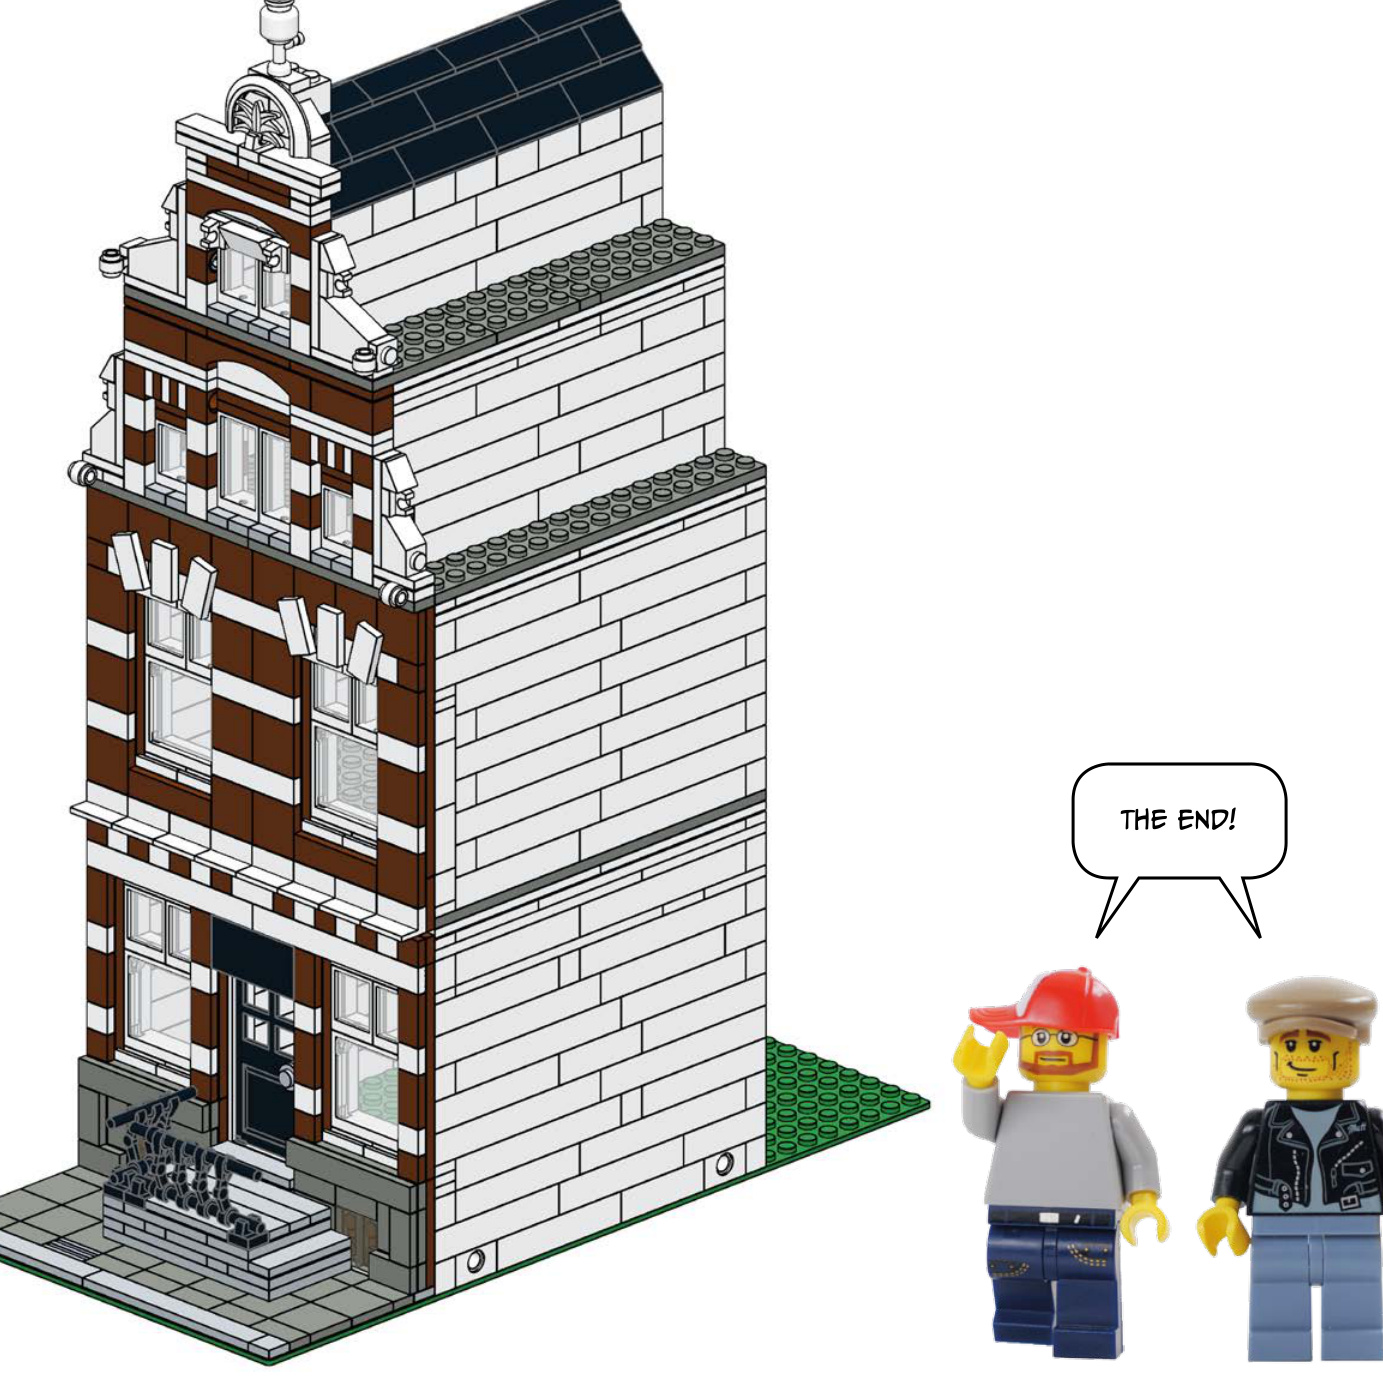
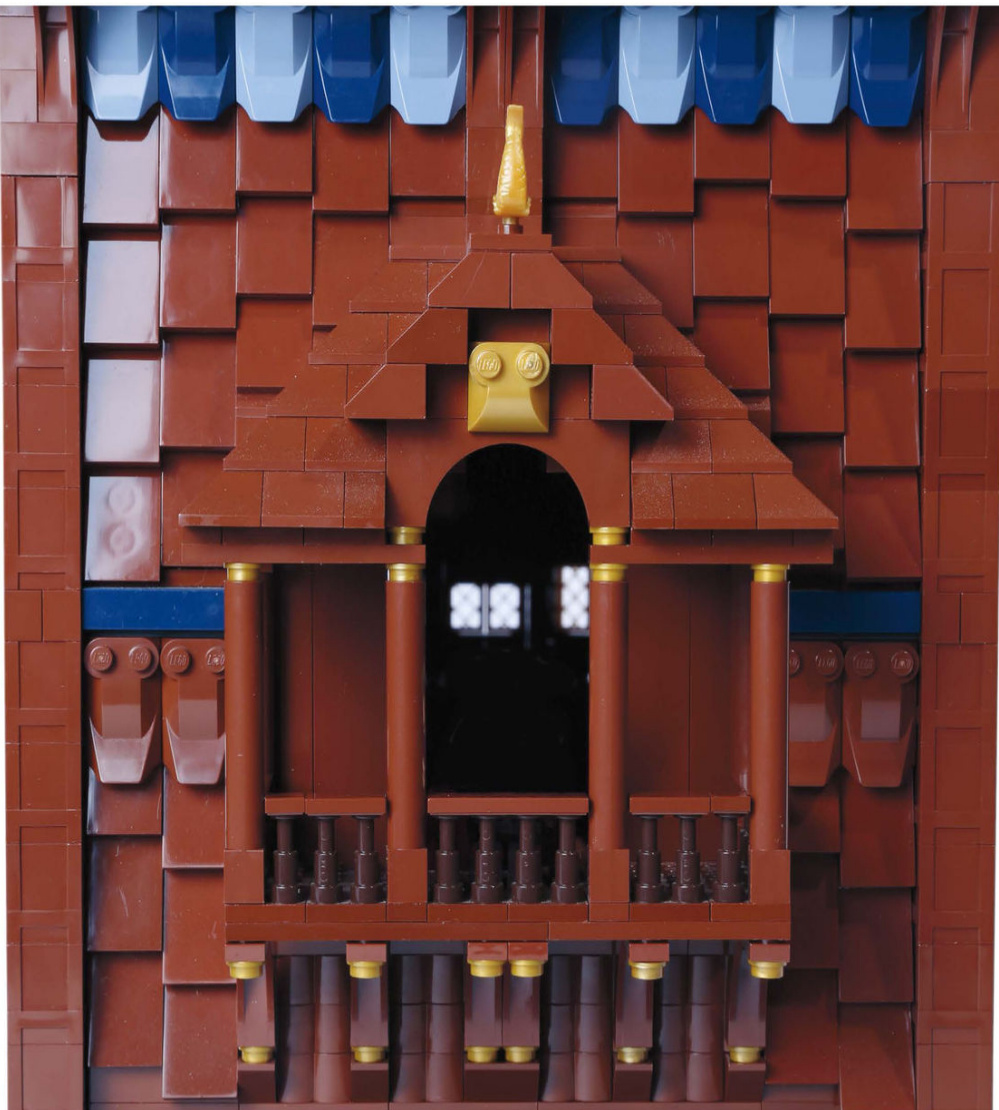
These houses represent two of the many styles that line the canals in Amsterdam. The skinny apartment building with steeply sloped roofs and the posts next to the canal make this scene unmistakably Dutch.
Modular Building Gallery 71
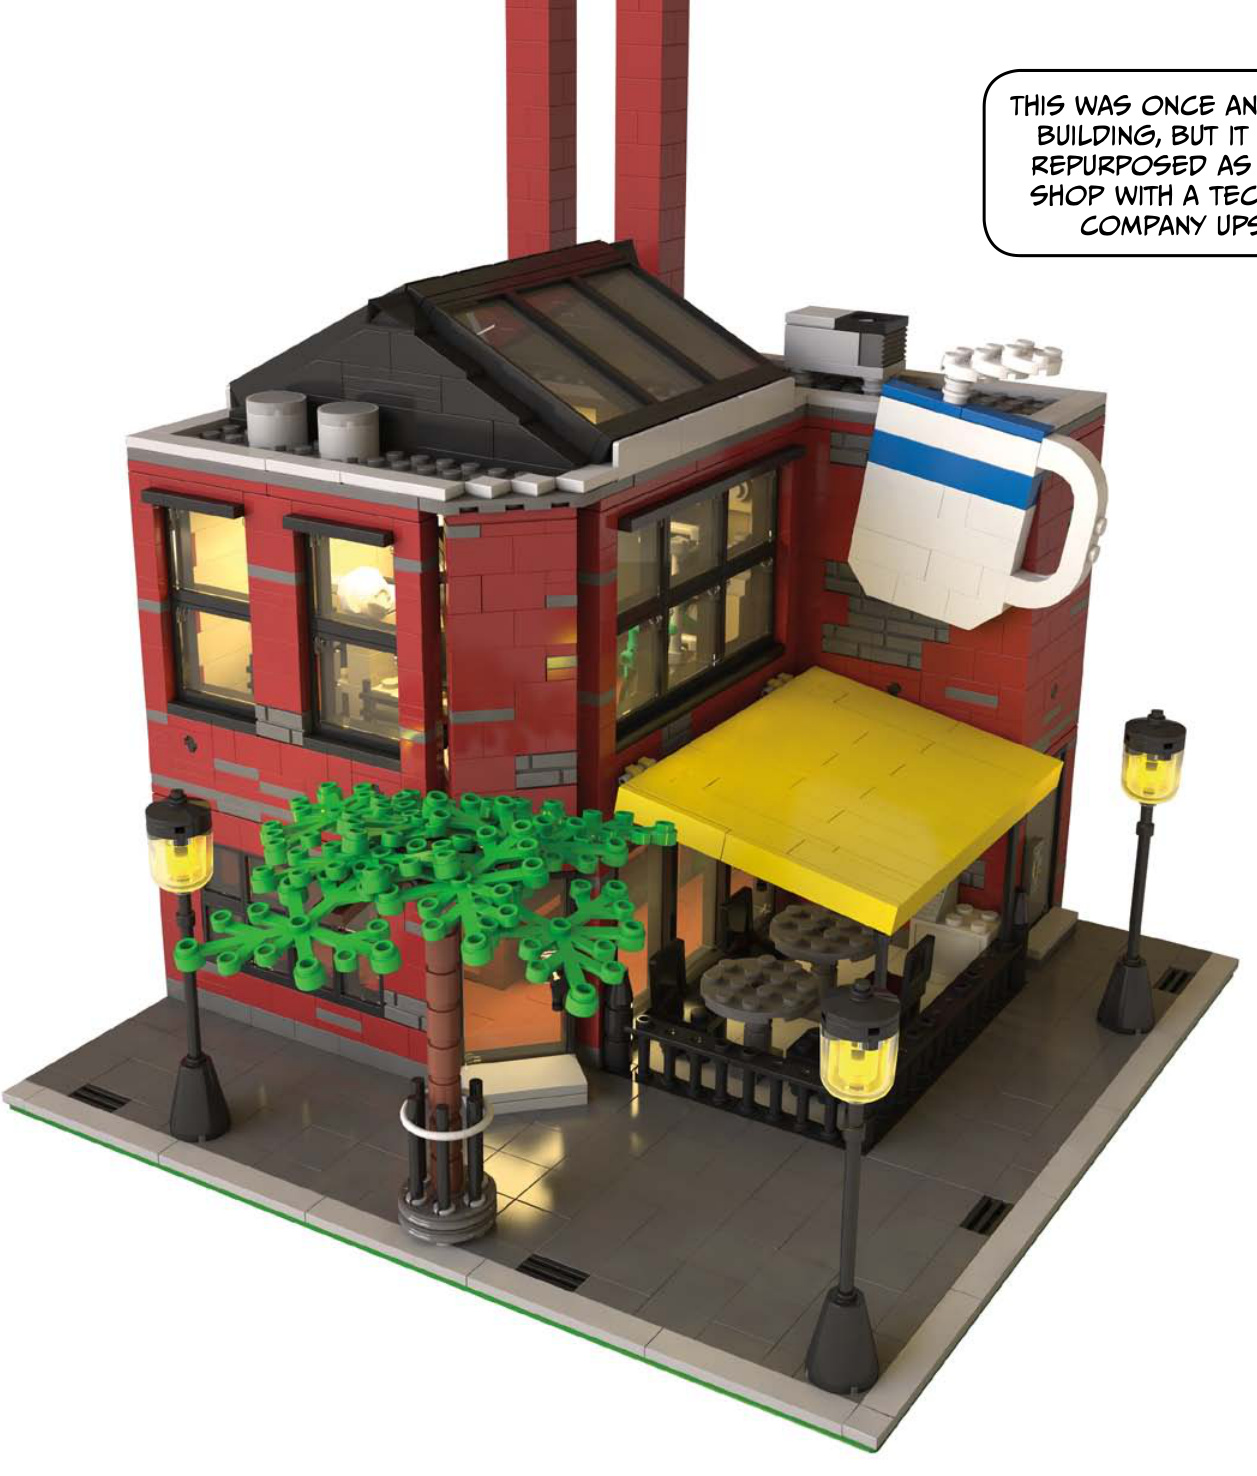
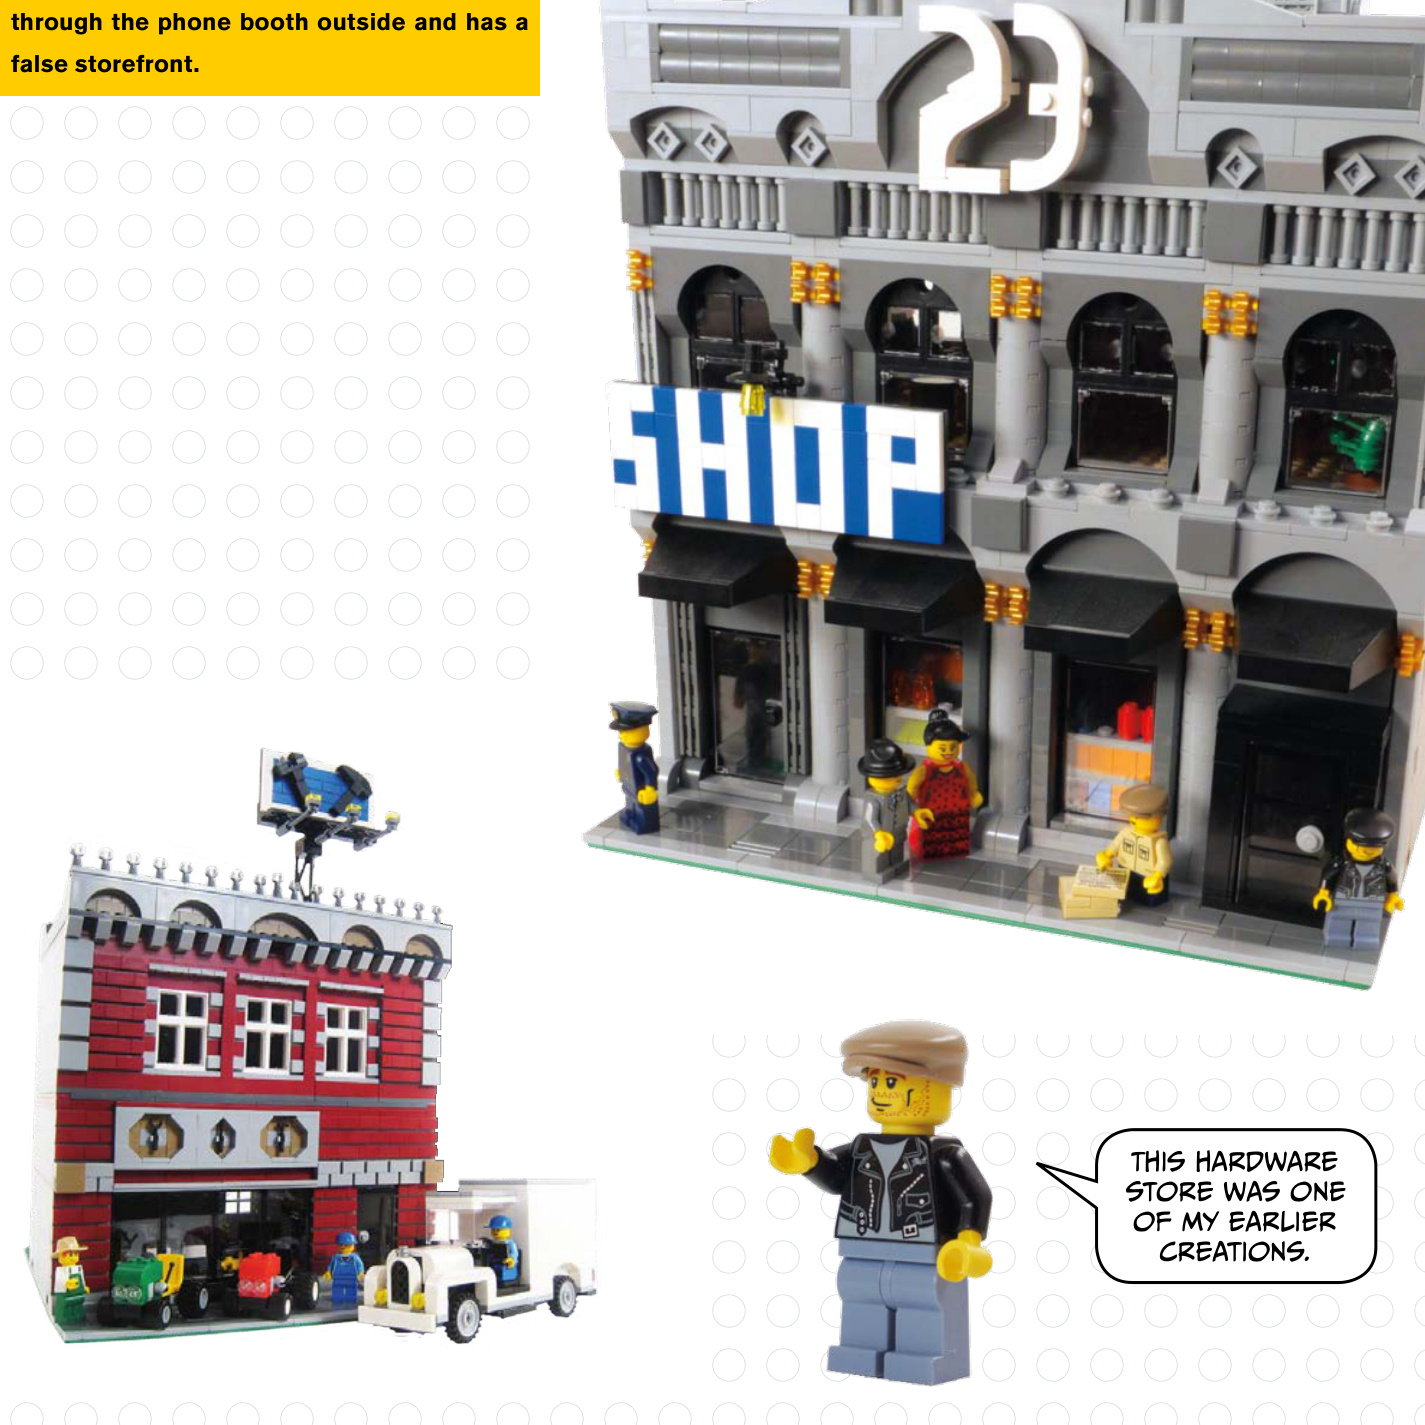
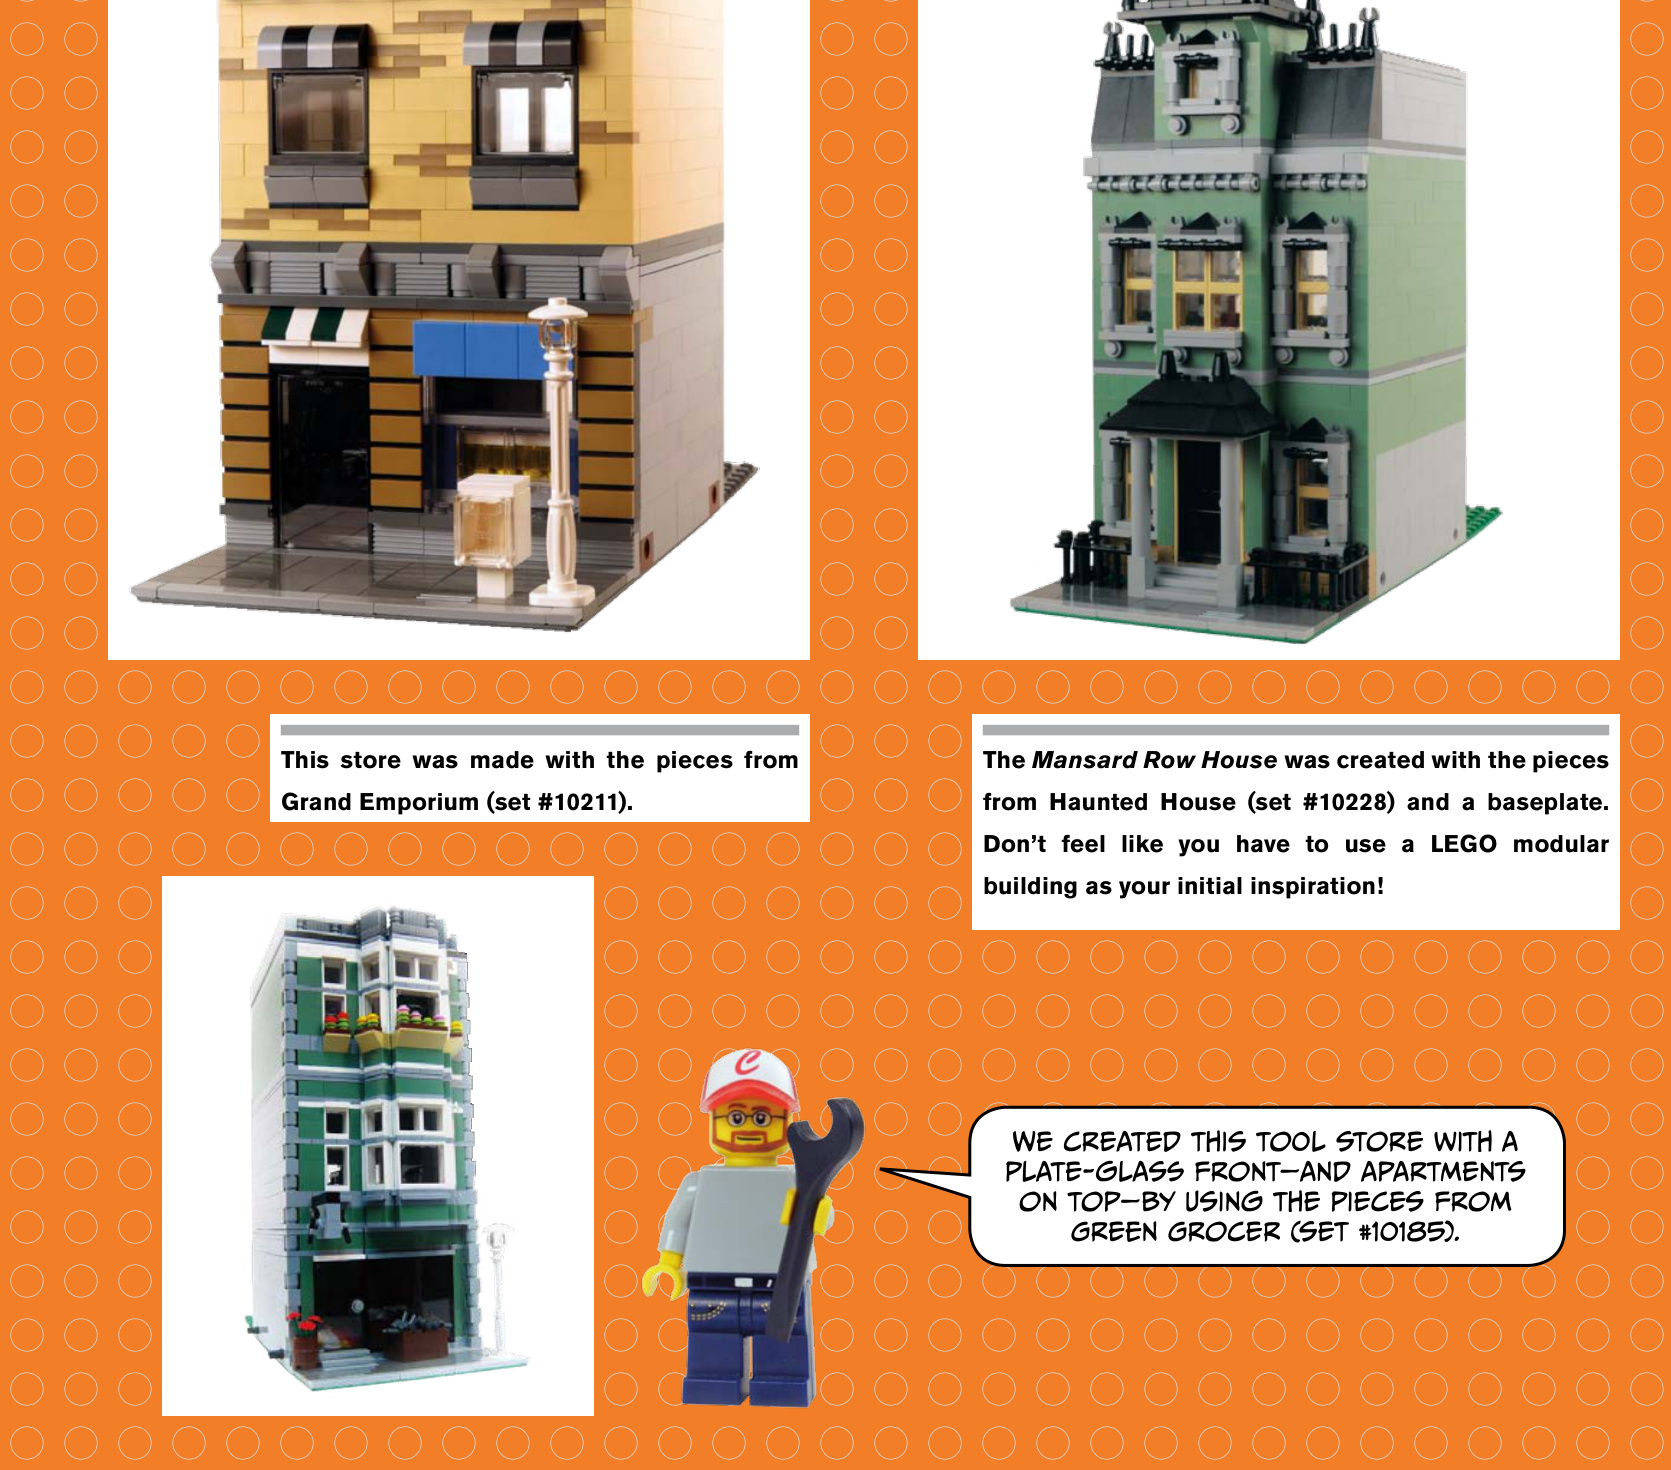
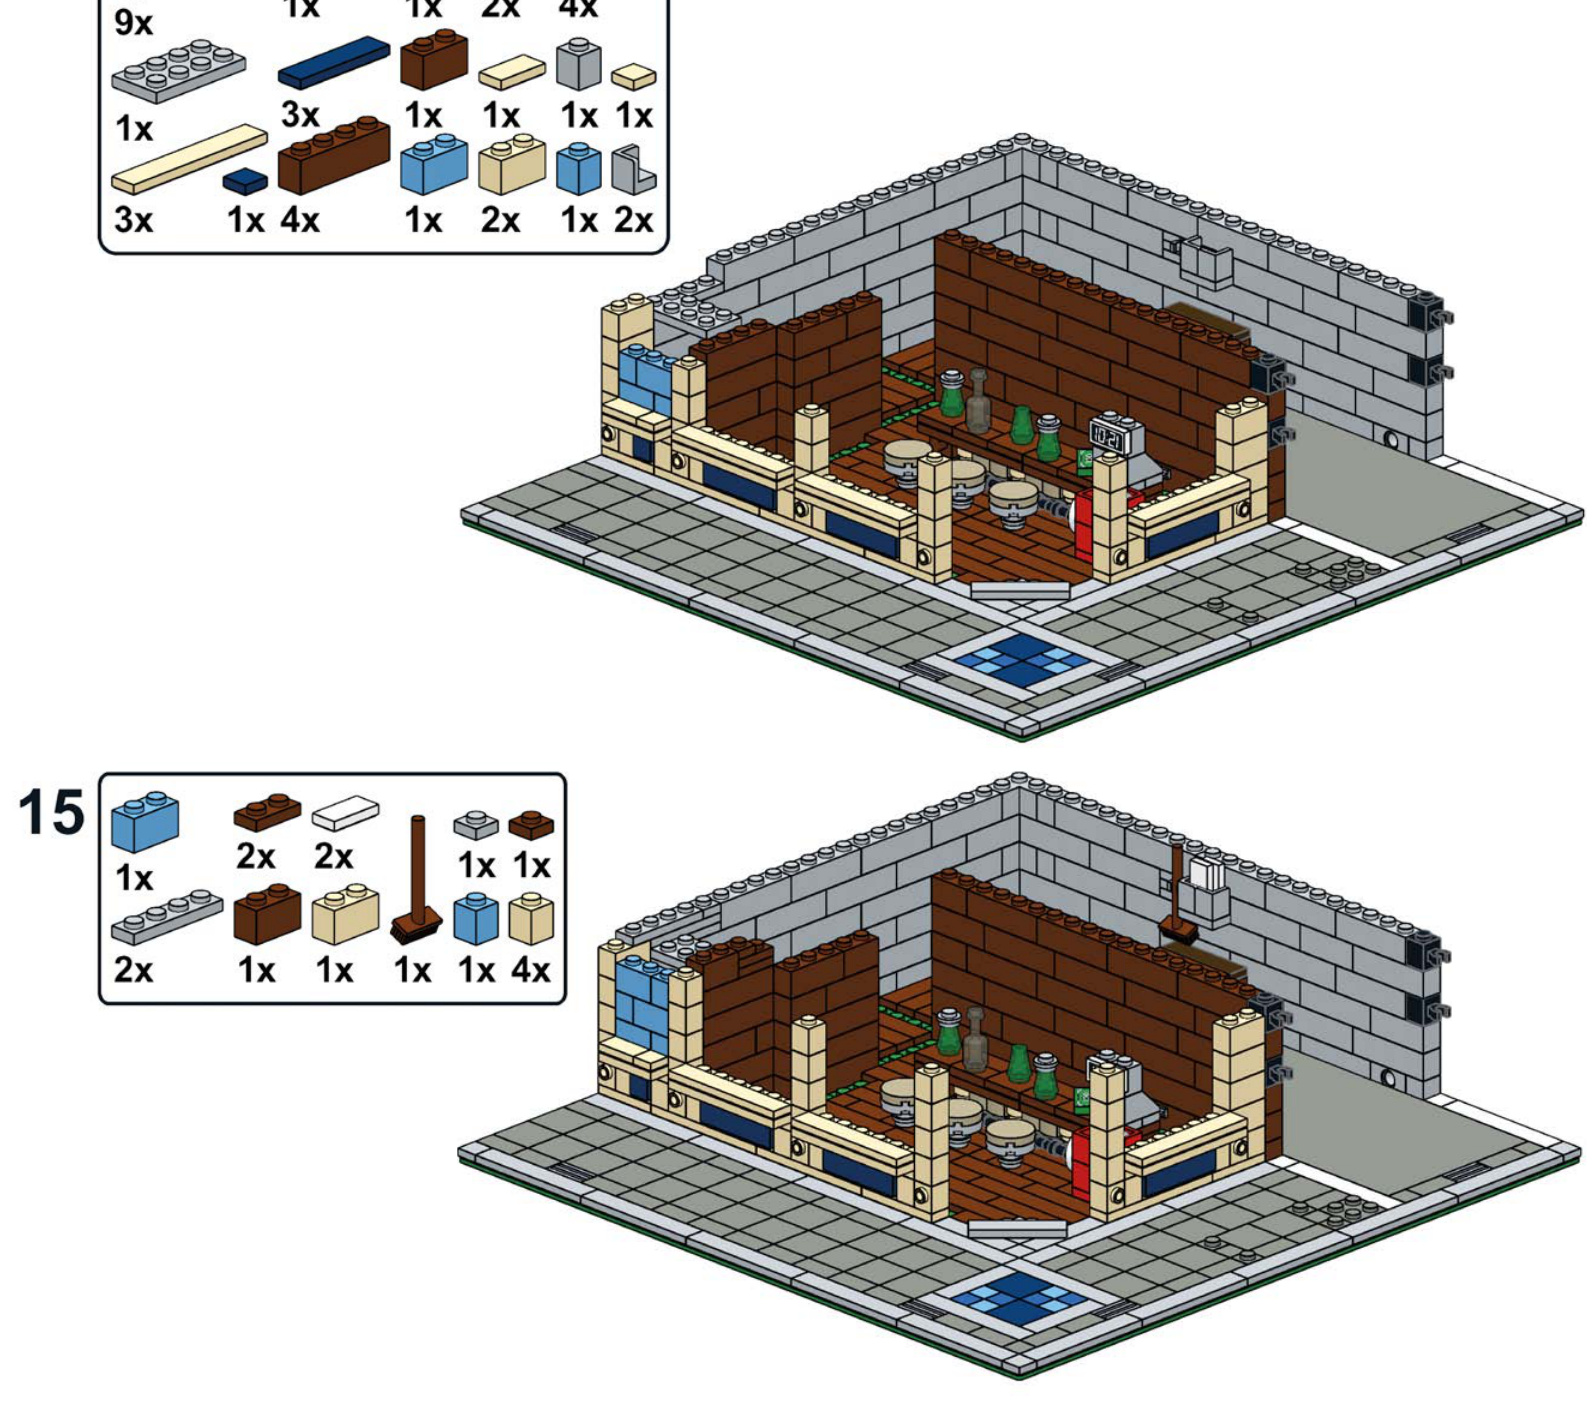
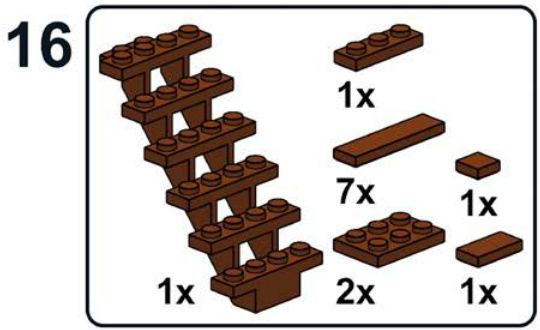
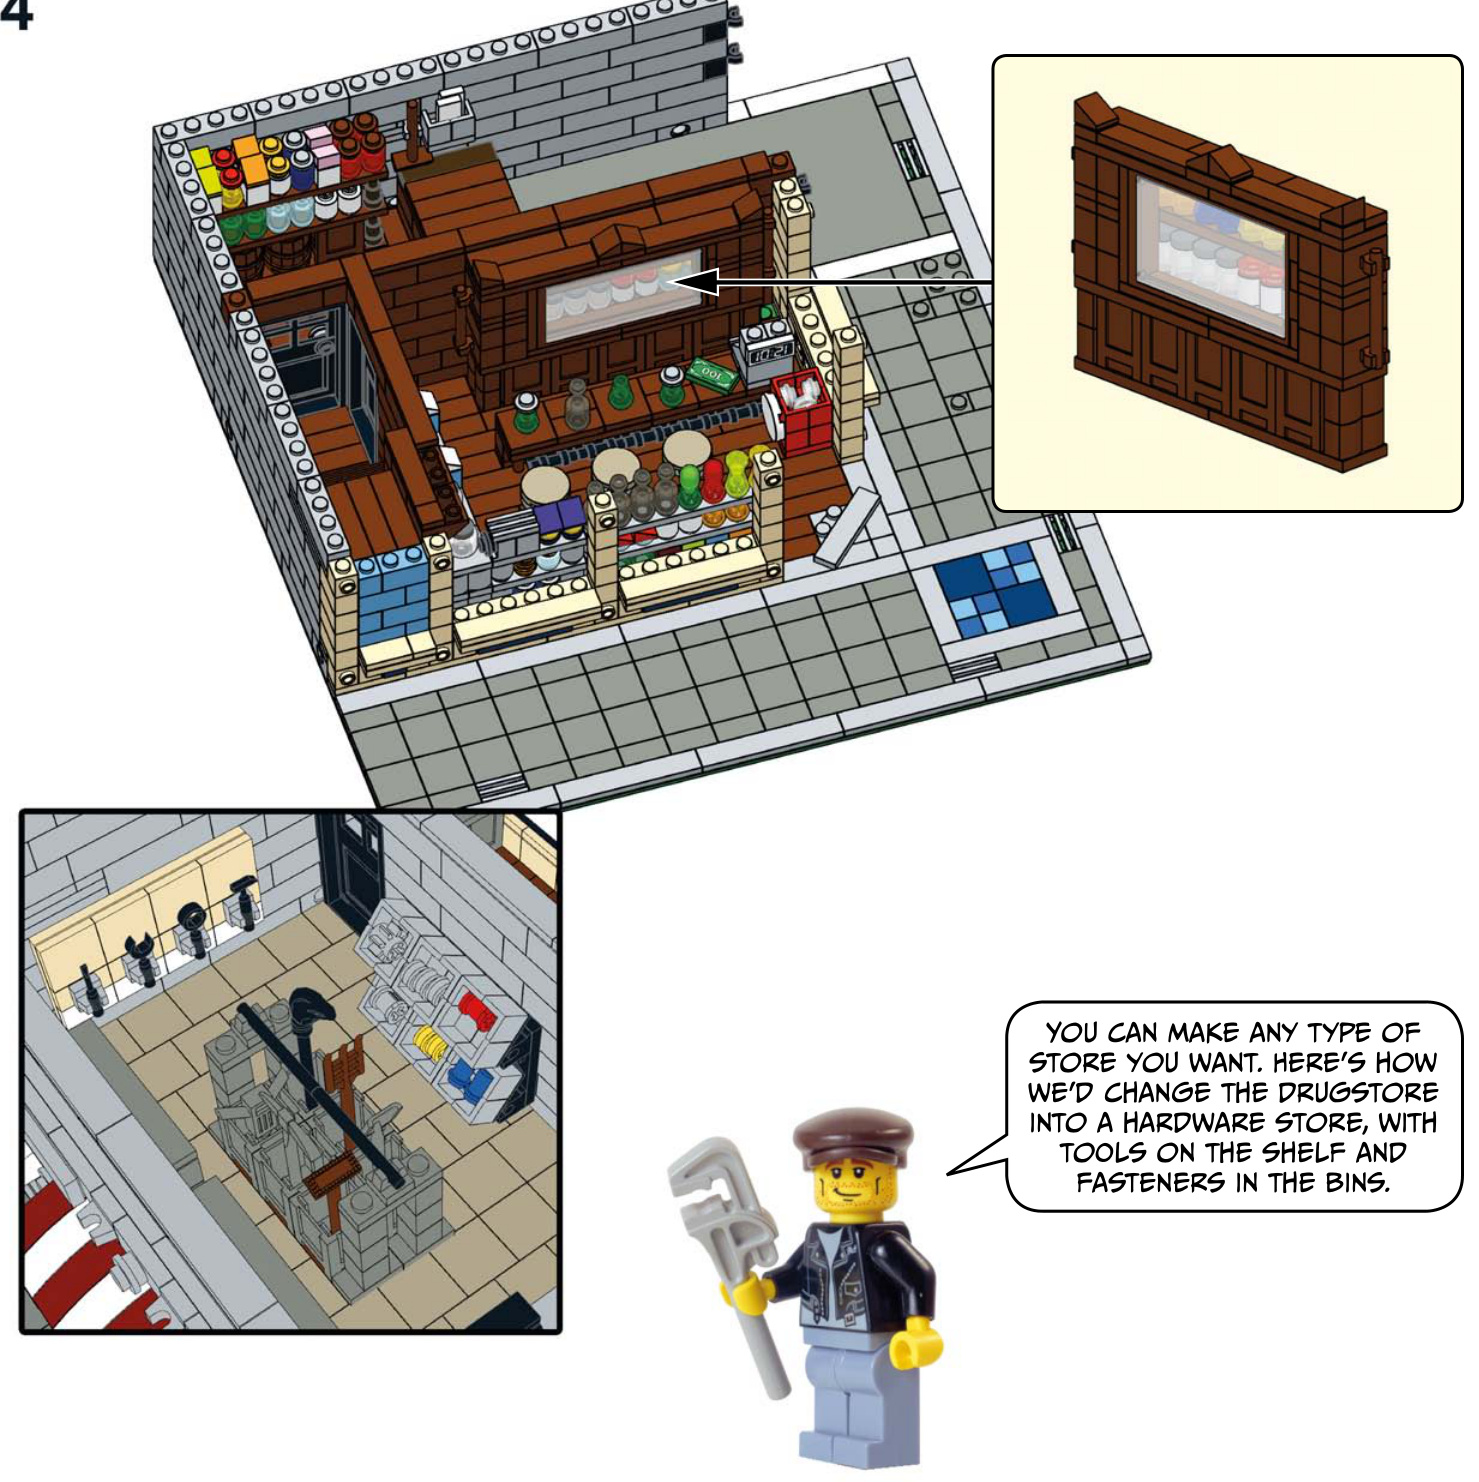
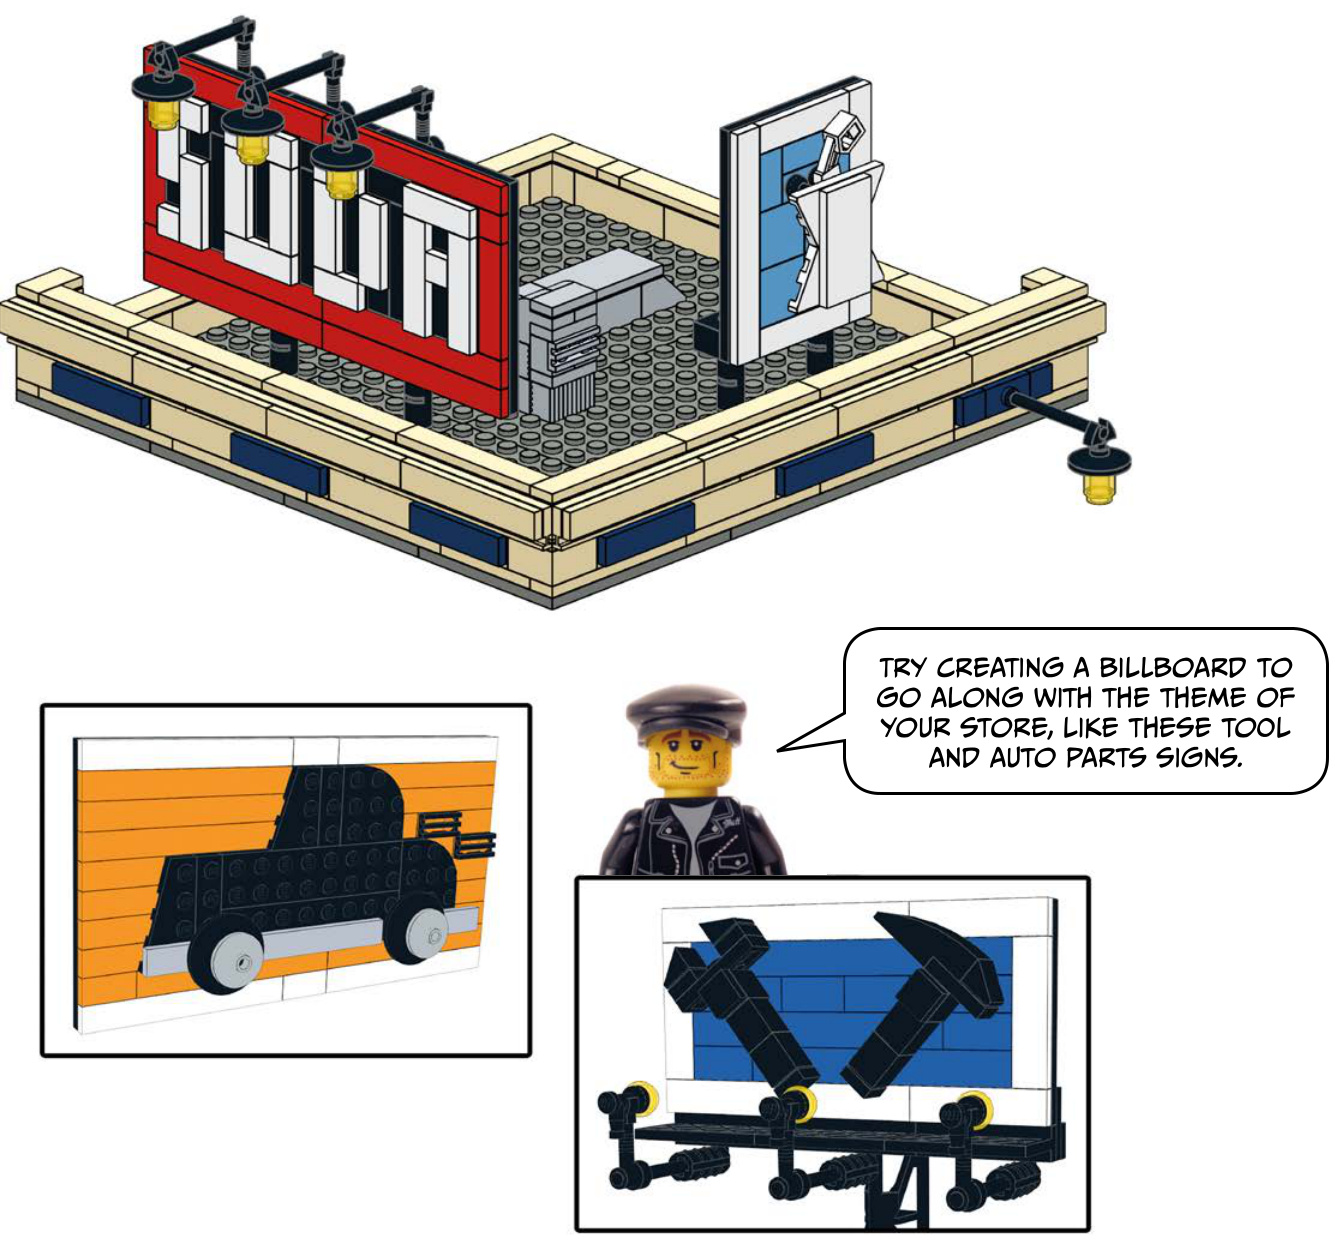
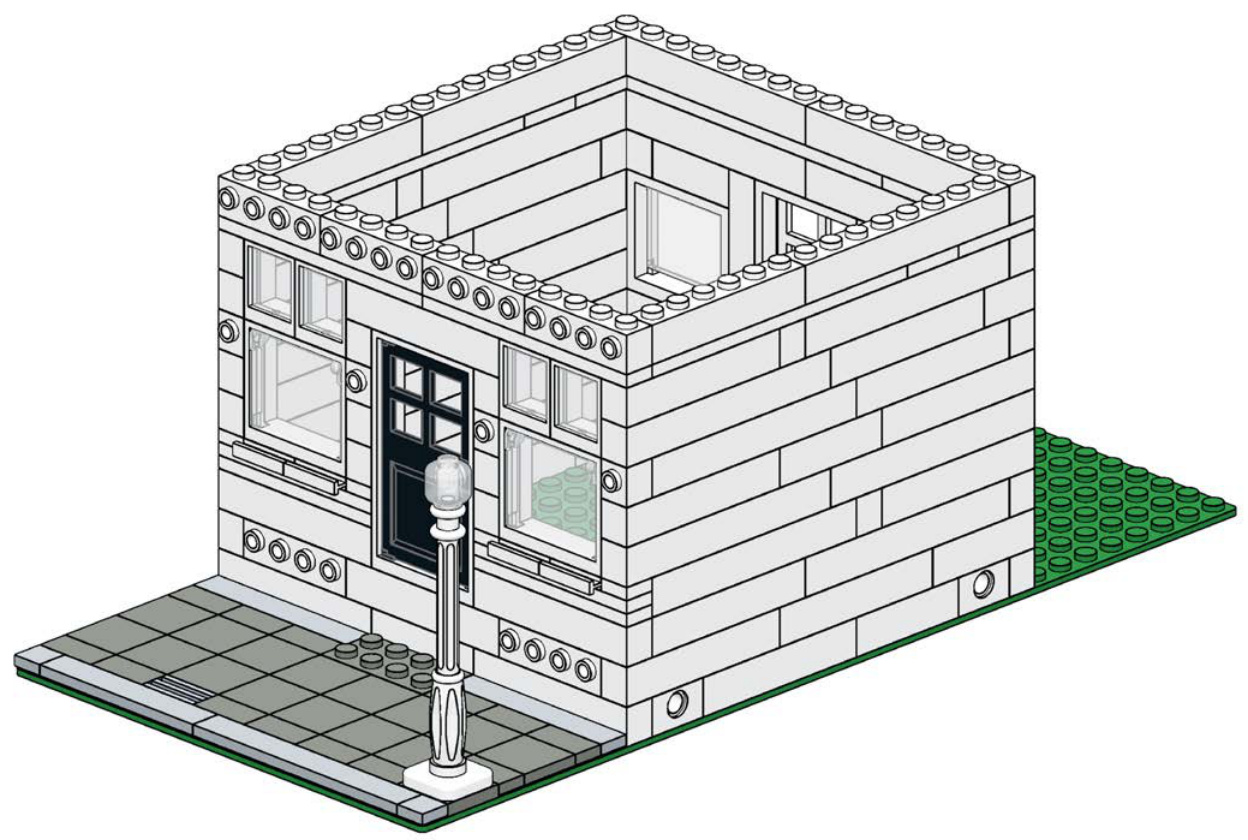
This corner hardware store is a variation on the Corner Drugstore (see page 81 for building instructions) and reuses the tool
74 Chapter 6
Modular Building Gallery 75
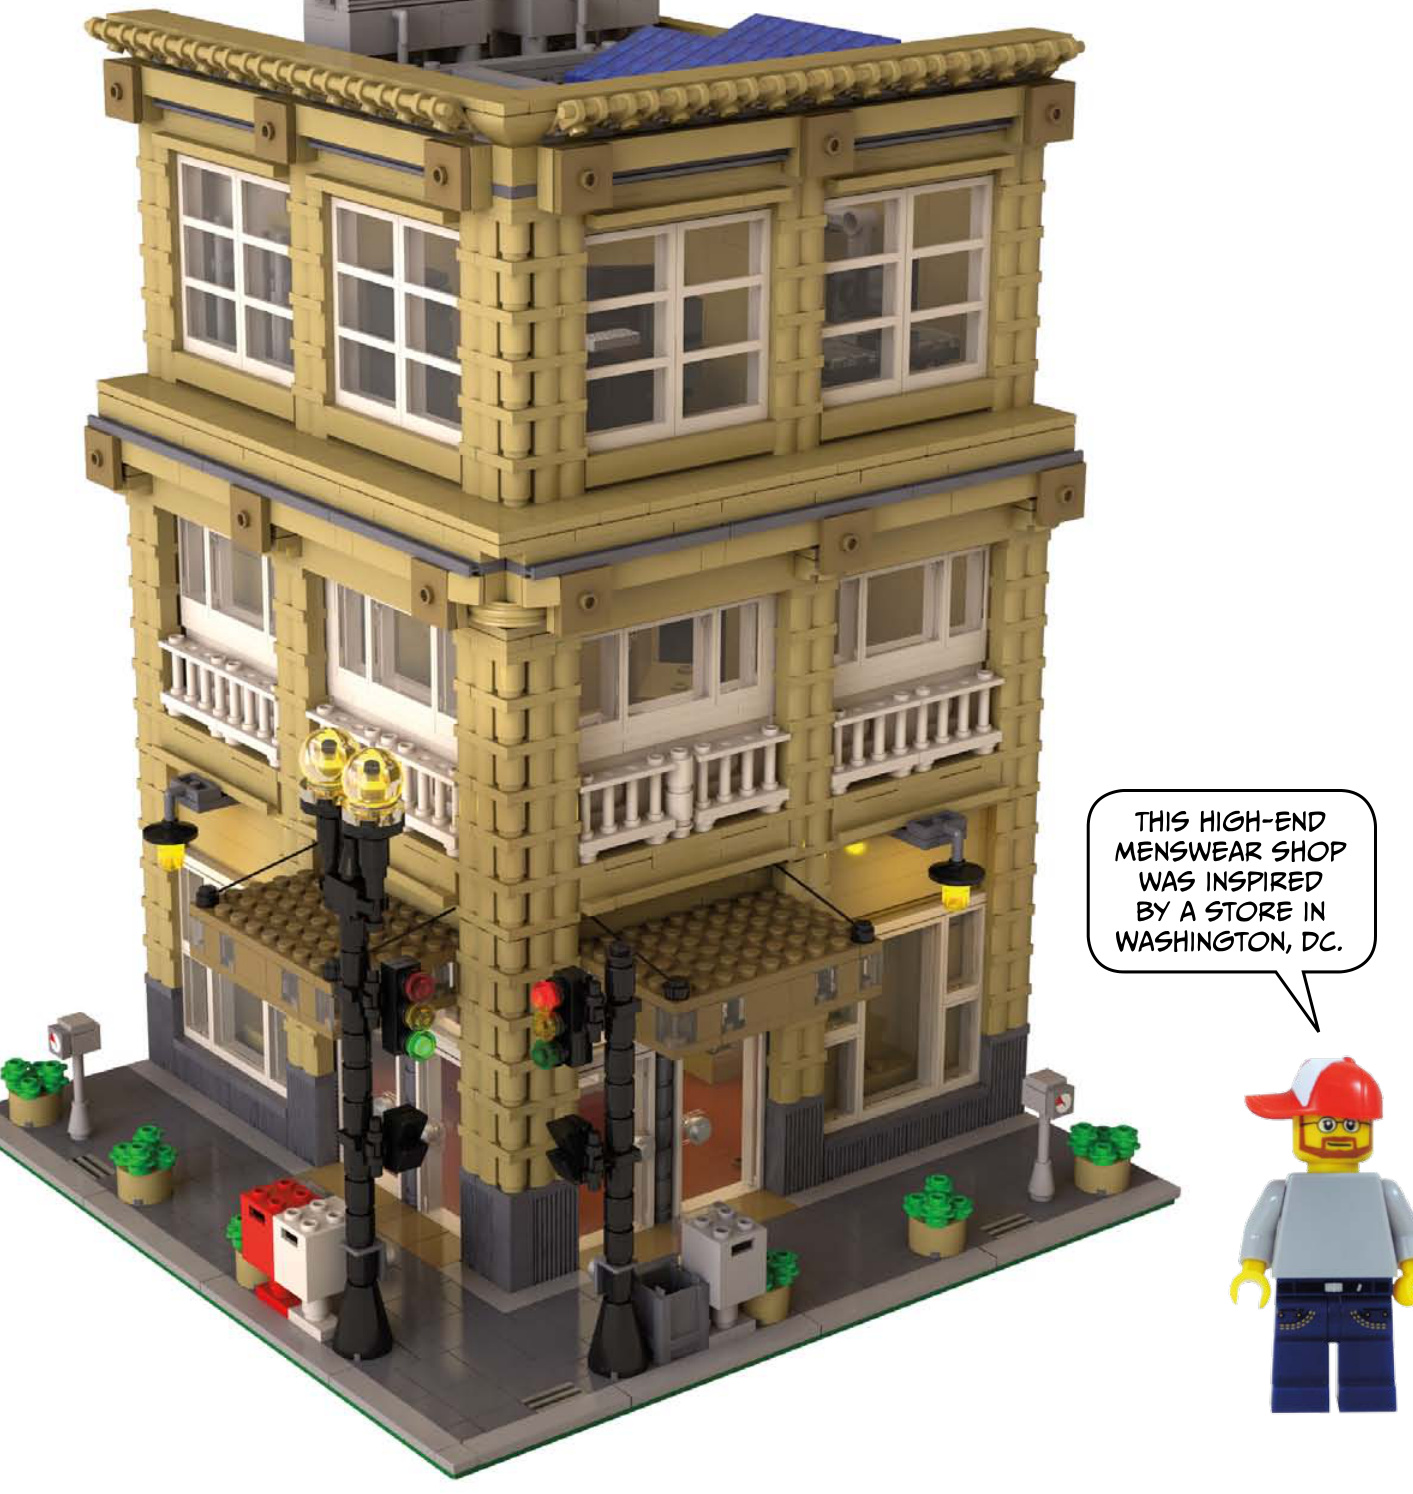
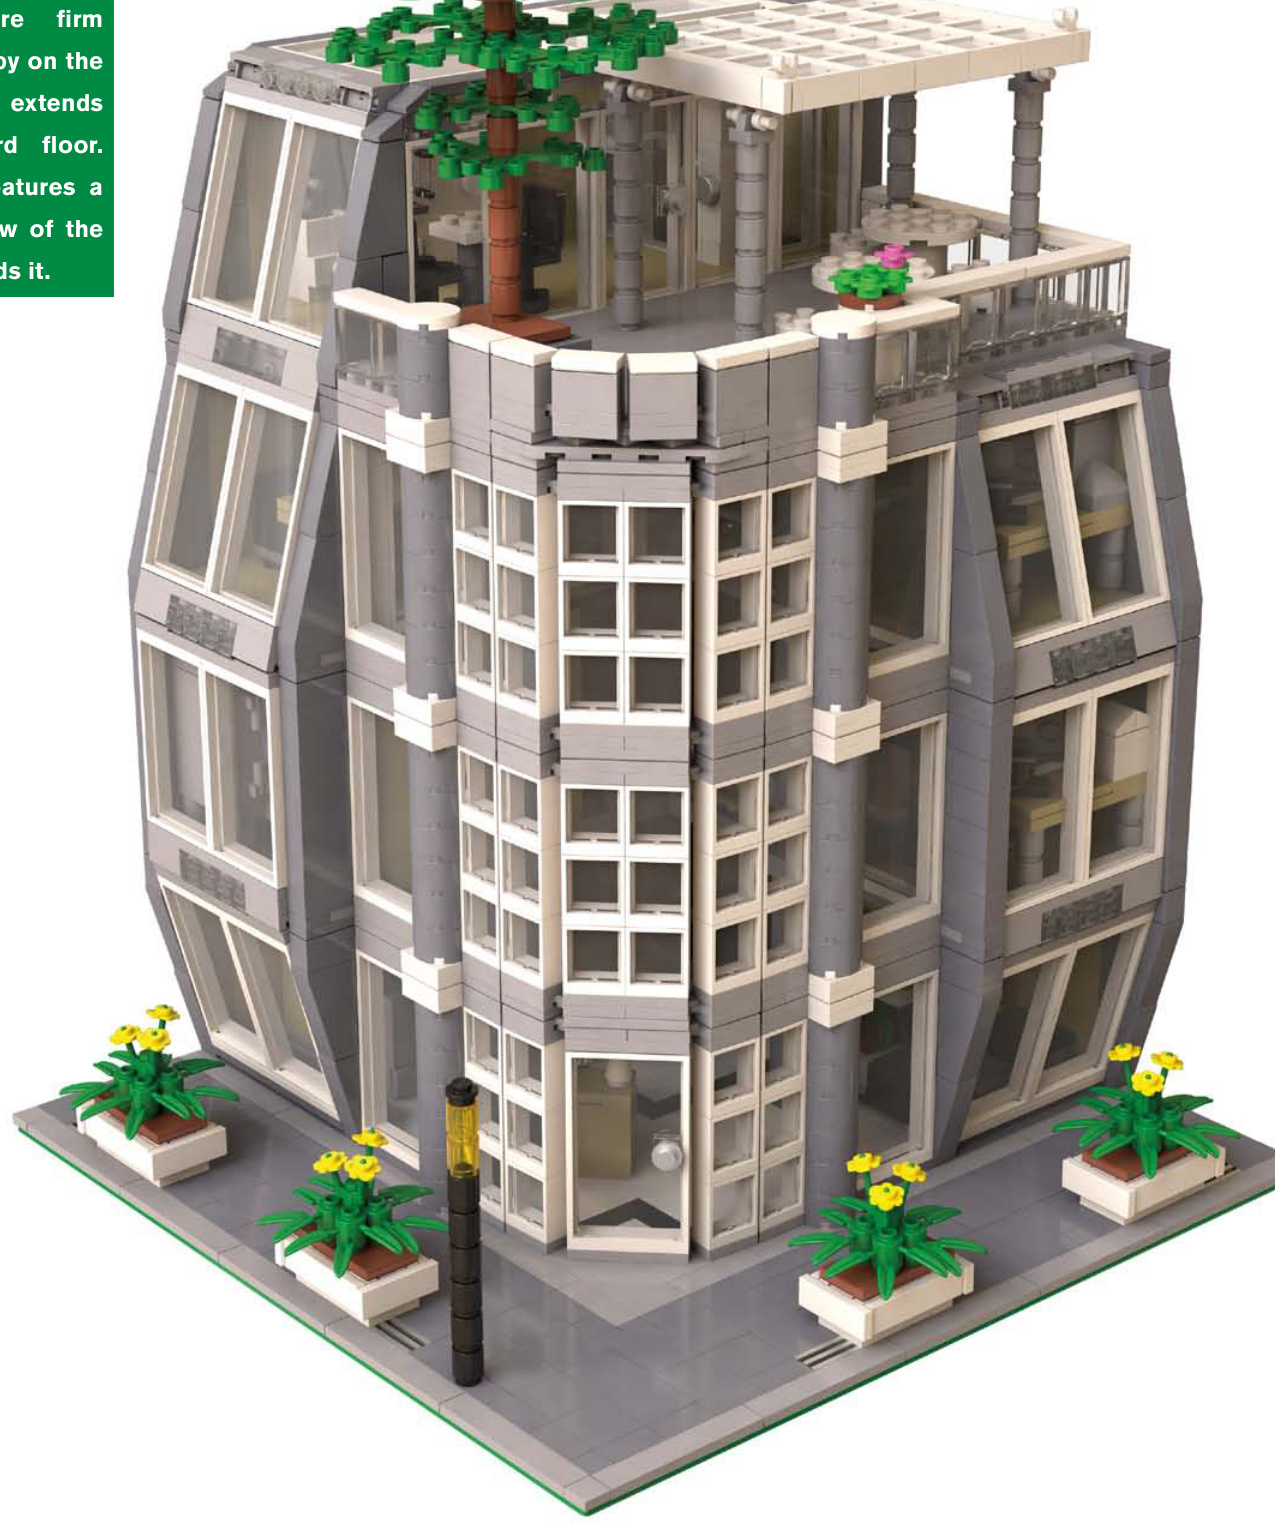
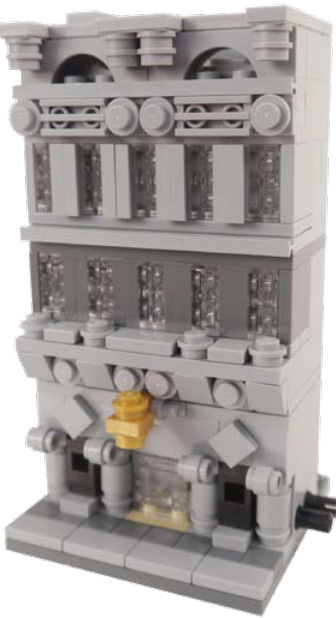
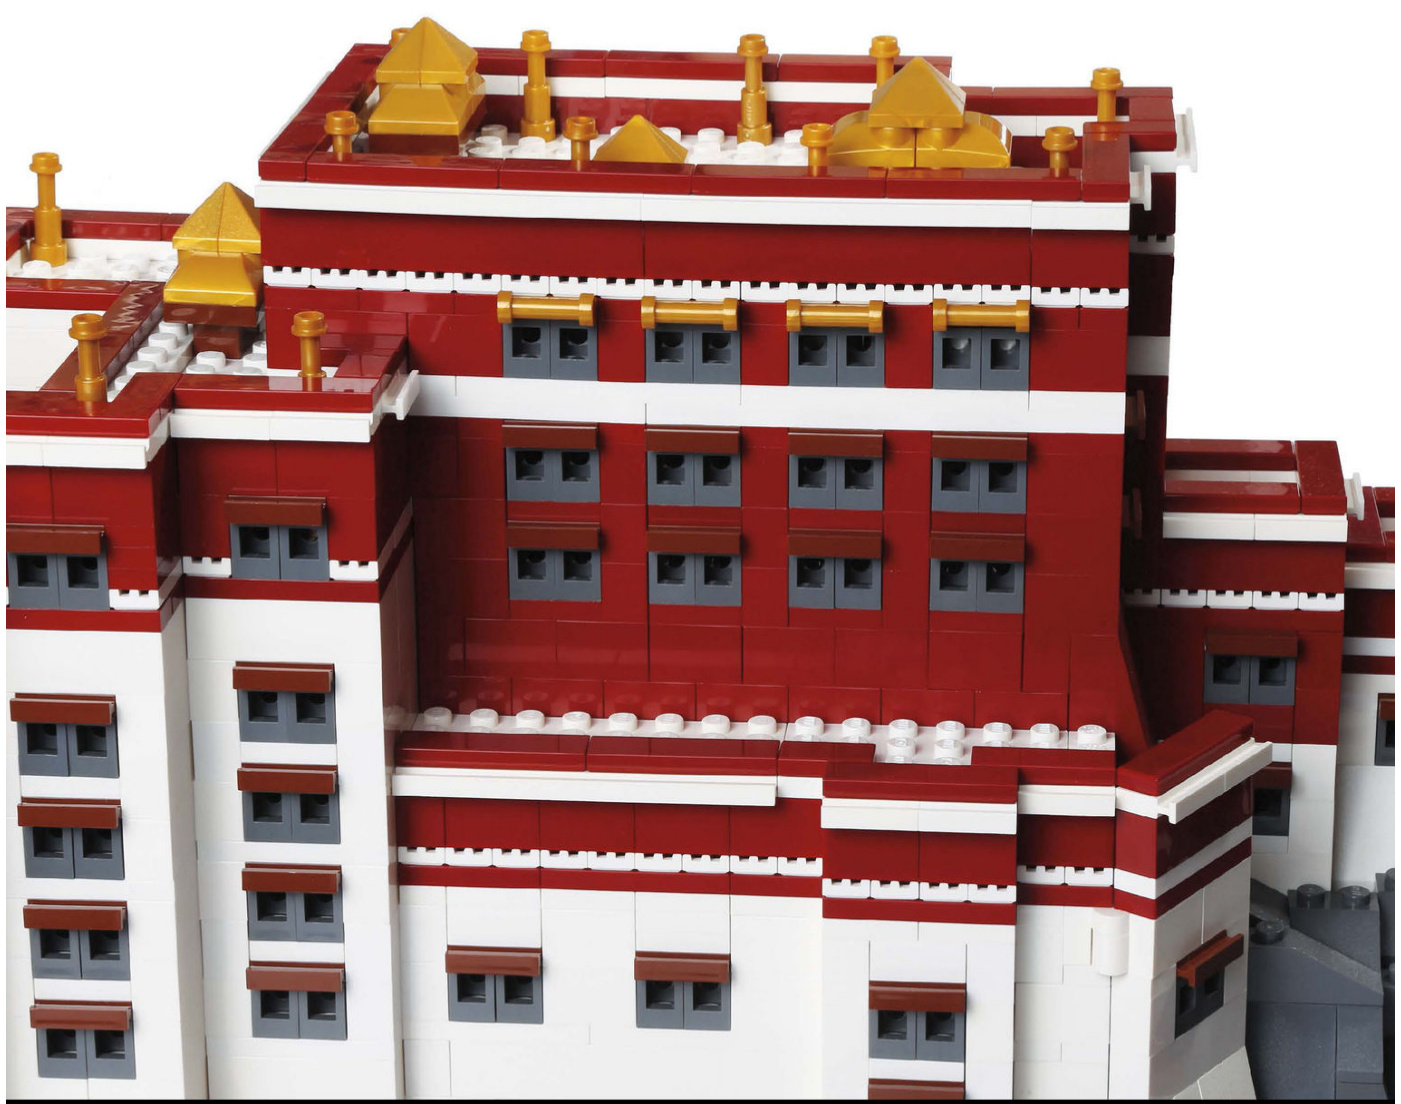
This architecture firm has an open lobby on the first floor that extends up to the third floor. The top floor features a commanding view of the city that surrounds it.
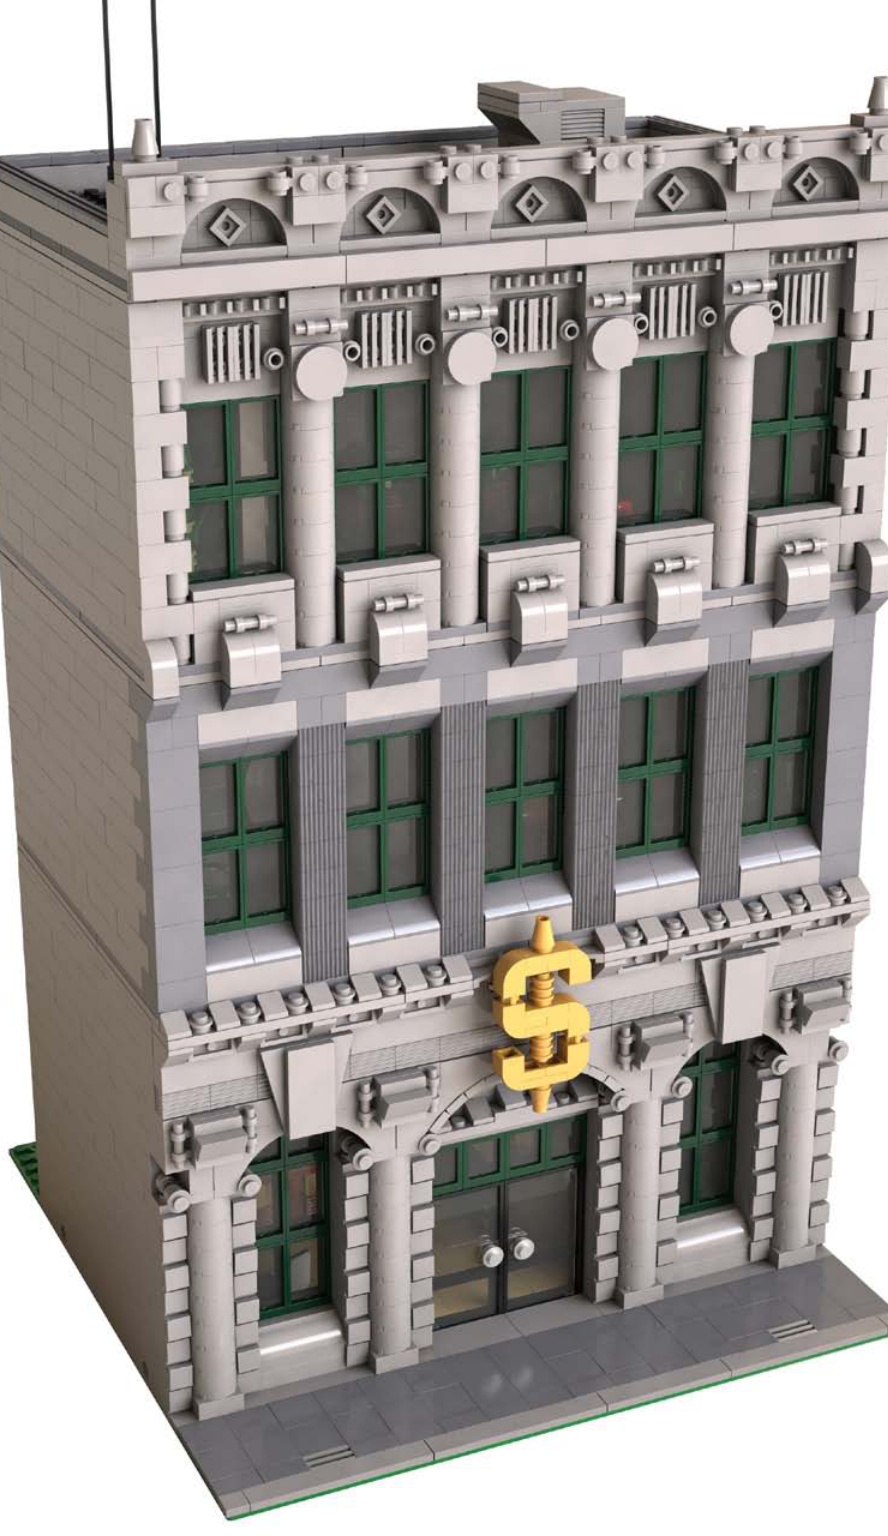
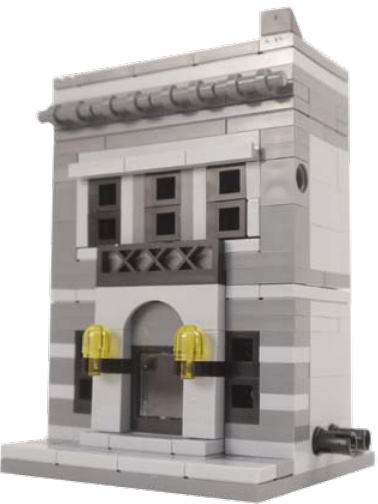
The National Bank was inspired by a bank in Richmond, Virginia, and features neoclassical architecture.

Mini Modulars
These are smaller-scale versions of some of our models. The size for these builds is , rather than . Building small is
Colonial Revival House & Bakery
Police Station
National Bank
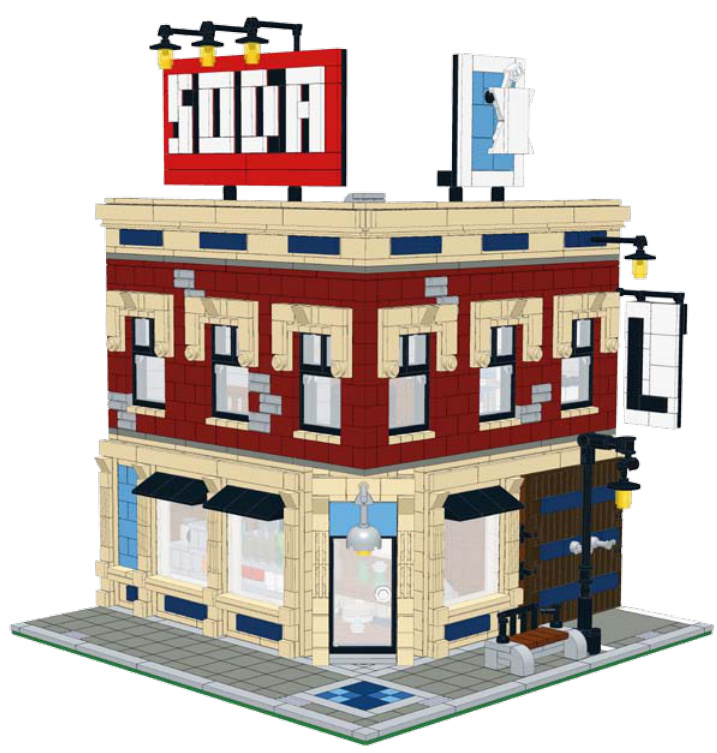
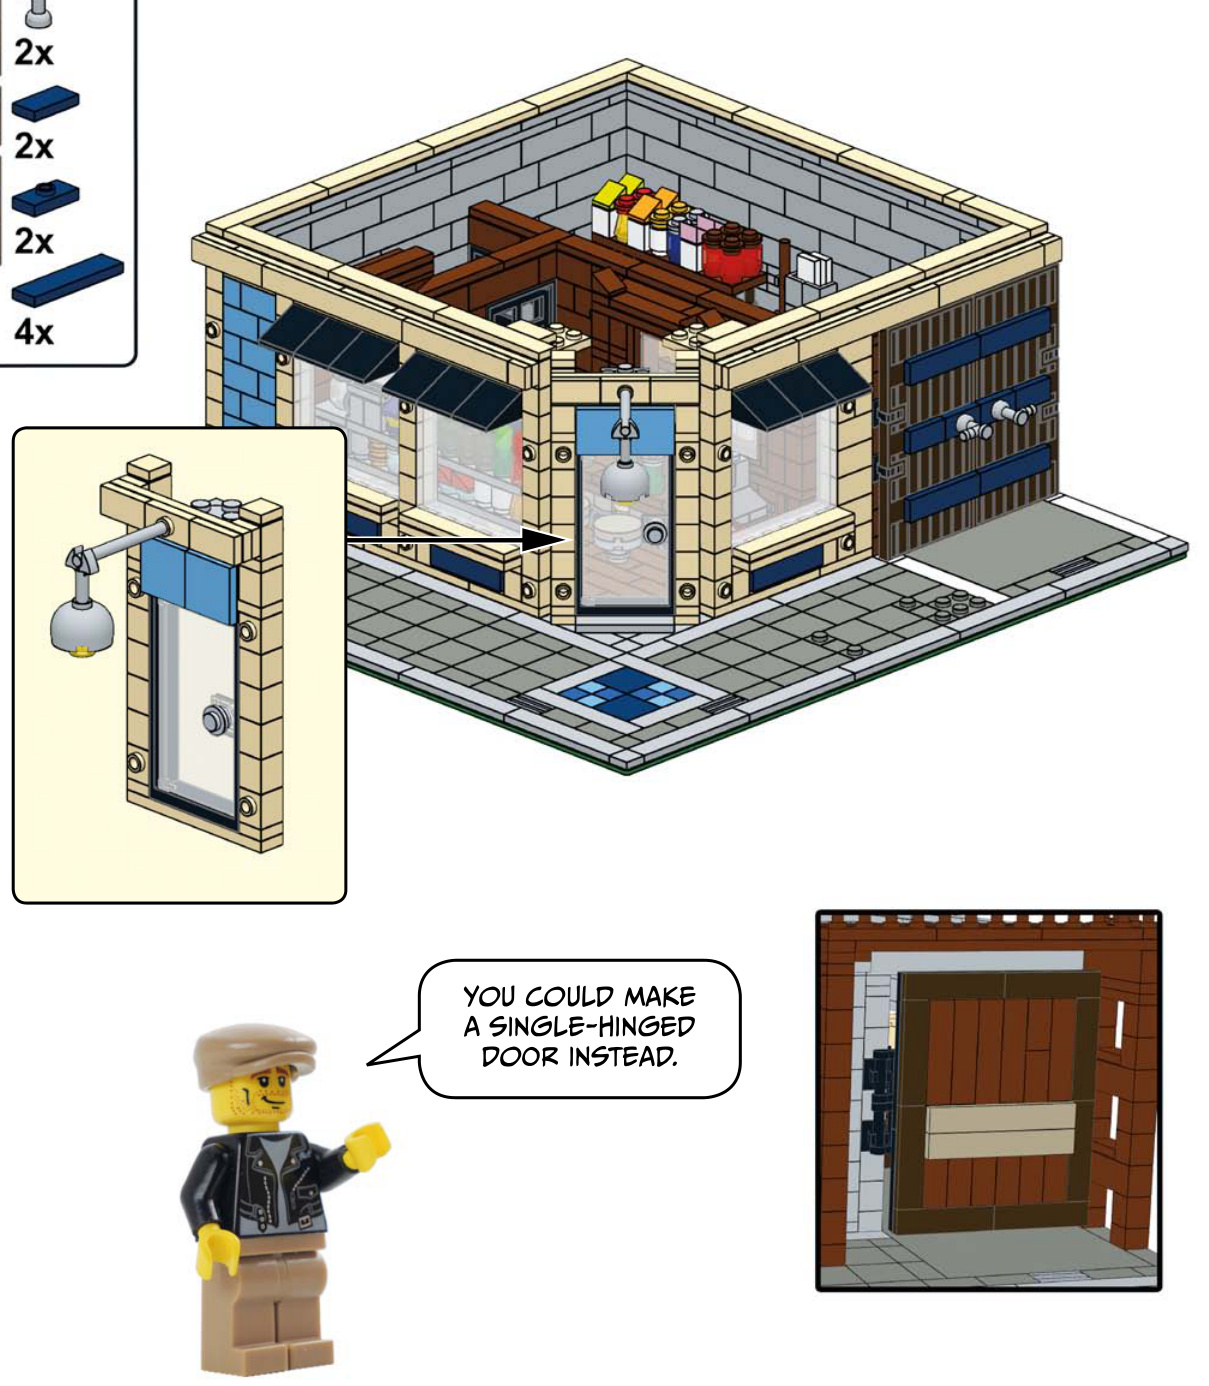
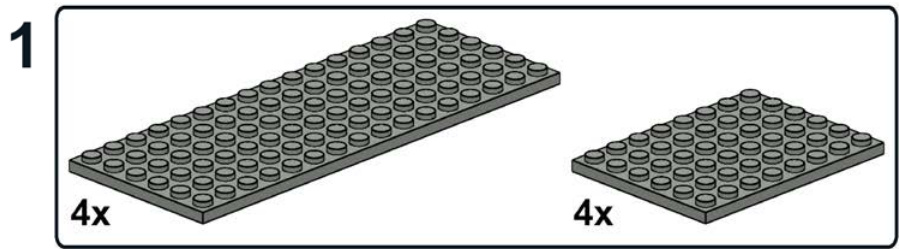
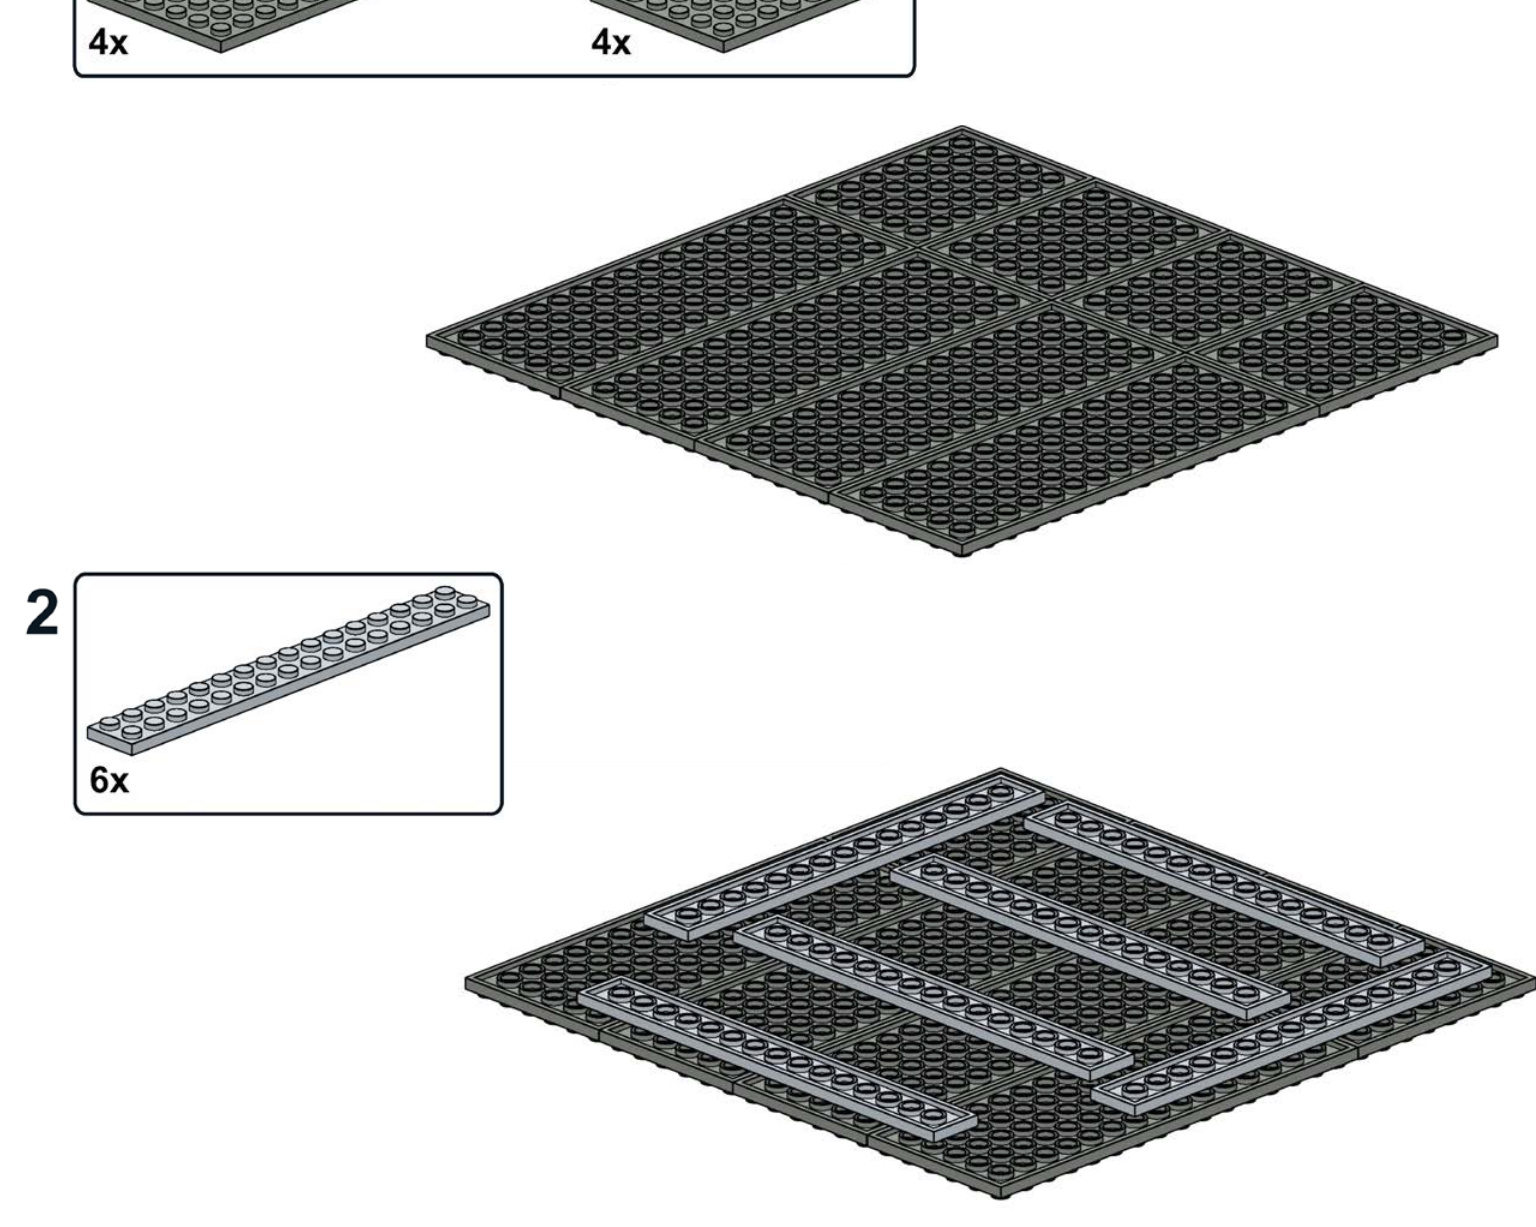
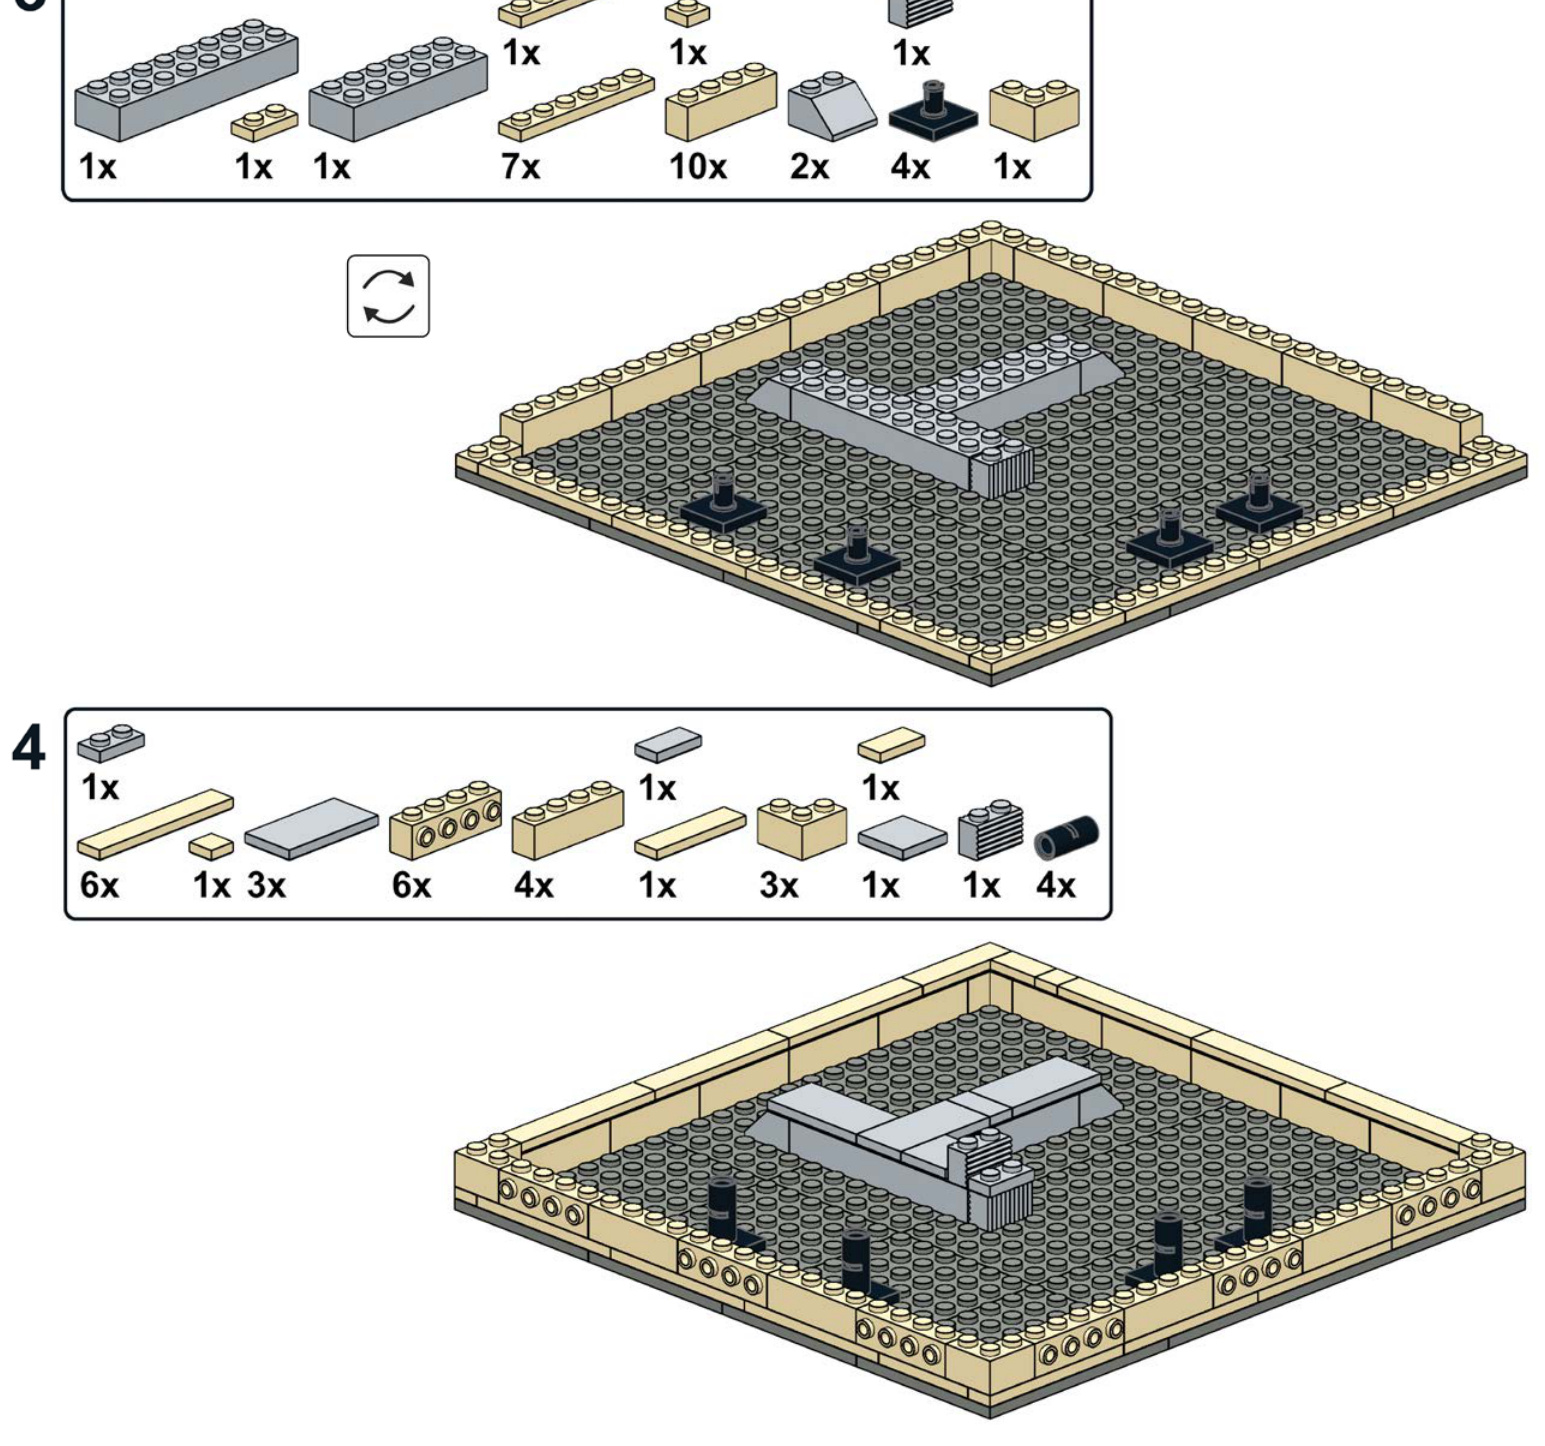
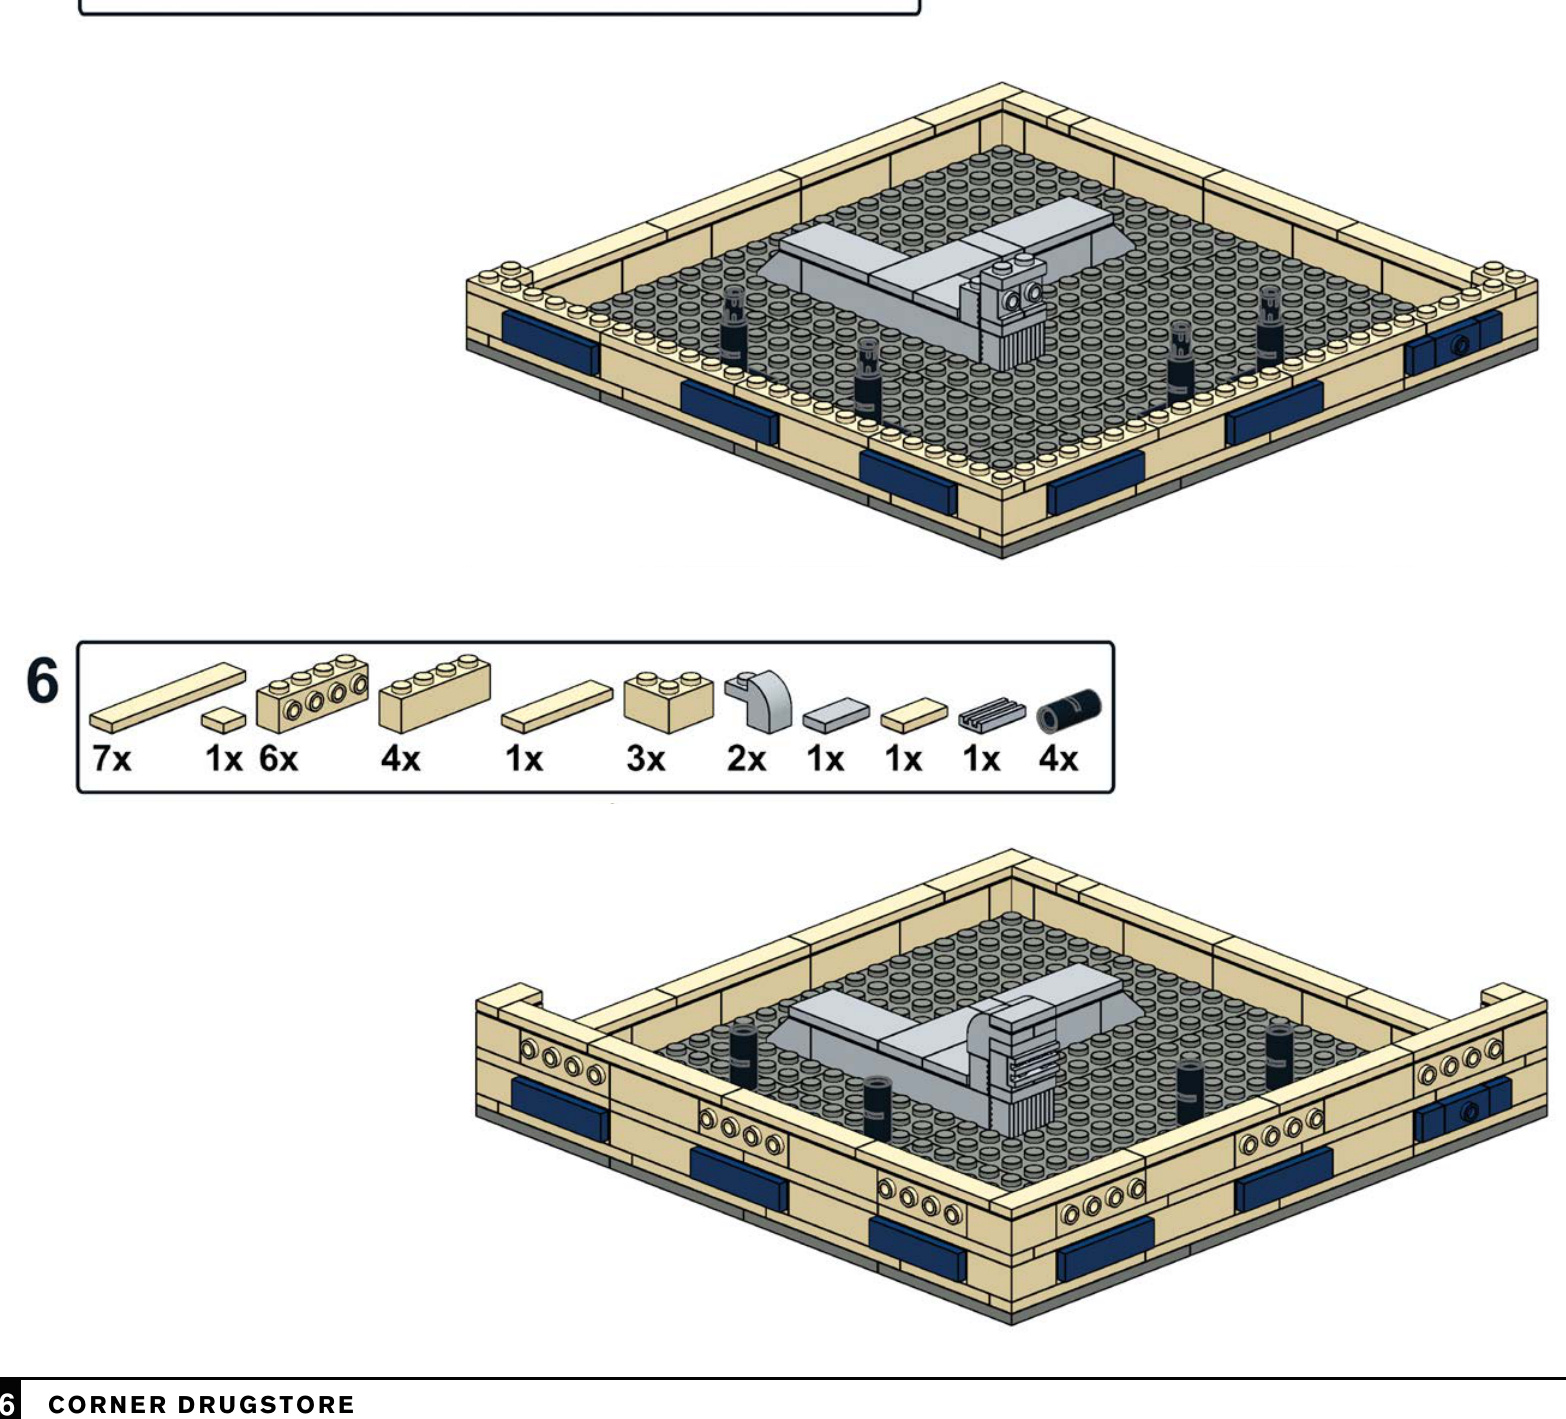
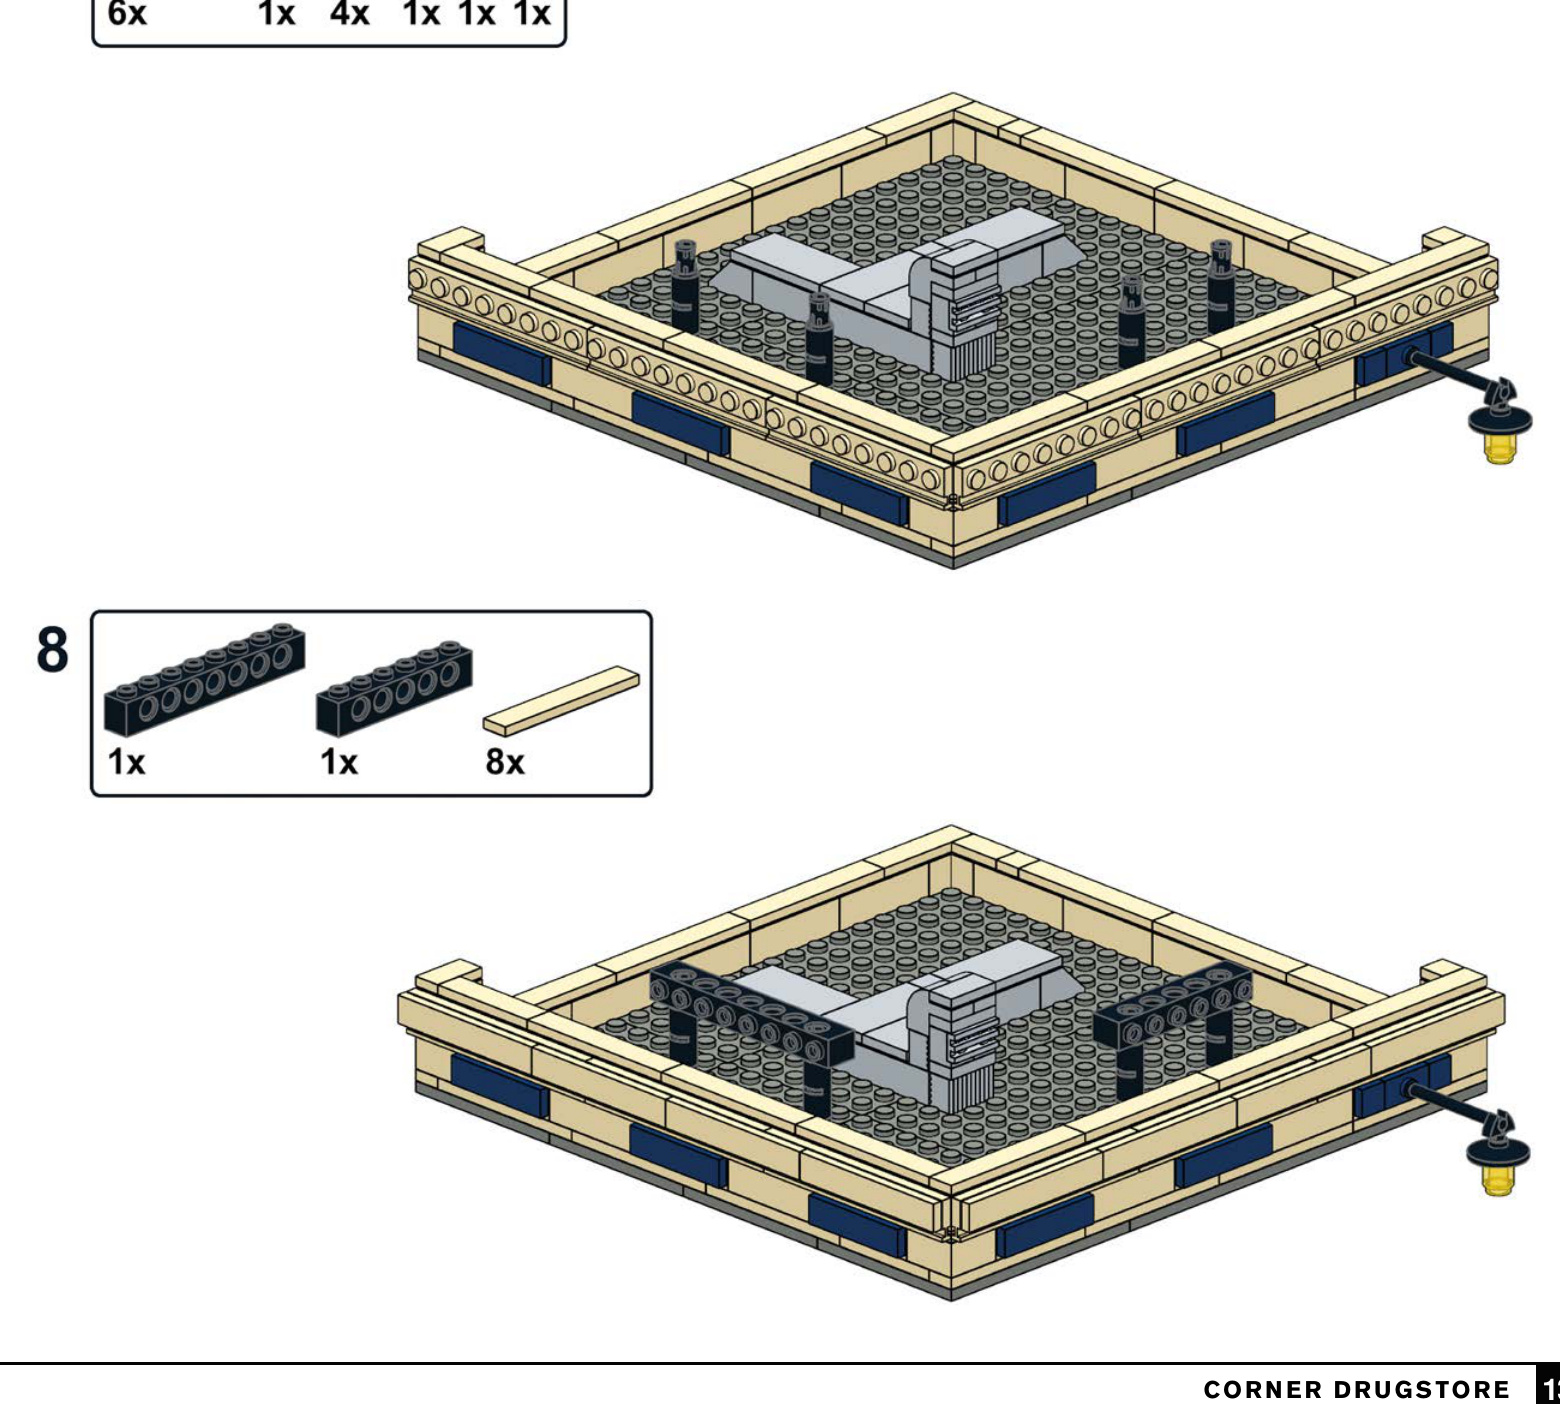
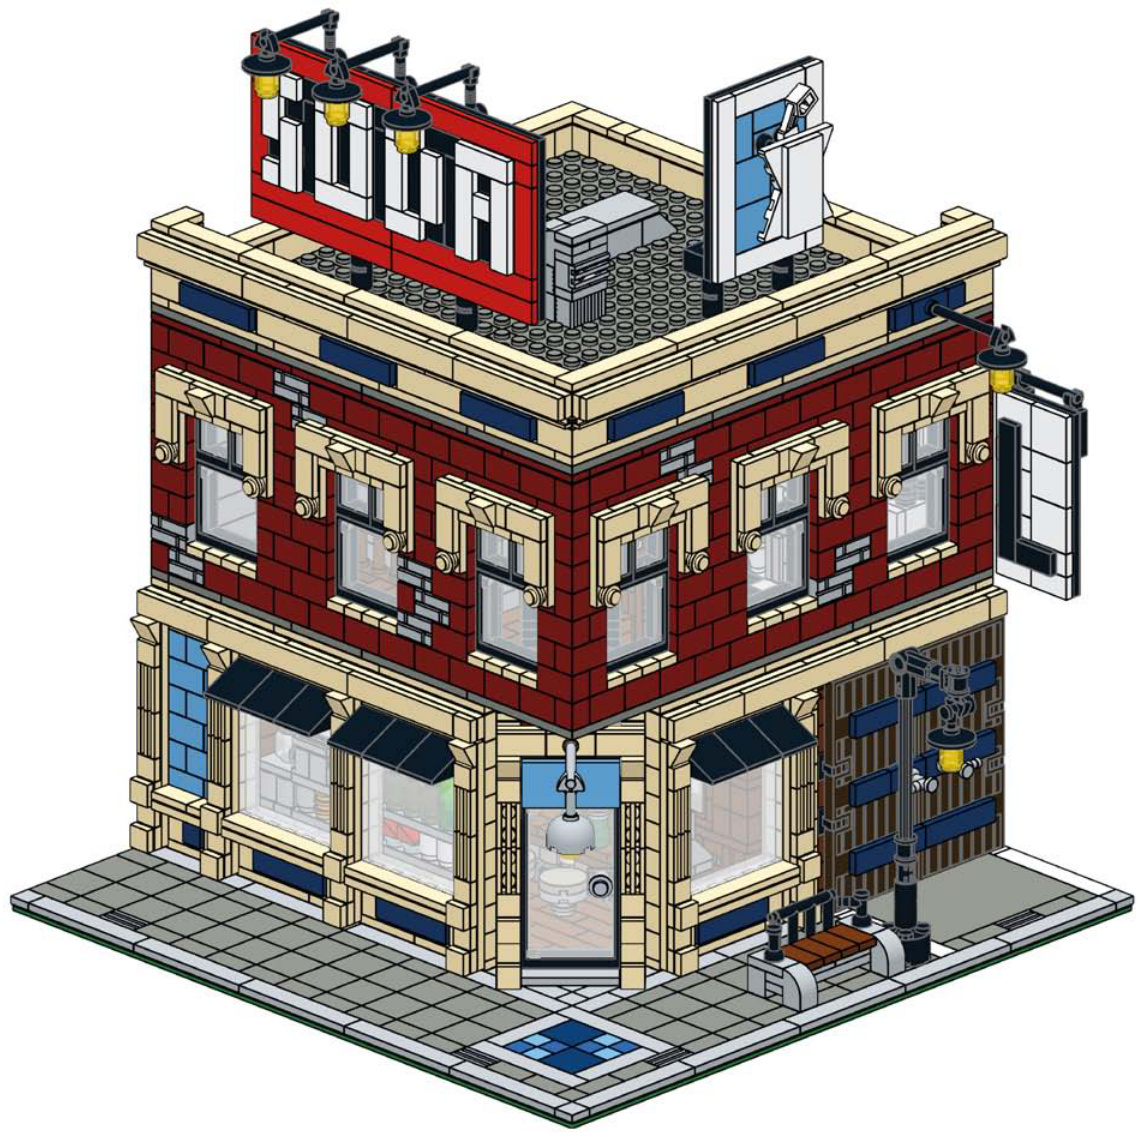
Corner Drugstore
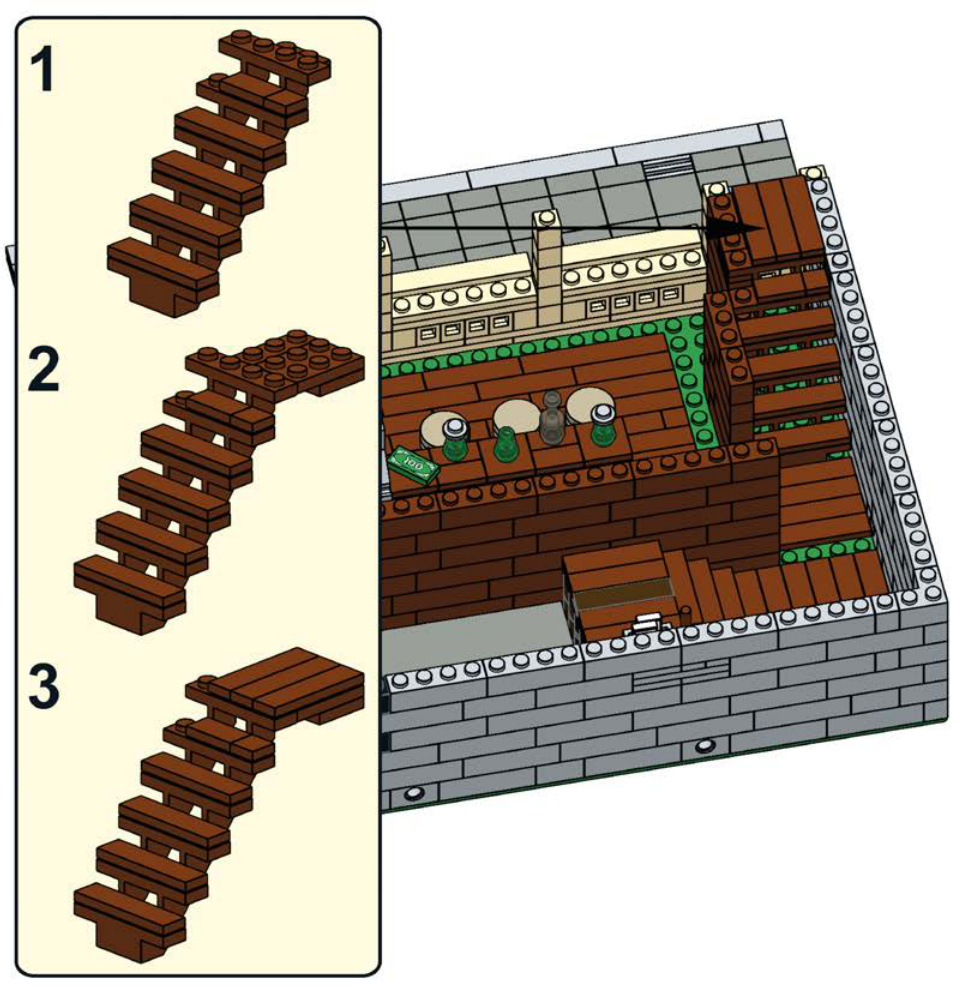
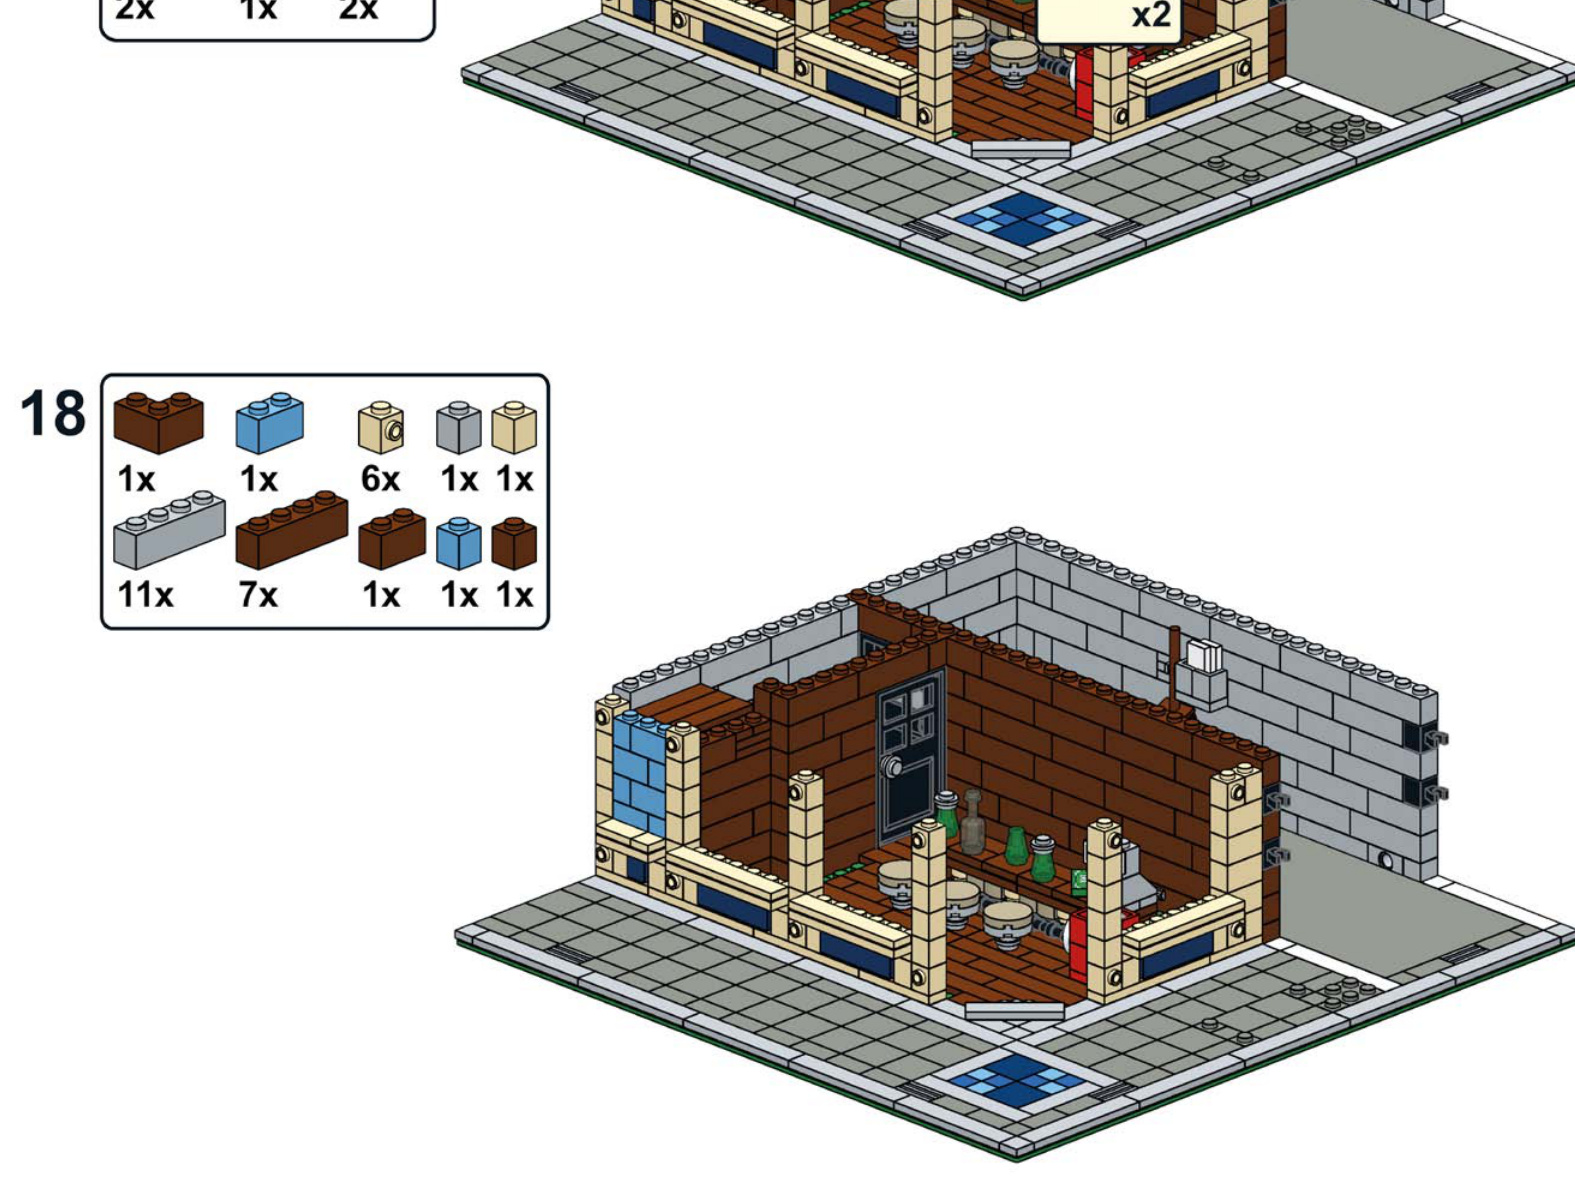
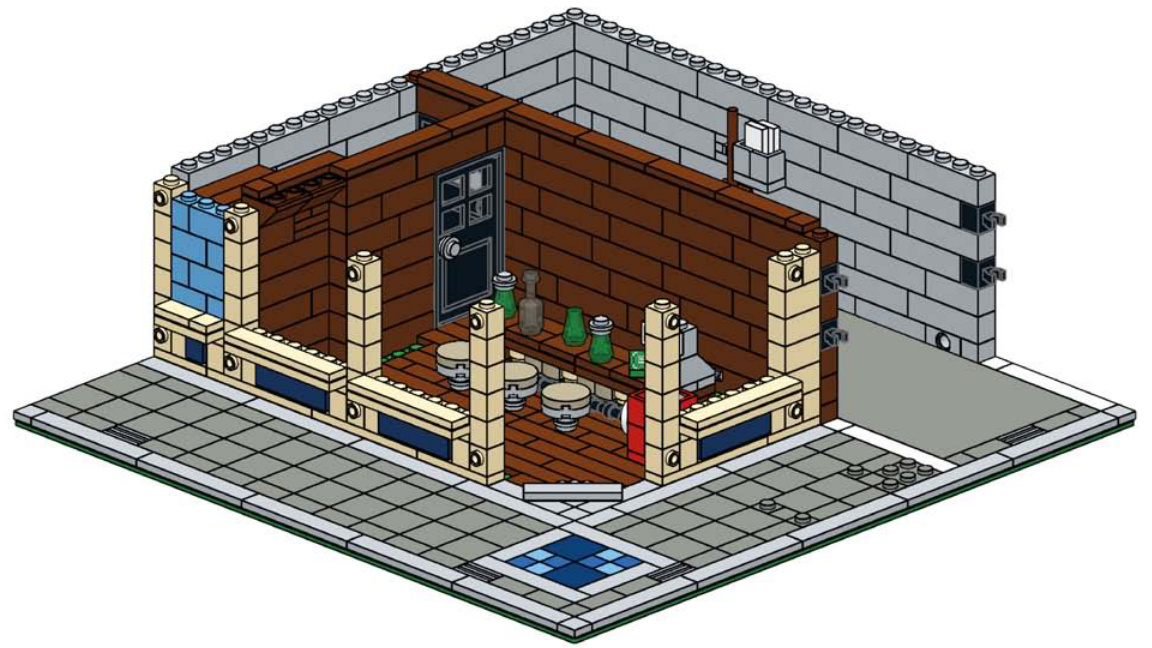
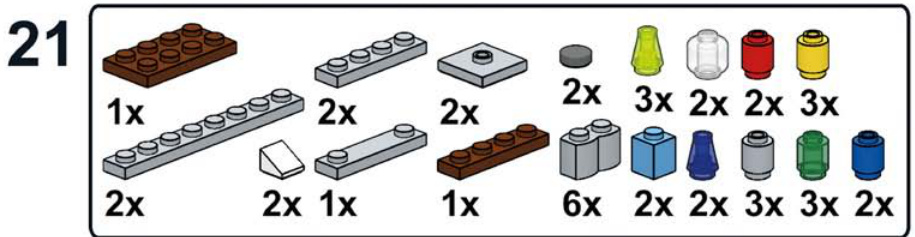
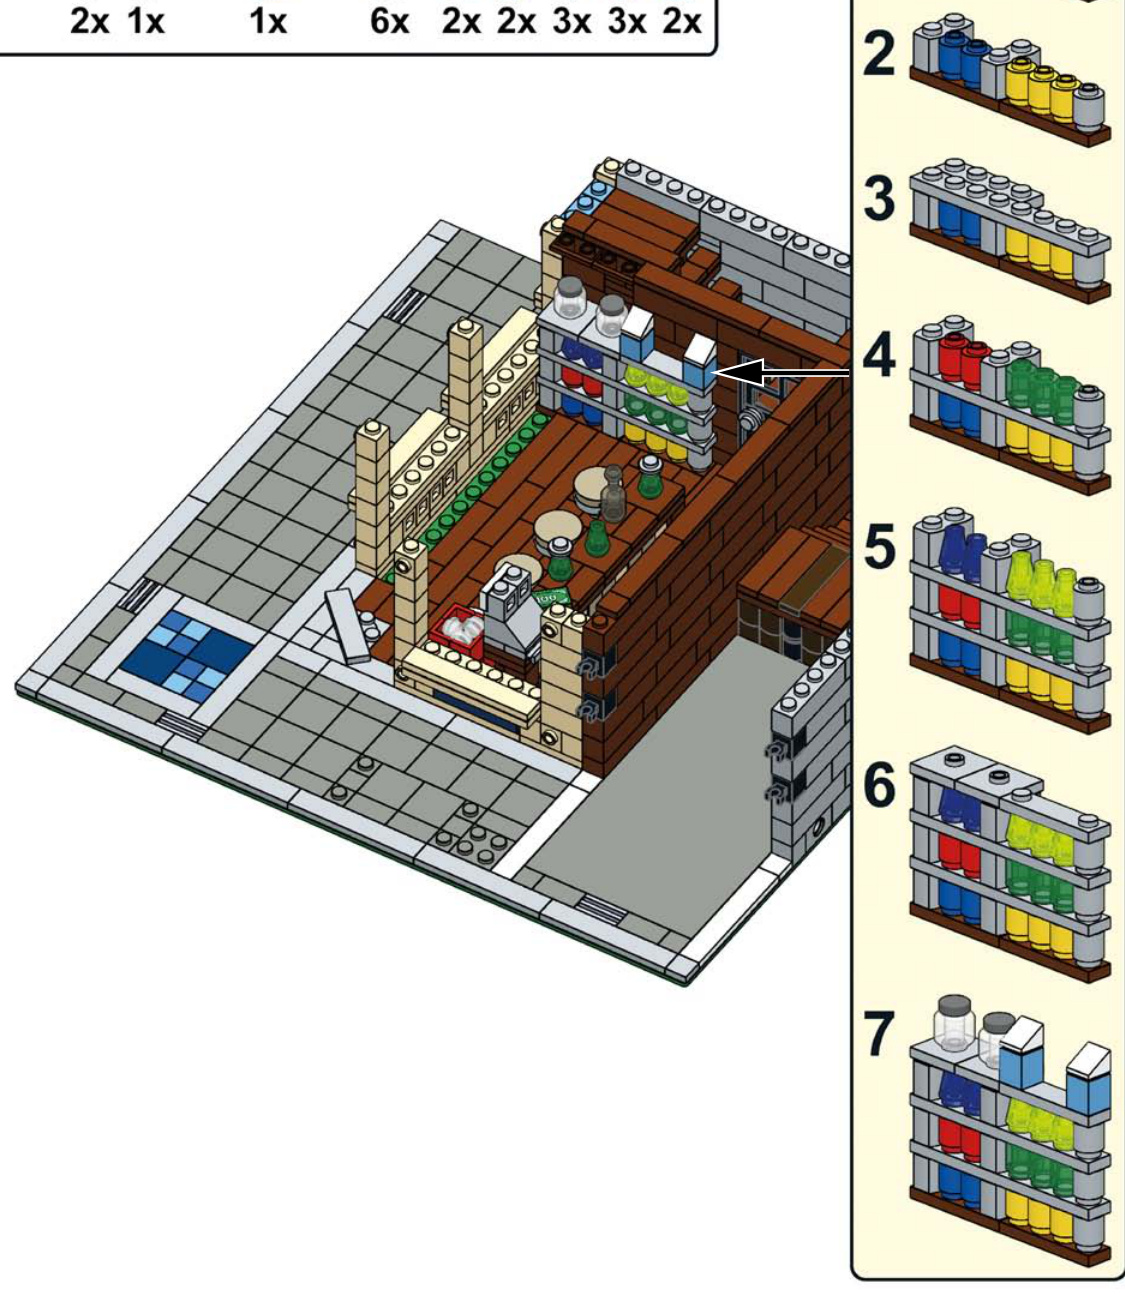
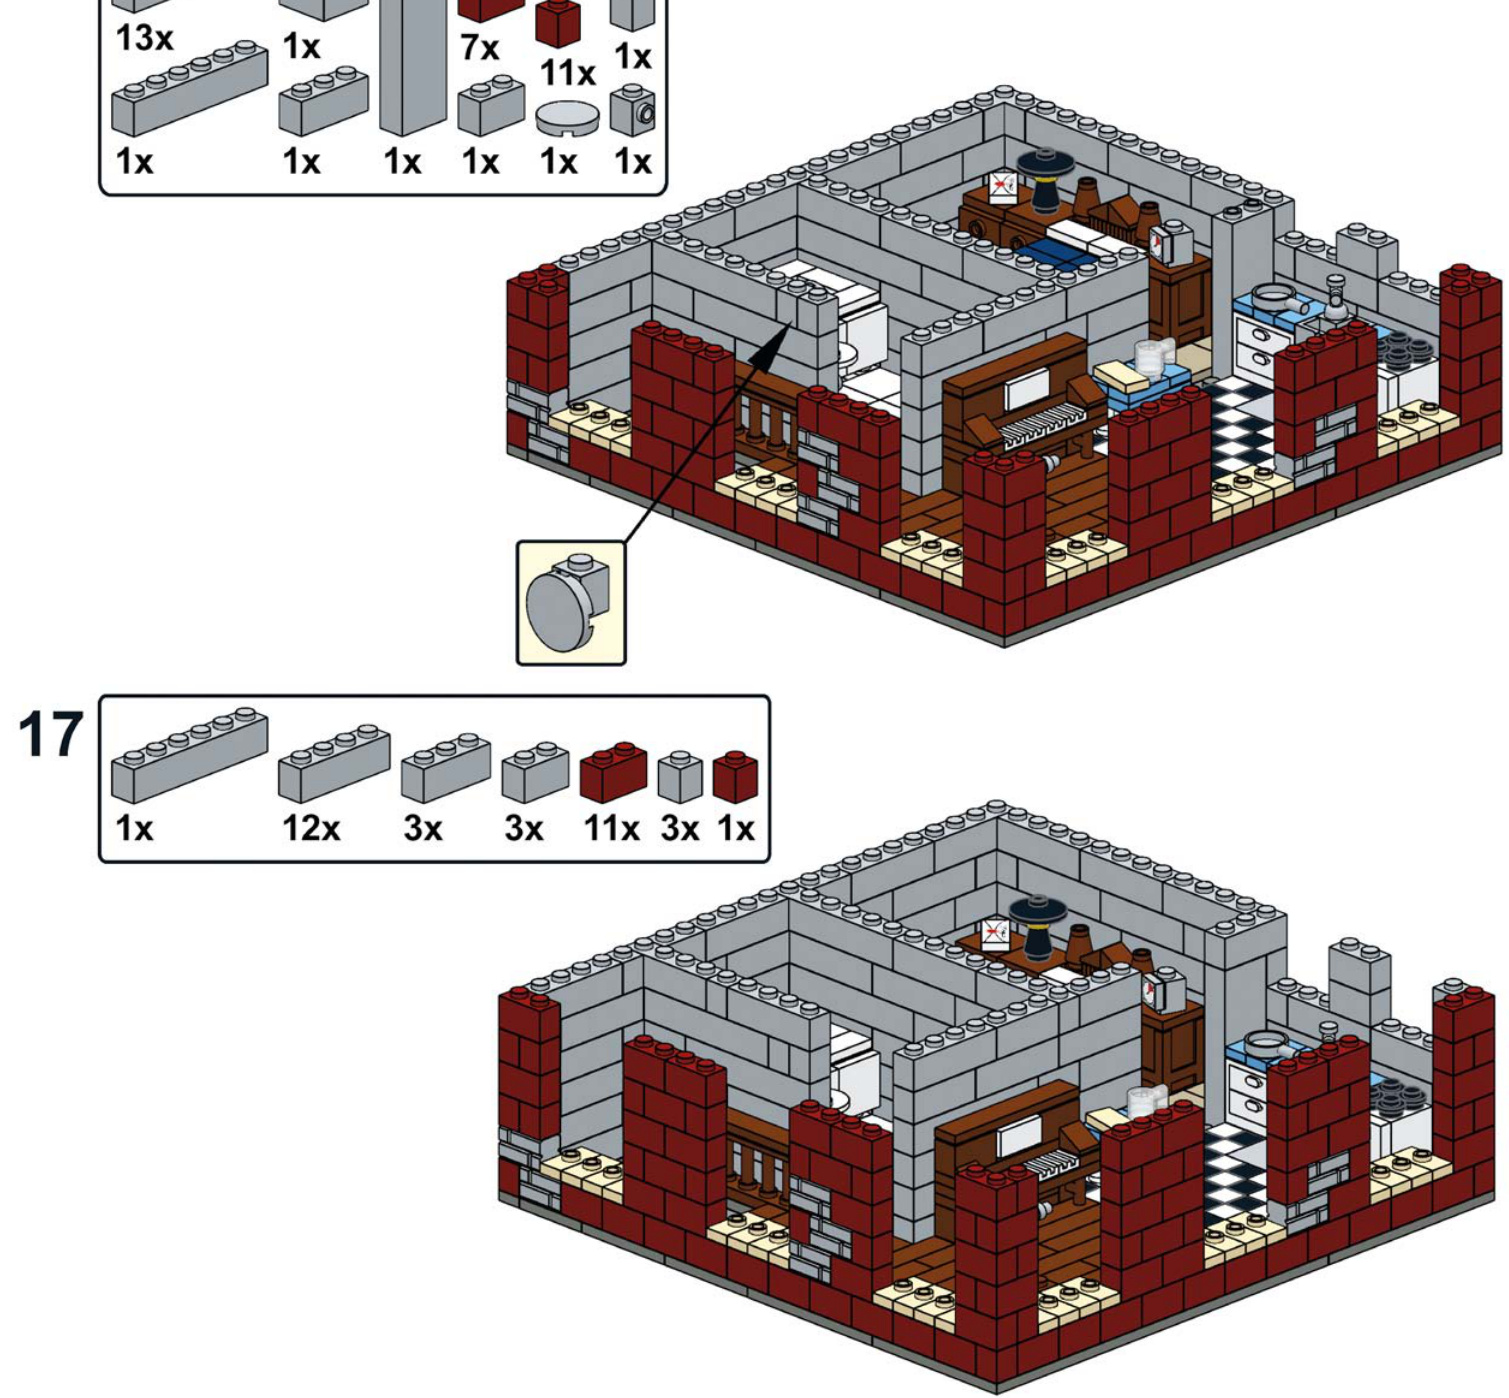
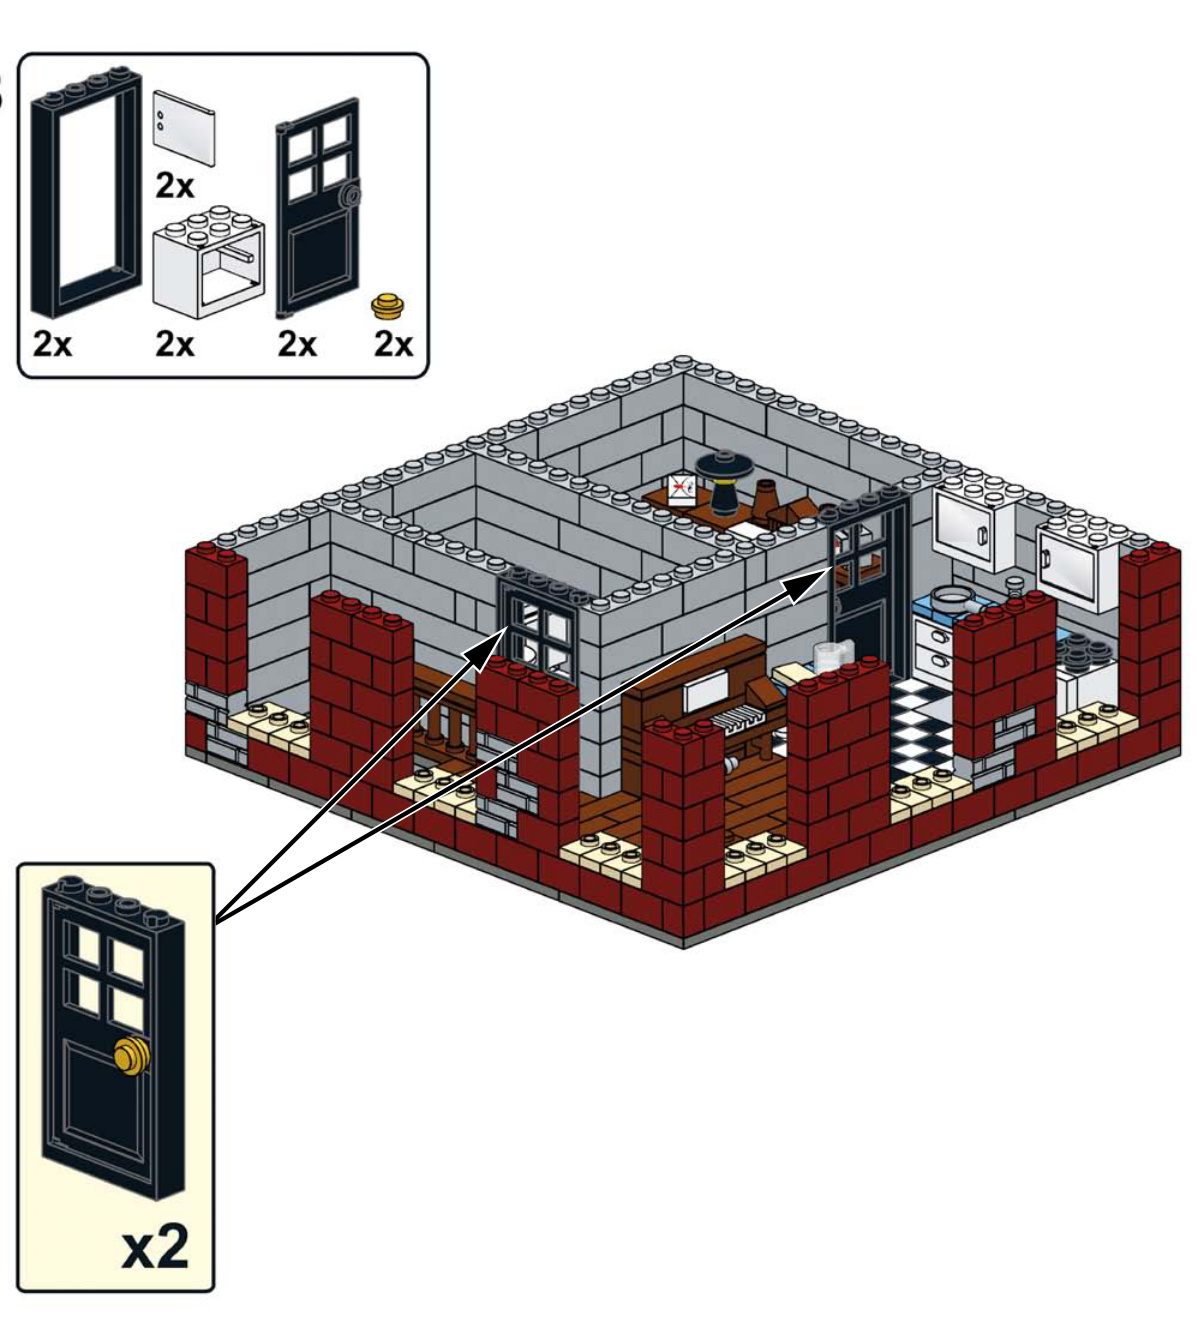
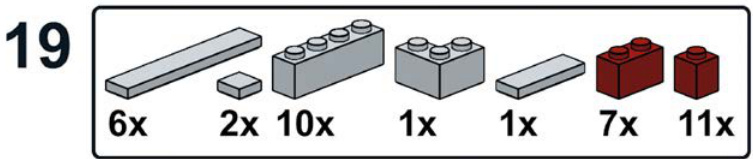
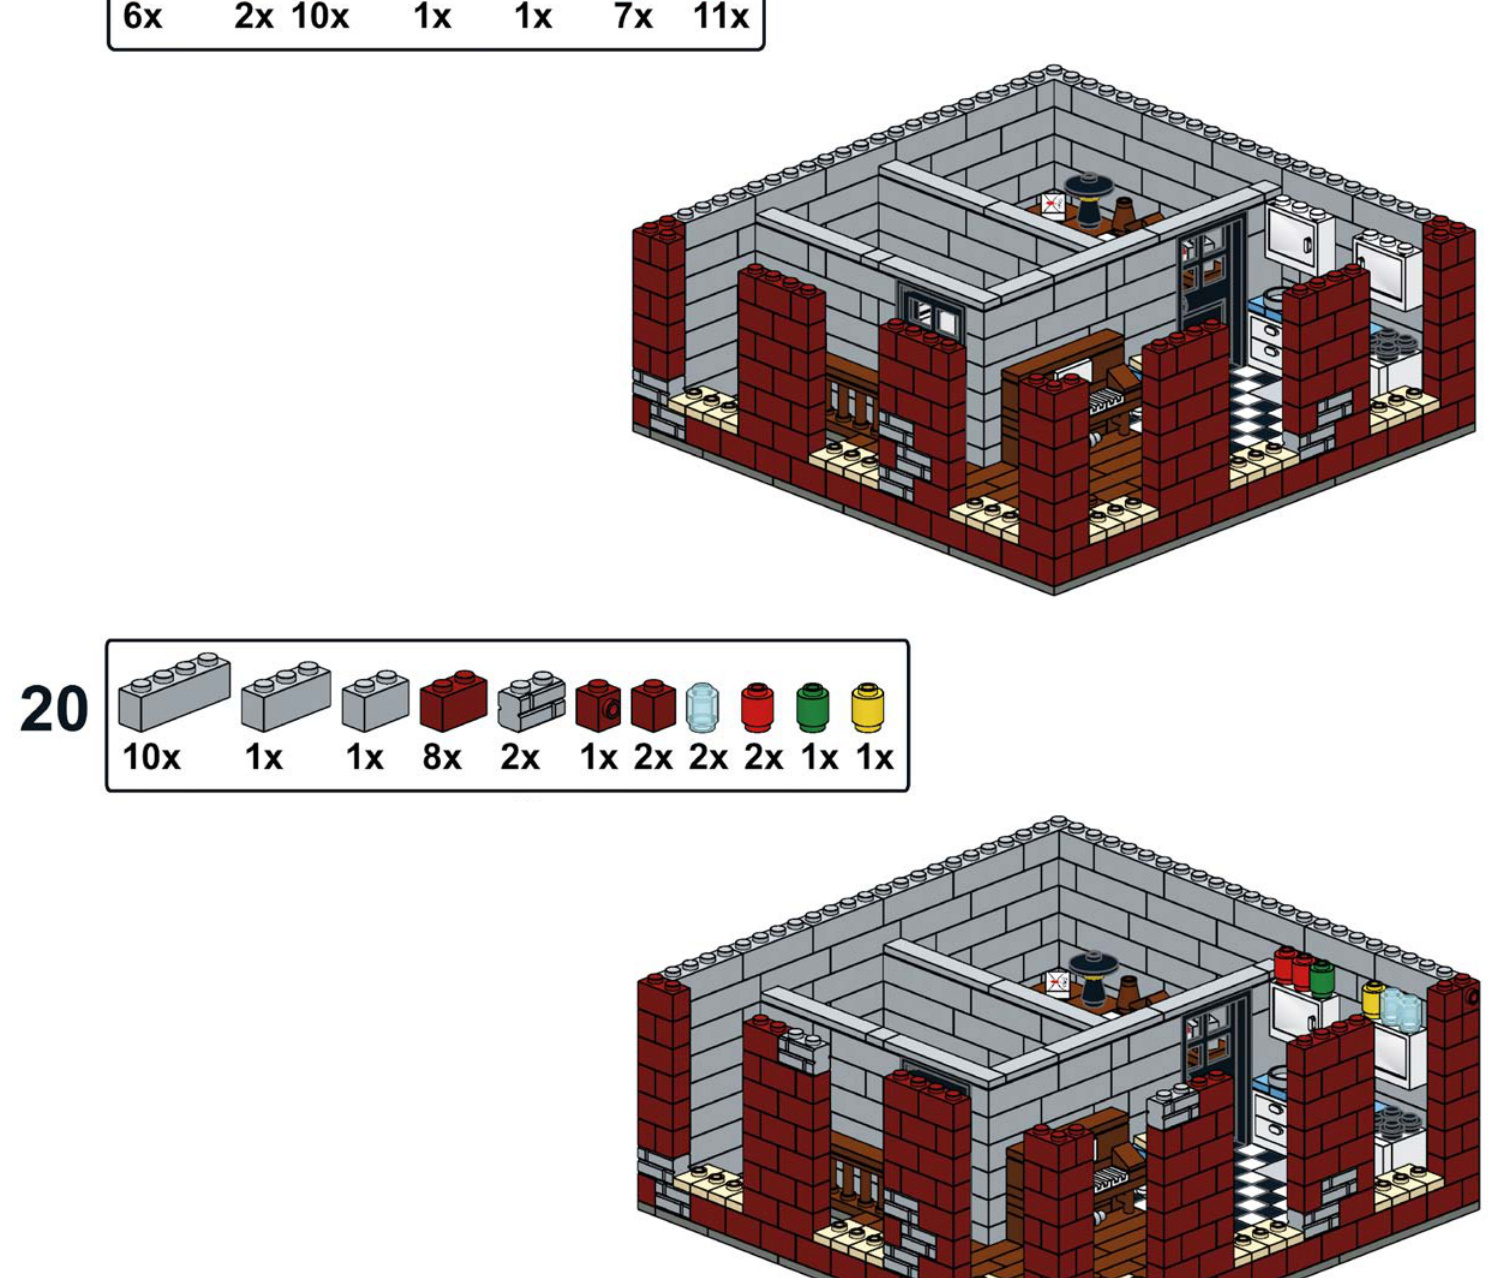
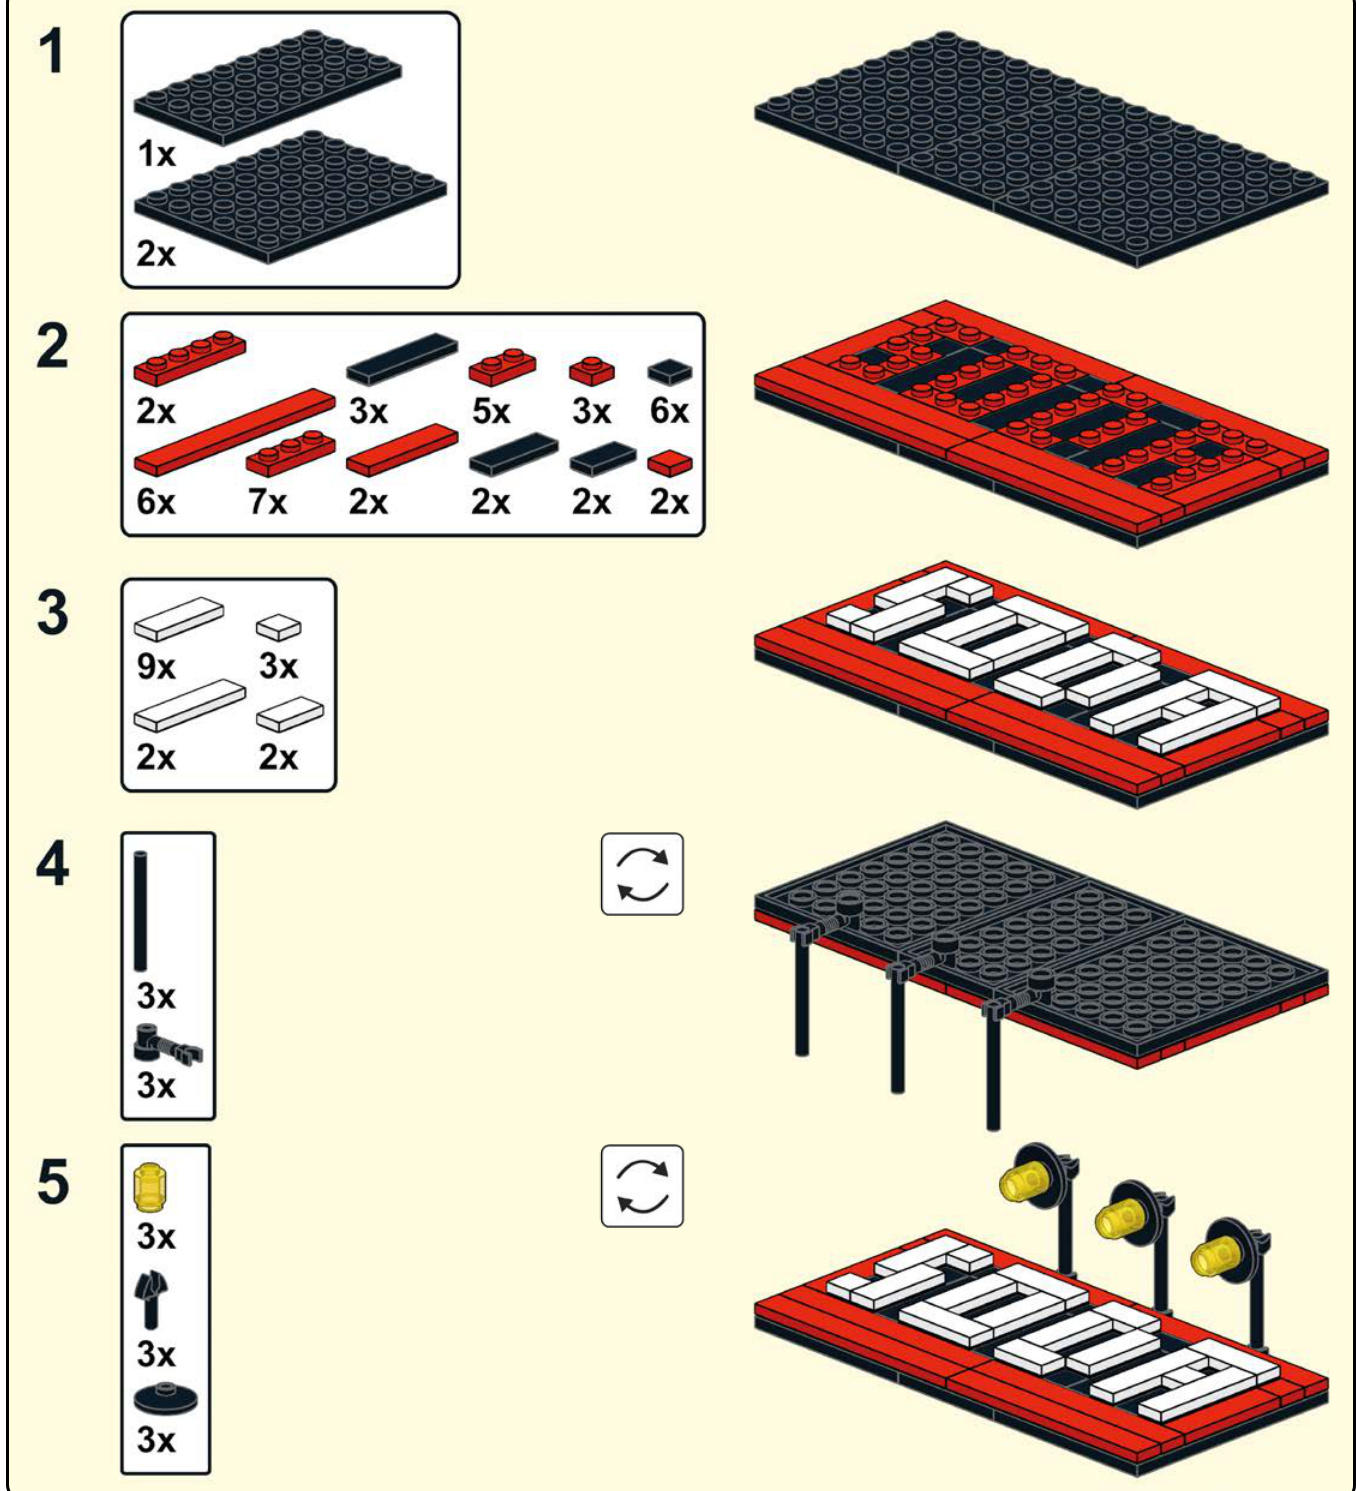
The corner drugstore re-creates an icon of classic Americana. You can almost see the soda jerk behind the counter. The drugstore has a small shop area as well as a back room for deliveries. Stairs lead to the second floor apartment, which has a fully furnished interior for the owner of the store. An apothe cary’s mortar-and-pestle sign, as well as the “SODA” billboard on the roof, make the building instantly identifiable even before you look inside.
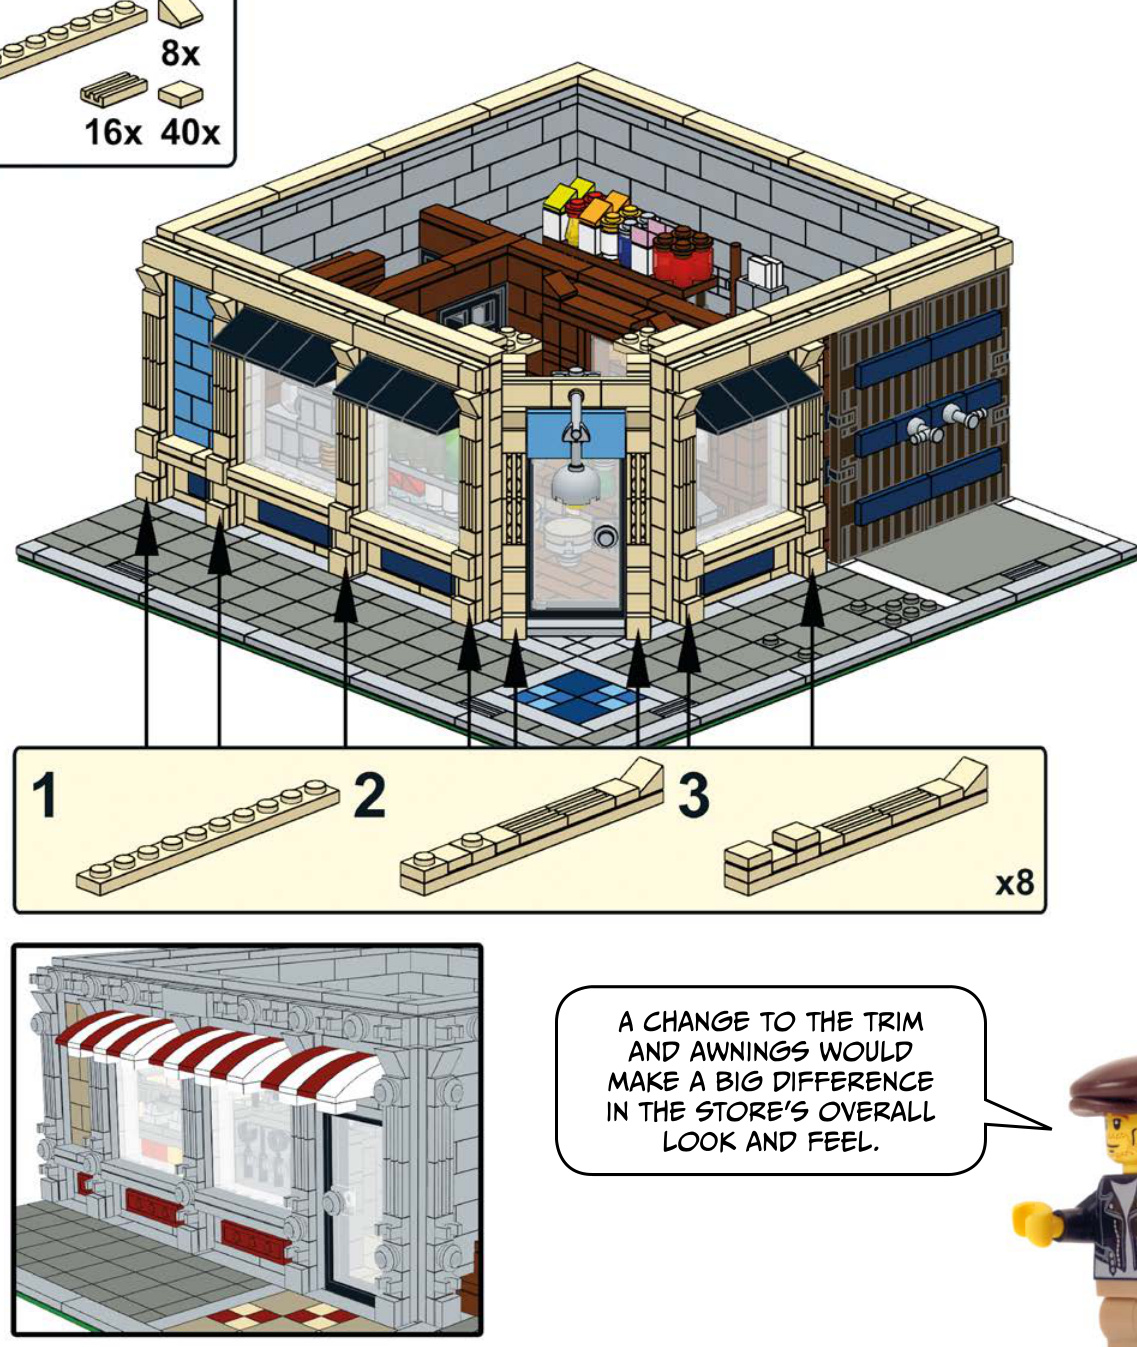
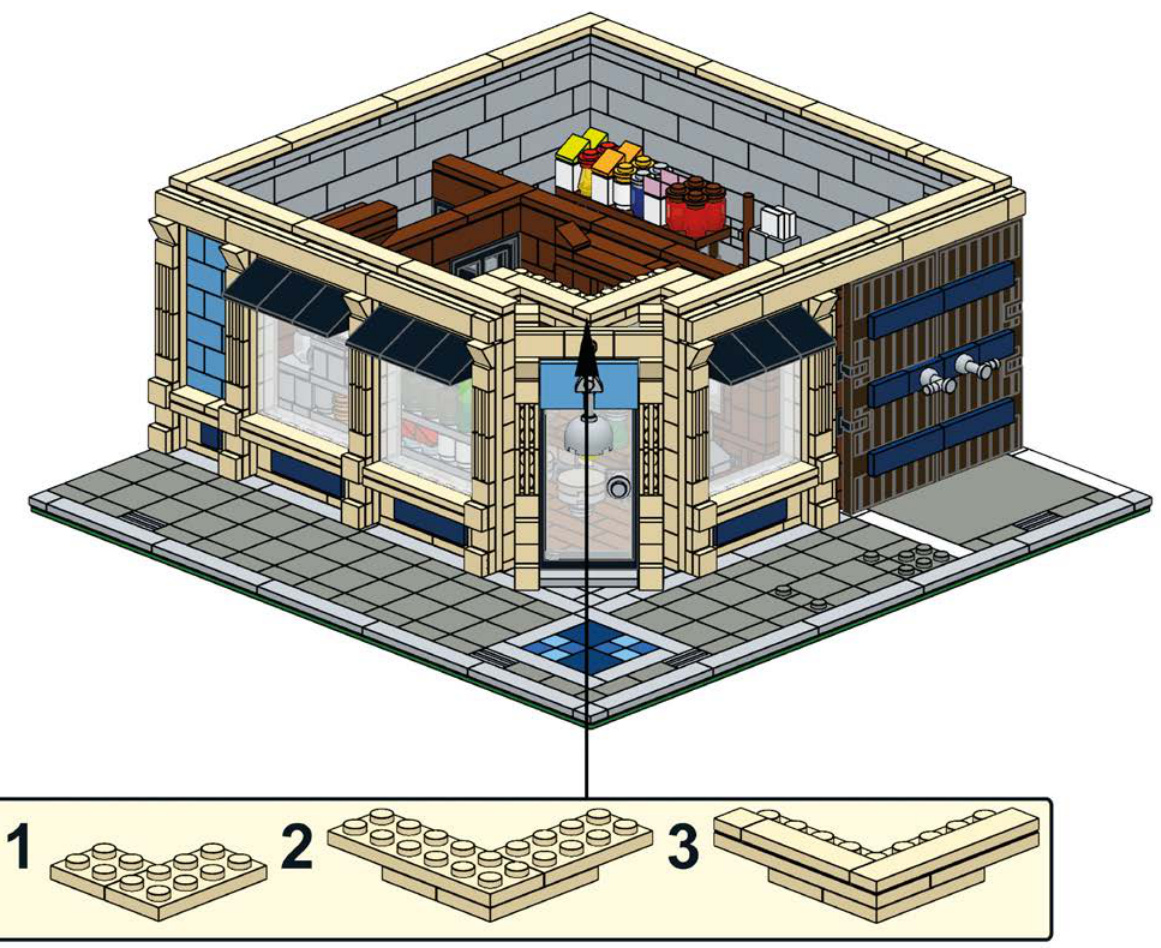
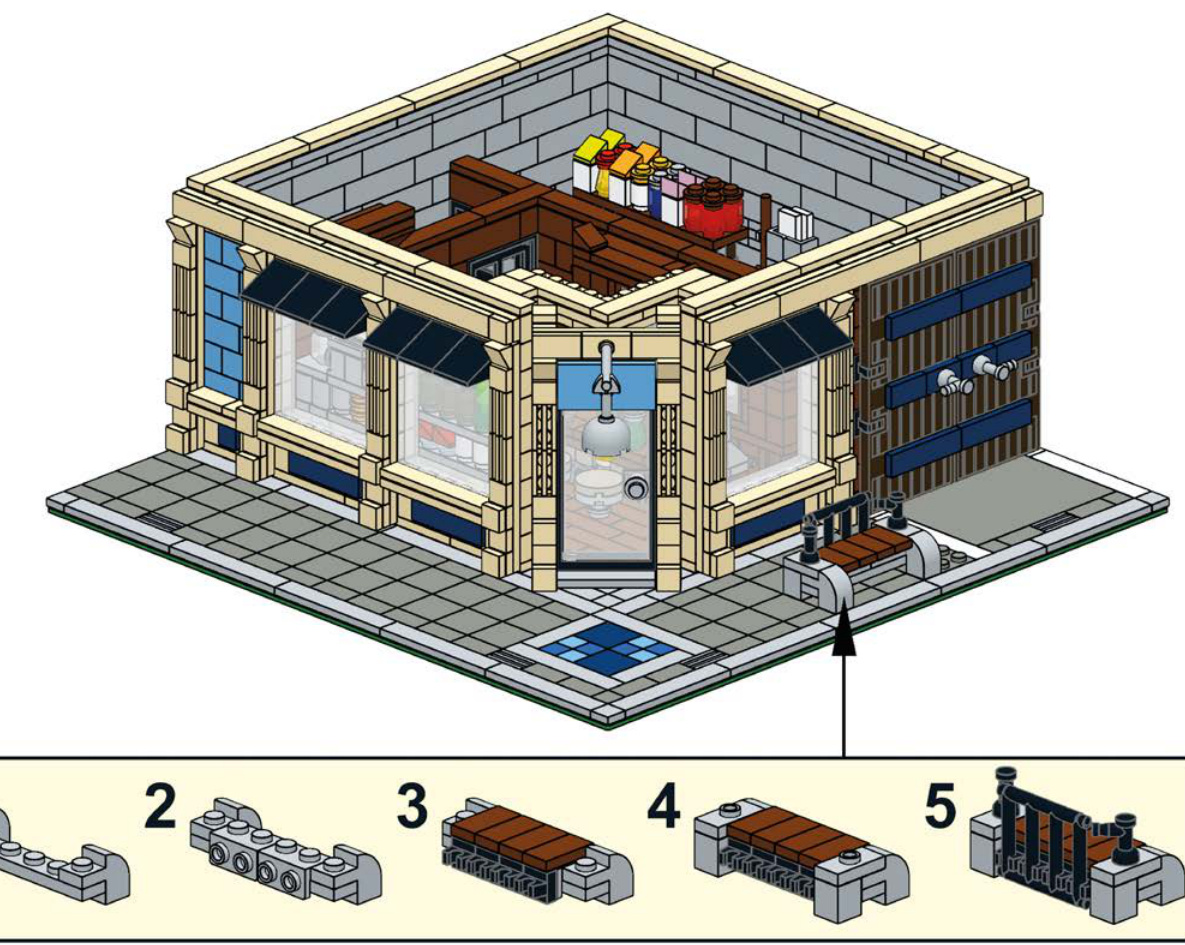
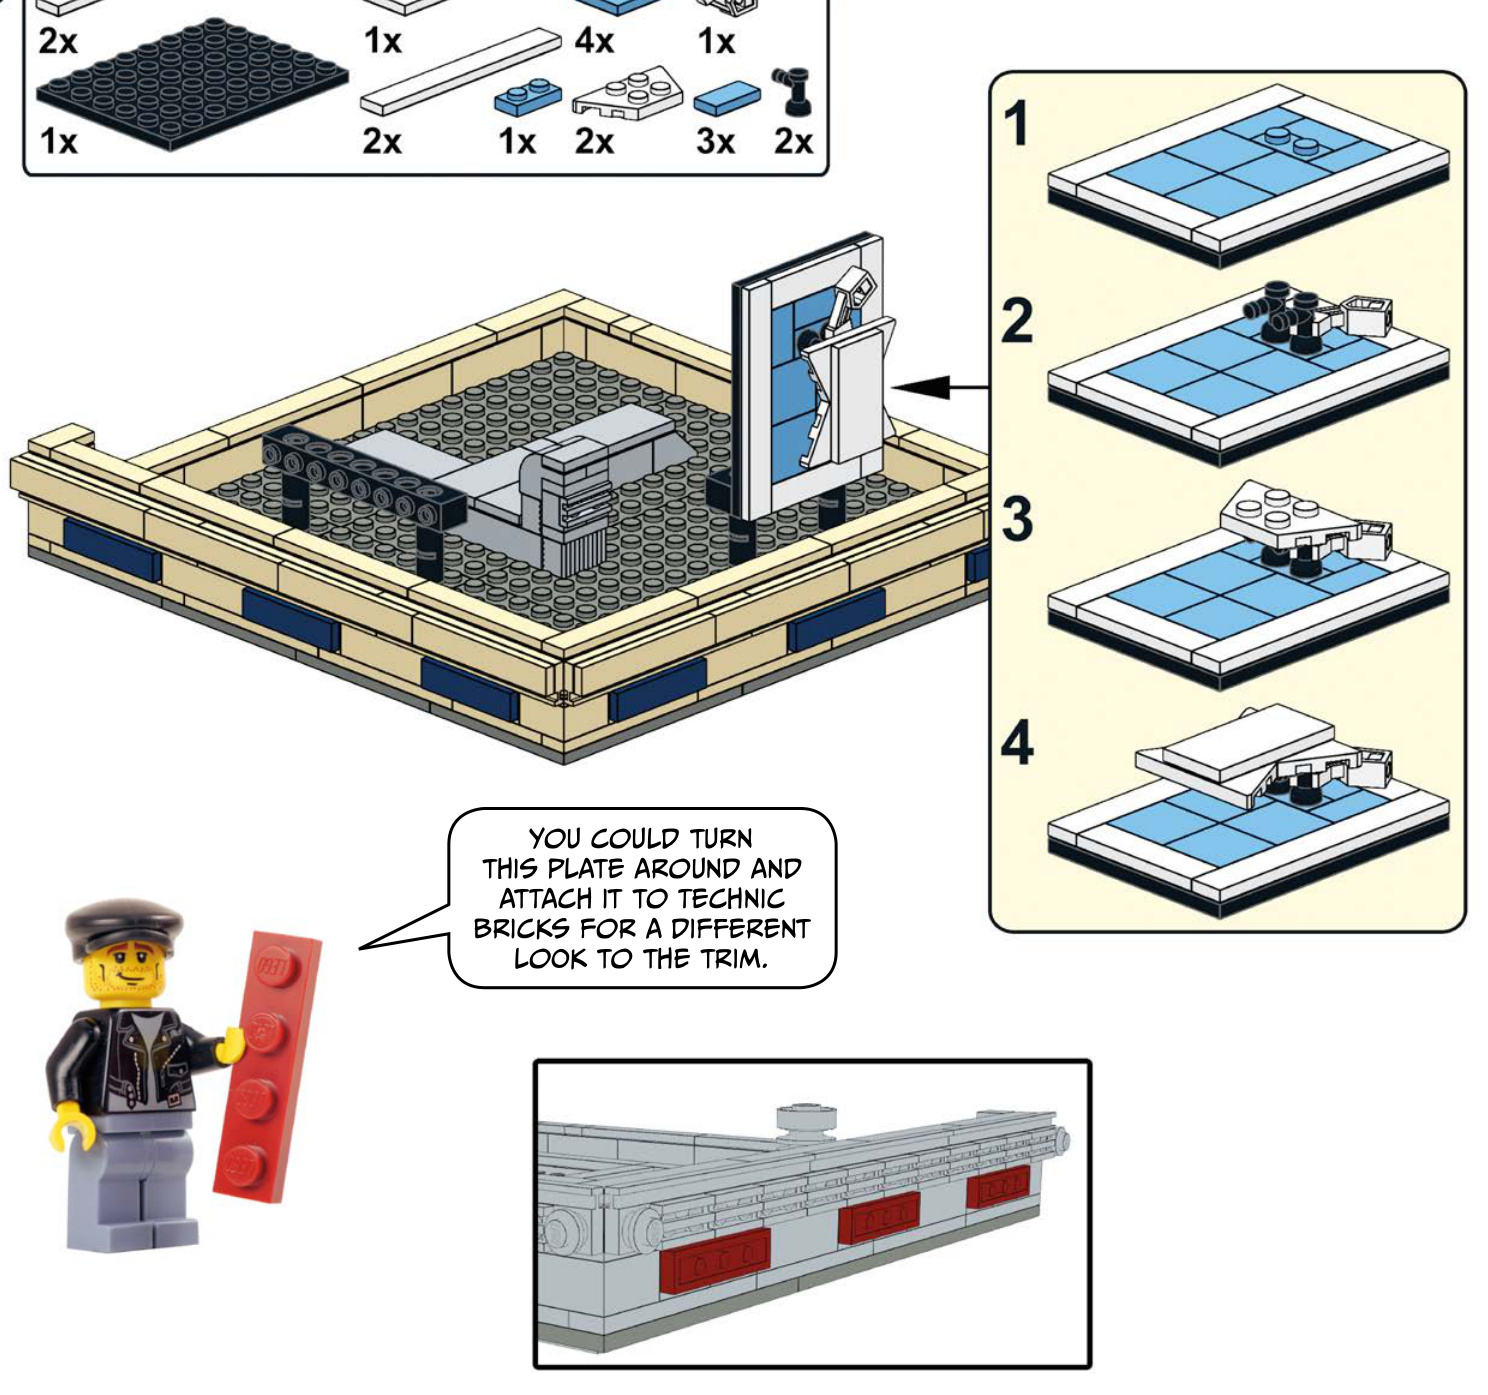
We encourage you to experiment and customize our creations. We’ll give you some ideas as you build!
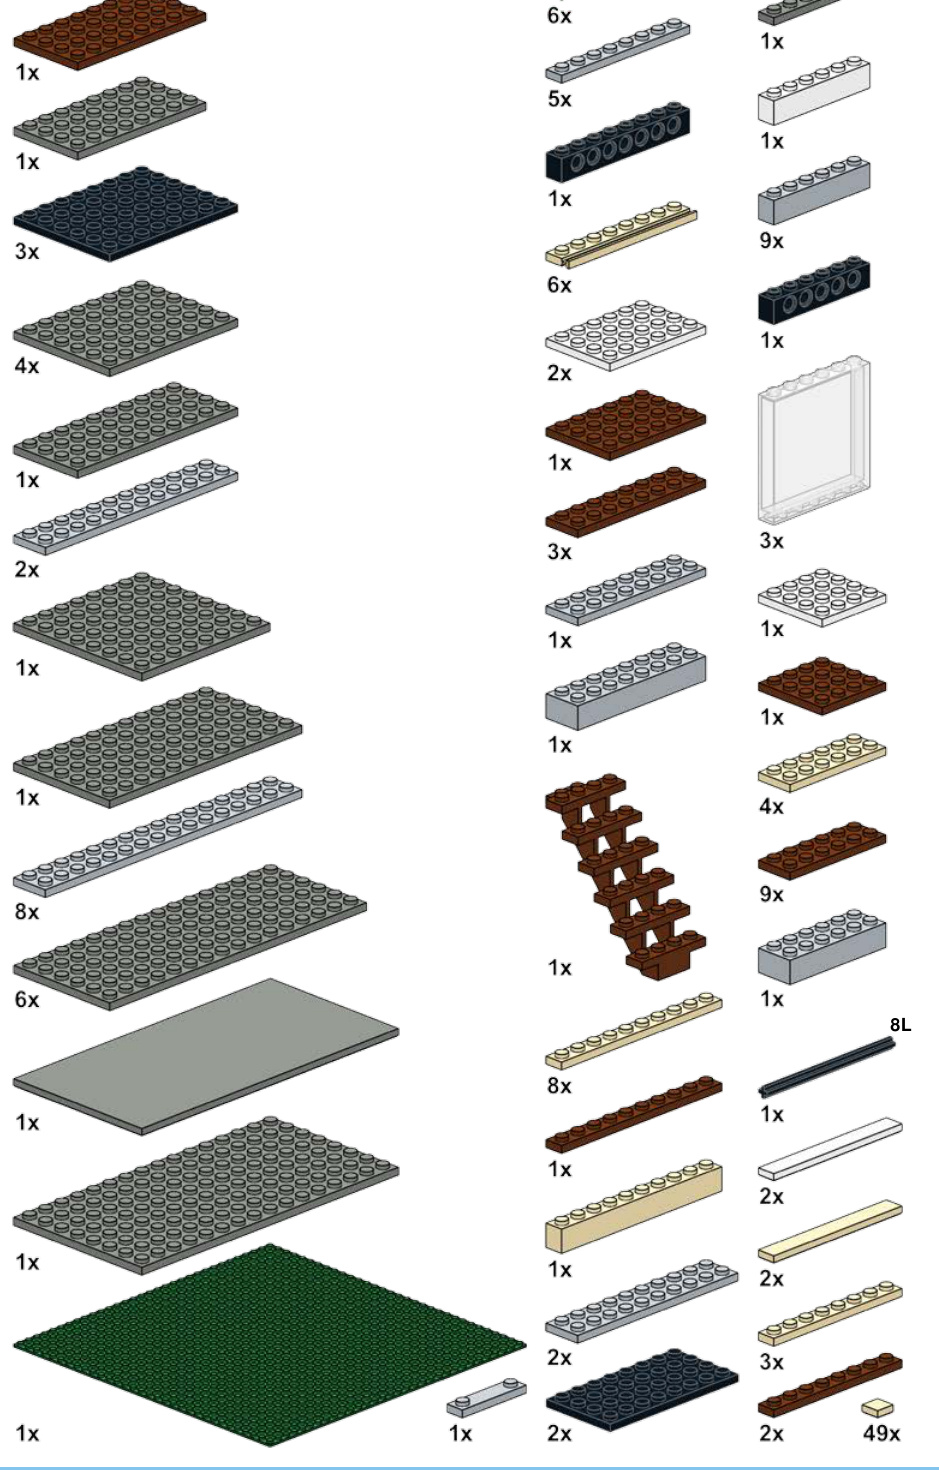
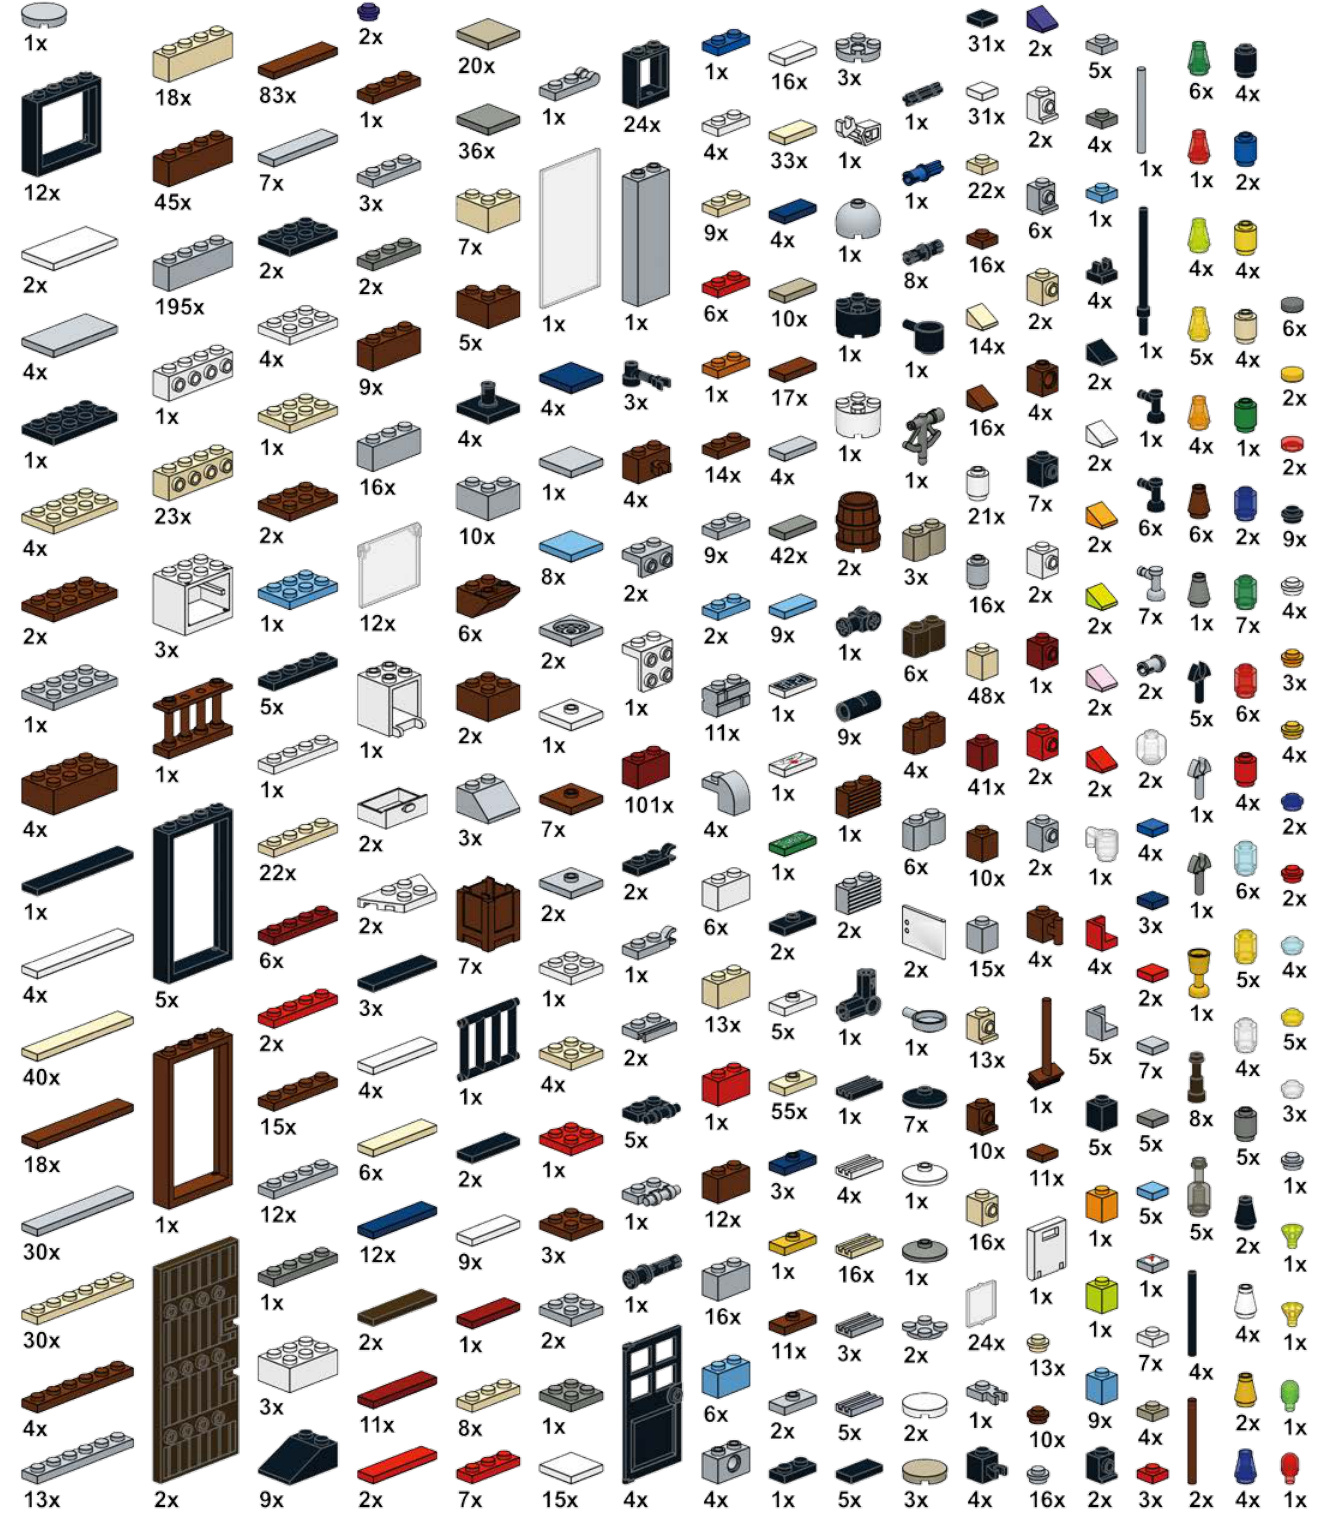
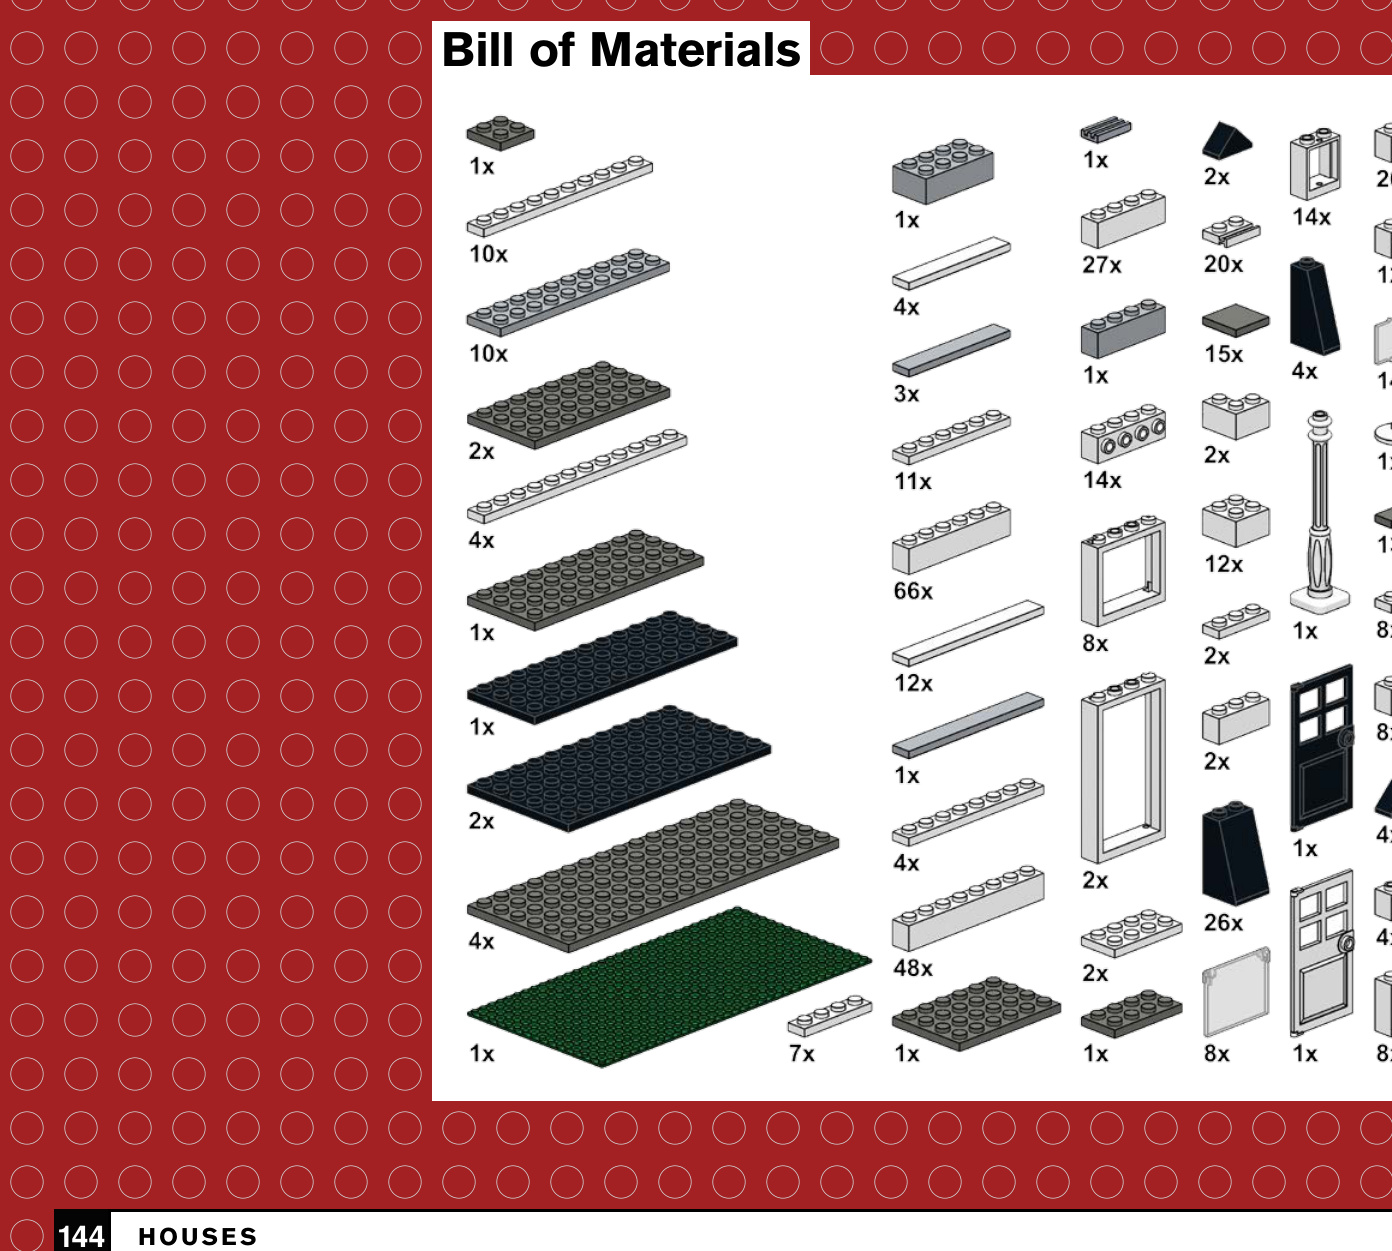
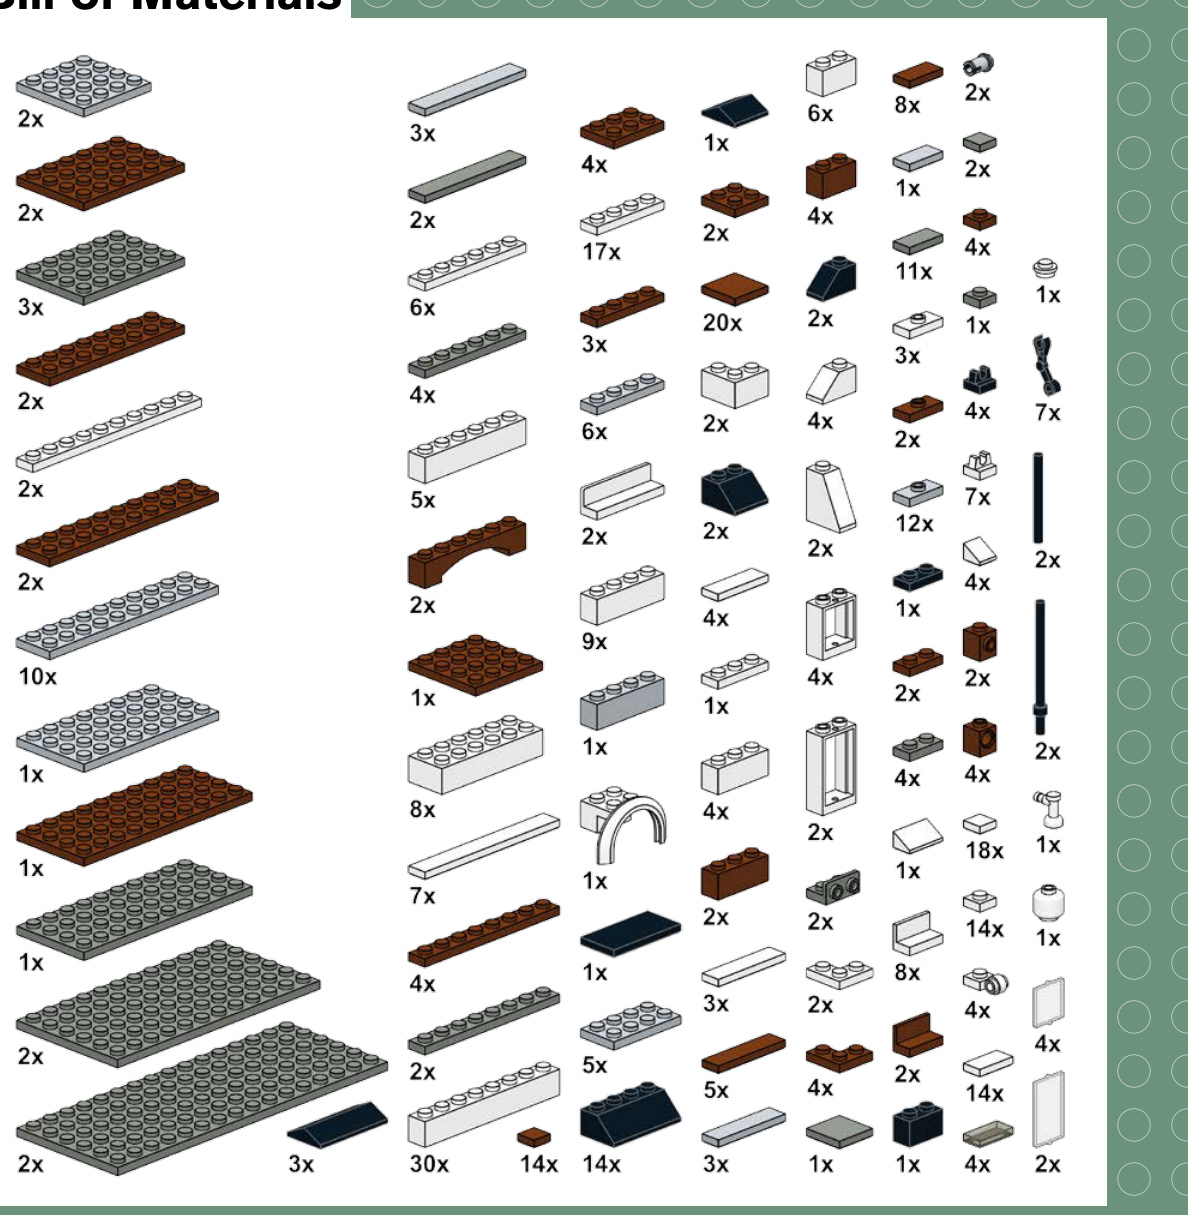
Bill of Materials
For a parts list you can download, visit http://nostarch.com/ legoneighborhood/.
While you’re there, you can also find building instructions for a delivery truck that fits perfectly in the stockroom.
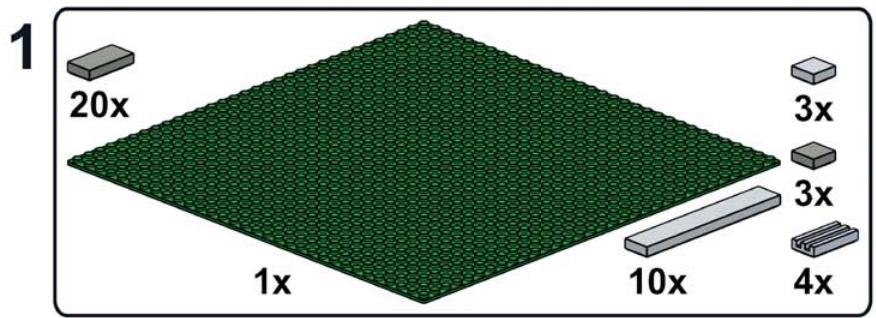
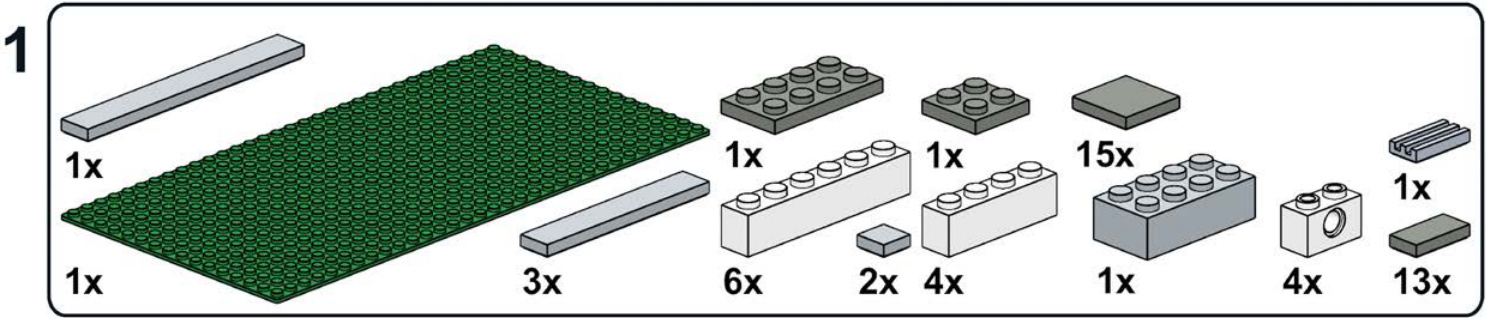
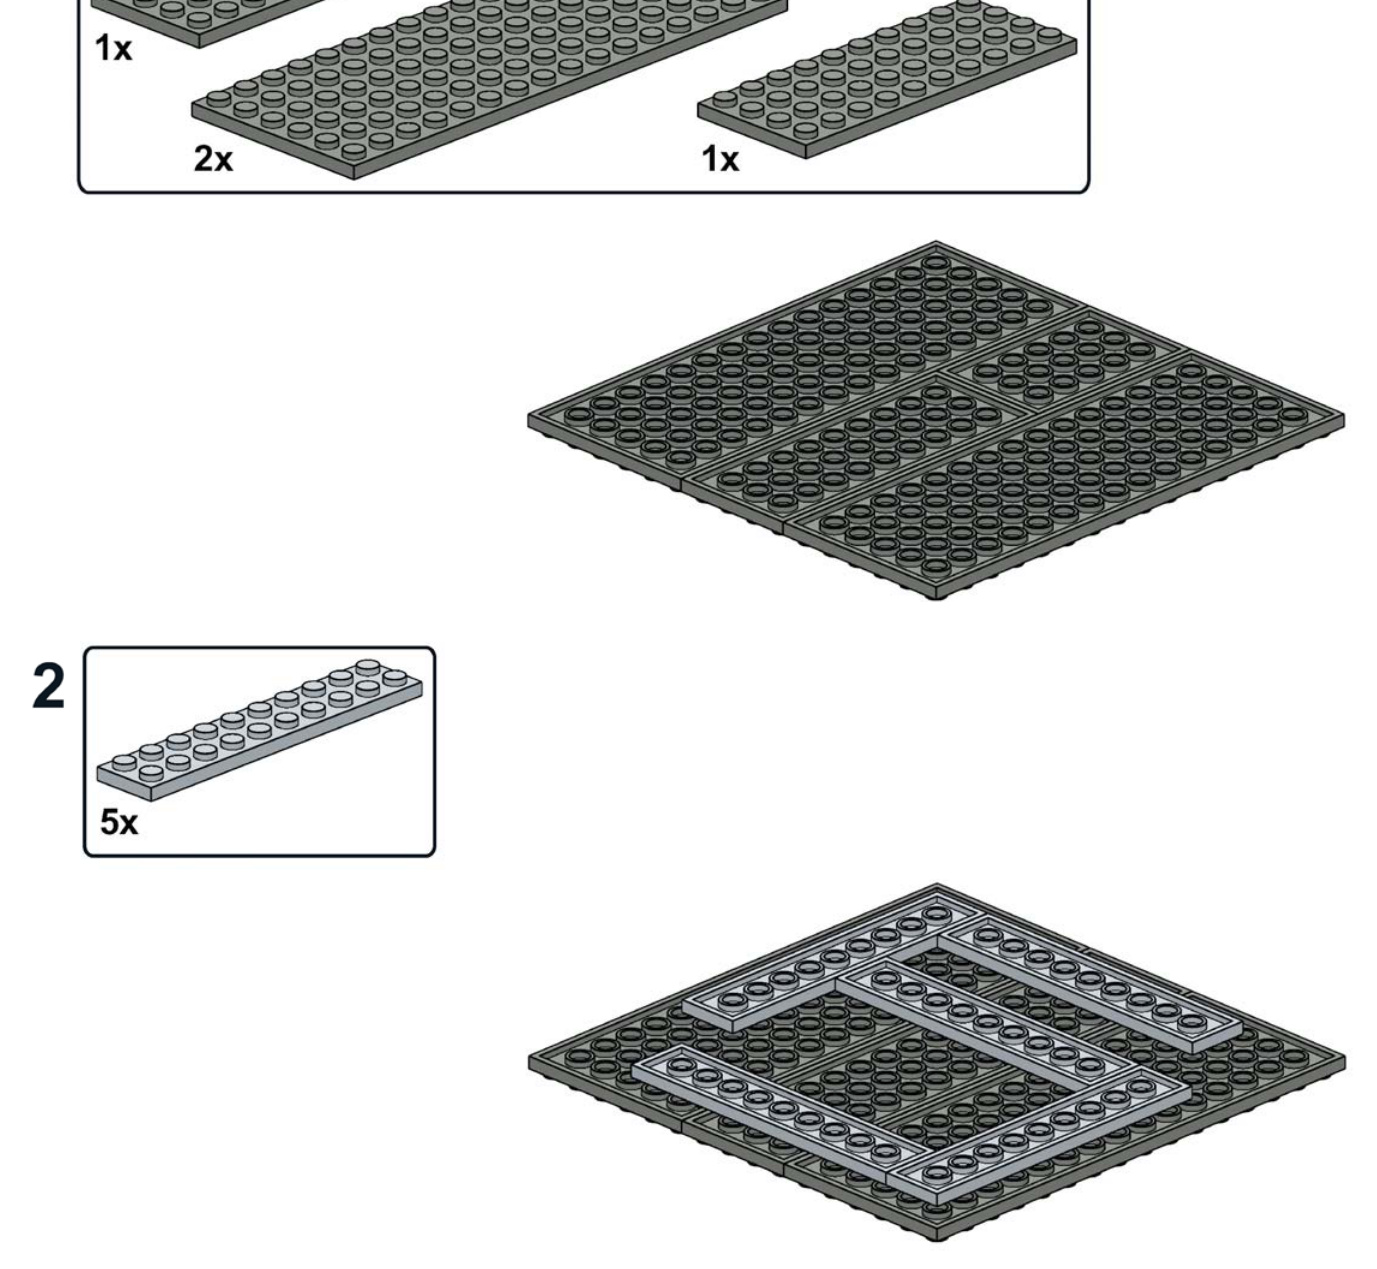
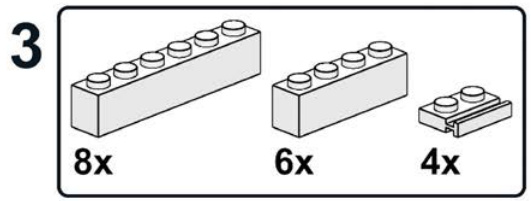
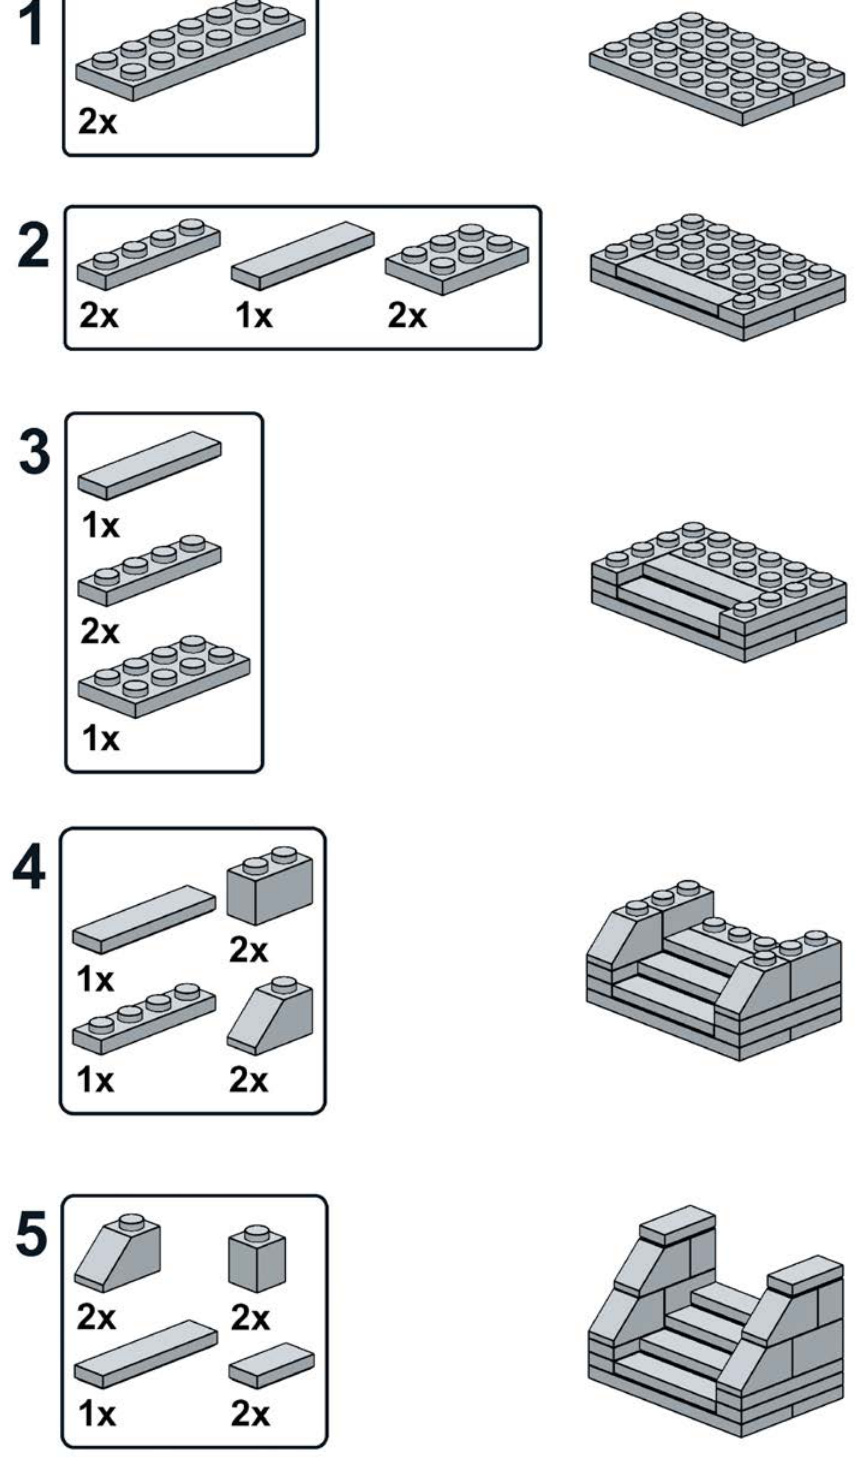
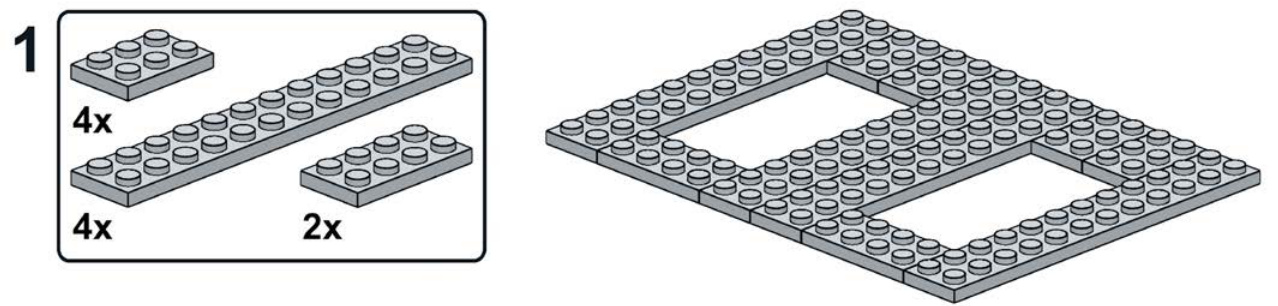
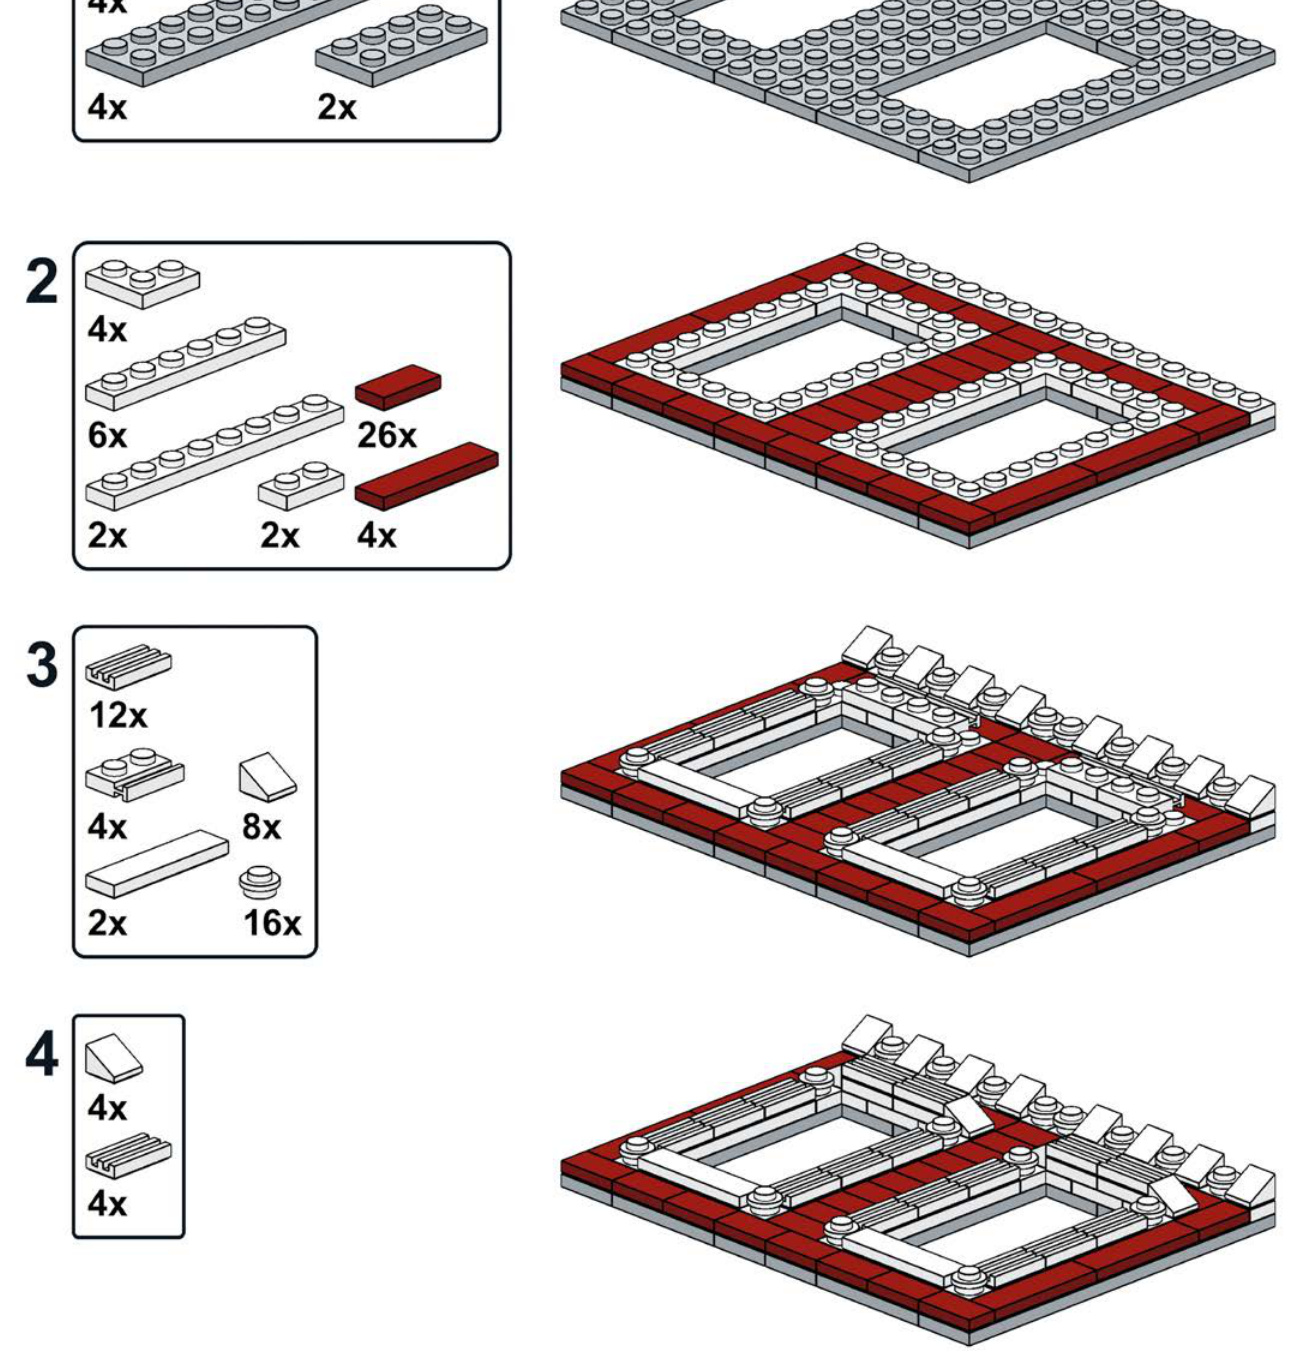
First Floor


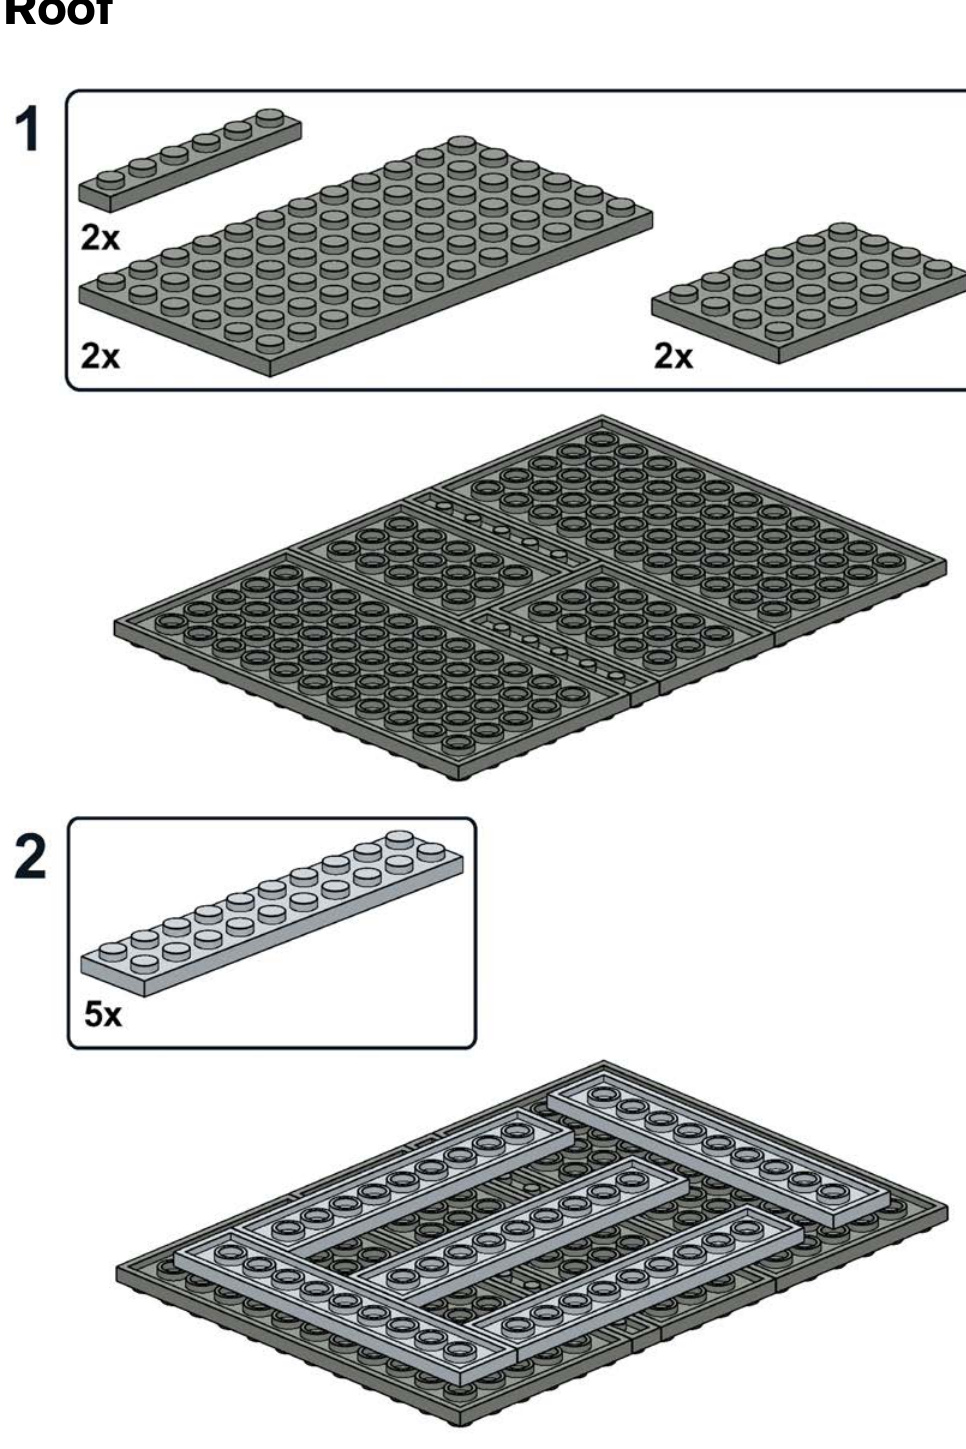
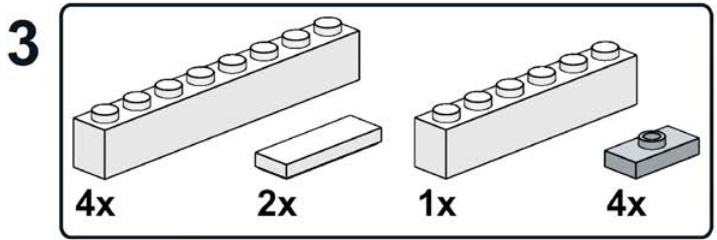
Roof

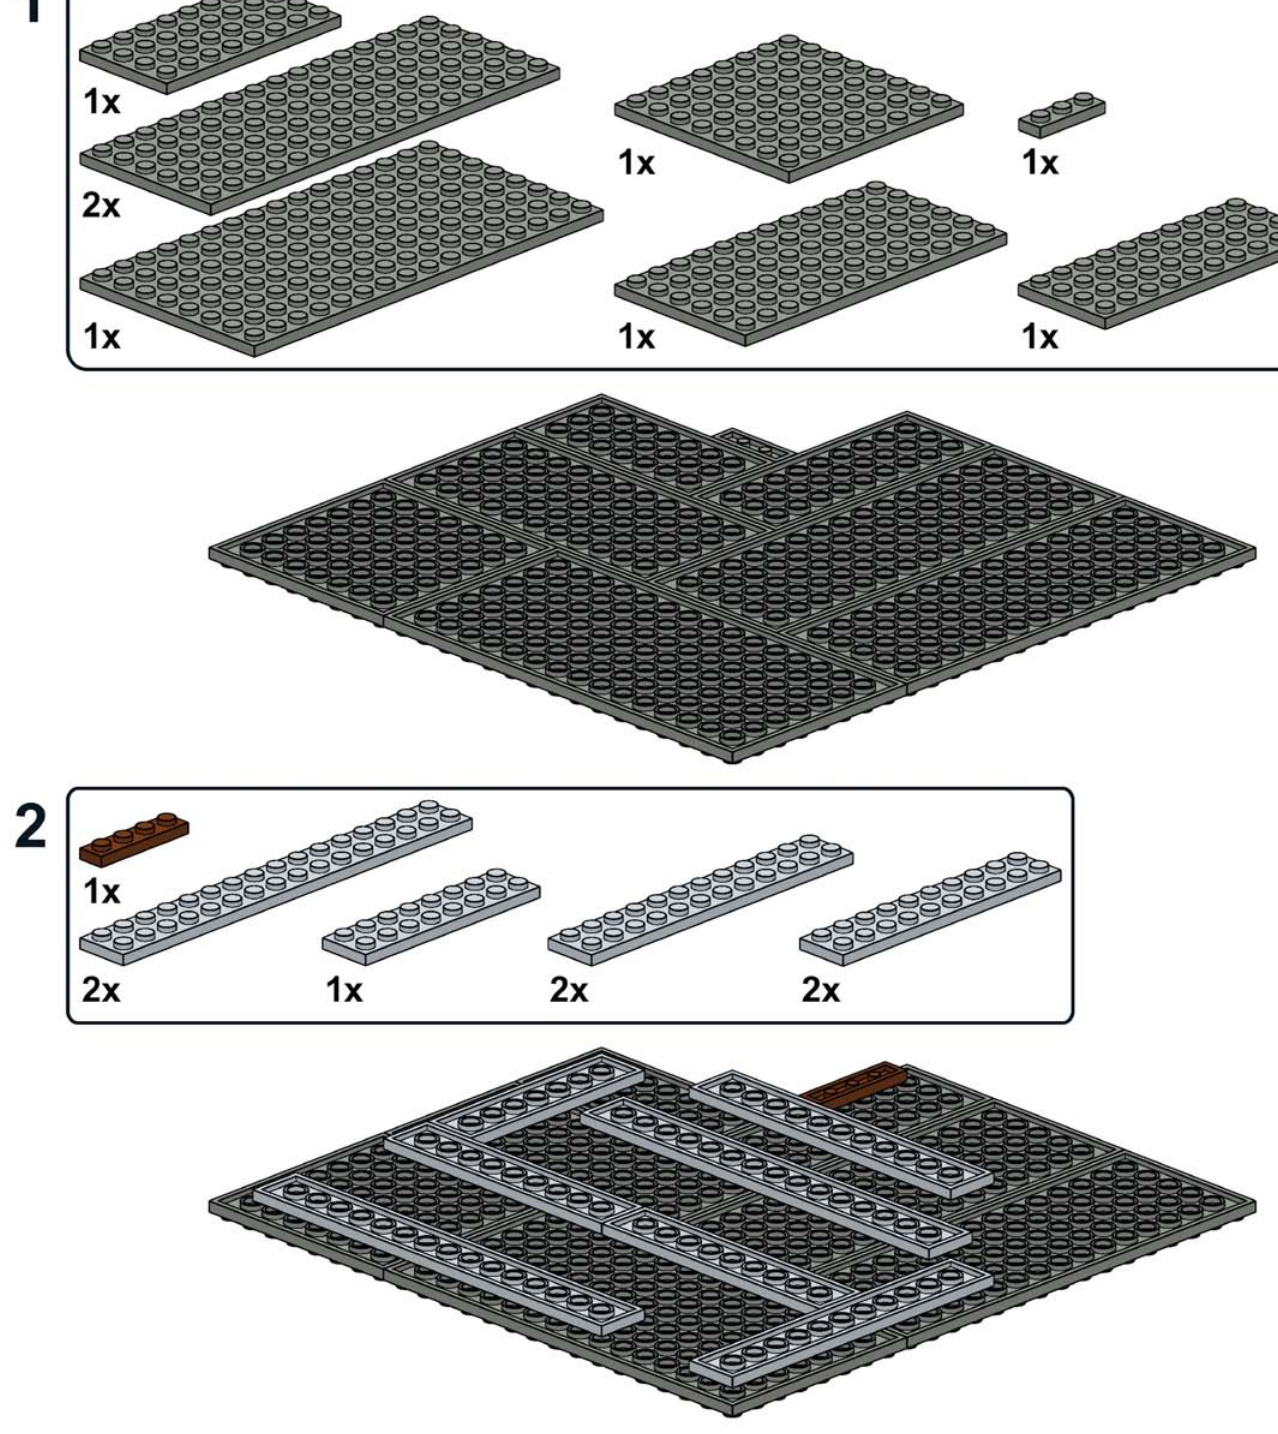
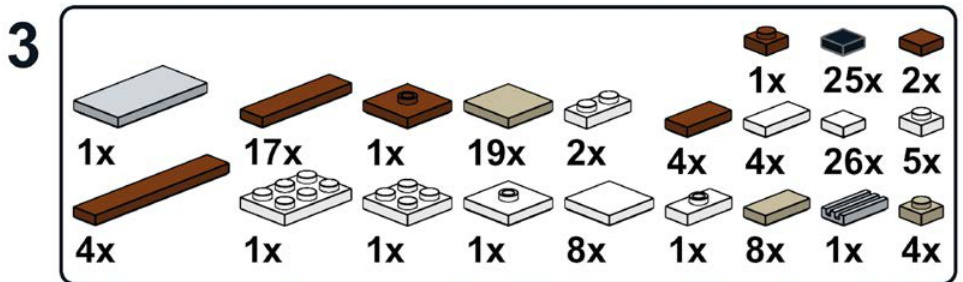
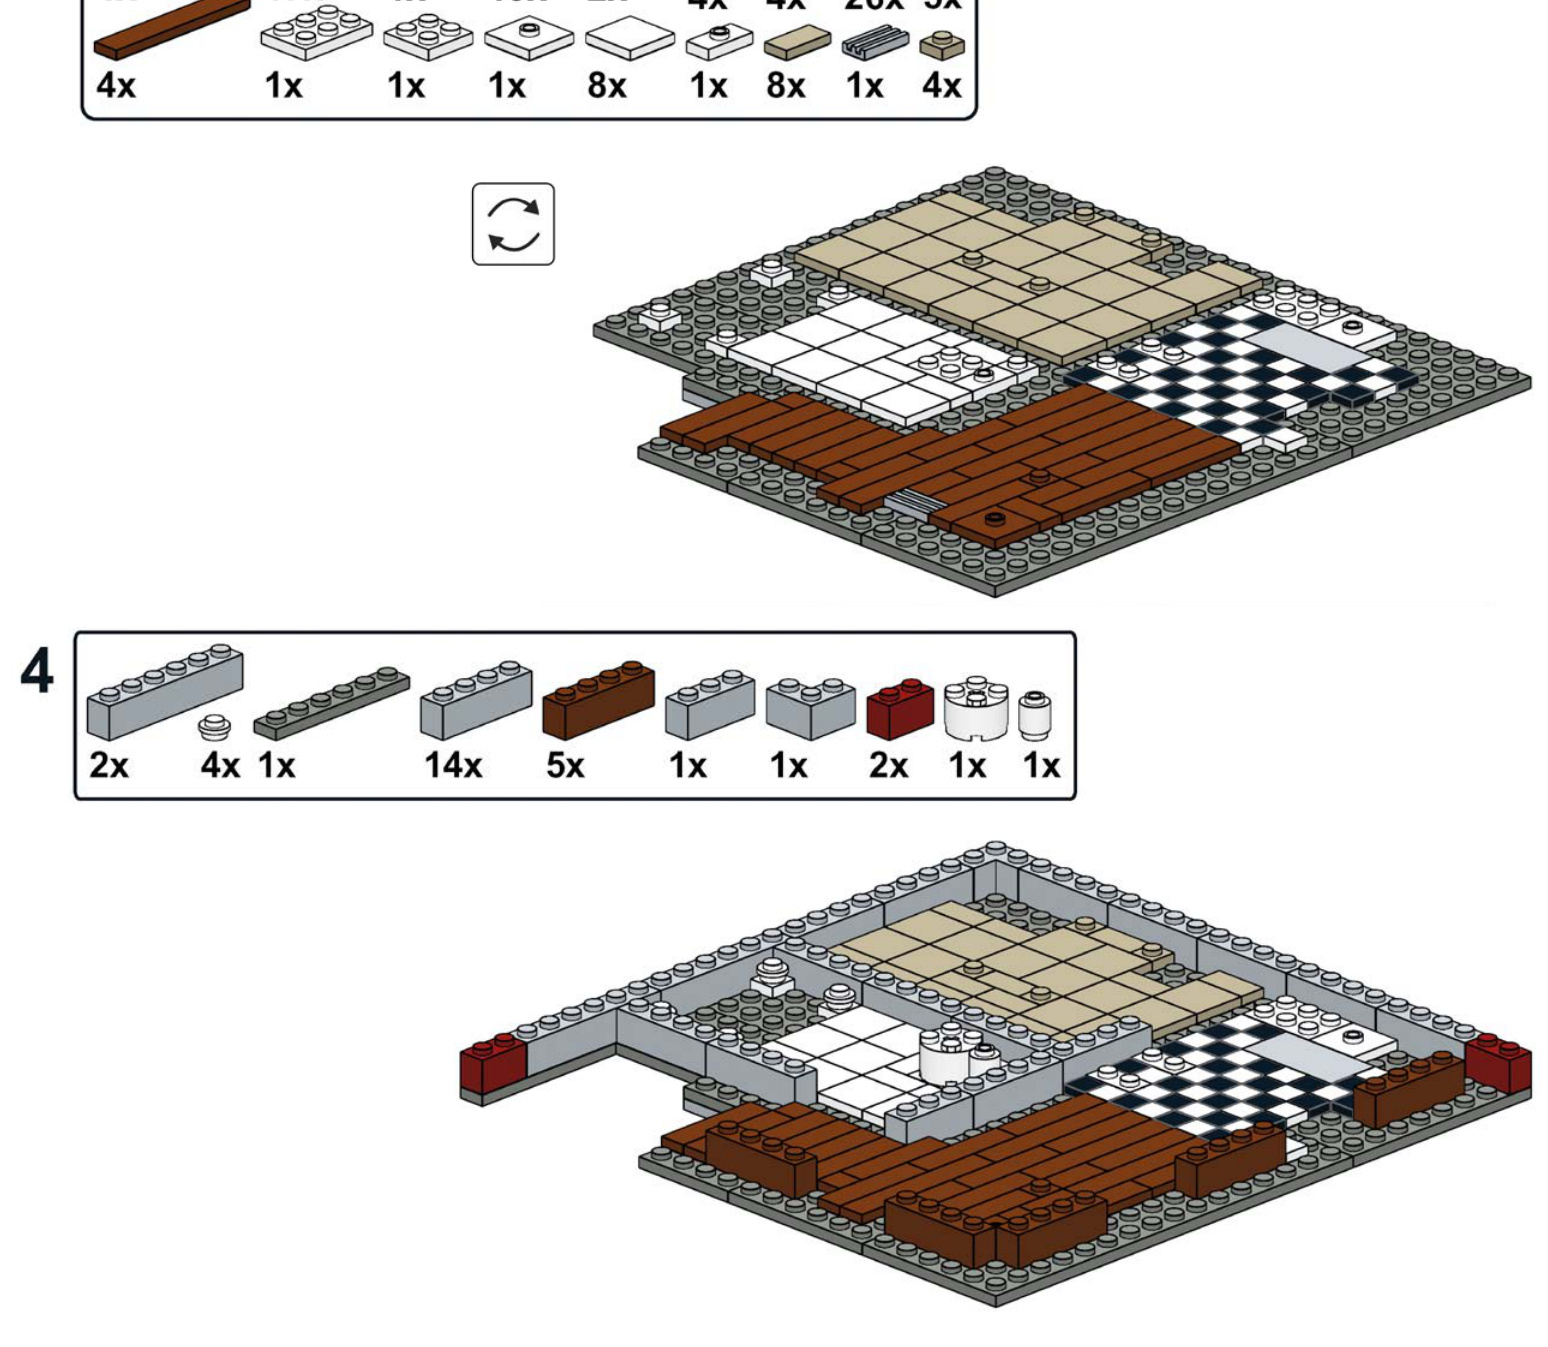
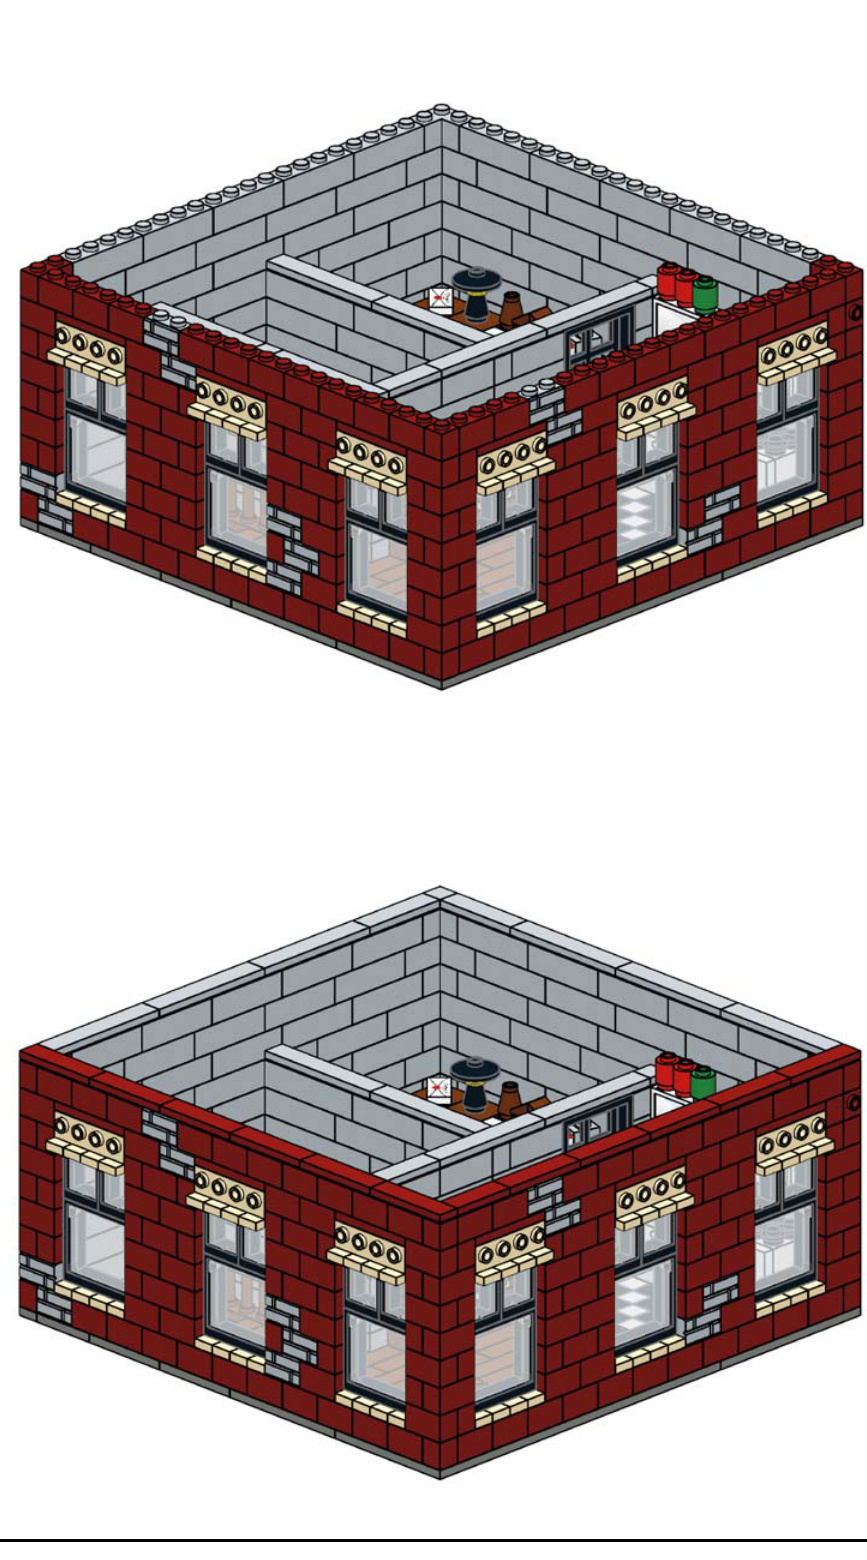
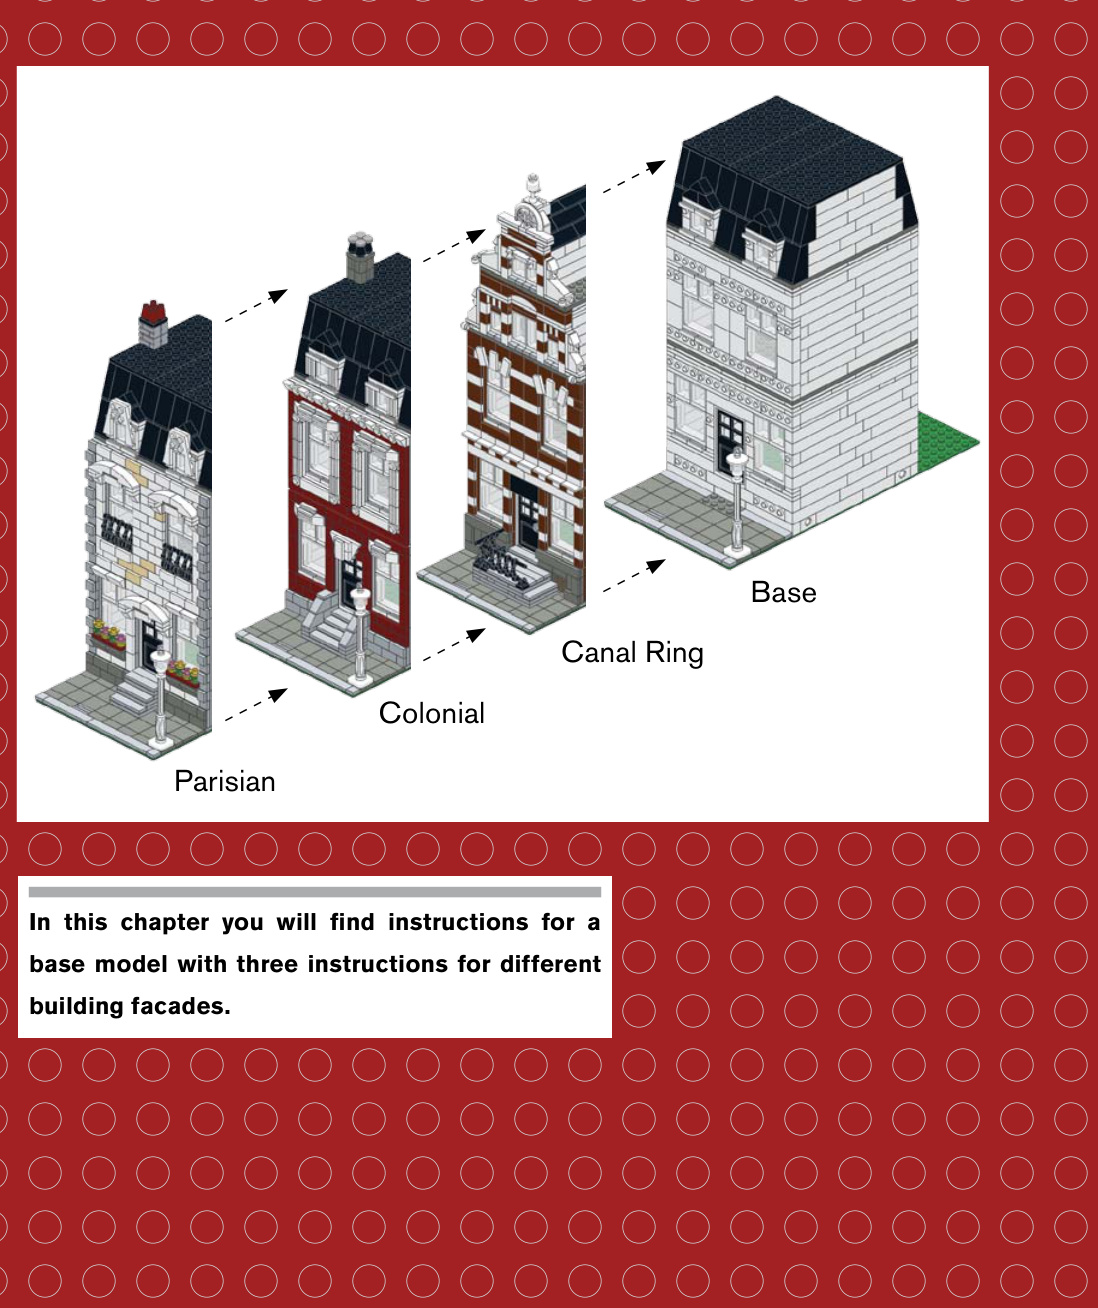
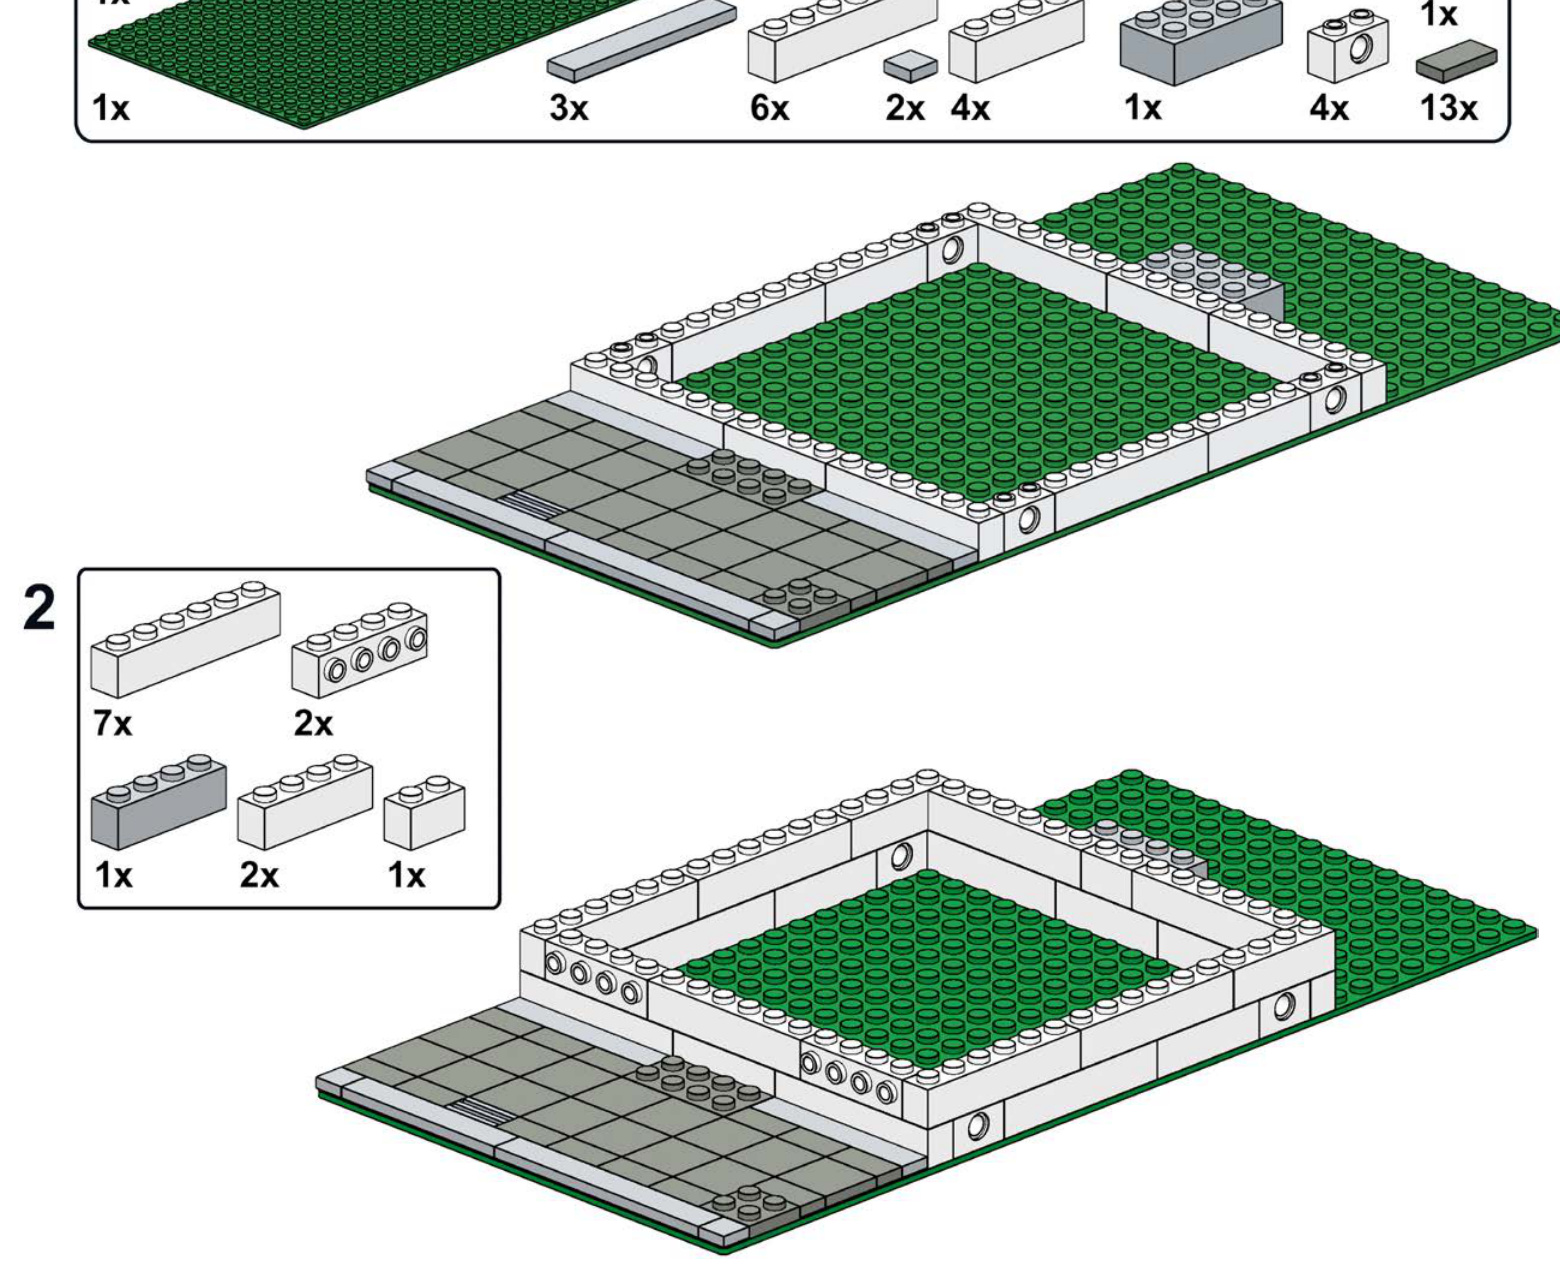
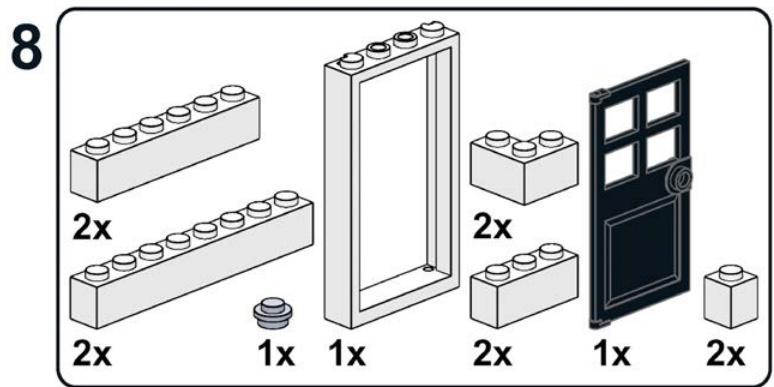
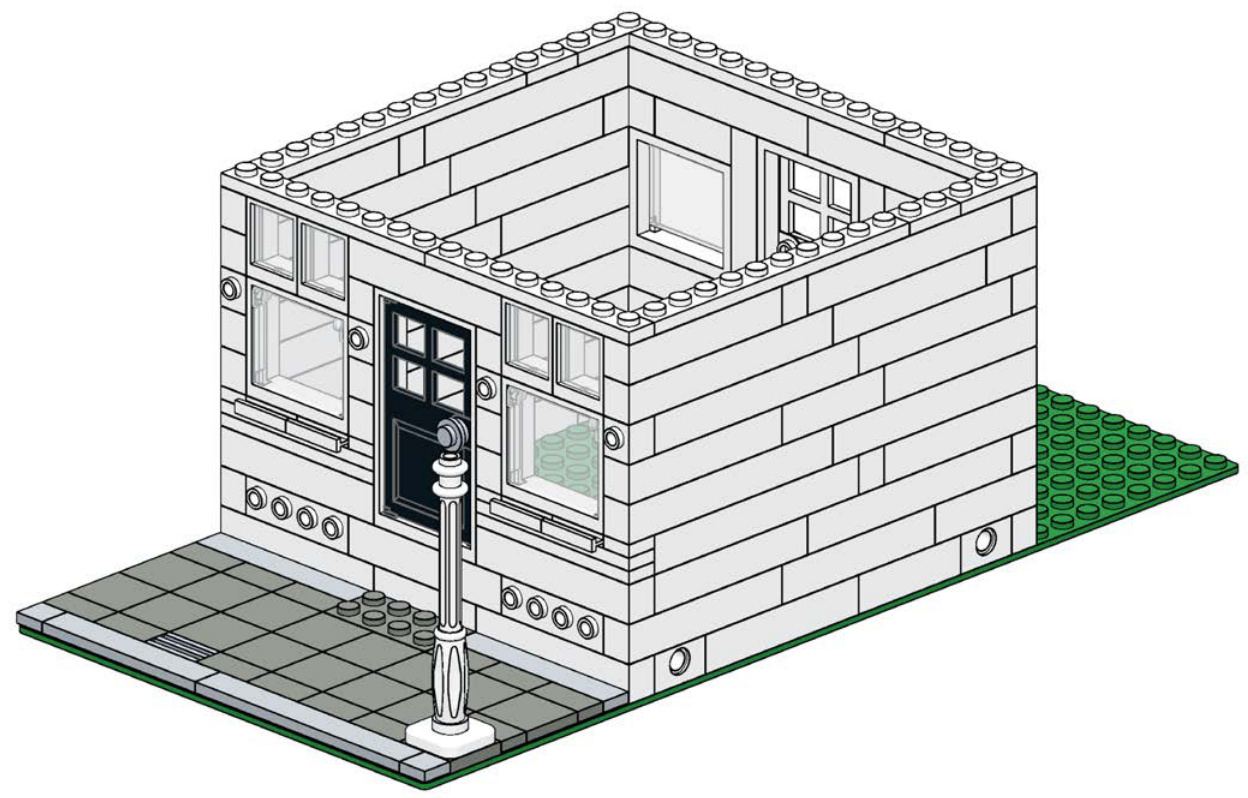
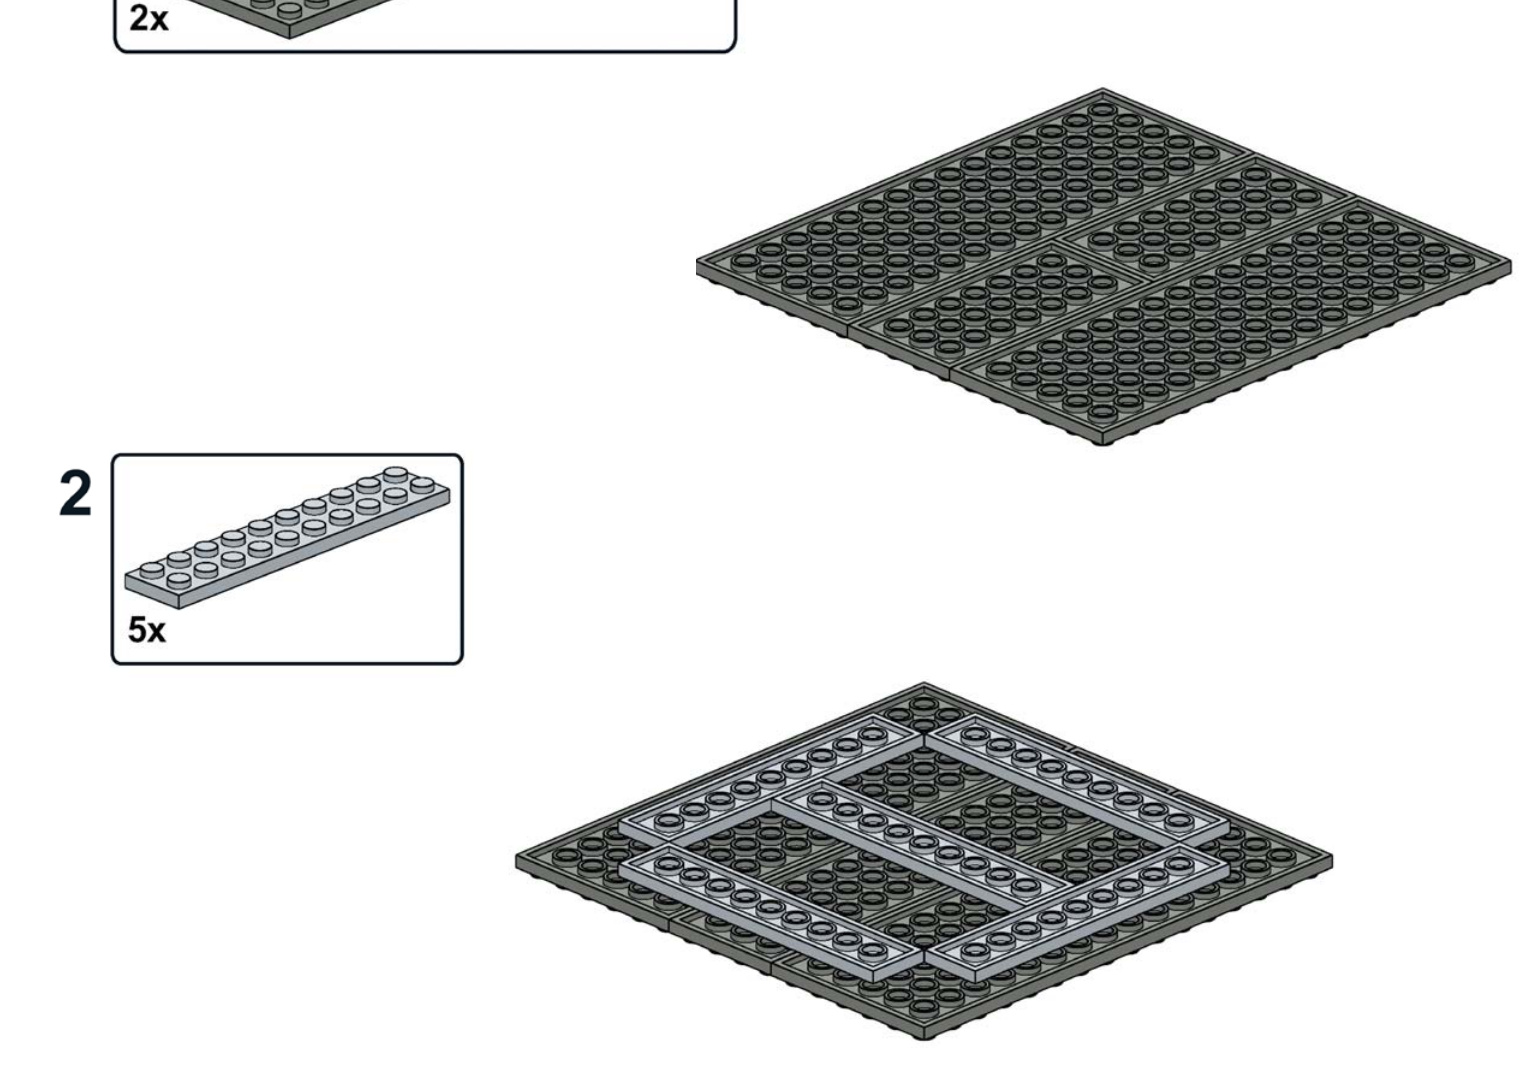
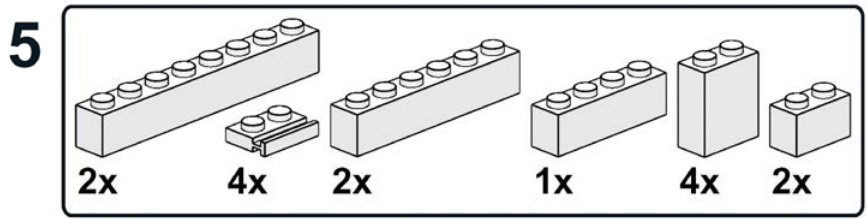
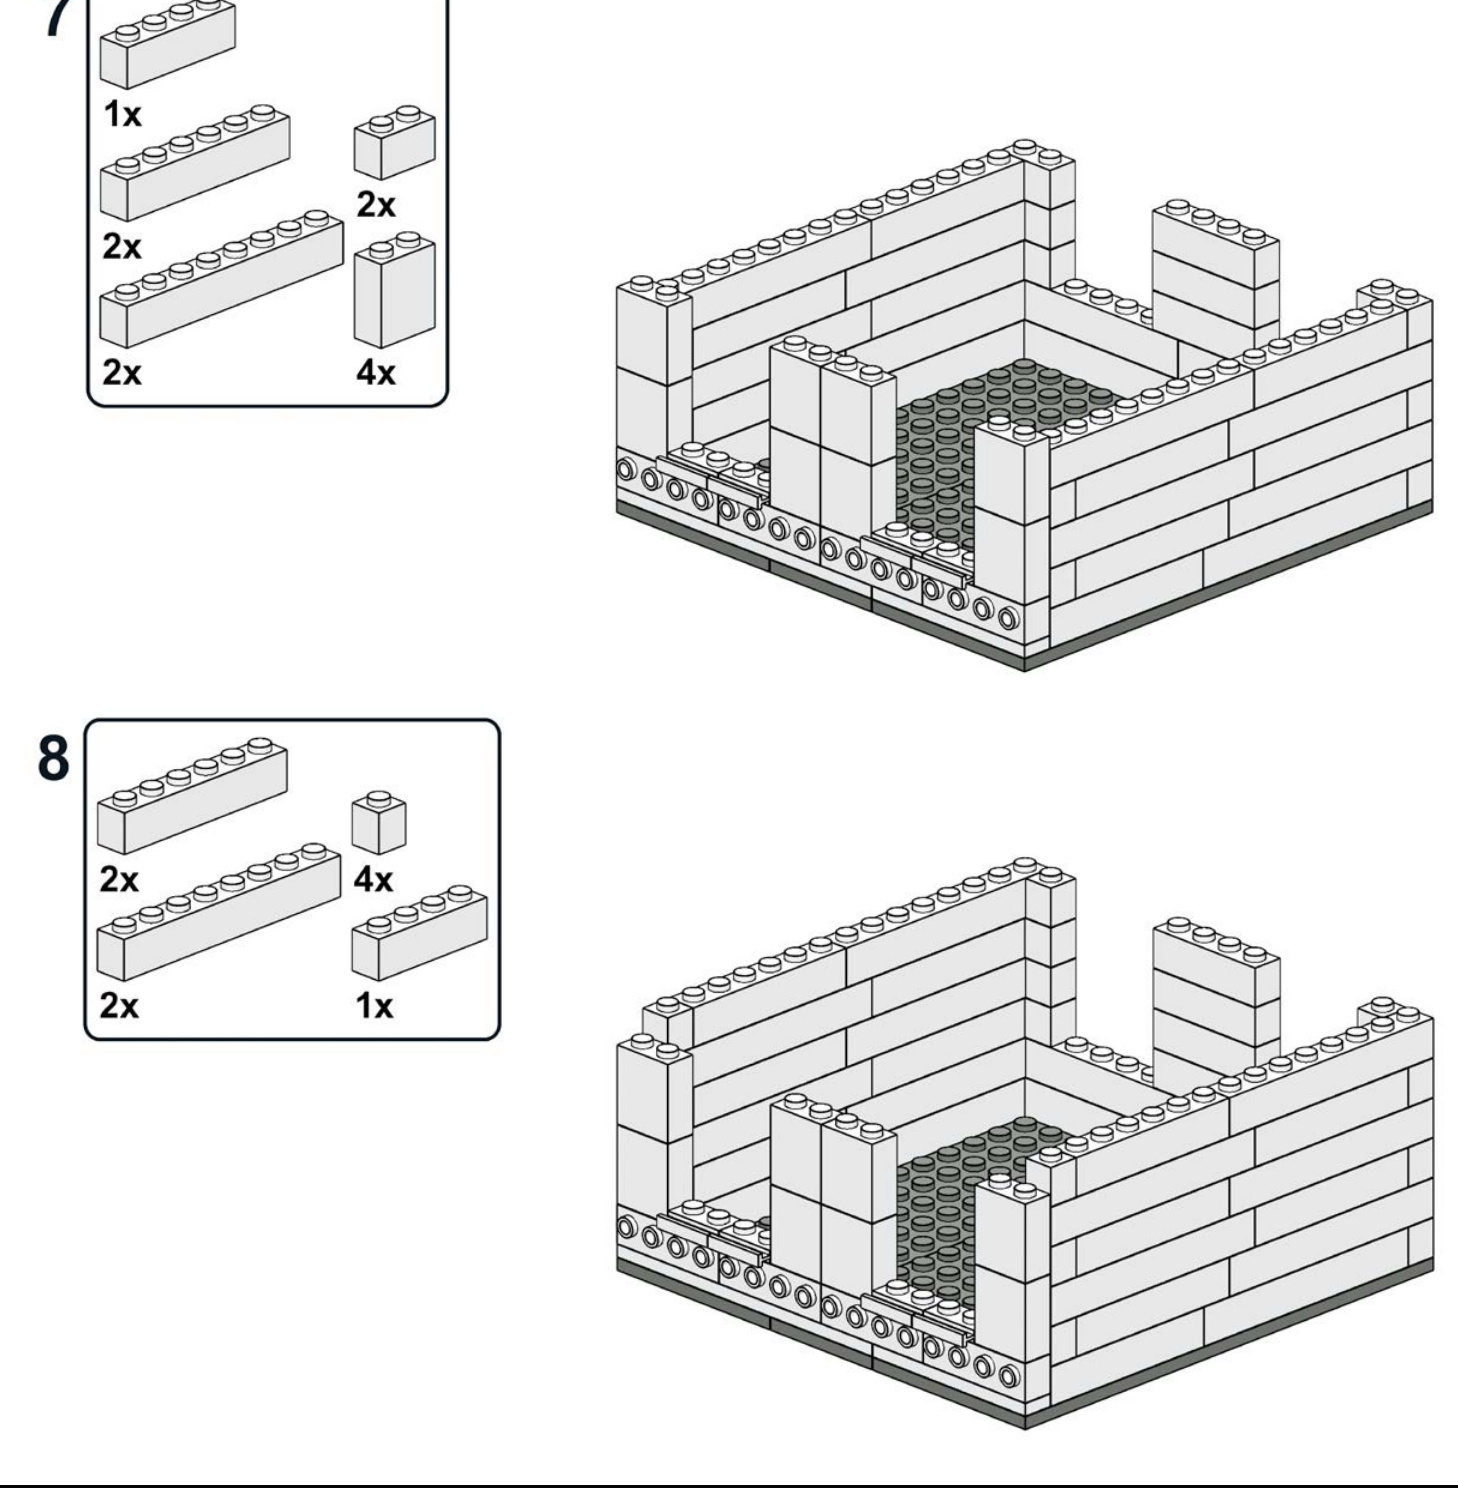
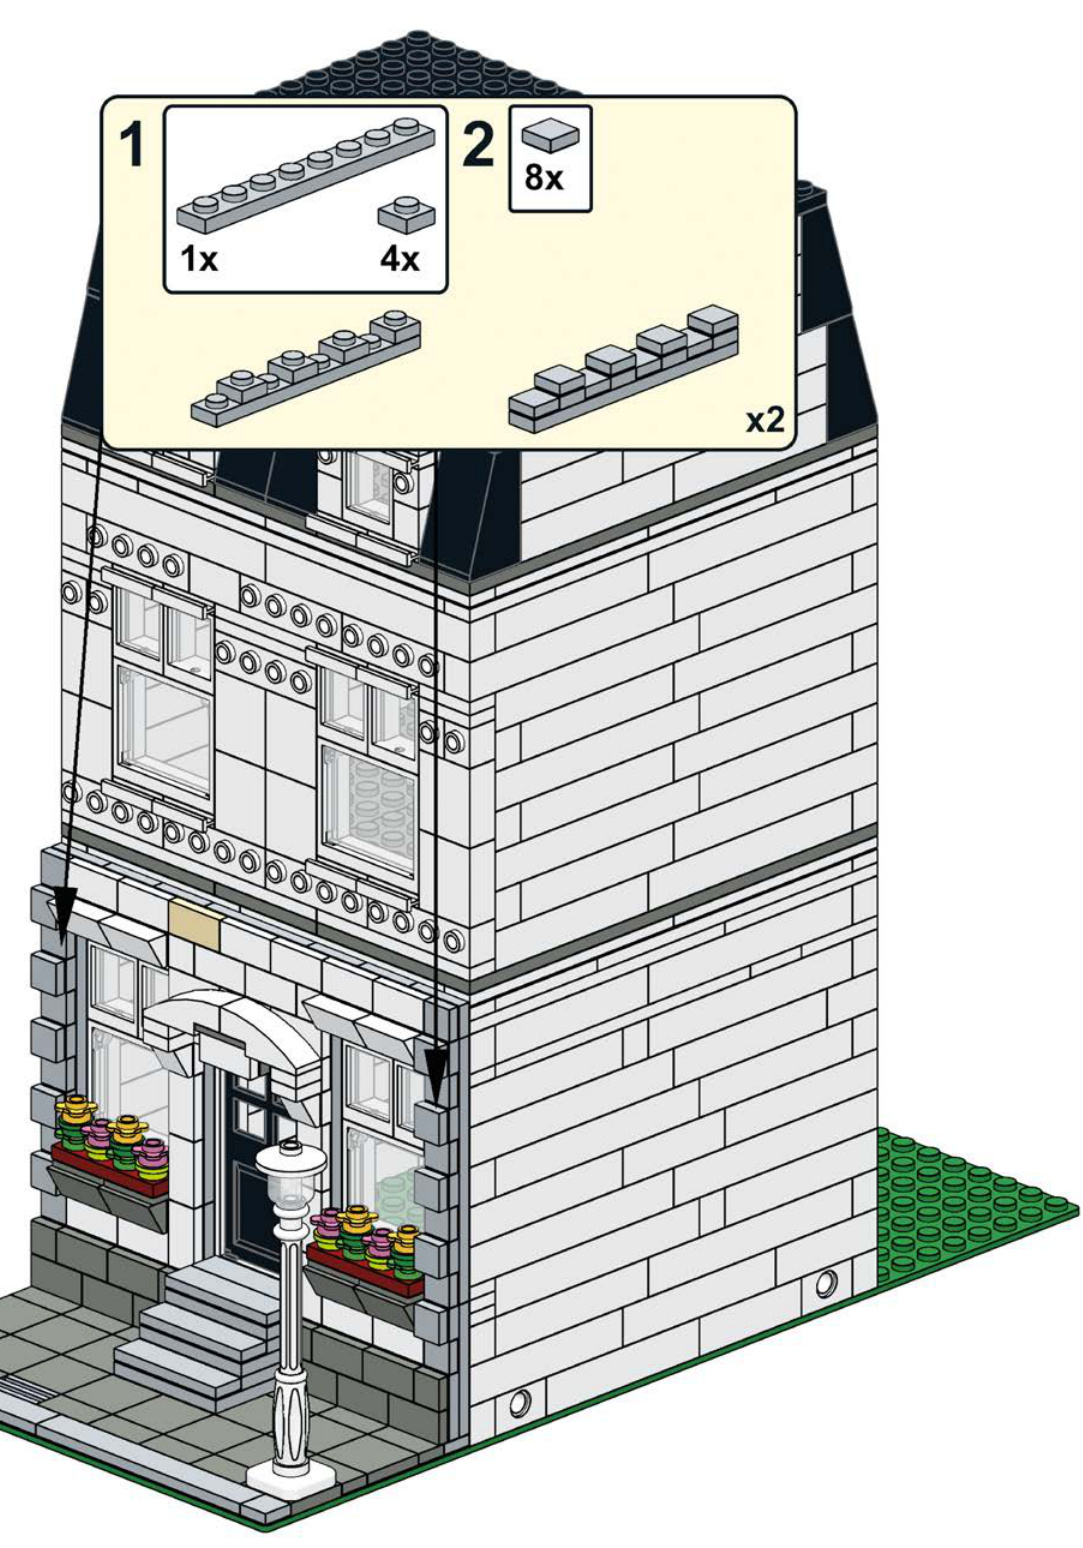
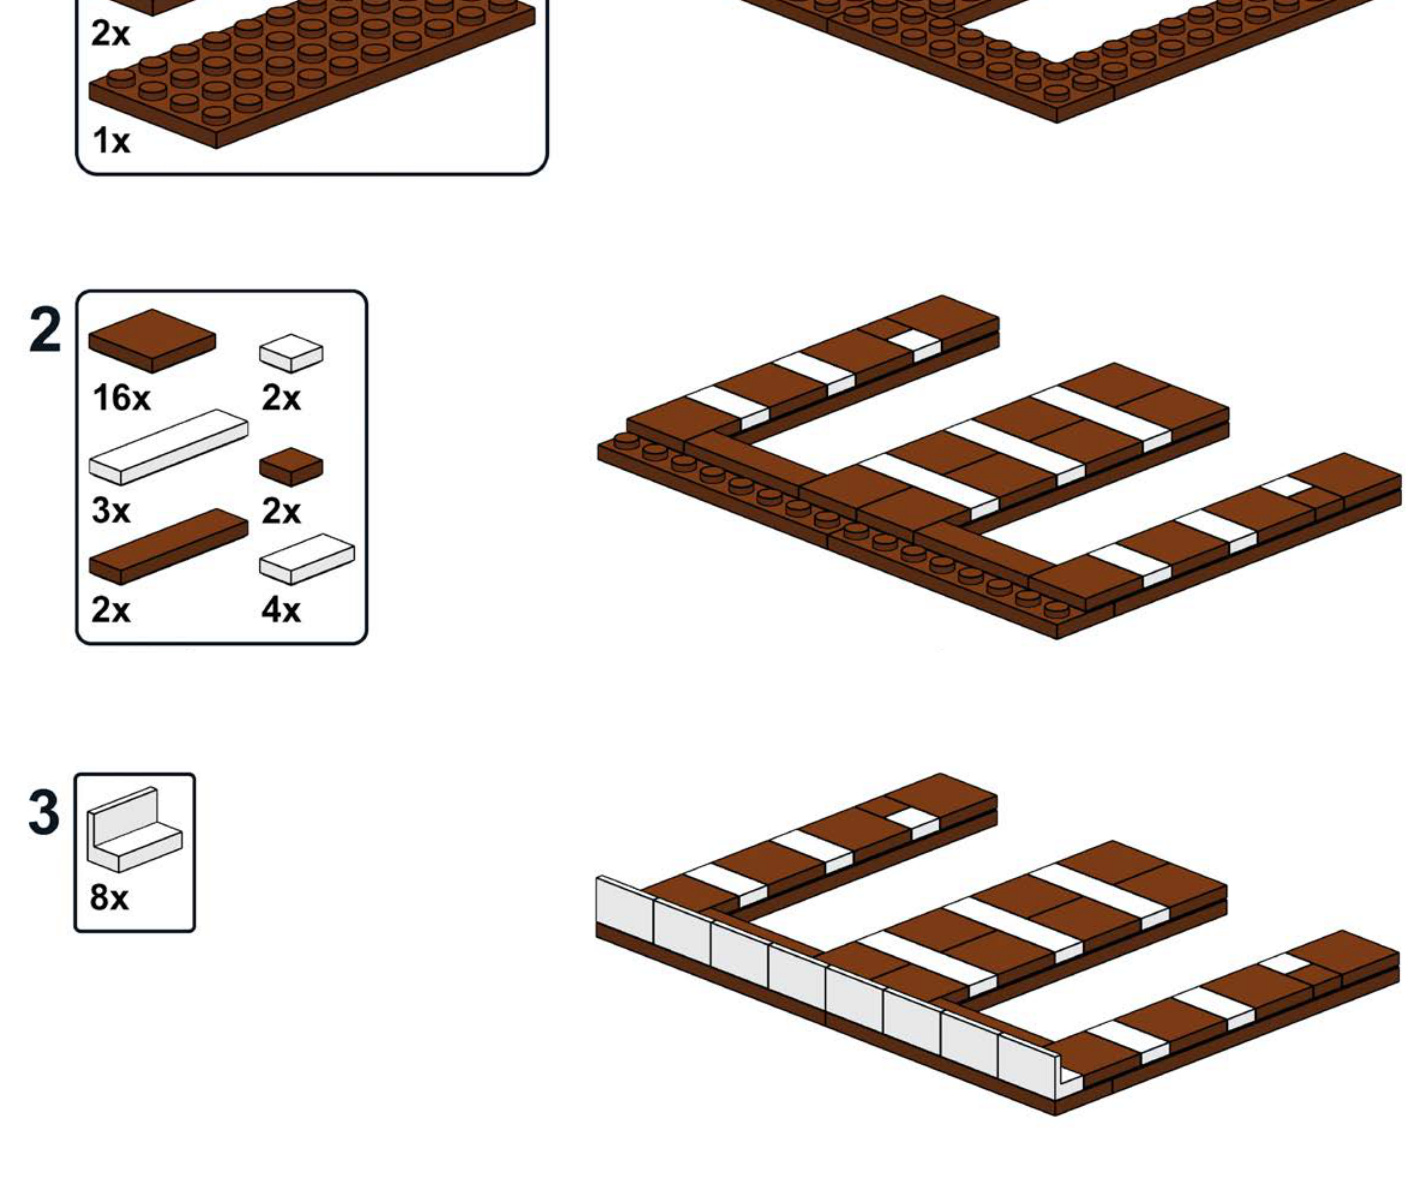
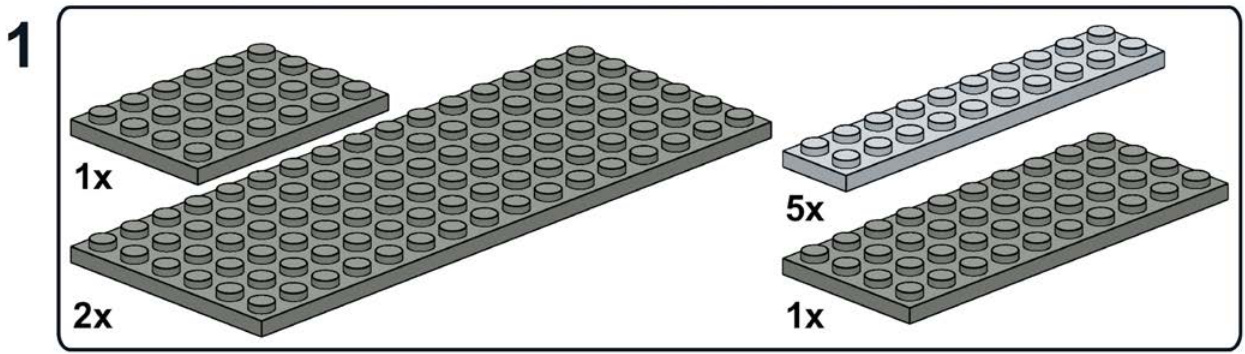
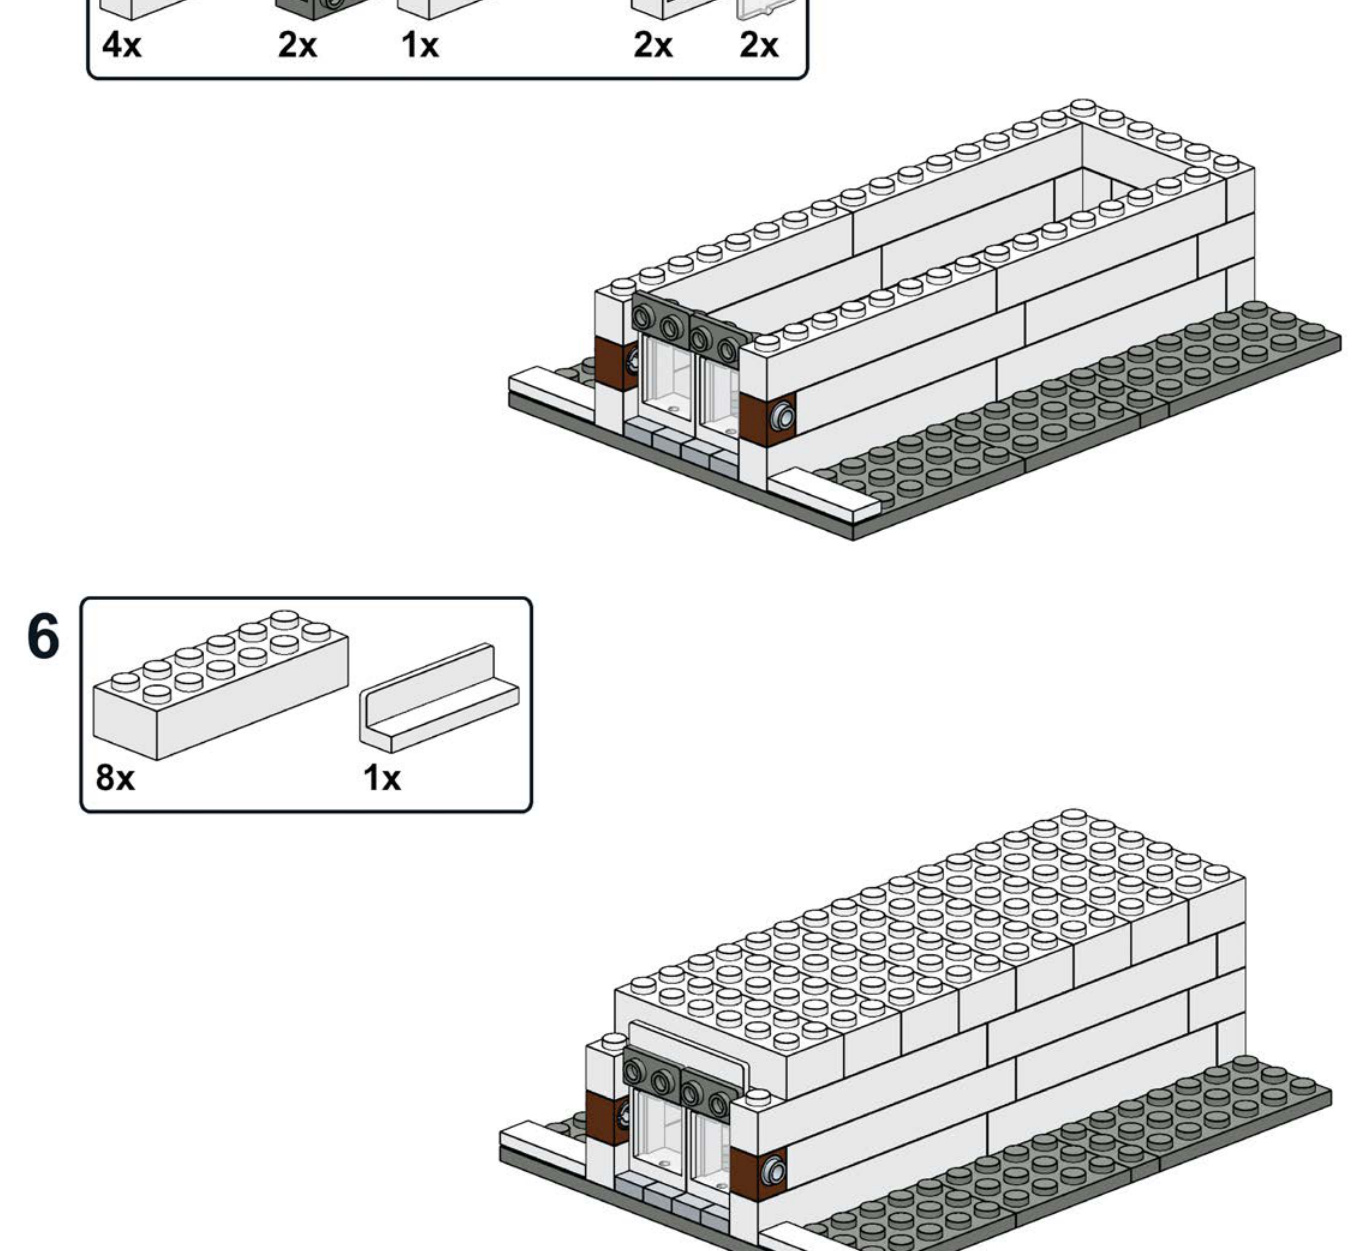
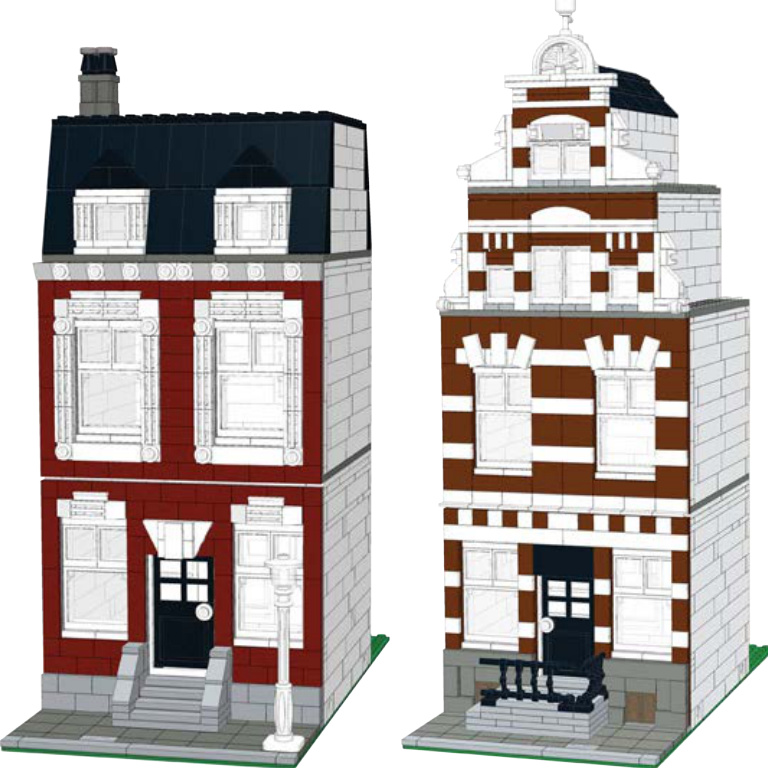
These three residential designs use the same base model as a starting point, which you’ll build first. The exposed studs on the face of the building allow you to connect various facades.
Assembling the structural elements of your building separate from the decorative parts lets you really experiment with new techniques.
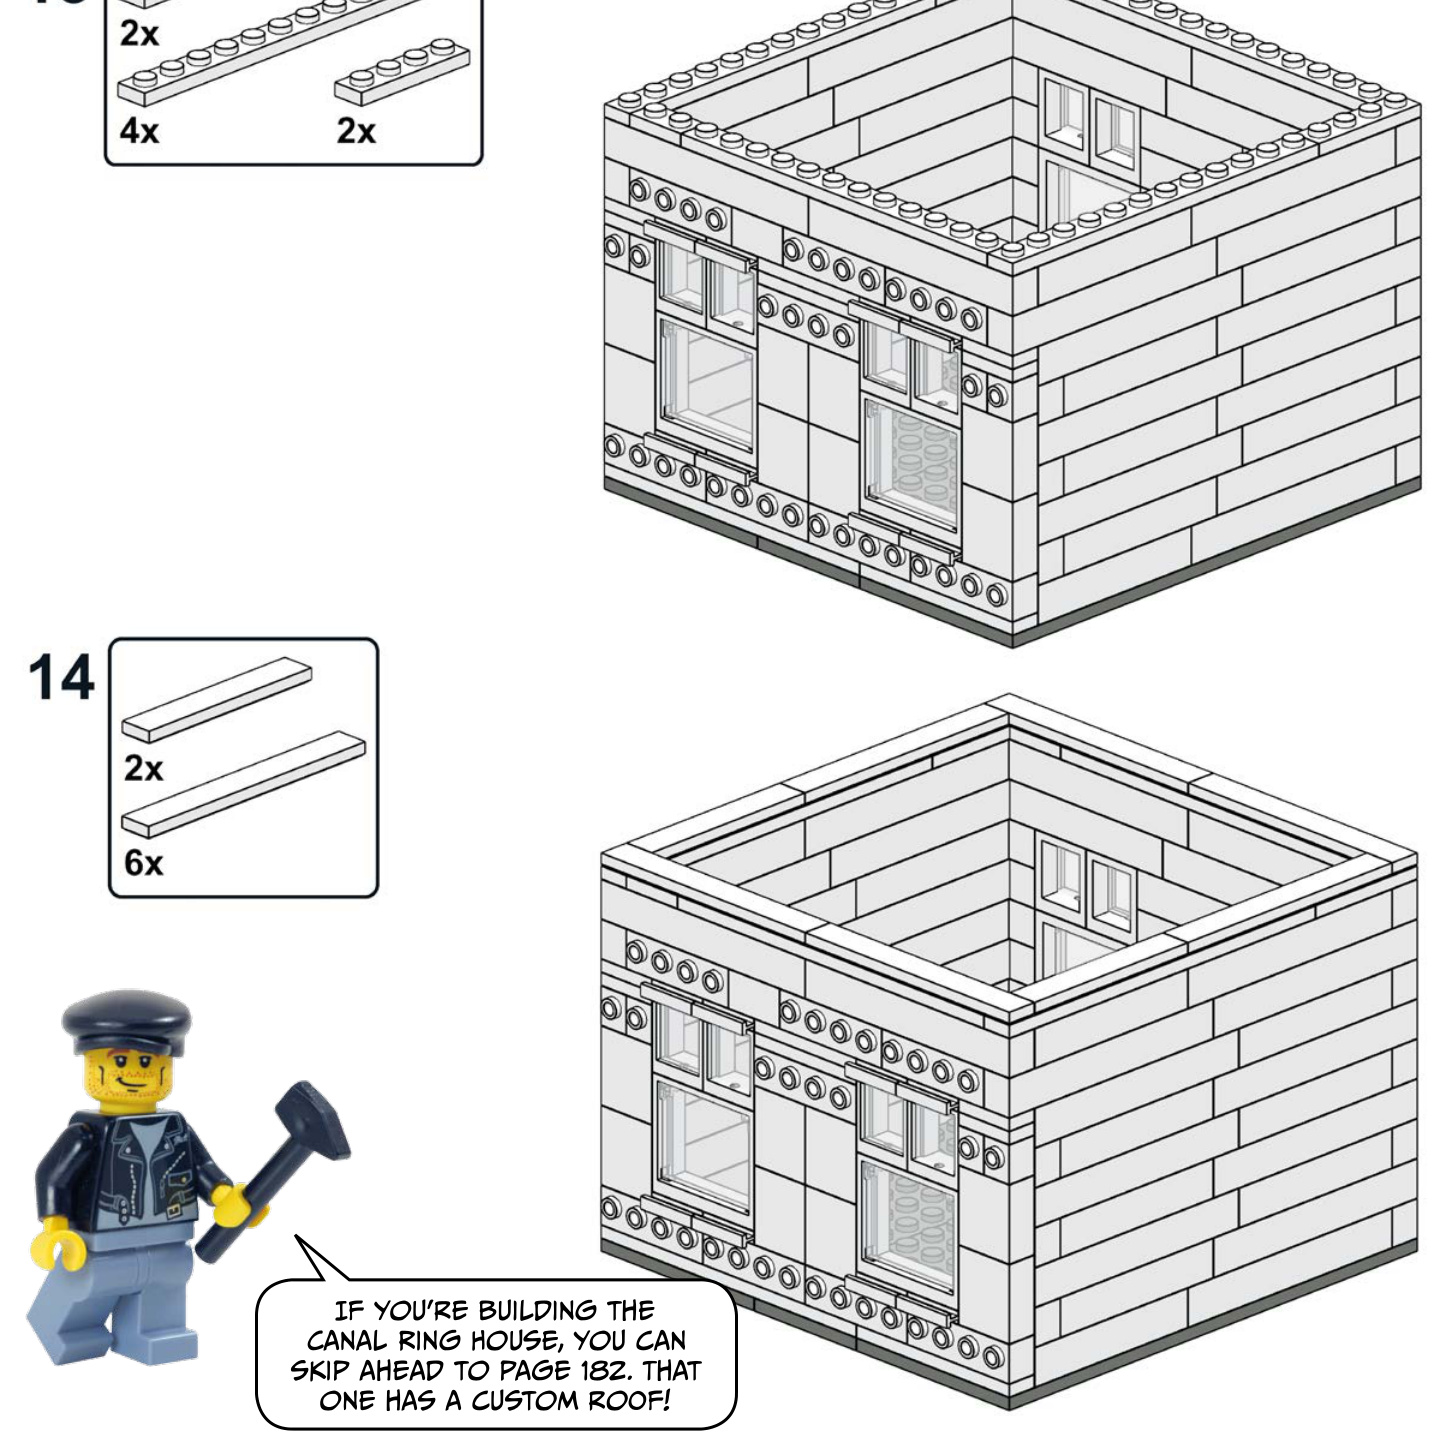
With the base complete, you’ll see instructions for the Parisian Apartment (page 169) and Colonial Row House (page 177), which use the complete base structure in two very different styles. The Canal Ring House (page 184), built in the style of Amsterdam’s Canal Ring district, uses the first two levels of the residential building but has a completely different third story and roof.


Second Floor


Roof


Colonial Row House 175

Third Floor


Build the LEGO® Town of Your Dreams!
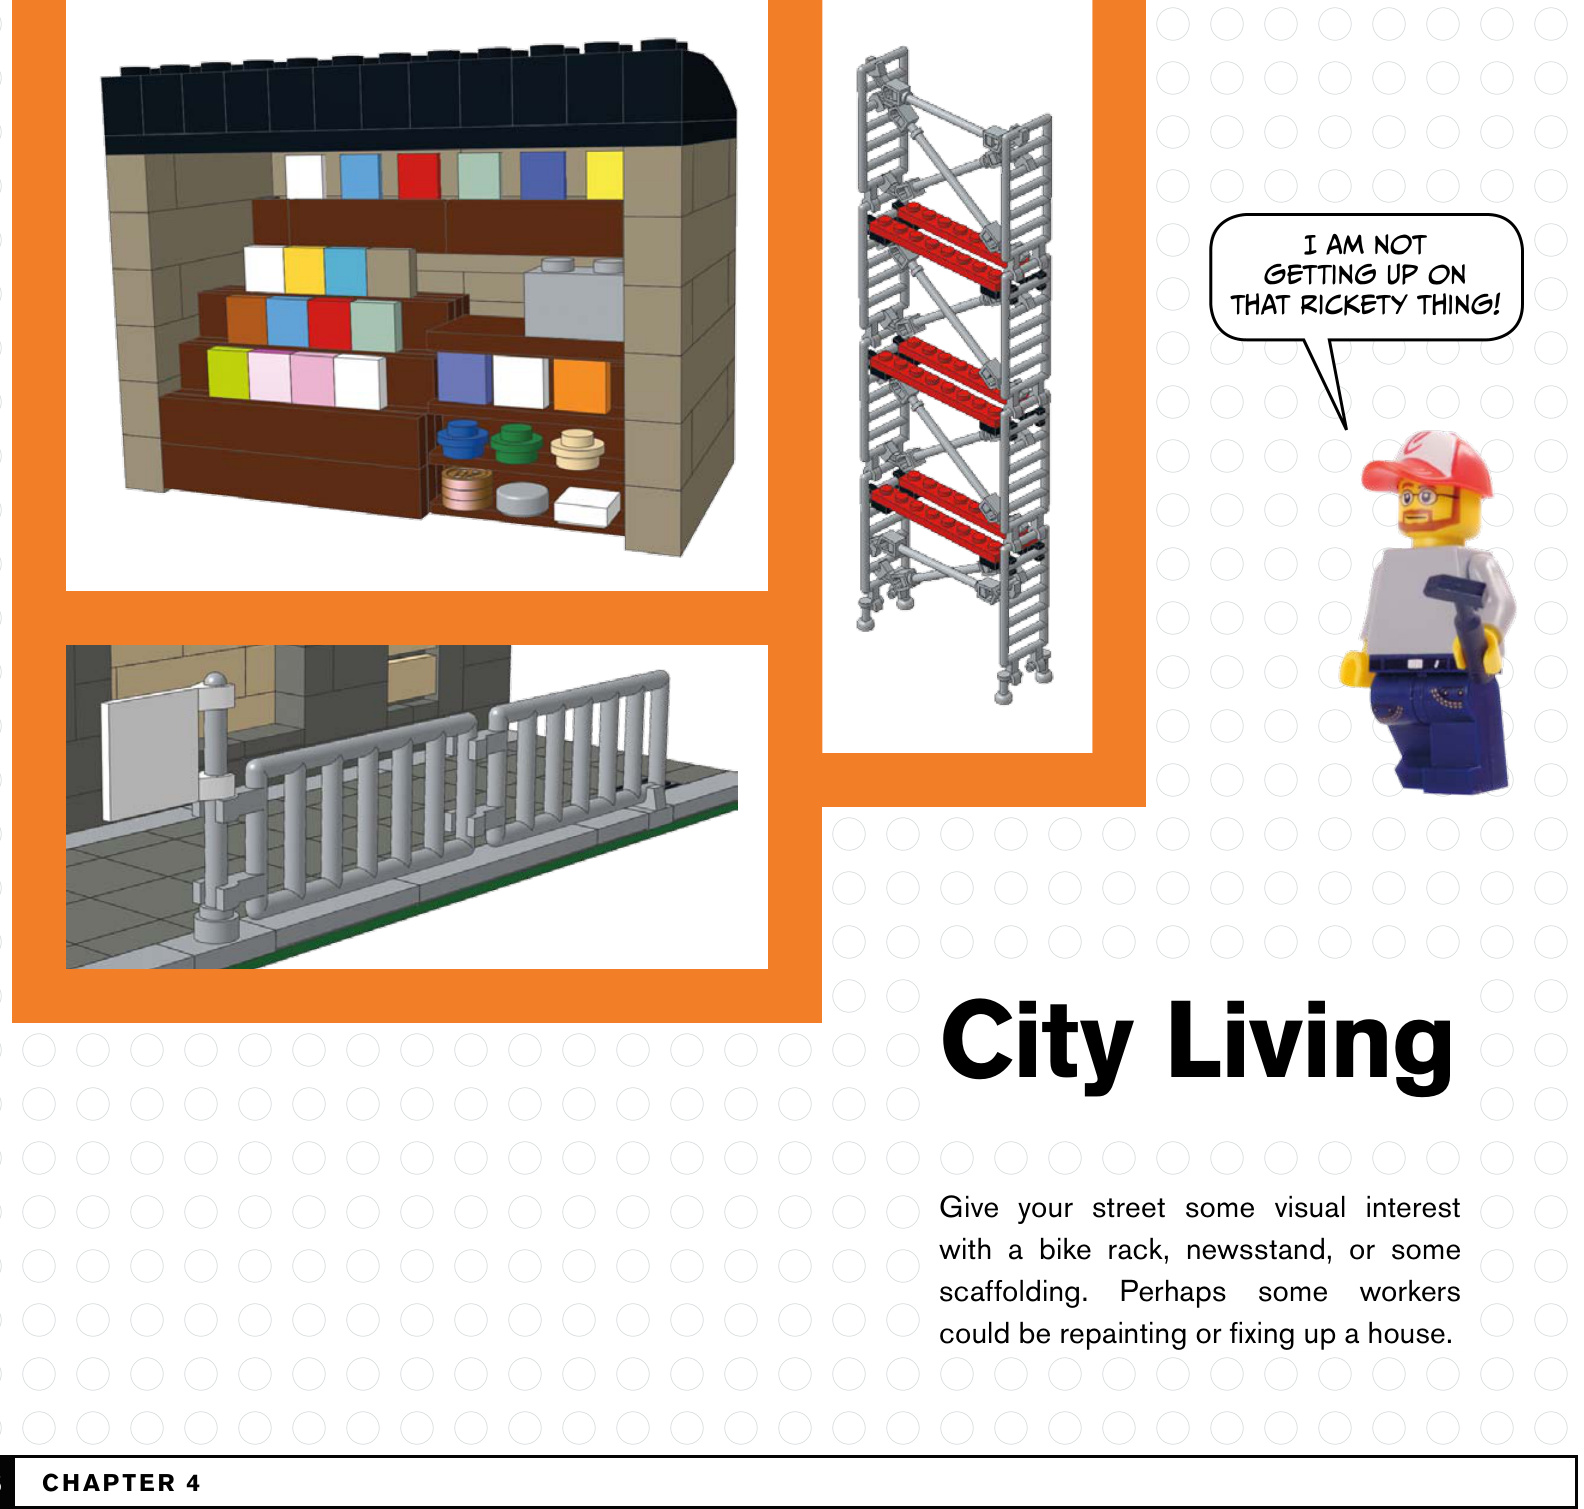
In The LEGO Neighborhood Book, you’ll create buildings with real-world details like cornices and facades, and try your hand at interior design by filling your buildings with furniture and light fixtures. Then add the finishing touches to your models with plants, traffic lights, scaffolding, and park benches. Snap together a few houses, shops, and apartment buildings to create your own neighborhood!
Inside you’ll find:
• Complete, step-by-step instructions for four multistory buildings
• Dozens of inspiring ideas to use in your own models
• Mini builds for a recliner, old-time lamp post, traffic light, and more
A gallery of the authors’ designs
THE LEGOARCHITECTUREIDEABOOK
1001IDEASFORBRICKWORK,SIDINGWINDOWS COLUMNSROOFINGANDMUCH,MUCHMORE!
THE LEGOARCHITECTUREIDEABOOK
Iremember building with basic LEGO bricks as a child.My natural tendency,eventhen,wastobuildarchitectural structures.My dad is a generalcontractor,soI grew up around the building process, surrounded by unusual woodworking projects like a convexfrontdoor.I suspect my early exposure to buildingprojects trainedme to seethe littledetails in architectureeverywhere.WhenItravel,Ialwayshaveacamerain hand to capture interesting and often quirky designs.Maybe I’ll getafew odd lookswhen snapping a photo of what appears to be a boringwall,but if there’s an interesting detail,I want to documentit.
Identifying Parts
Therearethousandsof different LEGOparts andmany different online catalogs and references. Unfortunately,the naming andpartnumbering systemsusedby thesecatalogsarenot universal, obvious, or logical.Ihave tried to find ahappy medium when identifying parts used in the models,using the following convention:
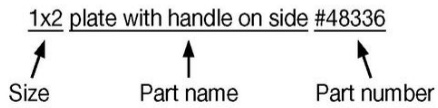
Size: Some catalogs reverse the size formatfor certain parts.Forexample,BrickLink(https://www.bricklink.com/) listsslopesas4x2insteadof2x4.If thesizedoesn’t seem to make sense,try reversing it.
In additiontofinding inspiration in real-world architecture,I am motivated by the LEGO communityandthe modelsI see atconventions,in workshops, and on blog posts.There are somanyphenomenalbuilderswhostretchtherepertoireof howbricks can be used,not just in architectural modelsbut in theLEGO world as a whole.It’s important to acknowledge the influence of other people’s ideas, even when they may beunconsciously absorbed.So to allthebuildersout there, thankyou for contributing to the collective creative wisdom of this community.I am grateful to everyone who may have contributed,even inthe slightestway,toalight-bulb moment. It is the collective creativity of us allthatkeeps this hobby fresh and inspiring.
Part Name: Names are made as concise and clear as possible.Printed parts and stickers have extremely long names, so manyarereferencedbywhat setsthey come in.
Part Number: Some catalogs differentiate between many differentversionsofapart.Moldshavechangedoverthe decades, so sometimes a part will have identifiers like a, b,orc atthe end of the number.I omit these identifiers,as itusuallydoesn’tmatterwhichversionit is.Whenitdoes matter, I make a note of it.
AboutThisBook
Ihopethatbuildersofallagesandexperienceswillfindthis bookto be a usefultoolanda source of inspiration.Just as a writer consults a thesaurusto find moreinteresting words, you can use this book to incorporate more interesting and detailed architectural elementsinto your buildings.
Someparts haveversionswithdistinctnumbers,such as 1x2 jumper plates,which come in two different versions. The maindifference between theversions is whether the bottomhasapostthatfits intothecenterof anopenstud (#3794) or three equal divided stud holders (#15573).
vii Preface
CustomParts
For just the right look, sometimes only a custom part will do. I’ve used custom pieces or printing from the following vendors: altBricks(http://altbricks.com/),BrickArms(http://brickarms .com/),BrickForge(http://brickforge.com/)Brickstuff(http:// brickstuff.com/),BrickWarriors(http://brickwarriors.com/), Citizen Brick (https://citizenbrick.com/),Jolly Viking Bricks (http://jollyvikingbricks.com/),andPromoTec(http://promo tecinc.com/).
How-toModels
When it’sdifficult to seethebuilding techniquesused in the finished model, look at the color-codedhow-to boxthat showswhatpartsarebeingusedand how.
Experimenting
Eachmodelservesasan inspirationonly. Ifyoudon’t have the sameexactpart in a certain color,use a differentpart or color.Beinspired,butdon’tbeafraidto modify a technique to fityour needs and improvise with parts you already have inyourstash.
ToReiner:The first giftyou ever gavemewasaLEGO set. Littledidweknow just howmuch LEGObuildingwould becomepart of our family and transformfrom a hobby into a professionalundertaking.Thankyou forbuildingwithus,for not minding our LEGO room taking over our house,and for being a supporter and partner in all that I do.
Modelsinthisbookwere inspiredbyBruceLowell,Katie Walker,Siercon and Coral,Simon NH,Soren Hixenbaugh,and manyothers.
Thankyou to allof the minifigs at No StarchPressfor all ofyour many contributions in bringing this book tofruition. An enormous thank you to Serena for juggling thousands of photographs,captions,andpartdetailsandpatientlywrangling them into manageable chapters. It has been a tremendousprivilege toworkwithyou inshaping thisbook.

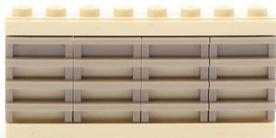
Brickwork
Simple Brick Walls
Use modified bricks to create wall variations and patterns.Texture can make a monochromatic wall more interesting without using more-complicated techniques.
1x2 modified brick with masonry profile #98283
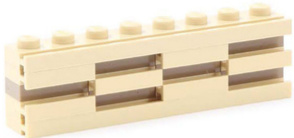
1x2 modified brick with grill #2877
1x2 jumperplate 15573
1x2 modified log brick #30136
1x2 modified brick with groove #4216
2x2 modified brickwith sloped end #47457
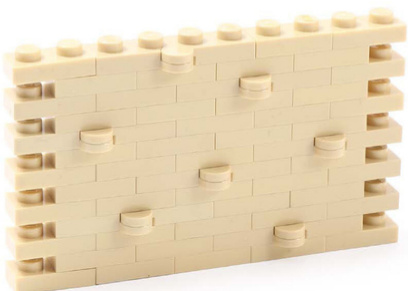
DecorativeRelief
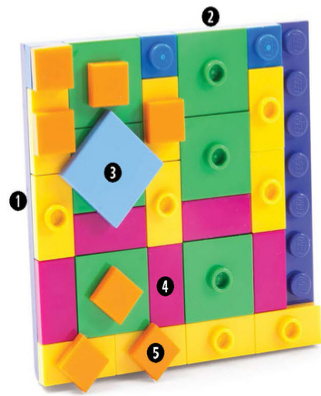
Raised tiles, hinge bricks, and hinge plates add texture to plain surfaces, creating decorative relief patterns.
Raised tiles add interest to a monochromatic wall.The wall can be set back on jumper plates (left) or flush (right).
Raised 1x2 tiles (#3069) add texture to 1x2 modified bricks with masonry profile (#98283), and a subtle color contrast adds interest.
The bump of the hinge bricks (#3830 with #3831) creates the look of irregular bricks that can be arranged randomly or in a pattern.
Hinge plates (#2429 with #2430) create a similar texture.
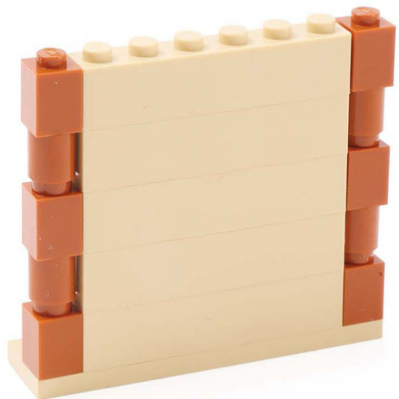
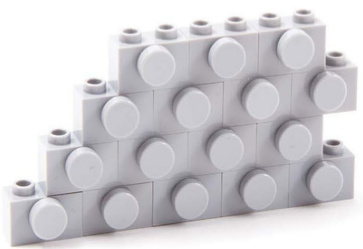
Quoins
A quoin is an architectural element used to accentuate masonry blocks at exterior corners of a wall. They can be overlapping or non-overlapping.
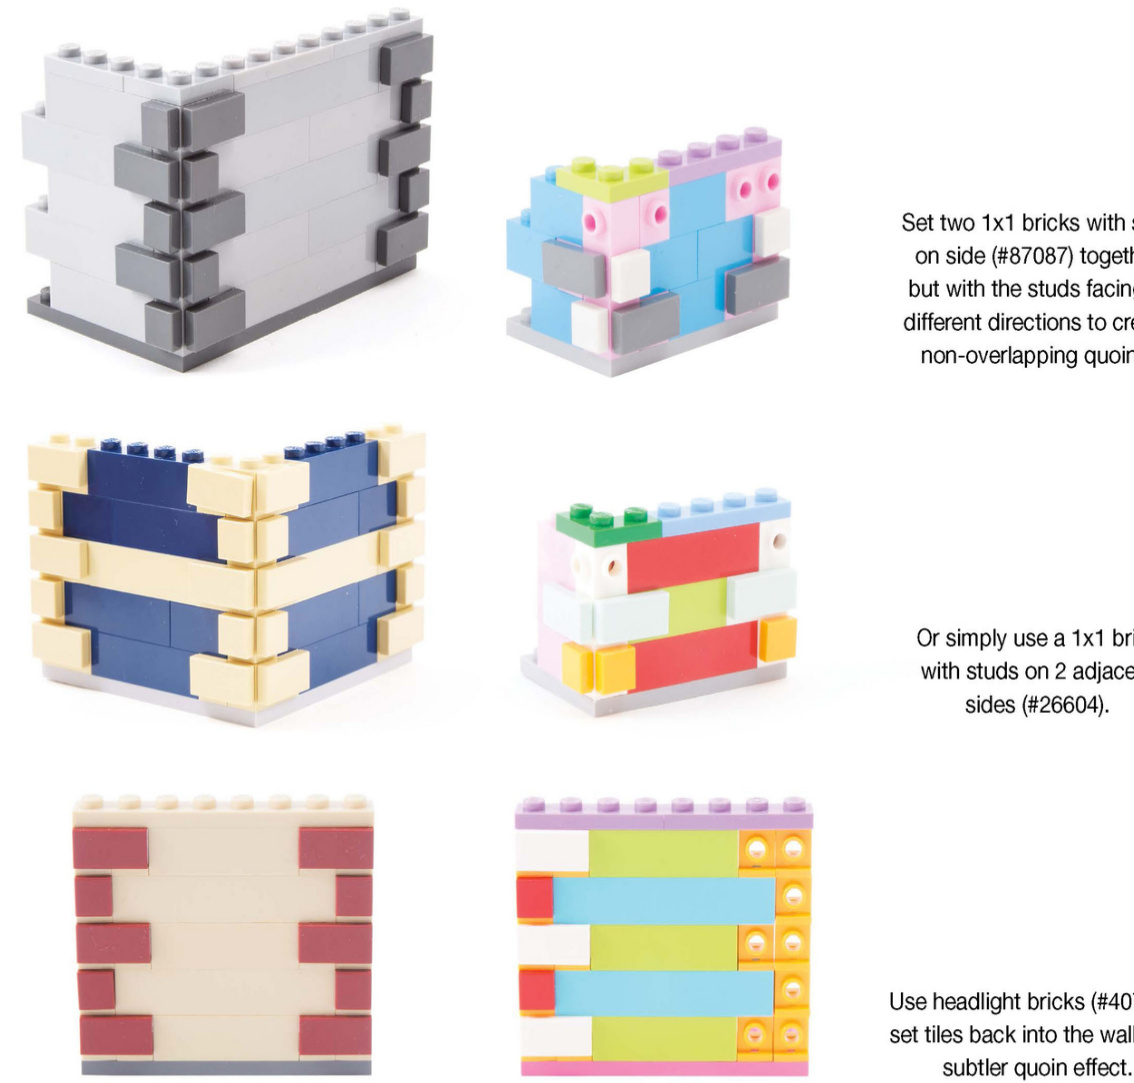

You can also build quoins using textured bricks or even gold bar pieces (#99563).
Alternating 1x1 bricks (#3005)with 1x1 round bricks (#3062) creates a subtle quoin.
How To: Overlapping Quoins
Because 1x2 tiles (#3069) do not have any stud holders,you can slide the tile over to cover the depth of the 1x1 tile (#3070).
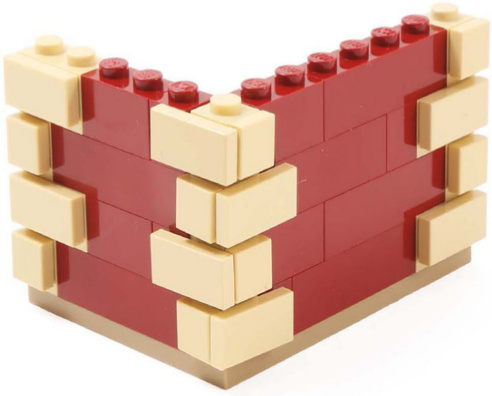
You can use either a 1x1 brick with studs on 2 adjacent sides (#26604), as shown on the left, or a 1x1 brick with studs on 4 sides (#4733) placed next to a 1x1 Technic brick (#6541), as shown on the right.
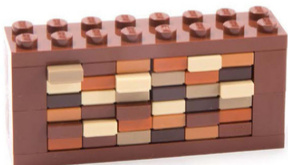
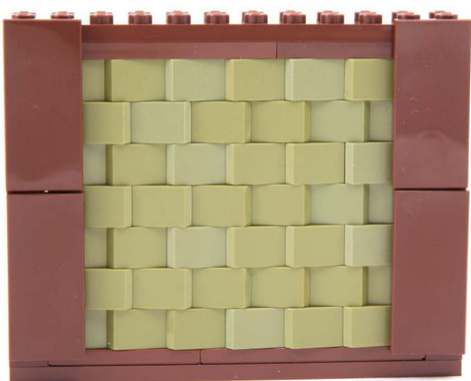
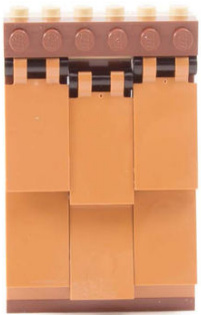
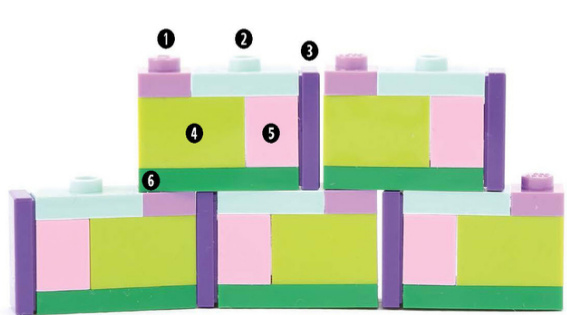
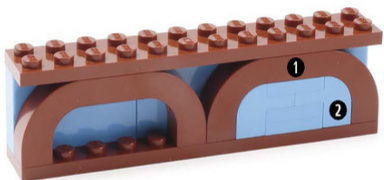
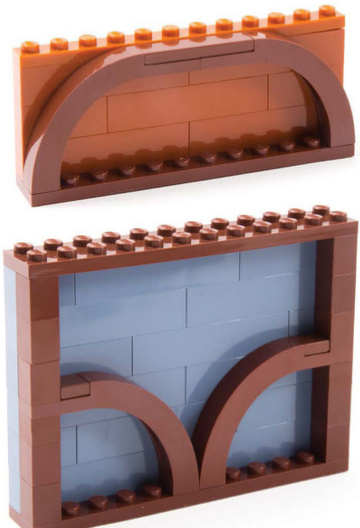
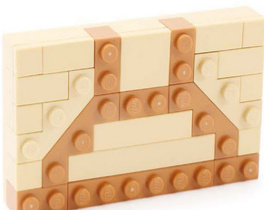
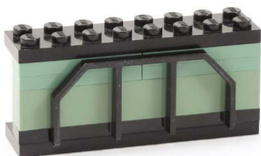
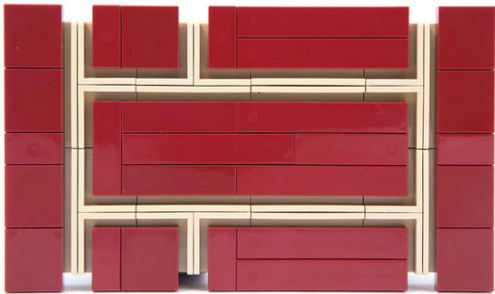
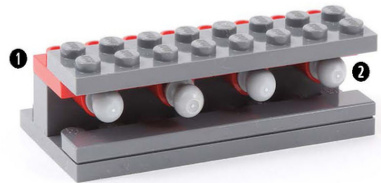
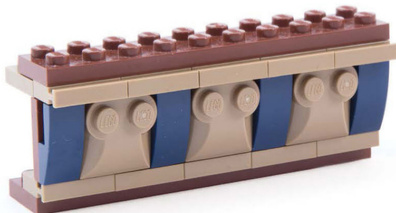
Stone Facade Walls
Use tiles on a background wallto create a raised facade.The background wall can be a solid color, creating a grout effect, or mixed to look aged and mossy.
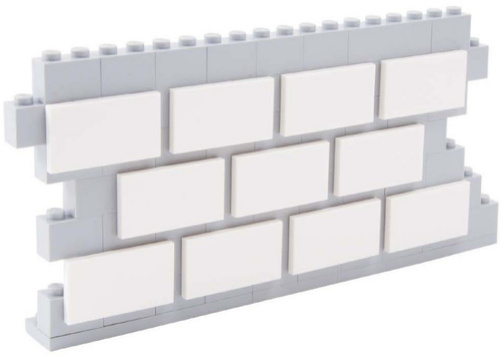

Mix colors to make a mottled background.
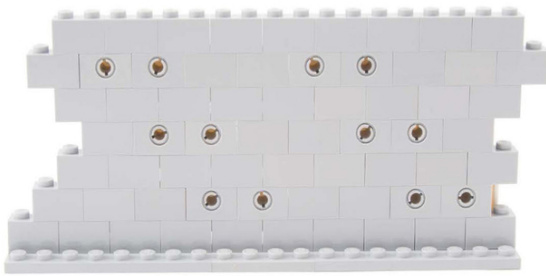
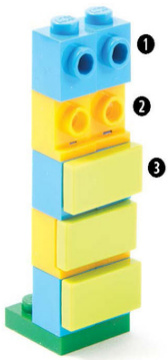
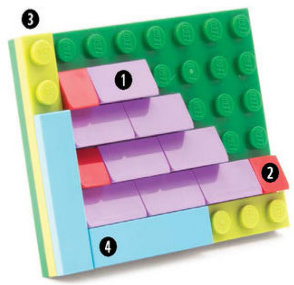
How To
The back of the wall shows how the Technic half pins are arranged.To offset the tiles,three different types of bricks are used on the front of the wall.
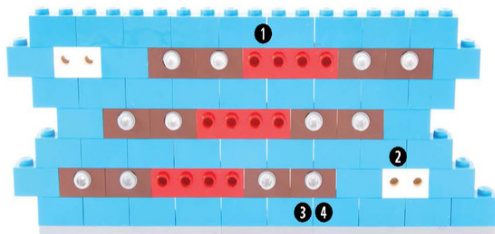
1 1x4 brick with 4 studs on side #30414 (or two 1x2 bricks with 2 studs on side #11211)
2 1x2 brick with 2 studs on side #11211 (or 1x2 brick with 2 studs on 2 sides #52107)
3 1x2 Technic brick #3700
4 Technic half pin #4274
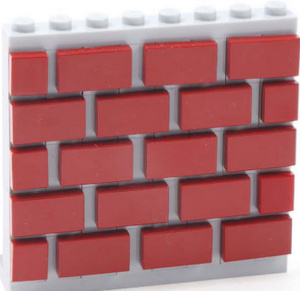
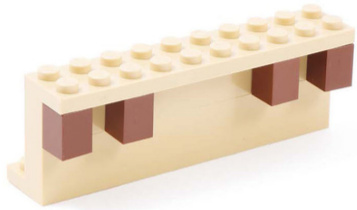
Alternate a brick and a stud to create a pattern with 1x2 tiles. Using contrasting colors makes the bricks behind the tiles look like grout.
1 1x1 brick with stud on side #87087
1x2 tile #3069
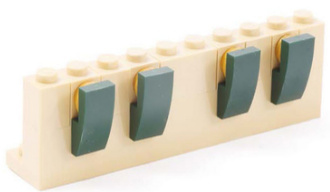
Attach 1x1 tiles to headlight bricks. Offset the headlights by a plate for a nice alternating pattern.
1x1 headlight brick #4070 2 1x1 tile #3070
For a wider grout line or to allow tiles or plates to sit at an angle, space the studs out.
1 1x1 brick with stud on side #87087
2 1x2 plate #3023
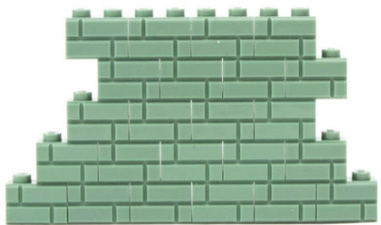
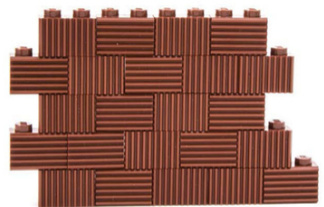
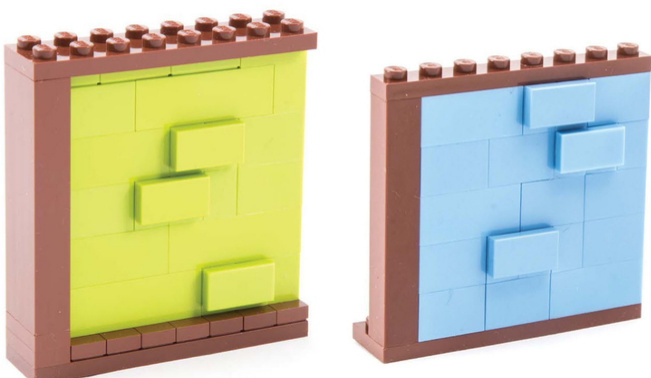
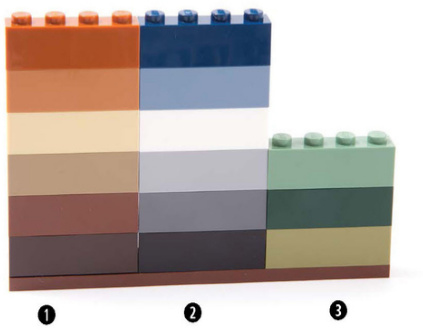
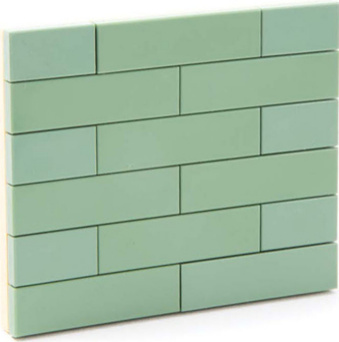
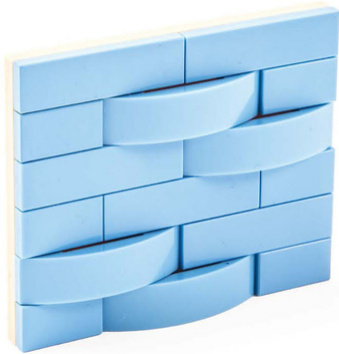
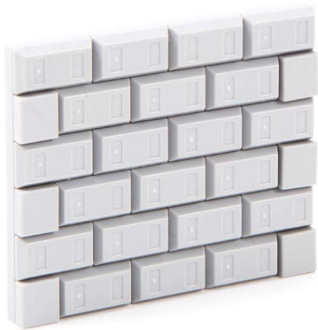
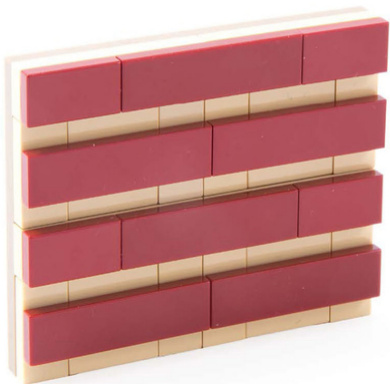
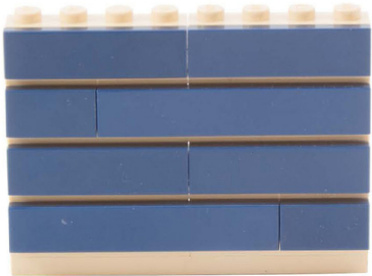
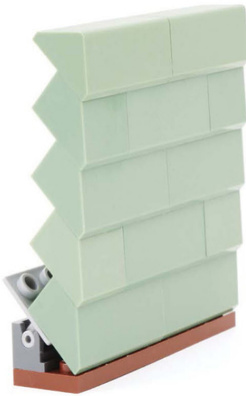
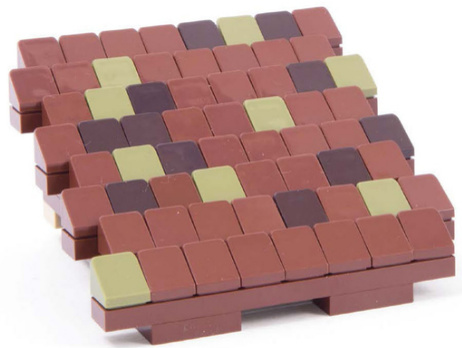
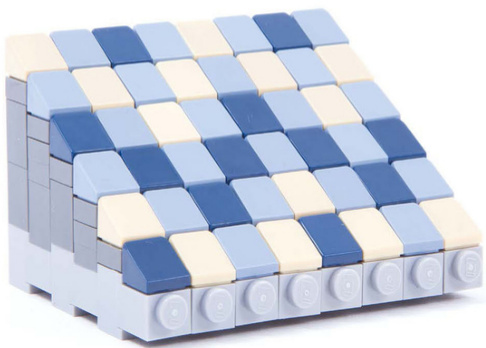
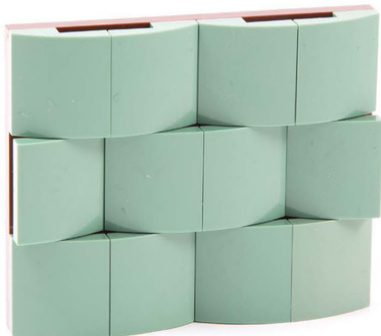
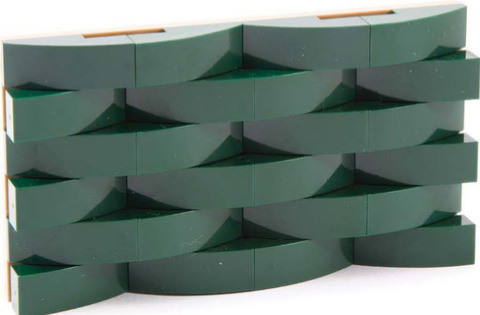
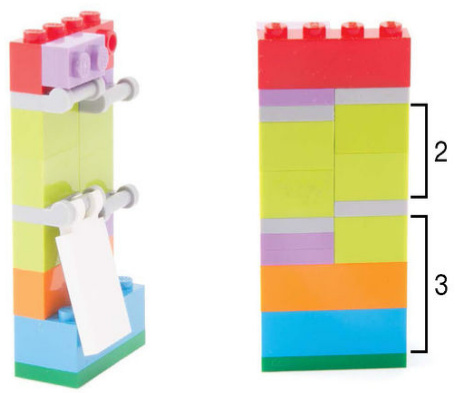
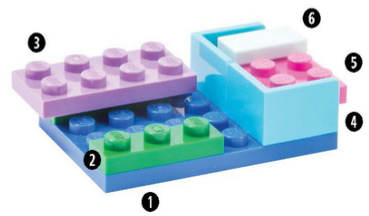
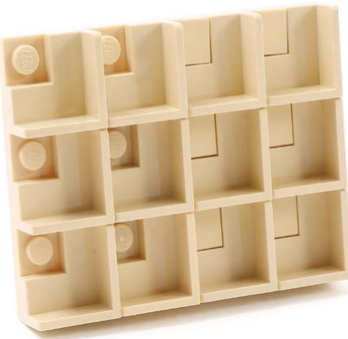
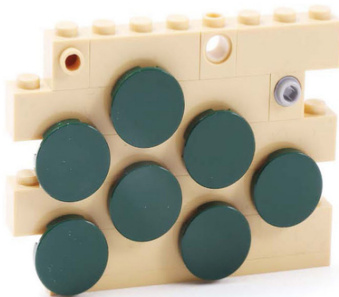
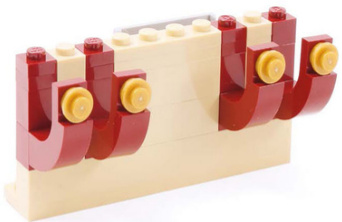
Weathered Walls
Use several shades of small plates to mimic discoloration from age and weather.
As plates are smaller than bricks, they show changes in color more gradually.
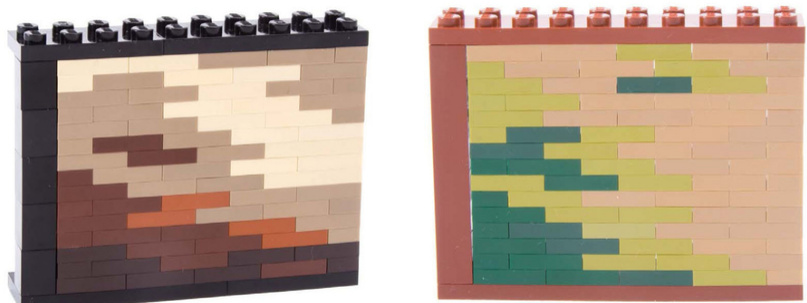
Different colorfamiliesprovide different weathering effects. Use green plates to mimic an old wall covered in moss.
Arrange 1x2 tiles (#3069) and
1x2 jumper plates (#3794/#15573)
by recessing some and pushing
others out tovary the color
and texture.
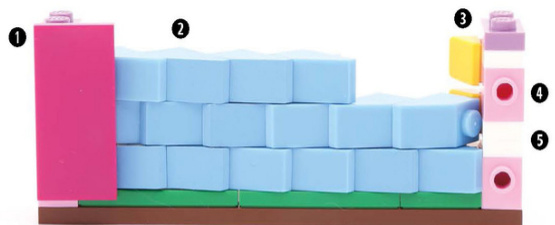
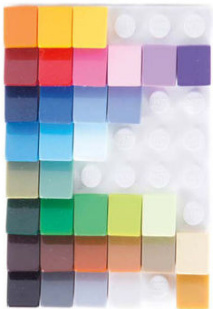
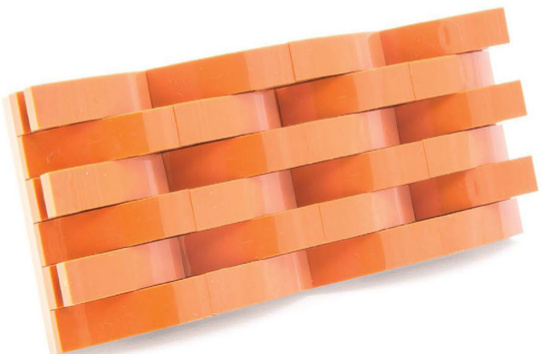
How To: Choosing the Right Colors
Use a variety of bricks from the same color family to make a simple weathered wall.
1 Dark orange, medium dark flesh, tan, dark tan, reddish brown, darkbrown 2 Dark blue,sand blue,white,light gray, dark gray, black ? Sand green,dark green, olive green

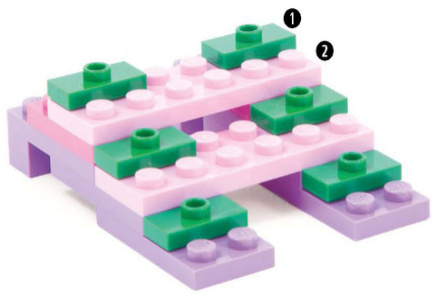
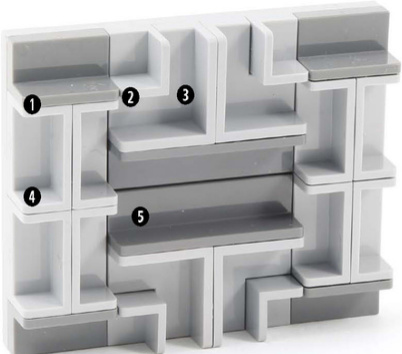
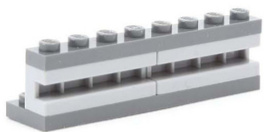
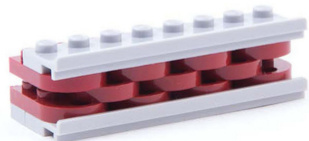
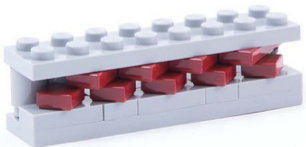
Mix 1x2 jumper plates (#3794/#15573) and 1x2 plates with rail (#32028)for very subtle texture on the front (top) or exaggerated texture on the back (bottom).
Combine a variety of pieces to build a deteriorating wall.
0 1x2 plate with rail #32028
2 1x1 plate #3024
③ 1x1 round plate #4073
? 1x2 tile #3069
? 1x1 round tile #98138
6 1x2 modified brick with masonry profile
#98283
Stacking 1x1 round plates (#4073) makes a pebbled wall. A mix of the natural colors creates variegation,and a few well-spaced 1x2 plates (#3023) hold it all together.
Add 2x2x2 slopes (#3688) to reinforce and emphasize the corners of a pebbled wall.
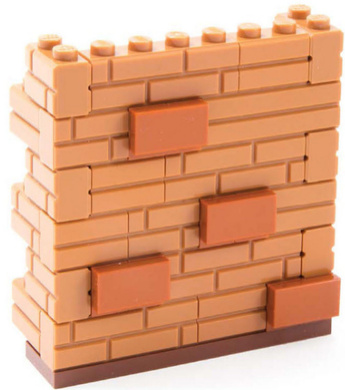
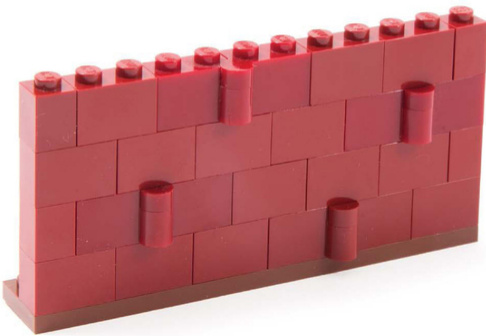
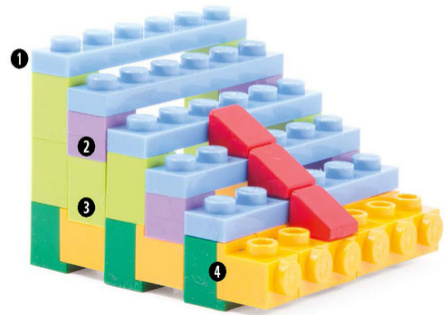
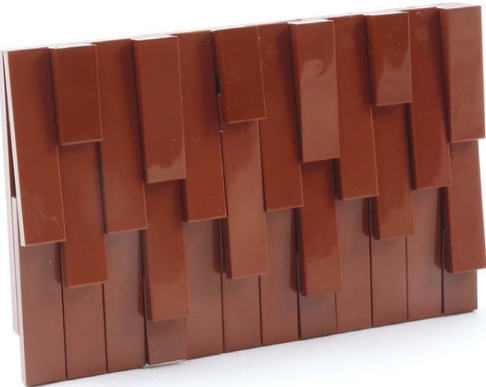
Crumbling Walls
Crumbling stucco or plaster can reveal the exposed rebar or the masonry underneath.
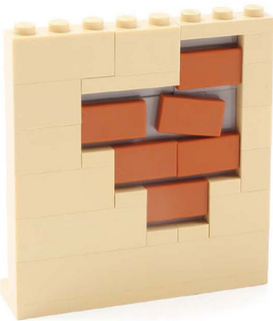
Attachtilesto brickswith studson sidesetbackon a jumperplate.Attachthe tile with one stud if you want it tilted or two studs if you want it straight.
Integratewith vegetation when a building is being reclaimedby thewildorto show climbing vines.
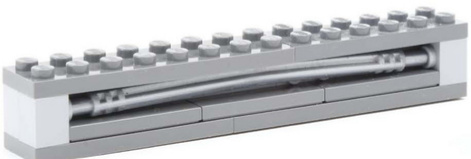
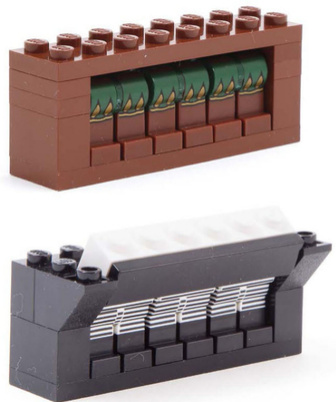
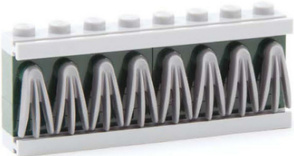
How To: Exposed Rebar
Connecthorizontal barsto 1x2Technicbricks with axle holes (#32064),and fit vertical bars into the open studs of jumper plates on the back row of bricks.The irregular opening created with slopes emphasizes the look.
Or use a combination of #2 axle and pin connectors,Technic bushes,and 3L or 4L axles, bars, or other similar pieces to create the exposed rebar look.
1 #2 axle and pin connector #32034 3L axle #4519
? Technic bush #3713
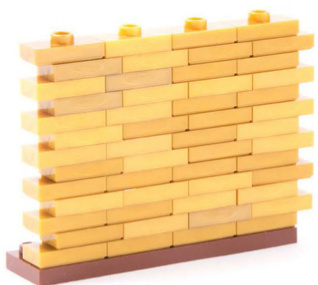
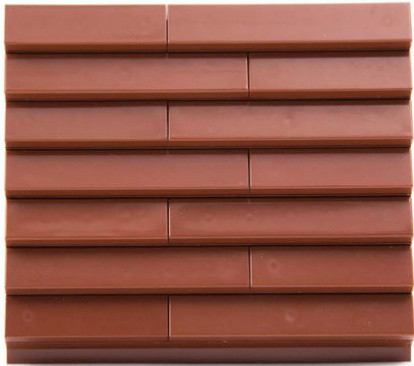
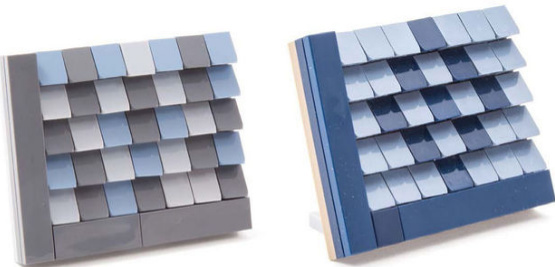
Wall Cladding and Shingles
Simple Siding
Tiles have a subtle groove at the bottom that you can use to emphasize gaps between the pieces.Mixing in curved slopes creates even more texture.
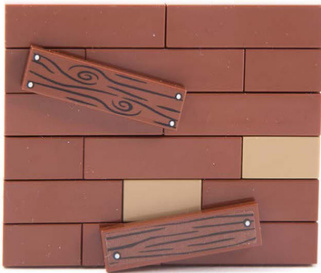
Textured Siding
Wood-grain tiles come in a variety of lengths and colors. You can use the same wood-grain tiles to add wainscoting to a particular area of a wall.
Gold bar pieces (#99563) also add an interesting texture.
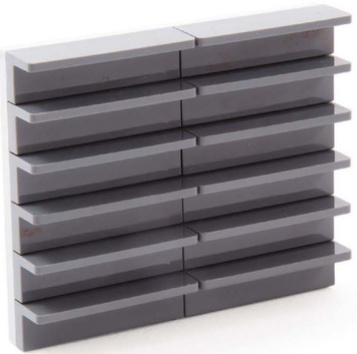
Contrasting Siding
Attaching tiles to1x2 jumperplates (#3794/#15573) and jumper plates (#87580) creates a gap between each row of tiles.Use a contrasting color to emphasize the gap.
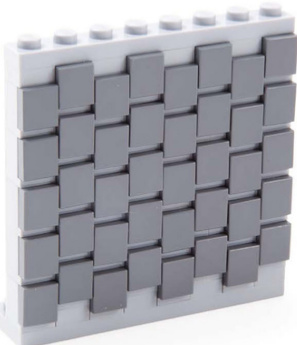
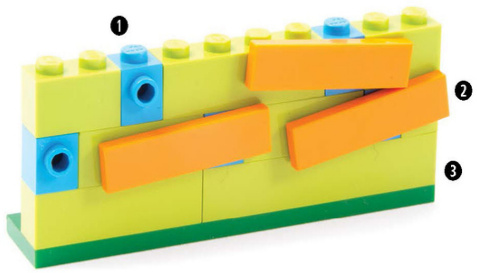
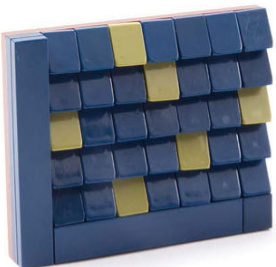
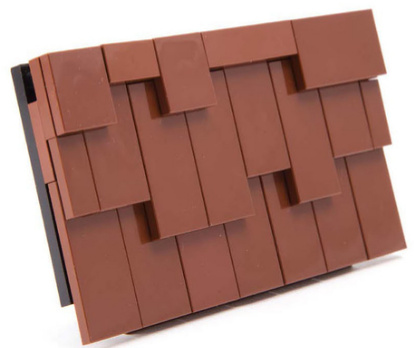
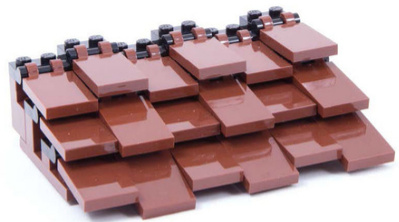
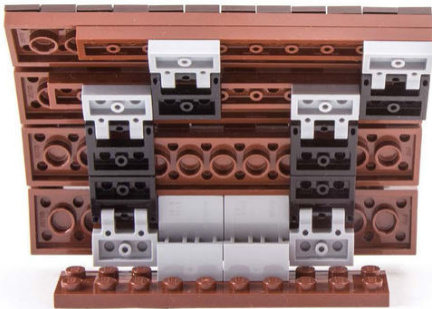
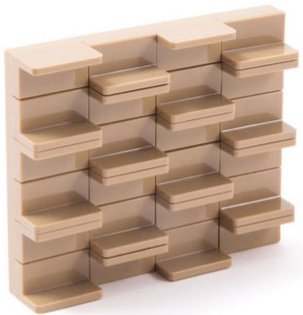
Ramshackle Siding
Interspersing studdedbrickswith regular bricks gives you room to tilt the tiles, creating a worndown look.

Using headlight bricks or bricks with studs on side instead of jumper plates creates a smaler gap.
1 1x2 brick with 2 studs on side #11211
2 1x1 headlight brick #4070
? 1x2 tile #3069
1 1x1brickwithstudonside#87087
1x4 tile #2431
Various 1x bricks
HowTo
Many of these siding techniques use SNOT (studs notontop)andrequirebuildingwith sideways-facingstuds.Hereare afewwaysto achievethatusingbricksandbrackets.
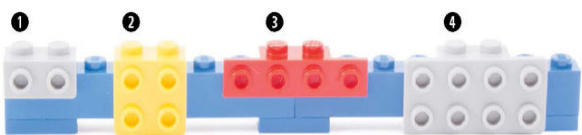
0 1x2-2x1bracket #99781
2 1x2-2x2bracket #44728
③ 1x2-1x4bracket#2436
1x2-2x4bracket #93274
? 2x2x2/3modifiedplate #99206
1x2-1x2invertedbracket#99780
7 1x2-2x2invertedbracket #99207
2x2-2x2bracket#3956
9 1x1headlightbrick #4070
1x1brick with stud on side #87087
1x2brickwith 2 studs onside #11211
1x4 brickwith4studs onside#30414

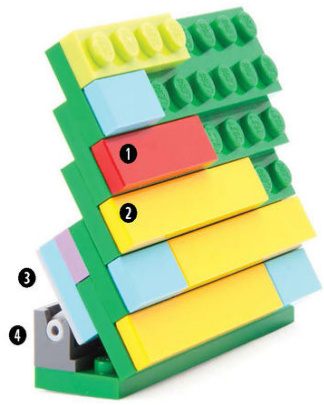
Clapboard Siding
Tilescan also be attachedto offset layers of 2x8plates (#3795),whichyou can tilt at the base using a hinge to create beveled siding.
0 1x4tile#2431 3 2x2 hinge brick top#6134
2 1x6 tile #6636 ? 1x2 hinge brick base #3937
Flat Slope Siding
Standard slopes have a flat lip that creates the look of overlapping siding.
For vertical siding,use a hinge brick (#3937with #3938 or #6134)to angle the slopes straight up.

For horizontal siding,alternate layers between supports that hold the layers firmly in place. It also looks good to frame the siding in a contrasting color.
① 2x4 tile #87079
2 1x2 slope #3040
? 1x1 cheese slope #54200
? 1x1 brick with stud on side #87087
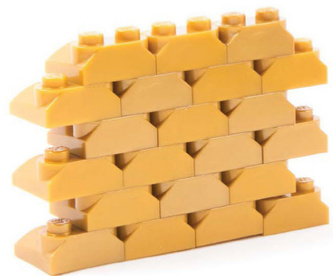
6 1x1 plate #3024
Cheese Slope Siding
Usecheese slopes to make siding or a shingled roof.The slopescan be set at a slightly crooked anglefor an aged look thanks to the tolerances betweenparts.
Use complementary colorsfor a more randomlookor use contrasting colors to create a regularpattern.
Using1x2cheeseslopescreates a smootherprofile;
theseamsbetweentheslopescanbestaggered.
Using an occasional slope inanothercolorgivesita weatheredlook,asifmoss weregrowing on someof the shingles.
HowTo
Framethe shingleswithtilesto make it look different than the same part used on a roof.
0 1x2cheese slope #85984 2 1x1 cheese slope #54200 ? 1xplates
? 1x4tile#2431
The 1x1 cheese slope comes in a huge variety of colors, with more added everyyear.
Cheese Slope Roofs
You can tweak this technique to cover not only flat surfaces but also sloping ones.
Attach cheese slopesto jumper plates for an offset look.
0 1x2 jumper plate 15573
2 2x6 plate #3795
To create a smooth surface,use a mix of plates and bricks so that the cheese slopes are level with the next row.
1 1x6 plate #3666 1x1plate #3024 ? 1x1 brick #3005 ●1x1 headlight brick #4070
Curved Slope Siding
Curved slopes create overlapping patterns that can be either brickwork or woodwork, depending on their color.

1x2 curved slope #11477
2x2 curved slope #15068
1x3 curved slope #50950
1x4 curved slope #61678
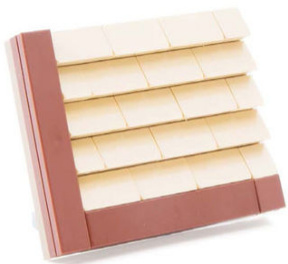
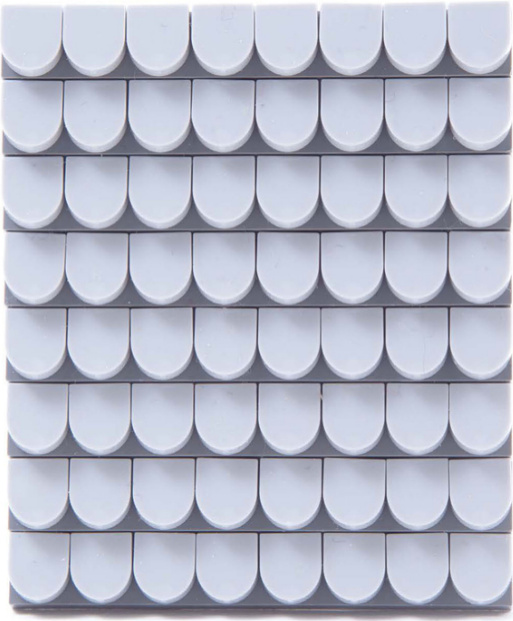
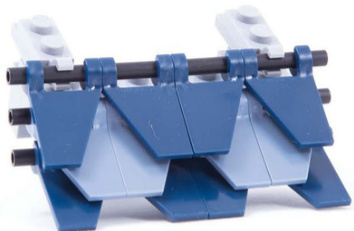
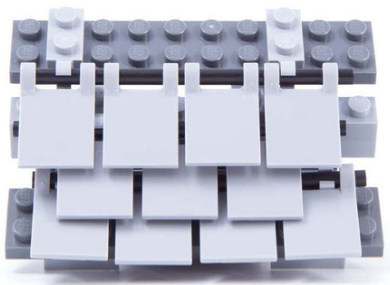
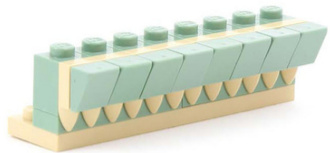
Simple Shingles
Arrange tiles vertically to create shingle patterns for walls and roofs.Tiles can be partially or fully attached.
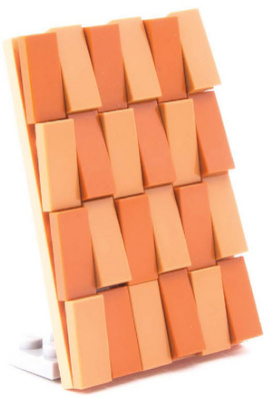
These tiles are only partially attached, and they’re vulnerable to coming off.The bottom layer can be straight or staggered.
These tiles are partially attached on alternating ends.
These tiles are fully attached to staggered layers of plates. As you can see, they’re flush with the plates and securely attached,though the siding becomes thicker with each layer.
Tilt a tiled wall at an angle using hinge bricks (#3937 with #6134).Putting 2x2 slopes (#3039) under the hinges makes the hinges less likely to get pushed over.
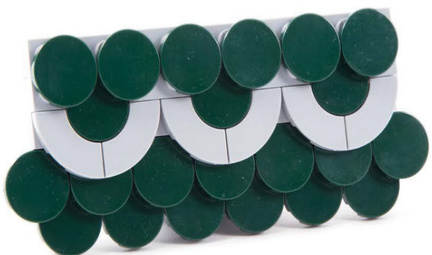
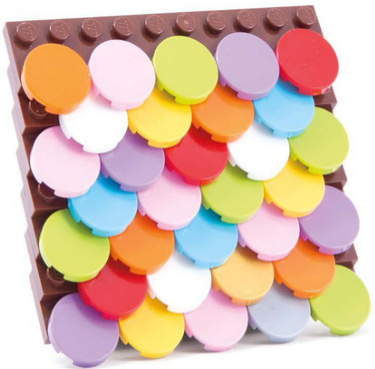
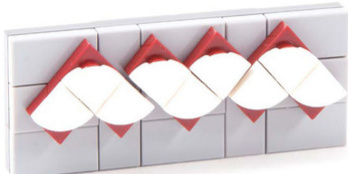
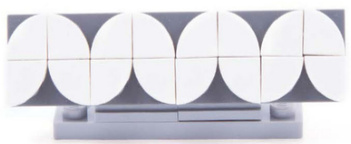
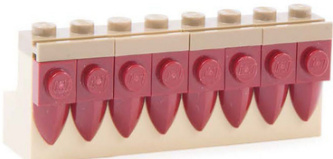
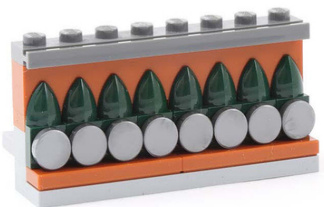
Fishscale Shingles
Round and pentagonal tiles can be used for an entire wall or as a decorative shingle border or feature.
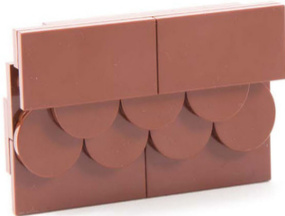
2x2round tile 14769
2x4 tile #87079 2x2 round tile 14769
1x1 half rounded tile #24246

2x2 round tile 14769
2x3 pentagonal tile #22385
2x2 round tile 14769 2x2 macaroni tile #27925
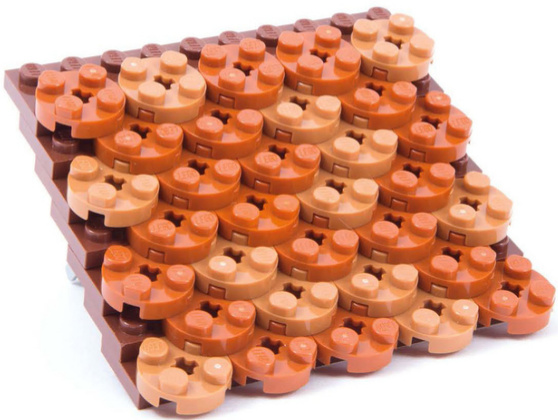
Fishscale Shingle Roofs
You can use round tiles to cover sloped surfaces as well.
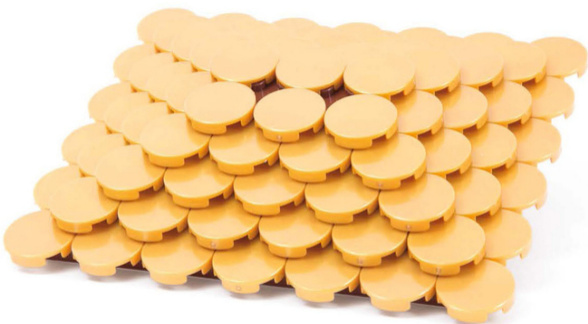
Layer round tiles (#4150/#14769) to create a stepped roof.
Use colorful tiles for a gingerbread house.
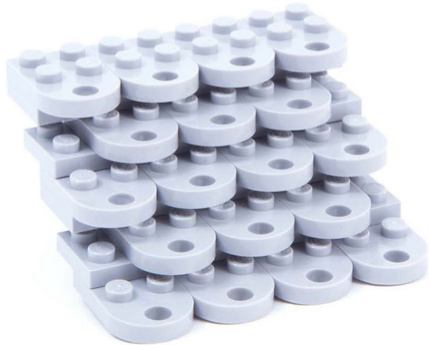
2x3 modified plate with hole #3176
You can achieve a similar look using 2x2 round plates (#4032),which look best when offset by one stud and with color variation.
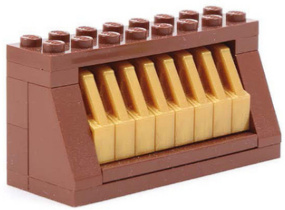
Clip-on Shingles
Tiles with clips create secure shingles thatyou can stagger to create rustic siding.
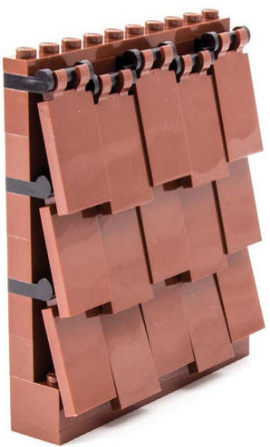
This shingle technique is 2 studs deep. You can cover the edges and corners by stacking 2x2x2 containers (#61780).
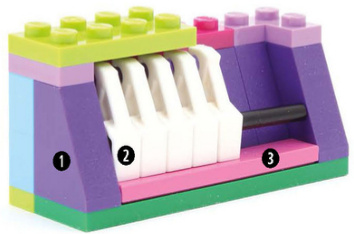
HowTo
Use a 2x4 brick (#3001) on thebottom so that each row of tiles sitsatanangle.Ontheleft,a tilewith 2 clips (#30350) is attached to a 1x2 plate with handle on side (#48336).
You can also stagger the height of shingles using plates,as shown on the right.The first plate with handle(gray)sits threebricksfrom the bottom. Successive layersofplatesarethentwobricks apart.Adjacentplates can be staggeredup or down one or two plates (lavender).
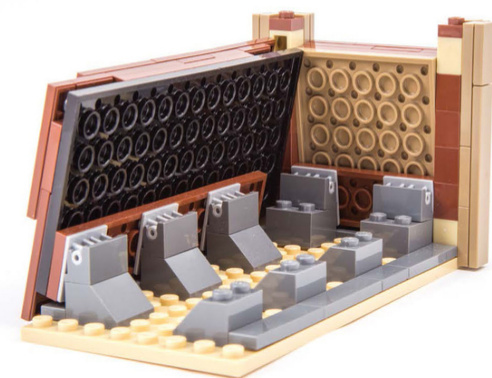
Clip-on Shingle Roofs
To modify this technique for roofs or other sloped surfaces,you can layer tiles and other flat pieces on staggered plates to create a nice pattern.
2x2 trapezoid flag #44676
2x3 tile with 2 clips #30350 1x2platewith handle onside #48336
2x2 square flag #2335

Any of these tiles can attach to handles or to a 3mm soft hose (#bb145).
Curved Shingles
Make a curved shingle wall or roof using rows of 1x2 curved slopes on 2x plates connectedto plateswith clipsandhandles.

The curved slopes are staggered to cover the gaps betweenthe plates.
The curved shinglesare attachedto the base with ahingebrick(#3937with#6134).
HowTo
Using 1x2 plateswith 2 clips (#60470) and 1x2 plates with handle on side (#48336) makesfor averyflexiblesystemforcurving a wall at the desired angle without collapse.
0 2xplates
2 1x2curvedslope#11477
3 1x1cheeseslope#54200
4 1x4plate#3710
? 1x2platewith 2 clips#60470
? 1x2platewithhandle onside #48336
0 1x2 hinge brick base #3937
2x2 hinge bricktop #6134
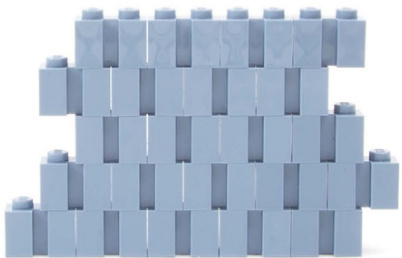
Curved Walls
Simple Curved Walls
A wall built with 1x2bricks (#30o4) has enough give thatyou canbend it slightly.
Be careful,though,because forcing too tight of a curve can damage your pieces.


You canalso gently bendwallsbuiltwith 1x2 plates (#3023).
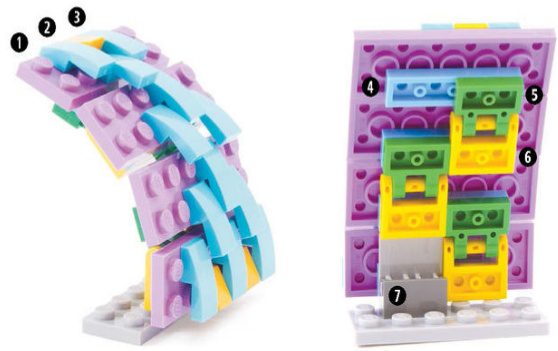
Plate Walls
Alternating 1x2 plates (#3023) with 1x1 round plates (#4073) makes a curved wall.
The round plates act like joints: this wall can be bent into a variety of curved shapes.
HowTo
Use this technique with longer plates or in different colors to create new patterns.
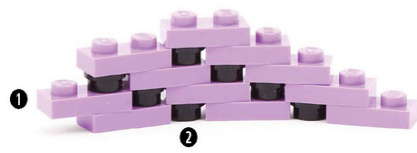
0 1x2 plate #3023
②1x1 roundplate #4073
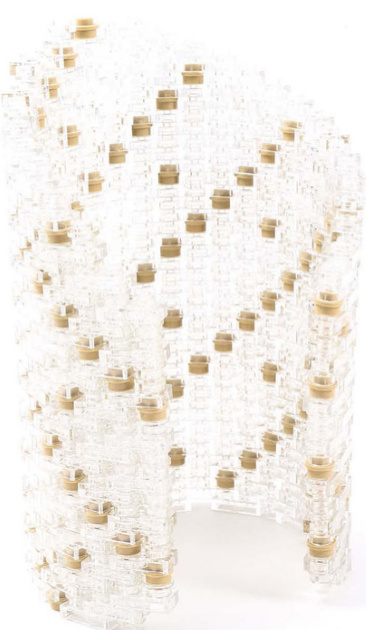
Use clear plates to create a curved window.
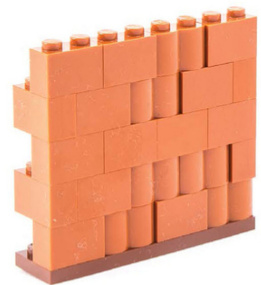
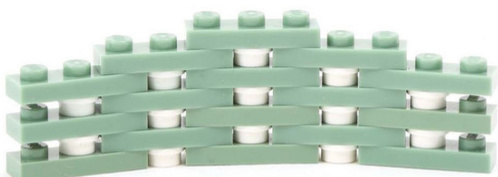
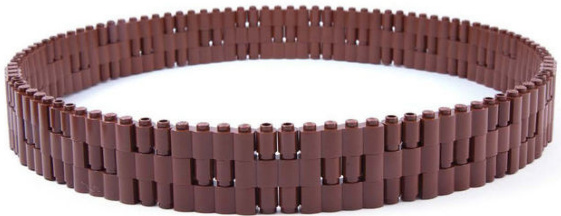
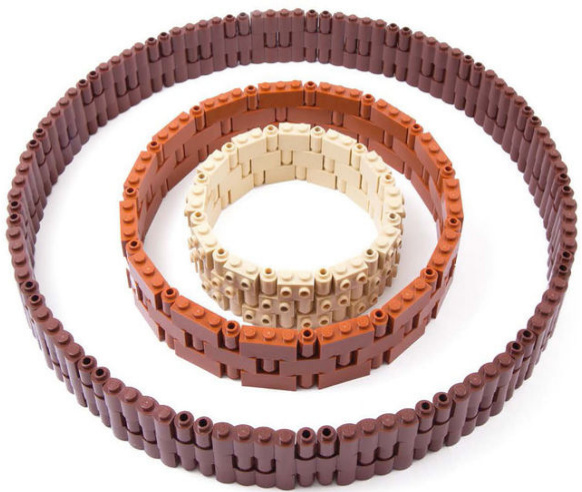
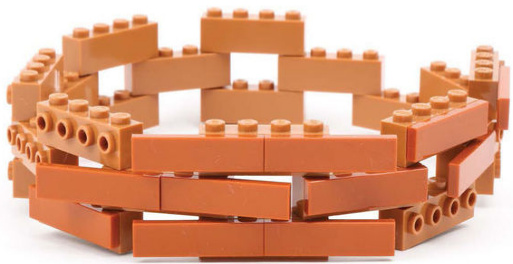
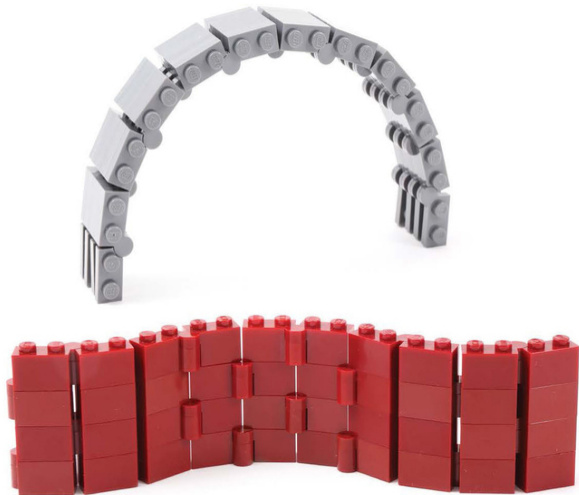
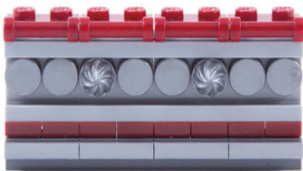
Brick and Cylinder Walls
You can also use bricks to make a curved wall, using 1x1 round bricks (#3062) as joints.
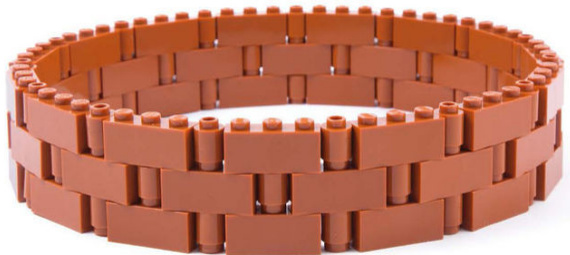
You can alternate 1x1 round bricks with any type of brick:1x2 bricks (#3004), 1x3 bricks (#3622),and so on.
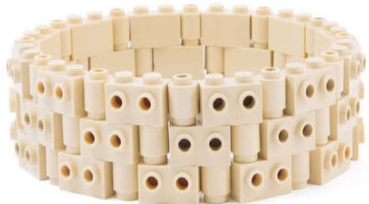
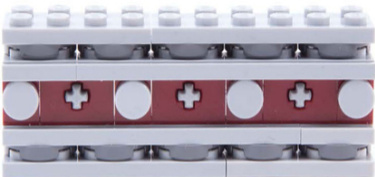
Using1x2 brickswith 2 studson side (#11211) lets you add cladding toyour wall orcover itwithvines.
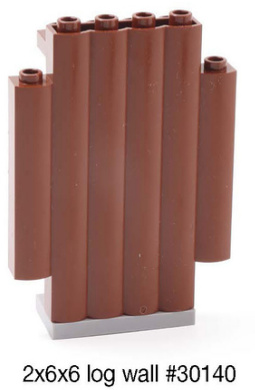
Using 1x4 modified log bricks(#30137) givesyourwall a more uniform look.
Brickswithlonger lengthswill giveyouwallswithlargerdiameters.
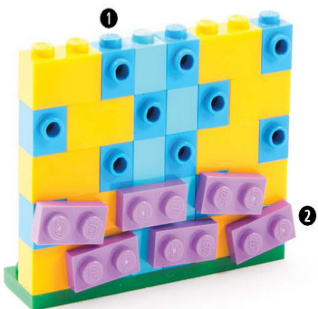
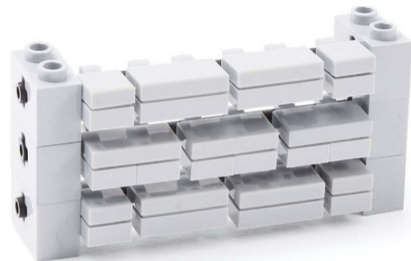
TiledBrick Walls
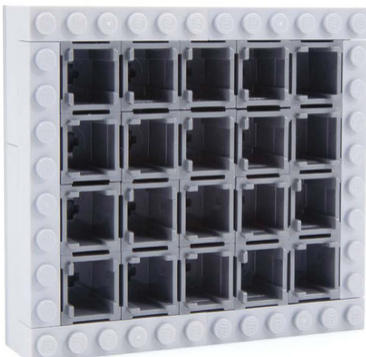
Use modified brickswith studs on sideand then attach a veneer of tiles.You can even omit the 1x1 round bricks for a different look and more flexibility.
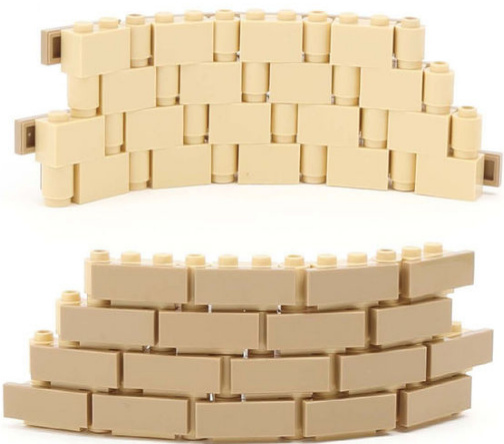
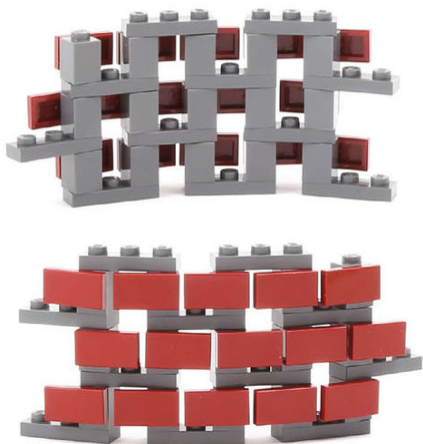
Attachaveneeroftilesto1x2brickswith 2 studs onside(#11211)to mimic raisedbricks.
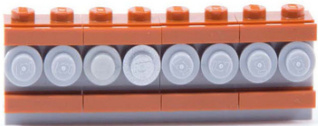
Skiptheroundbricksandusejust1x4brickswith 4 studs on side (#30414).The gaps allowfor more flexibilityandgivethewall a moredecrepitlook.
Combining1x1brickswithstud onside (#87087)with1x3plates(#3623)can also createaflexiblewall structure.
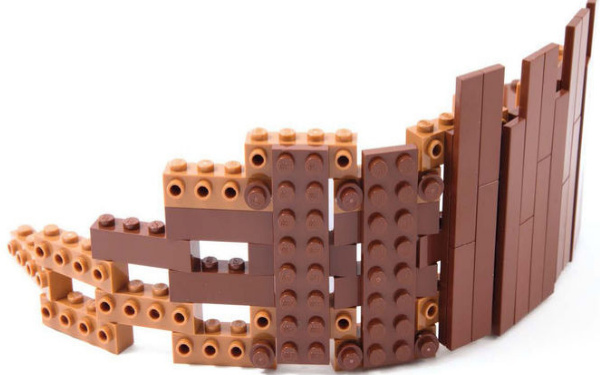
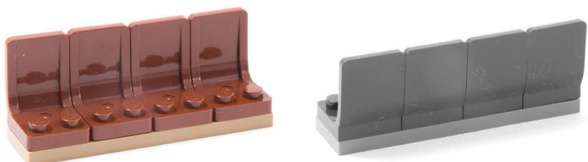
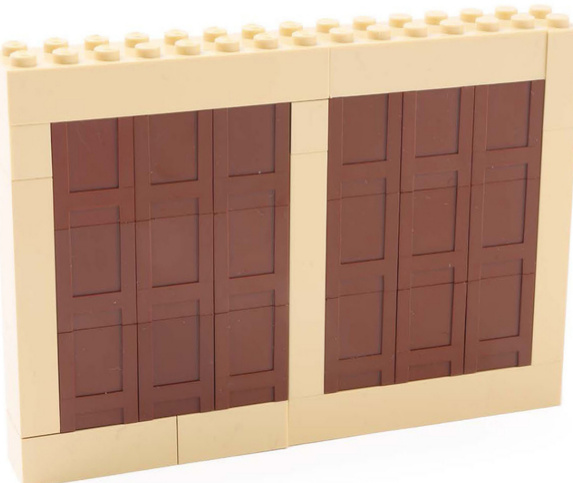
Platesandtilesontheoutsidecanalsobe attachedvertically,whichworksparticularlywell whencreating a woodexterior.
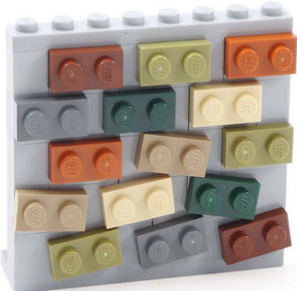
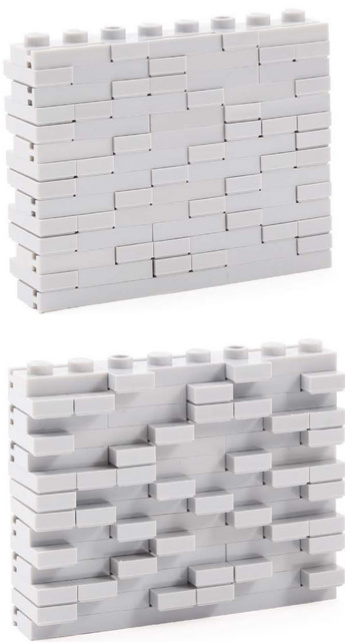
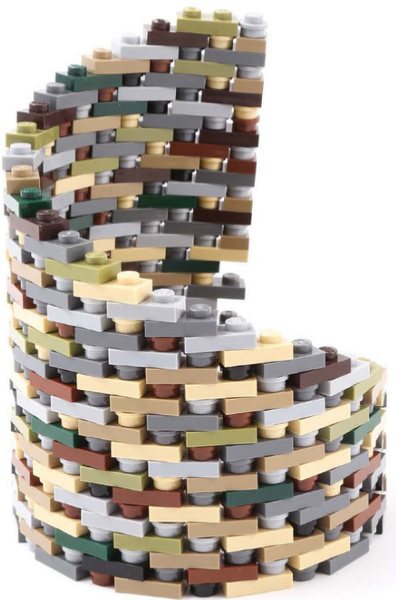
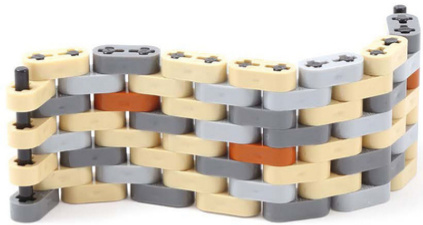
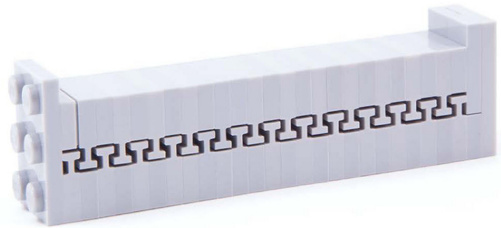
Grouted Walls
Combine tiles,plates, and bricks to create a bendable wall with distinctive grout lines.
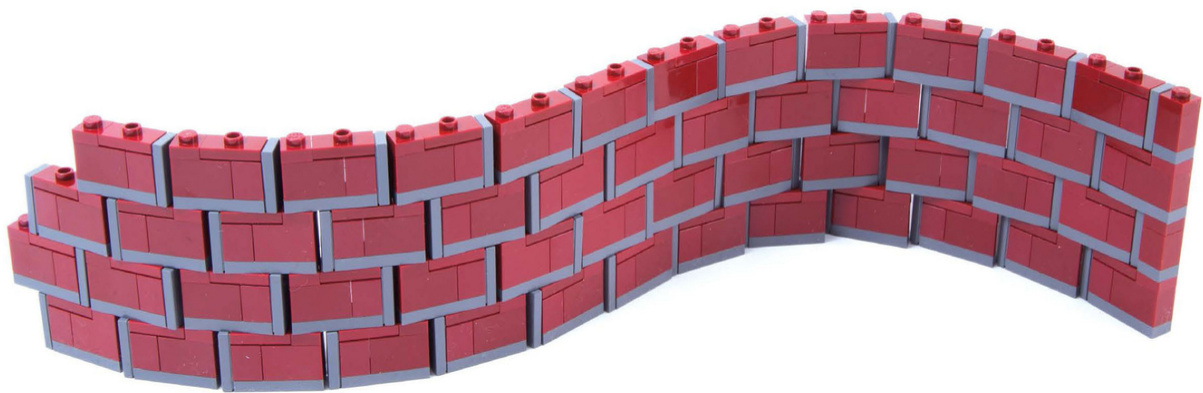
HowTo
The parts used in this wall are designed with a tiny amount of wiggle room so that they can give slightly when put together. This technique creates just enough give to allow the wall to flex in either direction.
1 1x1plate #3024
2 1x2 jumper plate 15573
? 1x2 tile #3069
4 1x2 brick #3004
? 1x1brick with stud on side #87087
6 1x3 plate #3623
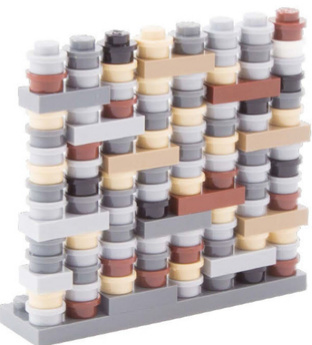
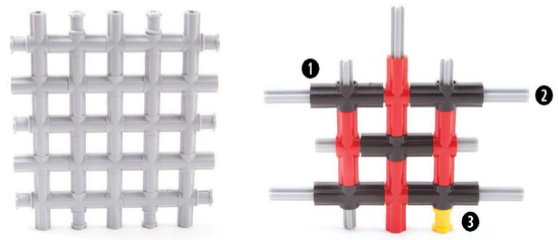
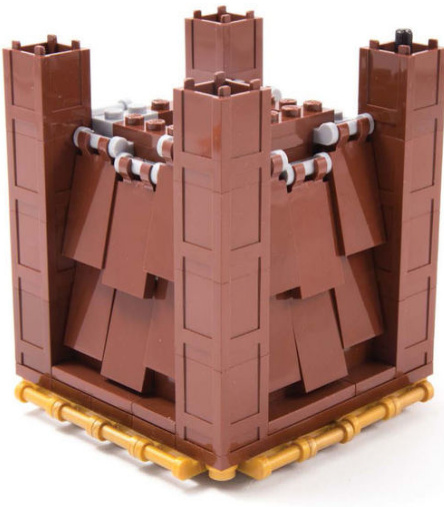
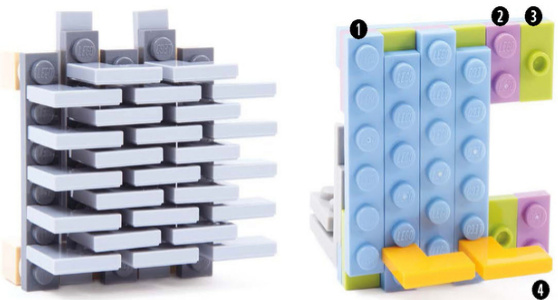
Liftarm Walls
Connecting Technic liftarms with axles can create a rigid wall. Using pins,bars,or hoses as connectors between liftarms makes a flexible wall.
HowTo
Stagger pins of different lengths to connect liftarms together. Using pins without friction ridges increases the flexibility of your wall.
1 Pin with friction ridges #2780 (or pin without friction ridges #3673)
2 3Lpin #6558
? 1x2liftarm #43857
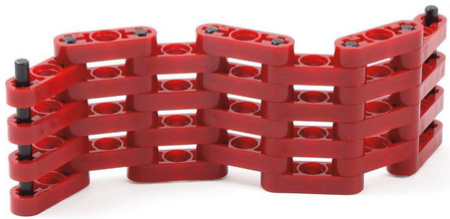
Liftarms come in both thick and thin varieties. Make a fence by using 1x3 thin liftarms (#6632) and leaving empty spaces between them.
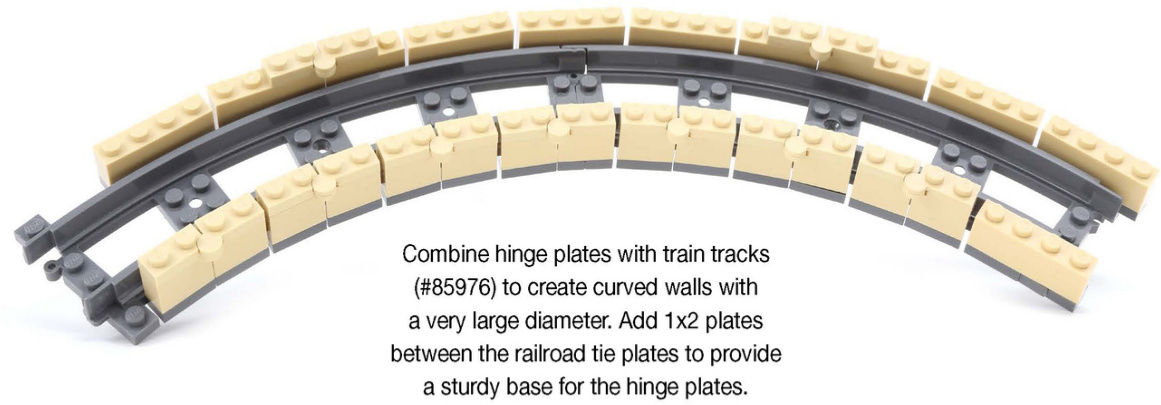
Hinge Walls and Railings
Hinge bricks and plates are very useful for making all kinds of curved walls and railings.
Keep hinges on one side to create an arch or alternate the direction of the hinges to curve a wall in either direction.
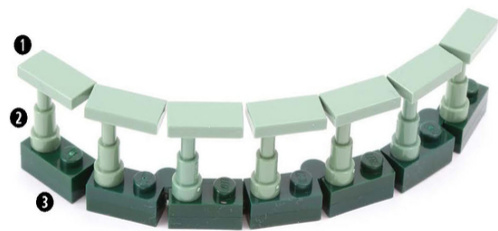
Hinge plates make a good base for balustrades. Use telescopes as balusters.
0 1x2 tile #3069
2 Telescope #64644
? 1x4 hinge plate #2429 with #2430
Framing and Paneling
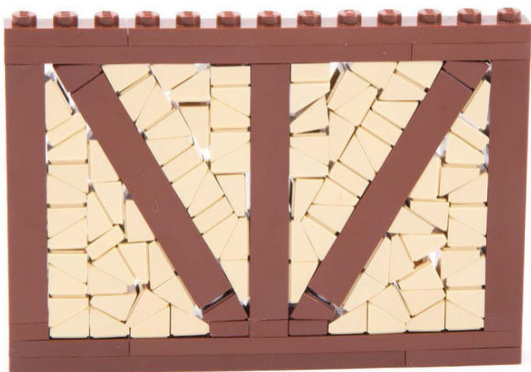
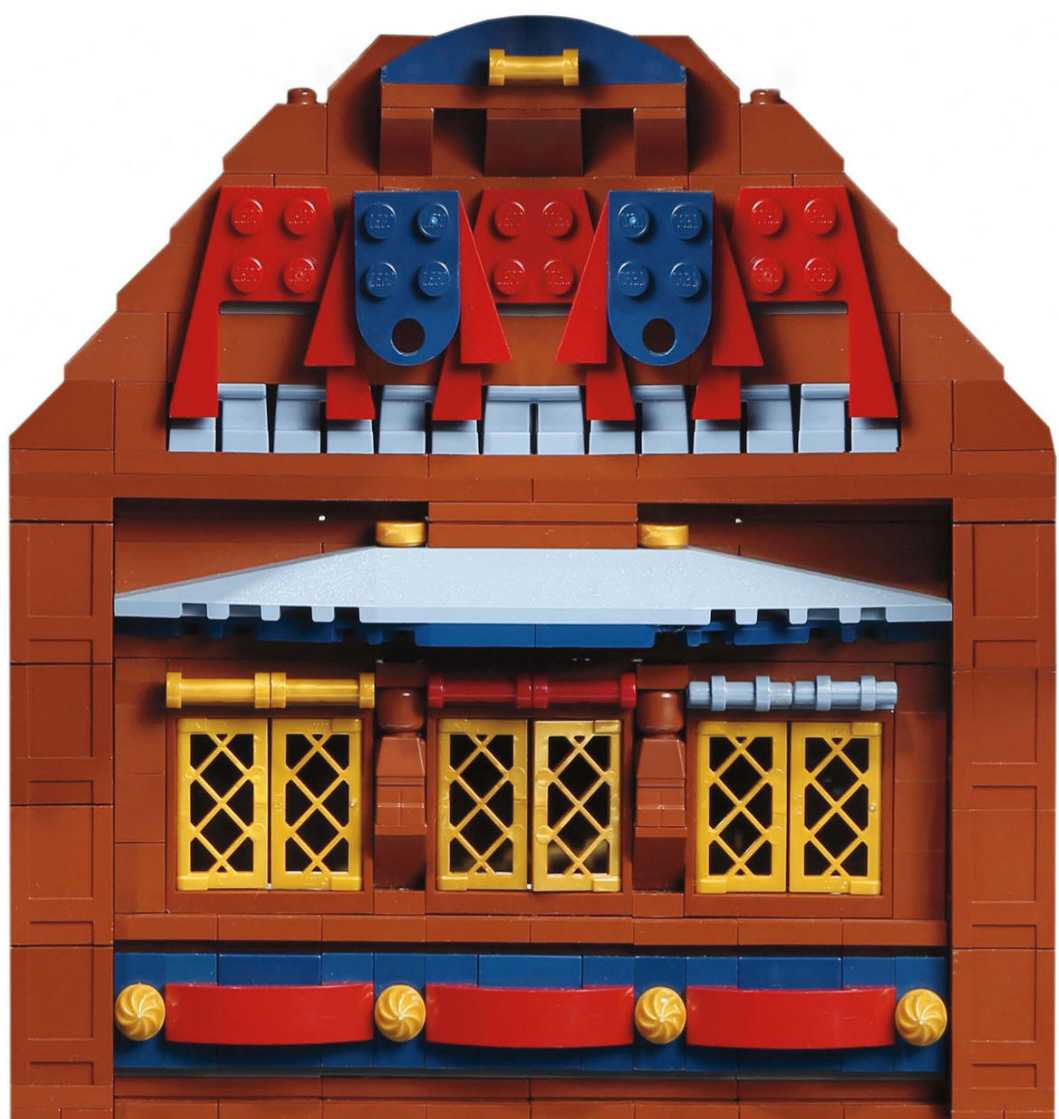
Simple Timber Framing
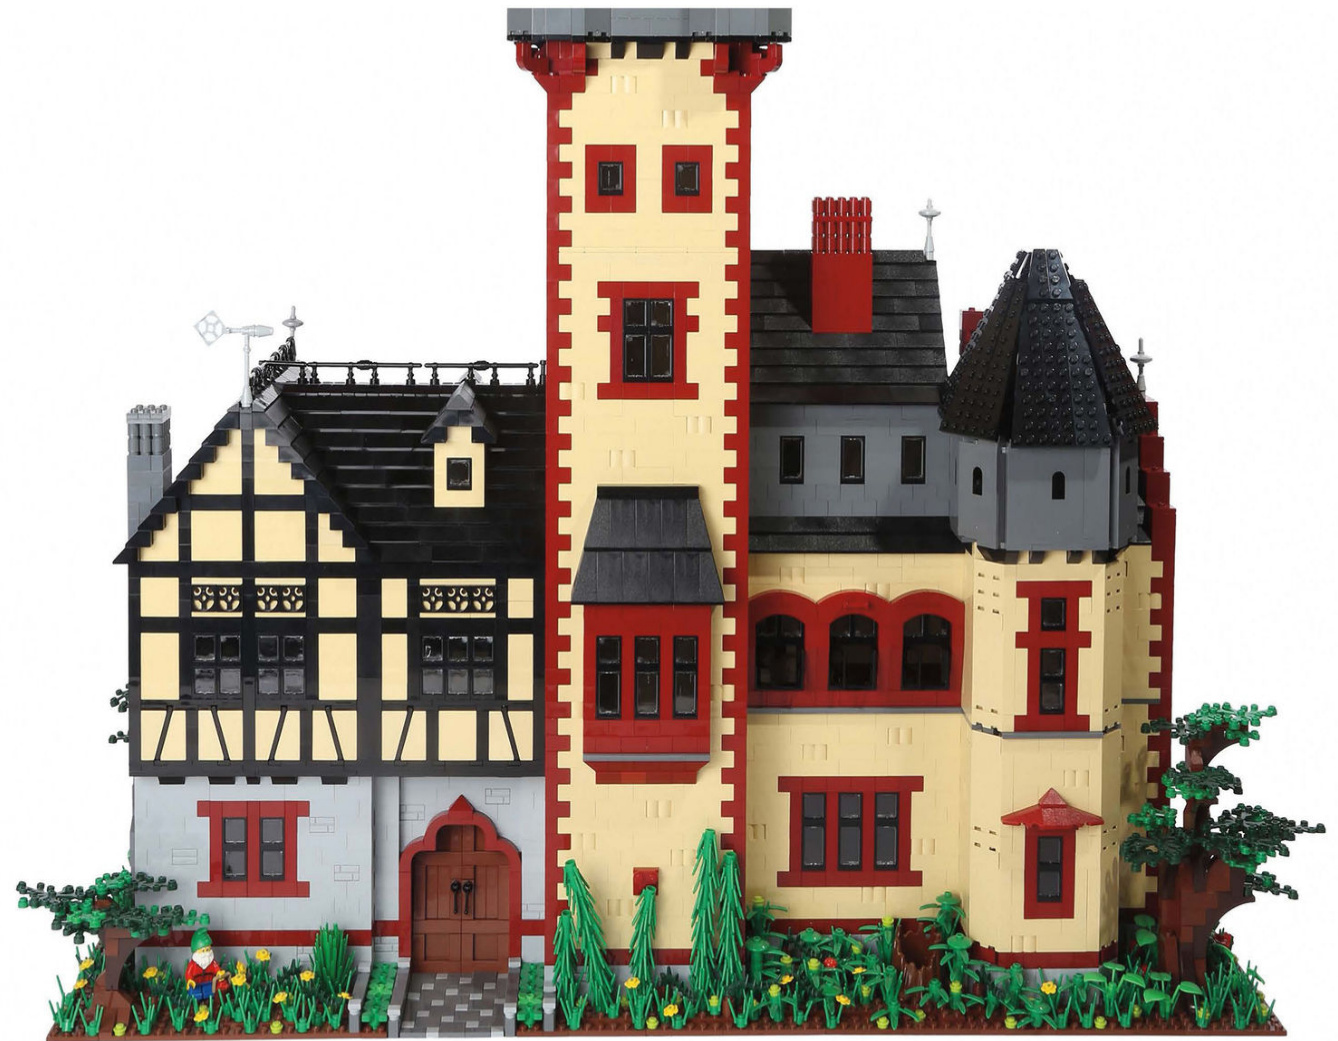
Half-timbered buildings have striking colors and patterns created by the timbers and the infill, which can be plastered or left exposed.
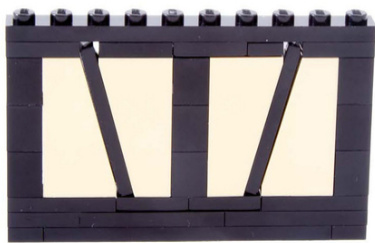
HowTo
A 1x4 tile fits perfectly into the slot between a slope and an inverted slope offset by a half stud.
0 1x3 plate #3623
2 1x1 brick #3005
? 1x2 plate #3023
0 1x2x3 inverted slope #2449
? 1x2x3 slope #4460
6 1x2 jumper plate 15573
0 1x1 tile #3070
8 1x4 tile #2431
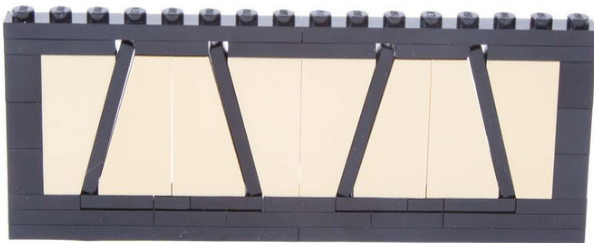
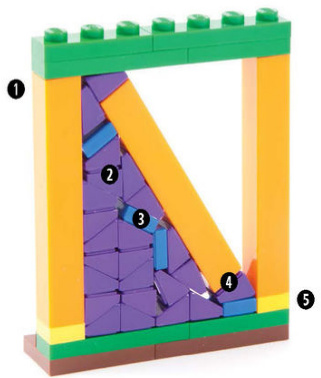
Timber Framing with Masonry
The space between timbers is often left exposed to reveal the infillmasonry. You can replicate this masonry with 1x1 cheese slopes and an occasional 1x1 tile.
HowTo
Although the cheese slopes shouldfit well enough to stay in with a bit of tension,it’s a goodideato reinforcewithtapeontheback topreventthem from jiggling free.You can also wedge ahalf pin inthebase of thecheese slope to help stabilizethe angled1x1x5brick.
0 1x1x5brick#2453
2 1x1cheese slope #54200
3 1x1 tile #3070
4 Half pin #4274
? 1x1plate#3024
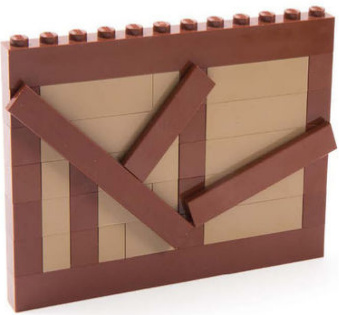
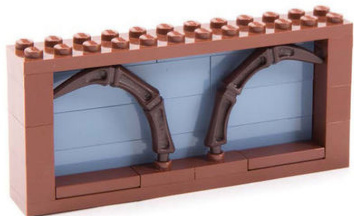
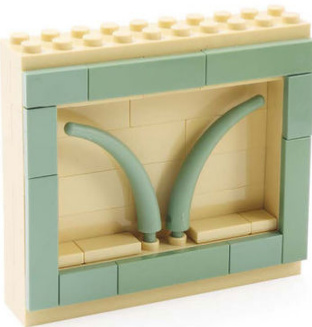
Timber Framing Variations
Many parts can be used to re-create the look of half-timbering.Historic timbered buildings are often brightly colored, so don’t feel limited to using brown.
6L bar with stop ring #63965 (or 6.6L bar with stop ring #4095)
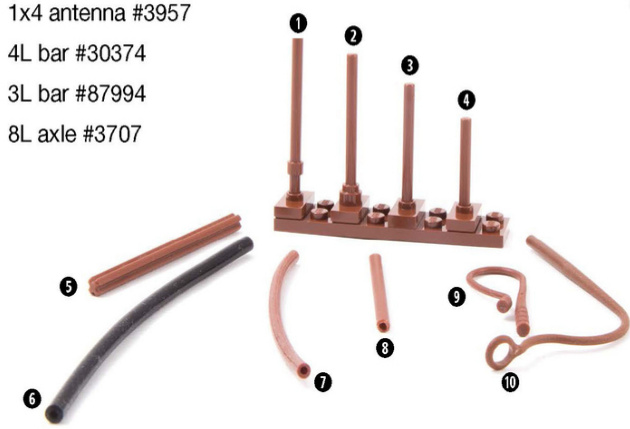
① 4mm pneumatic hose #5102 (various lengths)
7 3mm soft hose bb145 (various lengths)
● 3mm rigid hose #75 (various lengths)
●Whip #88704
0 Vine #2488
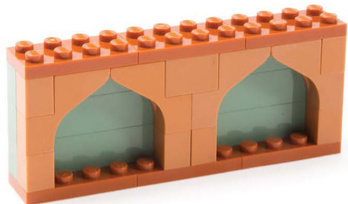
A bar,antenna, or hose can fit inside this framed space, created using tiles on 1x1 bricks with stud on side (#87087). You can cut longer rigid hose and angle the cut at each end to fit the corner as needed, or bend to form a curved timber frame.
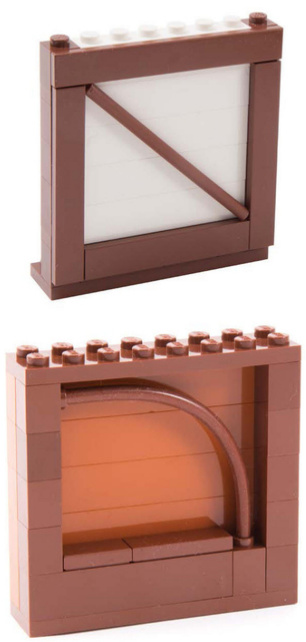
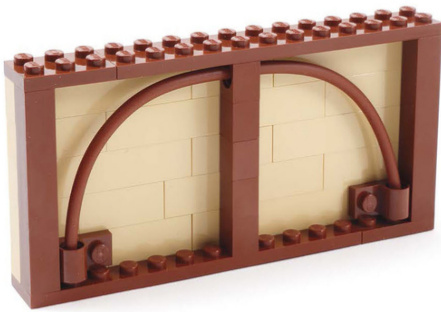
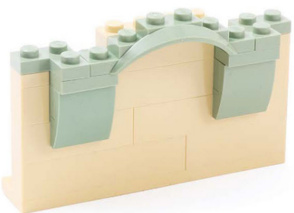
Here,one piece of 3mm rigid hose (#75) makes the complete arch. On each side,the hose is anchored to the bottom with a 1x2 plate with pin hole on top (#11458).At the top of the arch, the hose is inserted through a 1x1 Technic brick (#6541) in the middle divider.
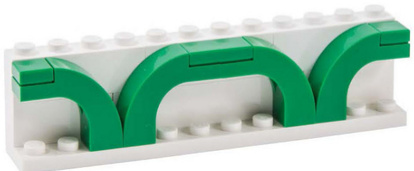
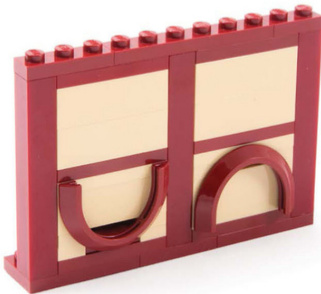
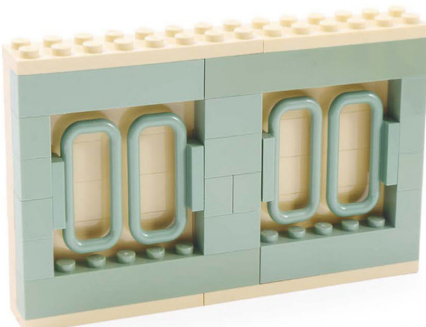
1x3x2 arch with curved top #6005
1x6x2 arch with curved top #6183 1x2x1 modified brick with curved top #6091
You can have the1x6x31/3 arch with curved top (#6060) face in (top) or face out (bottom).
3x3modified facetbrick#2462
1x6 modified plate #6583
1x3x2arch #88292
4x2 1/2 x 1 2/3 round arch mudguard #50745
1x4x2bar#6187
Tiles attached at angleson 1x1 bricks with stud on side (#87087)
Waterwheelplate#64566
A-shapeplate #15706
2x2modifiedplatewith squareframe #30094
4-bladepropellerwith roundedends #2479
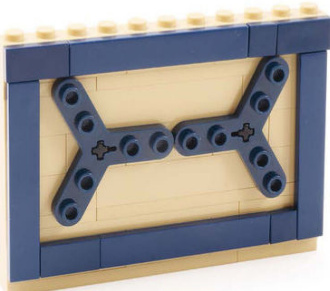
3-bladerotor#32125
Small bonyleg#15064
Dinosaur tail #40379
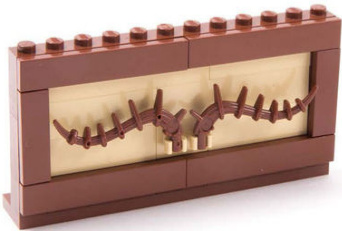
Plantvine#55236
How To: Timber Framing with Turntables
Turntable bases create a circular pattern that is reminiscent of timber framed woodwork. This effect works best when solid studs show through, so attach the turntable bases to plates.
0 1x2-2x2 bracket #44728
②2x2plate#3022
③ Turntablebase #3680
Create simple contrasting frames using various dark-colored 1x brickswith white 1x2x5 bricks (#2454)or 1x2x2 bricks (#3245),which can also be set back on jumper plates.
For a thinner frame, use brackets (#3956).
1 2x2-2x2bracket #3956
2 2x2plate #3022
3 2x2brick #3003
4 1x1 brick with stud on side #87087
6 1x2brick#3004
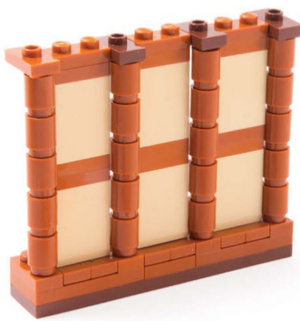
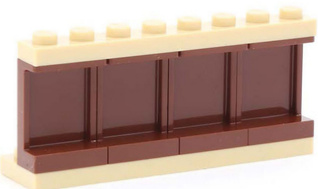
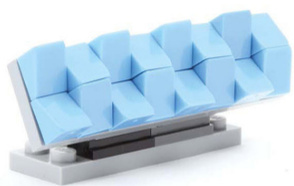
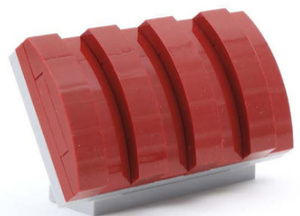
Simple Paneling
Panel pieces have defined edges that help break up a large section of wall. You can use this technique to add color or texture variations on an interior or exterior wall.
Large panels come in a variety of colors and sizes.
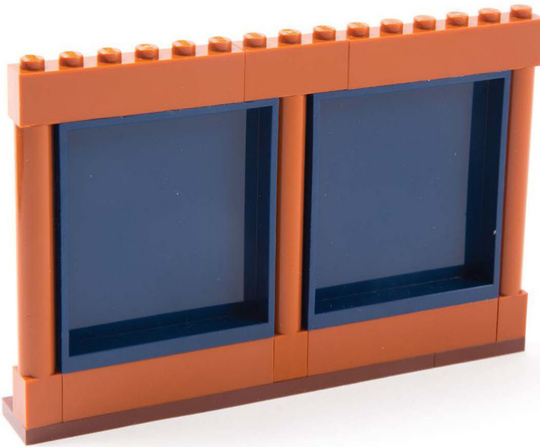
Framing a large panel in a contrasting color helps to add interest.
The 1x6x5 corrugated panel (#23405) has indentations that can act as narrow paneling.
The 2x2 seat (#4079) has reinforced edges that create a similar effect. You can even flip the seats to face the other way for an interesting look, as the seat backs are slightly convex with rounded corners.
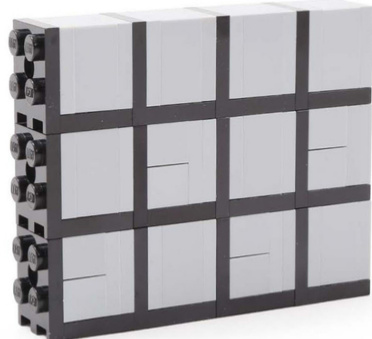
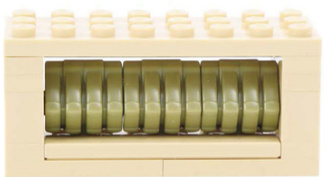
Paneling Using Containers
Use containers (#61780) to give texture to exterior walls, especially those on the edge of a model that might otherwise seem too plain.
Because the top of the container has limited clutch power, you need to frame it with regular plates or bricks.Put an axle through the center of the container to give it extra strength.
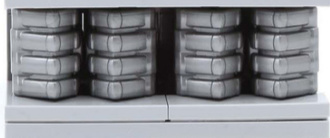
You can even use the top of container pieces for an interesting look.
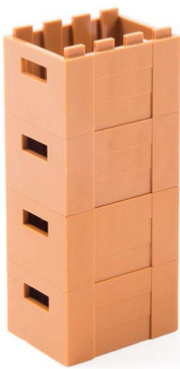
The sides of the crate (#30150) have a slight relief pattern,which when stacked forms a subtle paneling effect. Crates should be framed because they haveweak clutch power on top.
Layering 2xplates betweeneach row of container pieces adds strength and additional texture.
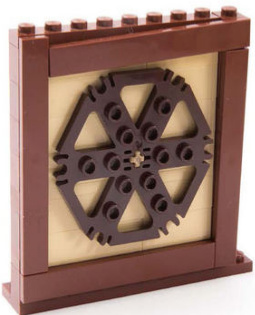
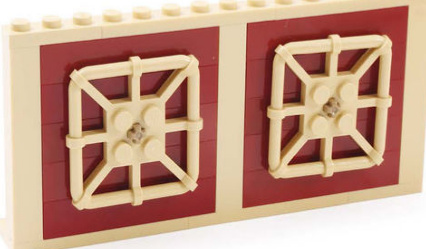
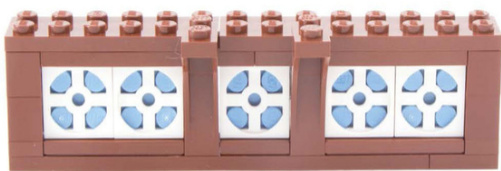
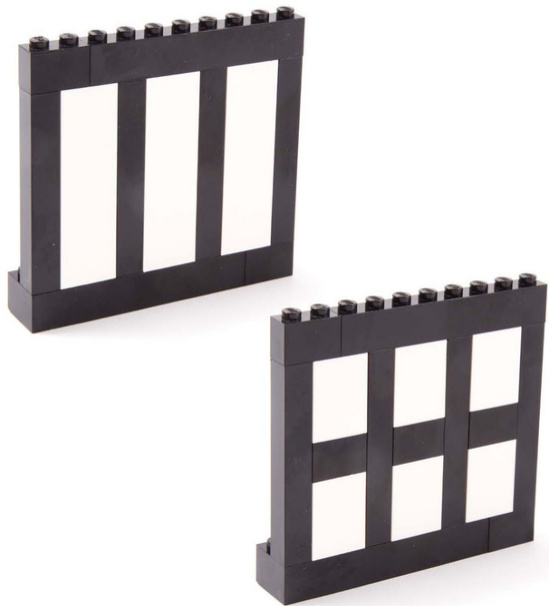
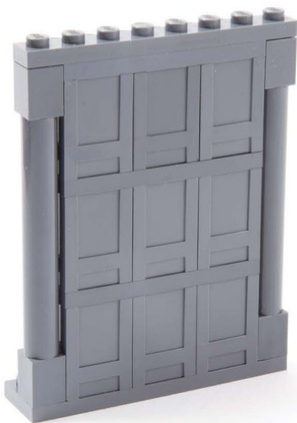
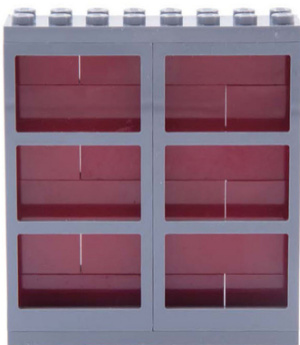
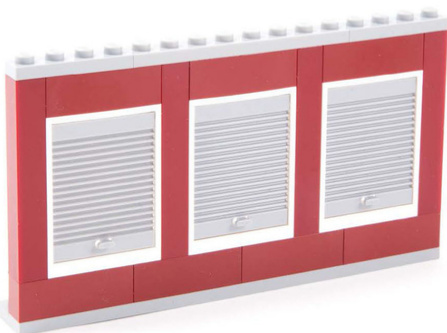
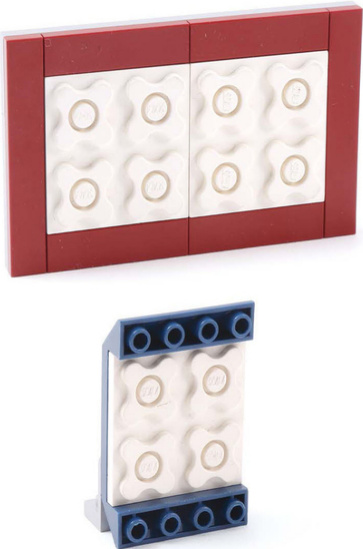
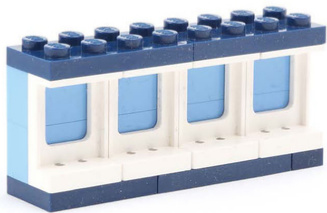
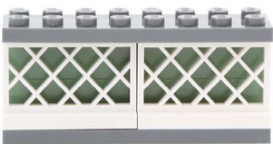
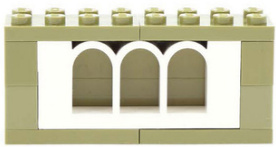
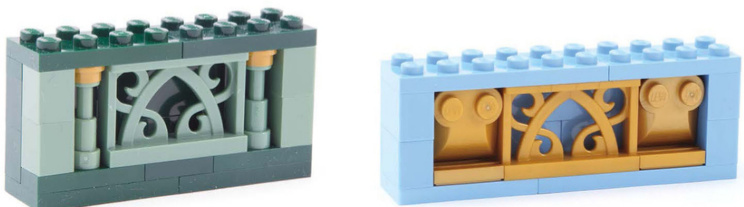
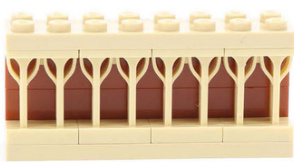
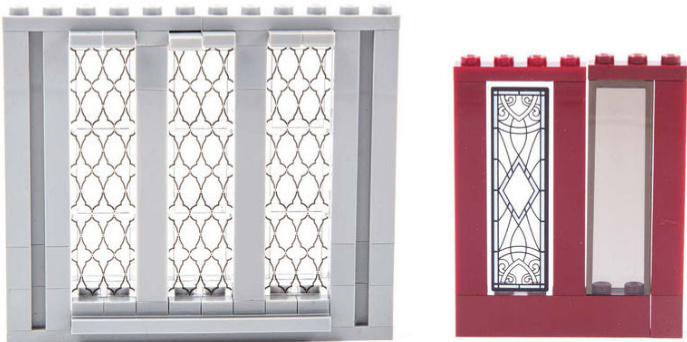
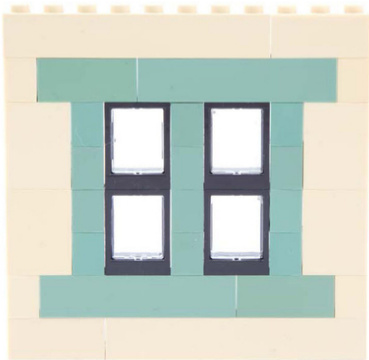
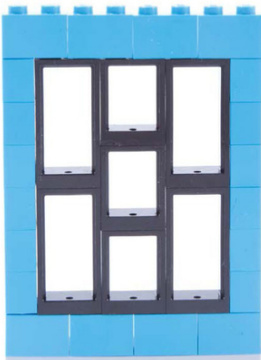
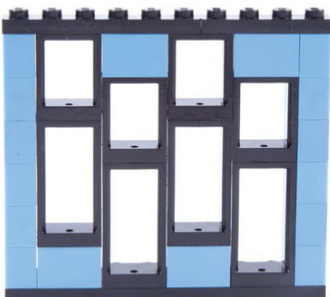
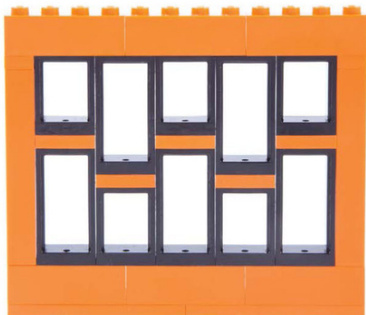
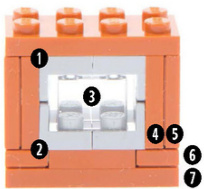
Paneling Using Windows
Use window frames to create paneling and geometric patterns on walls. Fill the background using bricks in either the same or a contrasting color.
1x4x6 window frame with 3panes #57894
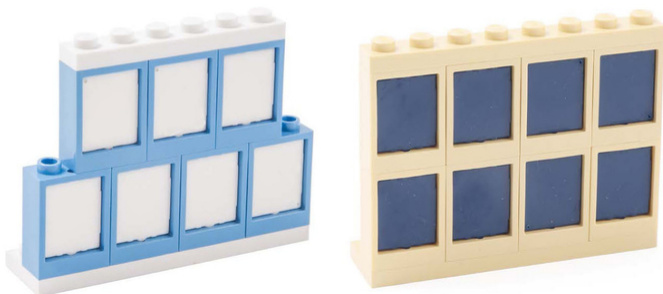
Fill frames with opaque,colored 1x2x2 window glass (#60601).
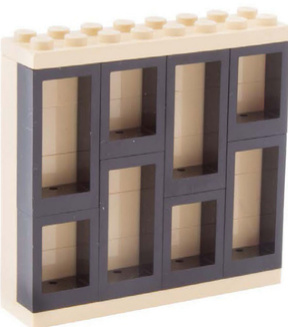

1x2x2window #60592
1x2x3 window #60593
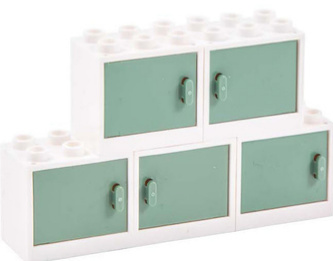
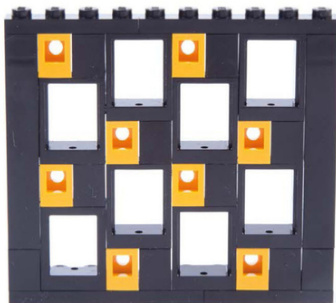
2x3x2 cupboards (#4532)and doors (#4533)
You can also fill windows with 1x1 cheese slopes (#54200),1x2 tiles (#3069),and 1x3 tiles (#63864) to mimic masonry.
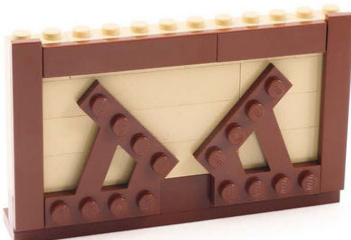
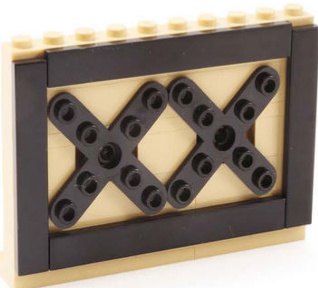
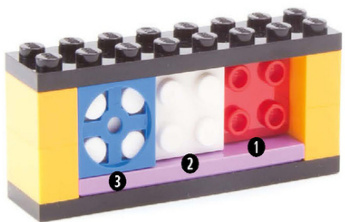
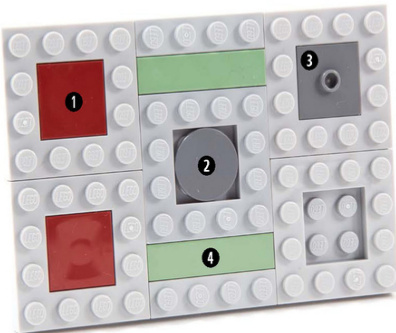
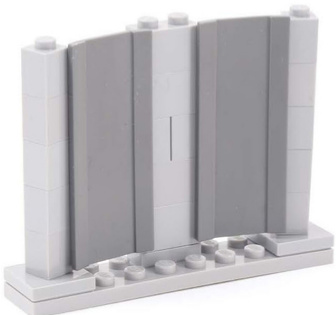
Decorative Paneling
Use smooth tiles to create raised panels, or combine textured pieces like Scala plates and lift doors for a more ornate decorative effect.
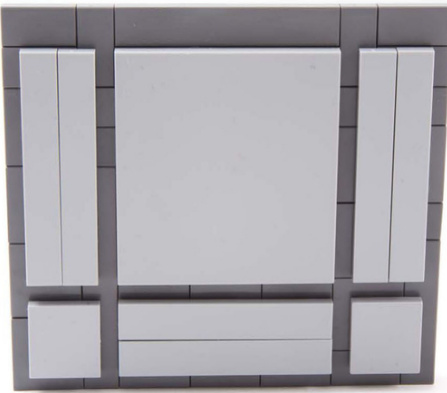
Create raised panels by attaching tiles to jumper plates to create half-stud recessed borders. The gaps expose the dark gray tiles underneath.
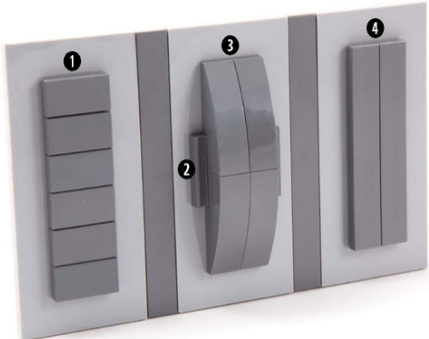
Use 4x8 modified plates with studs in center (#6576) with a variety of parts:
01x2tile#3069 ●1x3 curved slope #50950
2 1x2 plate with rail #32028 1x6 tile #6636
How To: Recessed Panel Borders
Use panel pieces for a deeper recessed border.
0 4x6 plate #3032 ?2x2x1 corner panel #91501
②1x3plate#3623 2x3plate #3021
③2x4plate #3020 6 1x2 tile #3069
Using 4x4 plateswith cutout (#64799),create a natural frame that you can fill with different colors and textures.
1 2x2 tile #3068 3 2x2 jumper plate #87580
2 2x2 round tile #4150 4 1x4 tile #2431
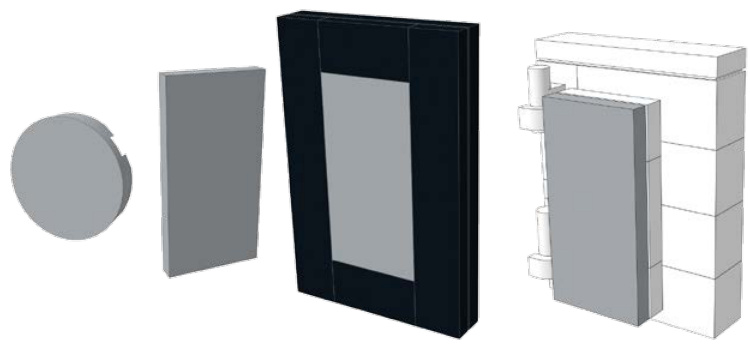
Combine a 1x4x4 door frame (#6154) and a1x4x4 liftdoor (#6155) for a panel with horizontal grooves.
The 4x4 Scala plate (#33062) has a quatrefoil shape that becomes apanel when framed by tiles.It also fits intothe cutout of a 6x4 double inverted slopewith cutout (#30283).
Use 1x1 round bricks (#3062) and 1x2 tiles (#3069) to give yourpanels some decorative framing.
The hinge panel (#2440) has a beveled shape so thatwhen used in a row, it creates a slightly concave wall.
Patterned Walls
Horizontal Stripes
Plates with rail create interesting striped shadows, even making plates of the same color appear darker.
Go for a monochromatic look or use a contrasting color.
1x8plate with rail #4510
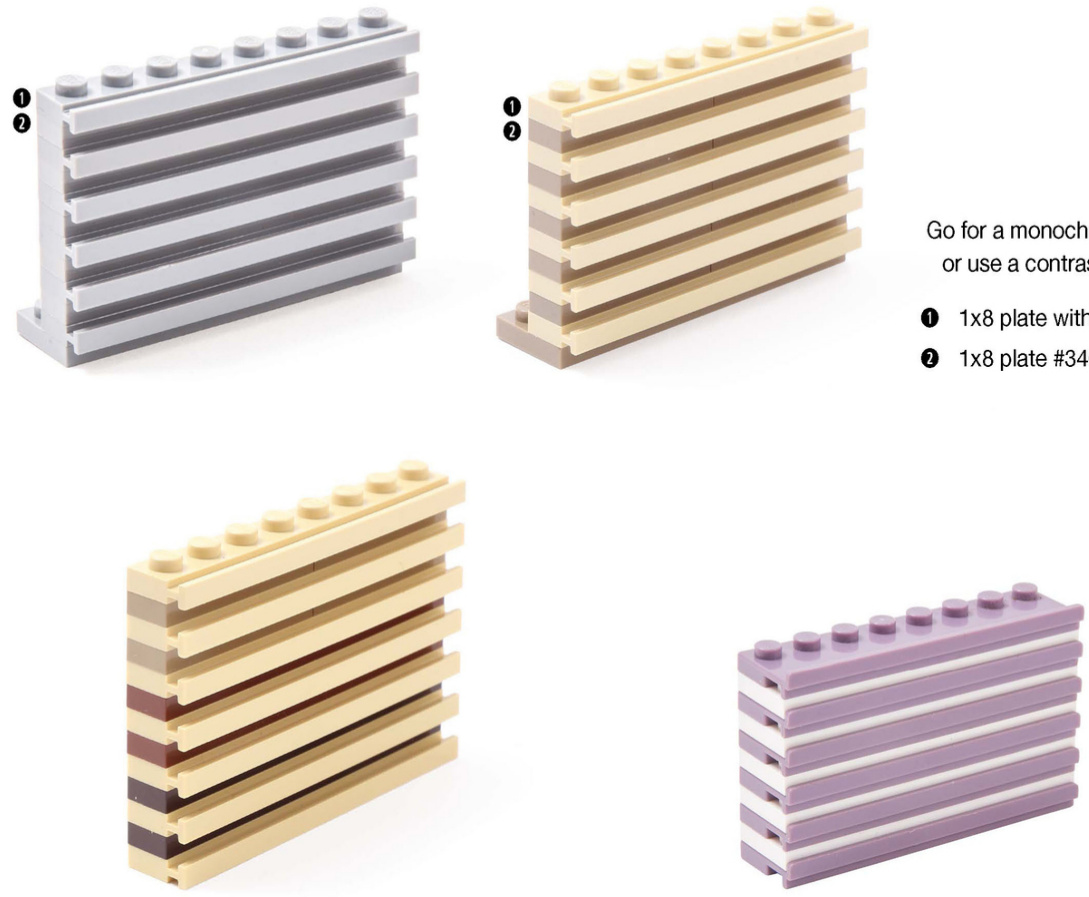
Accentuate these shadows by using different colors between the layers.Here, dark tan, reddish brown, and dark brown plates create an ombré effect.
To create narrower stripes, alternate plates with wide rail (#30586) and 2x8 plates (#3034).
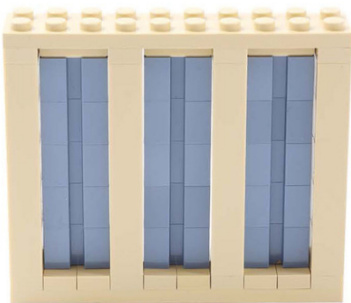
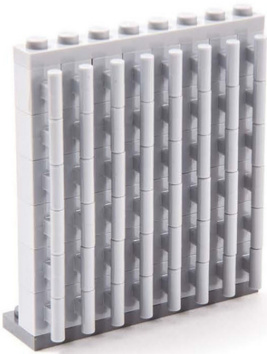
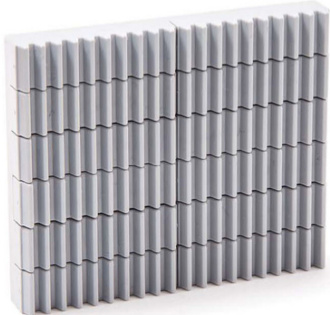
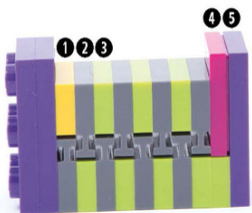
Vertical Stripes
Combine plates (for structure) and the grooved edges of jumper plates and tiles to create a subtle vertical texture.

Use the newer style of jumper plates with groove for this technique.
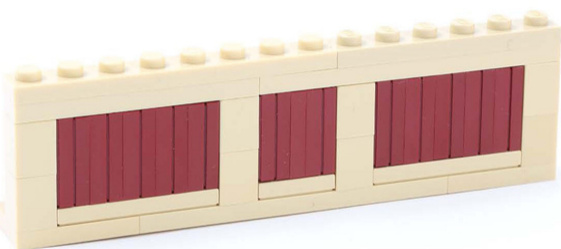
You can frame stacks of jumper plates (or jumper plates and standard plates) to make paneling.Attach the end of each stack to a brick with stud on side.
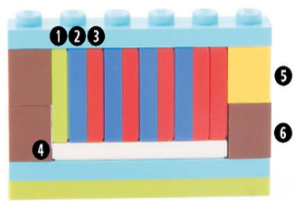
0 1x8plate #3460
2 1x2 jumper plate with
groove #15573
③ 1x2 plate #3023
4 1x4 tile #2431
1x4plate #3710
0 1x2 tile #3069
2 1x2plate #3023
③1x2 jumper plate 15573
4 1x4 tile #2431
? 1x1 brick with stud on side #87087
6 1x1 brick #3005
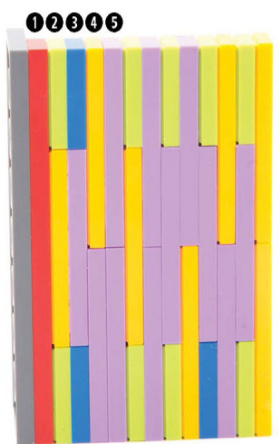
Stack 1x2 modified bricks with groove (#4216) and use jumper plates to set them back.
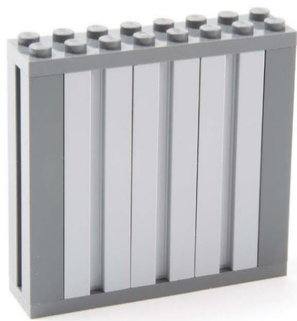
Create quick vertical texturing with 1x2x5 modified bricks with groove (#88393).
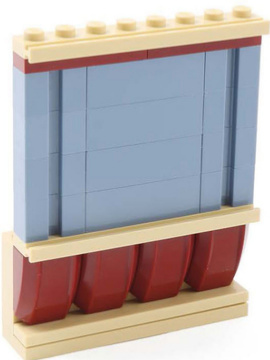
Use 1x8 plates with rail (#4510) to create a split wall.
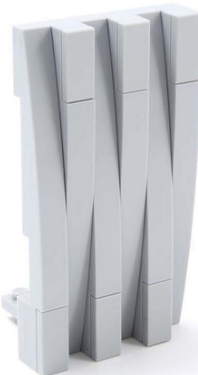
Alternate the direction of 1x10 curved slopes (#85970) to create a contrasting pattern.
1x1brickwith handle #2921
1x4 Technic gear rack #3743
Geometric Patterns
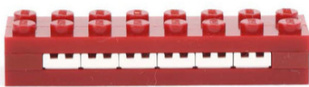
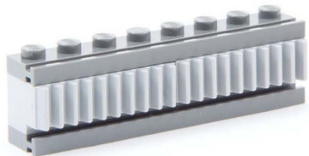
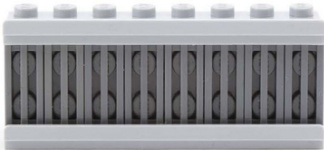
Use small panels to create geometric patterns like those found in modern concrete buildings.
Use 1x4x1 panels (#30413)to make clean horizontal lines and shadows for a ribbed concrete-wall effect.
Place 1x2x1 panels (#4865) back to back in offset rows to create a pattern of horizontal (or vertical) ribs.
You can make a gridded pattern using corner panels (#91501),which works well with or without the stud exposed.
Create a pattern using a mix of panel shapes.
0 1x2x1 panel #4865
2 1x1x1 corner panel #6231
? 2x2x1 corner panel #91501
4 1x2x1panelwith 2 sides #23969
? 1x4x1panel #30413
Horizontal Tiles
Build a wall by using the sides of tiles to mimic flat stone slabs.
The L-shaped corner tiles are wedged between the studs of theplates.The vertical plates are offset by half a stud via a jumper plate.
1x6 plate #3666 3 1x2 jumper plate 15573 2 1x2 plate #3023 4 2x2 corner tile #14719

You can achieve a similar effect using hoses and plates with clips.The tiles attach to plates with clips so that each row is 2 plates thick.

0 1x2 Technic brick with axle hole #32064
2 3mm rigid hose #75
?1x1 plate with horizontal clip 61252
0 1x1 tile #3070
? 1x2 tile #3069
1x2 plate with horizontal clips #60470
You can also “stack” tiles using 1x1 tiles with clip (#2555)or 1x2 plates with clip (#11476).
Patterned Tiles
There are endless possibilities for decorating walls with tiles.
2x2 corner plate #2420
1x1 quarter round tile #25269
1x1 quarter round tile #25269
2x2 tile #3068 1x1round tile #98138 2x2 corner tile #14719
HowTo
1 1x2 jumperplate 15573 ? 1x2 tile #3069
② 2x2 jumper plate #87580 ? 1x1 tile #3070
③ 2x2 tile #3068
Use jumper plates (#87580) in different colors for a modern, graphic design.
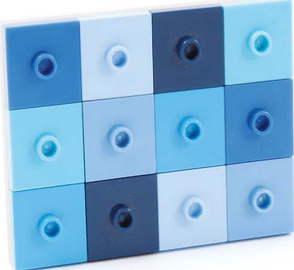
Create a polka-dot design with round tiles (#14769) on a 1x1 Technic brick (#6541) with half pin (#4274) or a 1x1 brick with stud on side (#87087).
Mix 2x2 round tiles (#14769) and 1x1 round tiles (#98138) of different colors.The back wall is made of 1x2 Technic bricks (#37o0) and half pins (#4274).
This monochromatic pattern uses 1x1 round tiles (#98138),1x2 Technic bricks (#3700),and half pins (#4274).
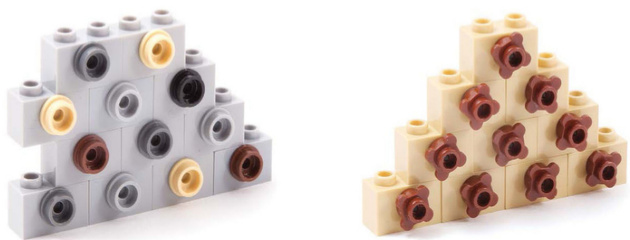
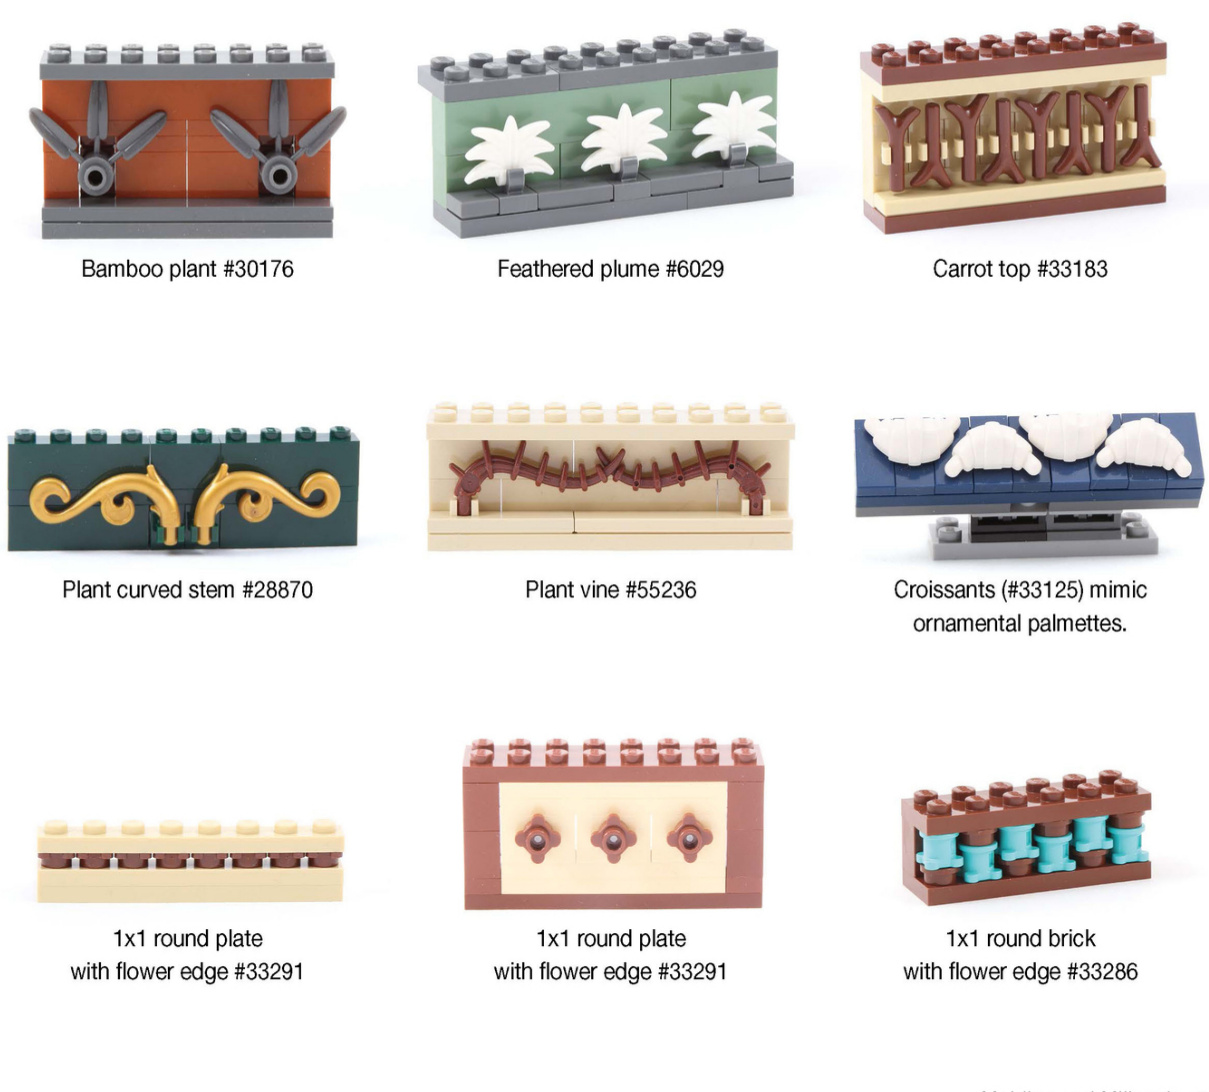
Make a patterned stone wall by combining 1x1 round plates (#4073) with 1x2 Technic bricks (#37oo) or using round plates with flower edge (#33291).
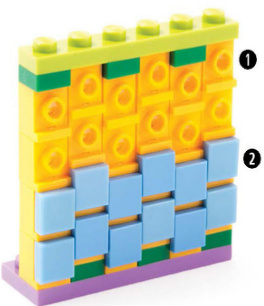
Checkerboard Walls
Use 1x1 bricks (#30o5) in similar or contrasting colors to create a checkerboard pattern.
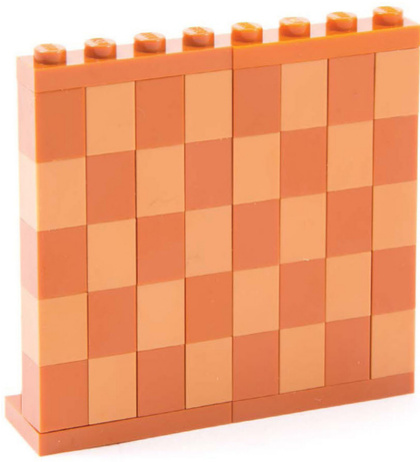
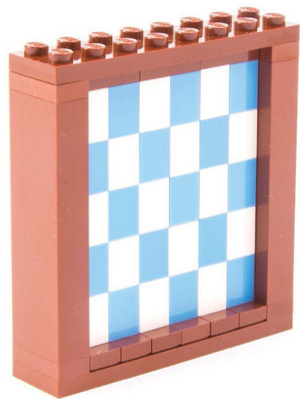
Frame a checkerboard pattern to turn it into a panel.
Recess it by using 1x2 jumper plates (#3794/#15573).
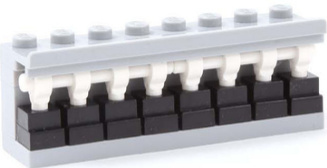
How To: Houndstooth Walls
Headlight bricks have a setback and a lip on the front, which can create an interesting houndstooth pattern.The wall can be finished with tiles since the pattern has studs on all sides.

0 1x1 headlight brick #4070
2 1x6 tile #6636
? 1x4 tile #2431
4 1x6 plate #3666
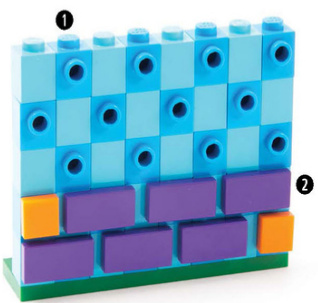
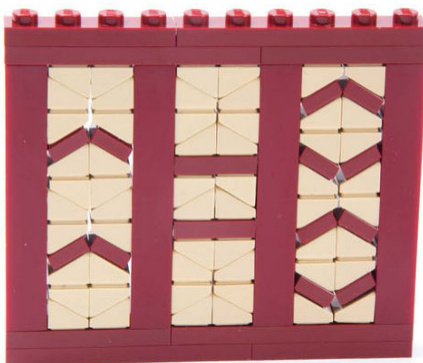
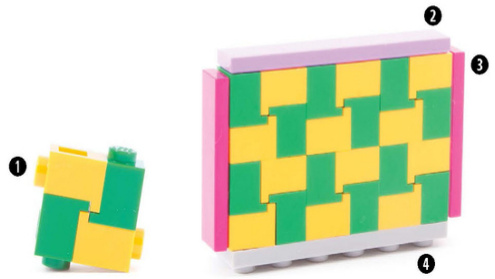
Herringbone Walls
There are two types of 1x2 jumper plates: with a groove (#15573)and without (#3794).
You can use either, but these patterns look best if you stick with one version.

Use1x2 jumperplatesto create a shapedpattern.Fill inthe rest ofthewall with jumper platesandtiles of a differentcolor.
1 1x2jumper platewith groove #15573
2 1x3tile #63864
3 1x2 jumper plate without groove #3794
? 1x1tile #3070
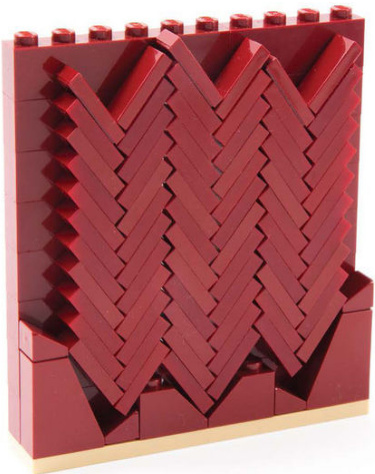

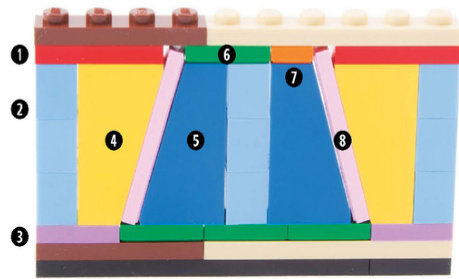
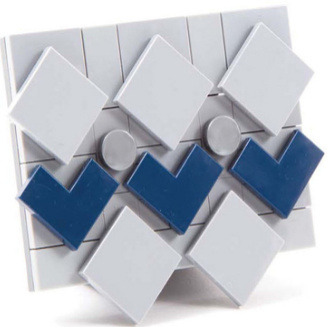
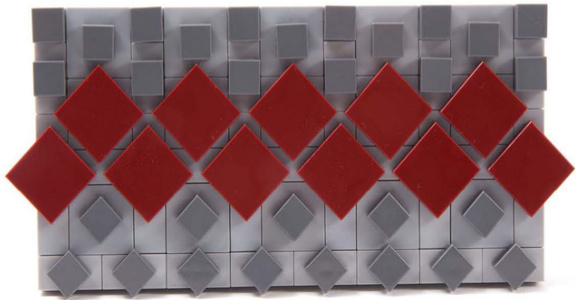
Stack jumper plates and thenfinishwith tiles atthetoptomake a herringbonepatternthat mimics intricate masonry,often usedbetween thewood of timber-framedexteriors.
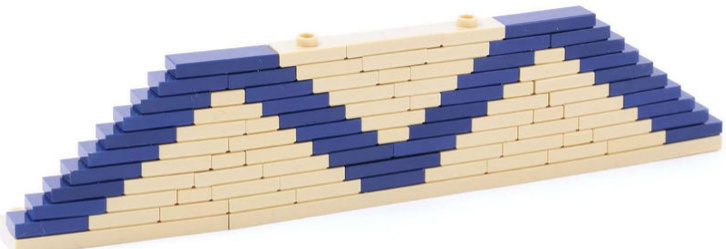
Useregular plates in contrasting colorsto createadiamondorlozengepattern.
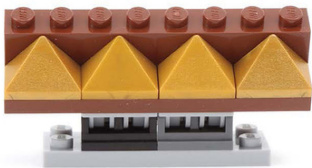
Textured Walls
Texturing adds interest and shadows without changing colors or parts.
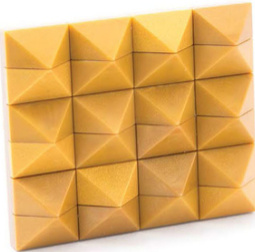
Place 1x2 triple slopes (#3048/#15571)together to make pyramids.

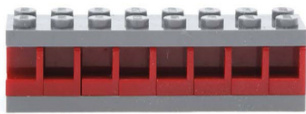
Frame 2x4x2 bricks with holes on sides (#6061) to display the pattern on the sides of the bricks.
Stack 2x3 modified plates with hole (#3176) to create a textured masonry wall.
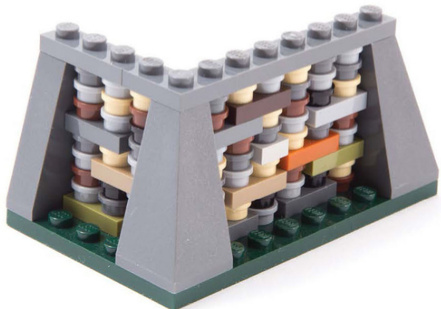
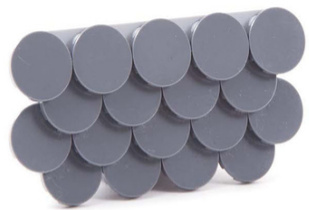
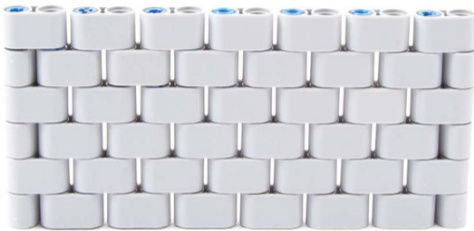
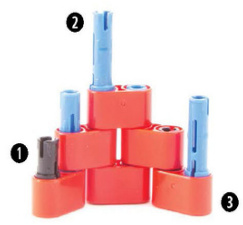
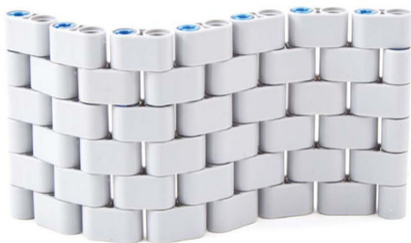
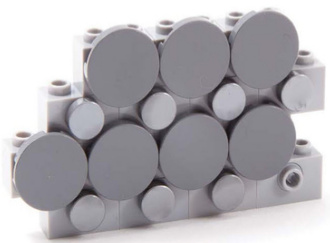
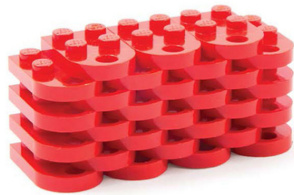
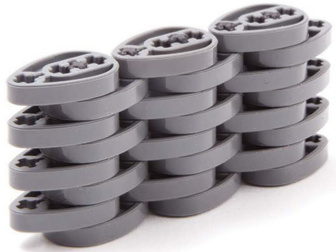
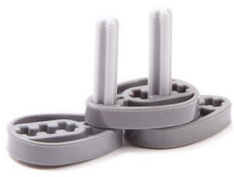
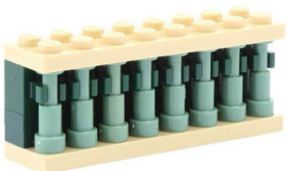
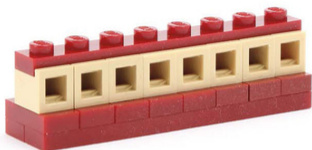
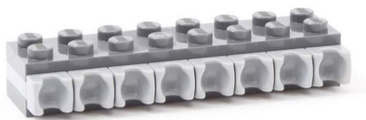
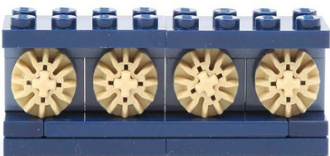
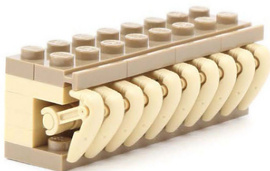
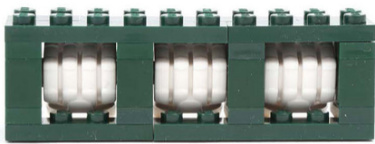
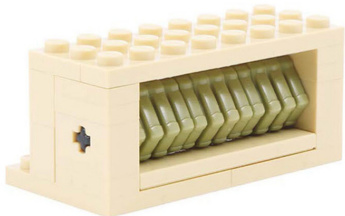
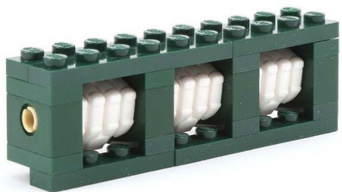
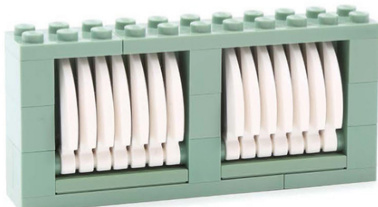
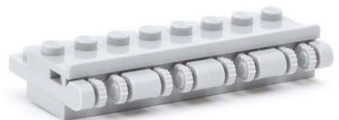
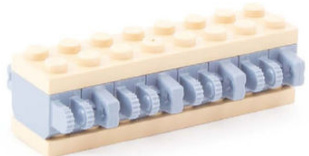
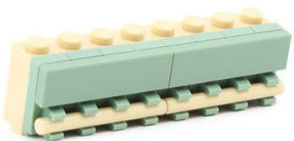
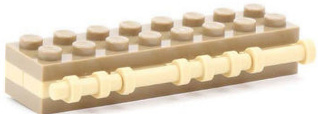
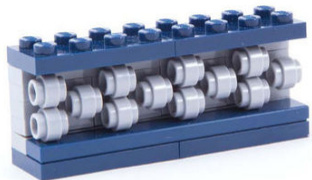
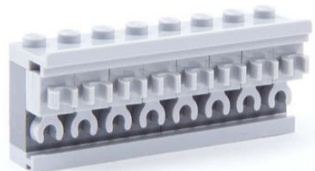
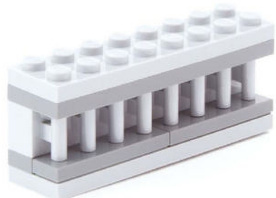
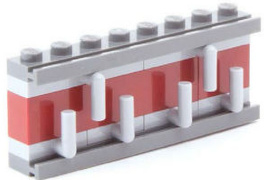
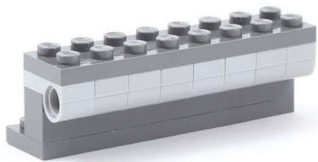
HowTo: Woven Fence Texture
Stack Technic cams (#6575) in an offset pattern to create a rounded wall that mimics a woven fence.
These cams are stacked on axles to create a continuousline.Therows alternatein direction to create the overlapping pattern.
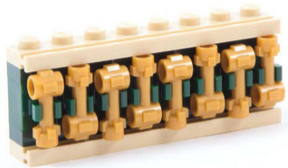
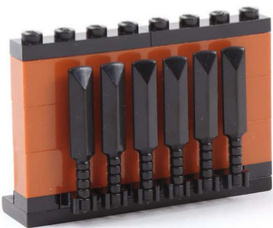
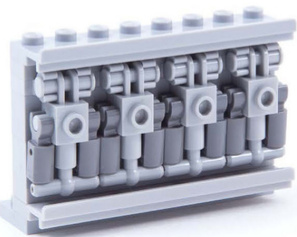
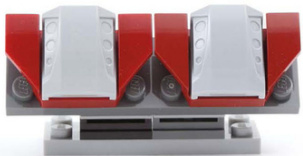
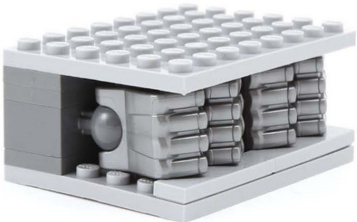
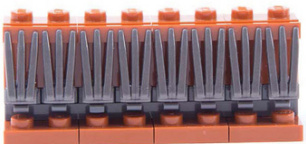
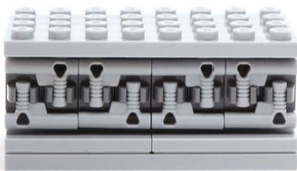
Greebling
Greebling is a technique that combines many little parts to create a mechanicallooking effect.
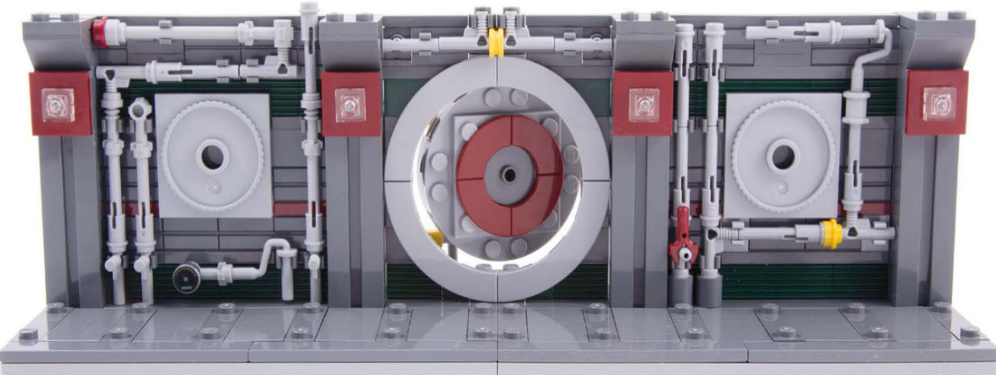
Which parts are used is not as important as the overall effect—you can choose whatever pieces would make interesting textures.
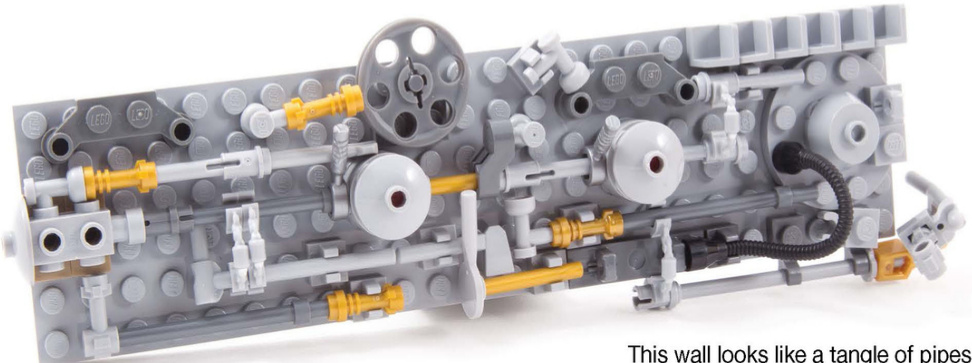
gears,levers,hoses, junctions,tanks, valves, and handles.
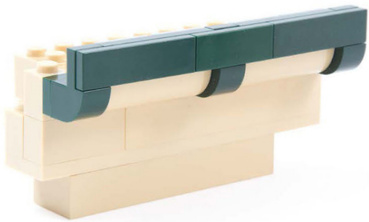
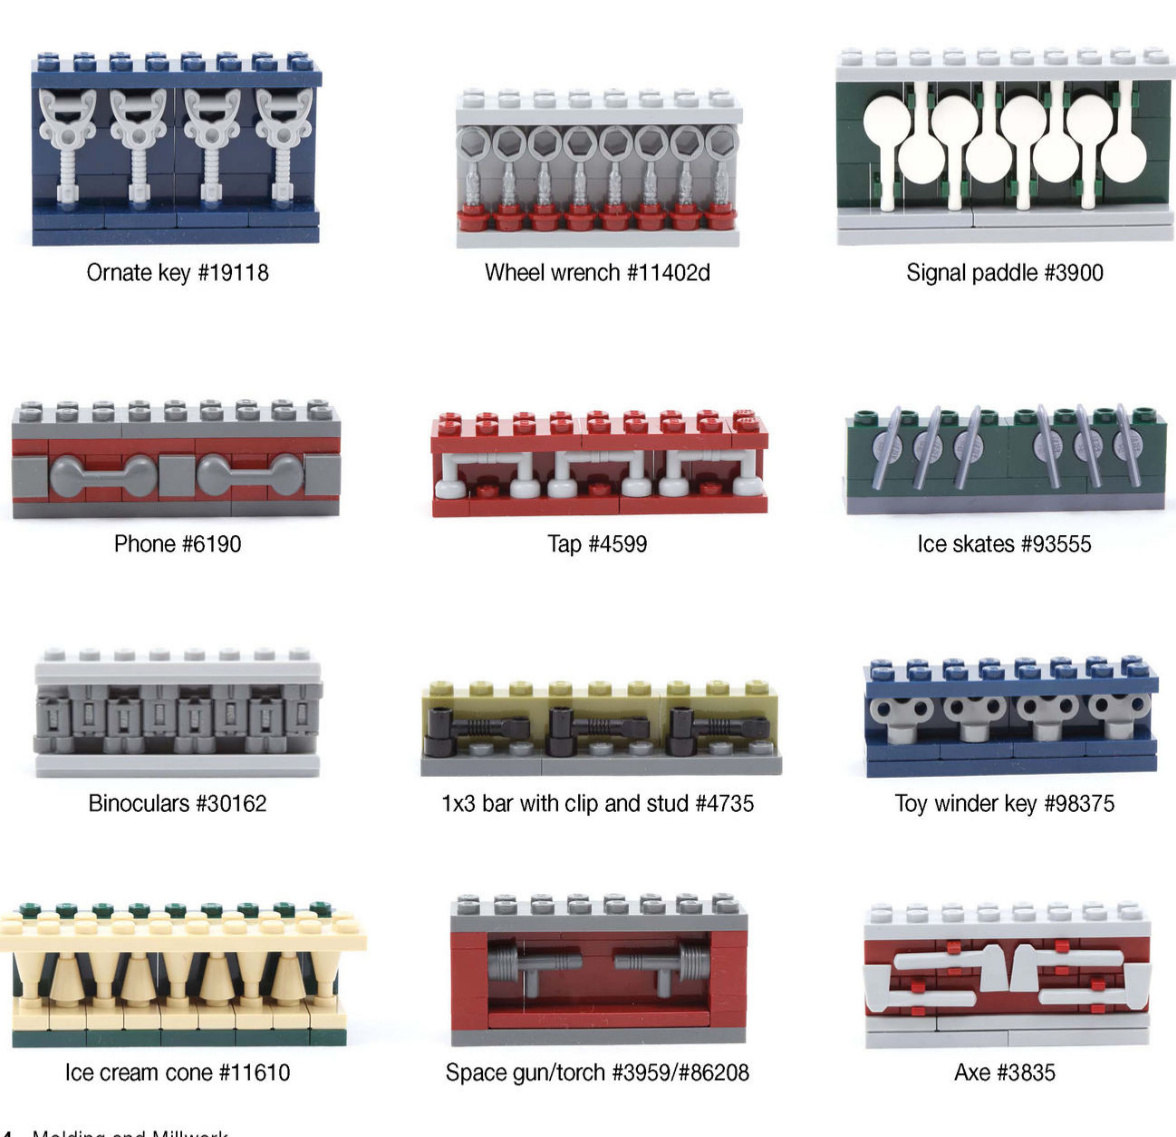
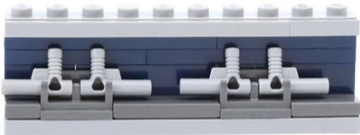
Molding and Millwork
Horizontal Molding
Stacking elements can create interesting horizontal accents.
1x2platewith rail #32028
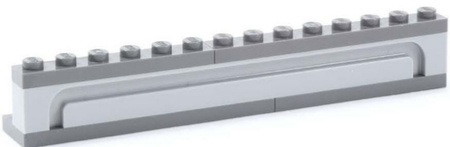
1x14 brick with groove #4217
1x4 brick with groove #2653
Attach a flexible hose to 1x1 bricks with stud on side (#87087).
2x3 modified plate with hole #3176
1x1tile #3070
How To: Building Sideways
Create a zipper-like grooved pattern with plates with rail by building sideways.
0 1x2 tile #3069
②1x2platewithrail #32028
3 1x2 plate #3023
● 2x2 jumper plate #87580
2x3plate#3021
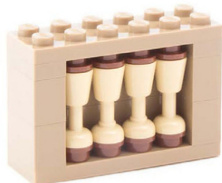
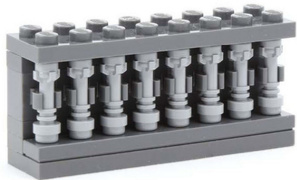
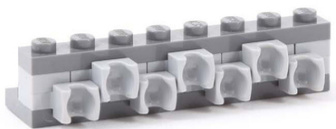
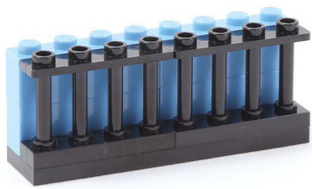
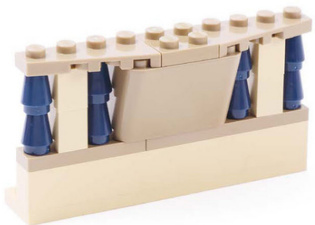
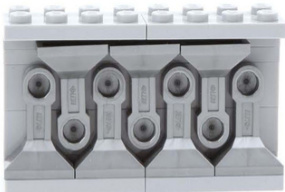
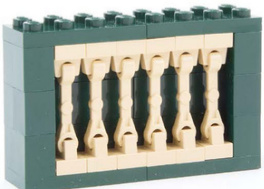
Vertical Molding
You can create vertical ornamentation with cones, goblets, telescopes, and more.

Set telescopes (#64644) on studs.
Or fit telescopes into clips for added detail.
Handle with side studs #92690
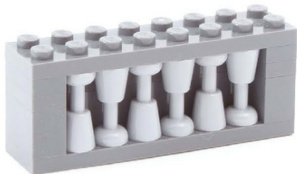
Goblets (#2343) can fit side by side in a variety of interesting patterns.
Add 1x1 round plates (#4073) for more detail.
Lightsaber hilt #64567
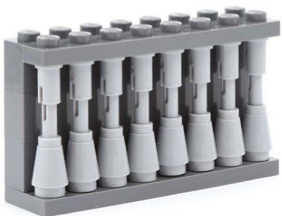
Combine the Technic half pin with bar extension (#61184) and 1x1 cone (#4589).
Cricketbat (by BrickArms)
Insert the pneumatic hose T (#4697) into a mechanical torso (#24078) and fit into a bar holder with clip (#11090).
Panel Accents
Create interesting geometric patterns with panels, grills, and other textured pieces.
Create repeating pockets of space using 1x1x1 corner panels (#6231).
1x1 headlightbrick #4070
1x2 grill plate #2412
1x4 Technic gear rack #3743
1x2x2 panel #87552
1x2 grill plate #2412
1x2x2 2/3 slopingvehicle grille #50946
1x2 modified brick with groove #4216
1x2x2 plane window #2377
2x4 hinge plate #2873 1x2 hinge plate with finger on side #44567
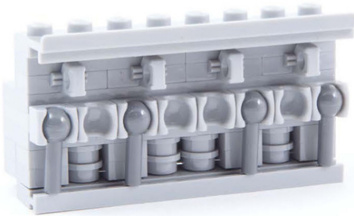
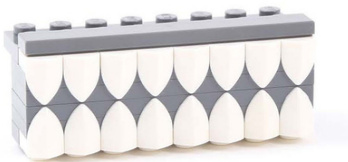
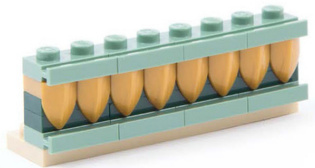
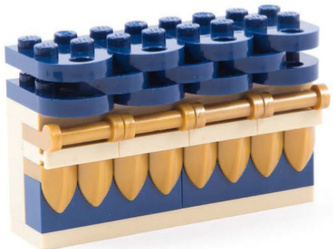
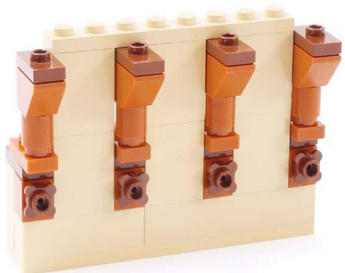
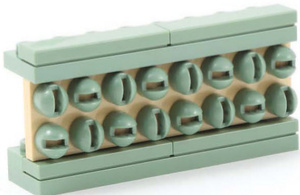
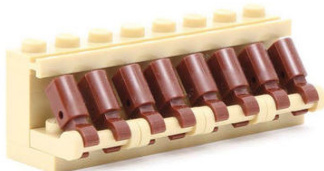
Egg-and-Dart Molding
Combine sockets and towballs to re-create the classical egg-and-dart ornamentation found in Greek and Roman architecture.
1x2 modified plate with socket on end #14418
1x2modifiedplate with socket onside #14704
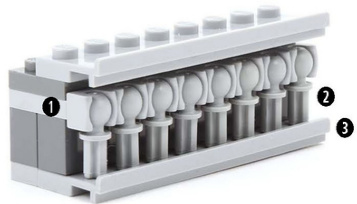
0 1x2 modified plate with socket on end #14418
2 Technic axle towball #2736
2x8 platewith widerail #30586
0 1x2 modified plate with socket on side #14704
2 Technic axle towball #2736
③ 2x8platewith widerail #30586
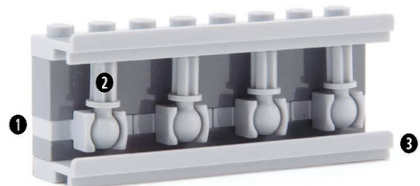
1Lbarwithtowball #22484
1 2x2 plate with 1 pin hole #2444 (or 2 pin holes #2817) 2 Technic axle towball #2736
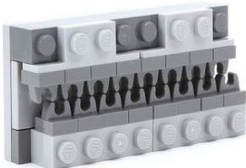
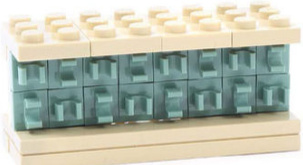
ModifiedPlatewithTooth
You can also re-create the egg-and-dart look with the 1x1 modified plate with horizontal tooth (#49668). This piece also comes in a version at a right angle (#15070),which has a similar profile but without the exposed stud.
Line them up for a simple take on egg-and-dart molding.
Attach 1x1 cheese slopes (#54200) to the exposed studs on the tooth.
Attach 1x1 round tiles (#98138) to the exposed studs on the tooth.
Align two rows of plates to make a diamond pattern.
Addplateswith rail above andbelowyour row of plates with tooth to add more depth.
Layer different pieces to gradually increase the depth of your molding.
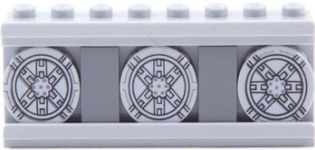
Circular and Rosette Molding
Plates, tiles, gears, and shields provide lots of options for creating circular molding and wall accents.
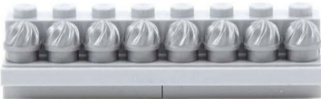
Line up 1x1 round plates with swirled top (#15470) to mimic classical spiral motifs.
1x1 round tile #98138 1x1 round plate with swirledtop #15470
1x2Technicbrickwith axle hole #32064
1x1 roundplate #4073

2x2 dish #4740 1x1 round plate with flower edge #33291
12-tooth gear #6589
2x2 round tile with SWpattern 4150pb086
Ovoidshieldwith SWpattern 2586px15
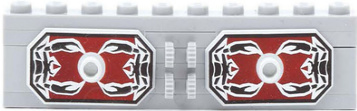
Scorpion shield 48494pb05
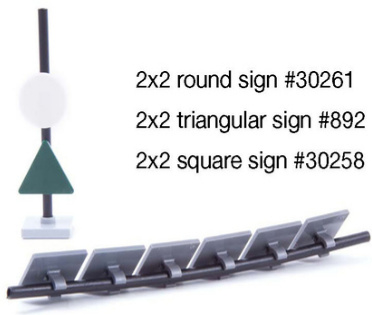
Fence Patterns
Fences are a great way to add interest to your models, especialy when using contrasting colors.
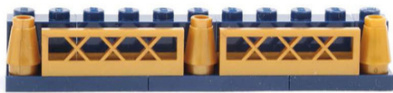
1x4x2fence #3185
1x4x1 fence #3633
1x1 cone #4589
Line up 1x2 plates with ladder (#4175) for a more modern take on this effect.
1x6x2fence #30077
1x4x2 fence 15332

Alternate 1x2 plateswith angled handles (#92692) to create a fence pattern.
AltBricks1x2x2fence
Frame a 1x4x2 ornamental fence (#19121) with other pieces, like telescopes or modified bricks.
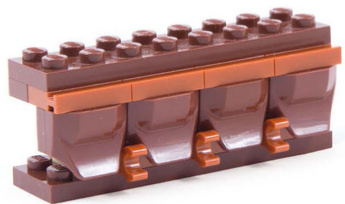
Slopes and Modified Bricks
You can arrange slopes and modified bricks to add textured accents.Include plates between layers to add definition.

2x1x1slope#60481
1x1 cheese slope #54200
4x1 double curved slope #93273

1x3 double inverted slope #2341
1x2 triple slope 15571
2x4 mudguardwith flaredwings #41854 2x2 curved slope with 3 side ports #44675
1x2x2/3 brick with wing end#47458
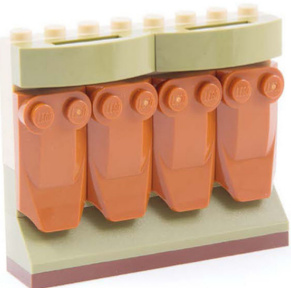
brickwith wing end #47456
1x2 curved slope #11477 2x2 modified brick with slopedend #47457
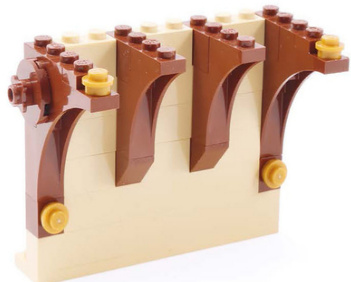
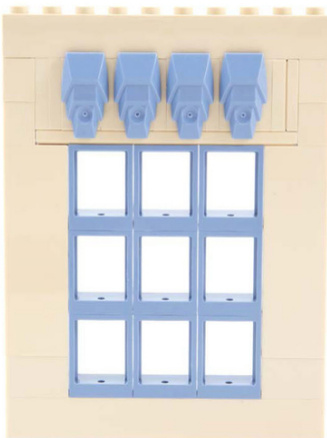
Corbels
Corbels are support structures for roofs, windows, upper levels, and even parapets.
They can be functional or decorative.
1x1brick#3005
1x2 curved slope #11477
1x3x2 archwith curvedtop #6005
1x2x1 modified brick with curved top #6091 1x4x1 modified brick with curved top #6191
1x2 inverted slope #3665
1x5x4arch #2339 1x3x3arch #13965
2x4x2 inverted windscreen #4284
1 1/2x6x1 arch mudguard #62361 2x2 curved slope #15068
1x3x3arch#13965
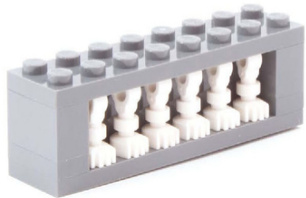
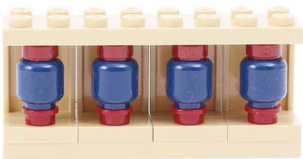
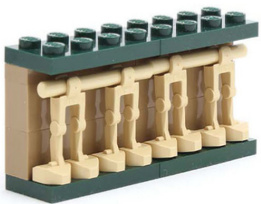
Microfigs and Minifigs
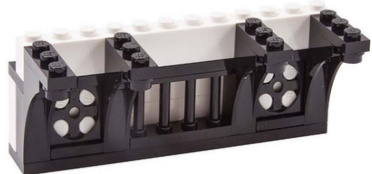
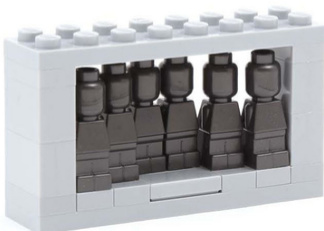
You can use microfigures and minifigures to mimic the look of sculptures in a pediment-or take them apart and use their legs and torsos as structural elements!
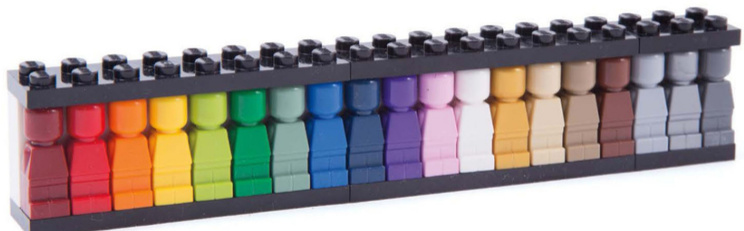
The microfig (#85863) comes in a wide variety of colors. Alternate two contrasting colors to create a simple pattern.
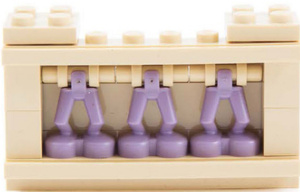
Offset microfigures using jumper plates.
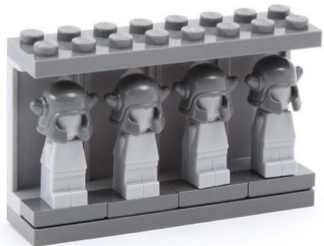
Here, microfigs with helmets (#94162) stand on jumper plates while the 1x2x3 panels (#2362) behind them add interesting vertical ridges.
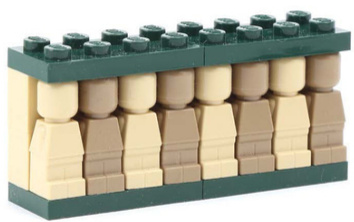
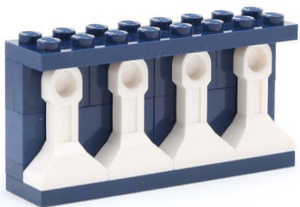
Minifigure legs (#970c00) can be placedupright or bent at the hips for a slight angle.
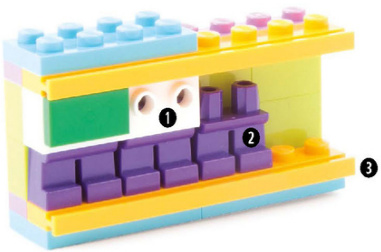
How To: Short Legs
Short legs (#41879) need bricks on top for the hips to fit into. Use bricks with studs to add a front-facing detail.
1 1x4 brick with 4 studs on side #30414
2 Short legs #41879
③1x8platewith rail #4510
Skeleton leg #6266
Space out skeleton legs with bars on top.
Skeleton legwith black boot#93062
Bent skeleton arm #93609
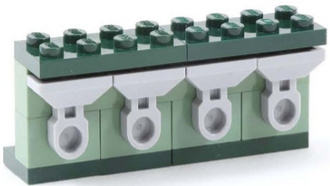
A minifig head (#3626) is wider than a stud, so space them out using jumper plates.
Martian leg x118
Droids and Robots
Star Wars droids and robots have unique angles and shapes that come in handy for creating architectural details.
Short droid leg#17486
Droid leg #30362
Droid leg #30362
Droid head #30378
Battle droidlegs #30376
Robot arm straight #59230
How To: Robot Arms
Robot arms create a nice angle that can be framed by 2x1x2 slopes.The arms are connected with an axle through the base.
0 2x1x2 slope #60481
2 Mechanical arm 98313
? 1x6 tile #6636
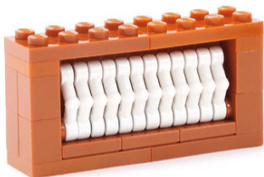
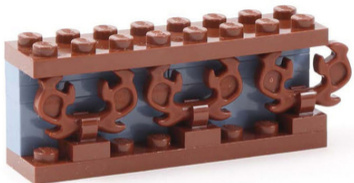
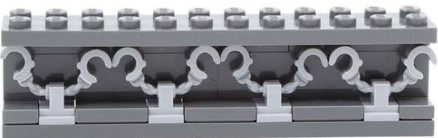
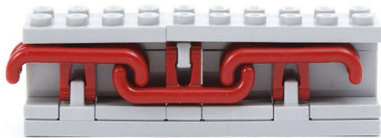
Fists and Claws
Bionicle fists and claw pieces can also be used as walldecorations to great effect.
套套套
Use axles to line up Bionicle fists (#93575).
Clip Bionicle fists onto the 2x2 brick with ball and axle hole (#57909).
Bionicle fists can also be connected with Technic axle pins (#3749).
Claw with clip #16770
Bladedclaw #10187
BrickForge fighting claw
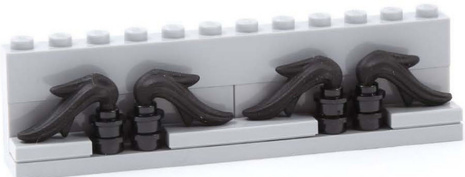
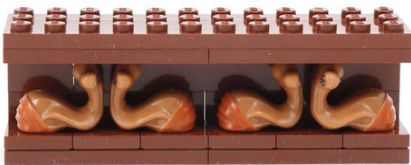
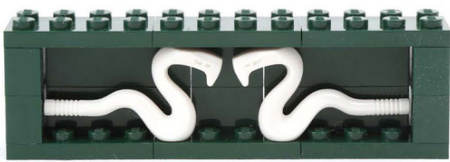
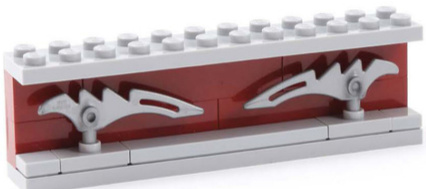
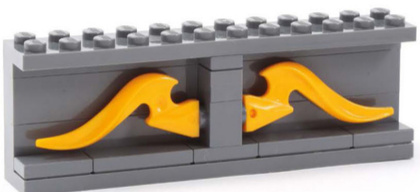
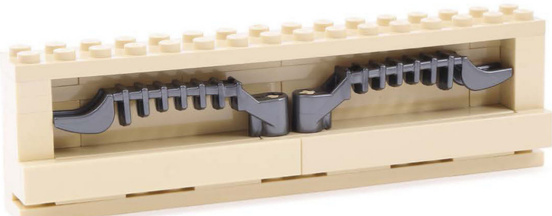
Animals
You can use unusual pieces like animal elements to re-create motifs on a cornice or pediment.
Antler#11437
Cattail #15429
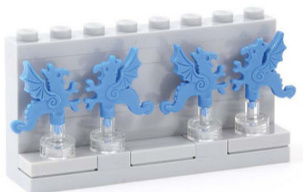
Dragon plume x47
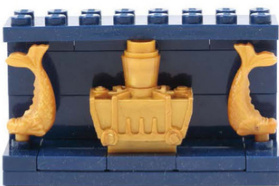
Ornamental fish x59 Bionicle knee cover #47299
Elephant tail/trunk #43892
SW Ithorian head #16475
Ponytail#22411
Snake#98136
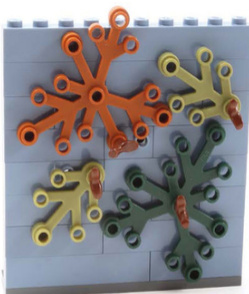
Plants
Mimic the look of floral and foliage decorations not only with actual plant pieces but alsowithothersmall decorativeelements.
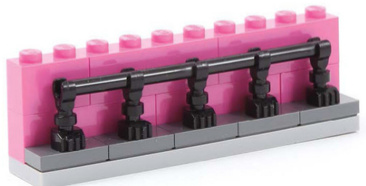
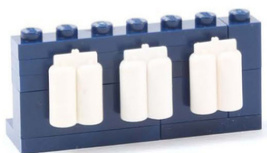
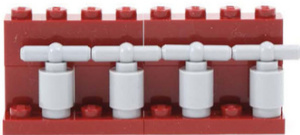
Tools and Sundry Items
LEGO tools can create a mechanical and futuristic look,but with a little creativity, tools can also mimic traditional architectural ornamentation and framing.
Airtanks#3838

Quadruple axleconnector#11272
Small lever base#4592
Nozzle #60849
Nozzle #60849
Pneumatic hose T #4697
Handcuffs #61482
Pantograph shoe #2922
Weaponcrescentblade #98141
Flame #18395
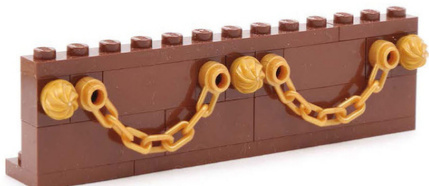
5-link chain #92338
Thornax launcher #64275
Hinges, Clips, and Handles
Because there are many hinge, clip,and handle parts,you can easily exchange one for another to create subtle differences in style.
Sandwich 3x4 hinge plates (#44570) between2x8plateswithrail (#4510).
1x2hinge brick locking withfingers #30386 (in alternating directions)
Use1x2plateswithclip ontop (#92280) to hold 4L bars (#30374).
1x2platewithhandle onside#2540/#48336
Attachbarholderswithclip (#11090)to 1x2 plates with handle on side (#48336).
1x1tilewithclip #2555
1x1tilewithclip #2555
Combine1x1plateswithverticalclip (#4085) with 1x1 tiles with clip (#15712).
1x1brickwithhandle #2921
Stagger1x4 plateswitharmdown (#30043) and1x2 plateswitharm up (#4623/#88072).
Stagger1x1plates with ring (#4081).
1x2platewithpin hole on bottom #18677
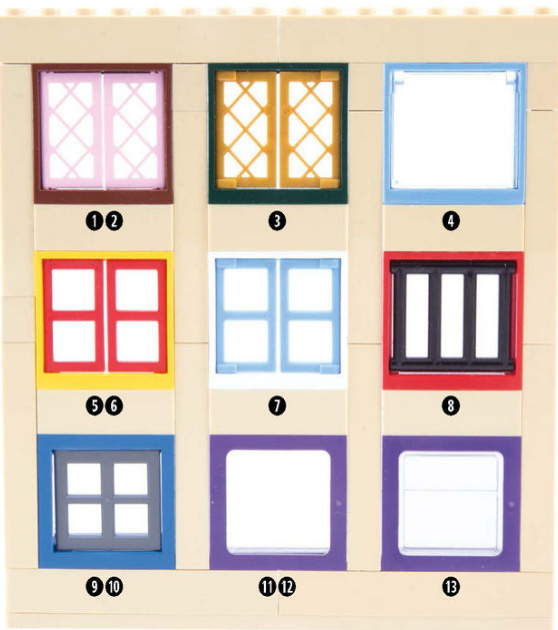
Simple Windows
Basic Windows
The simplest windows are the premade window pieces,but they come in a variety of sizes and styles, allowing for easy customization.
Basic windows come in a number of styles, and they can each be fitted with their matching glass piece.
Custom printed glass and stickers add interest to basic windows. Special train window glass even re-creates a divided pane.
0 1x2x2 window #60592
2 1x2x2 window glass #60601
? 1x2x2 printed glass from set #41174
4 1x2x2 castle window #90195
? 1x2x2 plane window #2377
6 1x4x2 plane window #4863
0 1x2x2 plane window glass #4862
0 1x2x3window #60593
2 1x2x3 window glass #60602
? 1x2x3 custom printed glass (PromoTec)
? 1x2x3 sticker from set #70413
? 1x2x3 train window #4035
6 1x2x3 train window glass #4036
Angled window frames fit standard window panes, window glass, and solid shutters.
0 4x4x3 roof window with bottompanel #60806
2 1x2x3 window pane lattice with tabs #60607
? 1x2x3 door with handle #60614
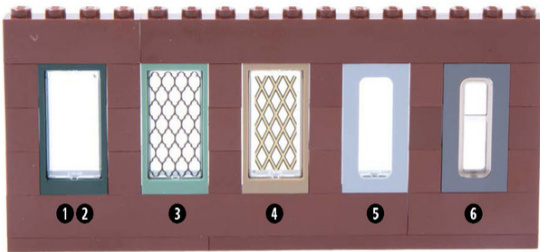
WindowPanes
Window panes without tabs can swing freely, whereaswindowpaneswithtabshaveenough friction that they will stay where youposition them. Train windows fit a single glass pane.
0 1x4x3 window #60594
2 1x2x3windowpanelattice #2529
3 1x2x3 window pane lattice with tabs #60607
④ 1x4x3 window glass #3855
? 2x4x3window #60598
6 1x2x3windowpane #3854
0 1x2x3 windowpanewith tabs #60608
? 1x4x3barwindow#62113
9 2x4x3window #4132
0 2x4x3windowpane #4133
① 1x4x3trainwindow 6556
1x4x3 window glass #3855
1x4x3 train window glass #4034
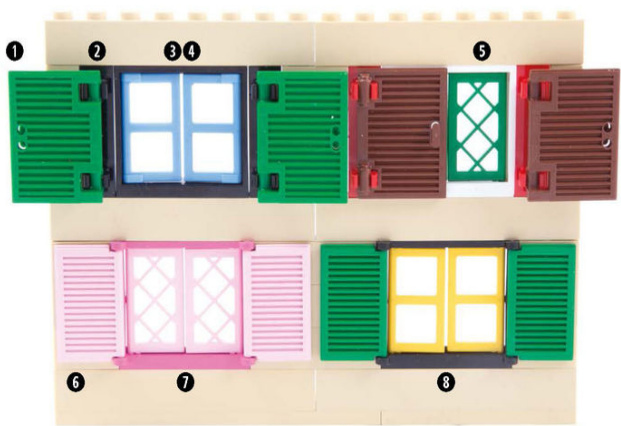
Shutters
Add colorful detail to your windows using shutters. Some have built-in clip handles while others fit into tabs on window frames.
0 1x2x3 shutter with hinges and handle #60800
2 1x1x3brickwith 2 clips#60583
? 1x4x3 window #60594
4 1x2x3 window pane with tabs #60608
? 1x2x3window pane lattice #2529
? 1x2x3 shutter#3856
0 1x4x3window#3853
? 1x2x3 window pane #3854
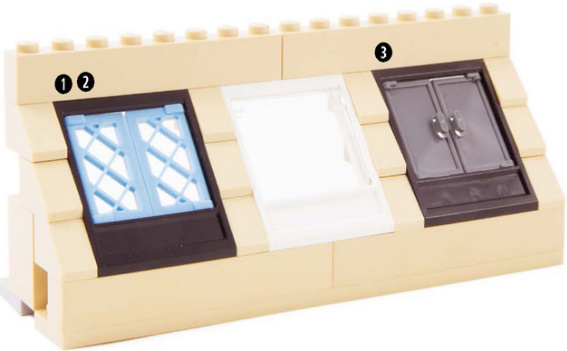
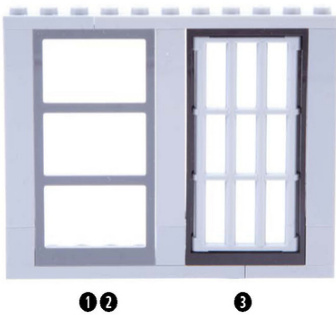
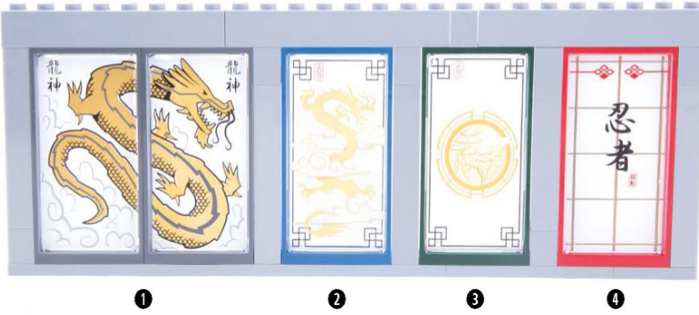
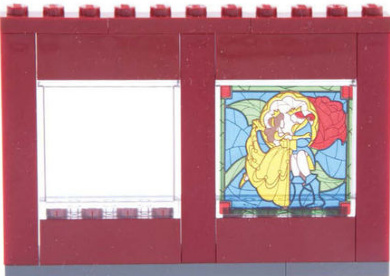
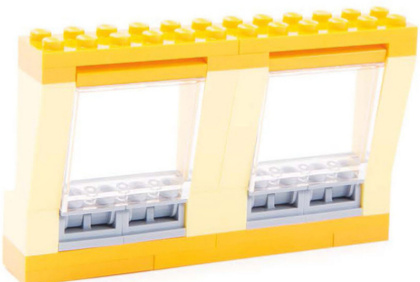
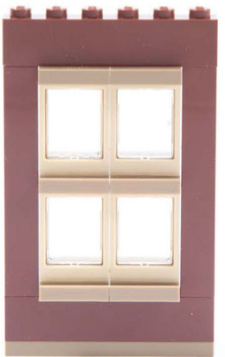
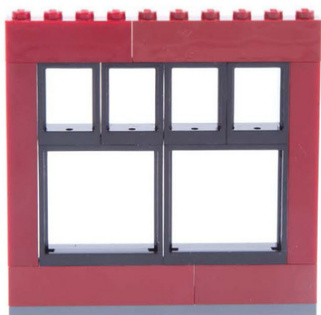
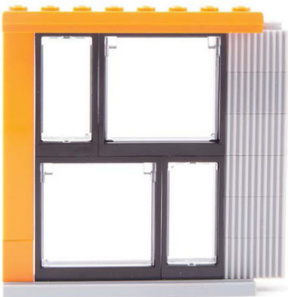
Large Windows
Use large window pieces with printed glass, stickers, or divided panels to create screen doors or French windows.

1 1x4x4 lift door frame #6154
2 1x4x4 lift door #6155
③ 1x2x2 window #60592
0 1x4x5 window #2493
1x4x5 printed glass (from set 4756)
1x4x5 window glass #2494
4 1x4x5 printed glass (from set #4856)
1 1x4x6 door frame 60596
1x4x6 window frame with 3 panes #6160
1x4x6 bar with end protrusions #92589
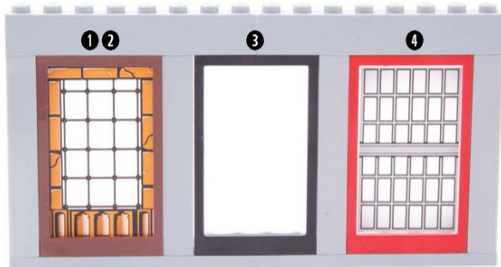
0 1x4x6 printed glass (from set #2507) 2 1x4x6 printed glass (from set #70505) 1x4x6 printed glass (from set #70751) ? 1x4x6 printed glass (from set #2520)

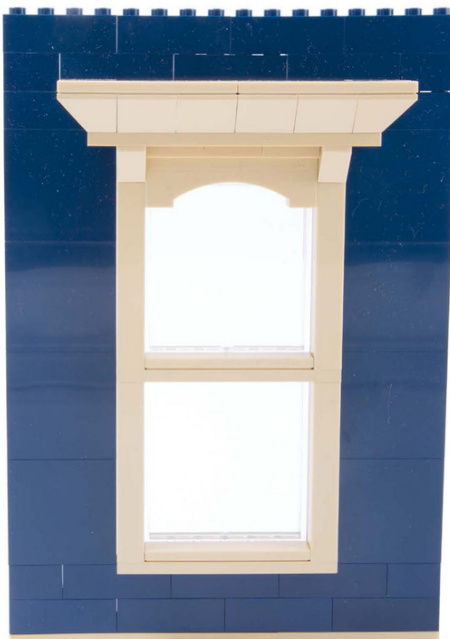
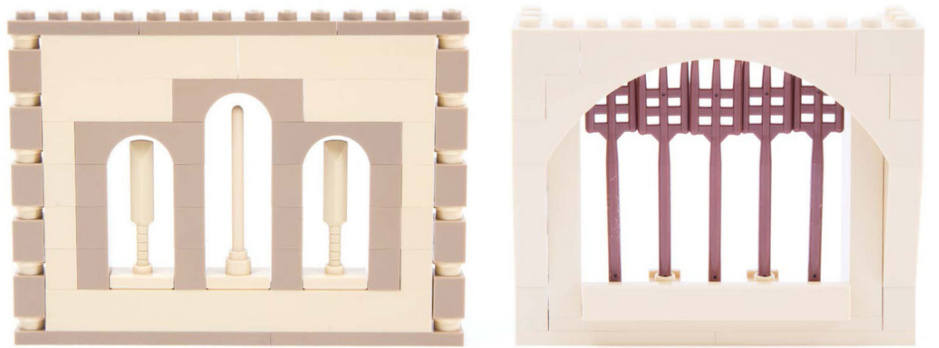
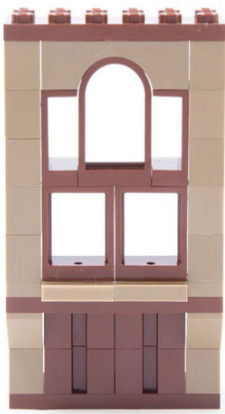
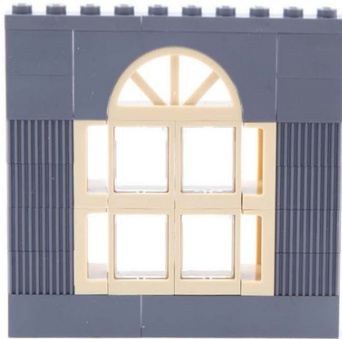
Combine large windows with arches to create a more interesting silhouette.
Divided panes work well in modern facades.
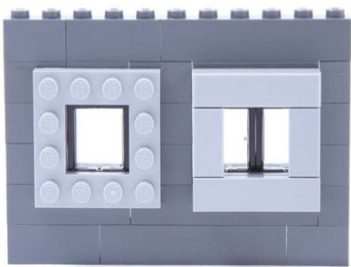
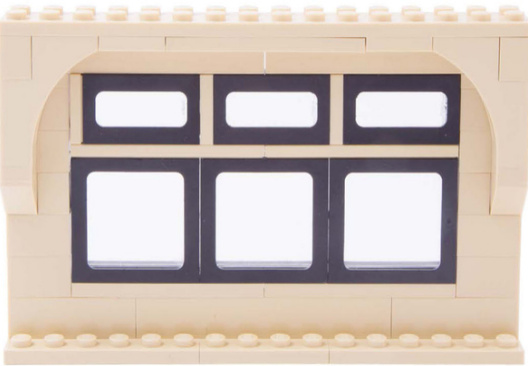
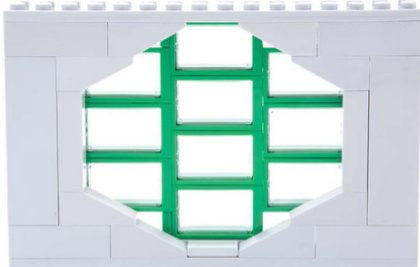
WallPanel Windows
These large wall panel pieces have built-in window cutouts.
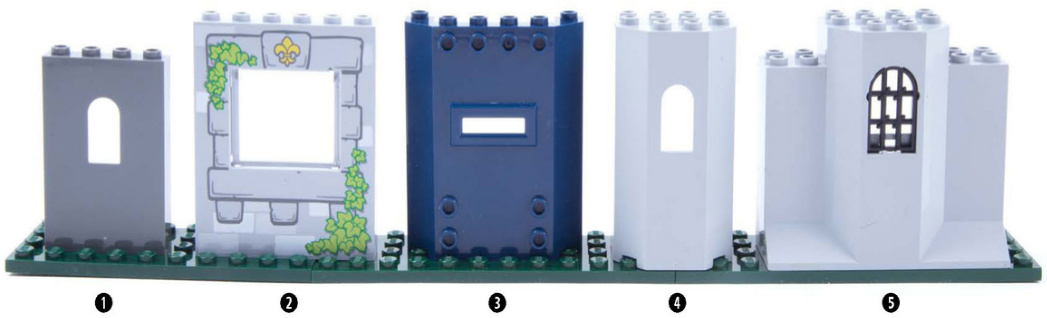
0 1x4x5 panelwith window #60808
2 1x6x6with window #15627
③ 2x6x6 panel with window slot #22387
4 3x4x6turretwall panelwith window #30246 ? panel withwindow #48490 1x2x2 2/3 pane with twisted bar and rounded top #30045
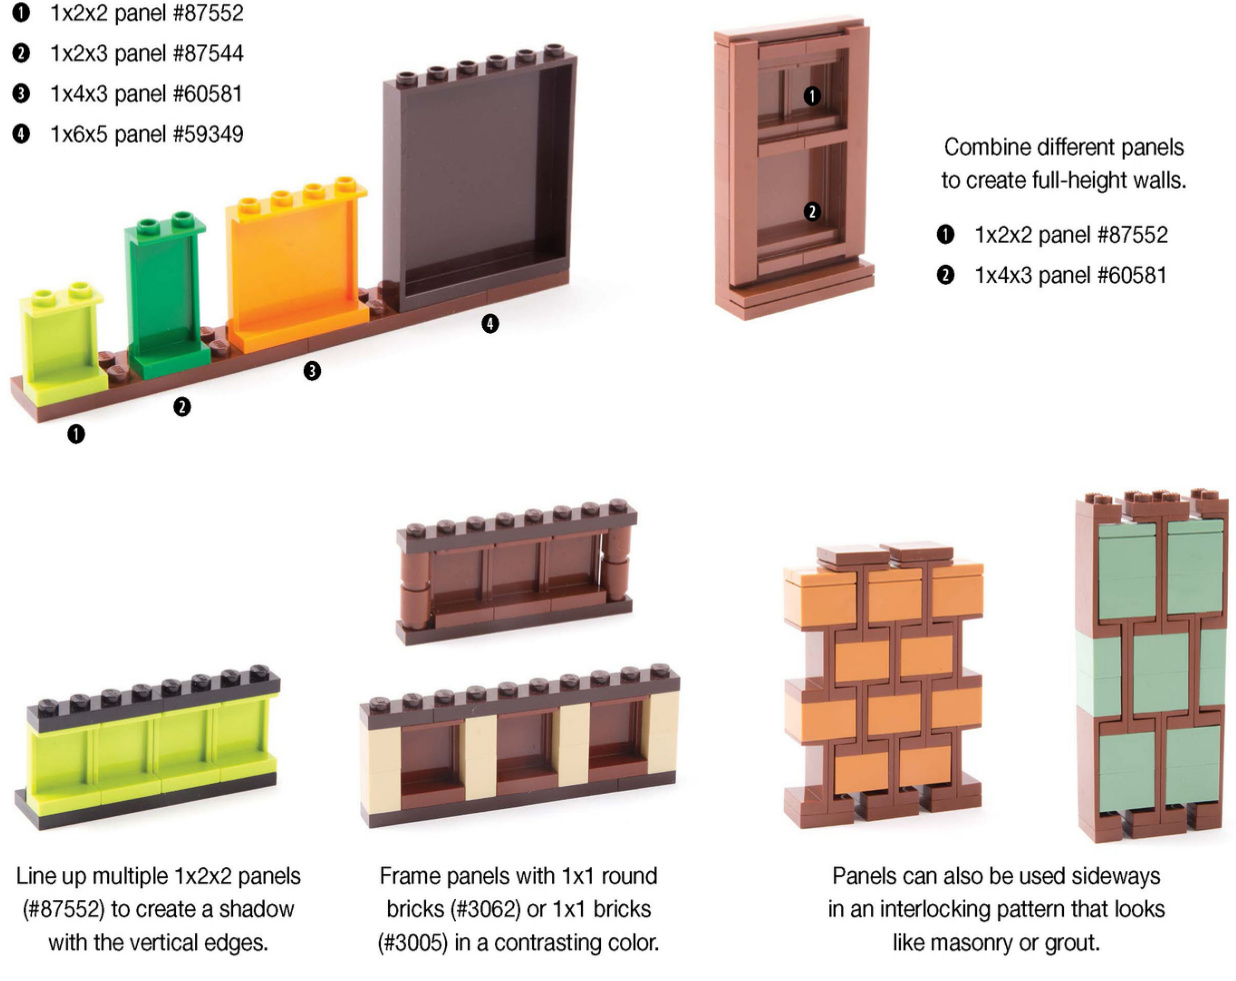
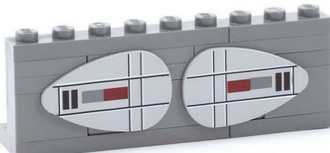
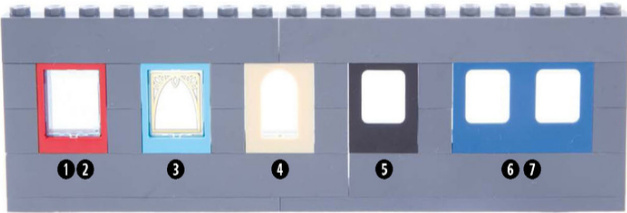
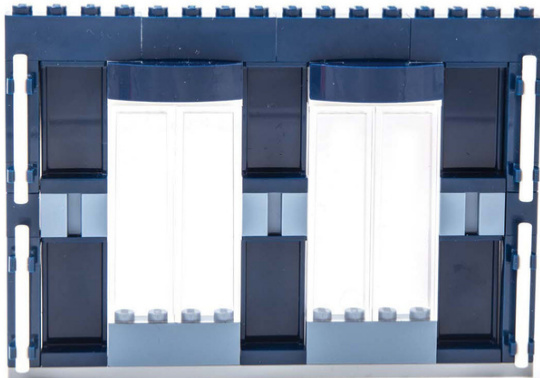
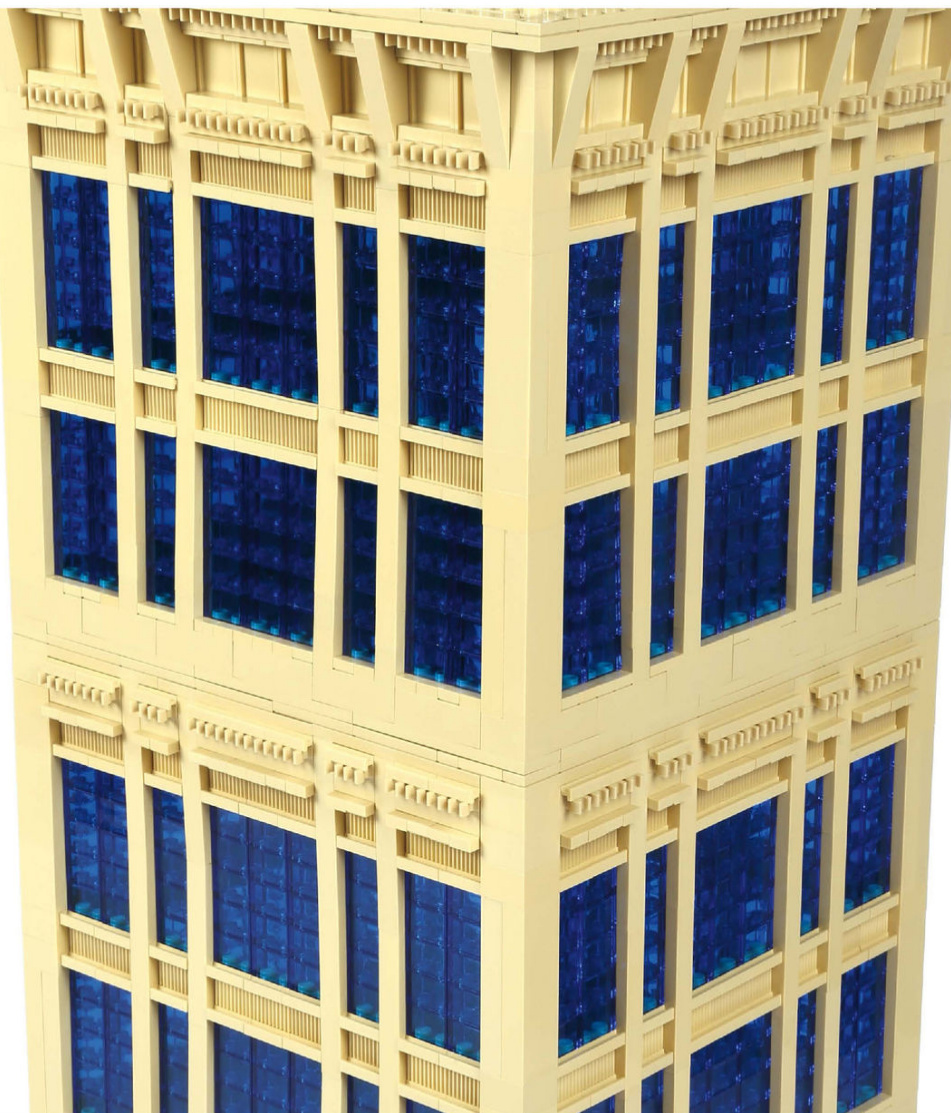
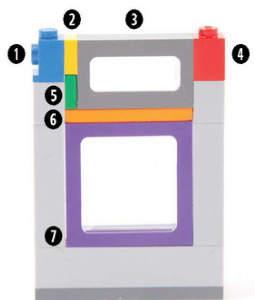
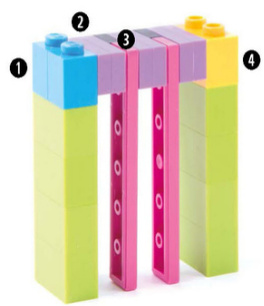
Plate-Glass Windows
Transparentpanels andbricks make for greatframelesswindows!

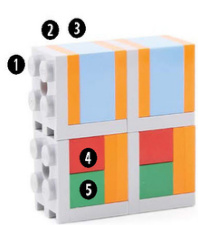
Newer panels have side supports, and their reinforced edges create a subtle linethatlookslike a plate-glasswindow.
0 1x2x2 panel with side supports #87552
2 1x2x2panel #4864
③1x2x3panel with side supports #87544
4 1x2x3panel #2362
1 1x6x3windscreen#64453 ? 1x6x5 stickerfrom set #75919
2 1x6x5panel #59349 ? 1x6x5 sticker from set #10222
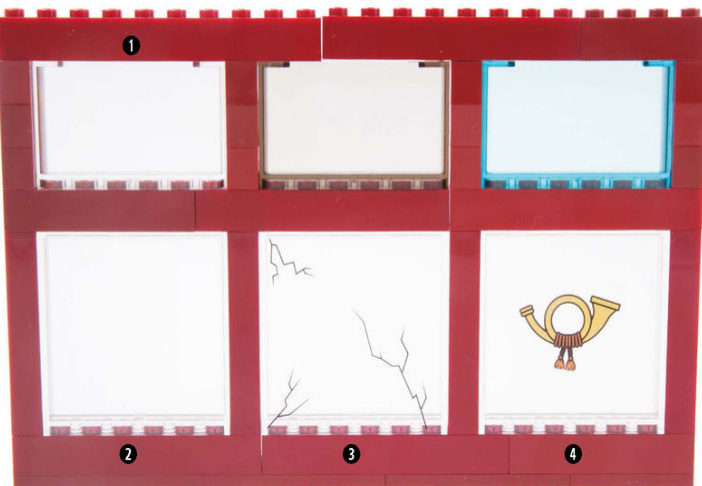
Use custom printing or stickers to make panels look likefloor-to-ceiling windows.
1x4x3panel #60581
The edges of the transparent 1x2x5 bricks (#46212) give this window a tall profile.
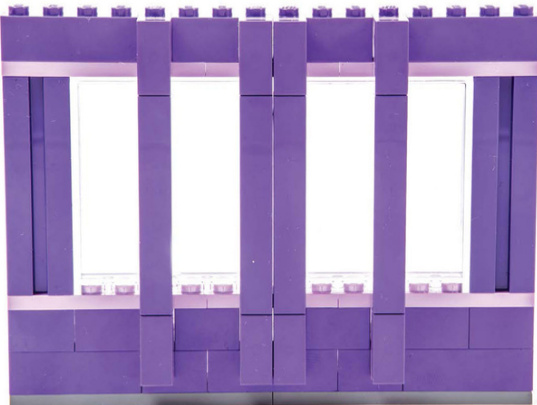
Subdivide large panels by layering tiles in front.

Mount panels sideways to create tall frameless windows.
Use hinge bricks to tilt window panels so that they follow the shape of the inverted slope frame.
Stack panels to create a double-hung window.
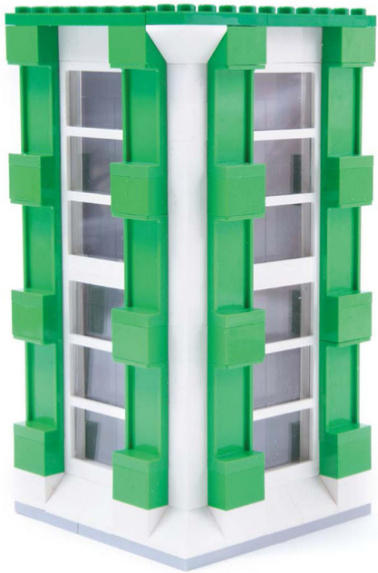
Sunrooms and Greenhouses
Use transparentpieces to build walls and roofs and createyour own sunrooms and greenhouses.
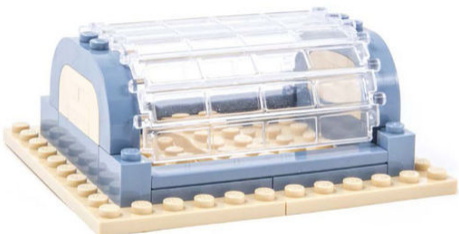
Transparentgarageroller door sections (#4218) canbeeitherlaidflatorbentaroundanarch piece to create a curvedskylight.
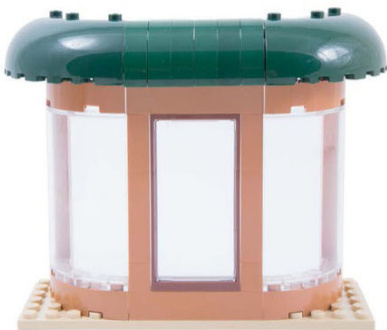
Create a curved sunroom using transparent 4x4x6 quarter panels (#46361).
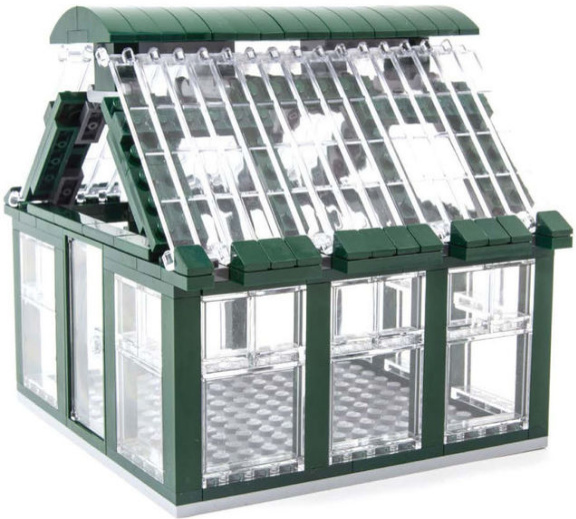
Top off your structure with garage roller door sections to create an all-glass roof.
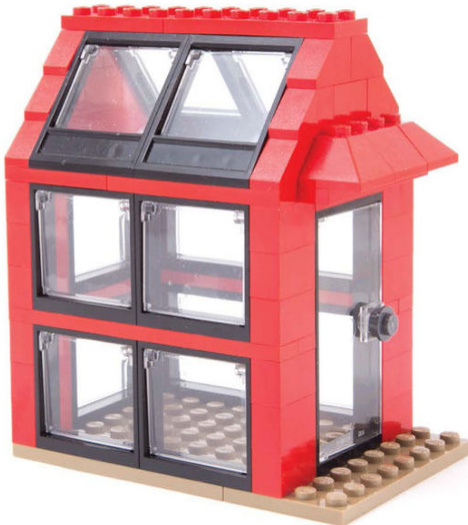
Combine standard windows with slopes to create angled skylights.
Custom Windows
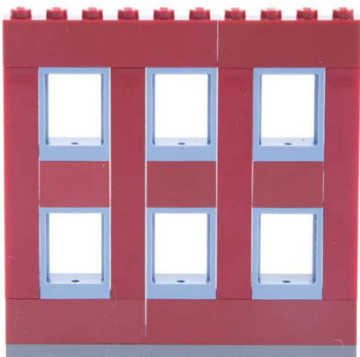
Mullions and Muntins
Combine window frames in different ways to create vertical and horizontal window divisions, which are called mullions and muntins, respectively.
Basic frames can be arranged to create divided panes.
Staggerframes behind even small openings to create a mullion.
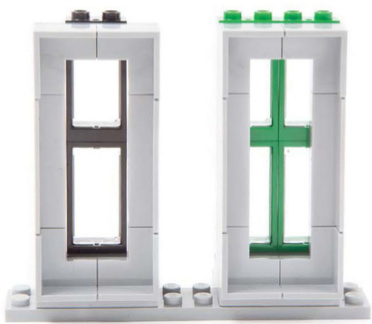
Stack two windows to create mulions (left) or offset four windows to create muntins (right).
The 1x2 plate with rail (#32028) gives a subtle divider.
Bricks makeforthick and colorful dividers between frames.
A brick border in a contrasting color emphasizes the top and bottom.
Mixwindowsizesand stagger the frames.
Mix smaller frames with larger ones.
Create a more modern look with asymmetric staggering and a textured frame.
Stagger differently sized frames with bricks.
Stagger frames with plates for a slightly subtler offset.
Add color-block emphasiswith 1x1 headlight bricks (#4070).
Create decorative mullions with interesting parts like cricketbats (by BrickArms) and pitchforks (#95345).
Sideways Window Mounts
Mount windows sideways for additional size and pattern options.
1 1x1 headlightbrick #4070 6 1x1 tile #3070
2 1x1plate #3024 6 1x4 tile #2431
3 1x2x3 train window #4035 0 1x4x3 train window
●1x1 brick with stud on side #4033
#87087
Brick-Built Mullions
Create mullions without window panes by separating tiles with plates or bricks.

① 1x1 brick with stud on side #87087
2 1x2 plate #3023
3 1x6 tile #6636
4 1x2 Technic brickwith 2 holes #32000
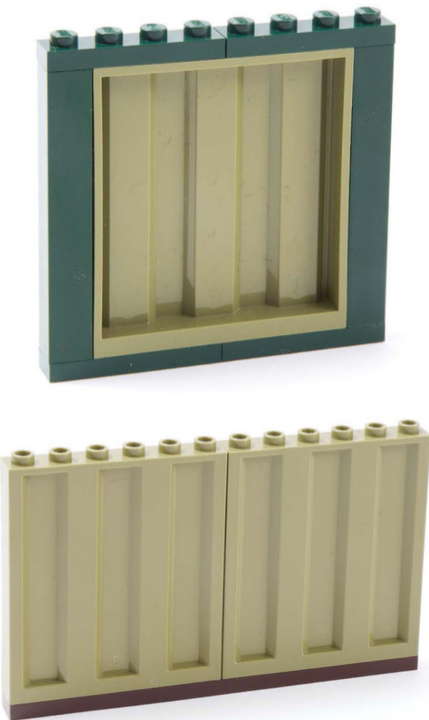
Panel Windows
Turn panels sideways to create open windows. Some panels have a thinner profile than others.
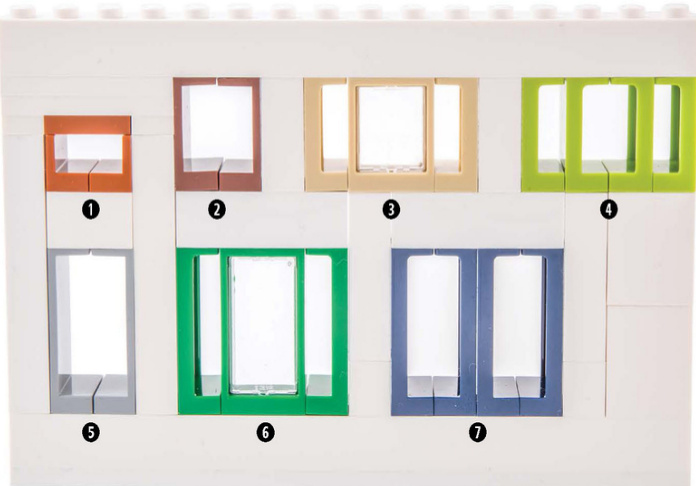
0 1x2plate 30231x2x1panel #4865
2 1x2x2 panel #4864
? 1x2x2 panel with side supports 875521x2x2 window #60592
4 1x2x2 panel with side supports #87552
? 1x2x3 panel #2362
6 1x2x3 panel with side supports 875441x2x3window #60593
0 1x2x3 panel with side supports #87544
The windows shown on the left are made from panelswithout side supports, so their edge profile is narrower than those of the panel windows shown on the right.
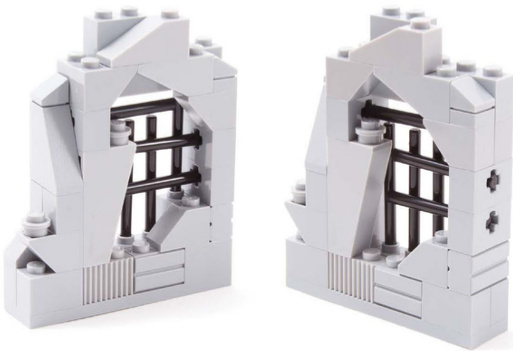
Custom Window Shapes
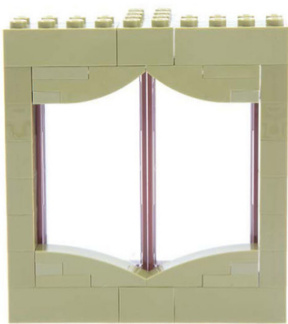
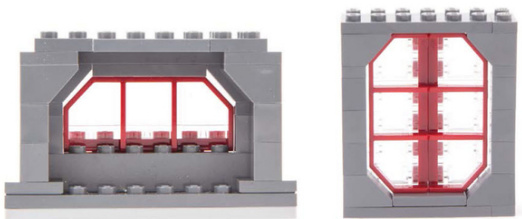
You can use slopes,arches, and other brick pieces to create custom geometric window openings.
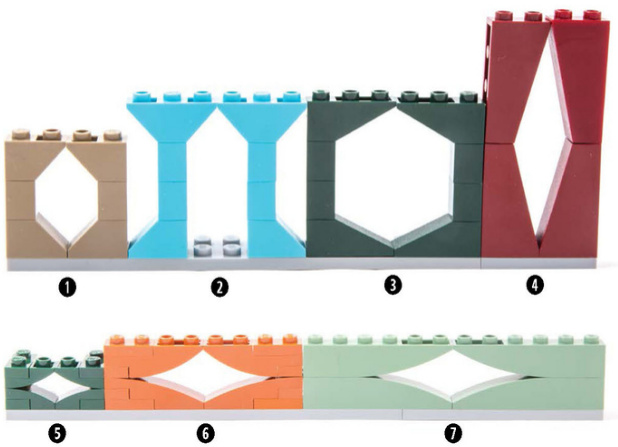
Pair straight or curved slopes with their inverted counterparts to create symmetrical geometric openings.
Mount 1x2x3 windows (#60593) sideways to makelandscape-orientedpanesframed in an octagonal opening.
1 1x2 inverted slope #3665 1x2 slope #3040
2 1x3 double inverted slope #2341 1x2 slope #3040
③ 1x3 inverted slope #4287 1x3 slope #4286
4 1x2x3 inverted slope #2449 1x2x3 slope #4460
? 1x2 inverted curved slope #24201 1x2 curved slope #11477
6 1x4 inverted curved slope #13547 1x4 curved slope #61678
0 1x6inverted curved slope #42023 1x6 curved slope #42022
Use 1x4 curved slopes (#61678) and 1x4 inverted curved slopes (#13547)to frame the top and bottom edges of a window.
Repurpose a train element (1x6 modified plate with train wagon end #6583) to make ahorizontal orverticalwindow.
RoundWindows
Create a round window by combining an arch with either another arch or two inverted arches.

This window fits only with arches with thin tops but can be oriented in different ways.
0 1x6x2 arch #12939
2 1x4x1 2/3 window with rounded top #20309
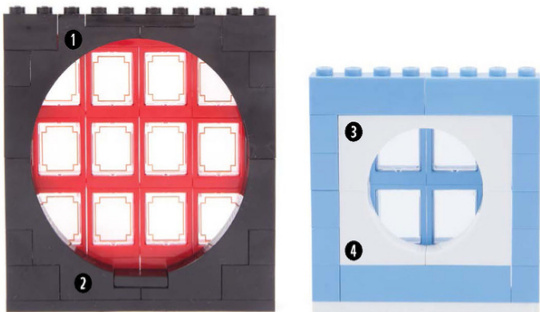
Create divided panels for round windows by layering basic window frames behind them.
1 1x5x4 arch #2339 3 1x6x2 arch 12939/ 2 1x5x4 inverted arch #15254 #30099 4 1x3x2 inverted arch #18653
OvalWindows
DecorativeWindows
You can frame an oval opening using two arches.
Here are some simple ways to create unique brickbuilt window openings.
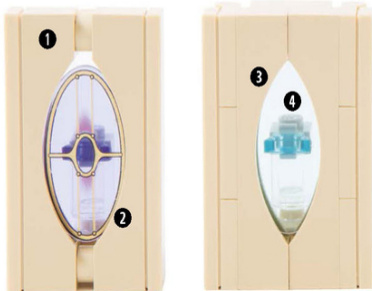
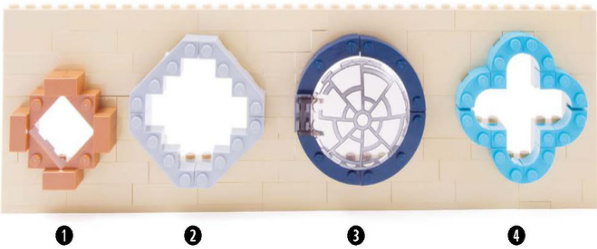
① 1x6 arch #3455 Printed oval shield (from set #75080)
Oval shield #92747
●1x1plate with horizontal clip #6019
0 3x3modified facetbrick #2462
②4x4modifiedfacetbrick #14413
?4x4macaroni brick#48092
? 2x2 macaroni brick #3063
Bracket Windows
Combine two or more brackets to build small rectangular windows.
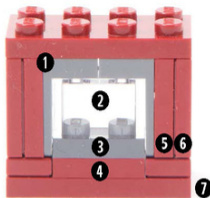
0 1x2-2x2 bracket #44728
2 1x2 brick without tube #3065
? 1x2plate #3023
0 2x2plate #3022
? 1x2 tile #3069
6 2x2 tile #3068
0 2x4 plate #3020
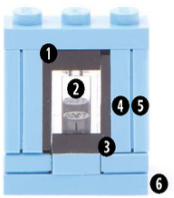
0 1x2-2x2bracket #44728
2 1x1 brick #3005
? 1x2- 2x2 inverted bracket #99207
4 1x2plate #3023
? 1x2 tile #3069
6 1x3 plate #3623
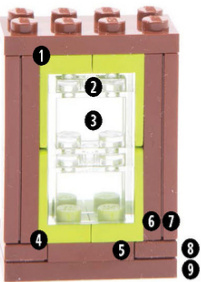
1 1x2- 2x2 bracket #44728
2 1x2plate #3023
? 1x2 brick without tube #3065
? 1x2 - 2x2inverted bracket #99207
? 2x2 plate #3022
6 2x4 plate #3020
0 2x4 tile #87079
8 1x2 tile #3069
9 2x4 plate #3020
0 1x2plate with rail #32028
2 1x2- 2x2 bracket #44728
3 1x2 brick without tube #3065
? 1x4 tile #2431
? 1x1 brick with stud on side
#87087
6 1x2 jumper plate 15573
1 1x2-1x2 bracket #99781
2 1x2-1x2 inverted bracket #99780
3 1x2 brick without tube #3065
4 2x2 plate #3022
5 2x2 tile #3068
6 1x2 tile #3069
0 2x4 plate #3020
1 1x2-1x2 invertedbracket #99780
2 1x2-2x2invertedbracket #99207
3 1x2- 1x2 bracket #99781
4 1x2- 2x2 bracket #44728

相关实体
- 乐高街道家具设计 - 公园长椅、交通信号灯、路灯
- 乐高客厅家具设计 - 沙发、电视、书架、植物、艺术装饰
- 乐高厨房家具设计 - 电器、橱柜、水槽
- 乐高卧室家具设计 - 床、梳妆台、儿童房
- 乐高浴室家具设计 - 洗手台、马桶、浴缸
- 乐高商业建筑家具 - 银行、餐厅、酒店家具
- 乐高模块化建筑案例 - 原创建筑设计参考